easyjob 6
Version 6.1
Documentation
Basic easyjob operating concept
So new users can start to use the user interface as quickly as possible, we have oriented its use toward current Office and operating system standards. The operating concept applies to the entire application. There are some exceptions that do not fully reflect the concept.
List Views
A lot of information is displayed in lists.
Visible columns, column width, order and sorting
Using the column heading context menu you can display and hide individual columns as well as activate the automatic column width. This setting defines the column width based on the widest entry.
The width settings can be changed manually. The settings are saved for the local user in the Windows profile.
Displaying and hiding columns
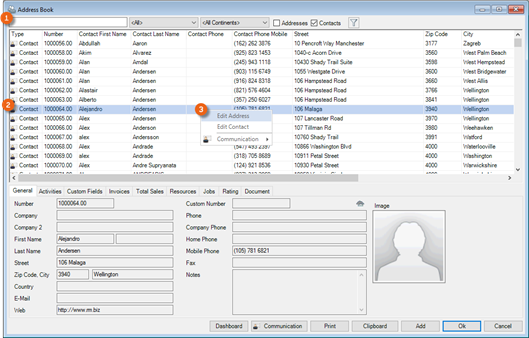
1. Move the mouse pointed on the column heading and right click to open the context menu.
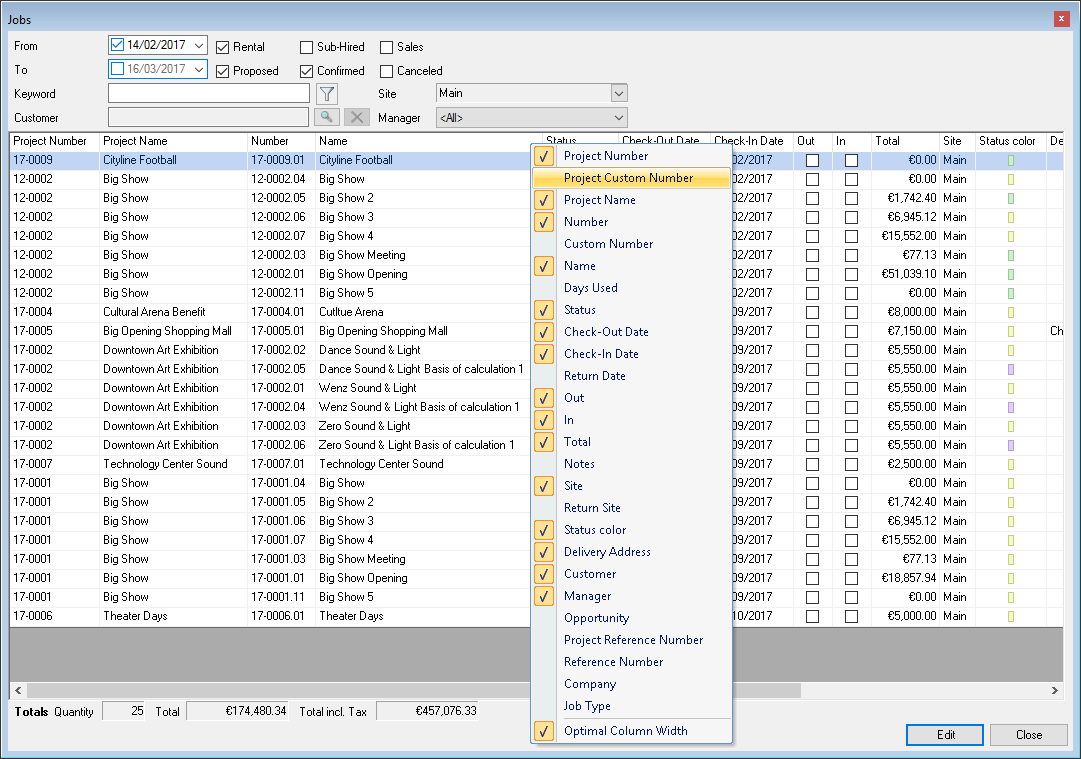
2. Select the desired column where you want to check or uncheck the box.
Manually customizing the column width
1. Move the mouse between two columns until the symbol becomes an image and the symbol  appears.

Hold down the left mouse button and move the mouse to the left or to the right.
Changing the column order in the list
1. Move the mouse pointer to the column head that you want to move and hold down the left mouse button.

2. Move the column head to the left or to the right and reposition the column head .

The functionality is currently available in the following views:
easyjob Today
Address Book
Projects
Jobs
Items
Addresses
Invoices
Workshop Activities
Purchase Orders
Sales Orders
Purchase Invoices
Bill of Items
Data column sorting is pre-filled by default.
Customizing the sorting order of the columns
1. Left click the Column Heading of the column you would like to sort by.
Based on the small arrow you can see the column and the order used for the current sorting procedure.
The sorting order is currently not saved.
Selecting an entry
Depending on the dialog form, confirm the current selection with a double mouse click or by clicking Ok.
Keyboard concept for the Live View and Dialogs
Most of the forms are designed to be used quickly also without the mouse.
This is why the keyboard focus is in the selection text box by default. Use the  key to access the list and the keys
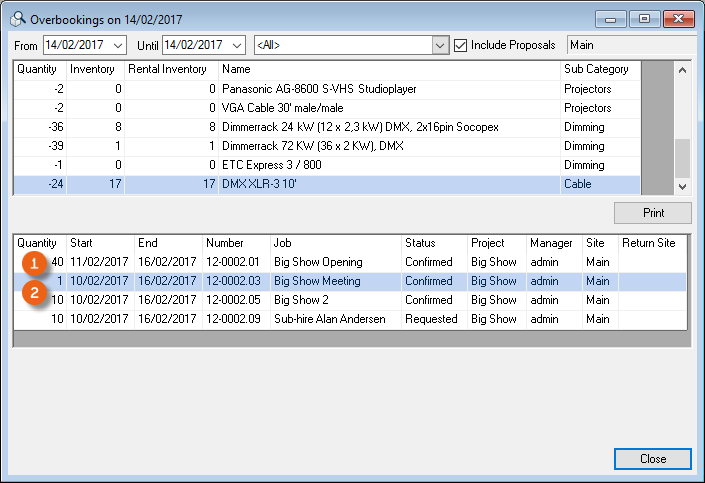
 to change the selection. User the context menu key
  to open the context menu. Use the
  key to perform the dedicated standard functions (e.g. process an address) and
  to close the form without a selection.

If the list supports a multiple selection, mark all entries with  +
+  .
.
Copy the current selection with  +
+  to the Windows clipboard for use in other programs.
Some of the buttons on the forms have additional shortcuts. You can view the shortcuts by pressing  . The shortcuts are underlined on the button.
  +
+  confirms the Ok Button.
In list views with jobs displayed, the  function key is assigned to Open project and
  function key is assigned to Open bill of items.

Keyboard concept for navigating the tabs

You can select the individual tabs with the key combination  +
+  ,
,  +
+  etc. using the keyboard.
Editing list entries
You can directly enter data in some lists. With the list editor, you can use this feature within the items and addresses master data. To do so, check the box in the Activate List Editor field.
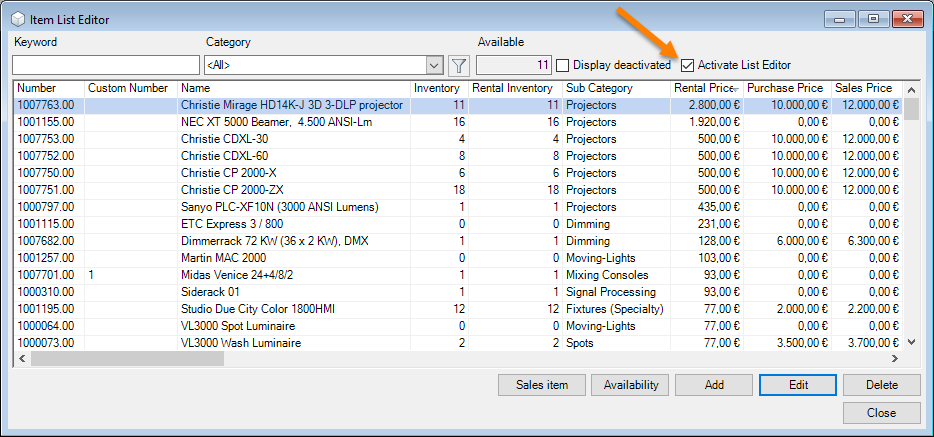
Select the entry and click again on the desired column using the mouse.
You can access the edit mode using the function key  .
.
Editing multiple entries
The Edit Multiple Entries feature can be used to edit multiple selected entries at the same time. The Edit Multiple Entries feature is available for the bill of items as well as for invoice item lists.
Editing multiple lines at the same time
1. Select the entries you want to edit.
2. Open the context menu with the mouse or keyboard
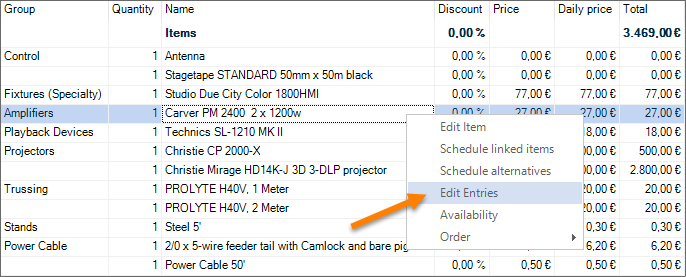
3. Edit Entries
4. Select the column you want to edit and enter the new value.
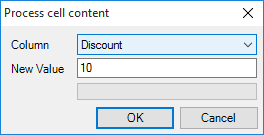
5. Ok
Context Menus
Within the list view, you can open additional context related functions using the context menu.
The context menu is opened with a right mouse click as well as with the 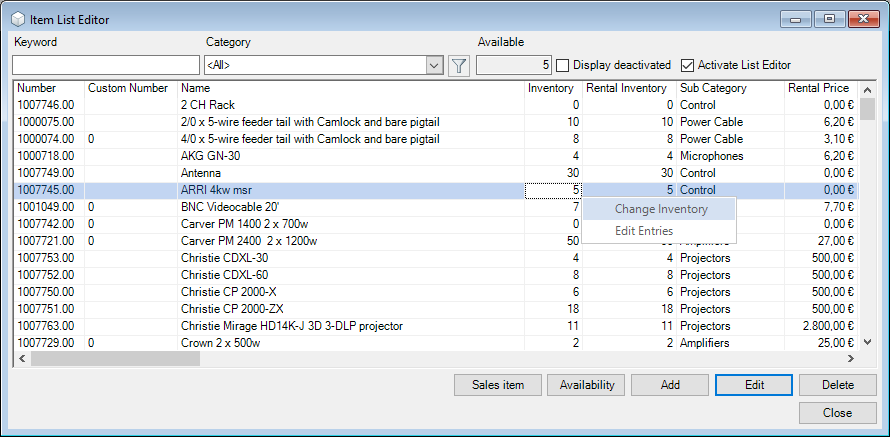 key.
key.

Automatic updating of list content
Due to performance reasons, only the most important lists will be automatically updated when changes are made. Automatic changes will be made in the address and item master data, Navigator, easyjob Today and Bill of Items views.
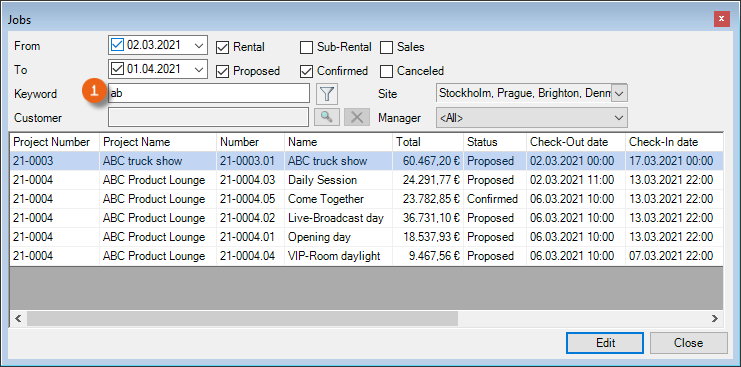
Keyword filter
A keyword filter is available for most selections. There you can enter a search term. The filters search context related fields by default. Therefore for a job search, the Job Name, Number and Custom Number will be searched.
Wildcards * and ? can be used in the filter. * replaces the rest of a word and ? replaces a letter with a variable text.
To use the filers quickly, easyjob automatically places an asterisk "*" behind your entry internally.
Example with 'ab'. The result will show all jobs that start with ab.
Example with *day. As easyjob additional places * at the end of your entry (*day*) internally, all jobs that contain the letters day will be listed.
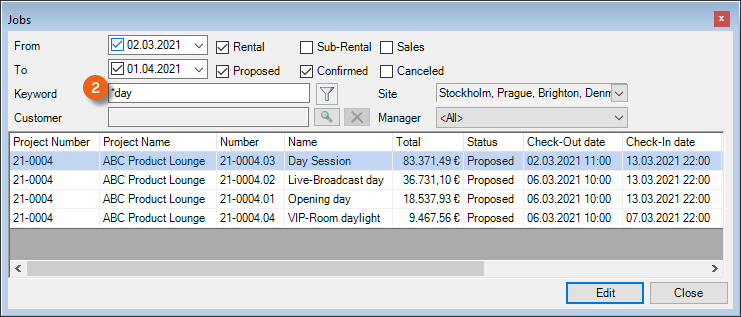
You can also use the wildcards in the middle of a word.
Managing standard Master Data
The standard master data management forms are described below.
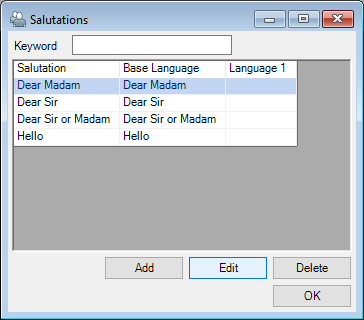
As the Master Data refers to already used Workshop Activities, when deleting the system will ask for the replacement data set. If you want to delete a salutation, for example, the system will ask you for the replacement salutation. The deleted salutation will be updated with the replacement in all addresses and contacts.
Customized data filters
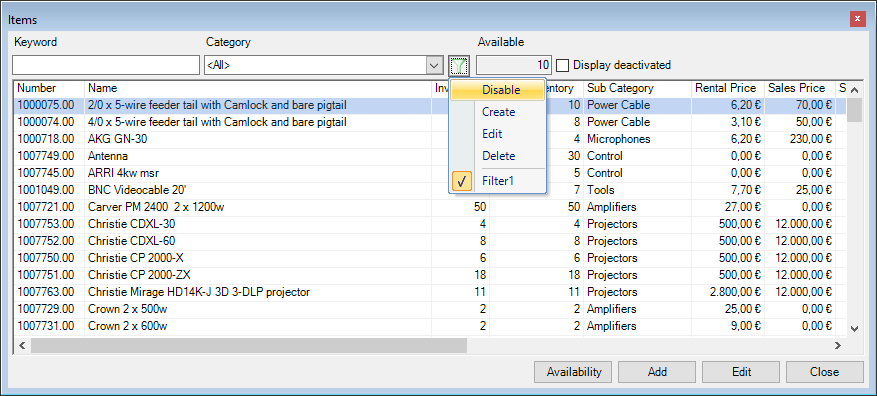
In addition to the predefined data filters, it is possible to create your own data filters in many lists. An active data filter is indicated with the green filter symbol 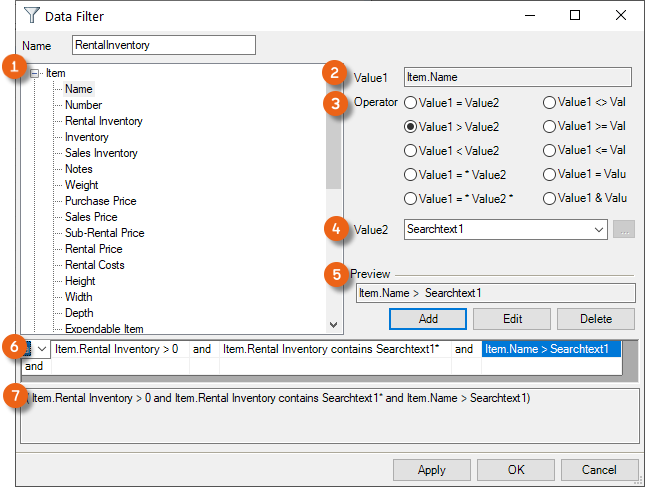 .
.
The filter settings are saved for the logged in user in the Windows profile.
On the left side, you can see the variable list for Value 1. On the right side you can see the setting for the current formula. With operator, you can determine how you want to link Value 1 with Value 2. For Value 2 you can use a search field, a fixed value or a variable.
The preview shows how the two values are currently linked with each other.
You can create as many links as you wish and join them together with 'and‘ and with 'or‘.
Each line produces parenthesis. The filter preview shows the current formula.
Creating your own data filter
1. Click the filter symbol and select Create Create
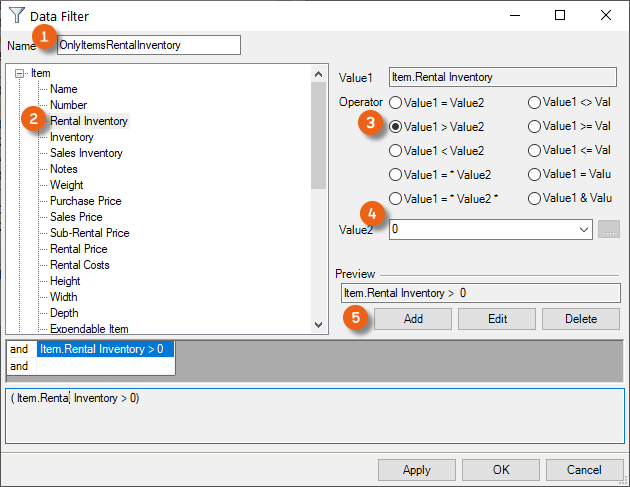
2. Give the filter a name
3. Select Value 1 from the list
4. Select the Operator
5. Select Value 2
6. Add the filter to the current formula with Add
7. Ok
Deactivating or activating the filter
1. Filter symbol

2. Deactivate or select the desired filter from the list
Colors
For a quick overview of the status of jobs, projects, staff and transportation, colors can be assigned to the status.
The individual colors are defined for the entire easyjob environment in the easyjob program settings.
Defining the status colors
1. easyjob Menu Tools Settings Projects/Jobs/Resources tab
2. Select the desired color
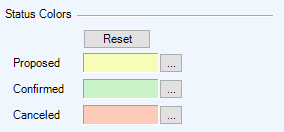
3. Ok
easyjob must be restarted to activate the changes.
A status color column is available in the Navigator, easyjob Today, project list and job list.
Menu and Toolbar
You can navigate the program using the easyjob menu and the easyjob toolbar.

The individual menus will be activated or deactivated based on your user rights.
Forms that you started from the View menu and have left open when ending easyjob will be automatically reopened the next time you start easyjob.
easyjob Icons and Symbols
Various symbols are used in the toolbar and in the program.
 | Navigator |
|---|---|
 | Monthly Overview |
 | easyjob Today |
 | Address Book and Addresses |
 | Item |
 | Availability functions |
 | Project, Jobs and related Master Data |
 | Loading Jobs |
 | Unloading Jobs |
 | Purchase Order System |
 | Sales Order |
 | Shopping cart |
 | Workshop and service intervals |
 | |
 | Information |
Log View
Many forms contain a status bar where you can see which user created the data, when it was created and who made the last change.
More detailed information can be found in the log view. . The log view contains additional information. This includes information about status changes made to projects/jobs as well as sum total changes.
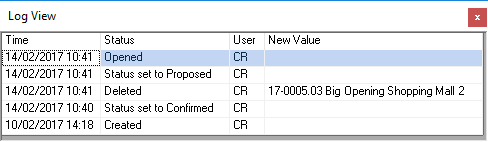
Open the detailed log view
1. Click the information icon in the status bar.
View current operations
In easyjob, there are many ways to view current workshop activities with the Navigator, easyjob Today, Monthly Overview, Reminders and Windows Gadget.
With the Navigator, easyjob Today and the Monthly Overview you can query the workshop activities on your own. The reminder screen turns off automatically.
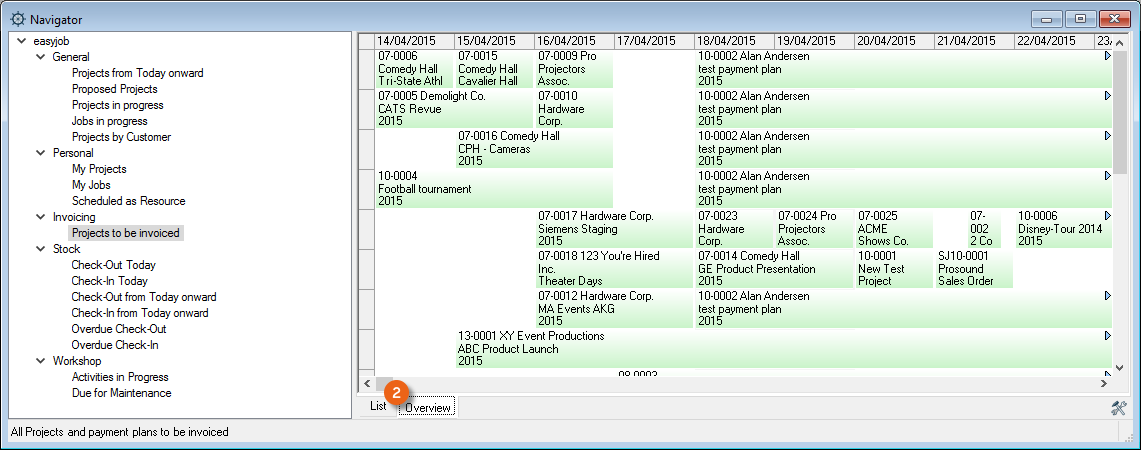
Navigator
In the Navigator, the various workshop activities are displayed grouped together in different categories.
You can define which workshop activities are displayed to meet your needs. This also applies to filter settings.
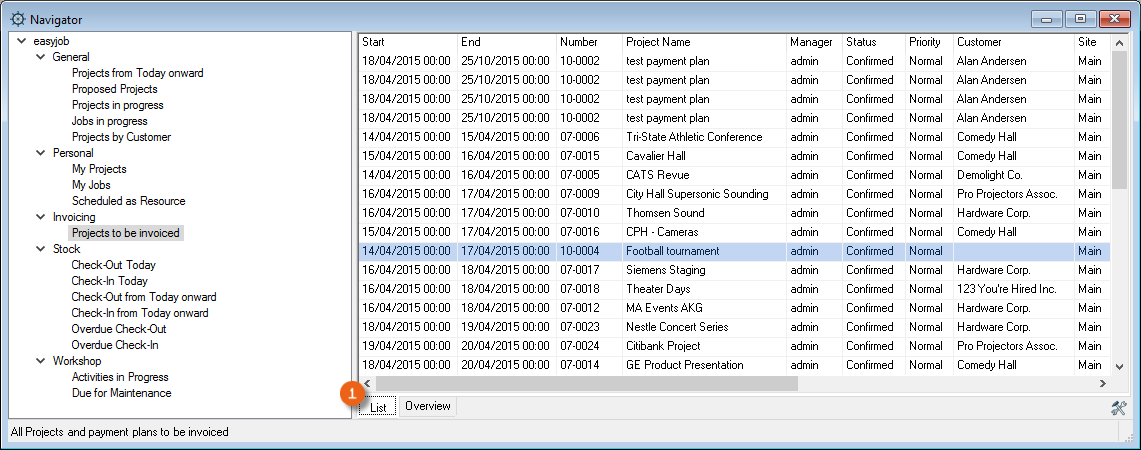
A time-based view of the list can also be displayed in the overview .
Open the navigator in the easyjob menu
1. easyjob Menu View Navigator
Open the Navigator using the easyjob toolbar
1. Click the Navigator Icon on the Toolbar.
Displaying and hiding workshop activities
1. Open the easyjob category context menu
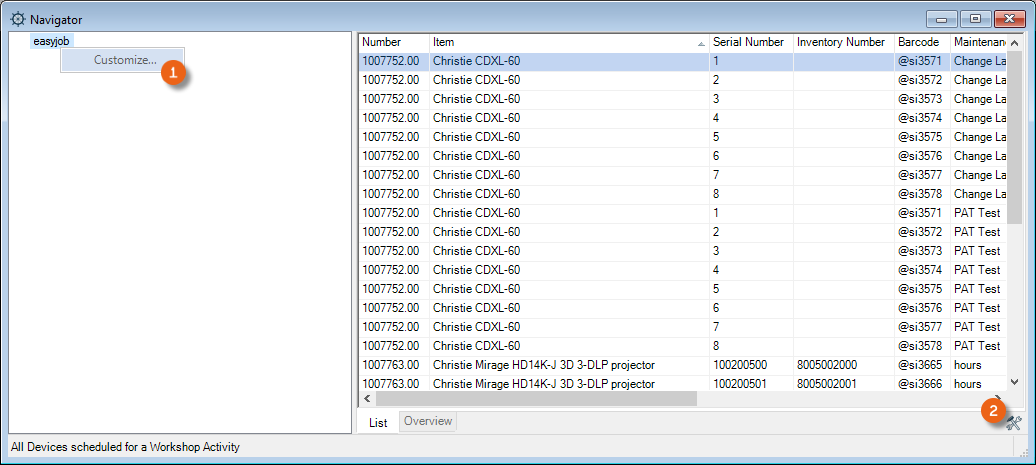
2. Click customize or the Settings icon.
Select the workshop activity list and Drag&Drop it to Navigation.
You can also select the workshop activity lists multiple times, sort them, set various filters and rename them as needed.
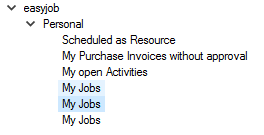
Selecting workshop activity lists multiple times
To remove a workshop activity list, Drag&Drop it back to the list overview.
Sorting workshop activities
1. easyjob Menu View Navigator
2. Customize or click the Settings icon
3. Select the workshop activity list and Drag&Drop it to Navigation.
4. Use the arrow keys to change the order of your workshop activity list.
5. End the setting mode by clicking the Settings
Customizing a filter
1. Open the Activity list context menu
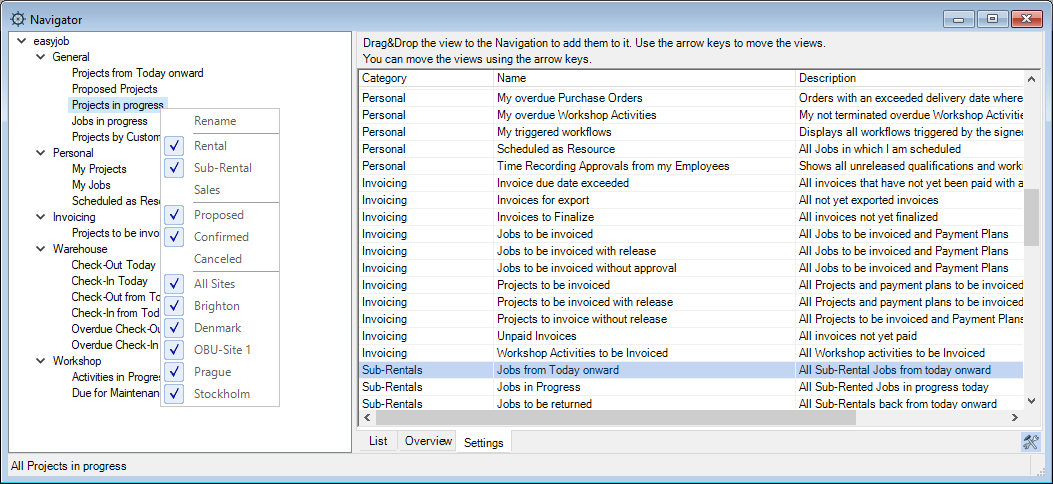
2. Customize the filter
In the Navigator you can now indicate the number of days in many views.

Renaming a view
1. easyjob Menu View Navigator
2. Click Customize or the Settings icon.
3. Select the view to be renamed
4. Right click with the mouse and enter a new name
5. End the setting mode by clicking the Settings icon
easyjob Today
easyjob Today provides you with a complete overview of all important Workshop Activities. You can define which workshop activities are displayed to meet your needs. This also applies to filter settings.
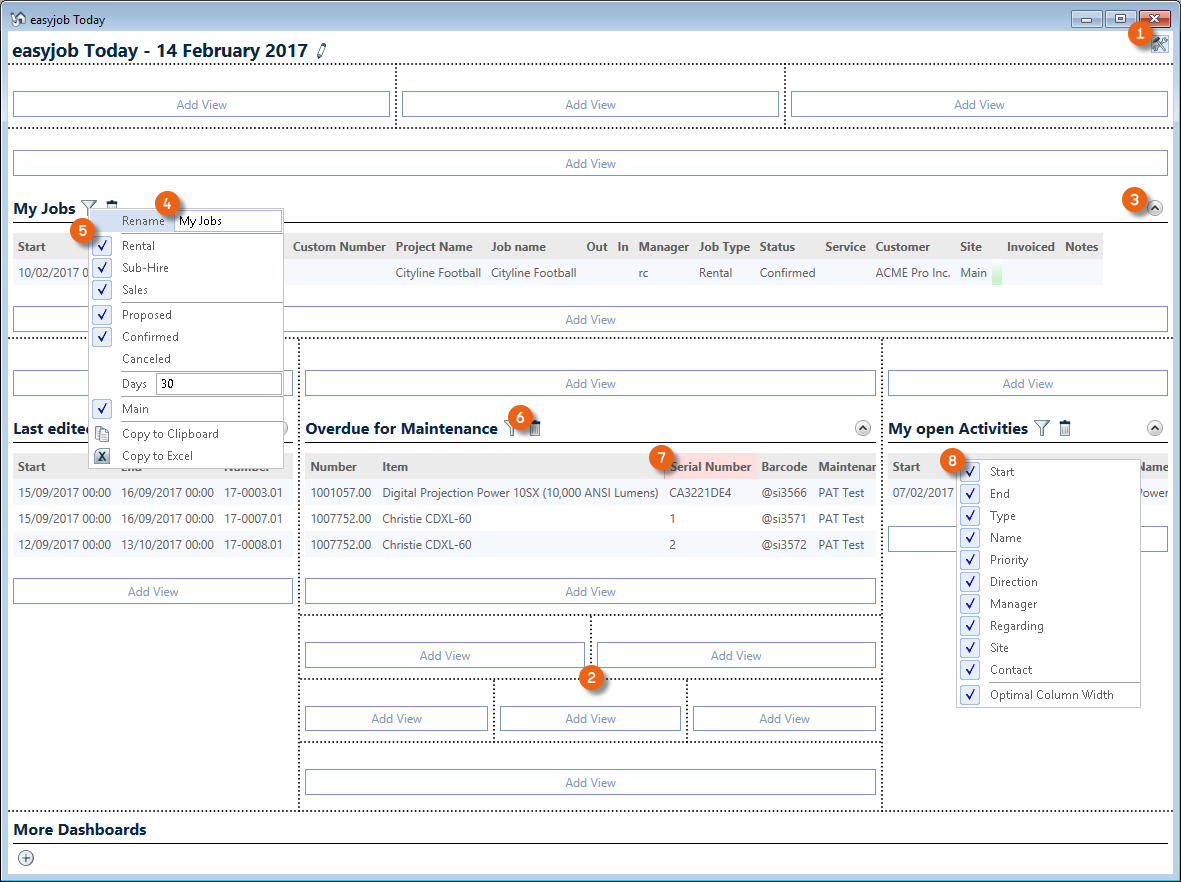
After switching to Settings mode you can freely order your information screen within a matrix . It is possible to open and close as well as rename , filter and delete information screens. You can move the Columns as required and display or hide them.
Opening easyjob Today using the easyjob menu
1. easyjob Menu View easyjob Today
Opening easyjob Today using the easyjob toolbar
1. Click the easyjob Today icon on the toolbar
Order and filter the information screen as required
1. Switch easyjob Today to setting mode
2. Select the desired position within the matrix and add a view from the selection list.
3. Modify the settings (rename, filter, columns, etc.)
4. Leave the settings mode
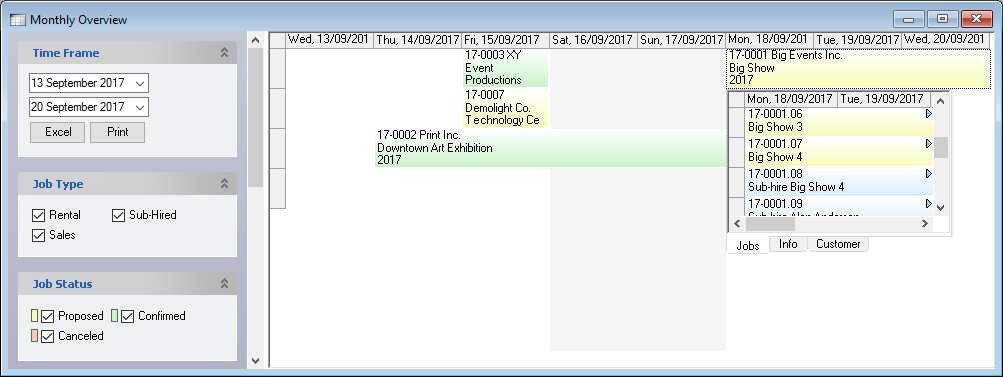
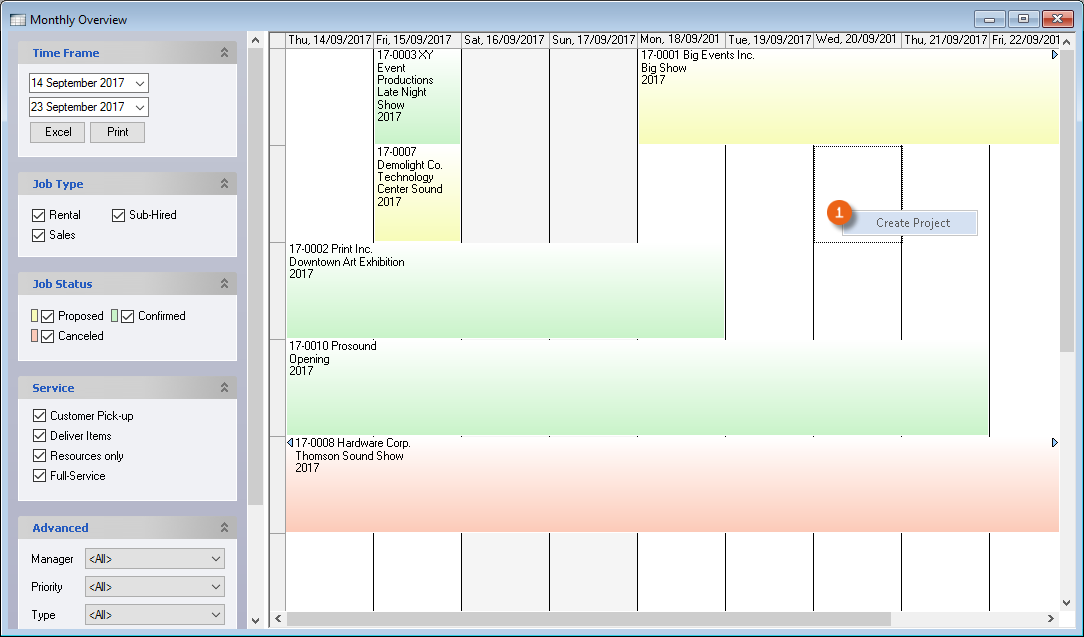
Monthly Overview
In the easyjob monthly overview, the projects are displayed in calendar form .
Many filters can be used to customize the view.
If a project goes beyond the time period shown, this is indicated with an arrow . Weekends have a gray background. After a project is selected, additional information is displayed in a popup window .
Opening monthly overview using the easyjob menu
1. easyjob Menu View Monthly Overview
Opening monthly overview using the easyjob toolbar
1. Click the Monthly Overview icon on the toolbar
Both the colors as well as the information in the bars can be configured in the easyjob program settings.
Customizing the color
1. easyjob Menu Tools Settings Projects/Jobs tab
2. Select the desired color in the colour status area
3. Ok
easyjob must be restarted to activate the changes.
Customizing the Display Options
1. easyjob Menu Tools Settings Projects/Jobs tab
2. Click Edit in the display options area
3. Add the desired display option via Drag&Drop to one of the three lines. Multiple variables (e.g. also a blank space) can be used on a line. The preview shows the result
4. To remove the display, mark the position and delete it
5. Close
easyjob must be restarted to activate the changes.
It is always possible to restore the Default Setting .
Additional Optical Effects in the Monthly Overview.
The program settings offer additional options for customizing the monthly overview display.
For better orientation, the weekends can be given a gray background. With the day division lines black lines are drawn between the days. The color gradient of the status colors can be deactivated.
The slow opening of the popup windows can be deactivated with the setting Fade Effects .
Customizing Optical Effects
1. easyjob Menu Tools User Settings General tab
2. Select the desired Optical Effects
3. Ok
easyjob must be restarted to activate the changes.
Reminder Screen
With the Reminders window you can remind yourself about important easyjob jobs. The status bar displays the current quantity of your reminders. You can click on it to open the Reminders window and process the jobs, e.g. Create Purchase Order – on the basis of Navigator and easyjob Today views. The Reminders screen also stays open when opening the respective job. You can select the time interval after which the reminders window should be displayed and save with Snooze . With Settings you can define the jobs you want to be reminded about.

Settings opens in your User Settings in the Reminders section. All active Reminders are displayed here. The filter options for the individual views are the same as for the Navigator and easyjob Today view. With Add you can select a new View and confirm it with OK . Marked views can be deleted .
Configuring your own reminders
1. easyjob Menu Extras User options Reminders
2. Add
3. Select the required Jobs and filter them if necessary.
4. Ok
easyjob must be restarted to activate the changes.
Configuring reminders for users
1. easyjob Menu Extras User Rights Management Reminders
2. Select the user
3. Edit
4. Reminders tab

5. Add
6. Select the required Jobs and filter them if necessary.
7. Ok
If the user has the Configure personal reminders right, they can change the set Reminders accordingly here.
E-Mail reminder
You have the option to have certain reminders sent to you also by e-mail. To do so, you must activate the E-Mail reminder service in easyjob 6 Servermanager . To do so, select Configure Task .

Activate the Task and select the Daily or Every hour execution type and define the time interval in Hours . The Status and the log of Last successfully executed are displayed.
Then configure the service and restart it .
You can define in the filter views of the individual reminders which reminders you want to also receive by e-mail.
The configuration of the Standard E-Mail-Settings is a requirement for sending e-mails from easyjob
Numbers, Custom Numbers and Custom Fields
No content for this section.
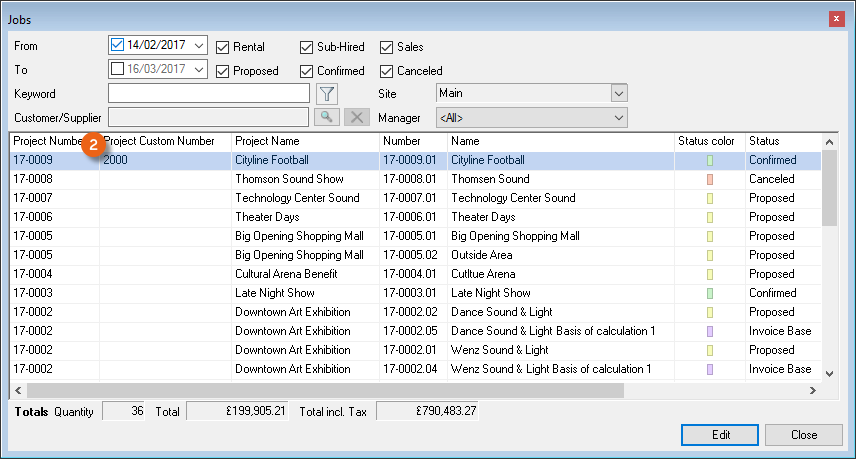
Numbers and Custom Numbers
In easyjob, workshop activities (projects, invoices,...) are assigned numbers automatically. As the easyjob full text search is so powerful, normally the number is only used as a reference for the customer. In addition, numbers can also be selected in most filters.
The numbers consist of the two digit year of the equipment, which is separated by a dash from a sequential number. Example: 17-0001, 17-0002, etc.
Jobs, addresses and item numbers differ from normal activity numbers.
A job contains the project number, which is separated by a dot from a sequential number . Example: 17-0001.01, 17-0001.02, etc.
Items and addresses receive a consecutive number, starting with a 1 and ending with .00. Example 1000019.00.
If you would like to change the number presettings, you can use the Custom Number field for your own number system. In program settings, you can activate an automatic script for automatic custom number creation.
Visual Basic .net is used as the script language.
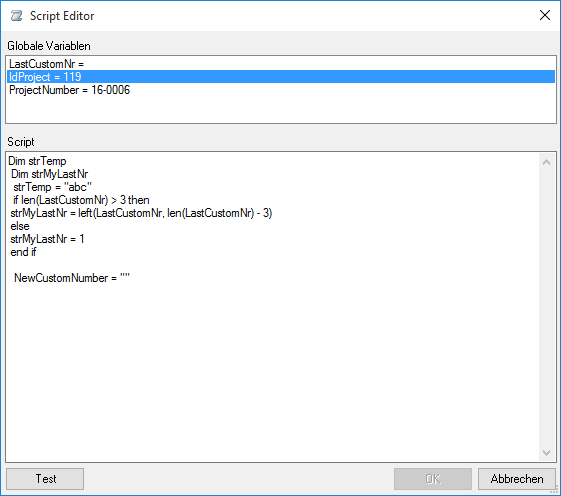
Some programming knowledge is required to develop the script. You can also contact the protonic software sales department to have the script customized.
Activating the automatic custom number generation
1. easyjob Menu Tools Settings Projects/Item/Addresses/Invoicing/Sales Order/Purchase Order tab
2. Activate Activate custom number and Edit
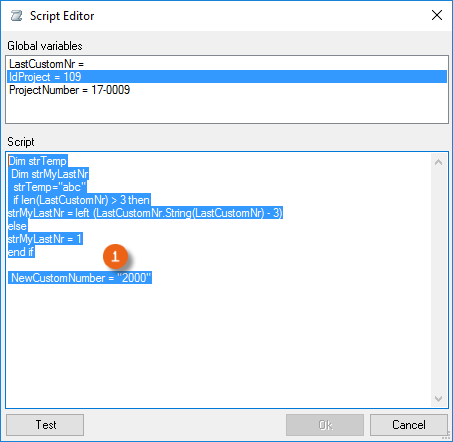
3. Add the script to the code window and test it.
easyjob must be restarted to activate the changes.
All newly created projects receive the preassigned Project Custom Number after activating the setting.
Custom Fields
Custom fields are available in some master data forms and workshop activities.
You can use the custom fields to record information for which no field is available in easyjob. There are fields for numeric, text and formatted text (RTF) entries.
| Custom Fields | Number | Text | RTF | Place of availability |
|---|---|---|---|---|
| Project | - | - | 8 | View Project Custom Fields |
| Job | - | - | 8 | View Project Job Custom Fields |
| Bill of Items | - | 2 | - | View Project Job Bill of Items |
| Groups | - | 2 | - | View Project Job Item Group |
| Item | 2 | 3 | - | Master Data Items Custom Fields |
| Device | - | 2 | - | Master Data Items Devices |
| Address | 2 | 3 | - | Master Data Addresses Custom Fields |
| Contact | - | 2 | - | Master Data Addresses Contact - Advanced |
| Resource | - | 2 | - | View Project Job Resource New/Edit |
| Resource Assignment | - | 2 | - | View Project Job Resource Assign |
| Invoice item | - | 2 | - | Invoicing Invoice Invoice Items Add/Edit |
| Invoice header | - | 2 | - | Invoicing Invoice Advanced |
| Workshop | - | 2 | - | Workshop Create/Edit Advanced |
You can use the program options to add additional standard text in a project or job. This can be used to add a personal introductory text to an offer. The custom fields are also output to reports.
Customizing custom field names
1. easyjob Menu Tools Settings Projects/Job/Bill of Items/Item/Addresses/Resources/Invoicing/Workshop tab
2. Enter the desired name for the custom field
Predefining custom field content for projects and jobs
1. easyjob Menu Tools Settings Projects/Job tab.
2. Click Edit in the RTF Field area.
3. Enter the formatted text
Using and editing predefined custom fields for projects and jobs
1. easyjob Menu Projects Edit Project
2. Select the desired project
3. In the project, click the Fields tab and select the custom field to be changed
4. Change the custom field as required
Initializing customer fields with RTF text modules
RTF test modules can be used to enter standard texts, which can be combined as needed in the RTF Fields in jobs, projects, etc.
Creating RTF templates
1. easyjob Menu Master Data RTF Templates Add/Edit
2. Select a group.
3. Enter a Name.
4. Create the template and format it as required.
5. Ok
The templates that are created can be selected and integrated in the corresponding area in the project in the Field tab as a Template .
With the Project and Job groups , you can also edit the eight available text fields, which may already contain entries, from the Template DropDown menu.
Manage Users
User Rights Management makes it possible to create users, assign and manage user rights. Without the appropriate user rights, menus will be hidden.
Creating a user
1. easyjob Menu Tools Manage Users
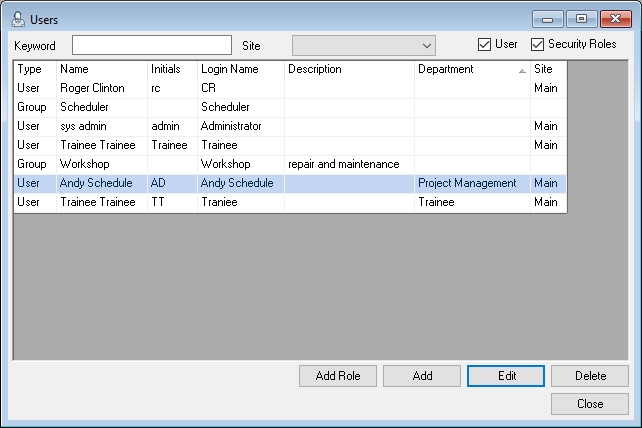
2. Add
3. Enter the data for the new user
4. Save
5. Access Rights tab
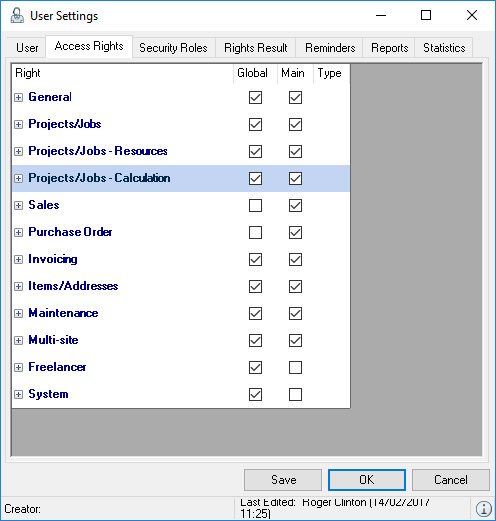
6. Assign the corresponding rights.
7. Save and Ok
The login dialog displays your user name.
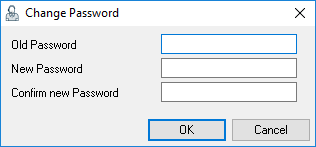
Changing passwords
Changing your own password
1. easyjob Menu File Change password
2. Enter your old and new password in the dialog
Group authorizations
With group authorizations, you can assign rights to a group, such as schedules, and then assign users to these groups. All group members have the same user profile. Assigning multiple groups to a user adds rights accordingly.
Creating a new group
1. easyjob Menu Tools Manage Users Add User group
2. Enter a group name
3. Access Rights
4. Define the rights for the Group.
5. User tab
6. Add the user to it that should receive these rights.
7. Ok
Company structure
You can map the structure of your company using a type of organizational chart. You can assign this company structure per area (department) Manager and Employee. The assignment takes place directly in the company structure or via User Rights Management. You can add or delete the desired areas in the graphic display as required . After you have added or selected an area , you can define your settings . In addition to the Name and Description , other Features are present depending on which modules are active. You can assign Managers and Employees to each area or delete them , in addition you can assign multiple managers to a manager level and change the order . You can export the created graph in png format and use it further.
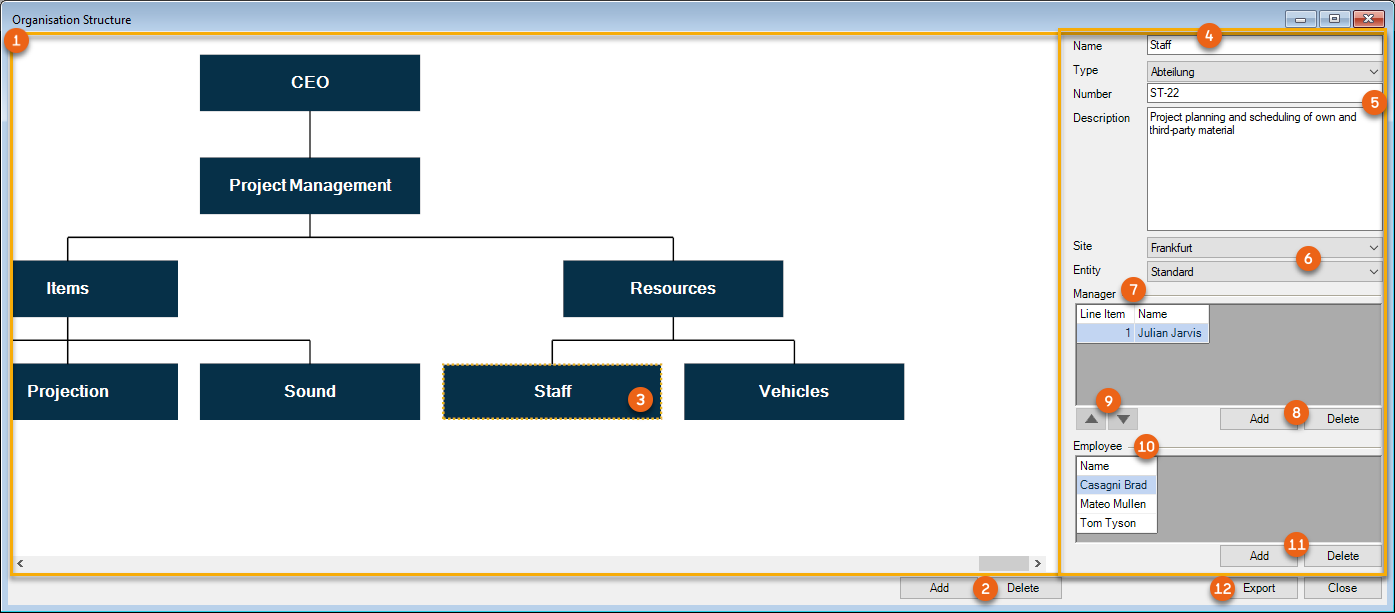
Creating and editing a company structure
1. easyjob Menu Master Data Company structure
2. Select an area or create a new one with Add
3. Enter a Name
4. Add Managers and Employees
5. Close
You need the Company structure user right to create and edit.
Company structure user right
1. easyjob Menu Tools User Rights Management
2. Select the user
3. Edit
4. Rights General
5. Check the Company structure box
6. Ok
You can be defined as a Manager in multiple areas. The employee roll can be assigned only once. This can also be found in the User settings. You can be added in an area as a Manager and Employee at the same time.
Company structure in User Rights Management
The Employee's position in the company can be defined in the user settings.
Company structure user right
1. easyjob Menu Tools User Rights Management
2. Select the user
3. Edit
4. User
5. Select the employee position in the company
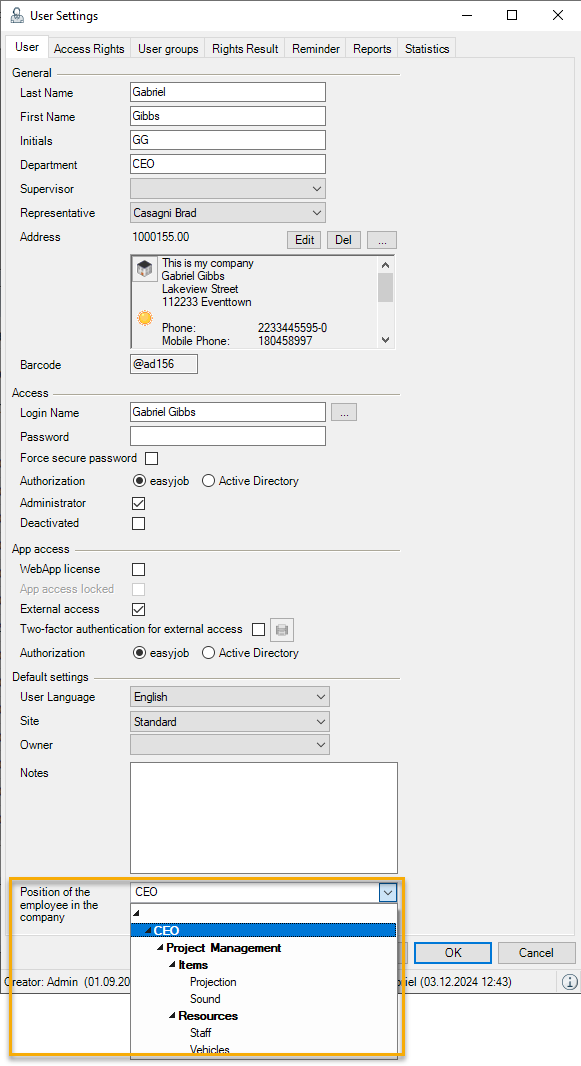
6. Ok
Company structure in easyjob
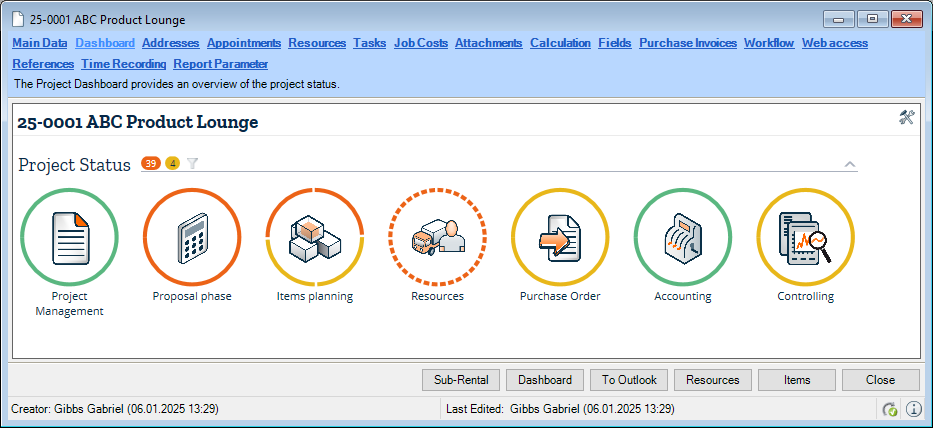
The company structure is currently used in the Time Card module and on the Project Dashboard. Additional functions are planned.
For the Time Card you can see a company structure filter in the work time overview (you can have the employees of only one area or your area displayed). Furthermore, a navigator view with time recording approvals of my employees displays all employees that require a work time or qualification approval and for which you are assigned (across all areas) as a manager.
The display and filter setting is global (same for all users) on the Project Dashboard. With company structure active, the display and filtering depends on how your area is assigned. All employees of an area are displayed the same. See also Dashboard .
Two-factor authentication
This information is only necessary if the easyjob administrator has activated two-factor authentication. For secure login with external access, easyjob provides two-factor authentication if required. In addition to the normal password, a key generated via an app is required for this.
The security key is generated by the easyjob Administrator.
Activating two-factor authentication for easyjob Users
1. easyjob Menu Tools User Rights Management
2. Select the respective user
3. Edit
4. Under App access, check the box for Two-factor authentication with external access
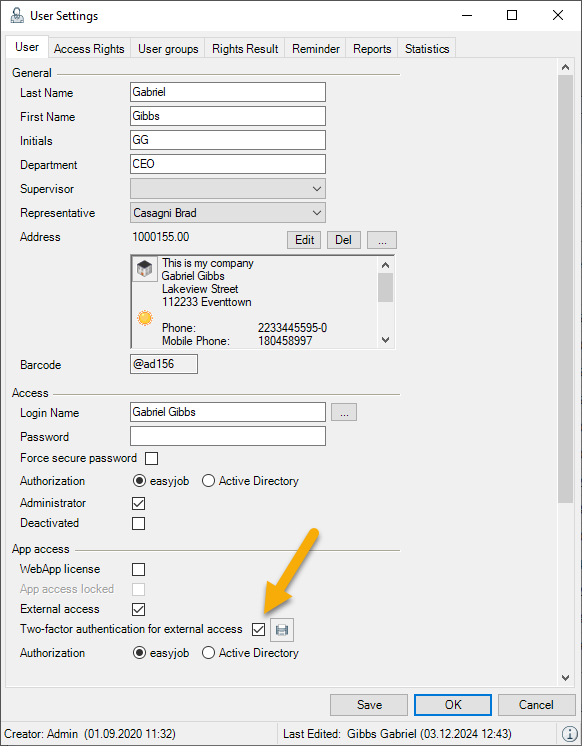
5. Ok
Generating a security key for easyjob Users
1. easyjob Menu Tools User Rights Management
2. Select the respective user
3. Edit
4. Click on the printer symbol for Two-factor authentication with external access
5. The report with the 2FA security key will be generated

Activating two-factor authentication for easyjob WebApp users
1. easyjob Menu Master Data Addresses
2. Select the desired address
3. Web Access tab
4. Check 2FA
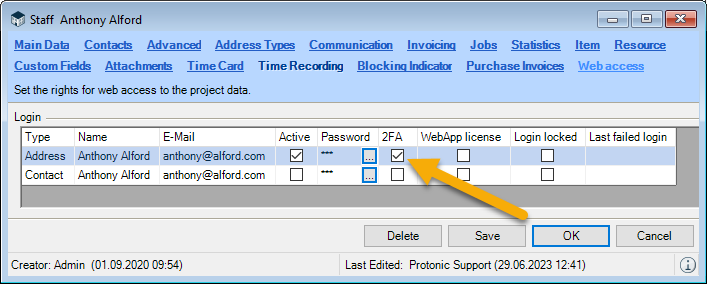
6. Ok
Generating a security key for easyjob WebApp users
1. easyjob Menu Master Data Addresses
2. Select the desired address
3. Web Access tab
4. Right-click 2FA
5. Print
6. The report with the 2FA security key will be generated
There are numerous Authenticator apps which can be used for this purpose. If you don't have an Authenticator app yet, you can use one of the two popular tools, for example.
Set up easyjob in the Authenticator App
1. Start the Authenticator app
2. Select e.g. Add account*
3. Scan the security key that was provided to you via PDF by your easyjob administrator
*Depending on the Authenticator app, different steps may be necessary here
Now you can use your Authenticator app to generate the 6-digit security key to log in to external access.
Operating concept for the MS Office environment
easyjob Remote Session Enhancer (RSE)
No content for this section.
Getting started
The easyjob Remote Session Enhancer improves integration between the executed easyjob application on the remote desktop and the local desktop.
This requires the installation of the easyjob Remote Session Enhancer Client on the local computer. This is described in more detail in the easyjob Installation and Configuration manual.
Settings
It is configured in the easyjob User Settings if Open files, Add files, e-mail or Microsoft Teams Dialog are opened on the Client or in the Remote Session.
Customizing the user settings in easyjob
1. easyjob Menu Tools User Settings
2. The settings are located on the first tab.
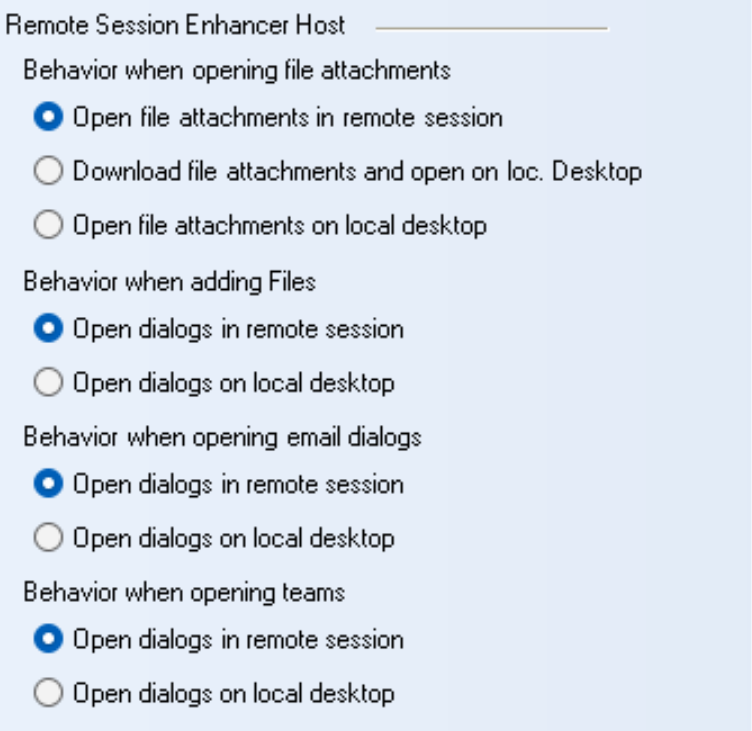
3. Select the desired settings
4. Ok
Operating the client
The uploading progress of the respective file attachment in the queue is displayed on the main window.
In addition, an attachment can be uploaded manually and the easyjob WebApp can be opened.
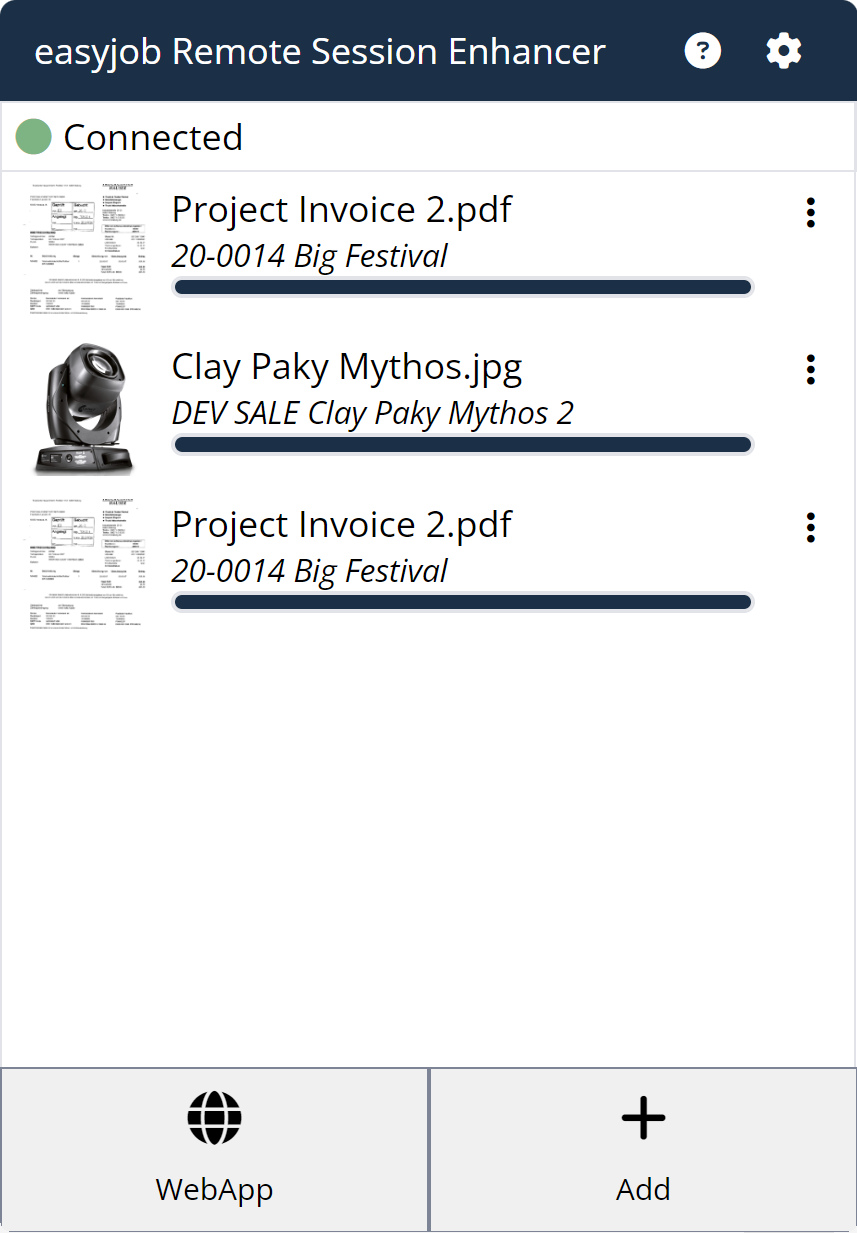
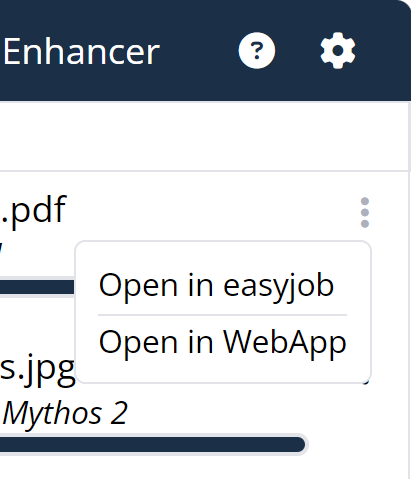
Via the context menu, the respective object can be opened from the queue in the easyjob WebApp or in the easyjob Windows App.
The Remote Session Enhancer displays the connectivity to the easyjob Environment with a Windows System Tray Icon as well as below the title of the main window.
| The connection is established |  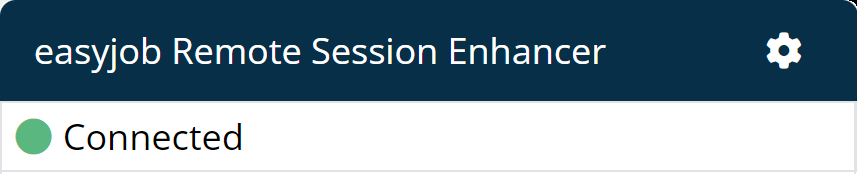 |
|---|---|
| The connection is not established |  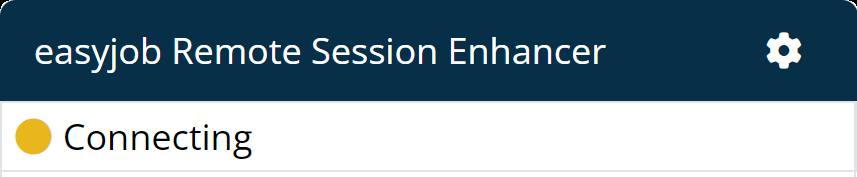 |
An Icon in the easyjob status bar shows if a Remote Session Enhancer Client is connected.
| Connections via a client are possible, the client is not connected. | 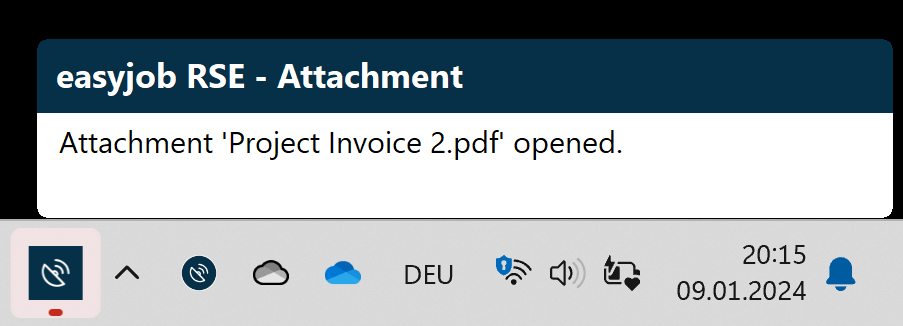 |
|---|---|
| A Remote Session Enhancer Client is connected. |  |
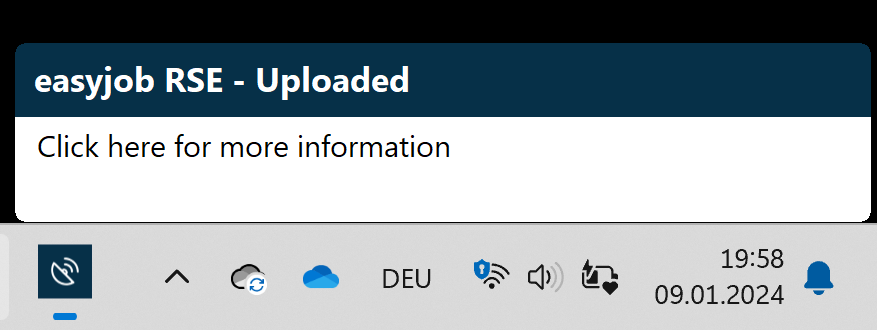
If a document attachment, an e-mail or a Microsoft Teams Contact should be opened on the client, this is signaled by a popup window.

The client tries to bring the dialog to the forefront in parallel, but this is not always the case due to the Windows security measures. The dialog is brought to the foreground by clicking on the popup window.
Manually adding files from the local desktop
Files can be added to the Remote Desktop from the local computer regardless of the started easyjob Client.
Adding files manually
1. Click on the Tray Icon of the Remote Session Enhancer
2. Add (main window)
3. Drag & Drop a file on the window or open it by clicking the file selection dialog
Drag & Drop is also supported for files that are dragged to the window directly from the e-mail dialog
4. In the Combobox, select which type of file attachment you are uploading and select the respective data set using the Autocomplete text box
The last projects that were used are displayed via the selection for fast access to the projects currently in use
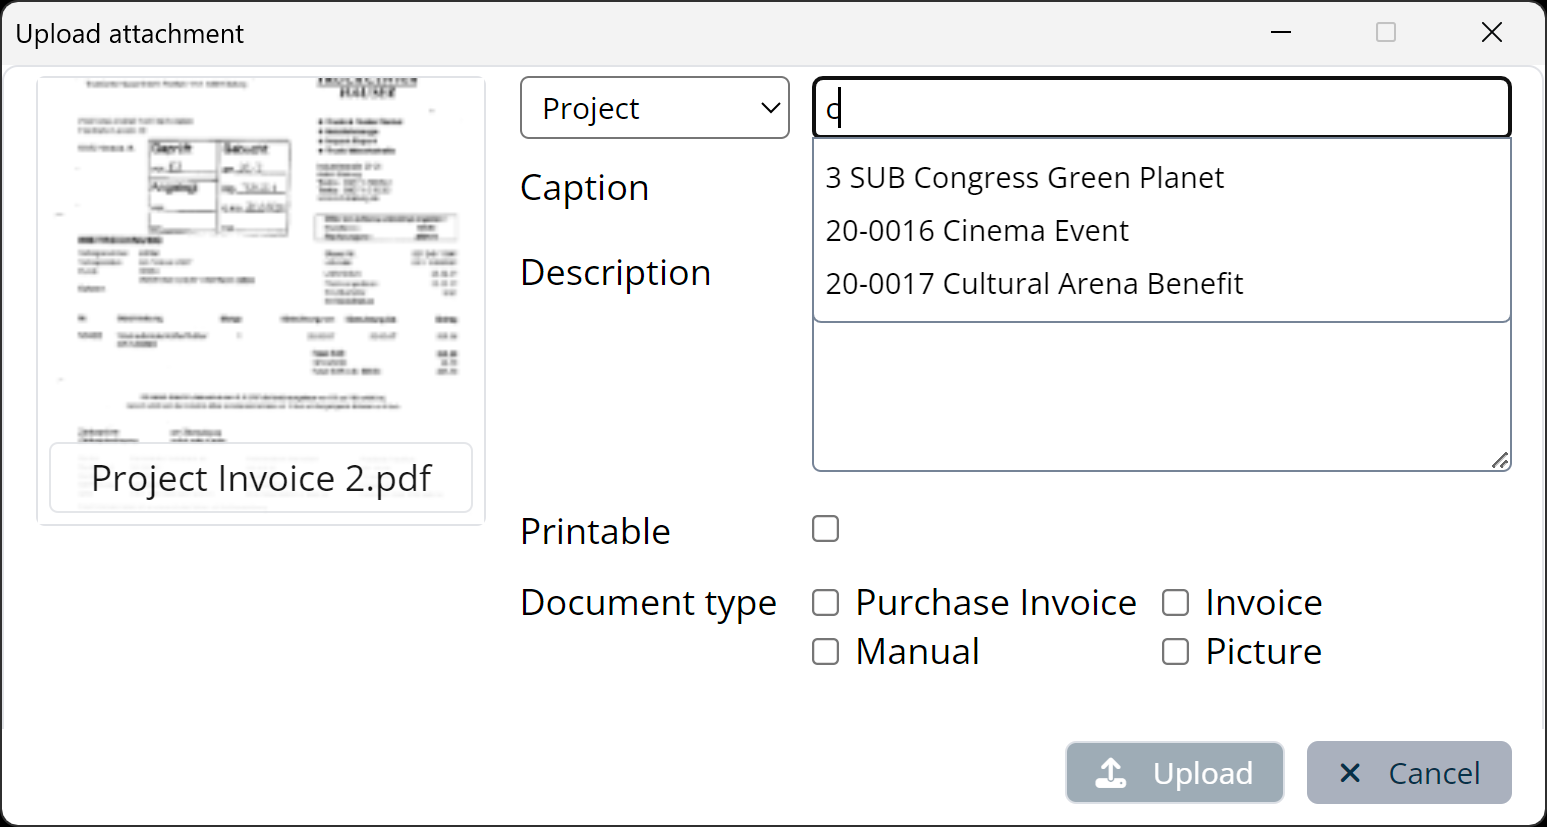
5. After selecting the data set, you can enter additional information, such as the description
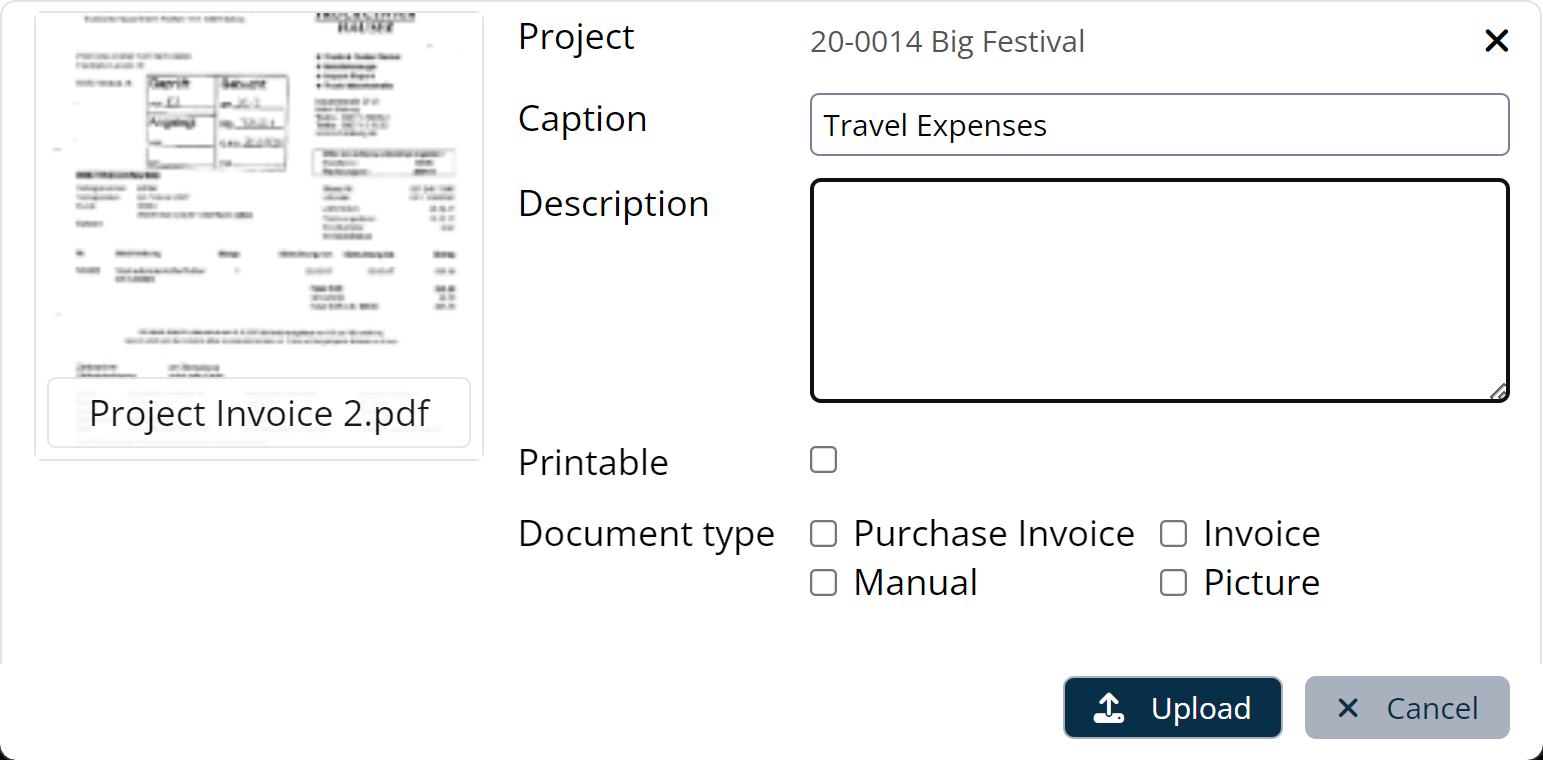
6. Uploading starts automatically and asynchronously after clicking on Upload
A popup window shows if the upload was successful
Opening email dialog on the local desktop
If creating an e-mail from a communication menu, a CRM activity or a print dialogue, the e-mail is created on the server side and then the Remote Session Enhancer opens the e-mail on the local desktop.
Office 365 Integration is necessary for this functionality.
Opening Microsoft Teams on the local desktop
If the respective contact is opened in Teams Contact from the communication menu, the Remote Session Enhancer opens the contact on the local desktop.
Opening file uploading dialog on the local desktop
If a file attachment in the project, item, etc. is added, the Remote Session Enhancer opens the Add dialog on the local desktop.
Opening a file on the local desktop
Files are opened on the local desktop. If the document is located in a SharePoint library and is available online with OneDrive, the file is opened from the OneDrive folder
Project Management
A project contains item scheduling, staff and transportation planning, task management, document management and cost calculation.
Each project consists of at least one job and may contain as many as you require. The project time frame starts from the earliest start date and ends on the the latest end date for all jobs.
Projects and Jobs
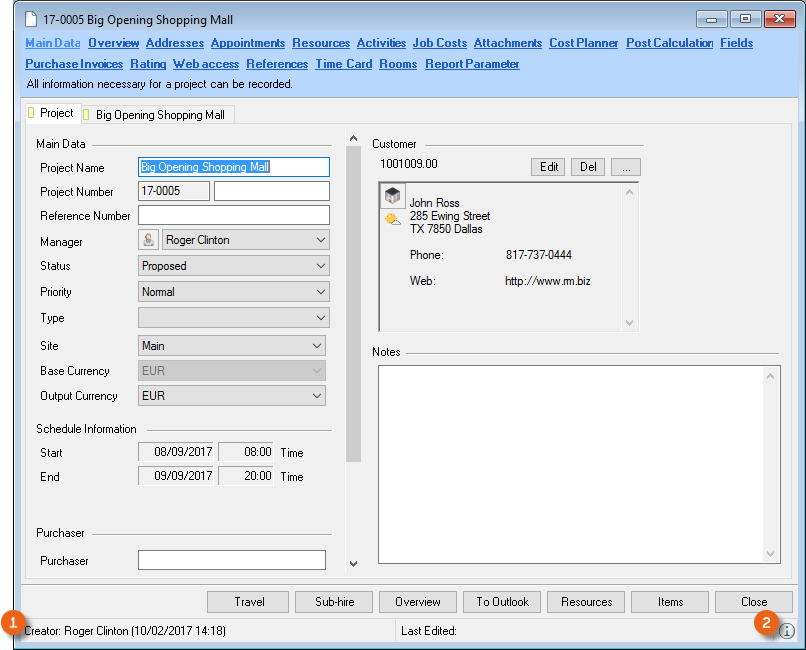
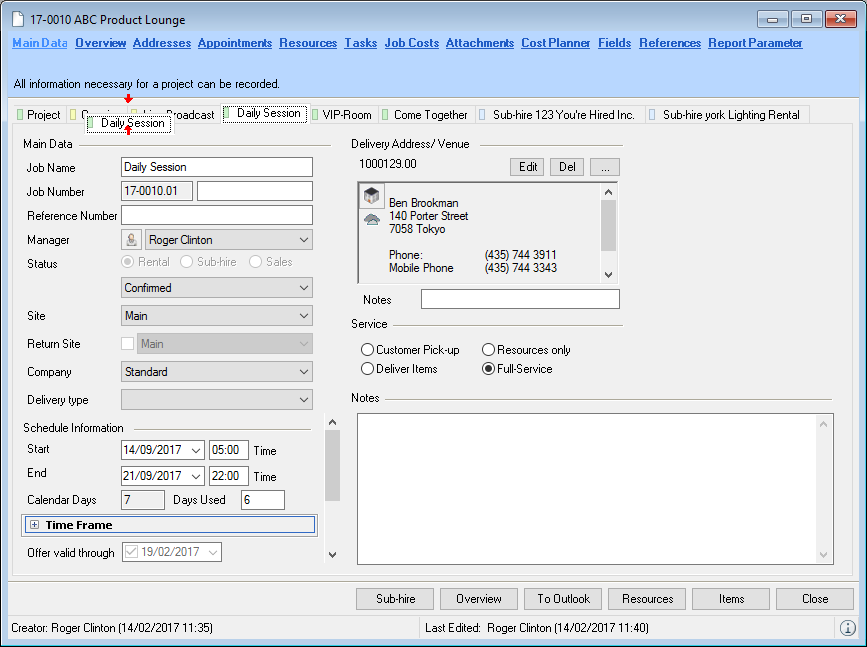
Every project can be divided into as many jobs as needed. When creating a project, the first job tab is automatically generated.
The first tab is used to manage the project data , and the others are used for the job data . The order of the jobs is determined by the order of creation. They can be changed later. Individual jobs can be archived and hidden using a shadow copy. Information about the customer and priorities are recorded in the project.
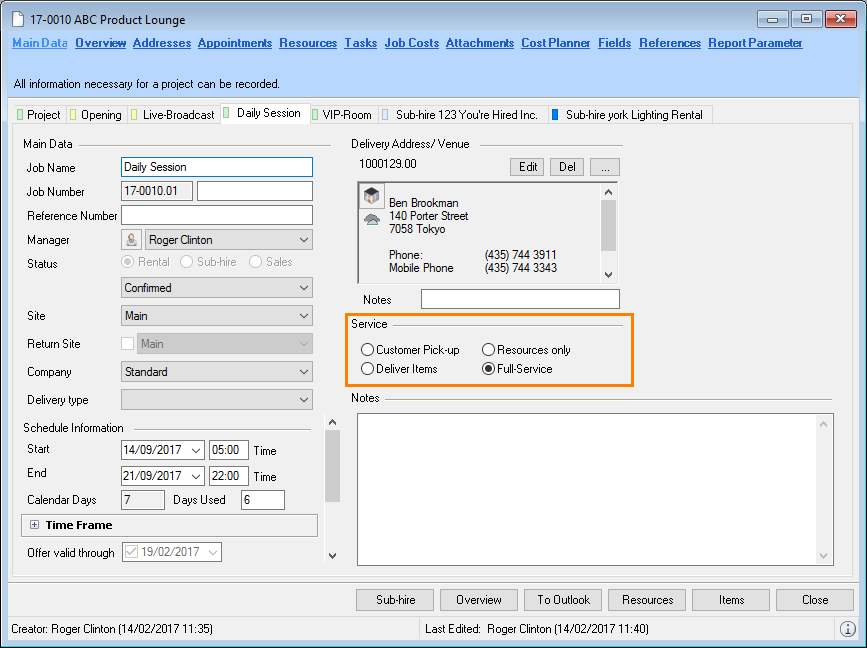
Information about, for example, schedule times , delivery addresses , service and the Rental/Sub-Rental/Sales Order status is recorded in the job.
With job related functions such as tasks, the project tab will contain all tasks for the job in the project, and the job tab will only contain the tasks for the selected job.
Opening an existing project:
Many methods can be used to open an existing project. A project can be opened by double clicking on it in almost all lists or using the context menu. The most common methods are described below.
Opening the project from the monthly overview
1. Open the easyjob monthly overview
2. Double click a project
Opening the project from the menu
1. easyjob Menu Projects Edit Project
Creating a new project/job
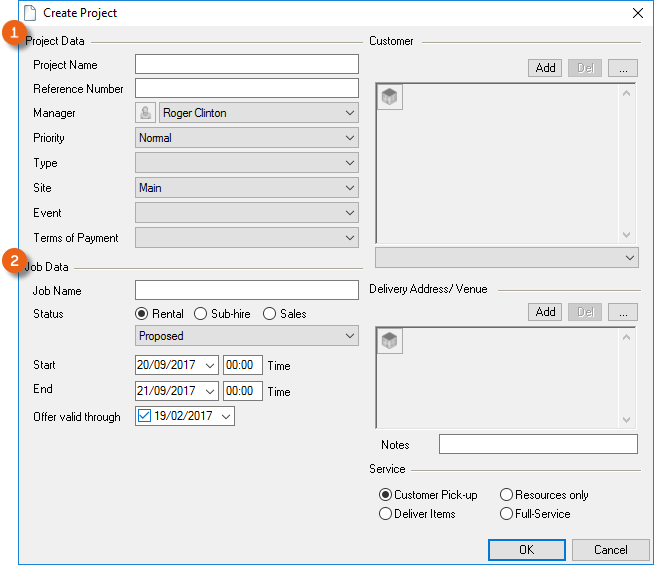
Many methods can be used to create new projects. When a project is established, the first job is also created.
Creating a new project from the monthly overview
1. Open the context menu in the monthly overview in a free field
2. Select
Creating a project from the menu
1. easyjob Menu Create project
In the Create project form, enter the project related data in the first section and the job relevant data in the second section . The manager will be preset based on the logged in user.
Copying a project
In order to minimize data creation for a recurrent project, you can create a new project on the basis of an existing project.
Copying a project
1. easyjob Menu Projects Copy project
2. Select the source project
3. You can decide if you want to accept all projects or only the selected jobs from the project. You can also select which data should be copied. The individual scheduled items are moved on the basis of the project's new start date.
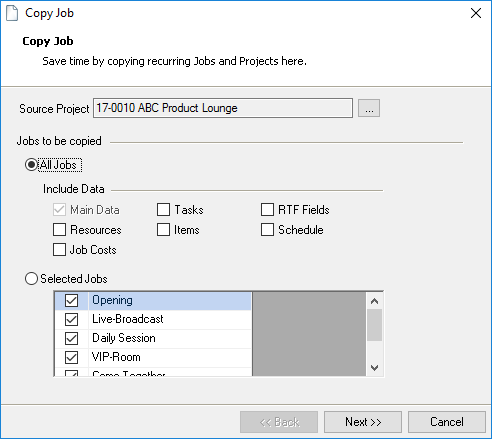
4. Enter the new project name and select the new start date
5. Next
6. Finalize
Creating a new job
You can add as many jobs to a project as you like.
Adding a new job to an existing project
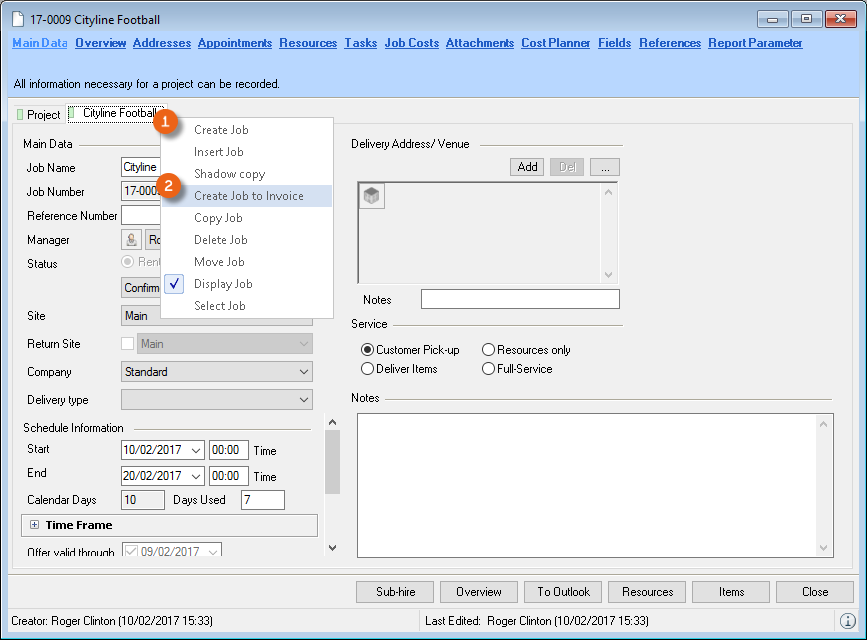
1. Open the context menu of the Project tab
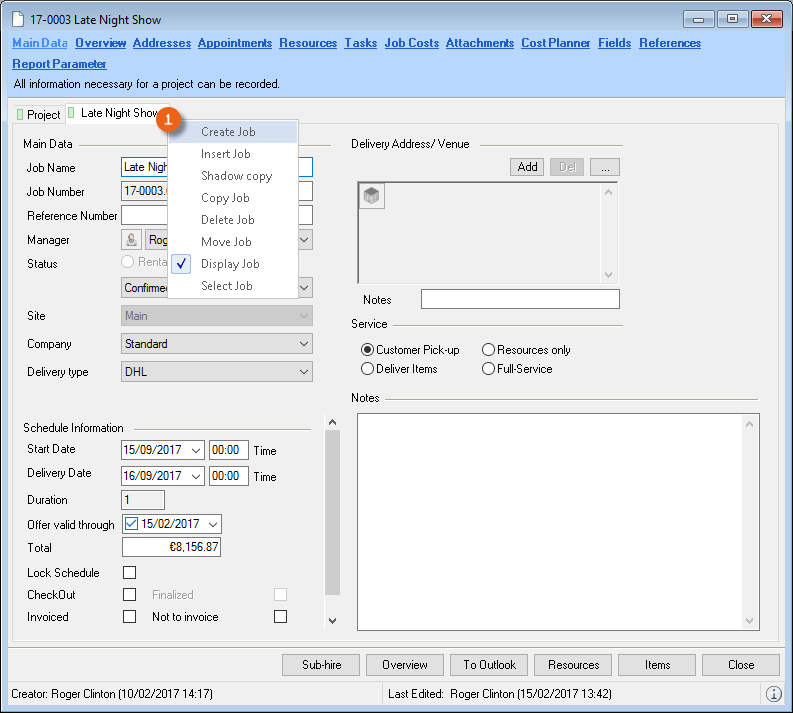
2. Click Create job
When creating a new job, various fields will be pre-filled so that the job start date will be automatically set to today's date , for example, if the project date lies in the past. The job name will be automatically set with the project name + 1 and marked so that the field can be directly edited without additional mouse clicks.
Inserting an existing job
You can copy an existing job within a project. The copy activity is similar to the project/job copy function.
1. Open the context menu of the Project tab
2. Select Add job
Transferring time frames to other jobs
The context menu can be used to quickly transfer the time frames of a job to another job of the project.
1. Open the context menu of the job tab
2. Select Create job
3. Right click time frame
4. Select the job from which the time frames should be taken over
Moving a project
If you moved the time frame for a project, you can move all of the assigned scheduled items with the project.
All scheduled items are moved based on the new start date. If staff and transportation havelready been assigned to the project, the assignment can be reset to Preferred.
Moving the time frame for a project
1. Open the context menu of the Project tab
2. Select Move project
Changing the order of the jobs and selecting a job
The job tab is sorted on the basis of its order of issue. Jobs can be resorted for a better overview.
Changing the order of the jobs
1. Click the job and hold the mouse button down when moving it
If a project consists of multiple jobs, you can select the required job in an additional list view.
Selecting a job
1. Open the context menu of the Project tab
2. Select jobs submenu
3. Select the job
Hiding and viewing shadow copies and jobs
The shadow copy function makes it possible to create a complete copy of a job. This can be useful to store an older version of a proposal. The shadow copy is automatically hid for a better overview.
Displaying and hiding jobs
1. Open the context menu of the Project tab
2. Select the jobs you want to view/hide, e.g. hall 4.1, hall 6.1
Creating a shadow copy
1. Select Shadow copy from the Job context menu
2. Give the copy a new job name and select the data to be copied
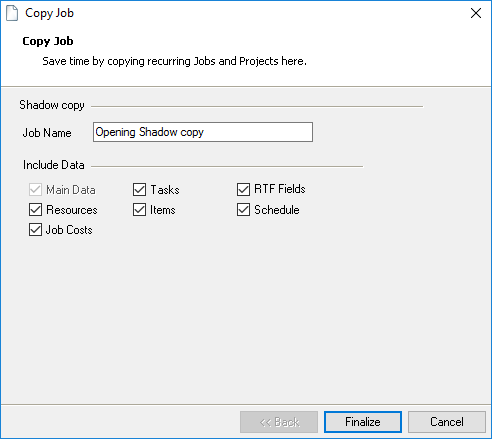
3. Finalize.
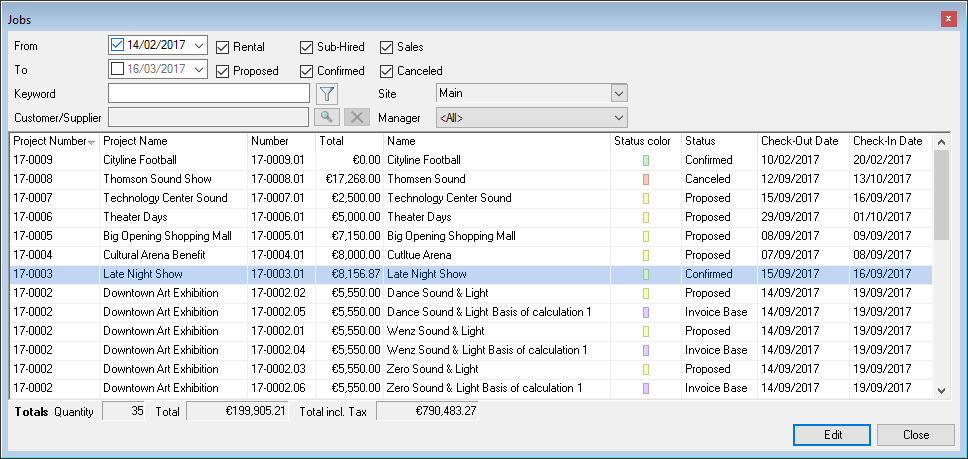
Project and Job Status
The individual project phases are indicated via the project and job status. Overview of the individual project/job status:
| Standard color and status | Job/project related | Description |
|---|---|---|
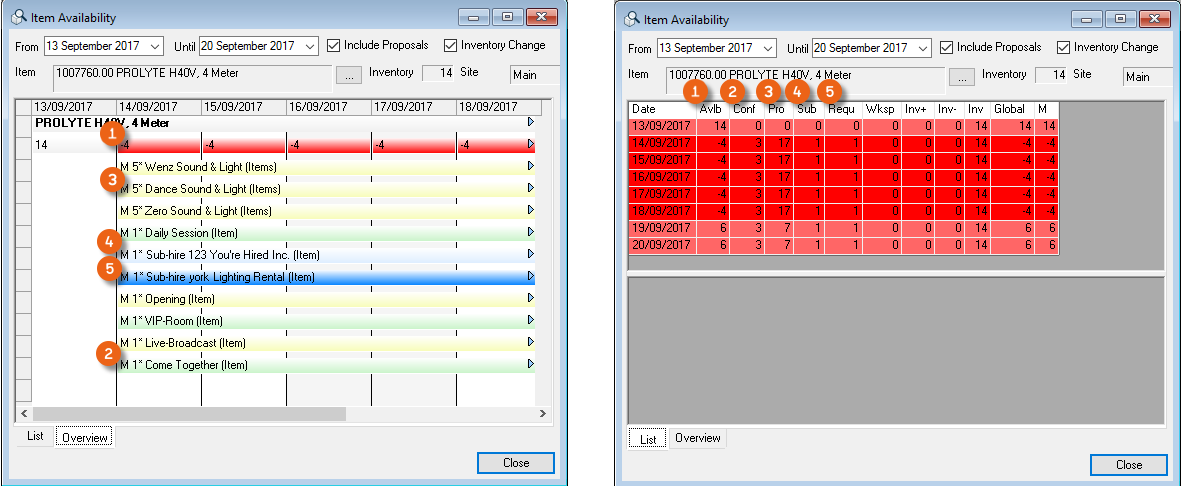 Tentative Tentative | Rental job | It is unlikely the job will be accepted. The scheduled items will not be considered during an availability check |
 Proposal Proposal | Rental project/job | The project/job is in the proposal phase. The availability of the job equipment is indicated in the proposed column . |
 Confirmed Confirmed | Rental project/job | The project/job is confirmed. The availability of the job equipment is indicated in the confirmed column . |
 Canceled Canceled | Rental project/job | The project/job has been canceled. For archiving purposes the workshop activity should be kept in the database. |
 Requested Requested | Sub-rental job | The material for a job is requested from a supplier. The process has not yet been confirmed by the supplier and the material has been indicated in the availability check in the Requested column . |
 Confirmed Confirmed | Sub-rental job | The material for a job is sub-rented from a supplier. The process has been confirmed by the supplier and the material has been indicated in the availability check in the Sub-Rented column . |
 Canceled Canceled | Sub-rental job | The sub-rental job was canceled. For archiving purposes the workshop activity should be stored in the database. |
 Invoicing Invoicing | Job invoicing basis | The job is invoiced analogously to the proposal. Any changes or item replacements will be ignored while loading. The availability of the items listed in this job will not be considered. |
Availability check example:

The project statuses are interlocked with the job statuses. The following rules apply:
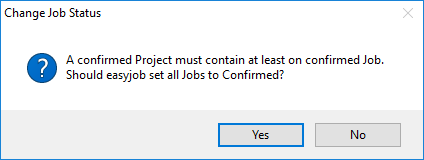
A proposed project cannot contain a confirmed job.
A canceled project cannot contain a proposed or confirmed job.
If a project contains a confirmed job, also the project will be confirmed.
Based on this rule, the status of the project or job will be automatically adjusted.
easyjob makes it possible to adjust to the status.

The status colors are configured using the global easyjob program settings for the easyjob environment.

Customizing status colors
1. easyjob Menu Tools Settings
2. Project/Job
3. Select the color to change with ....
4. Change color
5. Ok
easyjob must be restarted to activate the changes.
In addition to the job status, the Type of Service is defined for each job.

| Customer pick-up | The job only contains items and is not contained in staff and transportation. |
|---|---|
| Deliver Items | The job contains items and the delivery note |
| Resources Only | The job contains only staff and/or transportation and not any items |
| Full-Service | The job contains items as well as personnel and transportation. |
The booking of staff and resources is regulated accordingly.
Project Main Data
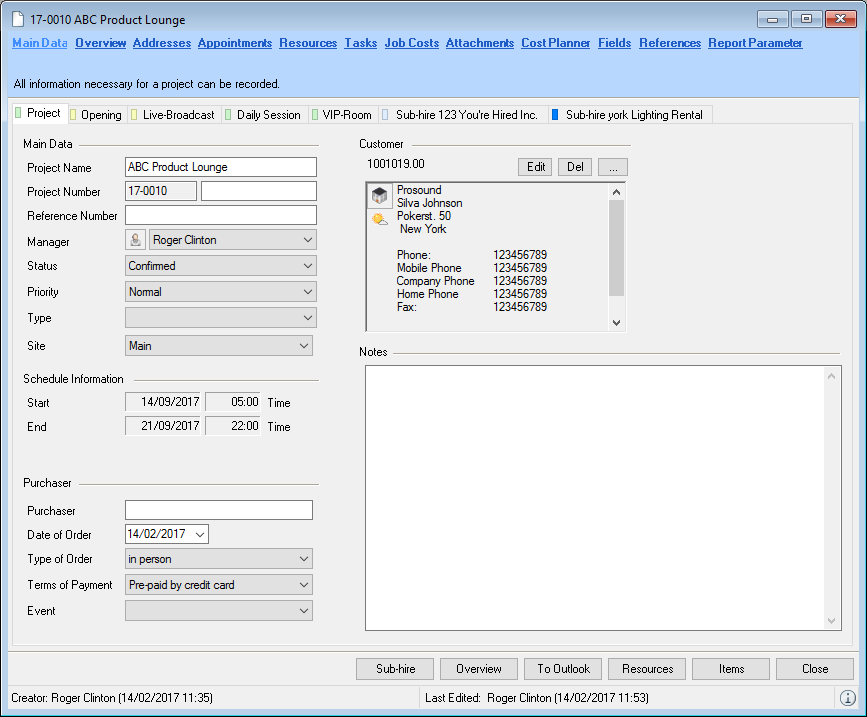
The individual fields in the project screen have been explained in the previous chapters and are mostly self explanatory.
The reference number can be used, for example, to store the activity number of the customer or, in the case of a sub-rental, that of the supplier. To exclude the possibility of creating double workshop activities, it is possible to activate the duplicate reference number check in the program settings.
1. easyjob Menu Tools Settings Projects
2. Check the box for Check reference number
3. Ok
A restart is necessary to activate the changes.
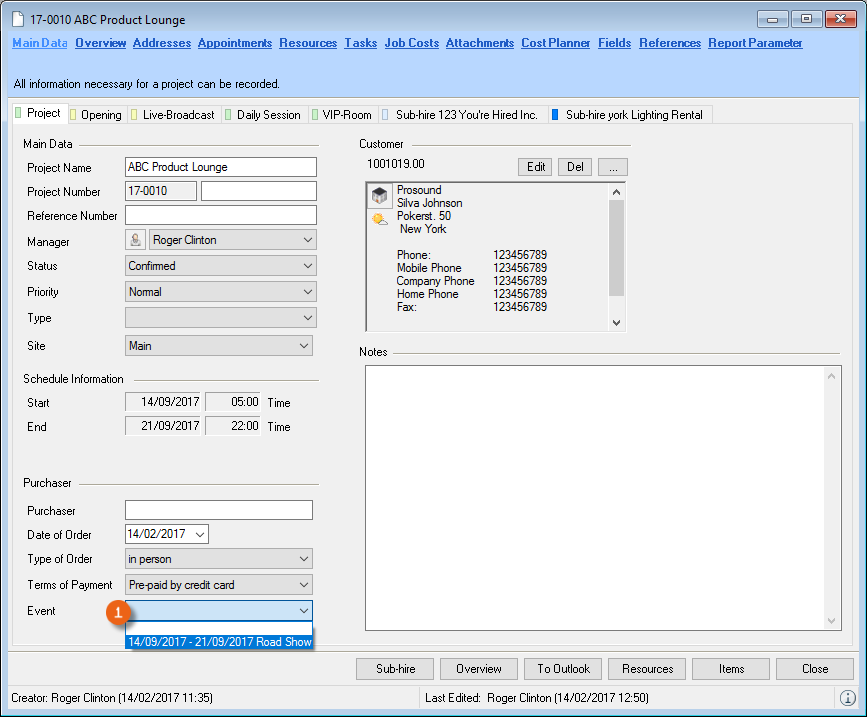
It is also possible to define a custom number (right field next to the project number) Priority is used to order the project according to importance. This field is mainly used for display purposes in the project as well as for some filters. With Type you can typify the project for filters and statistics. The project types can be created in the easyjob master data. An example of typification are rental types such as dry-hire, roadshows, trade shows, concerts, etc.. The schedule information shows the start and end date of the project. The dates are calculated on the basis of the earliest start and the latest end date for all jobs in the project. The Payment Method are taken from the address and can be manually adjusted. The Type of Order and the Payment Methods can be created in the easyjob Master Data.
Event calendar
In Events, you can create your own event calendar and apply data to the project. The definition is made in the easyjob Master Data Events.
Defining events
1. easyjob Menu Master Data Events
2. Select the event you want to Edit or Add
3. Enter the name, type, start and end date
4. By defining a color, you can identify your event quicker in the monthly overview
5. You can define the location and add a description
6. Ok
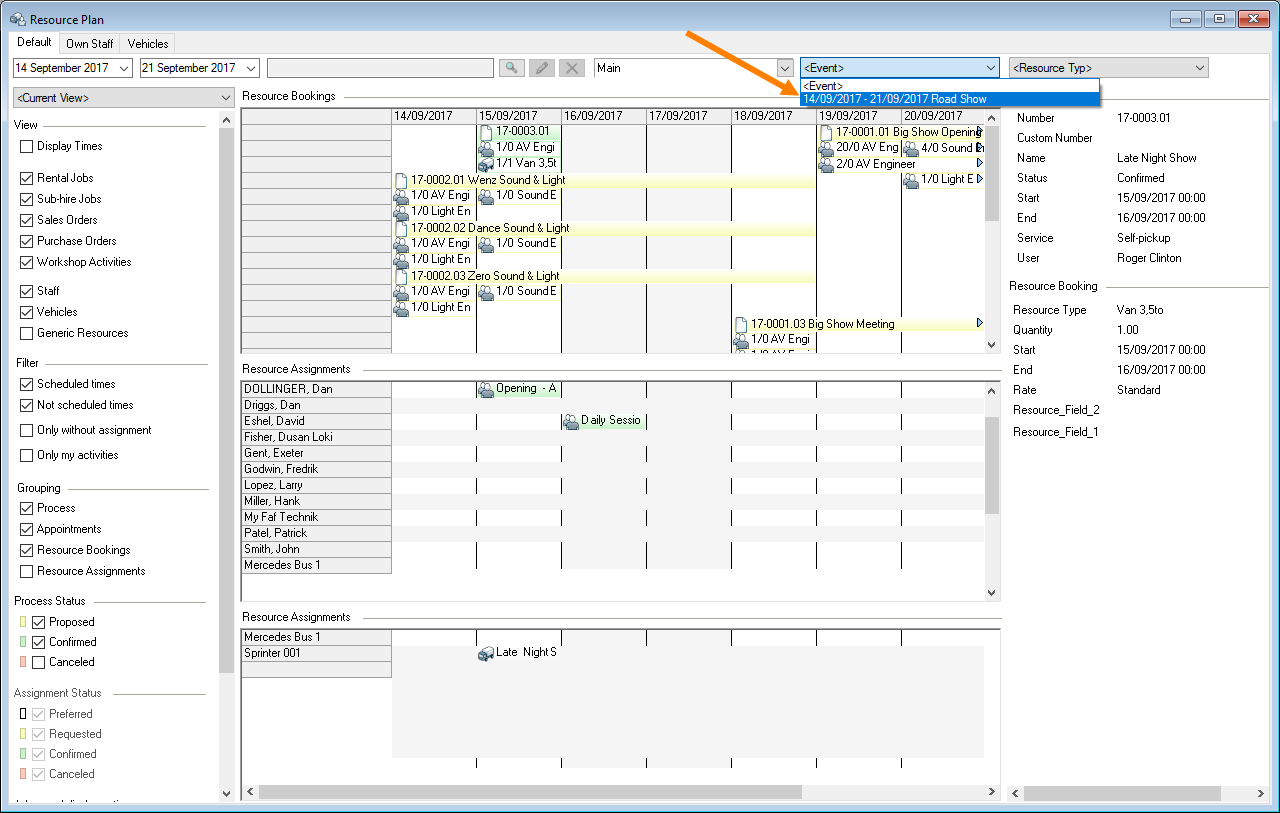
You can select your defined event under Event in the project main data.
The events are displayed graphically in the monthly overview. If you click on an event, all the projects assigned to the event will be filtered.
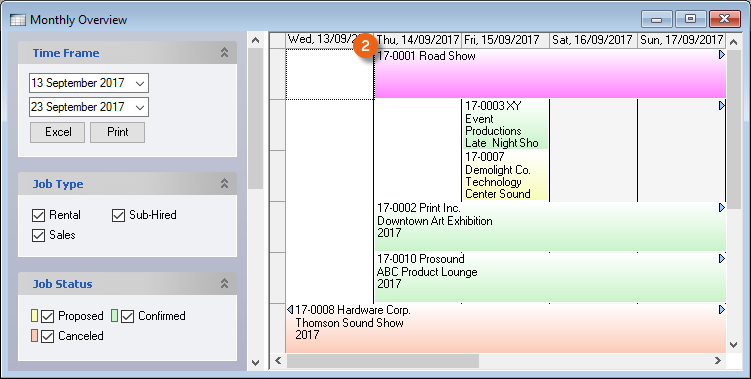
Various project (e.g a trade show) can be summarized for events. This makes it possible, for example, to output a Job Bill of Items and to better optimize staff use.
Main Data Job
The individual fields in the job screen have been explained in the previous chapters and are mostly self explanatory.
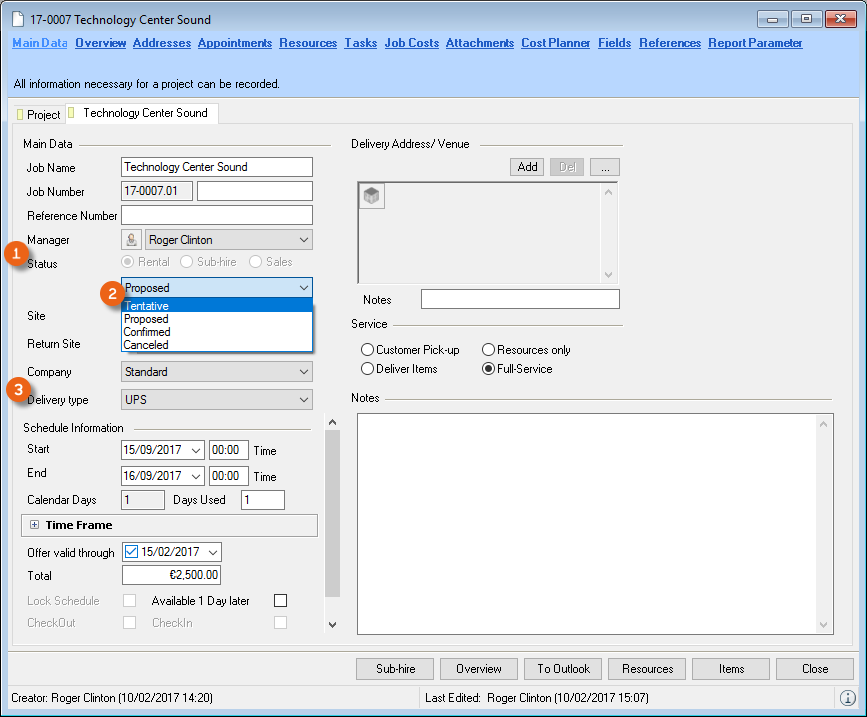
Status is used to determine if a job should be a Rental or Sub-Rental or a Sales Order. Also the Proposed, Confirmed statuses etc. are selected here. The Shipping Method selection is used to assign shipping methods such as DHL, UPS, etc. to individual jobs. The shipping methods can be created in the easyjob master data.
The availability of the job items is calculated based on the schedule time frame. The schedule time frame can be divided into individual phases.
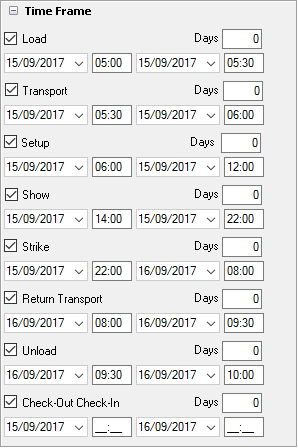
The start and end date of the time frame are interlocked via the schedule time frame. The individual phases are prepared as report variables. The available time frames can be hidden or viewed based on the program settings. An-Additional Address Text Field is available under the address. It can be used, for example, to indicate a trade show stand number for deliveries.
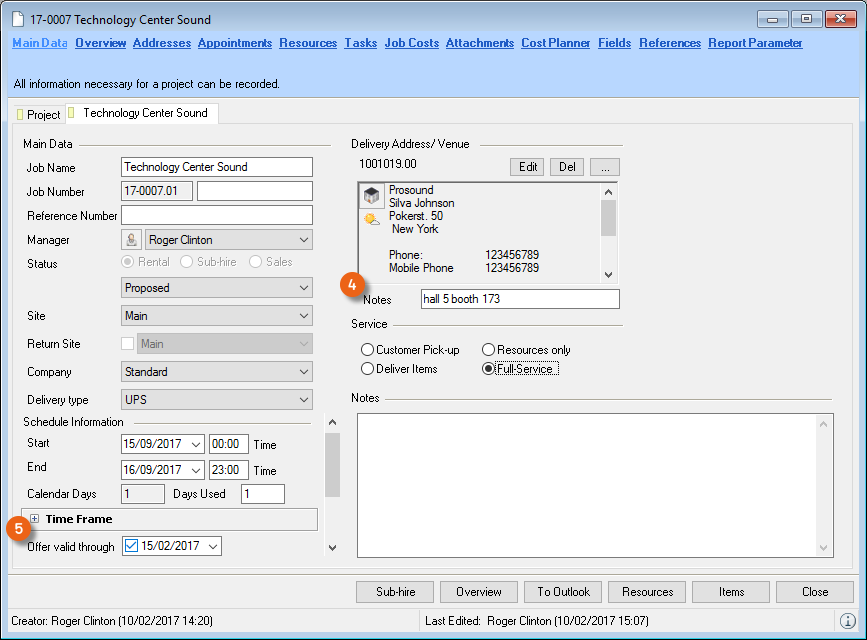
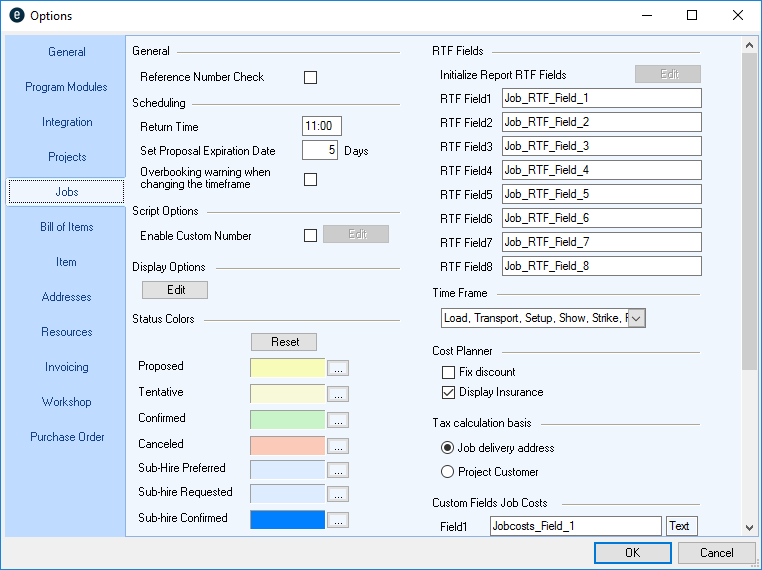
Offer Valid Through indicates how long the proposal is valid. If the term is exceeded, you will receive warnings in the navigator, easyjob Today, Windows Gadgets, reminders and in the project overview. You can automatically initialize the proposal expiry date.
Automatically initializing the proposal expiry date
1. easyjob Menu Tools Settings Jobs
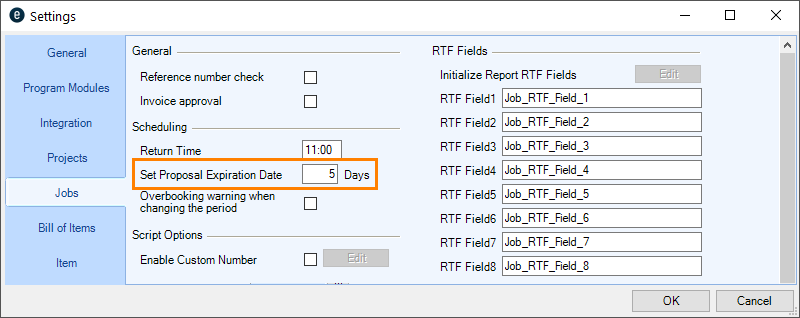
2. Enter the number of days before the job starts in Set Proposal Expiry Date
3. Ok
easyjob must be restarted to activate the changes.
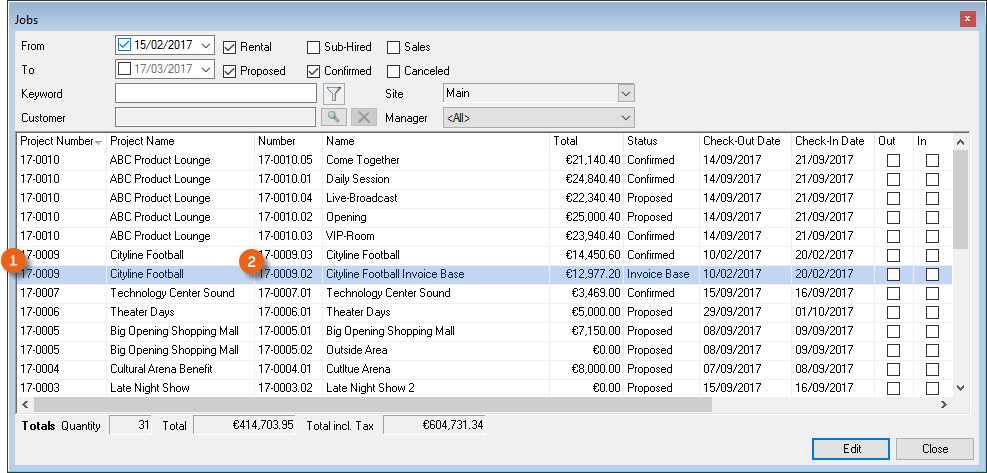
Invoice Base Job
For a selected job, you can create a new job with the Invoice base status. This job will then be invoiced according to the proposal. Any changes or item exchanges made during loading/unloading will be ignored. The items listed in this job will not be considered during an availability check.
Creating a job on an invoice base
1. easyjob Menu View Jobs
2. Select the job and Edit
3. In the job context menu select Invoice Base
4. Make the required settings in the Copy Job window.
5. Finalize
Before finalizing an invoice job, you can review the changes made in the overview, track them and make any necessary corrections.
Opening the change overview Job Differences with Cost Planner
1. easyjob Menu View Jobs
2. Select a job with the Invoice Base status and click Edit
3. Click the icon next to Status Selection .
4. Select the job with which you want to make the comparison

In the Job Differences Overview, the left side displays the Items, Resources, Job costs, etc. of the originally created Invoice Base Job , which is identical to the offer. The right side displays the Items, Resources, Job Costs, etc. used in the Actual Job . To create the final invoice, you can subsequently apply elements of the Actual Job to the Invoice Base Job. The Cost Planner helps you with this process.
The changes are marked in color for easier handling. Lines that are not marked are present in both lists and are identical. The green lines are only contained in the respective list, and the red lines are not present in the other list. You can mark multiple lines blue . Right clicking on the marked line will display the Bill of Items. The quantity of the marked lines is also shown for a better overview in the footer of the respective page. The orange lines are present on both sides, but have different values. The provided arrows can be used to transfer lines from one list to the other list.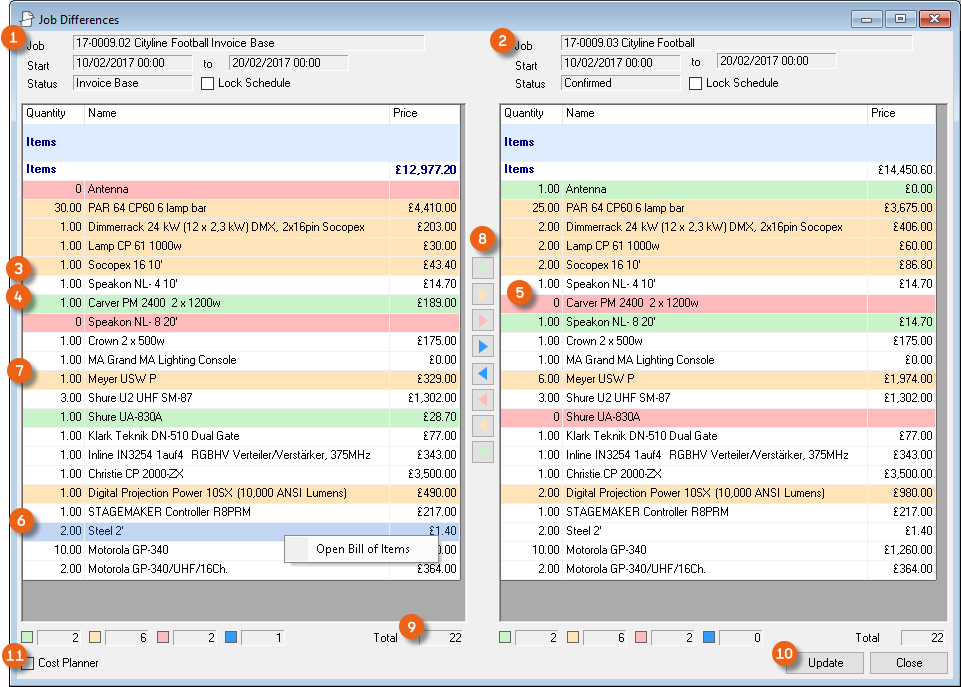 All green lines are transferred completely to the other list. The blue arrow
  is used to transfer individual blue lines. The arrow
  transfers the data of the orange lines in the direction of the arrow.
  deletes all red lines. If you made changes in the Bill of Items, you can Update them.

Company selection
If you use multiple companies (customers) you can assign the job to individual companies. This creates a company-related invoice export. You can create new companies in the master data.
Creating new costumers
1. easyjob Menu Master Data Companies
2. Add
3. Enter the Name, Initials and Address in the main data.
4. Ok
5. Invoice Export tab.
6. Select the Export Type and an Export Path if necessary.
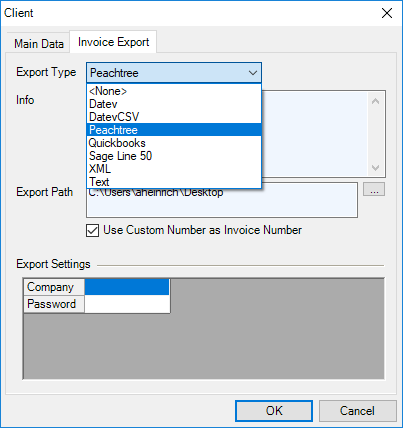
7. Ok
Overview
Complications may arise during a project. An item may be overbooked or a person may not be scheduled or a job may be checked-out.
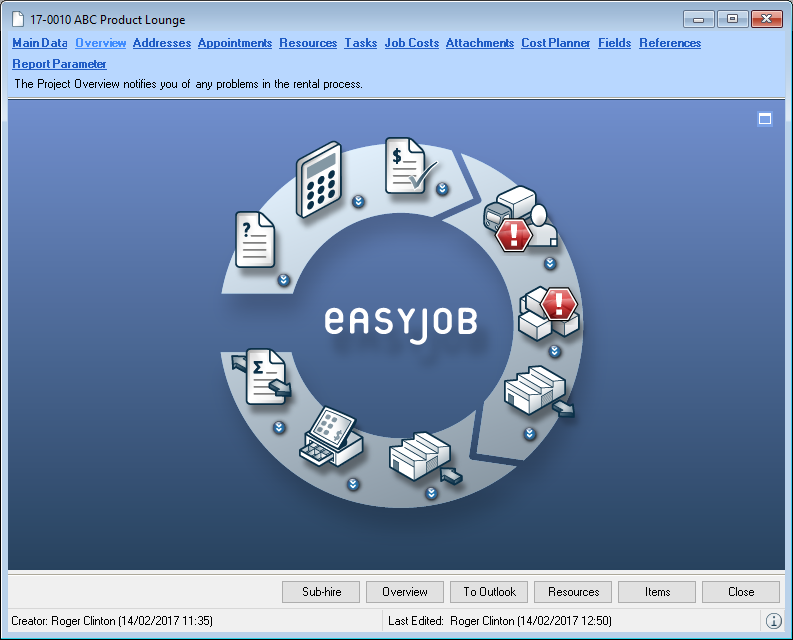
To avoid having to check the individual modules for problems during the project, important complications are displayed in the project overview. The complications are indicated with a warning symbol .
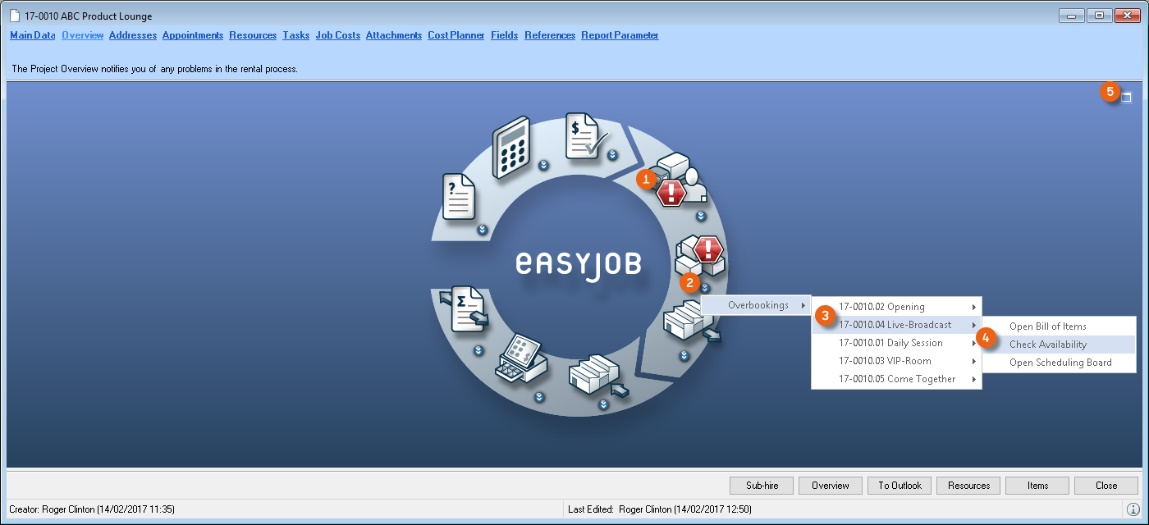
By clicking the symbol a list of the complications is displayed . The menu also offers conflict management tools . For an improved overview, the project overview also includes a view with additional information. Clicking the icon opens the expanded view with additional project information, jobs and tasks.
Overview of the analyzed complications:
 Request Request | |
|---|---|
| No customer selected | No customer has been selected yet in the project |
 Proposal Proposal | |
|---|---|
| Minimum Rental Price fallen below | The Minimum Rental Price lies below the Base Price |
| Total is missing | A rental price is not entered in one of the jobs. |
| Proposal has expired | The proposal has expired for a job |
| Tentative | The job still has a Tentative status |
 Workshop activity Workshop activity | |
|---|---|
| The job is too soon | The start date for a job is too short (two days) and the job is not yet confirmed |
 Resources Resources | |
|---|---|
| Resource overbooked | A confirmed and scheduled staff member or vehicle has been booked twice |
| Resources not confirmed | The number of confirmed, assigned staff members/vehicles is lower than the scheduled number |
| Resources not assigned | Insufficient staff/vehicles for a resource |
 Items Items | |
|---|---|
| Overbookings | At least one item for a confirmed job is overbooked |
| Check-out | |
|---|---|
| Overdue | The job start date has started and the job has not been checked-out |
 Check-In Check-In | |
|---|---|
| Overdue | The return date for the job has been reached and the job has not been checked-in |
 Invoicing Invoicing | |
|---|---|
| Not invoiced | A checked-in job has not yet been invoiced |
| Not finalized | An invoice for a job has not been finalized |
| Not printed | An invoice for a job has not been printed |
| No payment received | No payment has been received for a job invoice. |
| Minimum Rental Price fallen below | The Minimum Rental Price lies below the Base Price |
 Invoice export Invoice export | |
|---|---|
| Not exported | A finalized invoice was not exported to the accounting department |
Dashboard

This chapter will be published soon.
Addresses
With the project address function, you can assign as many addresses as needed to a project. This makes it possible, for example, to assign different customer contacts or locations or to enter all event locations for a tour. 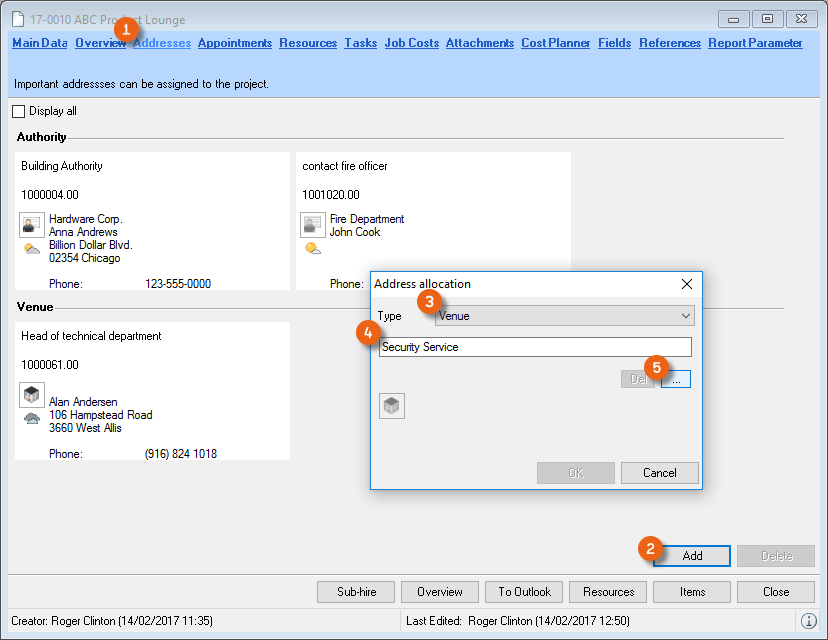
Adding a new address to a project
1. Click the Addresses tag in the project.
2. Click Add .
3. Select the Address Type .
4. Enter a description e.g. Security service.
5. Add an Address .
6. Ok
With the help of this function, you can assign an invoice address to the project that is different than what is specified in the main data, for example.
More information about this topic can be found in Chapter Address Types.
Scheduled items
The scheduled item overview provides an overview of all project schedules. In addition to scheduled items, also jobs, tasks and resources are displayed.
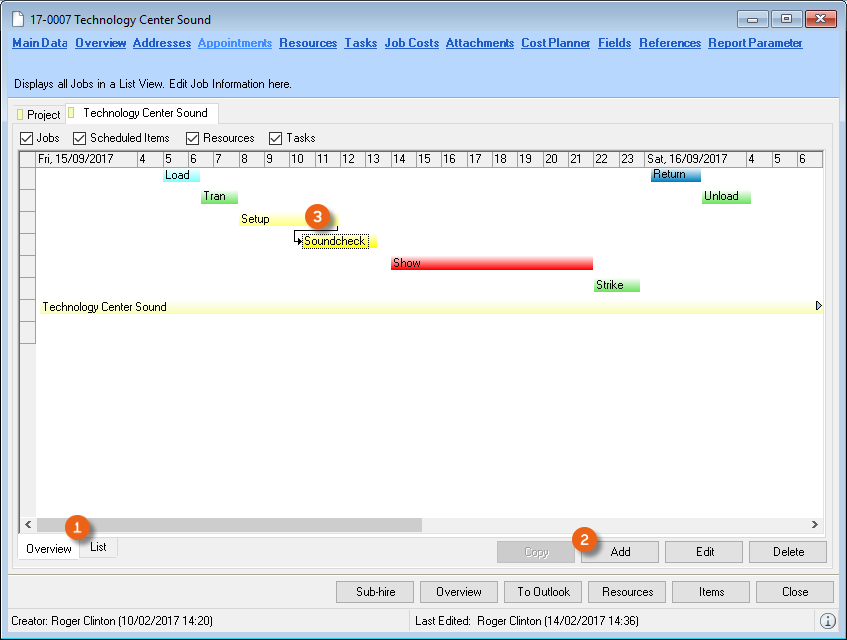
The graphic view can also be represented in the list. For this, click the List tab under the graphic. In addition to scheduled items, also jobs, staff, vehicles and tasks can be added to the project in this view . Scheduled items are automatically created from individual phases such as load, transport, etc. Manually created scheduled items can be linked with other objects. In this way, for example, if a setup is delayed, the sound check is automatically moved with it. The colors of the individual scheduled items are configured in the master data.
Adding a new scheduled item to a job
1. Select the Job from the Scheduled Items Planner
2. Add
3. Determine the Scheduled Item Type and enter a Name.
4. Selected a fixed scheduled item
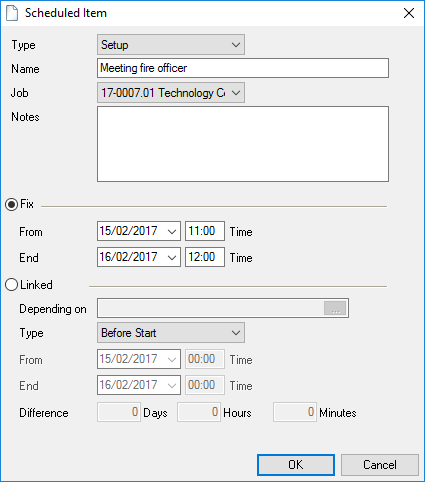
or
5. Create a Link to an exiting scheduled item
Select an available scheduled item and
determine the Type and the corresponding Difference
6. Ok
Managing scheduled items in the master data
1. easyjob Menu Master Data Job Scheduled Item Types
2. Add or Edit
3. Enter a name and change the color, if necessary
4. Ok
Resources
More information about this topic can be found in Chapter Resources in a Job (purchase order and workshop).
Tasks
You can assign as many Tasks to each project or individual job as you want. You can enter a name, task type, date and time, the responsible manager and completed status. A typical task is an inspection, for example.
The tasks can be displayed in various positions in the program. These include the Navigator, easyjob Today, the reminder screen and the project overview.
Editing and adding tasks
1. Click the Tasks tab in the project.
2. Select the job tab to which you want to assign a task.
3. Add
4. Enter the necessary information for the task (e.g. name, task type, date and responsible manager)
5. Ok
Managing task types in the master data
1. easyjob Menu Master Data Task Types
2. Add or Edit
3. Enter a name
4. Ok
Cost Planner
More information about this topic can be found in Chapter Cost Planner for Projects and Jobs - User Concept.
Calculation
This chapter will be published soon.
Fields
Each project and each job have eight custom fields for additional text entries. More information about this topic can be found in Chapter Reminder Screen
With the Reminders window you can remind yourself about important easyjob jobs. The status bar displays the current quantity of your reminders. You can click on it to open the Reminders window and process the jobs, e.g. Create Purchase Order – on the basis of Navigator and easyjob Today views. The Reminders screen also stays open when opening the respective job. You can select the time interval after which the reminders window should be displayed and save with Snooze . With Settings you can define the jobs you want to be reminded about.

Settings opens in your User Settings in the Reminders section. All active Reminders are displayed here. The filter options for the individual views are the same as for the Navigator and easyjob Today view. With Add you can select a new View and confirm it with OK . Marked views can be deleted .

Configuring your own reminders
5. easyjob Menu Extras User options Reminders
6. Add
7. Select the required Jobs and filter them if necessary.
8. Ok
easyjob must be restarted to activate the changes.
Configuring reminders for users
8. easyjob Menu Extras User Rights Management Reminders
9. Select the user
10. Edit
11. Reminders tab
12. Add
13. Select the required Jobs and filter them if necessary.
14. Ok
If the user has the Configure personal reminders right, they can change the set Reminders accordingly here.
References
All references (Purchase Orders, Workshop Activities, Invoices) for your project are listed here By doubling clicking or with Open you can view and edit them directly.
Calculation
The individual functions can be used individually or in combination with others. Individual calculation options can be disabled in the program settings.
The following pricing possibilities are available.
Customer discount
Material discount
Creating special price lists for select customer types
Days used by job
Special "days charged" rates for individual items
Manually discounting line items
Discounting the Job total
Fixed job discount
Calculation terminology
No content for this section.
Purchase price
The purchase price is the price that you can purchase the item from your supplier. The purchase price is stored for each activity in the inventory entry. In addition, you can record the corresponding purchase price for individual suppliers.
Sales Price
The sales price is the price you want to receive when you sell an item to your end customer. The price is used in the sales module, when invoicing missing items as well as for insurance calculations.
Sub-rental Price
The sub-rental price is the standard price for sub-hiring the item from your supplier. In addition, you can record the corresponding sub-rental price for the suppliers.
Rental Price
The rental price is the daily rental price you offer to your customer for the item.
Minimum Rental Price
The minimum rental price represents the costs you incur for a rental activity. The minimum rental price contains the purchase price, period of use, maintenance costs and inventory handling. A calculator is provided to help you calculate the price.
Price List
You can create as many price lists as you want and assign them to the individual customers. The price list is used to define the corresponding rental and sales price for an individual item.
Job Costs
In addition to staff, vehicle and sub-rental costs, a job can create additional costs, such as for hotel costs. With job costs, you can add many additional costs to the job as you want and charge them to the customer.
Job Sum Total
The job sum total is the price at which you want to offer the job to your customer. The job sum total accounts for the rental rate, expendable items, job costs, staff and transportation.
Calendar Days Curve
The Calendar Days curve is used to determine how the Days Used are calculated on the basis of the rental period.
Days Charged Curve
The Days Charged curve is used to specify how the days charged for the item are calculated on the basis of the days used. You can create as many Days Charged curves as you wish and assign them to the individual items.
Cost Planner for Projects and Jobs - User Concept
The easyjob cost planner will be replaced by the new calculation starting with version 6.19. Details on the calculation can be found under .Calculation for Projects and Jobs - User concept
The income and costs are calculated in the cost planner. The Cost Planner calculates the Material Costs (rental item, sales and expendable items, as well as the sub-rental costs), the Resource Costs (staff, vehicles and Generic Resources) and the Job Costs. The offer is created on the basis of the cost calculation. Costs are calculated for each job. The principle of the Cost Planner for the individual jobs in a project is identical to the overview in the project cost planner. The income and expenses for all jobs are added and compared on the project tab. The Project Cost planner differentiates between the costs for the Proposed and the Confirmed Jobs. In addition you can use the filter to determine which jobs should be included. The income is displayed next to the expenses . The income and expenses are used to calculate the respective profit margin as a percentage and the total for the entire project . Detailed information regarding the individual sum total amounts can be displayed using the expand button. The individually displayed detail lists can be compiled by each user using the context menu The relationship between income and expenses is displayed by chart . A Budget Management Tool is available. It helps you see if the project is going according to plan. In the case of confirmed jobs with a connected calculation basis, the income is calculated from the calculation basis and the costs are calculated from the confirmed job.
Cost Planner for Projects and Jobs – Basis of Computation
The basis of computation for the individual jobs and the project is the same. In the Project Cost Planner, a differentiation is also made between proposed and confirmed jobs.
Job all-inclusive price and discounts
The easyjob concept foresees that staff, transportation and job costs are not discounted. It is on this basis that easyjob initially adds all Income amounts from the rental items of the bill of items. The income already includes the discounts that were given in the bill of items on an item level. In the Total Items , the Subtotal , the Expendable Items booked in the bill of items and the items with No Discount are added.
This makes it possible, with various entries, to manage your Order Job Total. The price list saved for the selected customer provides information. The discount is saved in the Address Master Data and is displayed when you specified a customer with this property in the project main data. By selecting Apply the Discount is applied to the Item Discount , calculated as the Discount Amount , and deducted from the Rental Item Income . The Total Items and the Sum Total are reduced accordingly.
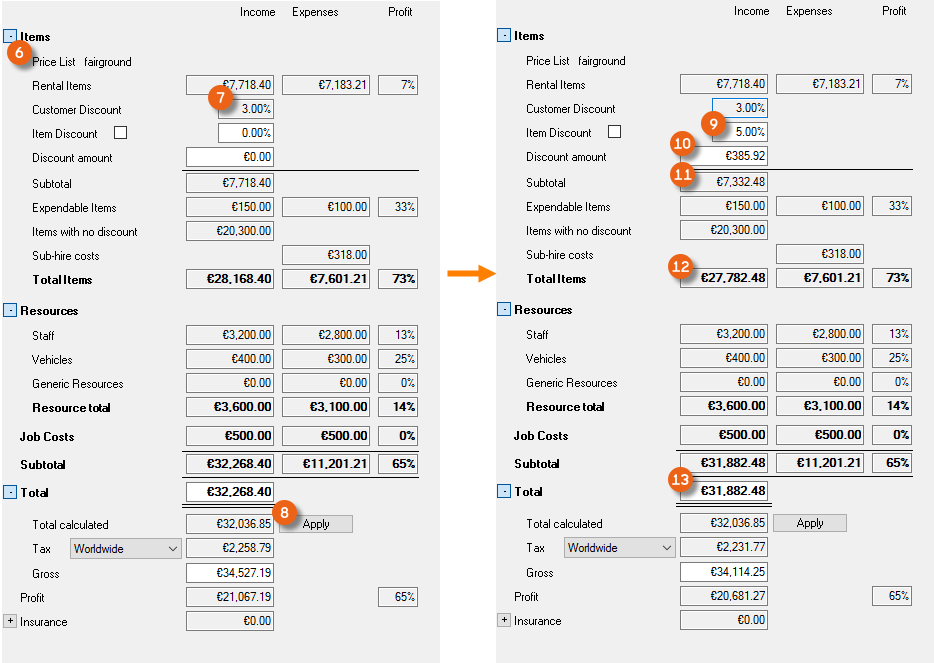
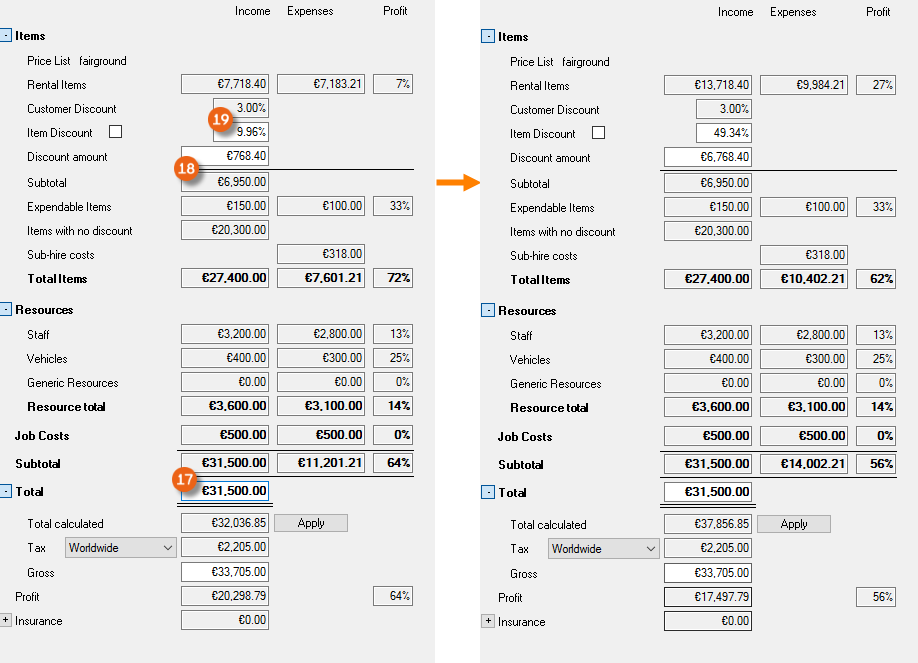
Other options include the direct entry of the Item Discount or a Discount Amount . The Cost Planner calculates the respective Discount Amount or the Item Discount. To update, click any field in the Cost Planner. The Sum Total changes accordingly.
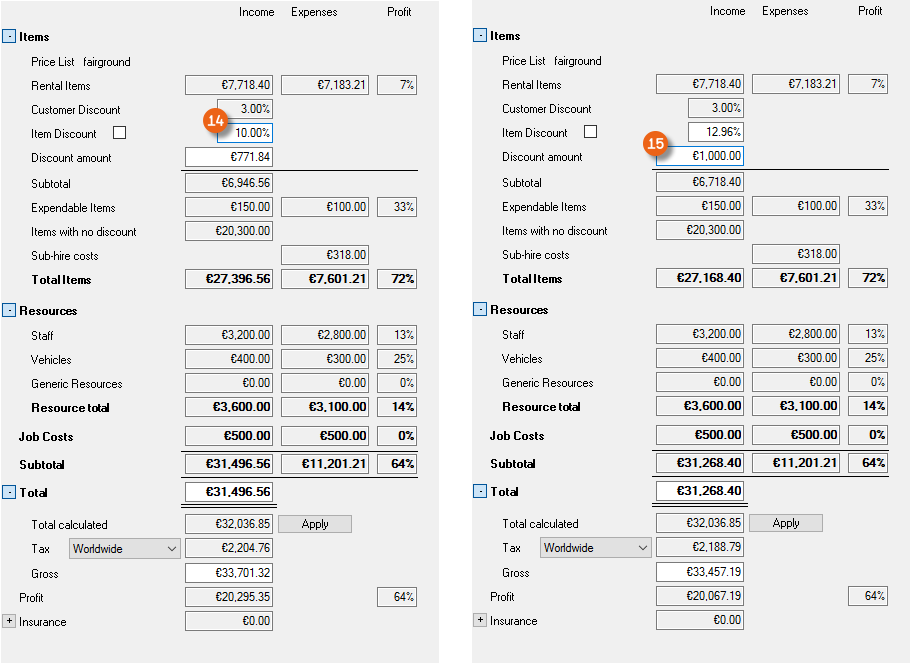
If you want to fix the real item discount, check the box next to the discount field. The Sum Total text field will now be blocked. When changing the job (here + € 6,000.00 €) the total items are updated based on the actual discount.
You can also check the box by default for all newly created projects
1. easyjob Menu Tools Settings Jobs
2. Check the Cost Planner box: Fix Discount.
3. Ok
easyjob must be restarted to activate the changes.
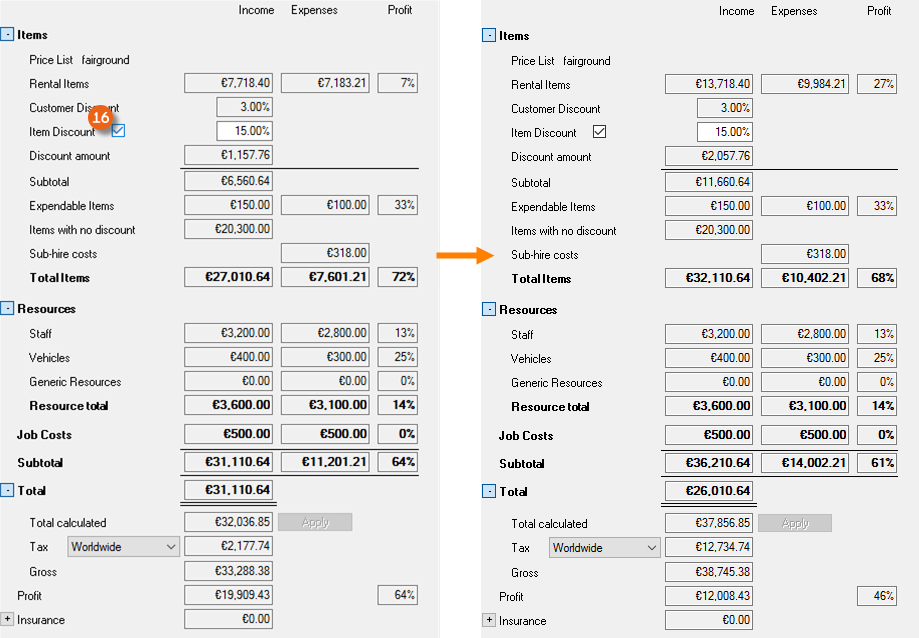
You can also specify an all-inclusive job price. On the basis on the entered All-inclusive Price easyjob takes the non-discountable Line Items (job costs, resources, sales items and items with no discount) and calculates the price of the rental item, and displays this in the Subtotal field. A back calculation is used to determine the resulting Item Discount . If you then make a change to the item in the bill of items (here, for example, + € 6,000.00), the item discount and the discount amount change, the Subtotal and the flat rate of the Sum Total remain the same.
Cost Planner – Formulas
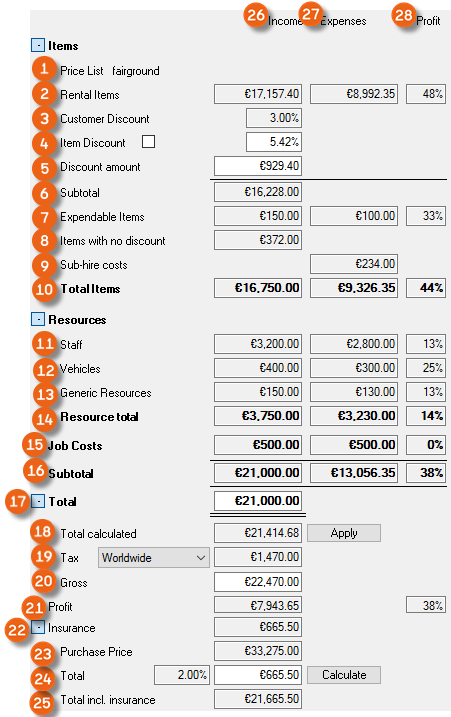

| Field | Income formula | Expense formula | Share formula |
|---|---|---|---|
| Items | |||
| Price List | This shows which price lists are used as the basis for calculation in the job | ||
| Rental Items | Total *1 of all items from the bill of materials: (calculated *2 quantity * days * [base price * discount] – expendable item – items with no discount) | Total of the minimum costs of the item:((quantity – quantity of sub-rental assignments) * minimum costs * daily basis*3) + ((quantity – quantity of sub-rental assignments) * check in/out expenses) | ([Income – Expenses] * 100)/Income |
| *1 Rounding to 2 decimal places*2 Available quantity – Reserve | *3 Based on the presetting for the Days Used, Calendar Days or Days Charged | ||
| Discount | Fixed discount established in the Master data for this customer |
| Field | Income formula | Expense formula | Share formula |
|---|---|---|---|
| Items | |||
| Item Discount | (( Rental Item – Subtotal) * 100)/ Rental Item | ||
| Discount Amount | Item Discount * Rental Item / 100 | ||
| Subtotal | Rental Item - Discount Amount | ||
| Expandable Item | Total based on (Quantity *4 * Base Price * Discount) of Expendable Items from the Bill of Items. | Total based on (Quantity*5 * Purchase Price) of the Expendable Items from the Bill of Items | ([Income – Expenses] * 100)/Income |
| *4 (Quantity – Reserve). Job checked in or returned > 0 then (quantity – returned) | *5 (Quantity – Reserve). Job checked in or returned > 0 then (quantity – returned) | ||
| Items with no discount | Total based on (quantity*6 * Days * Base Price) from the Bill of Items | ||
| *6 Available Quantity – Reserve | |||
| Sub-rental Costs | Job Cost Planner:Total based on the Sub-rental Item Price*7 from Sub-Rental AssignmentsProject Cost Planner: Job Sub-Rental Totals *8: | ||
| *7 Price from the Supplier Master Data or value from the Bill of Materials (can be overwritten) *8 Also sub-rentals that were not yet assigned or flat-rate sub-rentals are also added |
| Field | Income formula | Expense formula | Share formula |
|---|---|---|---|
| Item total | Subtotal + Expendable Item + Items with no discount | Total of the minimum rental price + Total of the Purchase Price of the Expendable Item + Total of all confirmed Sub-Rentals | ([Income – Expenses] * 100)/Income |
| Resources | |||
| Staff | Total price for staff | Total actual costs of staff | ([Income – Expenses] * 100)/Income |
| Vehicles | Total price of all vehicles | Total actual costs of all vehicles | ([Income – Expenses] * 100)/Income |
| Generic Resources | Total price of all generic resources | Total actual costs for all generic resources | ([Income – Expenses] * 100)/Income |
| Resource total | Income total - | Expense total - | ([Income – Expenses] * 100)/Income |
| Job Costs | |||
| Job Costs | Job Cost Total | Total actual costs of all Job Costs | ([Income – Expenses] * 100)/Income |
| Subtotal | |||
| Subtotal | Total Items + Resource Total + Job Costs | Total Items + Resource Total + Job Costs | ([Income – Expenses] * 100)/Income |
| Total | |||
| Total | Corresponds to the subtotal - it can be changed individually |
| Field | Income formula | Expense formula | Share formula |
|---|---|---|---|
| Calculated Sum Total | Rental Items + Expendable Items + Items with no discount + Resource Total + Job Costs | ||
| VAT | Sum Total * Tax Rate | ||
| Total incl. tax | Sum Total + VAT | ||
| Total | Sum Total – Expenses Subtotal | ([ Income – Expenses] * 100)/ Income | |
| Insurance | |||
| Insurance | Value from Total | ||
| Purchase Price*9 | Total of all Prices*10 of the Items in the Job | ||
| *9 Insurance basis can be selected under Tools/Settings/Invoicing | *10 depending on the insurance basis purchase, sales or rental price without discount | ||
| Total | Price*11 * Project Share*12 | ||
| *11 depending on the insurance basis purchase, sales or rental price without discount*12 depending on the setting Tools/Settings/Invoicing | |||
| Total incl. insurance | Sum Total + Insurance |
Tax calculation
Tax is calculated based on the various tax settings defined in the invoice settings. The gross amounts are displayed in the Job Cost Planner under the Sum Total. If needed, you can also customize the Tax Type here.
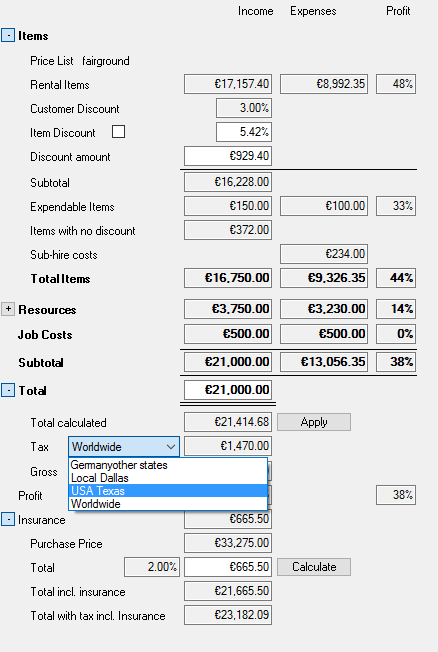
Tax calculation using the European tax settings (simple)
With the European tax setting (simple) the tax is calculated according to the customary EU guidelines.
Tax type
VAT tax type
Job delivery address - same country as the company address.
The job delivery address is located in the country specified in the program settings. (easyjob Menu Tools Settings General Company Address The tax rate specified in the invoice settings will be calculated in the gross amounts.
VAT free EU member tax type
Job delivery address - a different country than the company address, but within the EU.
The delivery address is within the EU and the EU member box is checked and the customer has an assigned tax identification number, therefore no tax is calculated (without a tax ID, normal VAT will be calculated).
VAT free tax type
Job delivery address - a different country than the company address, but outside the EU.
The delivery address is neither in your own country and the "EU Member" box is not checked in the regional settings, therefore no tax is calculated.
The tax type is preselected in the options settings and can be changed if necessary.
Setting the tax type by default
1. easyjob Menu Tools Settings
2. Invoicing tab
3. Set the required Tax Type that should apply by default.
4. Ok
easyjob must be restarted to activate the changes.
In the individual jobs in a project, the type of tax is automatically selected based on the delivery address. Sometimes, it is necessary to define another tax type for a certain address.
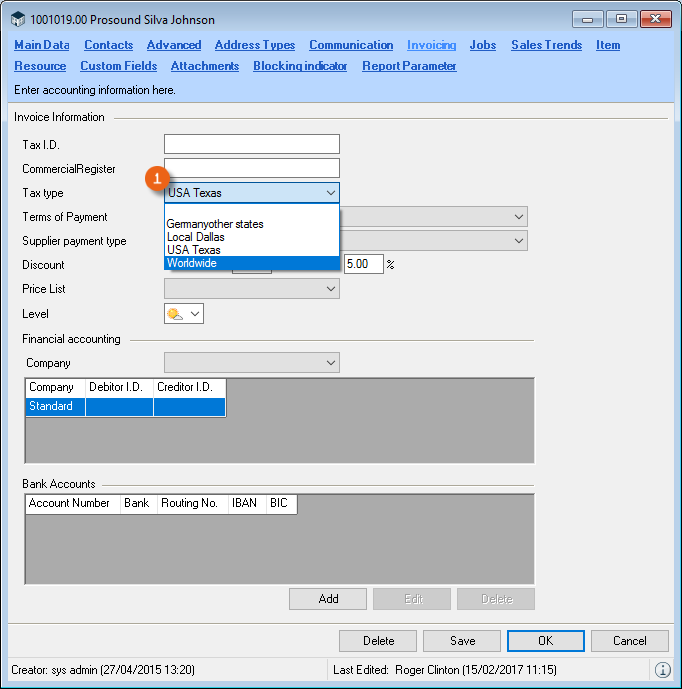
The different tax type then appears in the Cost Planner.
Defining a different tax type for a certain address
1. easyjob Menu Master Data Addresses
2. Select the desired address
3. Double click Addresses or Edit
4. Invoice tab
5. Change the Tax Type as required.
6. End with Save and Ok
Regional Settings
If there is no tax type in the address, the tax type resulting from the delivery address regional settings will be used.
Viewing and editing regional settings
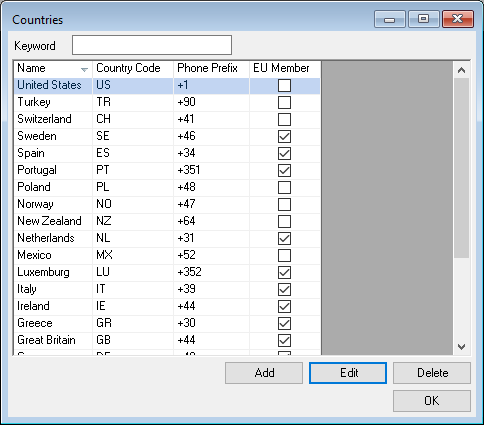
1. easyjob Menu Master Data Countries
2. Add or Edit
3. Add a new country or edit an existing one.
4. Ok
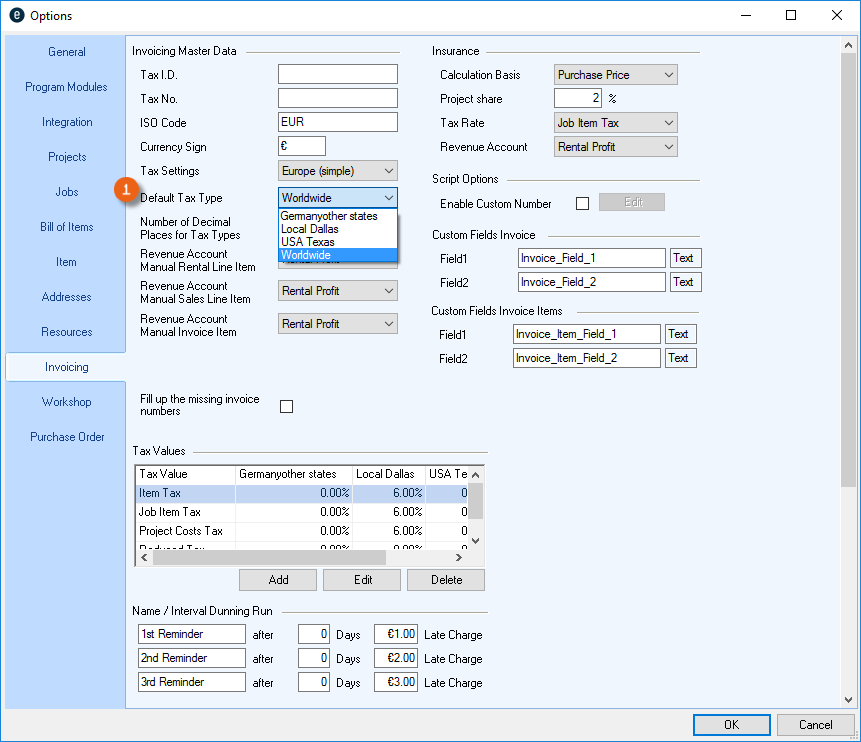
Tax calculations with USA/Canada/Other tax settings
The advanced tax setting module is designed to accommodate the unique needs of easyjob customers around the globe. A description is provided below of how the tax rates can be localized.
Please note that we cannot guarantee the correctness of this information. Tax law can vary considerably to some degree between individual countries, states, areas and cities. These examples are solely for the purpose of illustrating the program functions.
Tax SettingsTax Settings
There are different tax settings available in the program settings .
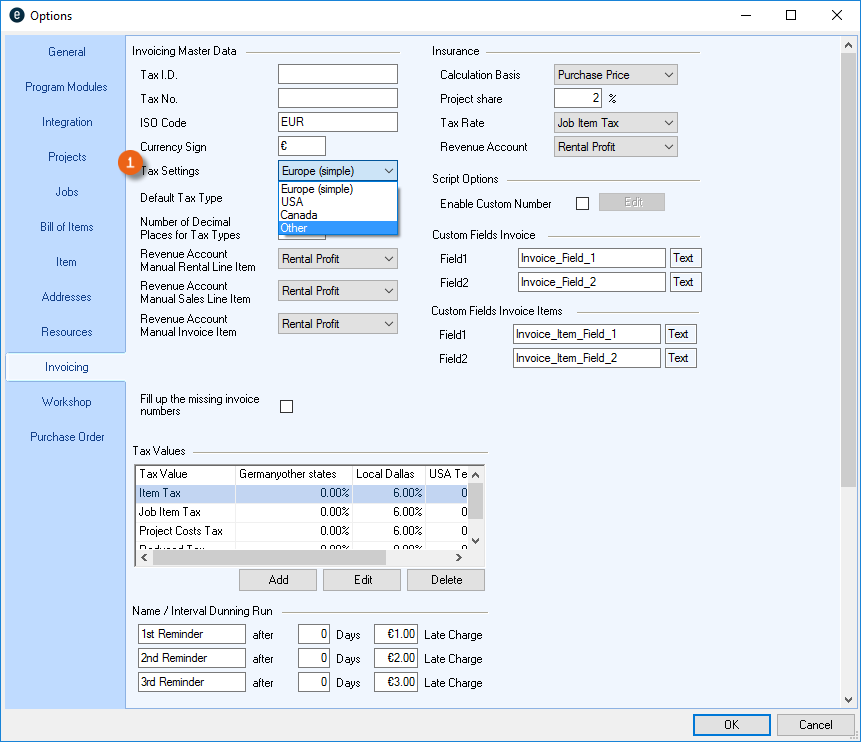
Setting the tax settings
1. easyjob Menu Tools Settings
2. Invoicing
3. Select the requires Tax Setting, i.e. USA.
4. Ok
easyjob must be restarted to activate the changes.
Tax type
The Tax Type will be set by default in the easyjob Program Settings
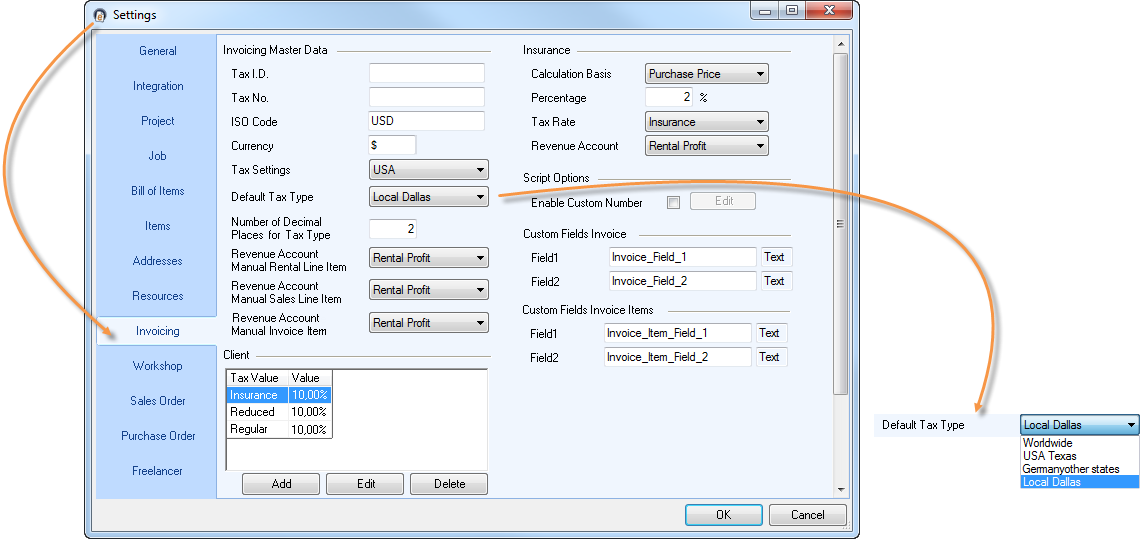
Setting tax type
1. easyjob Menu Tools Settings
2. Invoicing tab
3. Set the required Tax Type that should apply by default.
4. Ok
easyjob must be restarted to activate the changes.
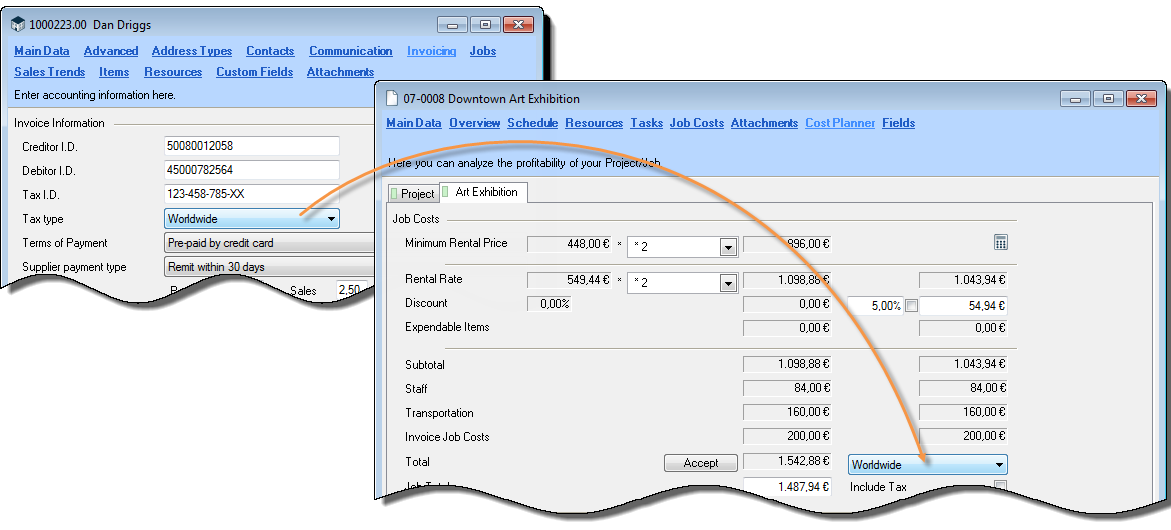
The tax type will be automatically selected in the individual jobs based on the easyjob program settings. In some cases, it is necessary to define another tax type for a certain address.
Defining a different tax type for a certain address
1. easyjob Menu Master Data Addresses
2. Select the desired address
3. Double click Address or Edit
4. Invoice tab
5. Change the Tax Type as required.
6. End with Save and Ok
The different tax types appear in the Cost Planner.
Various tax types can be established for each country.
Adding or editing a tax type
1. easyjob Menu Master Data Tax Type
2. Add or select the tax type that you want to change, and click and Edit
3. You can edit the individual fields by double clicking
4. A drop down menu is available in the 'Area' column.
5. With the settings  or
or  you can influence the output to the invoice or the type of tax calculation
6. Ok

If a Project's delivery address is listed as Dallas, the tax type Local Dallas will automatically be suggested in the Invoice. This can be changed manually.
Tax Rate
You can directly add and edit tax rates
1. easyjob Menu Tools Settings
2. Invoicing tab
3. Tax rates on Add or Edit
4. Enter a Name and a Value or make the necessary changes
5. Ok
easyjob must be restarted to activate the changes.
You can then select the appropriate tax rate in the Item Master Data.
Explanation about the areas
| County/Region | Usage |
|---|---|
| International | All countries outside of the home country of your business. |
| United countries | United countries are countries that have created their own unified business zone, such as the European Union (EU). |
| Country | Countries with a Federal Tax.Select your own country, unless you must charge tax for services rendered outside of your home country. |
| State/Province | States or Provinces with a unique tax.Select your own state/province, unless you must charge tax for services rendered outside of your state/province. |
| County/Region | Counties and Regions with a unique tax.Select your own county/region, unless you must charge tax for services rendered outside of your country/region. |
| City | Cities with a unique tax. Select your own city, unless you must charge tax for services rendered outside of your city. |
Insurance calculations
You can calculate the insurance premium based on the order volume. An automated premium calculation is provided for this purpose. The premium can be calculated for the job on the basis of the purchase, sales or rental price of an item. For this reason the calculation is done using the project share of the premium.
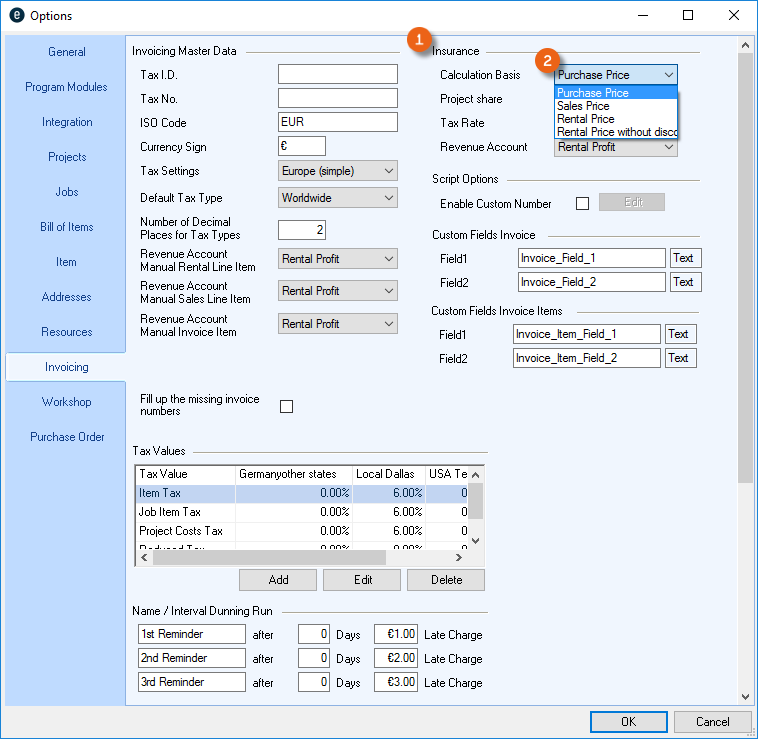
Configuring the global insurance settings
1. easyjob Menu Tools Settings
2. Invoicing tab
3. Make the required settings under Insurance
4. Ok
easyjob must be restarted to activate the changes.
Calculating the insurance amount in the job cost planner
1. easyjob Menu View Jobs
2. Job and Edit
3. Cost Planner tab
4. Insurance
5. Calculate
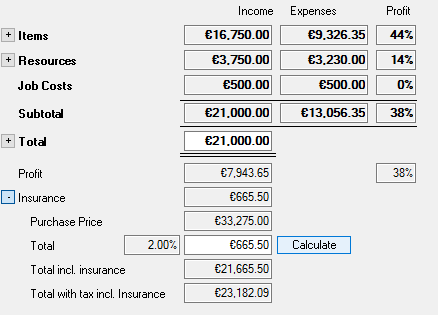
In order to display the insurance amount in the job offer, for example, the report must be specifically customized.
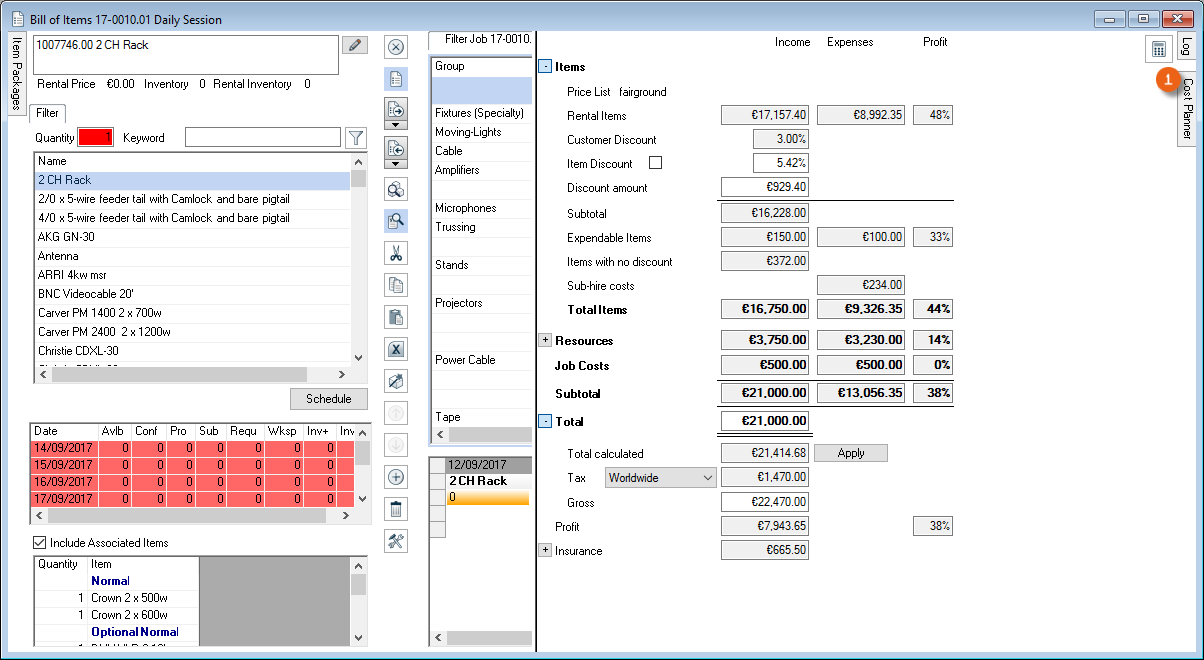
Job Cost planner in the Job and in the Bill of Items
You can open and edit the job cost planner in the job or directly in the bill of items.
Opening the job cost planner in the job
1. easyjob Menu View Jobs
2. Job and Edit
3. Cost Planner tab
Opening the job cost planner in the bill of items
1. easyjob Menu View Jobs
2. Job and Edit
3. Cost Planner
In the standard setting, the cost planner is shown to the upper right .
4. Cost Planner
5. The cost planner is displayed
Calculation for Projects and Jobs - User concept
The easyjob cost planner will be replaced by the new calculation starting with version 6.19.
A clear and detailed cost analysis (income and expenses) of the project or the individual job is displayed under Calculation You can use various filters (Project, Rental, Sales, Freely selectable) to influence what is currently displayed. You can also select Group jobs or Show diagram. Individual or all jobs can be selected or deselected with a checkmark . After you have made your selection, click Refresh to display the desired cost analysis.
To make sure that the current filter selection view is always displayed, make sure that the Refresh button is highlighted in gray. If it is highlighted in blue, click the button to refresh your filter criteria in the view.
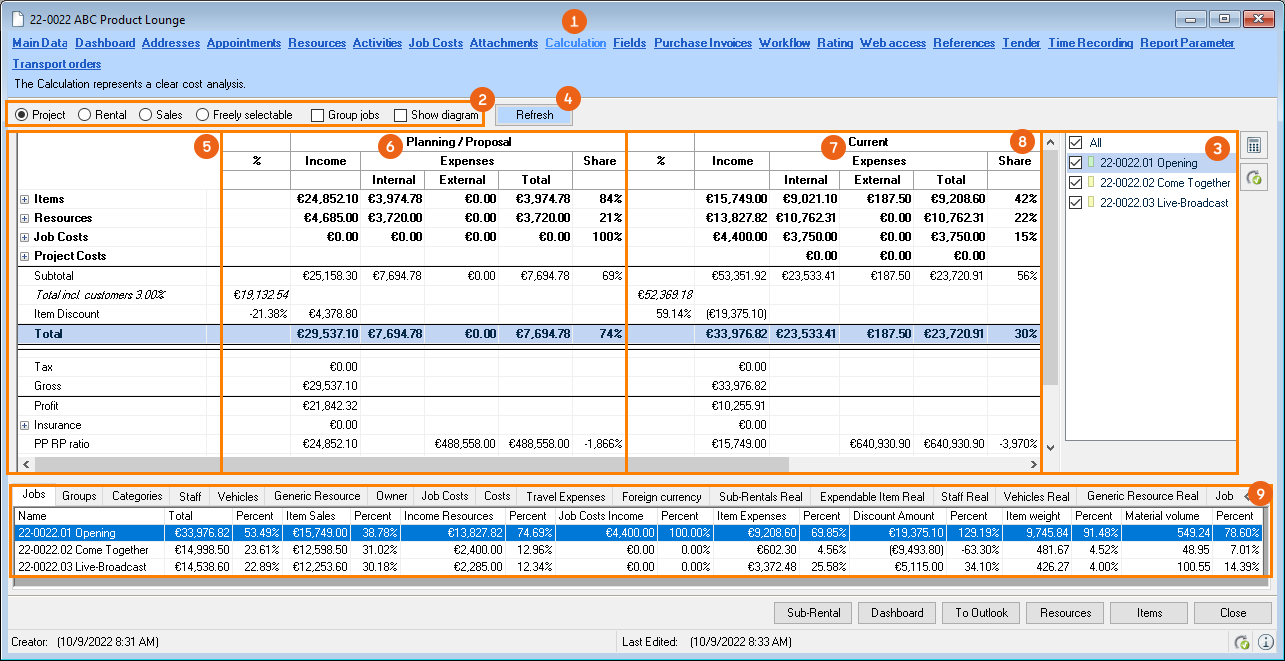
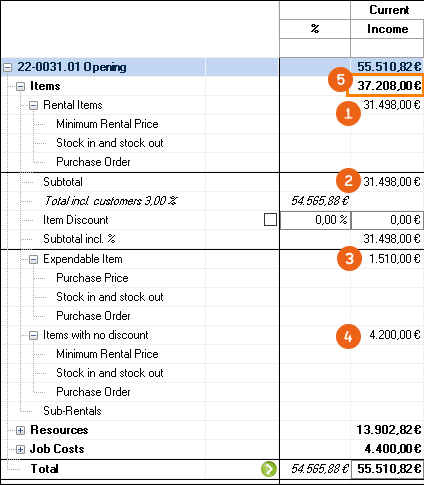
The areas are divided into Items, Resources and Job costs and can be displayed in more detail by clicking on them . The Subtotal, Discount, Total, Tax, Gross, as well as the PP RP ratio (purchase price/retail price) are listed. The data for the proposed (planning/proposal) and confirmed (current) jobs are displayed in various columns. The income is displayed next to the expenses, and the expenses are also divided into Internal, External and Total. The income and expenses are used to calculate the respective profit margin as a percentage . Individual detail lists can be compiled by each user using the context filter menu

The column width can be customized to suit your needs. You can change the column width by mousing over the desired column line and holding down the left mouse key. Use the right mouse key to deselect the checkbox for Optimal Column Width , so your setting will be saved.
The ratio between income and expenses is also displayed by a diagram . It is possible to make entries (item discount or project budget) directly in fields with a separate border .
With the cursor positioned in the table and by pressing the key combination  +
+  +
+  all possible subgroups per level will open , and will close per level when using the key combination again . By doubling clicking an individual job in the job list this job will be automatically selected and only the details of this job will be displayed in the calculation. If you would like to select multiple jobs, you can update the calculation with the key combination
  +
+  (analogous to the refresh button).
If Project or All is activated, you will see additional data that concerns the entire project. With budget management you can see if the project is going according to plan. In the case of confirmed jobs with a connected calculation basis, the income is calculated from the calculation basis and the costs are calculated from the confirmed job. You can also see the Profit and an overview of the Invoice for the project.

The Items area is further divided into Rental items (or Sales Items) , Expendable Items and Items with no discount . These are broken down further into Minimum Rental Price (rental items) (or Purchase Price for sales items), Stock in and stock out and Purchase Order. Furthermore, Sub-rentals and Sub-Rentals without assignment are listed. In the case of Resources and Job costs also the data from the associated Purchase orders is displayed.

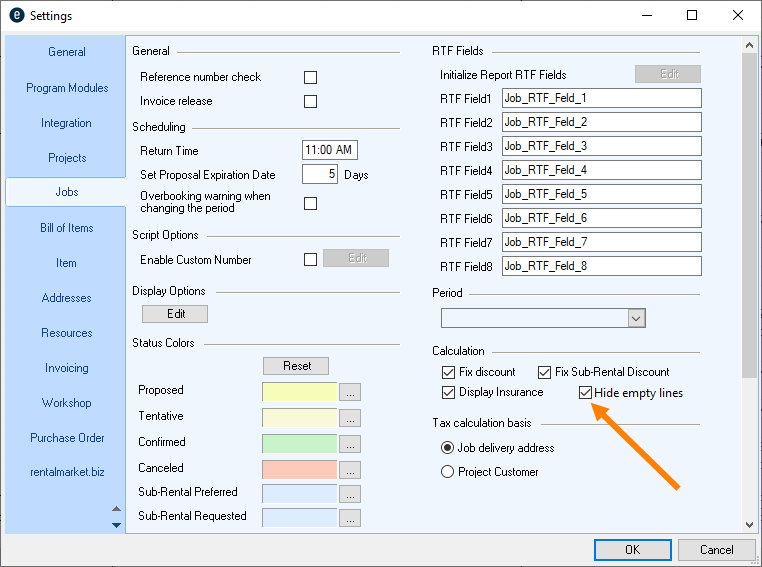
In the program settings, you are able to hide empty lines in the calculation, e.g. when the job does not contain any resources, job costs, etc..
Hiding empty lines in the calculation
1. easyjob Menu Tools Settings
2. Jobs tab
3. Under Calculation check the box for Hide empty lines

4. Ok
easyjob must be restarted to activate the changes.
Calculation for Projects and Jobs – Basis of Computation
The basis of computation for the individual jobs and the project is the same. The calculation distinguishes between proposed (planning/proposal) and confirmed (current) jobs.
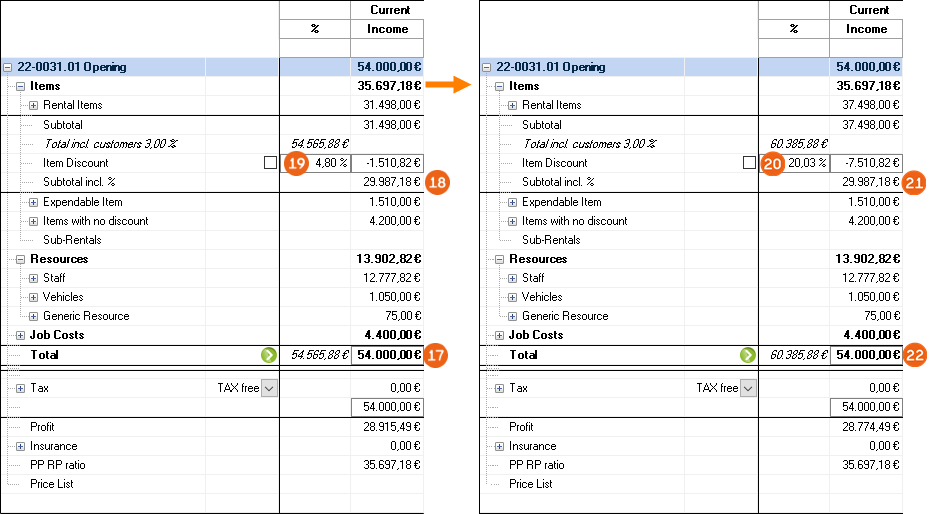
Job all-inclusive price and discounts
The easyjob concept foresees that resources and job costs are not discounted. It is on this basis that easyjob initially adds all Income amounts from the rental items of the bill of items. The income already includes the discounts that were given in the bill of items on an item level. In the Total Items , the Subtotal , the Expendable Items booked in the bill of items and the items with No Discount are added.
This makes it possible, with various entries, to manage your Total. The Price list saved for the selected customer provides information and can be adjusted if necessary. The discount is saved in the Address Master Data and is displayed when you define a customer with this discount in the project main data. With 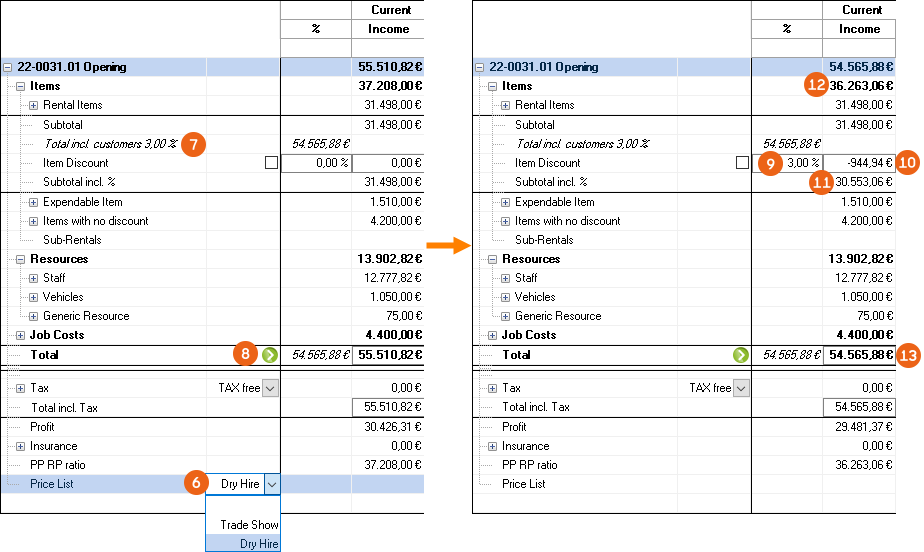 the Discount is applied to the Item Discount , calculated as the Discount Amount , and deducted from the Rental Item Income The Total Items and the Total are reduced accordingly.
The discount can only be applied when the Group jobs filter is active.
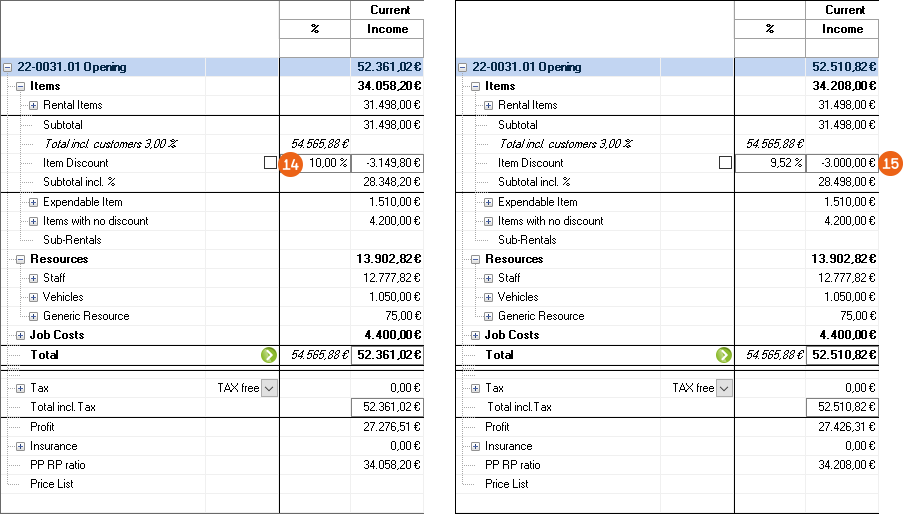
Other options include the direct entry of the Item Discount or a Discount Amount The Cost Planner calculates the respective Discount Amount or the Item Discount. To update, click any field in the calculation. The Totals change accordingly.

If you want to fix the item discount, check the box next to the discount field. The Sum Total text field will now be blocked. When changing the job (here + € 6,000.00 15 % of which = € 900.00) the total items are updated based on the fixed item discount.
You can also check the box by default for all newly created projects
1. easyjob Menu Tools Settings Jobs
2. Check the Cost Planner box: Fix Discount.
3. Ok
easyjob must be restarted to activate the changes.
You can also specify an all-inclusive job price as a total. On the basis on the entered All-inclusive Price easyjob takes the non-discountable Line Items (job costs, resources, sales items and items with no discount) and calculates the price of the rental item, and displays this in the Subtotal field. A back calculation is used to determine the resulting Item Discount If you then make a change to the item in the bill of items (here, for example, + € 6,000.00), the Item discount and the discount amount change, the Subtotal and the flat rate of the Total remain the same.
The total can only be discounted when the Group jobs filter is activated.
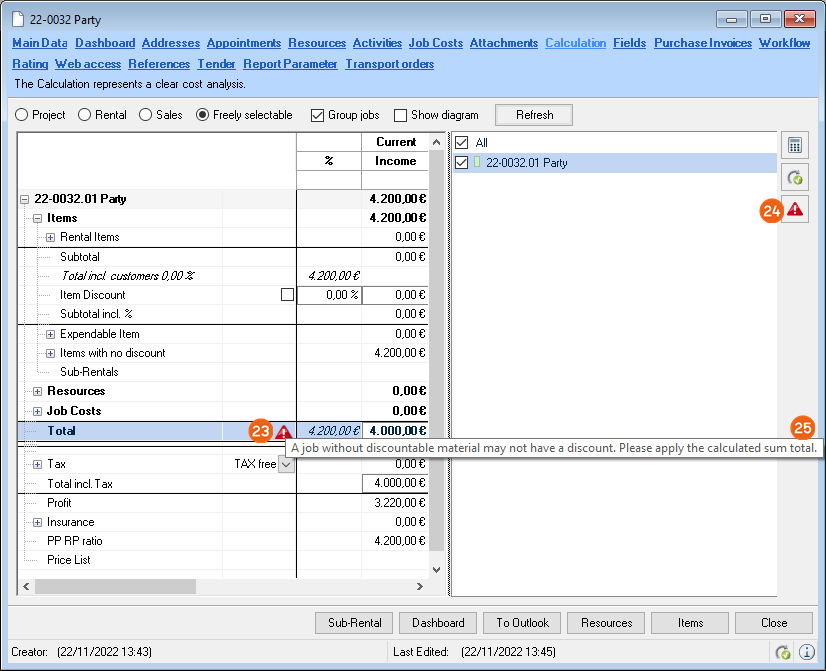
If you discount the total even if your job does not contain any items that can be discounted, a warning symbol appears next to the Total and to the right of the Calculation . Clicking on it displays the Warning message .

Calculation - Formulas
This chapter will be published soon.
Post calculation
This chapter will be published soon.
Item master data price
The rental price of an item is assigned to the item in the master data.
Entering an item price
1. Easyjob Menu Master Data Items
2. Desired item
3. Edit
4. Price tab
5. Enter the corresponding price
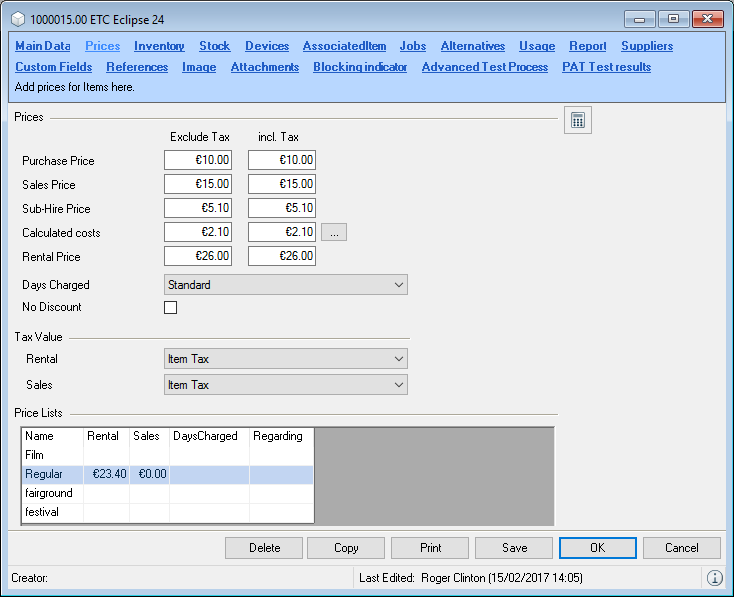
You can also enter the prices incl. tax. The basis of the price remains the net value. This means that when the formula is selected again, the price incl. tax may differ from the previous entry.
If the item contains linked associated items (e.g. a Mikroport with a transmitter, receiver, antenna, etc.), this must be taken into account for the prices. See also Linked Associated Items.
Minimum Rental Price
The minimum rental price represents the costs you incur for a rental activity. The minimum rental price is based on the purchase price, period of use, maintenance costs and inventory handling. This price is used as a standard, as the price can change based on higher or lower usage. The minimum rental price wizard helps with calculating the value and stores the variables for calculating the price. If performed again, the values do not need to be re-entered. In this way, you can compare yourwi:5152 planned values with the actual values at any time.
Opening the minimum rental price wizard
1. Easyjob Menu Master Data Items
2. Desired item
3. Edit
4. Price tab
5. …
Step one: estimate annual costs
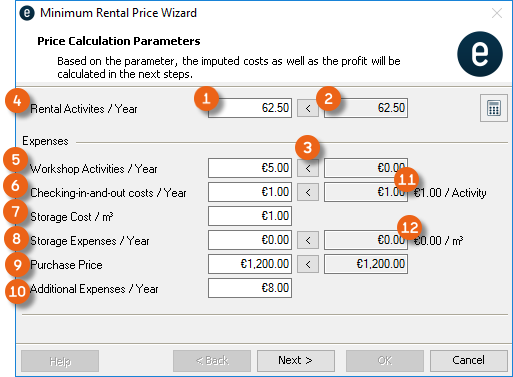
Step one determines the costs from the past based on the last 12 months and applies them to the scheduling values . Each value can be individually customized. After manually customizing the values you can reset the field to its default value .
The check-in/out expenses are calculated based on the number of the rental activities . The inventory expenses per m³ can be entered for the respective item. The inventory expenses per year are calculated based on the item volume. Additional costs per year can also be determined.
The check-in/out expenses/workshop activity as well as the inventory expenses/ m³ are configured in the easyjob program settings.
The minimum rental price wizard takes the stock expenses and the total quantity of check in/out activities into account when determining the stock volume. Average inventory expenses can be determined by dividing total inventory expenses (rental expenses for the stock, energy costs, etc.) by inventory volume. In addition, average check-in/out costs are adjusted according to changes in personnel costs and check-in/out volume.
These values are saved in the easyjob program settings.
The averaged numbers allow room for interpretation. For example, checking out multiple Items at once is less expensive per Item than checking out a single Item.
Adjusting check in/out expenses and average storage expenses per m³ per year
1. easyjob Menu Tools Settings
2. Items tab
3. Customize the Costs
4. Ok
easyjob must be restarted to activate the changes.
Basis of Computation:
| Field | Formula |
|---|---|
| Rental activities / last 12 months | TOTAL(units rented/last 12 months) / confirmed jobs inventory |
| Workshop Costs / last 12 months | TOTAL(workshop costs - invoiced costs workshop costs) / last 12 months) |
| Checking items in and out / Last 12 months | (Rental activities / last 12 months) * Activity costs from options |
| Inventory expenses / m³ | Inventory expenses / m³ |
| Inventory expenses / last 12 months | (Height * Width * Depth) * m³ Price |
| Purchase price | Purchase Price |
| Additional costs/ last 12 months | Additional costs |
Step two: determine the minimum costs.
Based on the annual costs from step one and the entered remaining time and the usage , the wizard will calculate the Minimum Rental Price .
If you want to apply the minimum costs to the master data, check the Apply minimum costs box .
Basis of Computation:
| Field | Formula |
|---|---|
| Annual costs | (Workshop expenses + Check in/out Expenses + Storage Expenses + Additional Expenses) + (Purchase Price / Remaining Time) |
| Usage in % last 12 months | The formula can be found in the easyjob Business Information Center manual. |
| Minimum costs | Annual costs / (365 * Usage) |
Step three: Calculate the item profit based on the minimum costs.
The parameters entered in the previous steps are used to calculate both your profit as well as the rental price.
Including the minimum costs in the Cost Planner
In the project cost planner, you can display the minimum costs of the booked item. In the Master Data, you can determine on which basis the minimum costs are taken into account in the cost planner.
Defining the basis for the minimum costs
1. easyjob Menu Tools Settings
2. Items tab
3. Define the basis for the minimum costs
4. Ok
easyjob must be restarted to activate the changes.
After activation, in addition to the costs for the sub-rental, also the minimum costs per day for the respective item are taken into account.
Supplier rental and purchase prices
In addition to the standard purchase and sub-rental price, you can also manage prices for each of your suppliers.
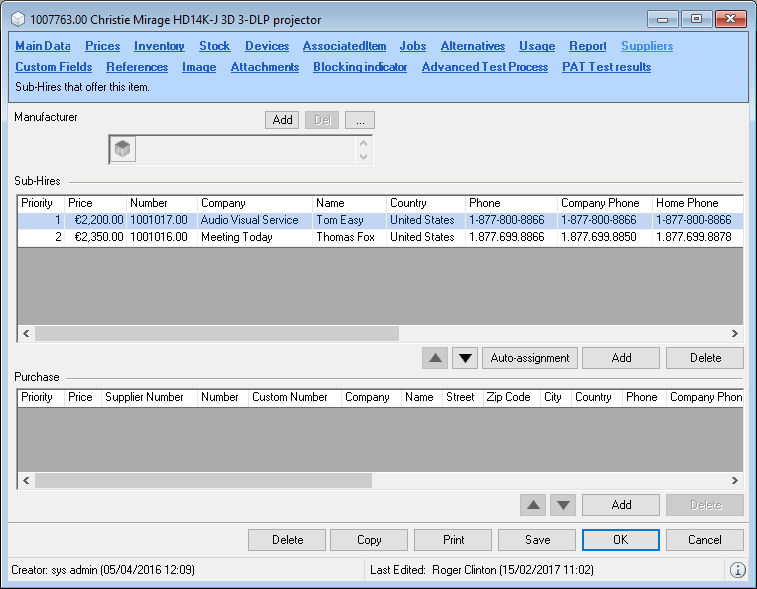
The data can be used in Purchase Orders, Sales as well as in Sub-rental wizard. More information can be found in the corresponding chapters.
Adding suppliers in items
1. Easyjob Menu Master Data Items
2. Desired item
3. Edit
4. Supplier tab
5. Add
6. Suppliers
7. Edit the price in the list.
8. Ok
Adding items in suppliers
1. easyjob Menu Master Data Addresses
2. Desired supplier.
3. Edit
4. Add
5. Items tab
6. Add
7. Items
8. Edit the price in the list.
9. Ok
Customer discount
rYou can give a fixed discount for each customer in the address master data. You can create different discounts for rentals and for sales .
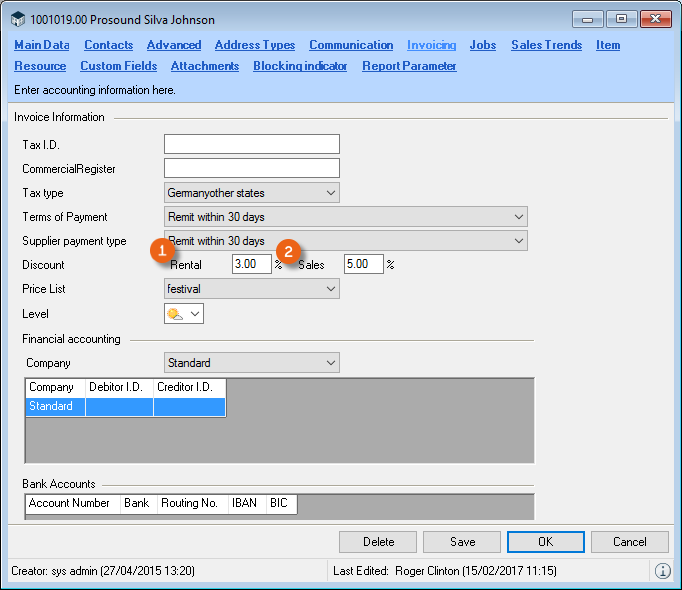
The Rental or Sales discount is accounted for in the cost planner.
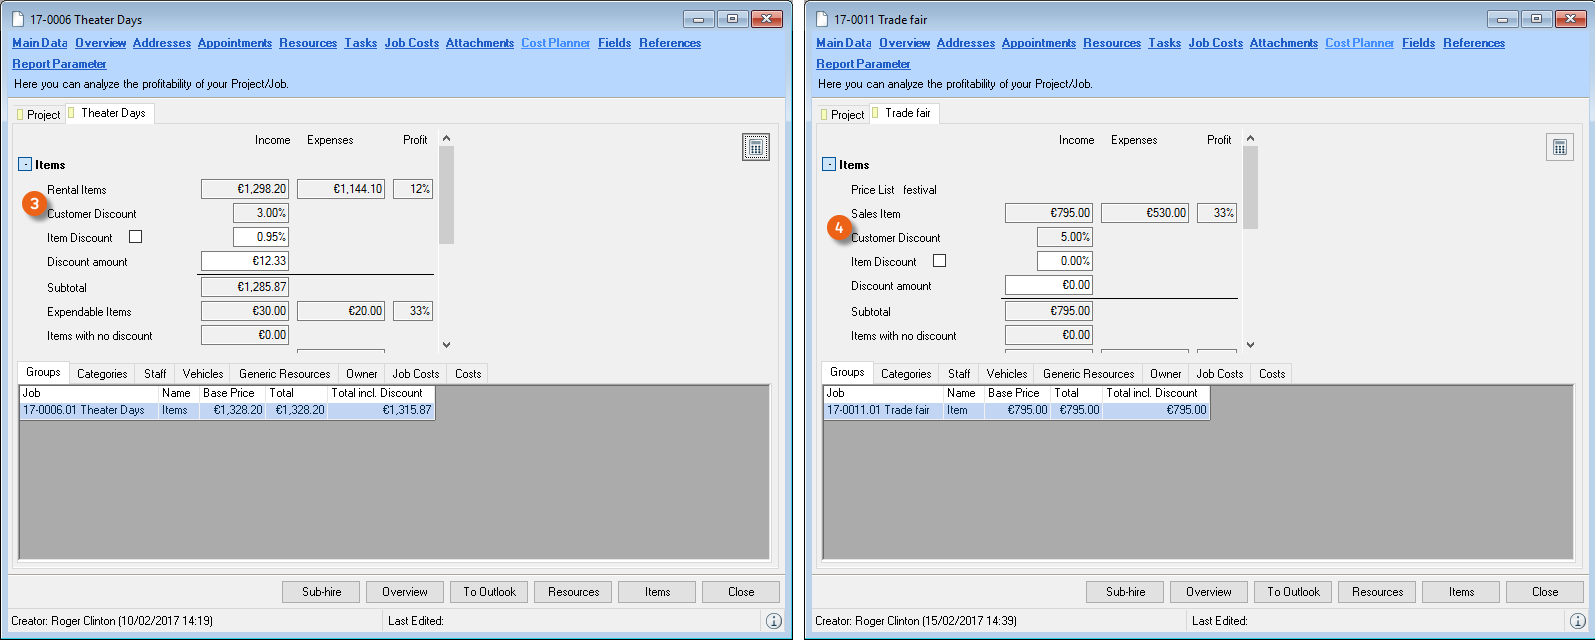
Giving customers a fixed discount
1. easyjob Menu Master Data Addresses
2. Select an address
3. Invoice tab
4. Enter the discount for rentals or sales in the Discount field.
5. Ok
Calendar Days
In order to provide a customer with a long-term rental with a discount after a certain period of time, the calendar days curve can be used to determine how the days used are suggested based on the calendar days.
This function can be used alone or in combination with the days charged described in the next chapter.
Customizing the calendar days curve
1. easyjob Menu Master Data Calendar Days
2. Add new entries by editing (double click) the empty line

Based on the calculation table, the days used for the job are suggested.
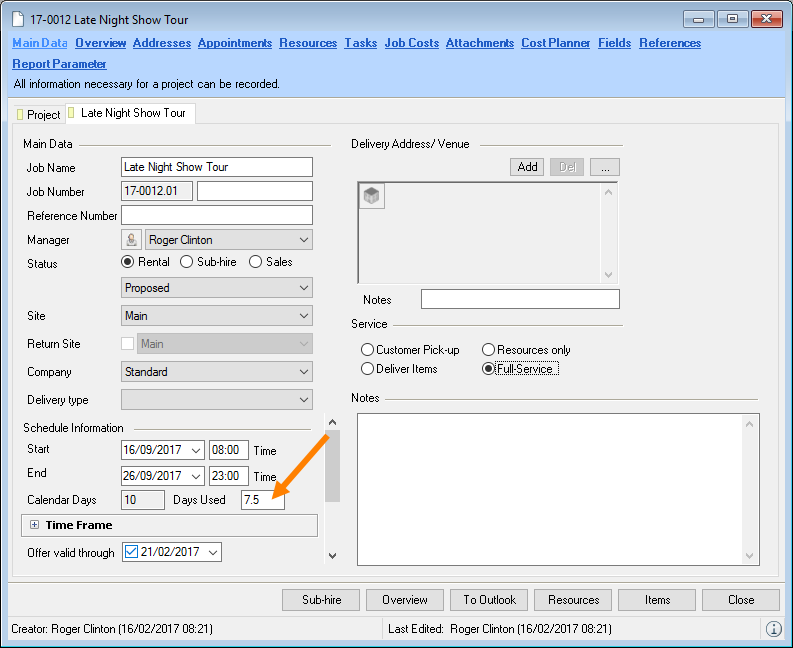
To avoid having to determine the suggested days used for every rental day, you can create the breakpoint in the curve
Enter the threshold value in the Calendar Days CD column for the next breakpoint. Enter the days used to be calculated for the break point in the Days Used DU column. Enter the days used in the Additional CD column that should be added to the Days Used DU after the breakpoint for each additional calendar day.
A test calculator is available for testing the entries. You can customize the curve scaling using the slider .
Breakpoints are entered by double clicking on the free line .
In the example, after the 5th rental day, 5 days plus 0.5 days used for every additional day will be calculated.
The test calculator makes the following calculation: 5 (first 5 Calendar Days) + 5 * 0.5 (the additional 5 Calendar Days multiplied by 0.5 Days Used) = 7.5 Days Used
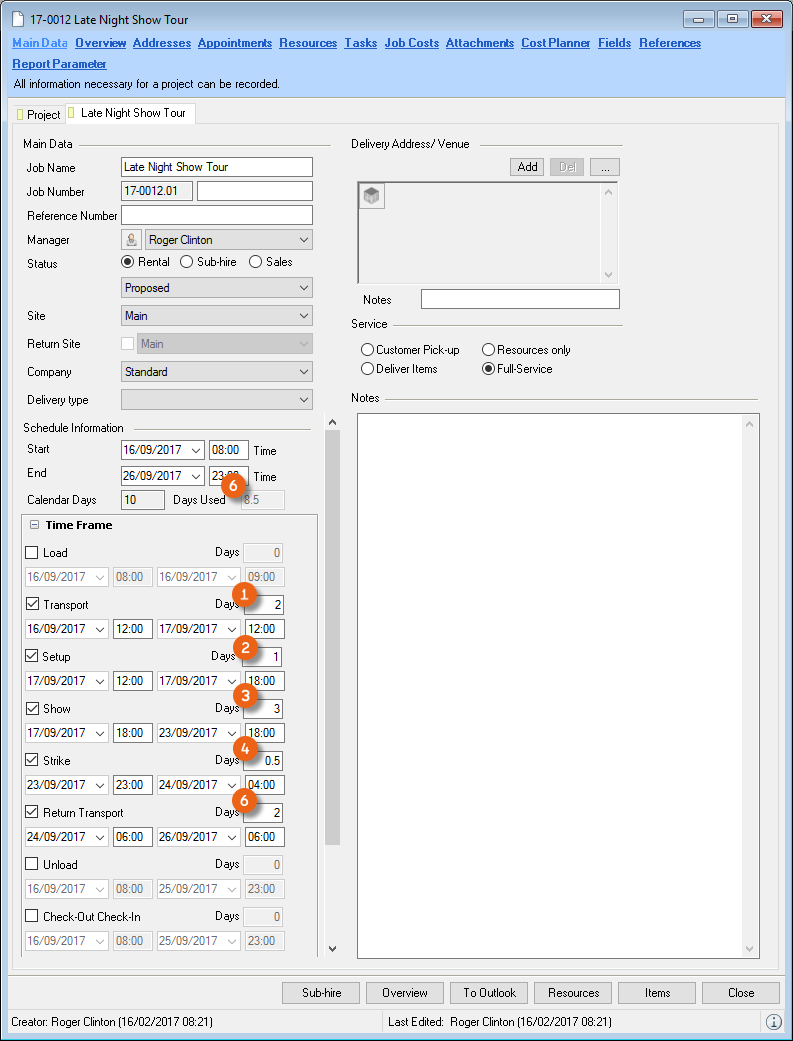
Further examples
| CD | Line | Invoice | Total |
|---|---|---|---|
| 1 | 2 | 1 DU | 1 DU |
| 2 | 2 | 1 DU + ((2 CD – 1 CD) * 1 additional DU) | 2 DU |
| 3 | 2 | 1 DU + ((3 CD – 1 CD) * 1 additional DU) | 3 DU |
| 5 | 3 | 5 DU | 5 DU |
| 10 | 3 | 5 DU + ((10 CD – 5 CD) * 0.5 Additional DU) | 7.5 DU |
If no special Days Charged prices are used in the Bill of Items, then the Days Used will be listed in the Cost Planner under Days Used .
If you use days used manually in the individual phases to in the job, the default entry process will be disabled and the days used will be added on the basis of the days used that you enter .

If special Days Charged rates are used for certain item categories, then the Days Used in the job will be the basis for calculation for the Days Charged. More information can be found in the following chapter Special days charged rates for individual items.
Manually discounting line items
In the bill of items, you can discount discount rental items or customize the price (by overwriting it). The original item price is displayed in the Base Price column.
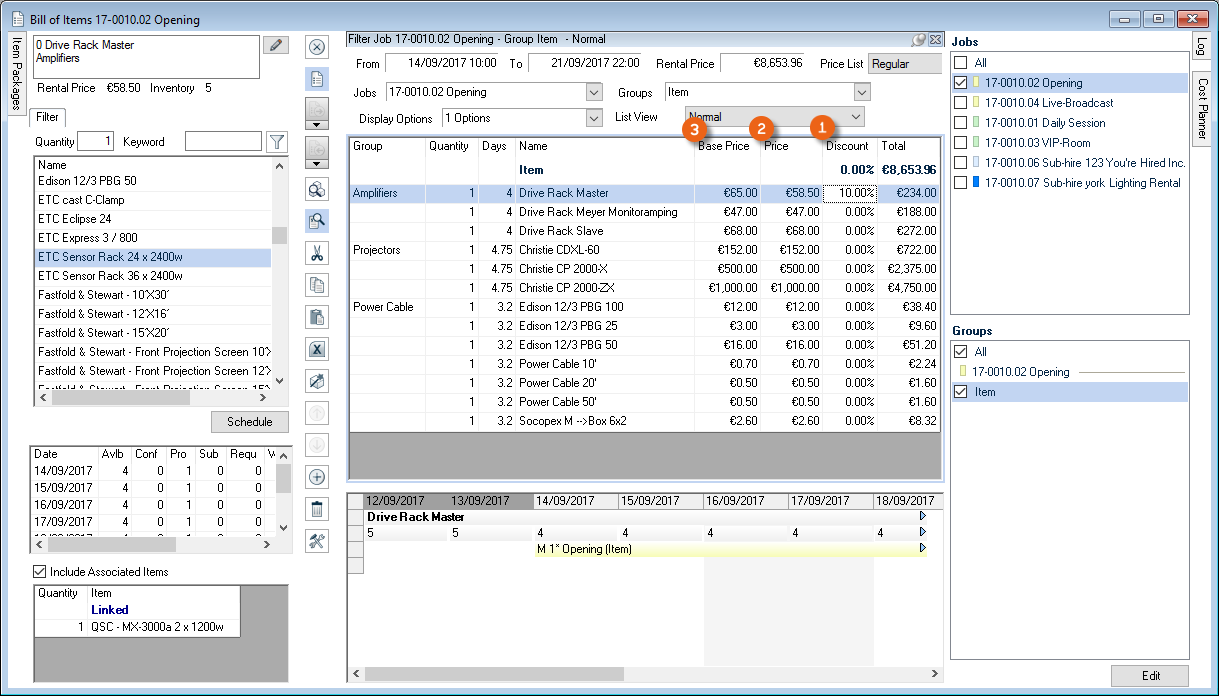
Base price groups
With the Base price groups function, you can group all prices that are entered in the item master data and indicate their validity. This makes it possible, for example, to enter a cost increase for the Minimum Rental Price and therefore create more precise evaluations in the statistical reports, as the price changes can be connected to a defined time period.
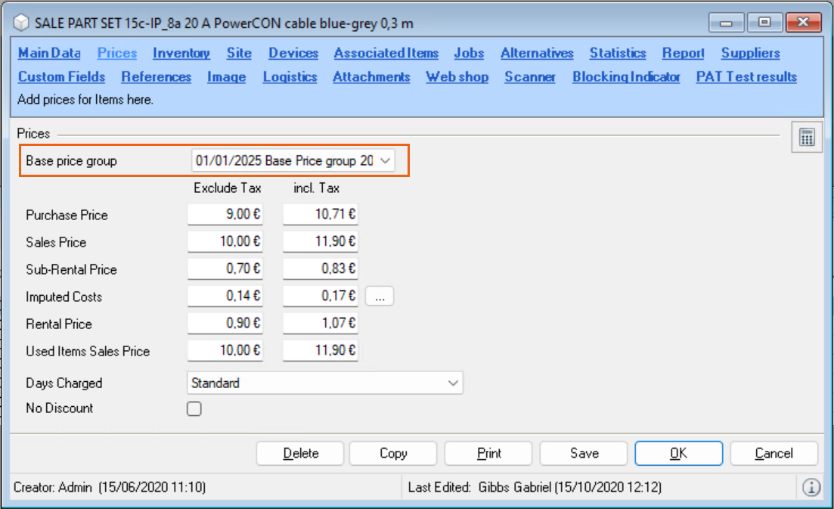
A Base price group is a list of all items whose prices you can edit in the master data. Assign a Name for the base price group, define its validity and activate the created base price group by approving . If necessary, you can also set base price groups that are no longer required to inactive .
In the base price group, you can define the rental price, minimum rental price, sub-rental price, sales price, stock in/out expenses and storage costs. The columns display the previous price (e.g. previous price ), - this comes from the base price group on which the newly created group is based - the current price (e.g. rental price ) that results from being multiplied with the change as a % (e.g. rental price change as a % ) .
To edit the list, you can select multiple, certain or all lines can at the same time and open the context menu with a right-mouse click to edit the columns of the selected cells . The Data exchange function is integrated on the surface, which makes it possible to export and import lists.
You can show or hide the lists as required, the checked column helps when editing the price.

If you create multiple base price groups, you will receive different price groups with a different validity date. New base price groups can be created on the basis of a previous base price group.
The prices in the group are used for all prices (also the Minimum Rental Price, etc. ) and all items. All current prices are based on the valid base price group, the price lists apply afterward.
If you use the easyjob Multi Currency Module, you can create a base price group for each currency.
Activating base price groups
1. easyjob Menu Tools Settings Program Modules
2. Check the Base price groups box
3. Ok
easyjob must be restarted to activate the changes.
Please note that this activation can only be reversed by restoring a backup or by protonic software.
Creating base price groups
1. easyjob Menu Master Data Base Price Groups
2. Add
3. Modify the settings and price adjustments as described above
4. Ok
Creating special price lists for select customer types
You can assign customer groups special prices for selected items and create resulting price lists. You can add as many items to a price list as you want and assign it to a customer. You can assign a discount to the entire price list.
Editing price lists and adding items
1. easyjob Menu Master Data Price Lists
2. Existing price with Edit or Add
3. Enter a name, a description and a discount
4. Add and desired Item
5. Ok
6. Edit the list price in the price list
A reference column can be selected in addition to the item prices. This makes it possible, for example, to provide customers with special price agreements with their own numbers on the invoice. wi:4061
Controlling price lists by project type
With project type, it is possible to define the price list in the project. This makes it possible, for example, to select the trade show price for a trade show project.
Assigning a price list to a project type
1. easyjob Menu Master Data Project Types
2. Select the existing project type with Edit
3. Select the desired price list
4. Ok
Editing a price list price for an item
1. easyjob Menu Master Data Items
2. Desired item
3. Edit
4. Price
5. Enter the corresponding price list price
Assigning a price list to a customer
1. easyjob Menu Master Data Addresses
2. Desired supplier
3. Edit
4. Invoicing
5. Price List

The price list assigned to the address will be pre-selected when creating a new job and can be changed manually.

Selecting the price list in the bill of items
1. easyjob Menu View Jobs
2. a Job and Edit
3. Items
4. Move the mouse to the top of the job bill of items and click the pushpin icon.
5. Desired price list
6. Click the pushpin icon to close the view.
When an item is booked from a price list, the Price is taken from the price list. The item will be displayed with a discount by default. This setting can be customized. More information can be found in chapter Basis for discount in the Bill of Items.
Assigning a price list with a Days Charged Curve
You can now define an individual rental curve (days charged) for all items on the price list. Individual items can also be provided with a different rental curve.
Item package price
You can create an item package for an item.
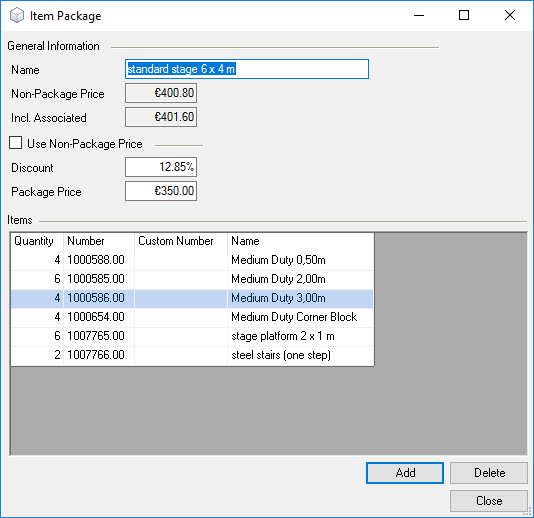
You can assign a fixed package price for the item package. When booking the item package, the item will be booked with the discounted price in the bill of items.
In the standard setting the item will be displayed with the discount. This can be changed. More information can be found in chapter Basis for discount in the Bill of Items.
More information about the item package can be found in chapter Associated Items and Item Packages.
Item group prices
By activating the Item Group Price Calculation function, you can assign fixed group totals or discounts to your created item groups.
This function is not active by default, as it requires report template customization.
Activating the item group price calculation
1. easyjob Menu Tools Settings Program Modules
2. Check the box for Item Group Price Calculation.
3. Ok
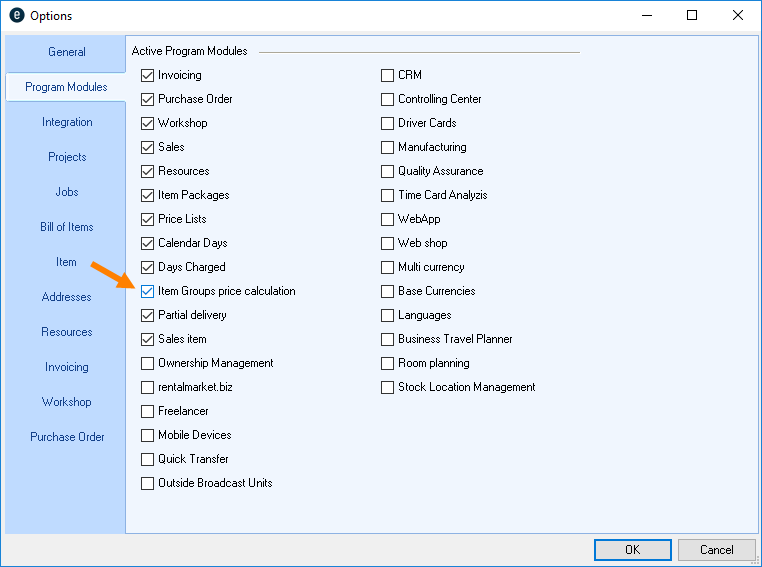
easyjob must be restarted to activate the changes.
The fixed group totals and discounts are specified in the bill of items in the respective item groups.
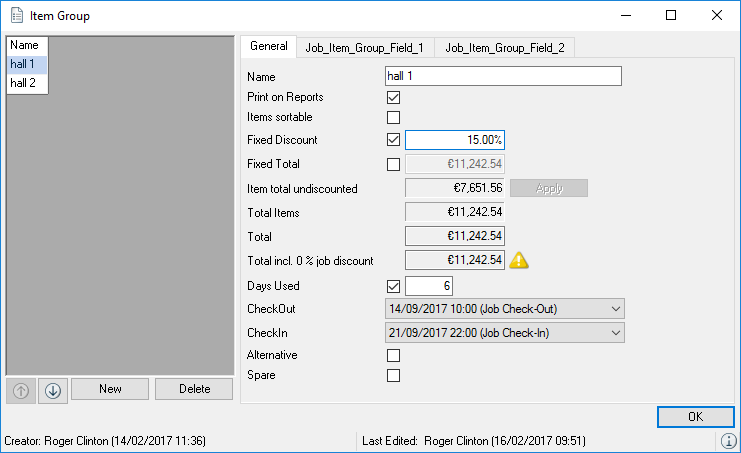
Discounting the Job total
You can calculate an all-inclusive price for each job. The functionality was already described in detail at the beginning of the chapter and will not be further described here.
Job Costs
In addition to staff, transportation and sub-rental costs, additional job costs can be incurred such as for accommodating the crew in a hotel. With job costs, you can add many additional costs to the job as you want and charge them to the customer.
Adding job costs to a job
1. easyjob Menu View Jobs
2. a Job and Edit
3. Job costs tab
4. Add
5. Select the job cost type, name as well as the actual costs and the costs you want to invoice.
6. Assign the supplier as required.
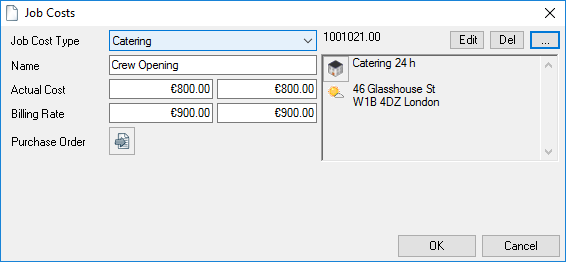
Ordering job costs
You can create a new purchase order for job costs, or attach them to an existing purchase order.
1. Left click the Order icon and select the next activity.
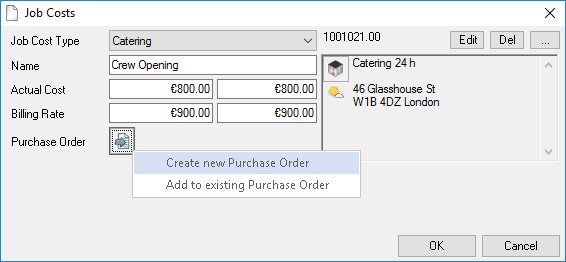
In the Master Data, you can initialize the various job cost types with actual costs and the corresponding invoice total.
Managing and pre-filling job cost types
1. easyjob Menu Master Data Job Cost Types
2. Create a new job cost type with Add or Edit
3. Give the job cost type a name, determine the revenue account and the tax rate
4. Define the actual costs and the amount to be invoiced
5. Ok
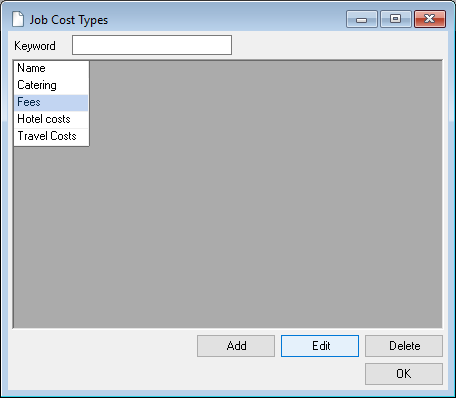
The job costs and the costs to be invoiced are displayed in the footer as the total.

Resources
The prices and actual costs that are pre-calculated based on the rates are taken into account in the cost planner.
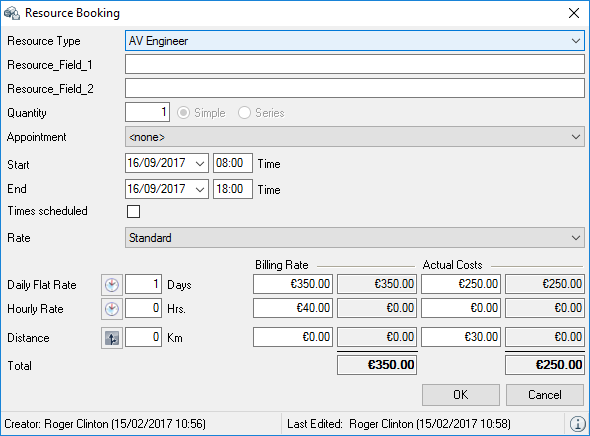
Staff planning is described in detail in chapter Staff and Transportation Planning.
If you want to create a sub-rental job, you can assign resources to it (e.g. item pick-up). Income cannot be generated with sub-rental jobs.
Basis for discount in the Bill of Items
Items discounted with a price list or item package are shown with a discount in the bill of items. To display a 0% discount so that an additional discount can be given later, the program settings must be customized.
1. easyjob Menu Tools Settings
2. Bill of items tab
3. Item Master Data or Package/Price List Price as the discount basis
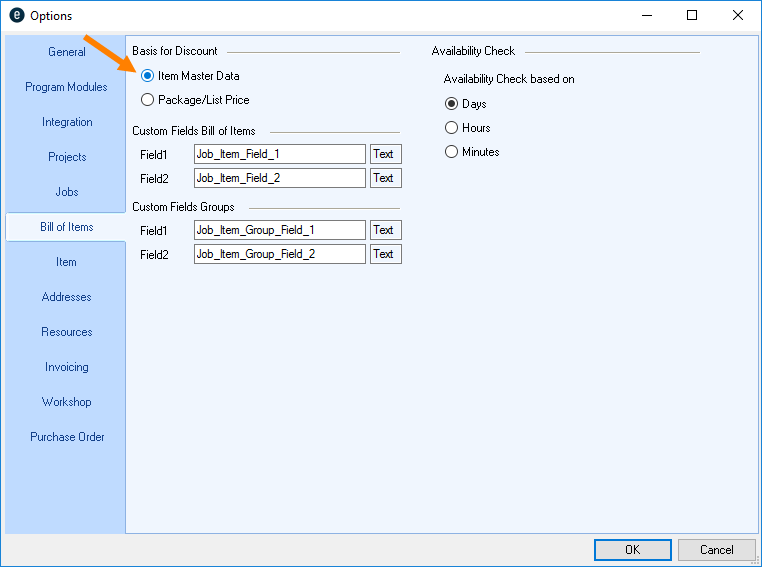
easyjob must be restarted to activate the changes.
Sample Job with varying rates and discounts
This illustration demonstrates how the varying rate and discount features can be combined. The job spans 35 calendar days. The Calendar Days function in the job suggests 20 days used. This item will be booked with the corresponding discount based on the Festival price list . An additional item has its own Days Charged (projectors) stored.
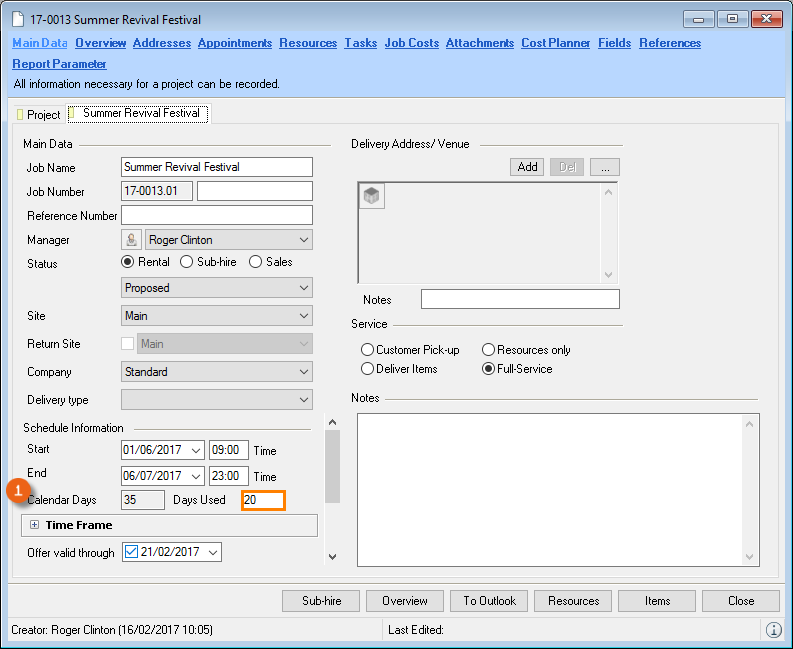
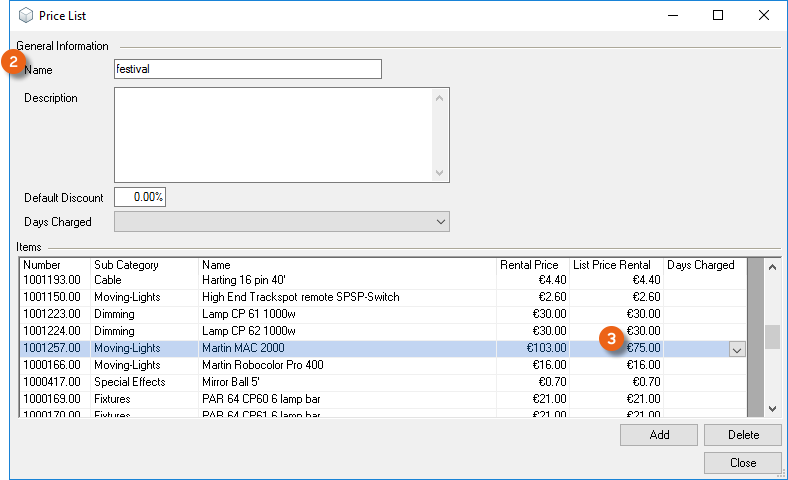
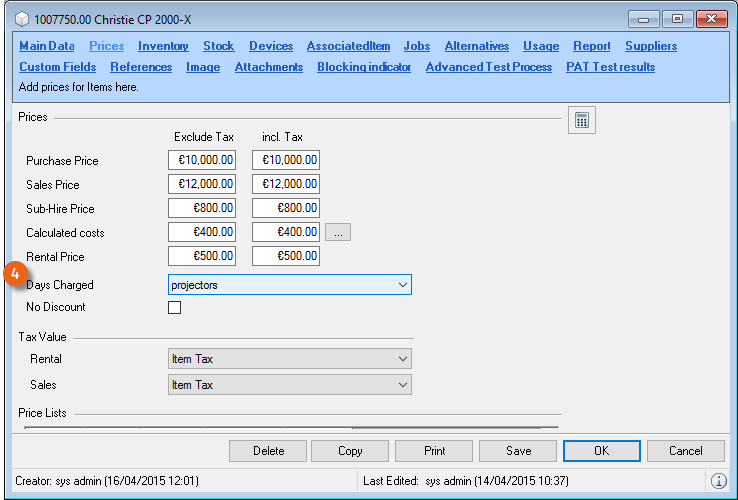
The result is displayed as the Total . Also the Sum Total entered in the Cost Planner is used to determine the actual Item Discount . The Total Including Job Discount indicates the total price of the job items.
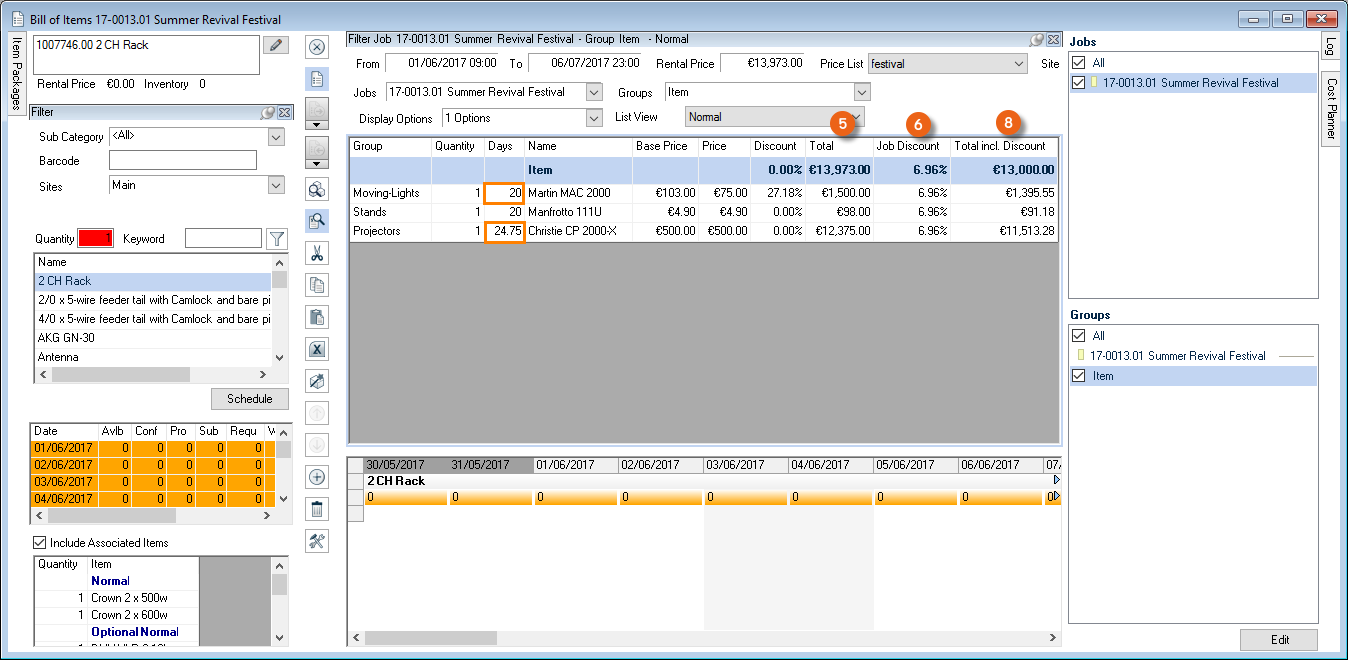
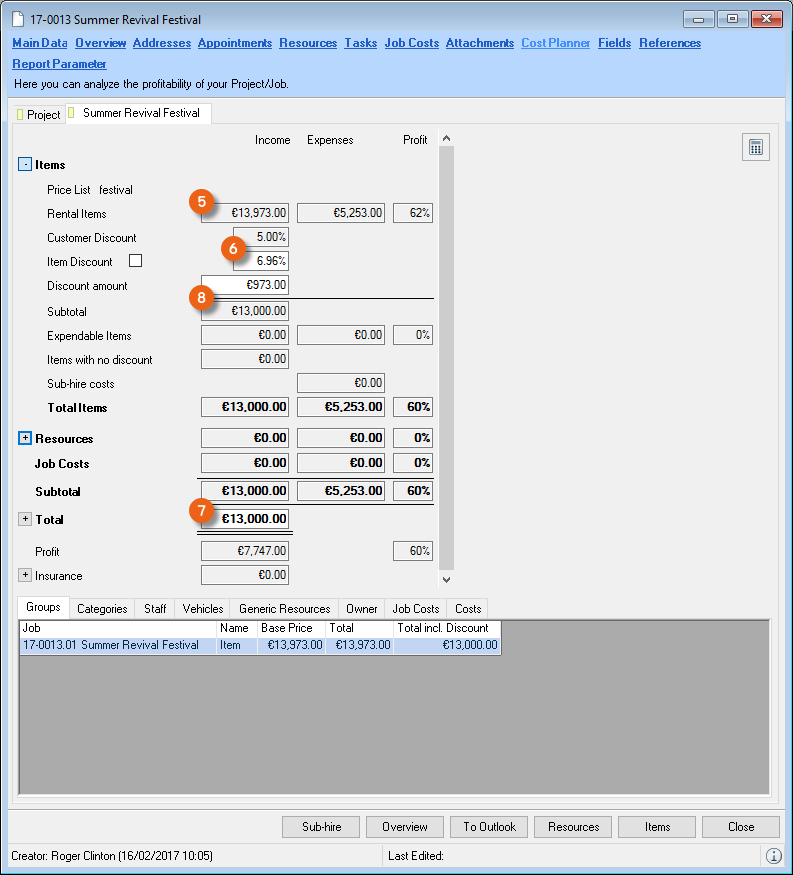
Invoicing
For the invoicing, easyjob assigns the corresponding revenue accounts to the invoice items. The assigned invoices can then be sent to your accounting department via the accounting invoice.
As you can process various workshop activities in one invoice process, the functionality is separated from the normal workshop activities. The reports still contain information about the original workshop activities.
You can create invoices manually, from a project/job, from a workshop activity, from a sales order and from missing items.
Displaying the Invoice List
In an overview, you can use different filters (time frame, keyword, customer, reminder status) to create an overview of your invoicing processes. A total row shows the number of invoices as well as the total net and gross amount on the basis of the currently displayed entries.
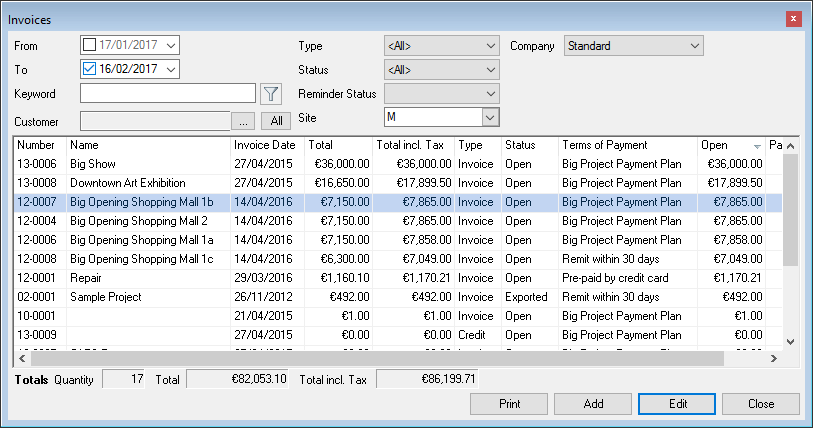
Creating an invoice list
1. easyjob Menu View Invoice
Creating Invoices Manually
Addresses and invoice items are copied on the basis of the master data. Changes to the invoice only affect the current invoice and do not update the master data.
Creating a new invoice
2. easyjob Menu Invoicing Create Invoice
Invoicing a project
With the Invoice Project function, an existing project is inserted in an invoice. You can insert projects in a new or existing invoice. After invoicing a project, the invoiced box for the project will be checked.
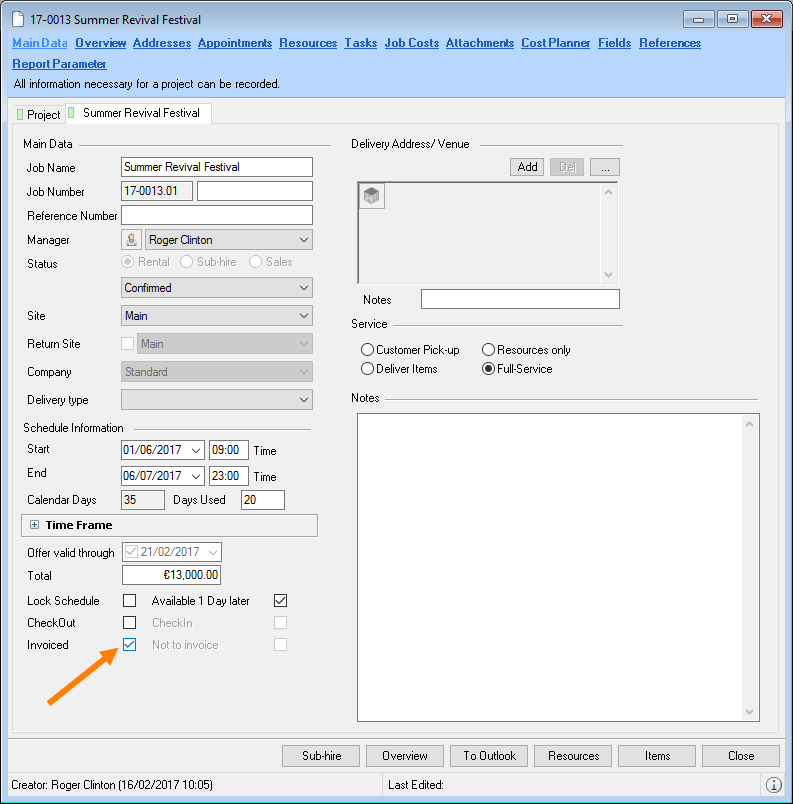
If you do not use the invoice module, you can check the Invoiced box manually.
Projects to be invoiced are displayed in the Navigator, easyjob Today, Windows Gadgets, Reminders and in the Invoice Project function. All jobs are displayed that have been checked in but for which the Invoiced box is not checked.
If you use an all-inclusive price for a job, the discounts are calculated back to the individual line items in the invoice. Rounding differences can be created as a result when carrying out the back calculation to the individual item. In the case of a rounding difference, easyjob automatically creates a rounding difference line item.
When adding a rounding adjustment line item, this is automatically set to not printable. wi:7086This function was not available prior to easyjob 6, therefore a display condition must be added for it to reports.
Inserting a project in an invoice
1. easyjob Menu Invoicing Create Invoice
2. With Add project, select the project you want to invoice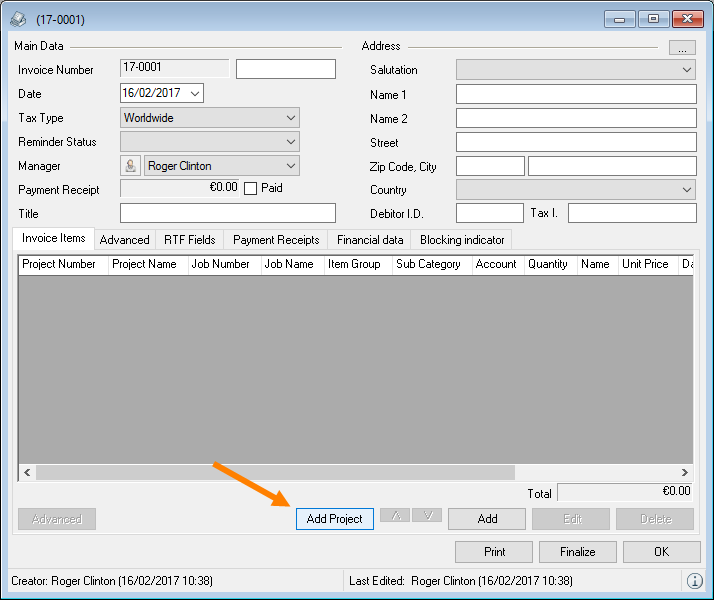
3. Select the job you want to invoice in the invoice dialog
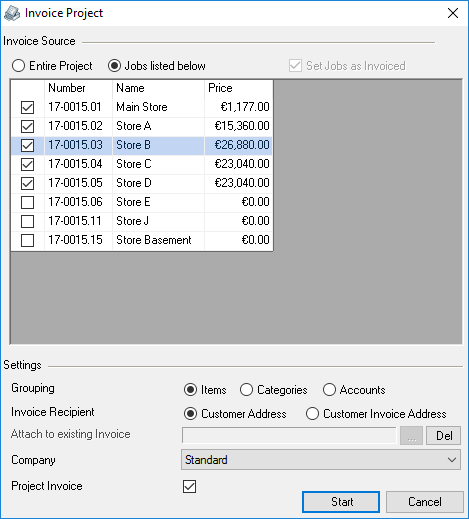
4. Also indicate on which level you want to group
5. If necessary, you can insert the project in an existing invoice
… and select an existing invoice
6. Invoice recipient
7. Start
Job not to be invoiced
By checking the Not to be invoiced box in the job master data, a confirmed job will not be invoiced.
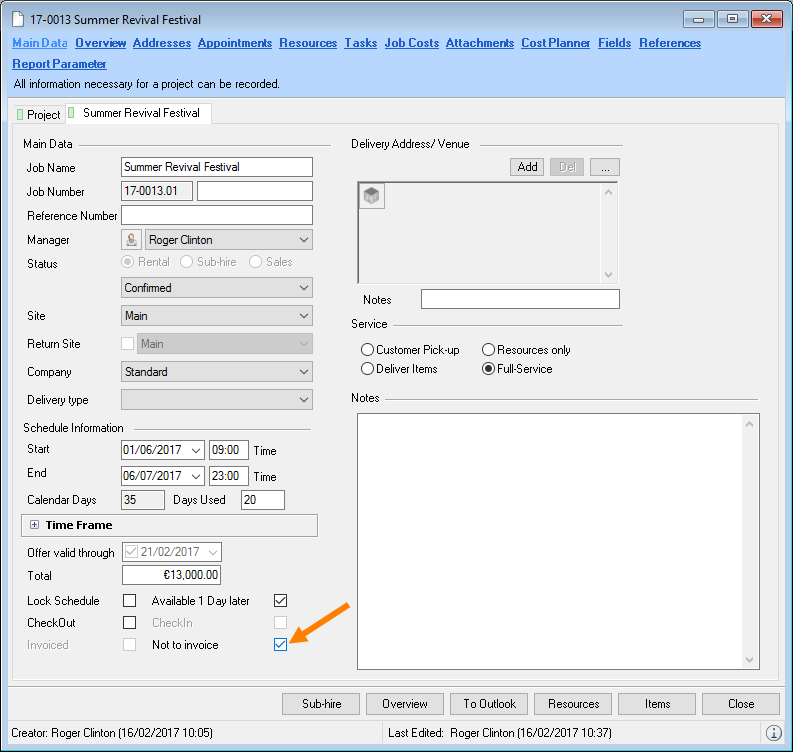
The job is then no longer displayed for invoicing and is not included in the income statistics.
Invoicing projects manually
1. easyjob Menu Invoicing Invoice Project
2. Select the project to be invoiced
Invoicing projects via the navigator
1. Open the navigator
2. Personal My projects for invoicing
alternatively:
2. Invoicing Projects to be Invoiced
3. Context menu Invoice project
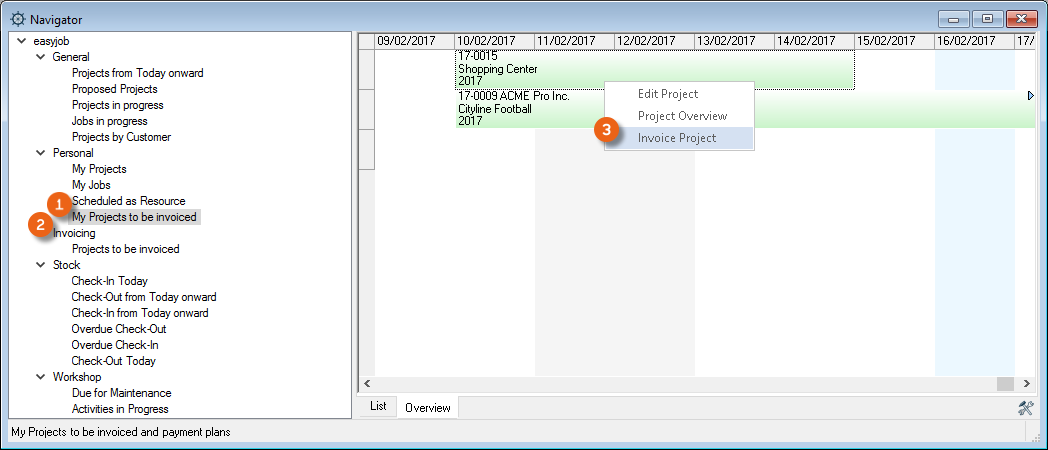
Editing a purchase invoice line item
You can edit purchase invoice line items within invoice items (right click Edit Entries) or via a dialog. To do so, select the required line and click Edit.
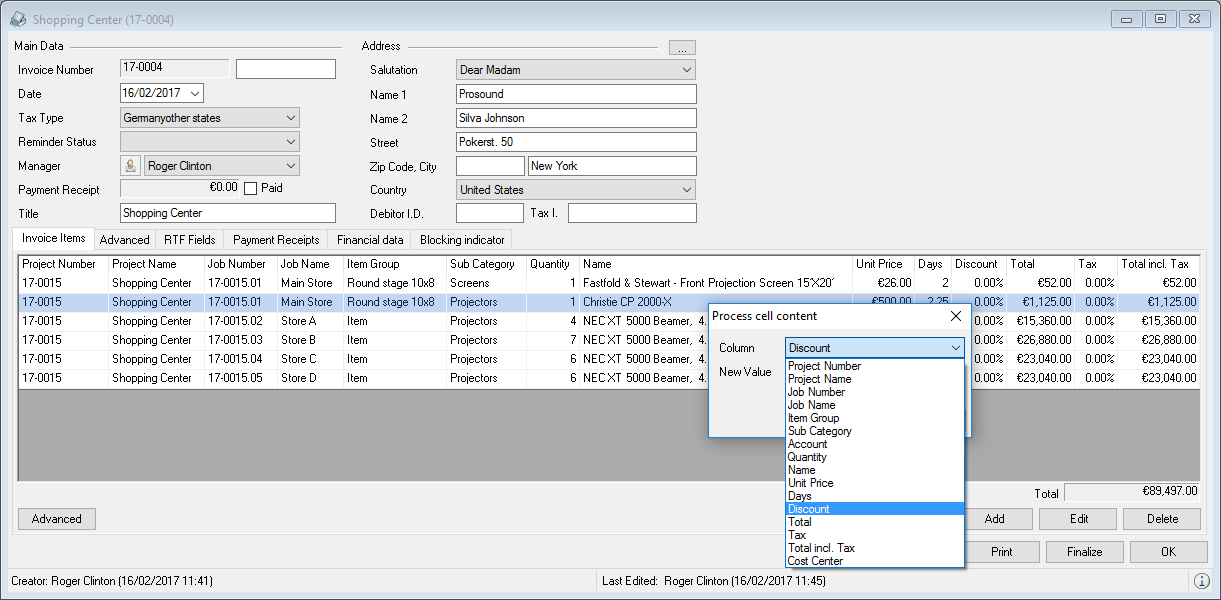
You can customize additional information such as job or project assignment in the dialog.
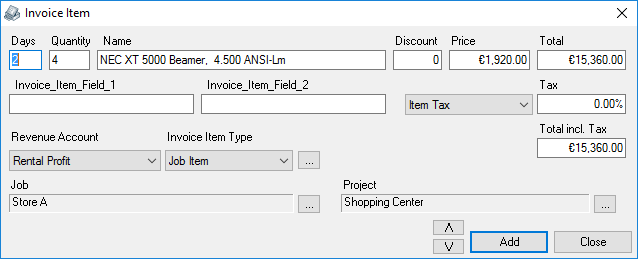
Sorting purchase invoice line items
The line items will be sorted according to the order in which the line items were entered. You can sort as necessary
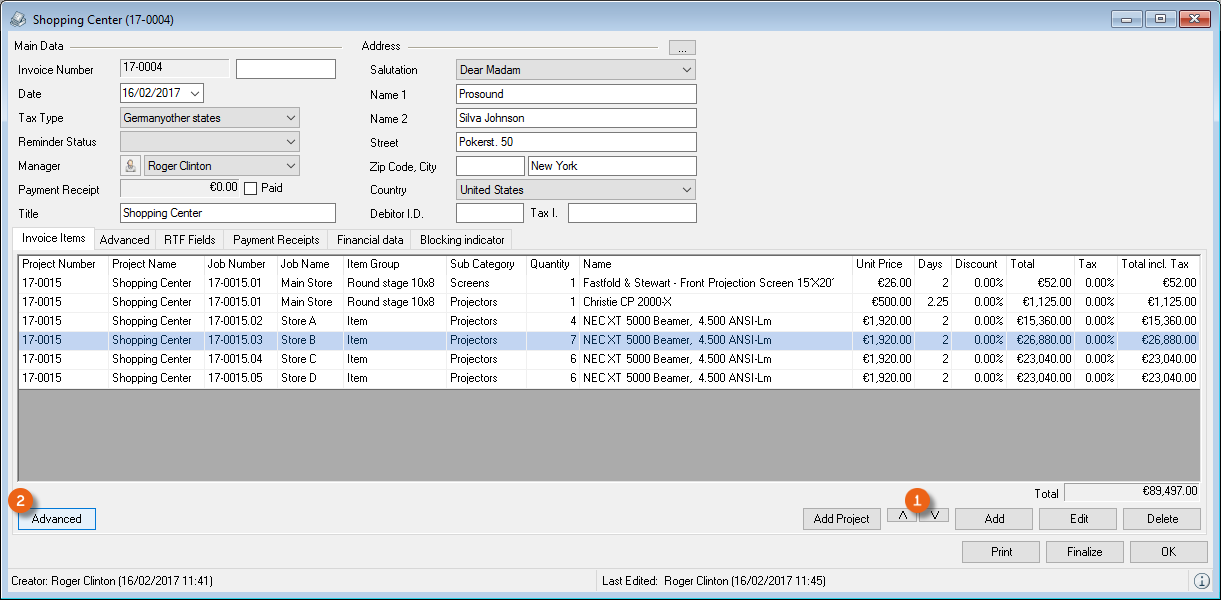
You can also have the purchase invoice line items sorted automatically using the expanded invoice options .
Creating a project invoice
This function makes it possible to use an invoice job as the basis for invoice printing. A project report can be used as an invoice template. As a result, the invoice will be exactly the same as the proposal or the order. Subsequent changes (item exchange, etc.) will no longer be considered.
1. easyjob Menu Invoicing Invoice Project
2. Select a project
3. Check the Project invoice box.
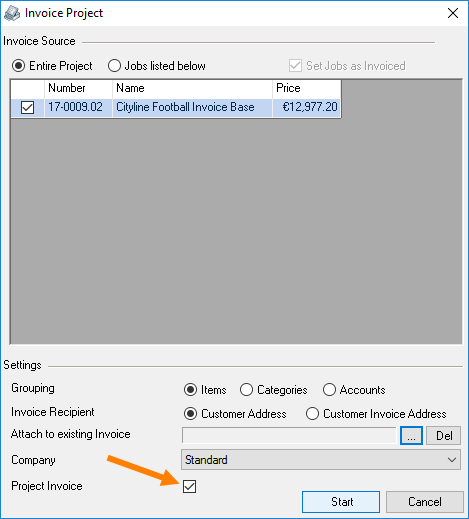
4. Project invoice
5. An invoice job will be created automatically for each confirmed job
6. Start in the Invoice Project window
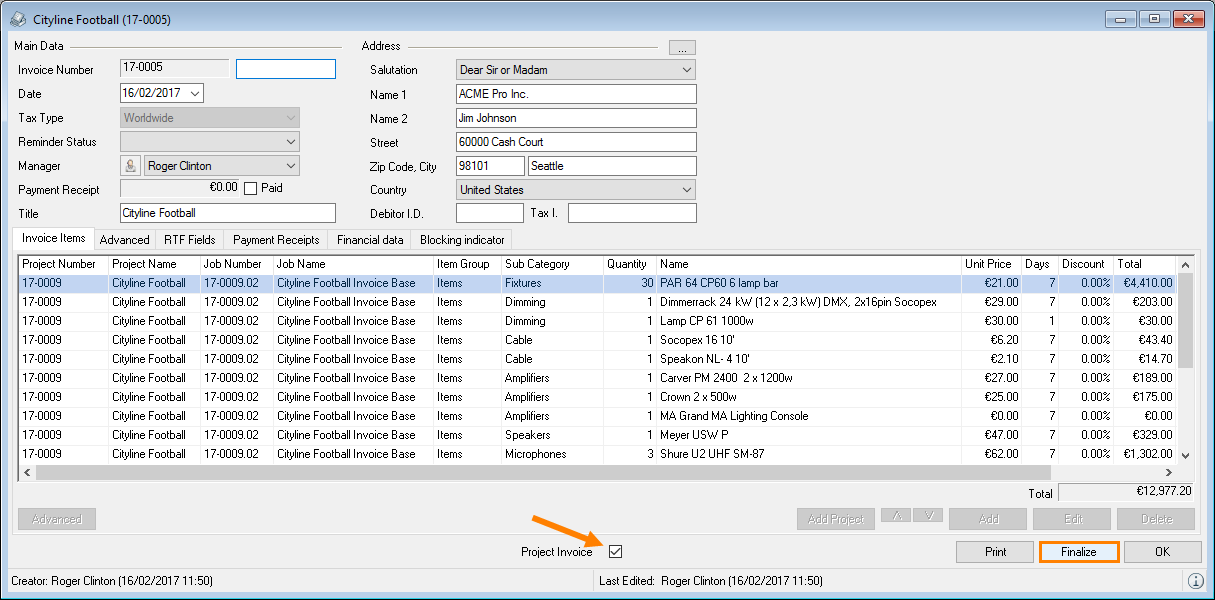
7. Finalize
Updating the project invoice
When making subsequent adjustments to a job with a project invoice, the project invoice status is reset.
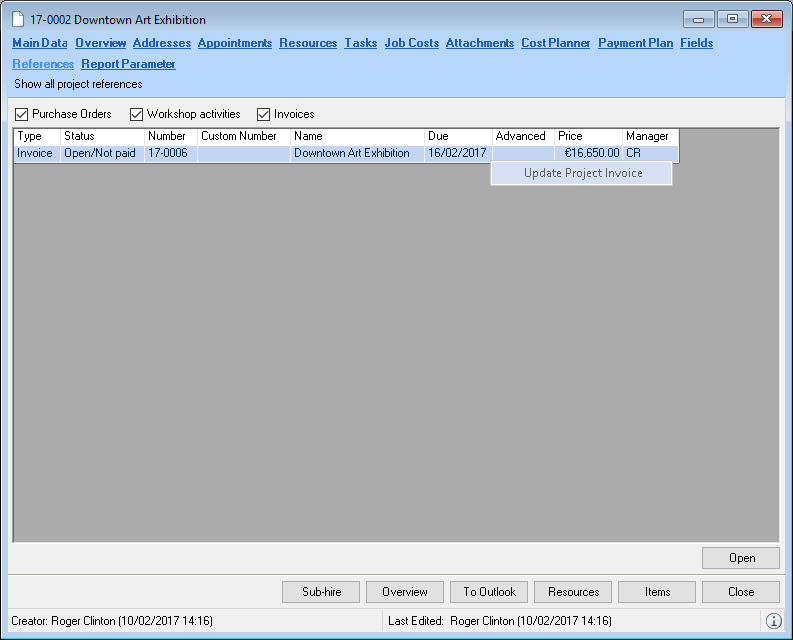
It is possible to subsequently update the content of an invoice based on the changes.
1. easyjob Menu Projects Edit Project
2. Select project and Ok
3. References tab
4. Select the desired invoice
5. Right mouse click and Update project invoice
6. Start
This function does not apply to finalized invoices.
Finalizing invoices
The invoice can be finalized if the contents are correct. Once finalized, no further changes can be made to the invoice. Corrections are made using credits.
When accounting export is activated, invoices are checked if all data was entered correctly according to the export specifications.
1. easyjob Menu Invoicing Edit Invoice
2. Select the desired invoice
3. Finalize
Deletable invoice
It is possible to delete invoices that are not yet finalized. You can define in the program settings if the invoice number of a deleted invoice can be used again.
1. easyjob Menu Tools Settings
2. Invoicing tab
3. Check the Fill up the missing invoice numbers box
4. Ok
easyjob must be restarted to activate the changes.
Checking the Tax I.D.
When creating an invoice, the Tax I.D. for customers from the EU can be checked. wi:4375
1. easyjob Menu Tools Settings
2. Invoicing tab
3. Check the Tax I.D. validation box
4. Ok
easyjob must be restarted to activate the changes.
Invoice note field
You can enter an invoice note in the master data, which is displayed in the invoice.wi:4375
1. easyjob Menu Master Data RTF Templates
2. Edit or Add
Credit Note
Credit note functionality is similar to invoicing.
Creating a new credit note
1. easyjob Menu Invoicing Create Credit Note
To credit an existing invoice, you can transform an invoice into a credit note.
Inserting an invoice in a credit note
1. easyjob Menu Invoicing Create Credit Note
2. Insert Invoice.
3. Select the desired invoice
4. Finalize
Invoicing workshop activities
You can invoice repairs to your customer for returned equipment that was returned damaged. If you create the workshop activity from a job using the barcode scanner, the Assigned Job will be preset. The customer address for the project will be used as the invoice recipient.
1. easyjob Menu Workshop Edit Activity
2. Select a workshop activity
3. Cost Planner tab
4. Enter the Assigned Job and the costs
5. Invoice
6. Create a new invoice or select an existing one
7. Ok
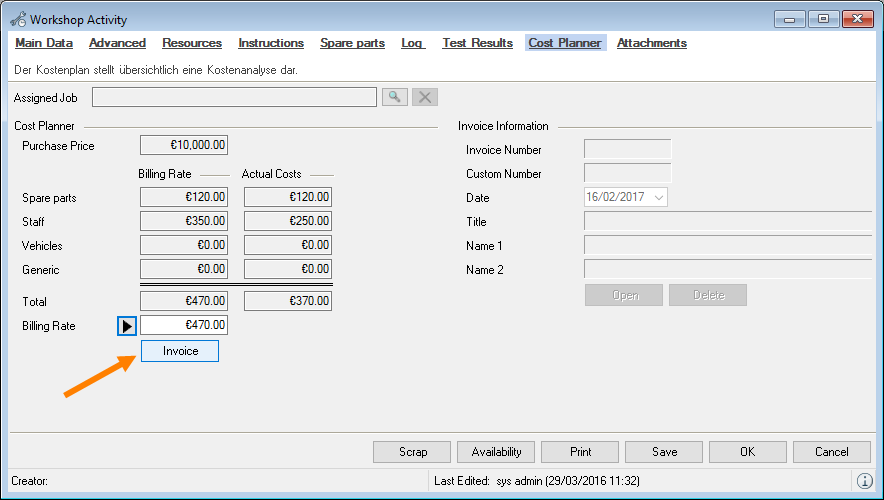
Invoicing a sales order
Sales orders are invoiced similarly to a project
Invoicing missing items
If your customer does not return missing items, you can invoice the missing material when the job is unloaded. The items are added to the invoice with the master data sales price.
1. easyjob Menu Projects Unload Job
2. the corresponding job
3. Unload the available items
4. Click the Unload icon and select Finalize unloading.
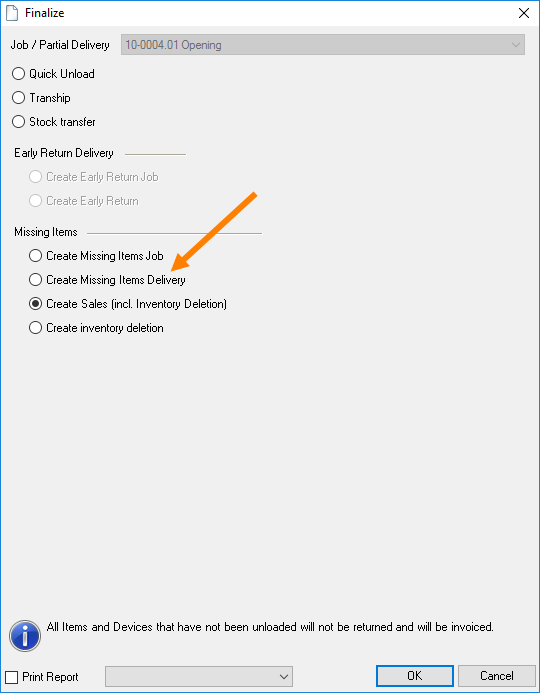
5. Click Create Sale under missing items
6. Ok
A job called Missing items sale will be created when ending the process with Ok. This can then be invoiced.
Copy invoice
You can copy invoices to make it easier to edit recurring manual invoices.
Copy invoice
1. easyjob Menu Invoicing Copy Invoice
2. Select the invoice to be copied
3. Ok
Entering a payment receipt
You can book each invoice (invoice or credit note) to a bank.
1. easyjob Menu Invoicing Payment Receipt
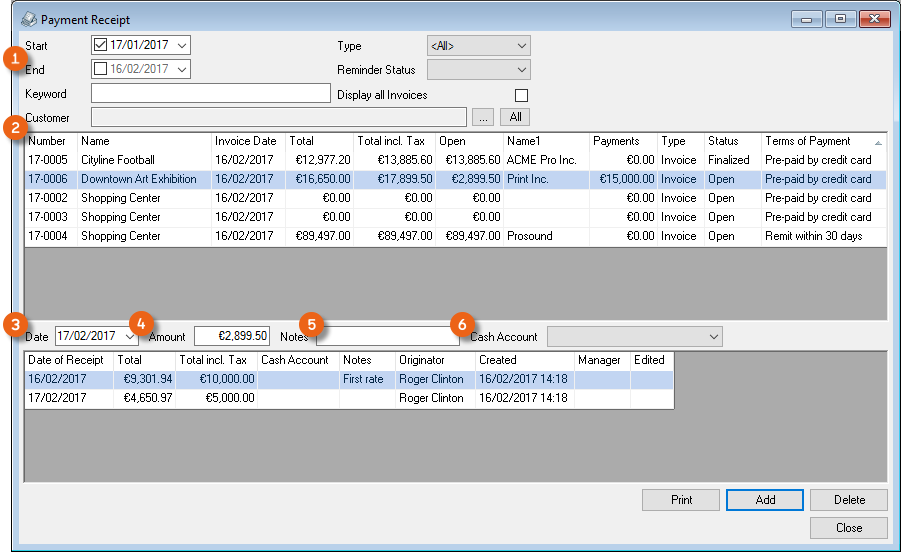
You can filter the purchase invoices with the data filter . By default, only purchase invoices without a Paid status are displayed. After selecting a purchase invoice you will see the payments that were already booked . To quickly enter the new payment, the amount is preset. In addition to the note, also a log is created.
Creating a payment receipt
1. Purchase Invoice
2. Enter the payment date , the amount , a note as well as the cash account
3. Add
If the total of the processed amounts corresponds with the purchase invoice amount, after a query, the purchase invoice is set to Paid. This also accounts for the discount amount within a payment period. You can view the processed payments as well as the Paid status in the invoice under Payment Receipts.
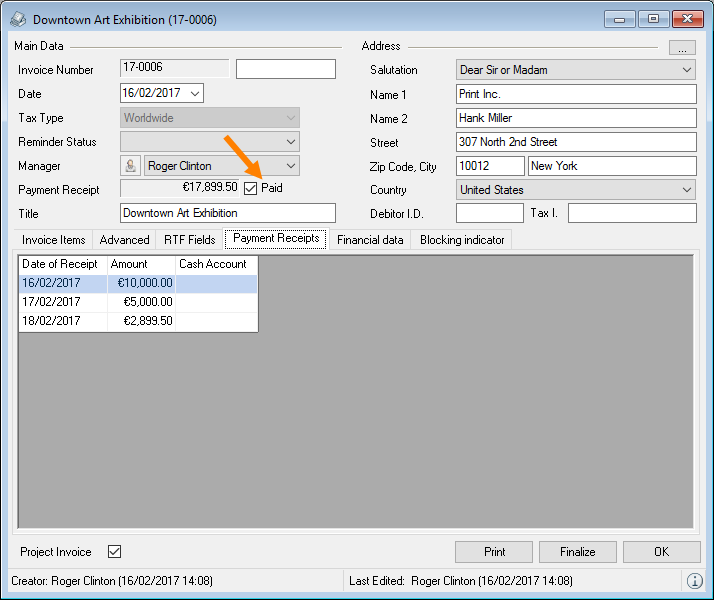
Payment Terms
The payment terms are used to specify which invoices can be remitted by customers and under which terms.
You can assign the standard payment terms to a customer. The corresponding payment conditions will be used for new activities.
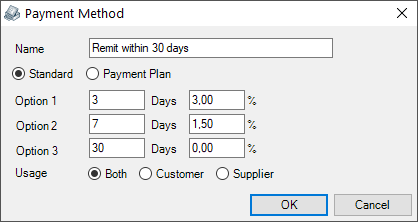
To provide customers with discounts within a period you can determine several payment dates.
Managing terms of payment
1. easyjob Menu Master Data Terms of Payment
2. Create new payment terms with Add or select existing ones and Edit
3. Specify the name as well as the payments
4. Ok
Creating payment plans
You can create individual payment plans to invoice a project over a time frame. The parameter Value (e.g. 25 %), Date (e.g. after the Order) and Payment Method (e.g. within 8 days) can be defined individually according to your requirements.
Adding a payment plan
1. easyjob Menu Master Data Terms of Payment
2. Create a new window with Add
3. Click Payment plan
4. Specify the name and Add
5. Define the Share, Days / Invoice days, Name and the Terms of Payment
6. Repeat the process until all Percentages Shares are defined
7. Ok
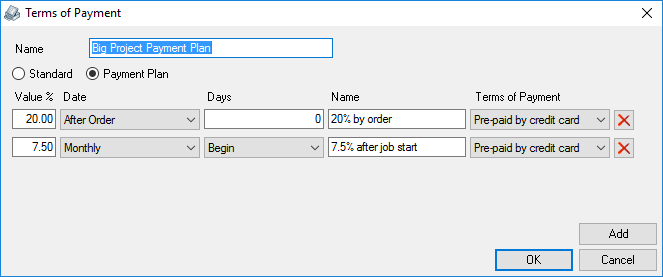
There are multiple options for the point in time of the invoice. In the case of interval-based time frames (monthly, yearly, etc.) it is also possible to select the following points in time.
In the project main data, select the payment type of the payment plan. After selecting the payment plan, the payment plan tab will be visible.
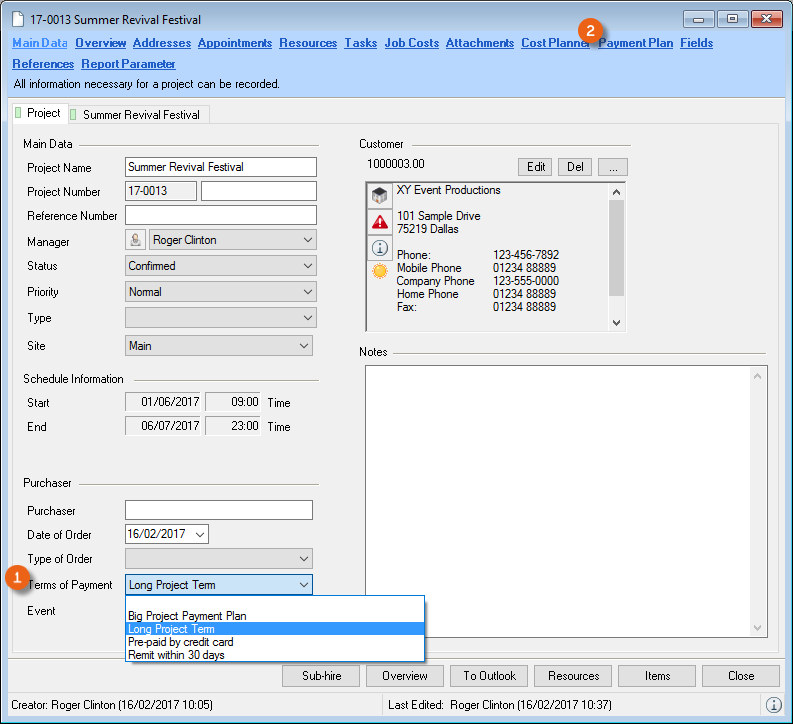
In the payment plan you can see the individually scheduled invoicing dates as well as the invoices that were already created .
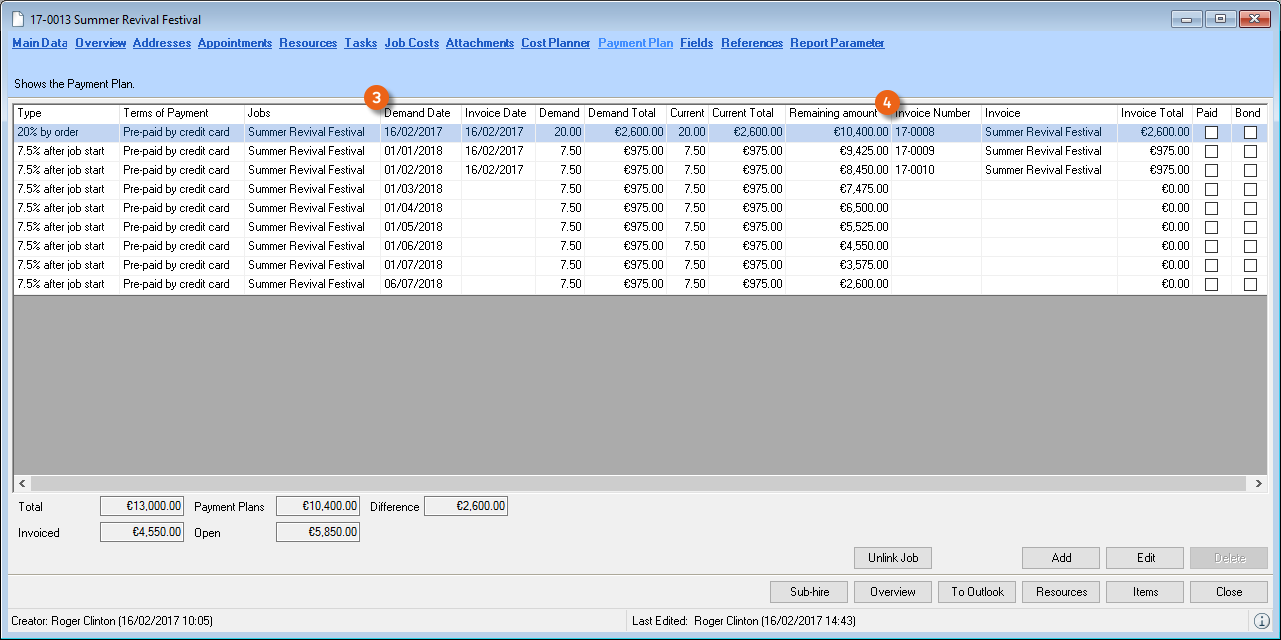
Assigning a payment plan to a project
1. easyjob Menu Projects Edit projects
2. Project und Ok
3. Define the terms of payment in the main data
4. Payment Plan tab
5. In the selection window, select Create new payment plans on the basis of a 'Long-term rental'
6. Ok
If the job total changes, the difference will appear in the payment plan. With Add you can create a manual line item and add it to an existing invoice date.
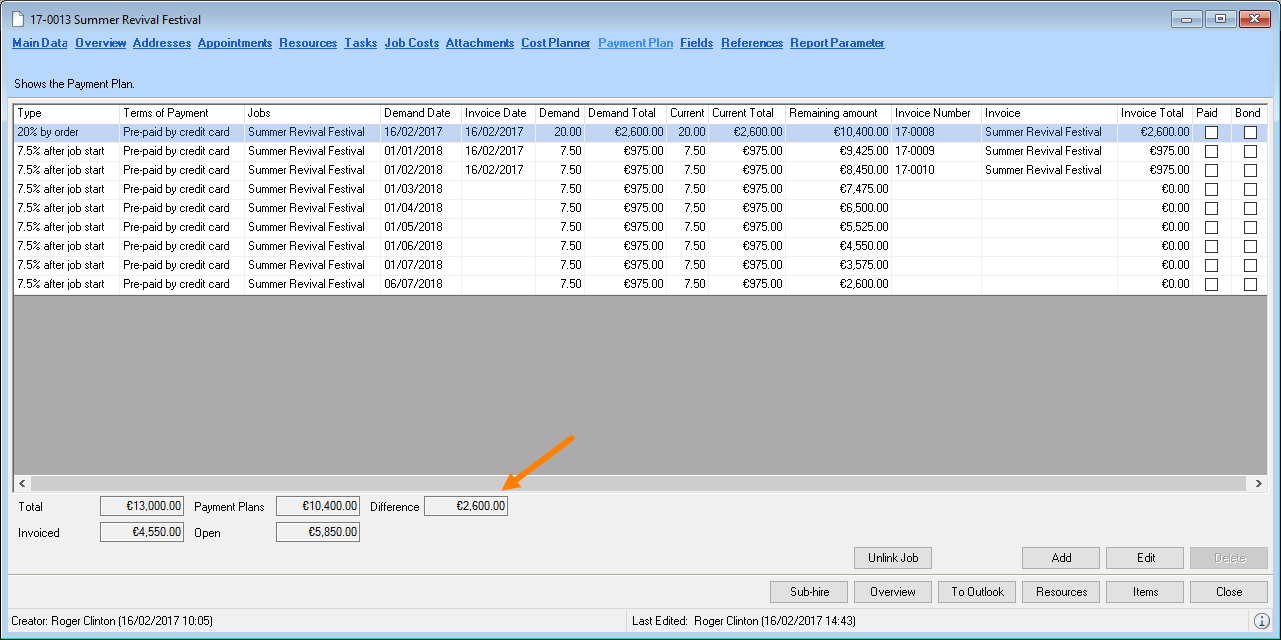
Creating a manual line item in a payment plan
1. easyjob Menu Projects Edit projects
2. Project und Ok
3. Payment Plan tab
4. Add
5. Enter a description and define the terms of payment.
6. Enter the displayed Difference in the Current Amount Due
7. Ok
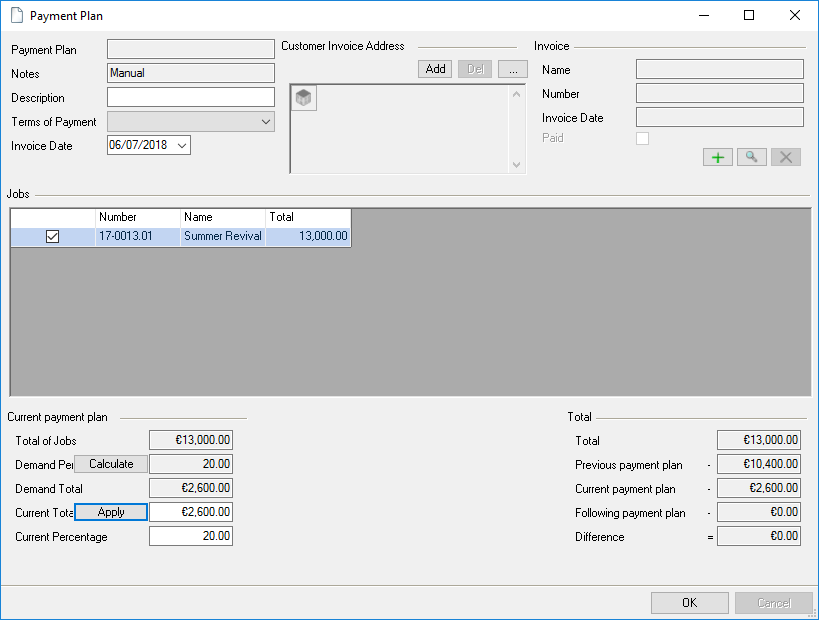
A new Manual type entry is created in the payment plan.
With Unassign job, you can release a job from an already assigned payment plan and assign it a new payment plan.
In the easyjob Navigator, you can use the filter Projects to be Invoiced to display your projects with the due dates defined in the payment plan.
Invoice Reminders
Invoice reminders are used to remind customers with open purchase invoices.
Invoice reminders have three levels. No level is assigned by default to the invoice. After the invoice reminder process has started, the current level is raised to the next level. The reminder list displays all purchase invoices without a Paid status.
You can enter the name of the individual reminder levels and the late charges in the program settings.
Editing names/intervals
1. easyjob Menu Tools Settings
2. Invoicing tab
3. Adapt the name/interval/late charges as necessary
4. Ok
easyjob must be restarted to activate the changes.
When printing, all unpaid invoices are submitted with the current reminder status.
Implementing invoice reminders
1. easyjob Menu Invoicing Invoice Reminders
2. Start to raise the reminder status of the displayed invoices
3. If you would like to print all reminders, confirm the 'Auto-print request' with Yes.
4. Alternatively, click No and individually select the reminders you want to print
5. Print
6. Select the addresses to which you want to send a reminder
7. Ok
8. Select the report and Ok
Reminder block on an invoice level
With the reminder block on an invoice level, you can exclude individual invoices from the reminder procedure.
1. easyjob Menu Invoicing Edit Invoice
2. Select the Blocking indicators tab
3. Check the Create reminder box
4. Ok
Revenue accounts
When invoicing, each invoice item is assigned to the predefined revenue account. This assignment is based on the accounts assigned in the master data.
Revenue accounts in the master data and program settings
Revenue accounts can be assigned to the following master data
1. easyjob Menu Master Data …
%2.Subcategories Categories Select subcategory and Edit
%2.Job Cost Types Select Job Cost Type and Edit
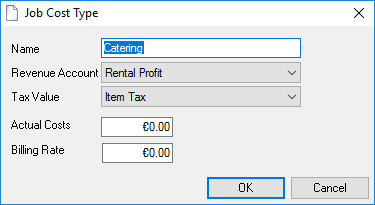
%2.Resources
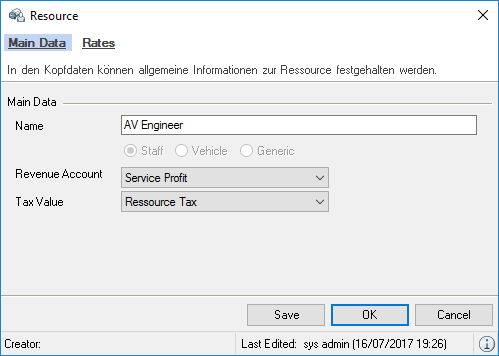
5. Select Revenue Account
6. Ok
You can assign the revenue accounts in the following program settings
1. easyjob Menu Tools Settings
2. Tab …
Workshop for invoicing
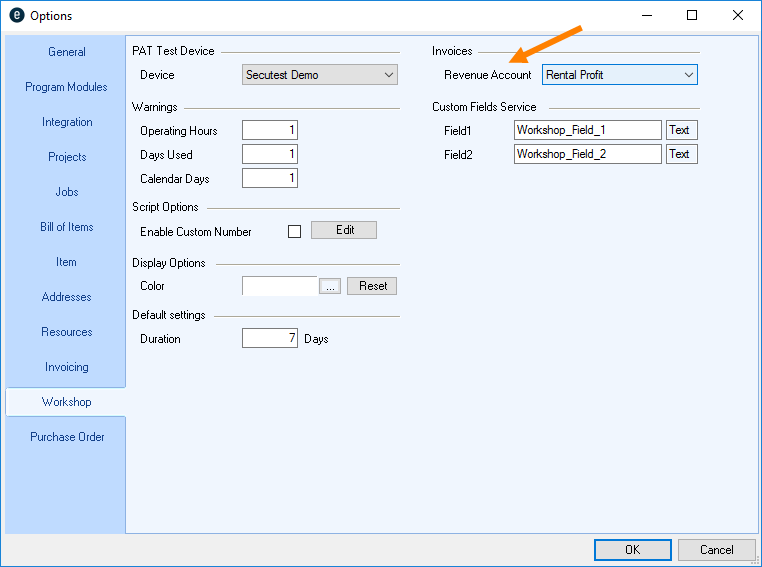
%2.Invoicing Insurance
%2.Invoicing Manual Invoice item
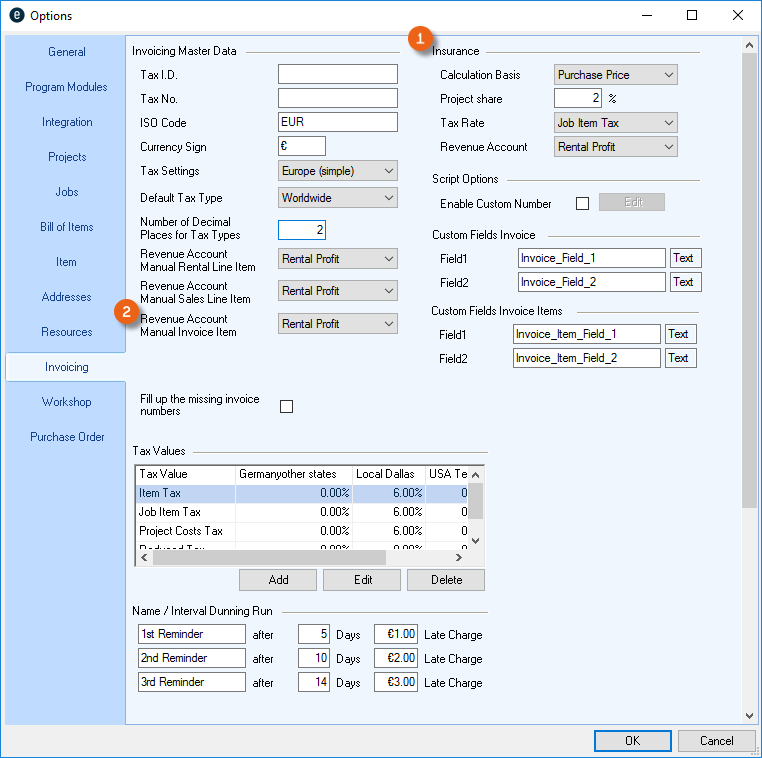
5. Create the corresponding Revenue Account
6. Ok
easyjob must be restarted to activate the changes.
Accounting interface
With the accounting interface, you can export the finalized outgoing invoices and credit notes and the processed payments to your accounting department.
The item bookings are assigned based on the creditor and debtors ID as well as the income account. When finalizing an invoice, a check is performed to make sure it complies with the export interface.
Exporting purchase invoices
1. easyjob Menu Invoicing Export
2. Select the purchase invoices and payments you want to export in the Export column

3. Start
Configuring the export interface
Setting with multiple companies in the Master Data
1. easyjob Menu Master Data Companies
2. Company Edit or Add
3. Enter the main data and details

4. Adjust the Advanced Settings with your accounting department
Automatic assignment of Creditors/Debtors I.D.
With the automatic creditors and debtors I.D. assignment, a new number is automatically assigned for the Creditor or Debtor when creating an invoice or a purchase invoice.
Activating creditor/debtor ID generation
1. easyjob Menu Tools Settings
2. Address tab
3. Activate the desired function
4. Ok
easyjob must be restarted to activate the changes.
The numbers are assigned when the Address is used in a Purchase Invoice.
E-invoice
Possible E-invoice formats are XInvoice and ZUGFeRD. Both formats contain an XML file, which is based on the program standard UBL (XInvoice) or CII (ZUGFeRD and XInvoice). The XInvoice format consists of only one XML file, whereas ZUGFeRD is generated as a PDF file with an integrated XML file.
XML file programming standards
No content for this section.
CII
The CII format was developed by the United Nations, is common in the EU and is used in hybrid PDF documents in German as ZUGFeRD as well as in France as Factur-X.
UBL
The UBL format was developed by the OASIS organization. The format is used internationally and in addition to E-invoices, it offers format definitions for purchase orders and delivery notes, for example.
When importing E-invoices, the XInvoice (UBL and CII) and ZUGFerd/Factur-X (CII) formats are supported. See easyjob Controlling Center.
easyjob supports the ZUGFeRD (CII) format when creating e-invoices. The UBL format will be supported in a future release.
Creating E-invoices
If E-invoices are created in ZUGFeRD format, which means with a format that can be viewed as a PDF and with an imbedded, machine readable XML file, the Body issuing laws has written that this is to be considered an "identical copy". This means that the visually readable PDF document must correspond to the structured content of the XML file.
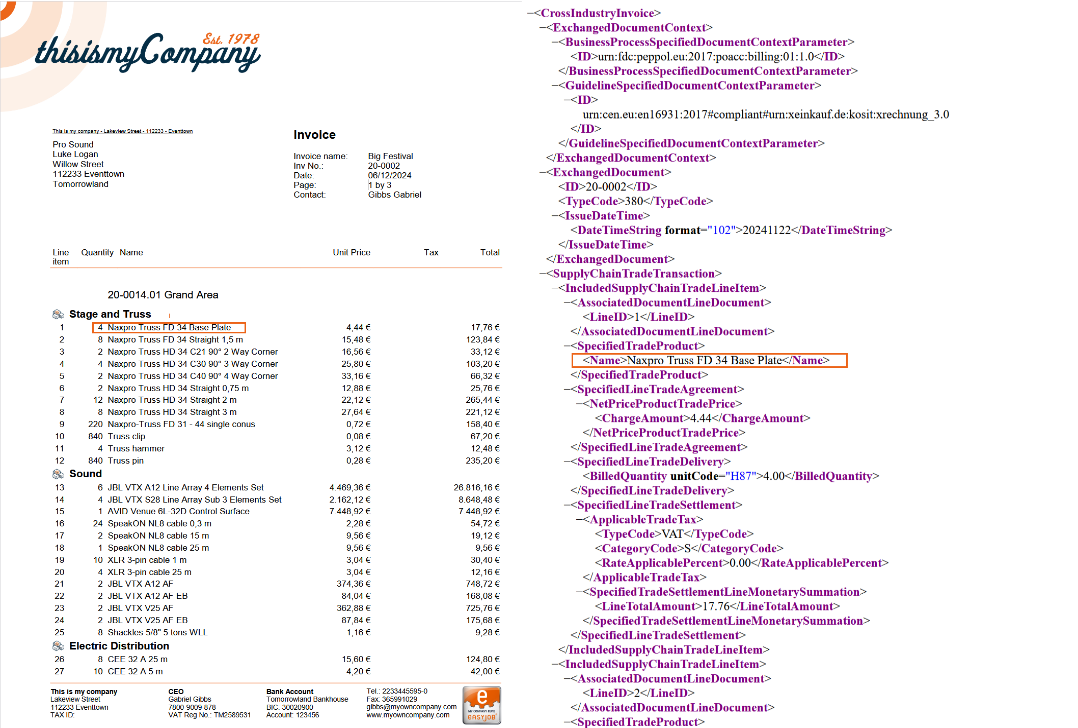
A letter of the Federal Ministry of Finance to the highest fiscal authority of the Länder, dated October 15, 2024 regarding the issuing of invoices according to § 14 UStG (Value Added Tax Act) specifies that:
"32: If the image part does not contain any invoice data that deviates from the structured part according to §§ 14, 14a UStG, this image part is considered a copy with identical content (refer to section 14c.1 para 4 UStAE). If instead the structured part contains deviating invoice data (e.g. another service description or a deviating tax amount due to manipulative interventions) this represents an additional (other) invoice, for which the requirements of § 14c UStG must be checked. Technically justified, negligible deviations, clarifying or supplementary information (e.g. due to the use of an abbreviated service description or rounding differences) are not objected to, when this does not change its character as a copy with identical content. An input tax reduction is also in this cases only possible from the structured invoice part."
The wording "when this does not change its character as a copy with identical content" unfortunately does not indicate precisely what this means for the complex visual invoice variants in the event industry. Is it sufficient, for example, if individual prices are not output within a group, only the selected group total, or all individual line items must be output cumulatively in a line with the group total? Time periods, factors etc. are not supported in the standardized format.
Please discuss this with your tax advisor.
Implementation in easyjob
easyjob offers the option to output invoices as structured XML files according to EN 16931 or as a visual PDF document that includes an XML file.
The standard output (XML or PDF) in the print dialog can be predefined on the customer level in the address master data.
Activating the E-invoice function
Activating E-invoice in the program settings
1. easyjob Menu Tools Settings
2. Invoicing
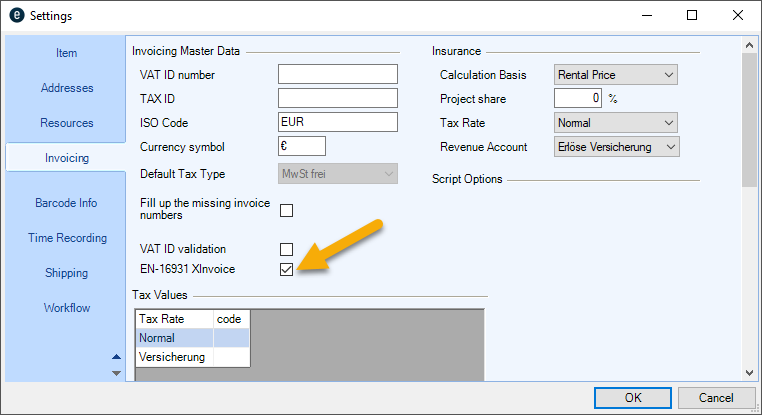
3. Activate EN-16931 XInvoice
4. Ok
easyjob must be restarted to activate the changes.
E-invoice XML file
The XML file is available as an attachment to the created PDF file. To export the XML file, open the PDF with a PDF viewer (e.g. PDF-XChange Viewer). Here you can display the attachments and export the contained XML file.
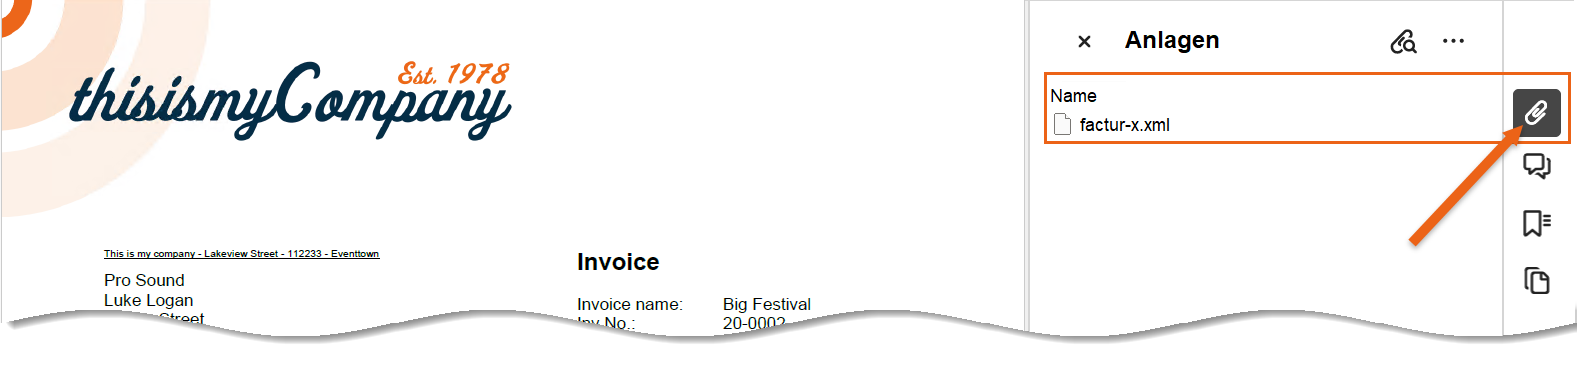
The output format for the E-invoice can be predefined in the address master data.
E-invoice output format
1. easyjob Menu Master Data Addresses
2. Select the address
3. Edit
4. Invoicing
5. Select the desired output format
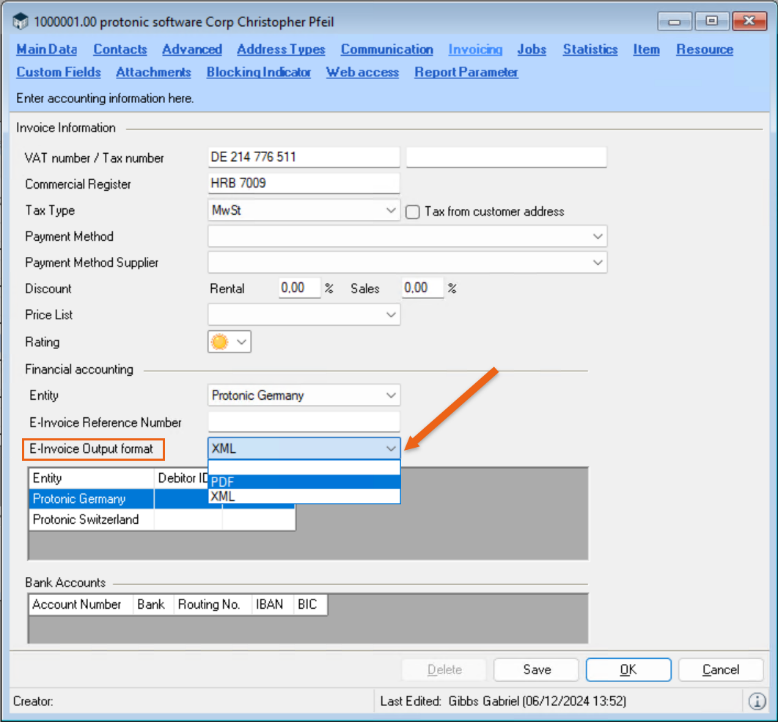
As the visual PDF and the structured XML must be an "identical copy", there are two implementation variants in easyjob.
Variant 1: simple line-by-line output of the individual line items
In the case of a simple, line-by-line invoice to be issued, without intermediate totals or hidden lines, etc., implementation is relatively simple. To do so, we can provide you with an E-invoice report as a template. You only have to activate this with the E-invoice function in the report. Details can be found in E-invoice (simple, line-by-line output).
Variant 2: complex output with hidden line items or prices.
If it is a complex task with hidden line items, hidden prices with the output of group totals or similar, implementation in easyjob is more complex.
As easyjob with the integrated Report Designer offers complex, formula-dependent, visual options, it is not possible to automatically create an identical copy as a structured XML.
For this reason, the implementation of the E-invoice function in complex reports involves higher costs.
Before customizing the report, we recommend determining which different parameter queries should actually be used when printing.
For the individual creation of a structured XML file, we have implemented the WriteEInvoiceLine function in the List&Label Report Designer. Each time it is accessed, an item line is written in the structured XML. For better usability, the function returns the item text as the result. This means that the function can be used as a formula in all points where a item text is output without having to buffer the item text in a variable or add the formula once for the visual output and once for the structured output. This simplifies a later customization or editing of the report. Details can be found in E-invoice (complex output).
Please note that protonic software does not offer tax or legal advice. We researched the information in good faith, implemented and documented it in easyjob, but cannot guarantee its accuracy.
E-invoice (simple, line-by-line output)
List & Label Version 29 is required to be able to create an electronic invoice according to ZUGFeRD EN16931 X-invoice (CII). You can select the List & Label Version separately for each report. By clicking the box EN16931 XInvoice (CII) in the report settings, the respective report is created as an electronic invoice when printing it.
Please note that checking the box for the E-invoice EN16931 XInvoice (CII) does not guarantee that the e-invoice will function without errors. Depending on the report content, extensive report customizations must be performed.
Please check the report thoroughly before using it. To do so, also use the E-invoice preview.
The update to List & Label 29 cannot be reversed.
We recommend using the E-invoice report template we provided.
Activating the E-invoice template
1. easyjob Menu Tools Report settings
2. Add
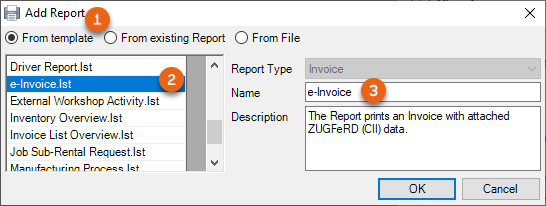
3. From template
4. Select E-invoice
5. Ok
6. The report is automatically marked as EN16931 XInvoice (CII)
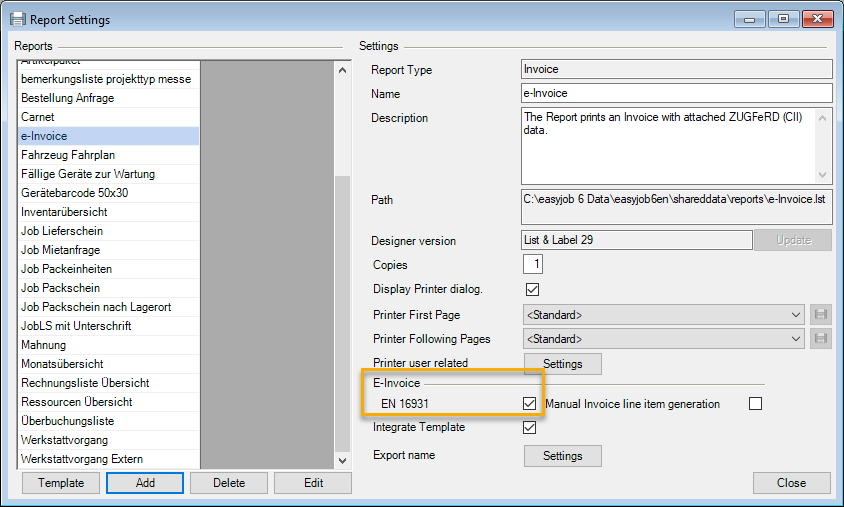
E-invoice preview
When creating an E-invoice, you can check the most important data in the E-invoice preview . The XML view offers the option to select individual items.
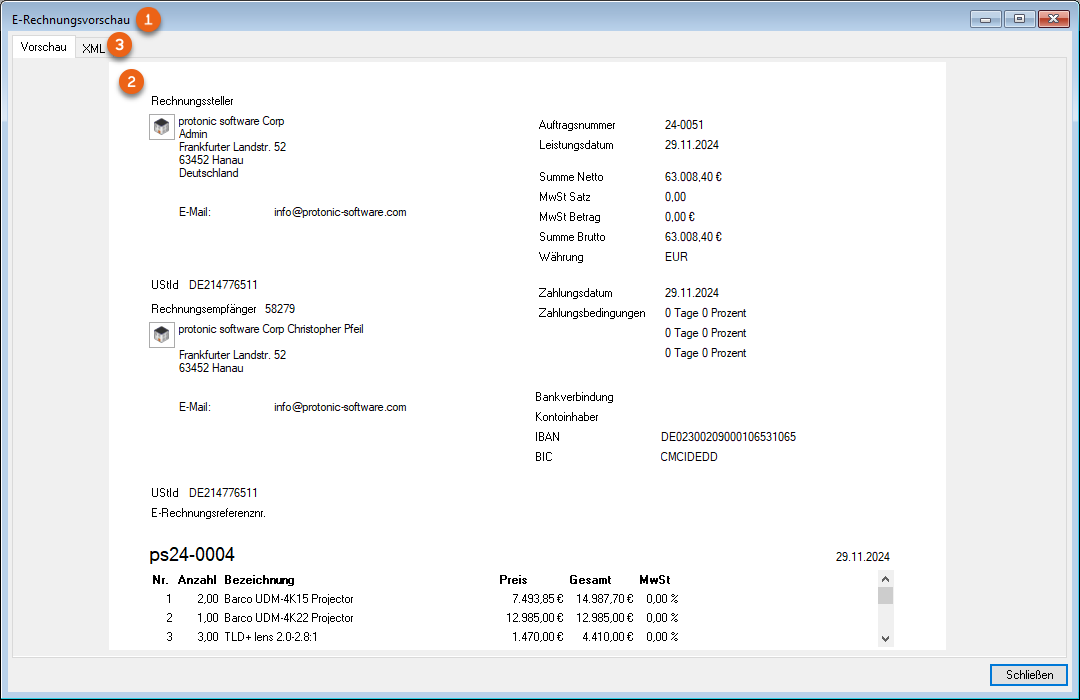
If you select, for example, an item on the right side, the corresponding line in the XML file is displayed.
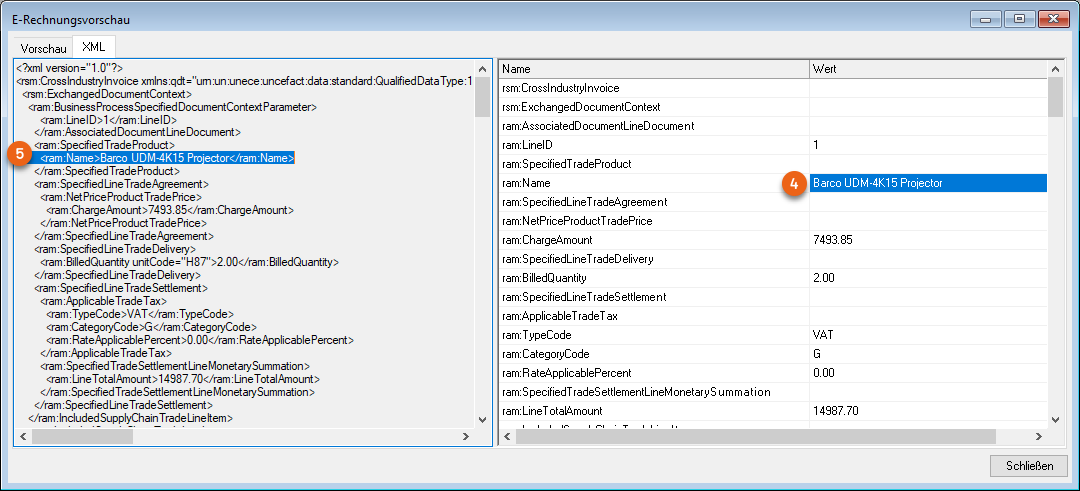
Opening the E-invoice preview
1. easyjob Menu Print Select E-invoice report
2. Open file
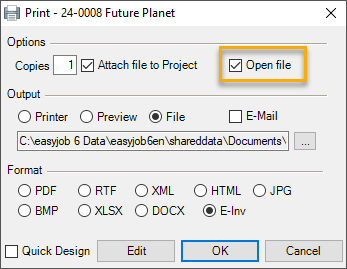
E-invoice (complex output)
You can create item lines yourself in XML using the Manual invoice line item generation function. This is called up with the easyjob WriteEInvoiceLine(,) function in the L&L Designer.
Formula: WriteEInvoiceLine( AUSGABE , "(description:text|factor:1|price:100|tax:0,19”))
Example - invoice report
WriteEInvoiceLine (f.Rechnungsposition.Bezeichnung, "description:"+f.Rechnungsposition.Bezeichnung+"|factor:"+str$(f.Rechnungsposition.Anzahl,0,0)+"|price:"+str$(f.Rechnungsposition.Preis,0,2)+"|tax:"+str$(f.Rechnungsposition.Mwst,0,2)+"")
Activating manual invoice line item generation
1. easyjob Menu Tools Report settings
2. Select the E-invoice report
3. Add
4. Check the box Manual invoice line item generation

Both components (PDF and XML) must represent an identical multiple item with regard to the invoice details in accordance with §§ 14, 14a UStG The EN16931 XML standard programmed here lists every invoice line. If you customized your invoice report, you can use create the XML using manual invoice line item generation. After converting, please fully test your report to make sure that it functions as required.
You can find the specifications and further information about the "Standard XInvoice" at:
https://www.e-rechnung-bund.de/faq-e-rechnung/faq-xrechnung/
E-invoice fields in easyjob
Certain data fields must be filled in easyjob in order to create a valid E-invoice. The BT/BG number defined in the XML document (CII) and the corresponding field in easyjob are indicated below. Some fields have 'double numbers', as they are present multiple times in the XML document, and each location requires a one-to-one BT/BG number
In general, a differentiation is made between three types of invoices: Credit (TypeCode 381), Deposit invoice (TypeCode 326) and other Invoice (TypeCode 380).
Invoice main data
Invoice main data fields
1. easyjob Menu Invoicing
2. Select Invoice
3. Edit
4. Check if the described fields have been filled.
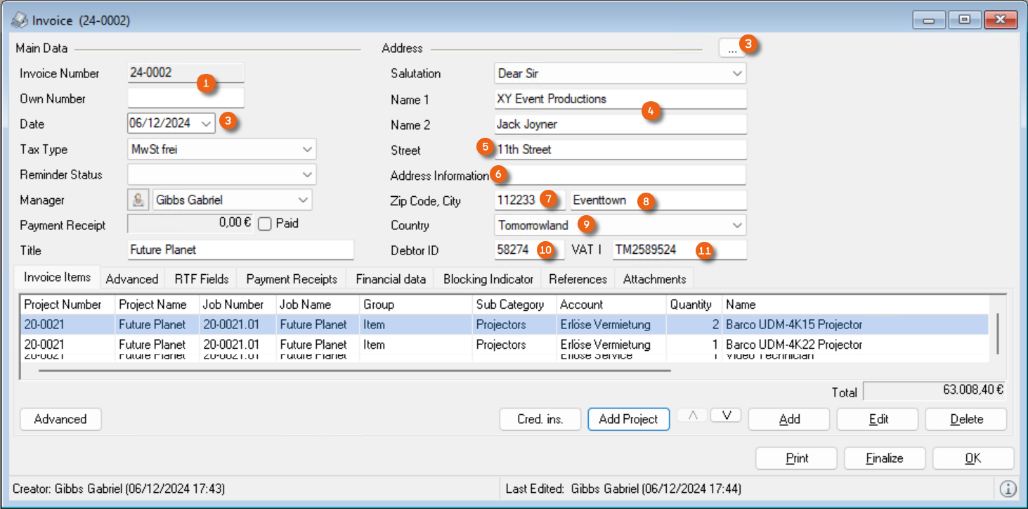
| Invoice | E-invoice |
|---|---|
| Invoice number|own number | BT-1 |
| Date | BT-2 |
| E-mail (from contact or address) | BT-49 |
| Name1 + Name2 | BT 44 | BT-70 |
| Street | BG-50 | BT-75 |
| Address information 1 | BT 51 | BT-76 |
| Zip Code | BG-53 | BT-78 |
| City | BT-52 | BT-77 |
| Country (ISO Code master data) | BT-80 | BT-55 |
| Debitor I.D. | BT-46 | BG-13 |
| VAT no. | BT-48 |
Invoice Items
Invoice item field
1. easyjob Menu Invoicing
2. Select Invoice
3. Edit
4. Invoice Items tab
5. Check if the described fields have been filled.
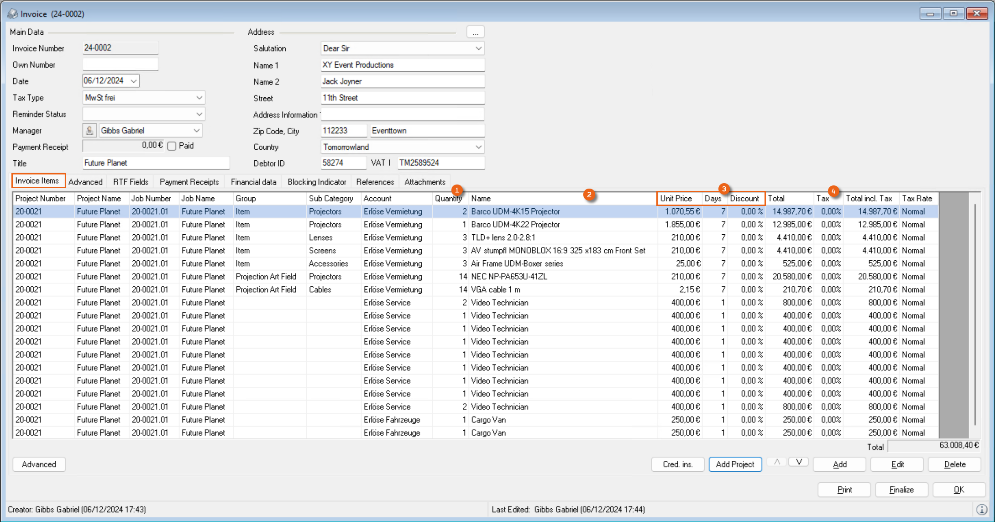
| Invoice Items | E-invoice |
|---|---|
| Quantity | BT-129 |
| Name | BT-153 |
| Price * Days * Discount | BT-146 |
| VAT % | BT-152 |
| Quantity * Price * Days * Discount | BT-131 |
Invoice financial data
Invoice financial data fields
1. easyjob Menu Invoicing
2. Select Invoice
3. Edit
4. Check if the described fields have been filled.
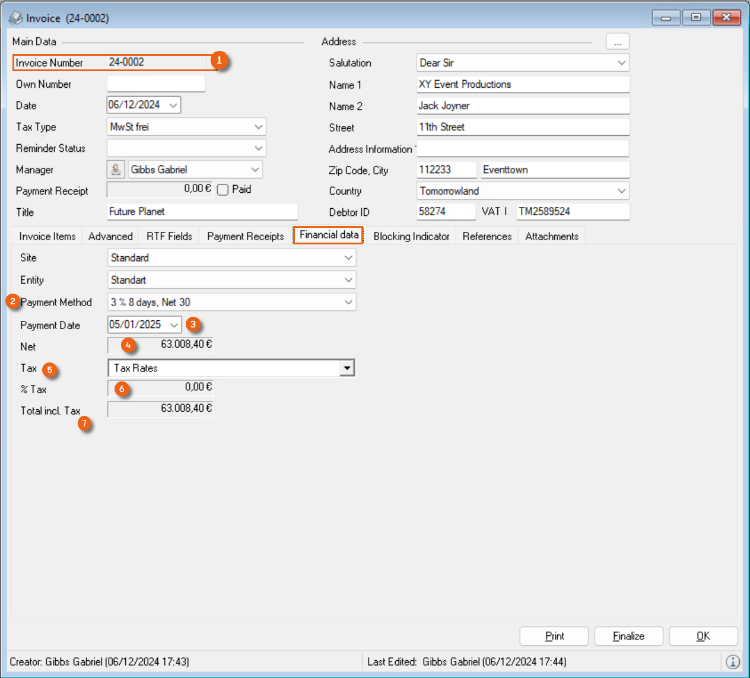
| Financial data | E-invoice |
|---|---|
| Invoice Number | BT-126 |
| Payment method | BT-20 | BT-82 |
| Payment date | BT-9 |
| Total | BT-106 |BT-109 |
| VAT % | BT-119 |
| Total VAT | BT-110 |
| Total incl. tax (Total + Total VAT) | BT-112 |
| Payment receipts + deposit invoices | BT-113 |
| (Net sum + total VAT) - (Payment receipts + deposit invoices) | BT-115 |
Invoice recipient
Recipient fields
1. easyjob Menu Master Data Addresses
2. Select the address
3. Edit
4. Invoicing
5. Check if the described fields have been filled.
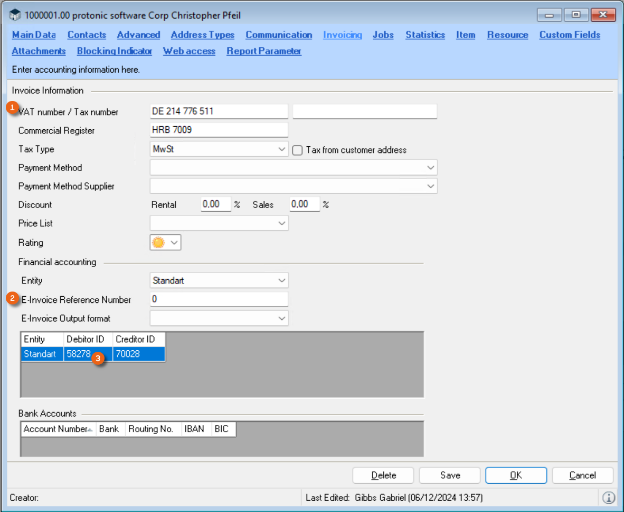
| Recipient | E-invoice |
|---|---|
| VAT no. (Invoice main data ident.) | BT-48 |
| E-invoice reference number (project address if necessary) | BT-10 |
| Debtor ID (invoice main data ident.) | BT-46 | BG-13 |
The E-invoice reference number (this is also called the routing ID) is only required for Federal invoice processing platforms or for authorities or the federal administration. The VAT ID is required for invoices between companies (B2B). In private areas, these two numbers are not required.
To ensure that the E-invoice reference number (routing ID) is present, a workflow can be used that performs a check, for example with the address type"Public Body", if the required number is present in the address.
Invoice project
Project fields
1. easyjob Menu Projects Edit Project
2. Select the Project
3. Edit
4. Check if the described fields have been filled.
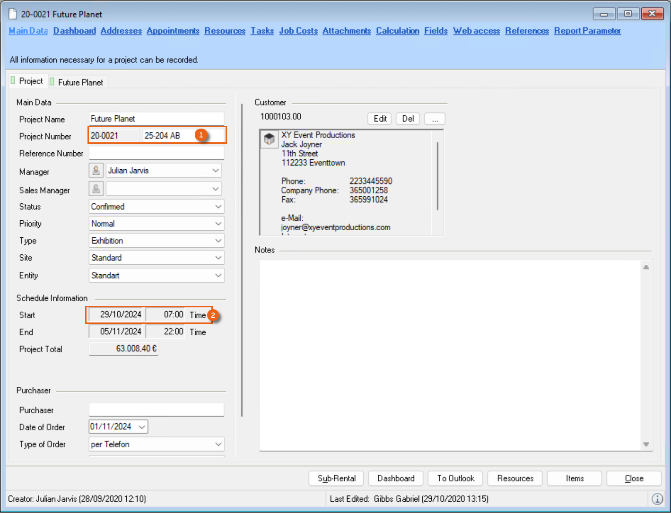
| Recipient | E-invoice |
|---|---|
| Project Number | BT-14 |
| Start date (corresponds to the service date if the invoice date is not the service date) | BT-72 |
Invoice creditor
Depending on which functions and modules you use in easyjob, the data for the invoice creditor comes from different fields.
Company address and invoicing master data
Invoice creditor (only one company) fields
1. easyjob Menu Tools Settings
2. General
3. Company address (if there is only one company)
4. Check if the described fields have been filled
Invoice creditor invoicing master data
1. easyjob Menu Tools Settings
2. Invoicing
3. Invoicing master data
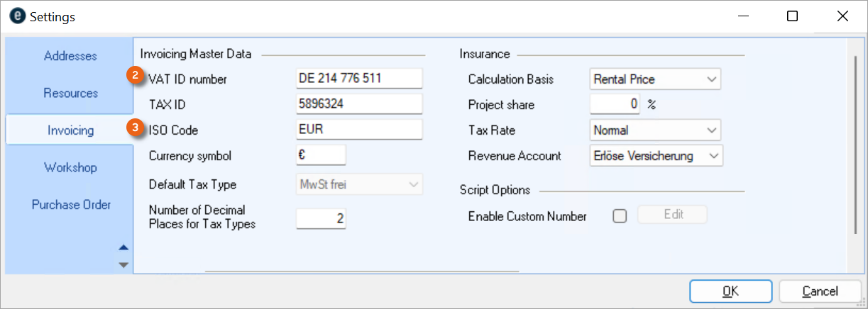
4. Check if the described fields have been filled.
| Invoice creditor address | E-invoice |
|---|---|
| Company address comprised of | |
| Company | BG-27 |
| Street | BT-35 |
| Zip Code | BT-38 |
| City | BT-37 |
| Company phone (or from the address of the current user) | BT-42 |
| E-mail (or from the address of the current user) | BT-34 |BT-43 |
| VAT no. | BT-31 |
| ISO Code (output currency) | BT-55 |
Company
Invoice creditor (one or more companies) fields
1. easyjob Menu Master Data Companies
2. Select the company
3. Edit
4. Address
5. Edit
6. Main data and Invoicing tab
7. Check if the described fields have been filled.
Invoice creditor invoicing master data (company) fields
1. easyjob Menu Tools Settings
2. Invoicing
3. Invoicing master data
4. Check if the described field has been filled
| Invoice creditor (company) | E-invoice |
|---|---|
| Company | BT-27 |
| Road | BT-35 |
| Address information 1 | BT-36 |
| Zip Code | BT-38 |
| City | BT-37 |
| Country | BT-40 |
| Company phone (or from the address of the current user) | BT-42 |
| E-mail (or from the address of the current user) | BT-34 |BT-43 |
| VAT no. | BT-31 |
| Bank | BT-85 |
| IBAN | BT-84 |
| BIC | BT-86 |
| ISO Code (output currency) | BT-55 |
Invoice current user
Some data for the user logged into easyjob at the moment the E-invoice is created will be transferred automatically to the XML format.
Current user fields
1. easyjob Menu Tools User Rights Management
2. Select the user
3. Edit
4. Check if the described fields have been filled.
| Current User | E-invoice |
|---|---|
| Last name + first name | BT-41 |
| Department | BT-41-0 |
| Company phone (or from the company address) | BT-42 |
| E-mail (or from the company address) | BT-43 |
Address and Contact Management
To filter them better, the addresses are categorized by address type.
Contacts can be assigned as address contacts. You can assign as many contacts as you want to an address.
Depending on the process, you can assign an address or a contact.
| Process | Address | Contact |
|---|---|---|
| Project | X | X |
| Job | X | X |
| Sales Order | X | X |
| Purchase Order | X | X |
| Invoice | X | |
| Assigning a supplier to an item | X | |
| Resource | X | |
| User | X | |
| Workshop-maintenance address | X |
Address Book
Addresses are managed in the easyjob address book.
Open the easyjob address book
1. easyjob Toolbar Address Book
The list displays addresses and contacts based on their filters. The Type column indicates if it is an Address or a Contact. After selecting the address additional information will be shown in the information area.
Displaying addresses/contacts
Addresses and contacts are displayed in various forms. If you select an address or contact, the corresponding information will be displayed. (In this example, Project view main data.)
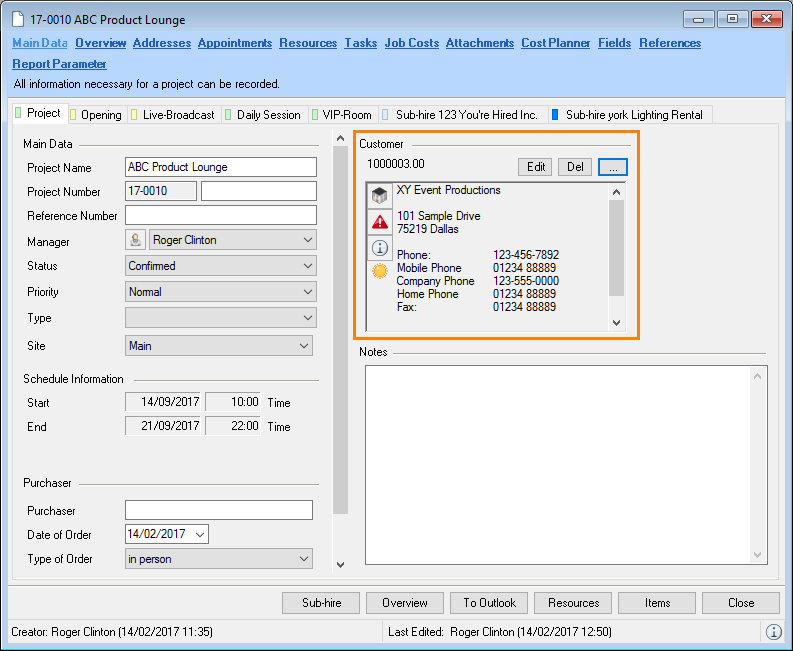
| New | Create and assign new addresses in the master data |
|---|---|
| ... | Assign current addresses with the address book |
| Edit | Edit assigned addresses in the master data |
| Del | Delete assigned addresses from a workshop activity |
Communication menu
The available communication devices are configured in the easyjob program settings. More information can be found in the manual Installation and Configuration.
Depending on which communication devices are activated, you can access different communication operations using the address or a contact:
 | TAPI | Make a call |
|---|---|---|
 | Open a standard email dialog | |
 | Open Facebook profile page | |
 | Lync | Send a Microsoft Lync message |
 | Skype | Open Skype |
| Internet | Start the standard web browser | |
 | Bing Maps | Open the Bing Maps roadmap |
| Text message | Send a text message to a mobile phone |
When Facebook, Microsoft Lync, Skype or Windows Live Messenger Integration is activated, the communication icon will display the current on-line status.
| Contact | Address | User | |
|---|---|---|---|
| Available |  |  |  |
| Do Not Disturb |  |  |  |
| Busy |  |  |  |
| Away |  |  |  |
Signaling an incoming call
When integrating a phone, incoming calls will be resolved based on the stored phone number data and signaled with a popup window.
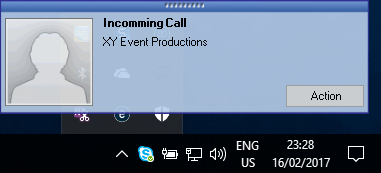
You can perform additional activities using the context menu.
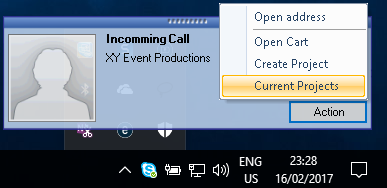
From the call list context menu you can perform additional actions using a known address.
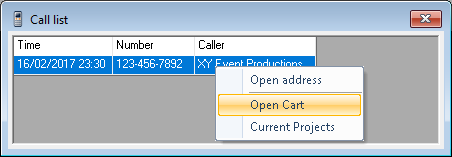
Countries
In addition to the address, also the country master data is used in the item as the manufacturer country. Also the country code is used in the carnet.
With TAPI support activated, we recommend entering the country prefix.
Managing countries
1. easyjob Menu Master Data Countries
2. Select a country you want to Edit or create a new country with Add.
3. Enter a name, country code and phone prefix.
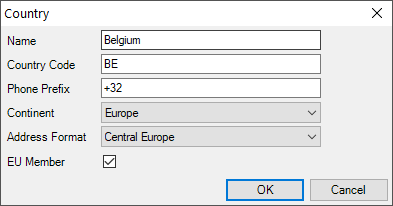
4. Ok
Address Master Data
Addresses and contacts are managed in address master data.
In addition to the address book and the master data, the master data form can be opened from additional forms and lists.
Open the address master data
1. easyjob Menu Master Data Addresses
Main Data
Most of the fields are self explanatory. When creating an address and/or a contact, a simple Duplicate Check is performed if there is already another address or contact with the same contact data such as contact phone and e-mail.
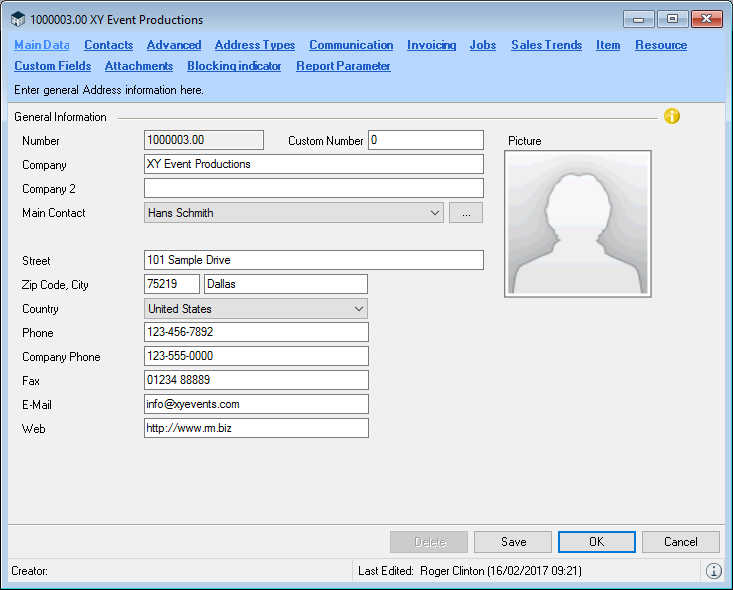
The Company 2 field can be used to complete the company name. An image can be added to the address main data with a double click. You can assign a Main Contact to any addresses and open it directly via … .
The geo-coordinates of an address are determined when creating and changing addresses. Therefore you can use the distance filter in the resource plan, for example.
To do so, the Geolocation area must be activated in the program settings, which makes saving a new address slightly slower.
1. easyjob Menu Tools Settings
2. Integration
3. Click the Use Geo-Coordinates box
4. Ok
easyjob must be restarted to activate the changes.
The distance is calculated as a linear distance.
The salutations are managed in the master data.
Managing salutations
1. Easyjob Menu Master Data Salutations
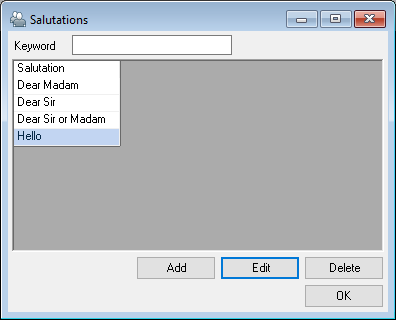
2. Select a salutation to Edit or create a new one with Add.
3. Give the salutation a name.

4. Ok
If you have saved multiple contacts in the address data, we recommend keeping the Last Name and First Name fields empty and entering the data as a contact in the address.
Contacts
To manage contacts within a company, you can assign as many contacts to each address that you want.
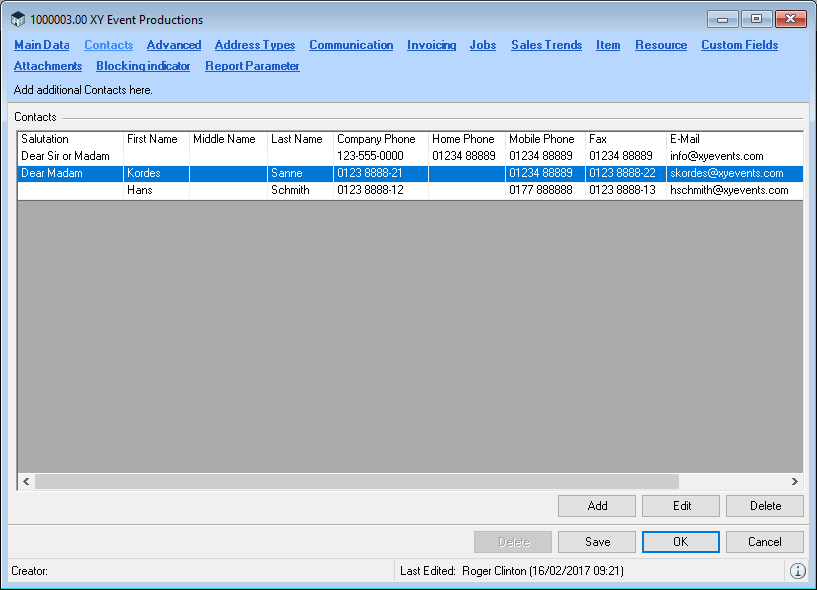
Adding a new contact or editing an existing contact
1. easyjob Menu Master Data Addresses
2. Address and Edit
3. Contact tab
4. Add or Edit
5. Complete the Main Data
6. Select the Advanced and Communication tabs
7. Enter the desired data
8. Ok
With the advanced contact master data, you can enter additional personal information.
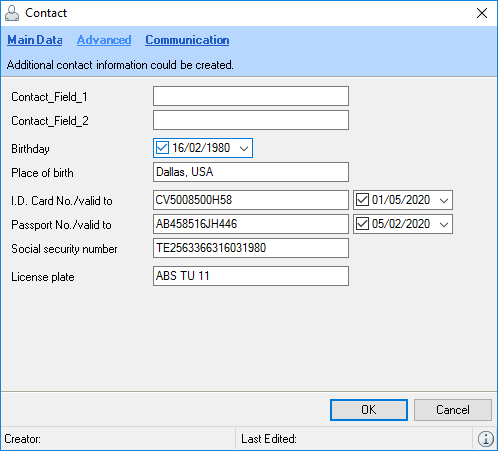
Advanced
The distance from the address data is used in transportation planning and by the Sub-Rental Optimizer. New rental and sales orders are created based on the delivery address.
If the note field is filled with information , this is signaled by the Information Icon in the address field. A small menu displays the field content .
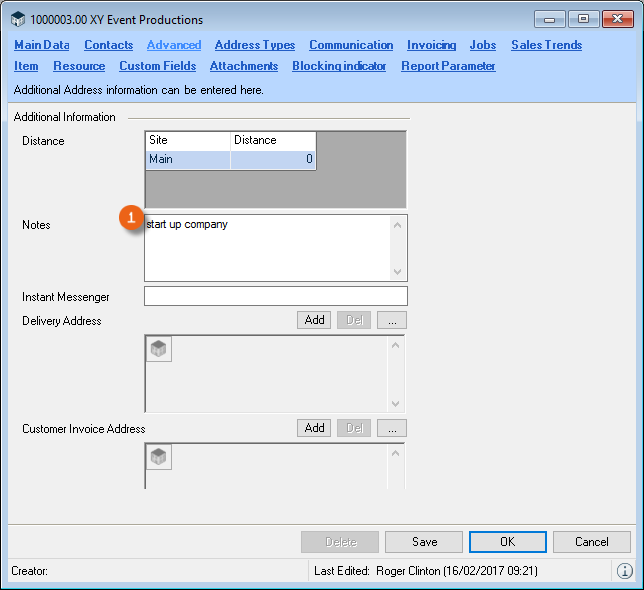
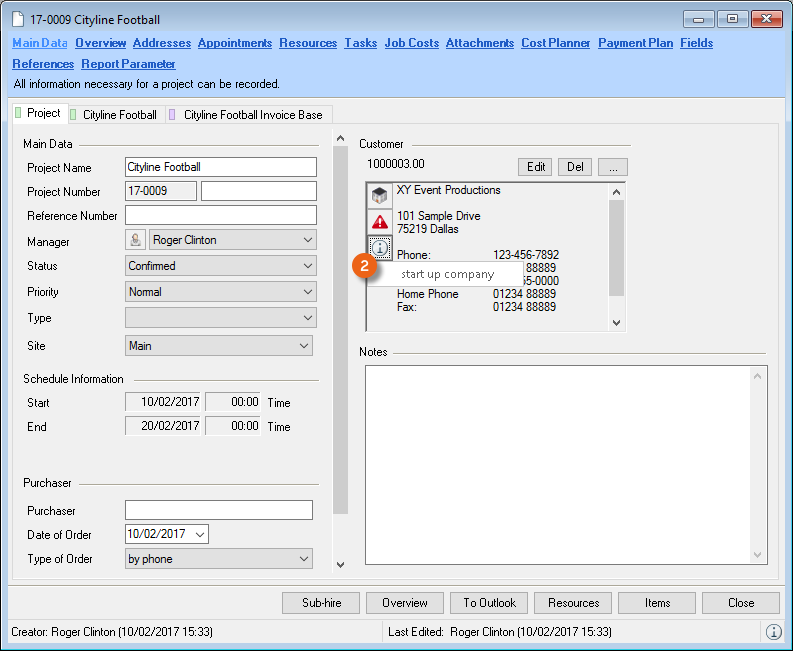
Address Types
You can assign each address to as many address types you want for categorization purposes. Based on the address type, you can filter parameters in the address book faster for data export.
Assigning address types
1. easyjob Menu Master Data Addresses
2. Address and Edit
3. Address Type tab
4. Check the box for the applicable address types
5. Save
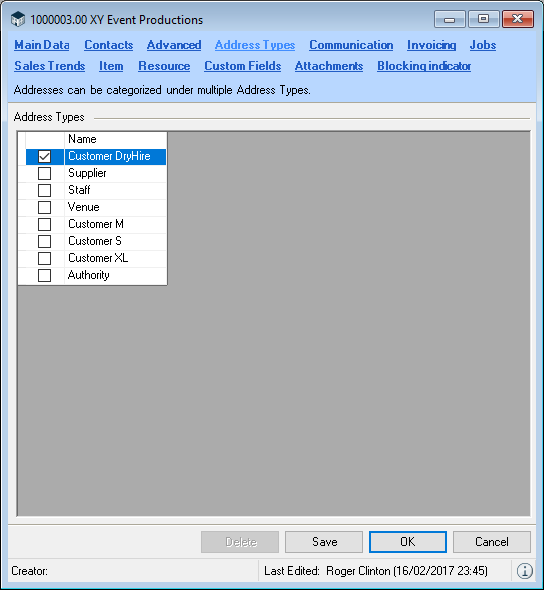
Editing address types
1. Easyjob Menu Master Data Address Types
2. Select an address type to Edit or create a new one with Add.
3. Enter a Name

4. Ok
Assigning the address type
This filter option categorizes address types according to use. In this way, they can be assigned to various areas. If for example an address type is assigned as the type Customer, then in easyjob, this address will only be displayed in cases where a customer can be selected. When selecting a customer in a project, then only customers will be displayed, for example, and no Delivery Addresses, Employees, etc.
By default, all boxes are checked for address types, and can be individually customized.
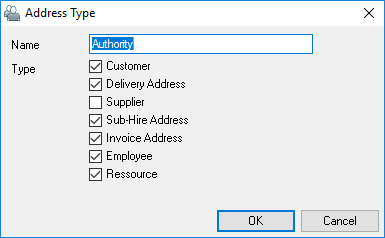
Overview of the types of addresses and their assignment:
| Type | Assignment |
|---|---|
| Customer | Customer selection in the project |
| Shipping Address | Selection in the job |
| Supplier | Selection with Items |
| Sub-rental supplier | Selection in the job when the job type is a sub-rental |
| Invoice recipient | Invoice |
| Employees | Resource Assignment |
| Resources | Resource Assignment |
Managing address types
1. easyjob Menu Master Data Address Types
2. Select the address type with Edit or create a new one with Add
3. Give the address type a Name
4. Check the corresponding box for the Type
5. Ok
Communication
More information about this topic can be found in Chapter Communication menu.
Invoicing
Enter the information regarding the price calculation and the data export to the accounting department in the invoicing settings.
More information can be found in chapters Calculation and Invoicing.
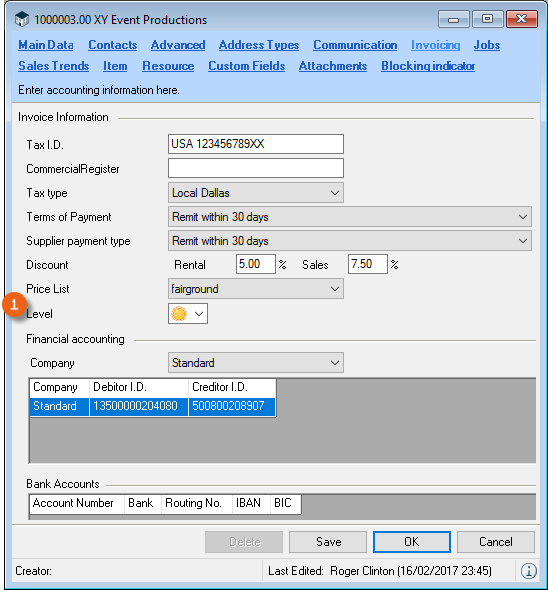
You can use the level indicator as you like. For example, you can use a sunny sky to indicate a good customer relationship and storm clouds to indicate a certain level of awareness.
Jobs
The jobs list lists the jobs for a customer. The list is creased based on the customer address in the project.
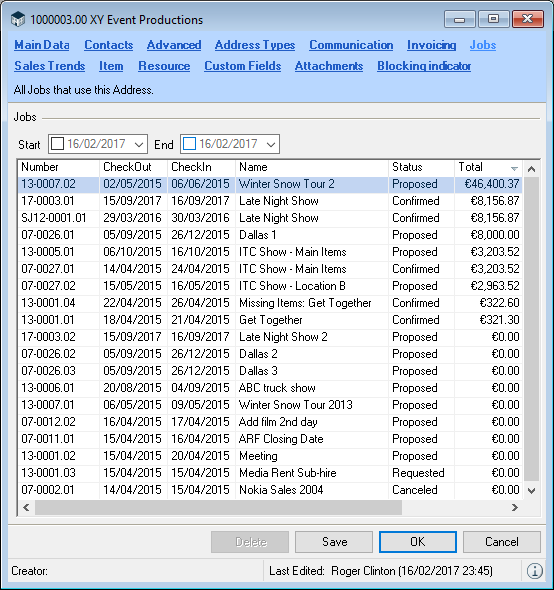
Sales Trends
Sales Trends shows the order volume trend with the customer. The list is grouped by job status. More information about calculating the individual numbers can be found in the easyjob Business Information Center.
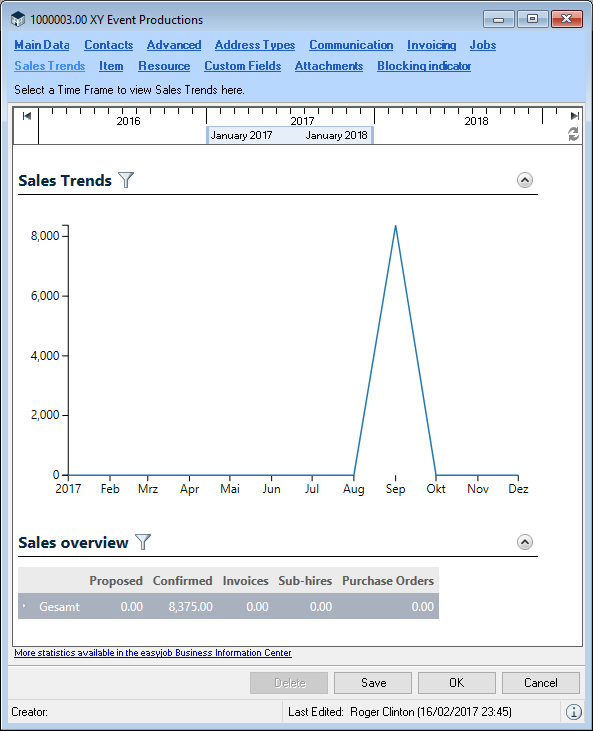
Displaying the sales trends
1. easyjob Menu Master Data Addresses
2. Address and Edit
3. Sales Trends tab
4. Select the required time frame in the calendar view by moving the bar
5. 
Items
If an address conceals a supplier (sub-rental/purchase), you can enter the corresponding item here. Additional information can be found in chapters Calculation and Scheduling and Site Management.
Resource
More information about the resource settings for an employee can be found in chapter Staff and Transportation Planning.
Custom Fields
More information about custom fields can be found in chapter Custom Fields.
Attachments
More information can be found in chapter Attachment.
Workshop Activities (Service/Repair)
Each item can be set for reoccurring maintenance and maintenance intervals in the workshop field.
Main Data
Create a workshop activity
1. easyjob Menu Workshop Create Activity
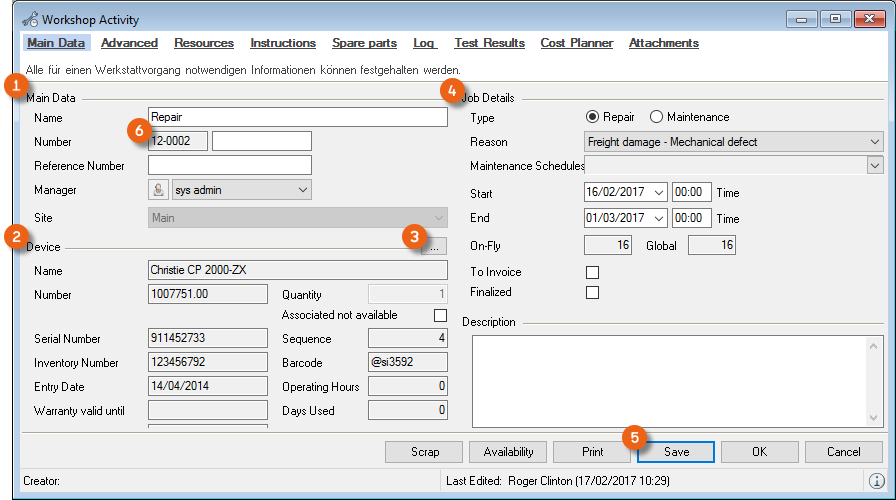
Enter a name and additional information in the Main Data . You can assign multiple items or a device to a workshop activity via an additional submenu .
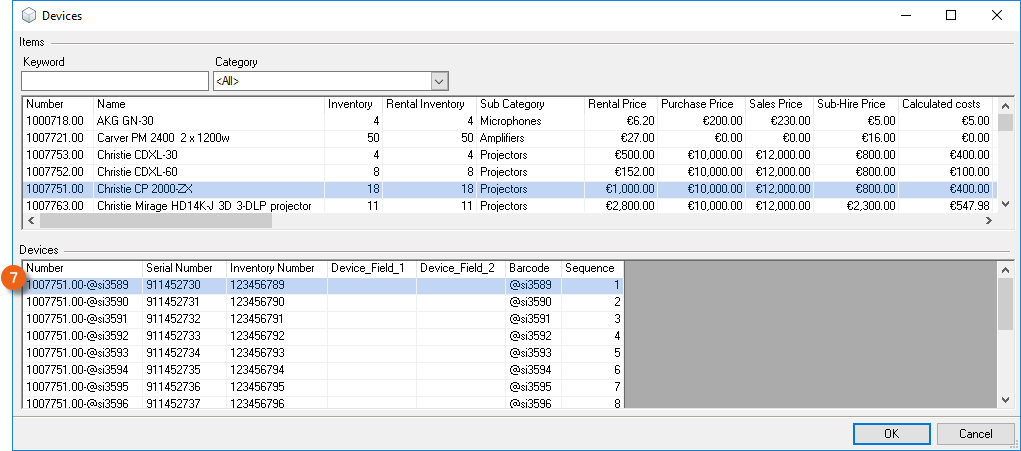
In the activity type , indicate if it is a maintenance or a workshop activity. If maintenance is performed based on an interval, enter the corresponding maintenance schedule.
During the time frame, the items are considered available. Please note that for longer durations, the end date must be customized. If a workshop activity is not yet finalized, the activity will be displayed in the Navigator, easyjob Today, and reminders.
After you have entered the data, save it. Easyjob allocates a workshop activity number .
If a device is booked during its warranty period in a workshop activity, the Warranty valid until field will have a red background.
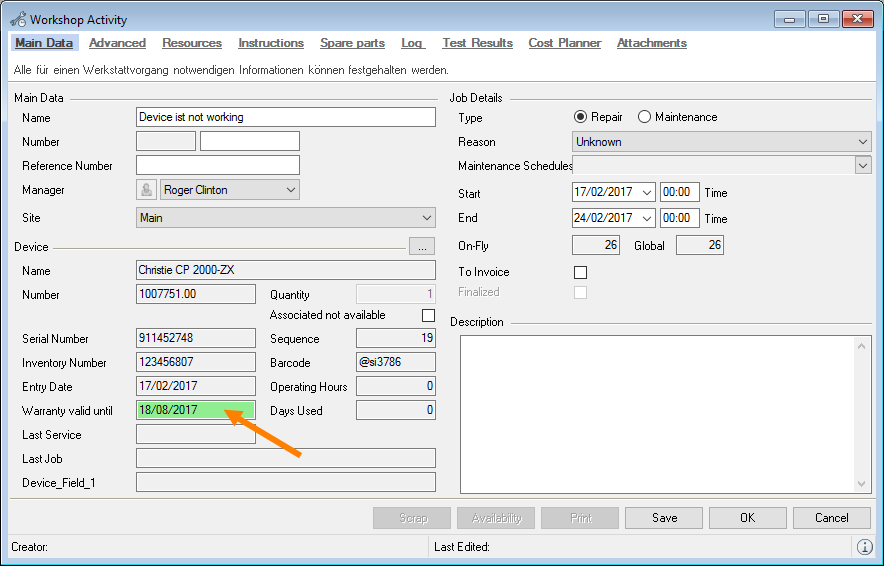
Advanced third party repairs/maintenance
The workshop activity may be carried out by an external company. The external address must be entered. The information for a delivery note/dispatch note is available in the report designer. In addition, indicate the status of the external workshop activity with the Shipped and Back date.
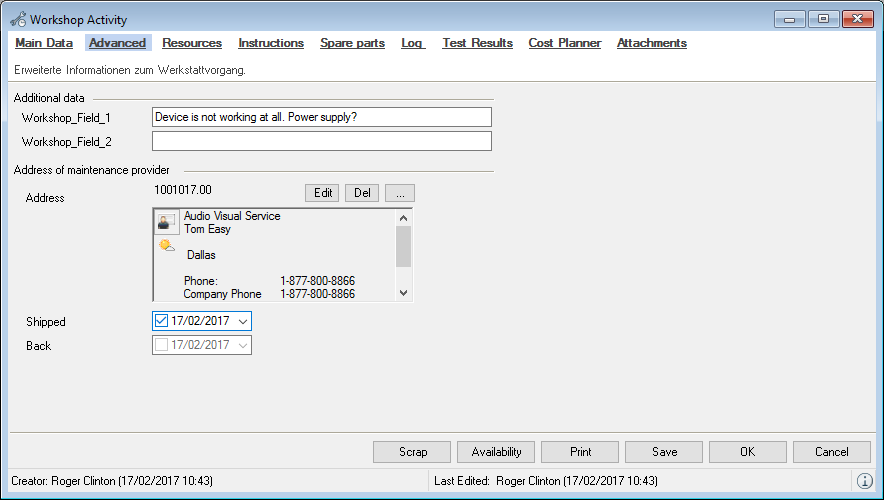
Resources
In order to plan necessary staff for a workshop activity, you can plan the resources necessary for this. More information can be found in chapter Staff and Transportation Planning.
Instructions
For maintenance activities, the instructions defined for the maintenance schedule will be displayed in the item master data .
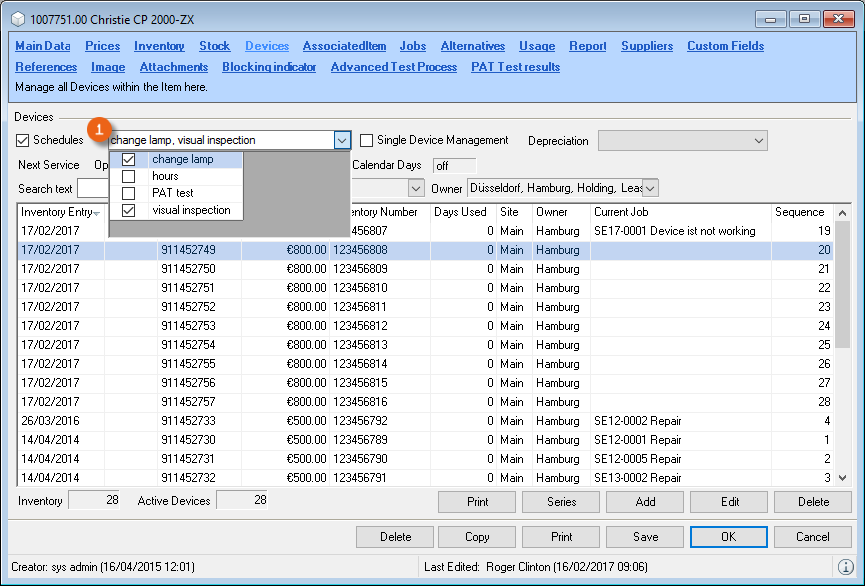
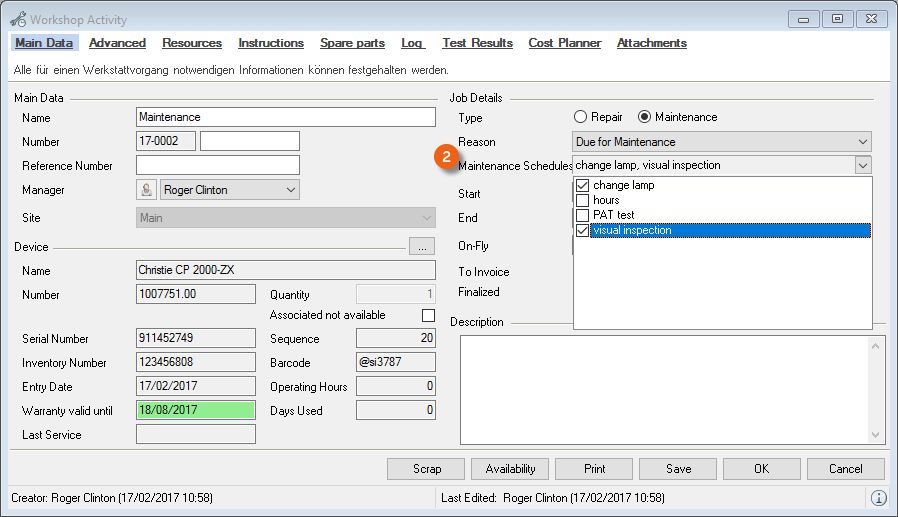

More information about this topic can be found in Chapter Maintenance intervals.
Spare parts
If spare parts are necessary for a workshop activity, you can add the respective item. For this, the item must be created as a substitute part in the master data. More information can be found in the chapter Items Main Data. The spare parts can be assigned to a workshop activity. The inventory deletion is booked in the sales inventory. There is also a minimum inventory for spare parts, and if the amount goes below this level, you will automatically receive a reminder.
Assigning spare parts
1. easyjob Menu Workshop Edit Activity
2. Select the required workshop activity
3. Spare parts
4.
5. Select the required substitute part
6. Ok
7. Enter the quantity of the required spare parts
8. Select the time period for the inventory deletion
9. Ok
Log
The log of the activities and any notes can be entered in the log field. This information can be particularly important in the case of a repeated activity.
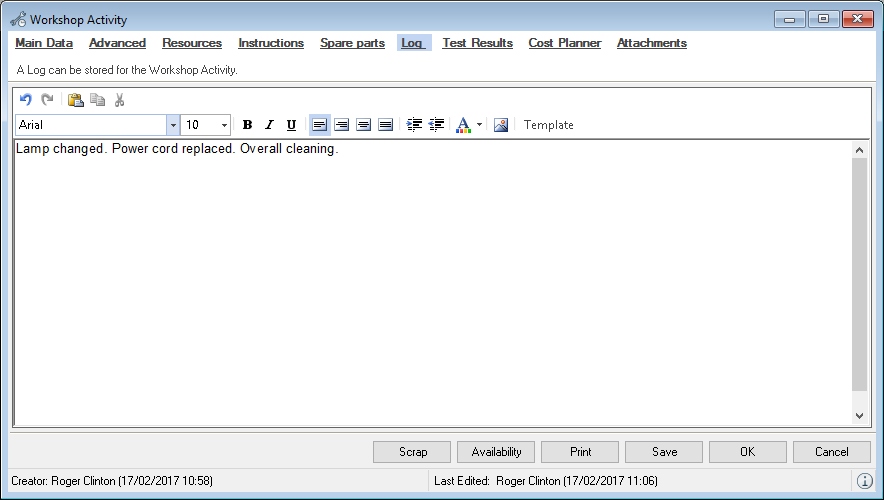
Test results
The results from the DGUV V3 Prüfung (previously BGV A3) can be assigned to each workshop activity. This is automated with the easytool PAT Test Integration. More information can be found in chapter Importing test results.
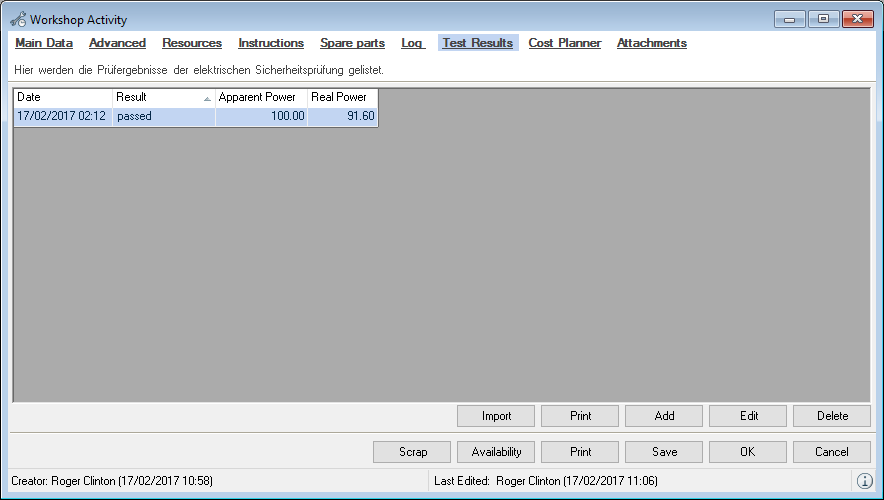
The individual results can be viewed and edited in the test results dialog.
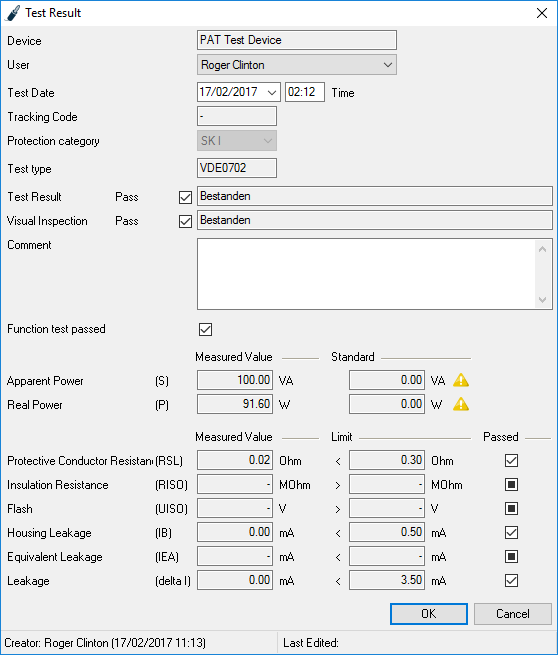
If the apparent or real power deviates from the values saved in the master data, the total will be marked with a warning.
Cost Planner
The cost planner is used to enter the workshop costs. If the workshop activity was created using the barcode scanner, the assigned job is already preset.
More information about this topic can be found in Chapter Invoicing workshop activities.
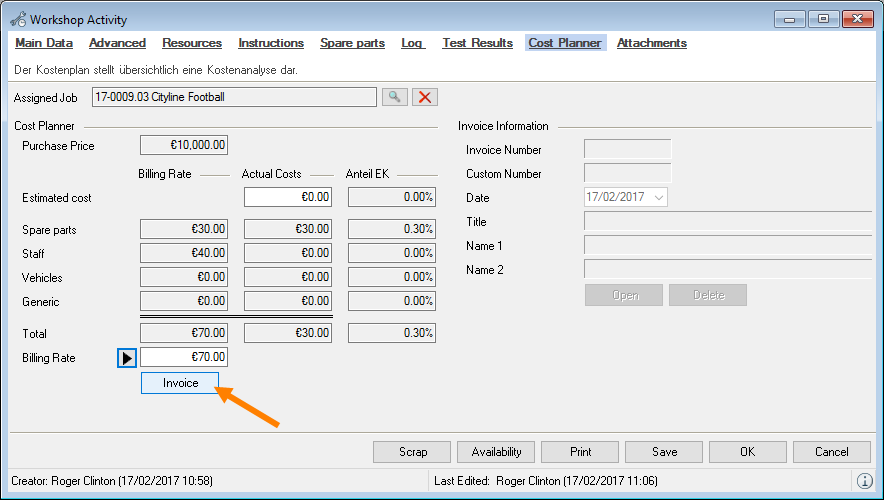
Cost Planner
In the cost planner, you can define amounts for spare parts, staff, vehicles and other costs . You determine which amount should be charged and can invoice it .
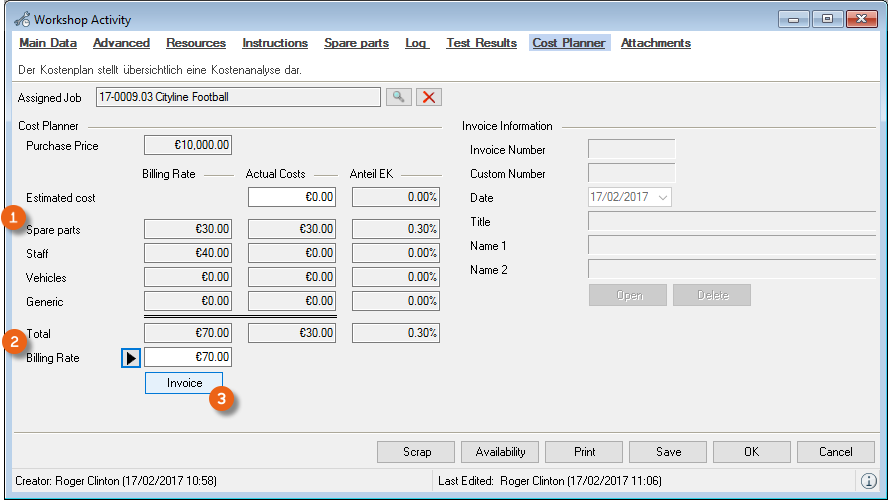
You can either create a new invoice, or add the costs to an existing invoice .
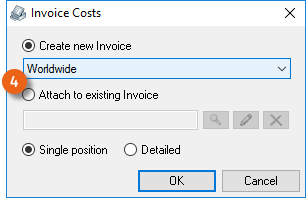
More information about this topic can be found in Chapter Invoicing workshop activities.
Attachments
More information can be found in chapter Attachment Management.
Scrap
If an item/device cannot be repaired or repairing it is not economically feasible, the device/item can be scrapped.
When an item/device is scrapped, the inventory is corrected with an inventory out entry.
Scrapping a device
1. easyjob Menu Workshop Edit Activity
2. Workshop Activities
3. Scrap
4. If necessary, enter the quantity to be scrapped.
5. Ok
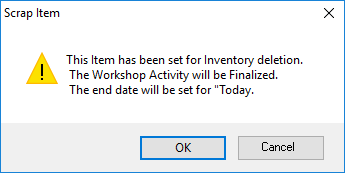
6. Ok
7. A corresponding inventory deletion will be created.
Maintenance intervals
In the case of recurrent maintenance such as PAT testing, bulb replacement or similar, create the maintenance schedule and assign the item to it.
Maintenance Schedule
Enter the name, maximum operating hours , maximum days usedor maximum calendar daysin the maintenance schedule. You can use a combination of the parameters. If a threshold value is reached, the device will be suggested for maintenance. You add a descriptionund instructions.
Managing Maintenance Schedules
1. easyjob Menu Master Data Maintenance Schedules
2. Maintenance Schedule and Edit or create a new one with Add
3. Enter a name for the maintenance schedule and complete the fields
4. Ok
Operating Hours
You can change the device's operating hours manually in the device master data and with the barcode scanner.
Days Used
The days used are calculated on the calendar days of the job.
Calendar Days
Enter 365 in the calendar days to service the device yearly.
Electrical Test
To import test results based on the maintenance schedule, check the box for Electrical Test .

Due at inventory entry
With this setting, you determine the maintenance schedule for which the inventory entry of a device generates the due date for maintenance, for example for devices that were not tested by the manufacturer or for used items. If this box is checked, when an inventory entry is made for this device, it must be mandatorily tested.
Assigning maintenance intervals to devices
Maintenance intervals are assigned to the devices in the item master data.
Defining maintenance intervals for devices
1. easyjob Menu Master Data Items Edit
2. Device tab
3. Check the Maintenance Schedules box
4. Select the interval you want to assign to the item
5. Save
Viewing the workshop activity history of a device
You can view the workshop history as well as the history of the test results for a device in the device master data.
Open the workshop history for a device
1. easyjob Menu Master Data Items Edit
2. Device tab
3. Select the device and Edit
4. Workshop tab
A list will show all workshop activities for the device. You can also edit the selected activity or create a new one with Create.
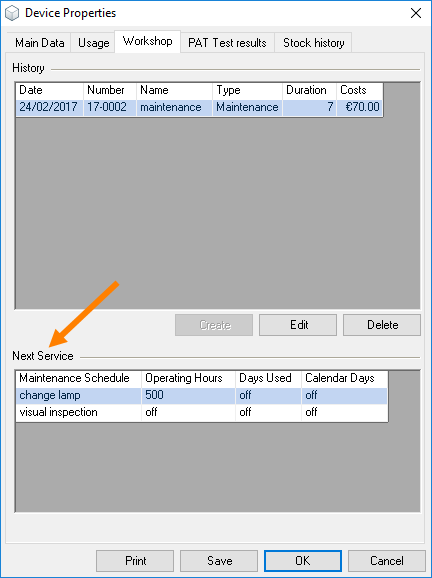
The Next Service list shows when the device will be due again for maintenance.
Determining devices due for maintenance
A list of devices that are due and overdue for maintenance can be found in the Navigator, easyjob Today and Windows Gadgets in the workshop menu.
Determining devices due for maintenance
1. easyjob Menu Workshop Due for Maintenance
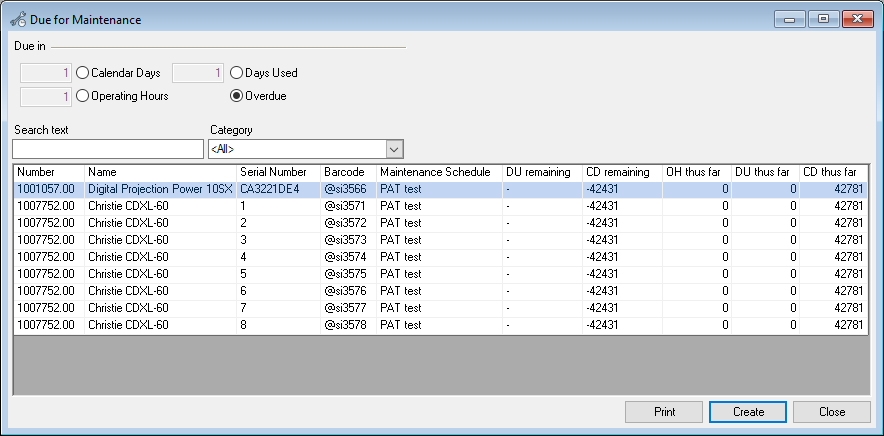 By default, all overdue devices are displayed. A device is overdue when a pre-defined maintenance interval has been reached.
In addition to the standard columns, you can display additional information about the due date in the list:
| Remaining OH | Operating hours until the next maintenance due date |
|---|---|
| Remaining DU | Days used until the next maintenance due date |
| Remaining CD | Calendar days until the next maintenance due date |
| Elapsed OH | Operating hours since last maintenance |
| Elapsed DU | Days used since last maintenance |
| Elapsed CD | Calendar days since last maintenance |
Customizing standard values for due date reminders
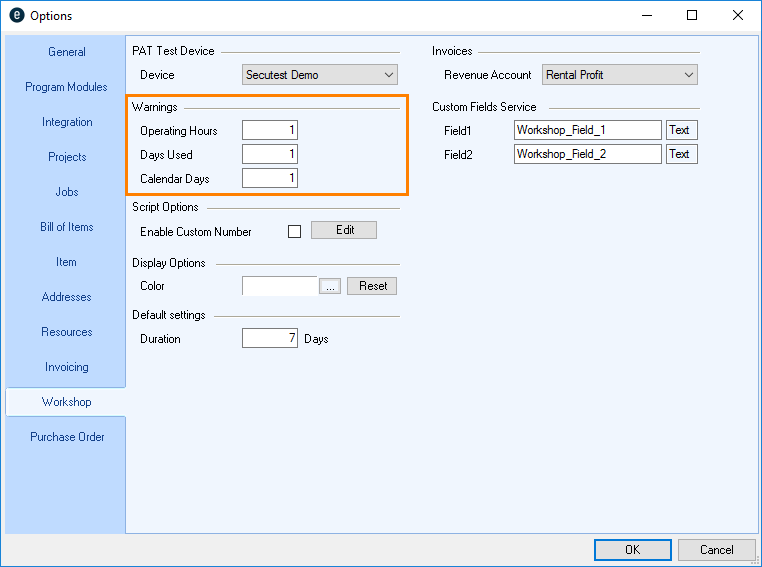
1. easyjob Tools Settings
2. Workshop tab
3. Customize the values
4. Ok
easyjob must be restarted to activate the changes.
You can create the workshop activities from the list of devices due for maintenance.
Creating workshop activities from devices due for maintenance
1. easyjob Menu Workshop Due for Maintenance
2. Select the devices in the list for which you want to create a workshop activity
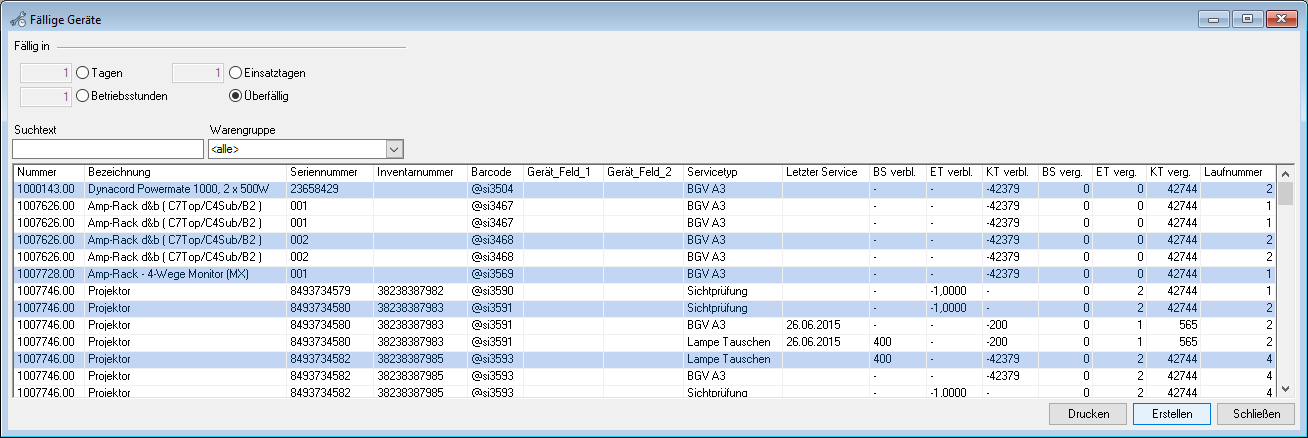
3. Create
4. Select the Manager and the time frame
5. You can also finalize the activity automatically. Check the Finalized box. This settings can be used when the necessary activities are finalized and no additional documentation for the activity is available.
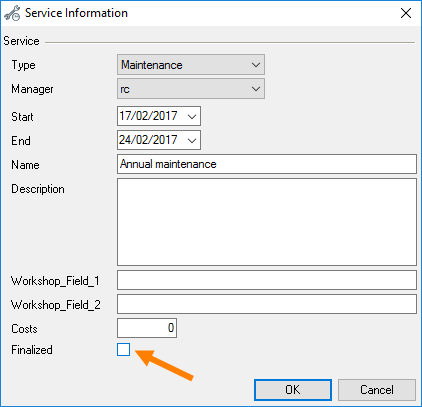
6. Ok
Importing test results
With easytool Secutest, the test results are exported and assigned automatically to the corresponding devices.
They are assigned based on the barcodes scanned prior to testing.
Importing test results
1. easyjob Workshop Import test results
The test results will be displayed after the import.
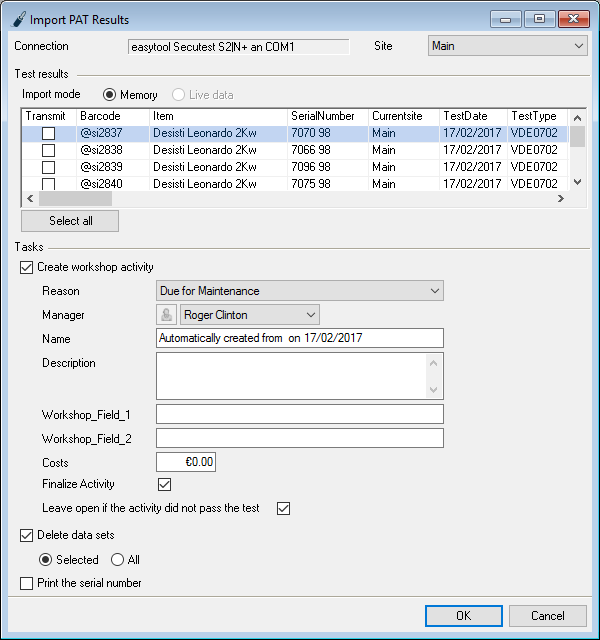
Creating workshop activities from the imported test results.
1. Enter the parameter for the new activities in the Actions group
2. After the workshop activities are created, you can delete the tests from the device's memory
3. Check the test results to be transferred in the Transmit column.
4. Ok to create the activities based on the test results
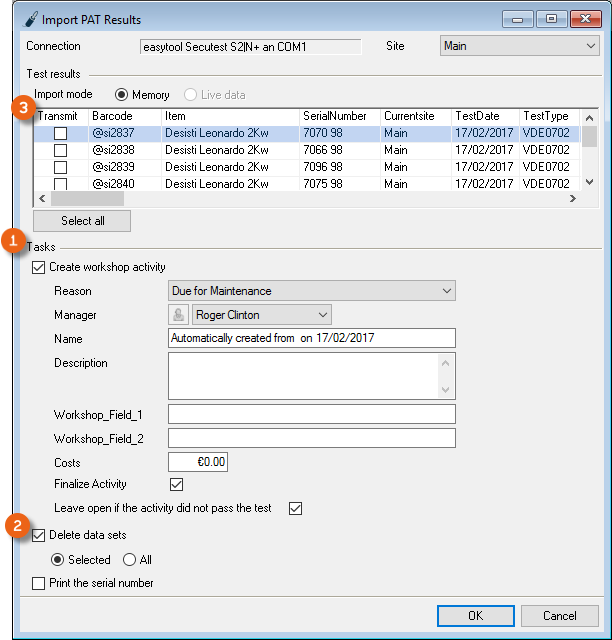
Activating the easytool PAT Test Integration interface
1. easyjob Tools Settings
2. Workshop tab
3. Enter the COM interface to which the device is connected
4. Ok
easyjob must be restarted to activate the changes.
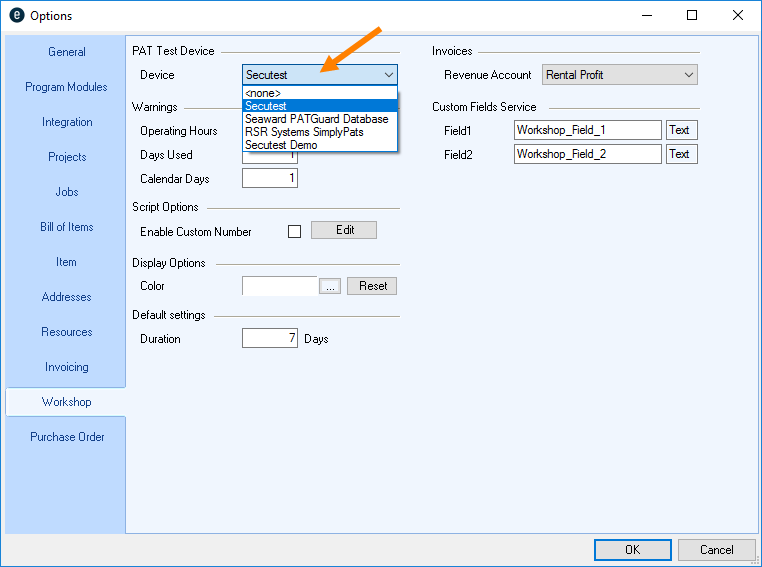
Secutest ST
The data from the test device memory is transferred to easyjob using a USB flash drive.
Import the Secutest ST database into easyjob:
1. Insert a USB flash drive in the test device
2. When setting up the test device 1/3 database 1/2 select the backup function
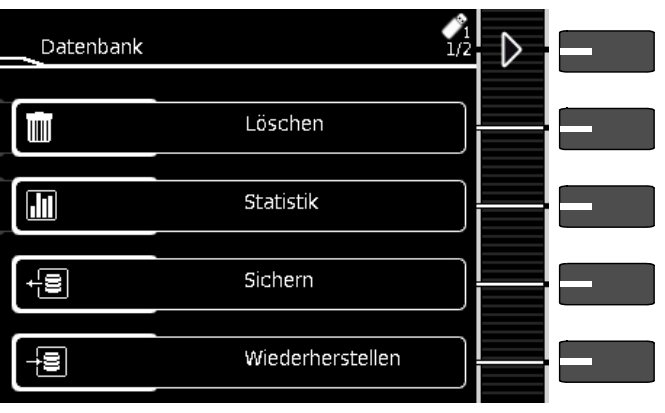
3. In easyjob Import test results
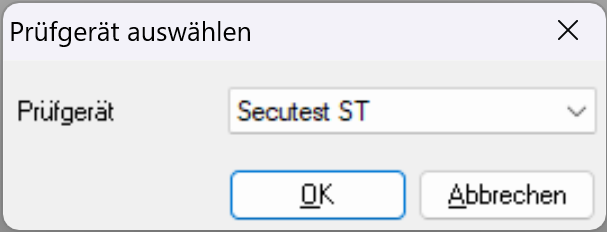
4. Select the backed up database file and select the test tag of the results to be imported
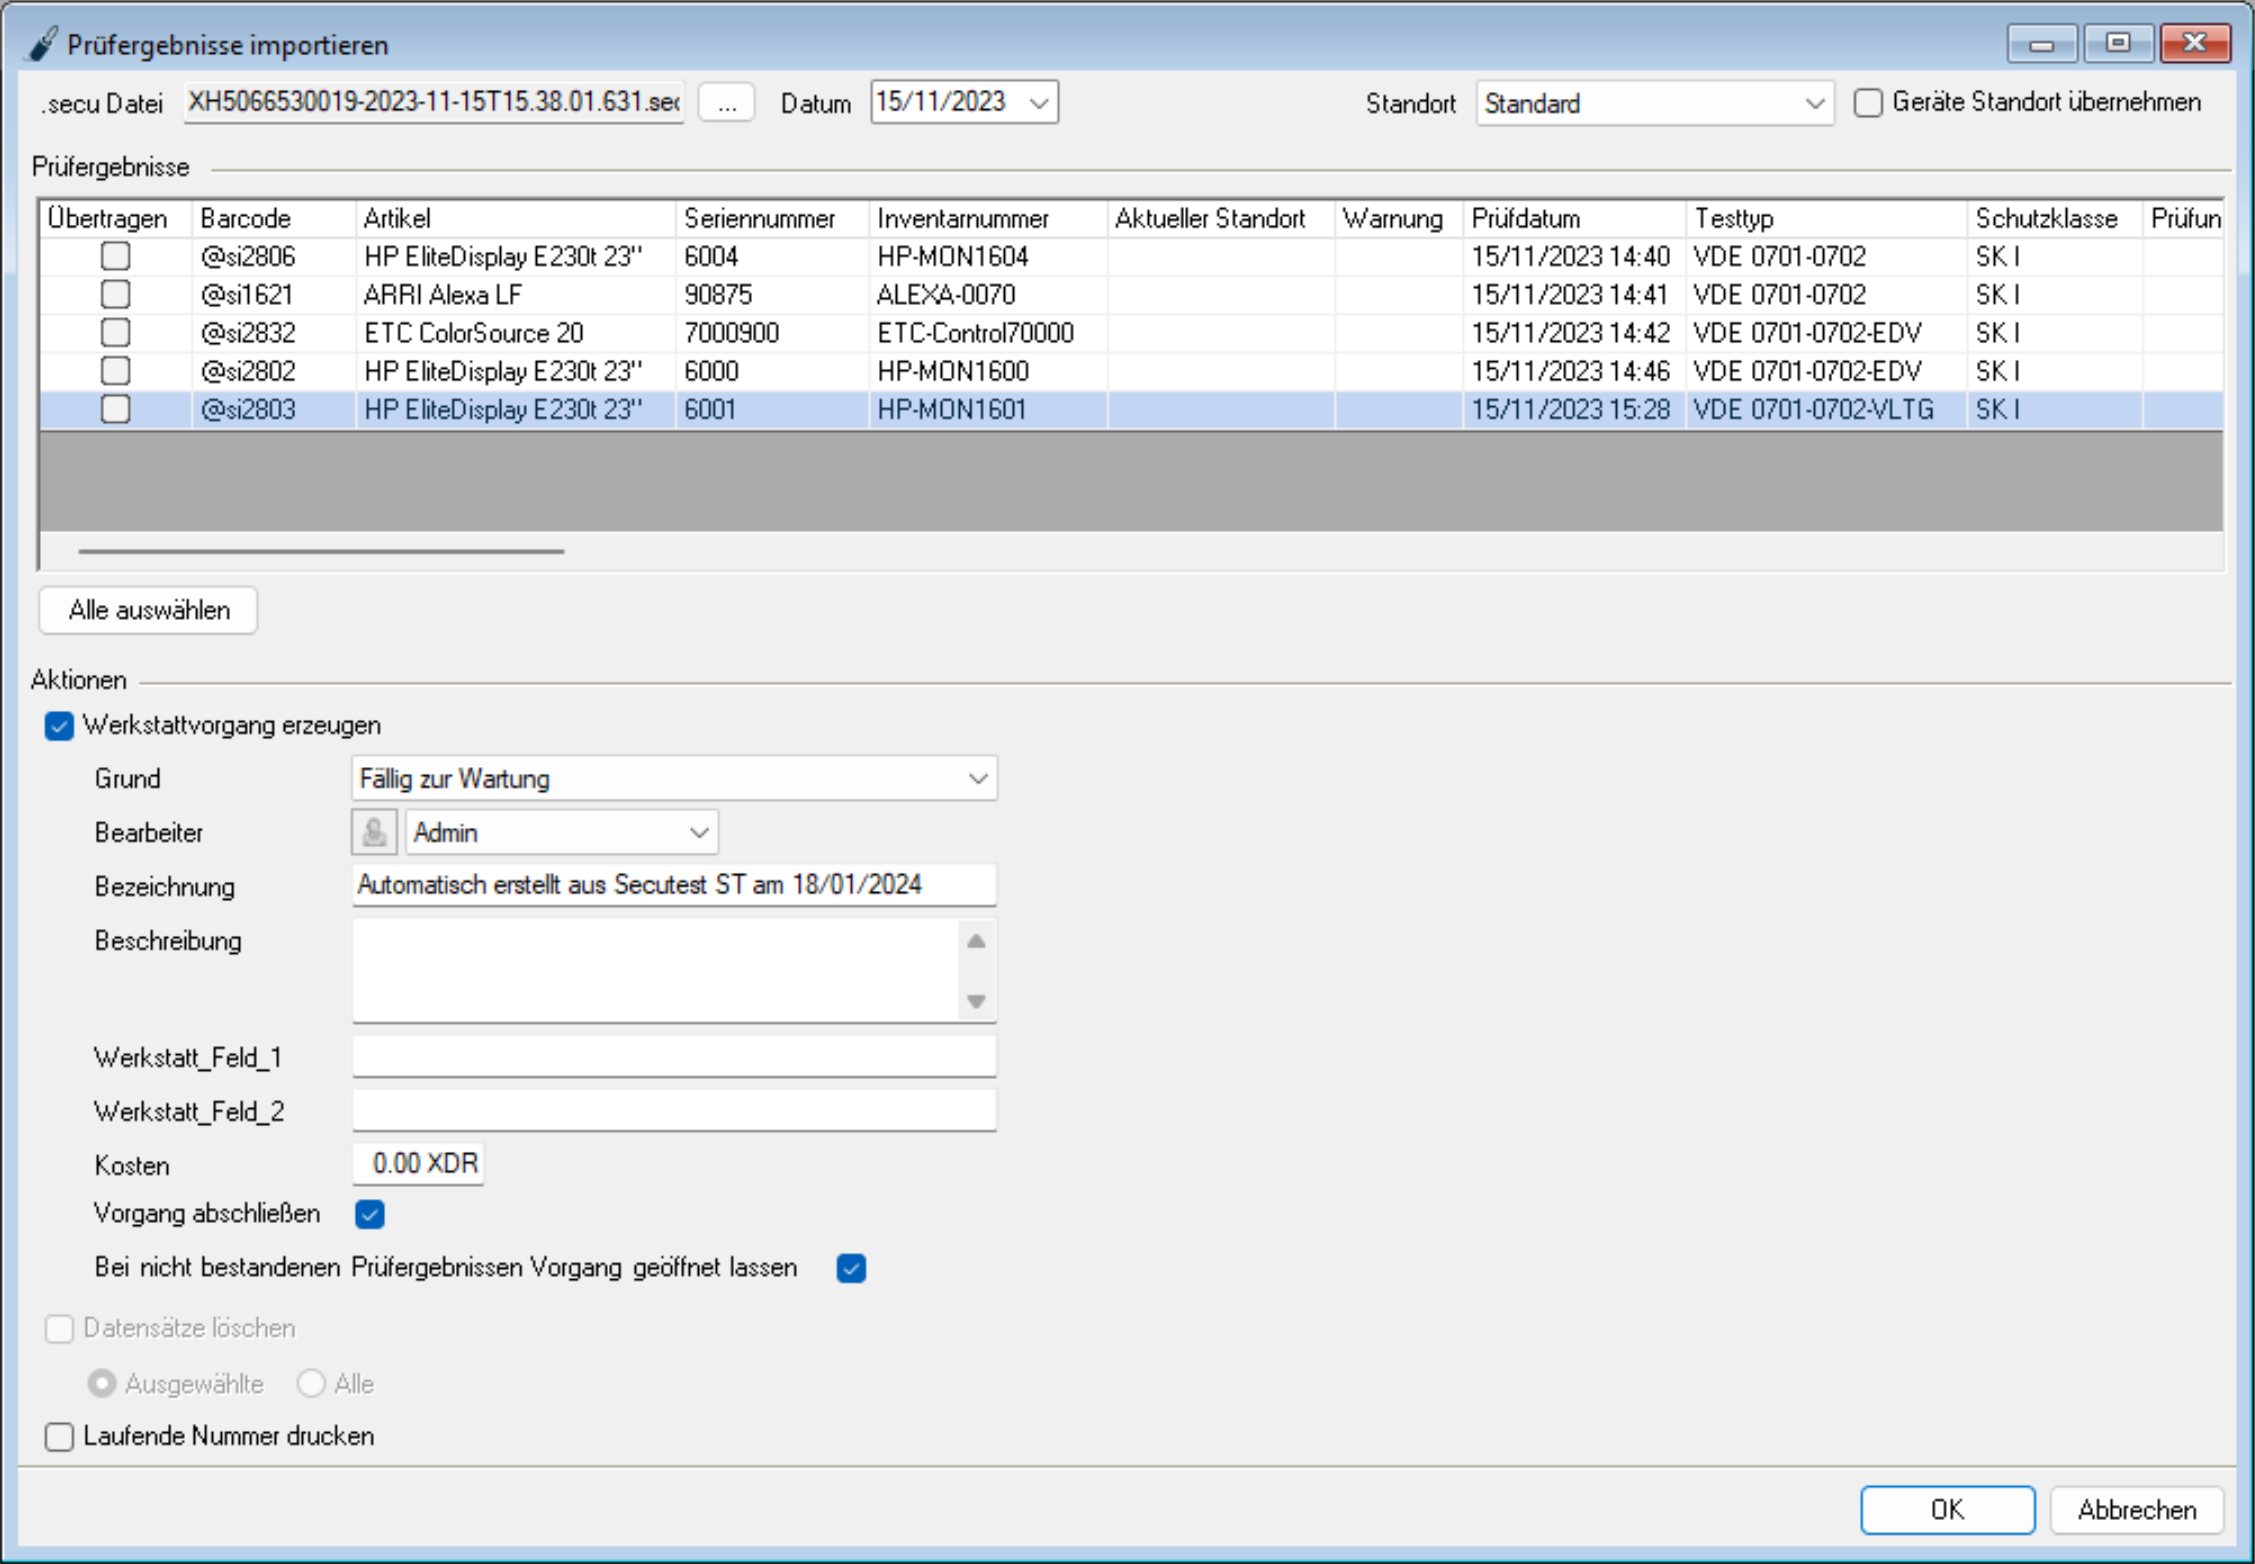
5. Select the results to be imported
6. Ok
You can find additional information about exporting data from Secutest in the manual from the test device manufacturer-
Sales
Sales orders are created and edited in easyjob in the same way as Projects/Jobs. When creating the job, activate the Sales status .
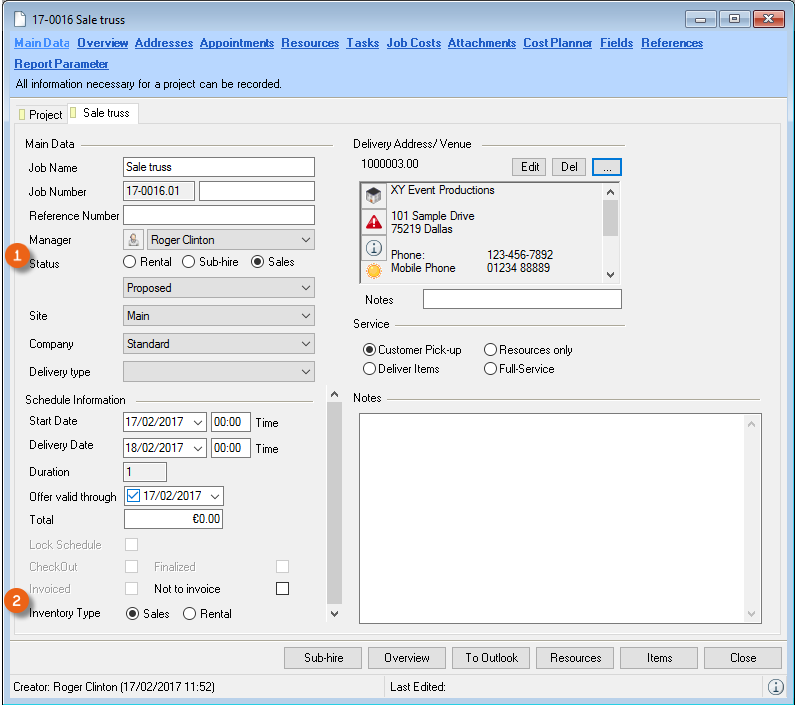
On the Job tab, indicate the inventory type (Sale or Rental) in order to determine which item should be used in the job. Only items that correspond to your inventory type preselection will be displayed in the bill of items . Instead of the rental price, the sales price will be used in the bill of items. If necessary, you can activate a purchase order directly using the context menu . When the sales order is created, an inventory correction is made in the master data of the used item. The sales job cannot be unloaded .
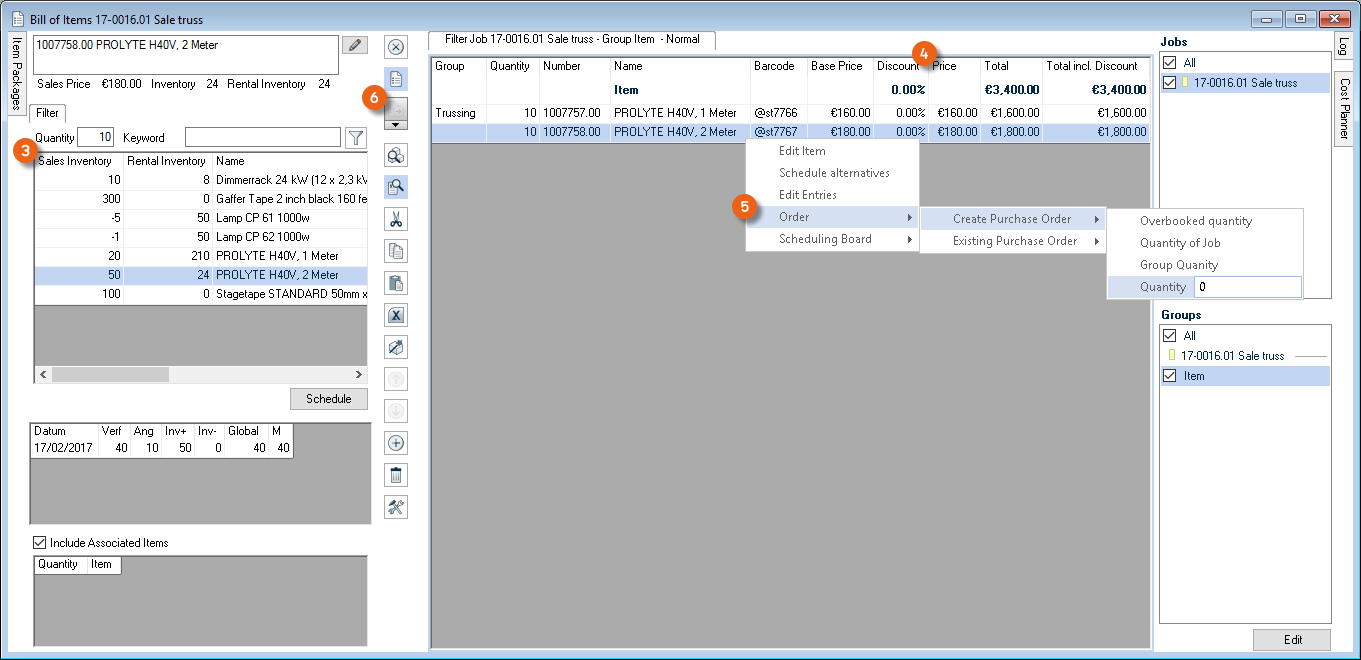
If needed, sales jobs and rental jobs can be created in the same project.
More information about creating and editing projects/jobs can be found in chapter Project Management.
Sales Items
To be able to select the desired item in a sales job from the bill of items, it must be first created in the item master data. On the Inventory tab, activate Sales Items . Based on the item type, you can see which items are intended for sale. The sum of the items available for sale is displayed under sales inventory .
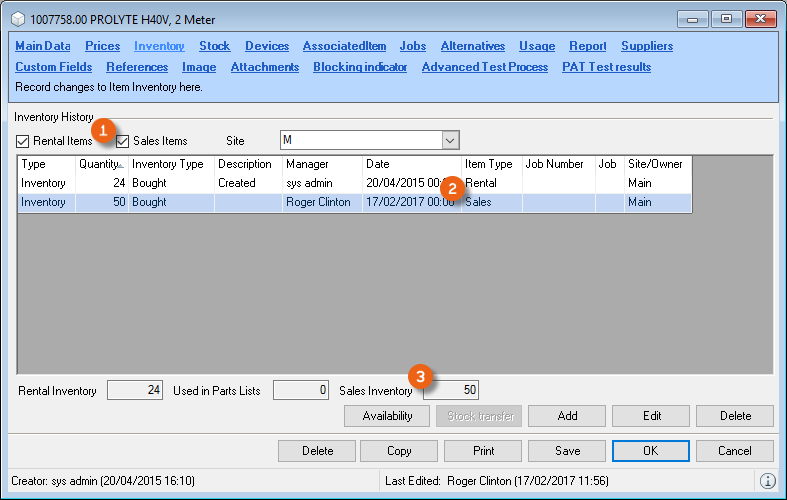
More information about creating items can be found in chapter Inventory.
Purchase Orders
With this purchase order system, you can select and order various elements. You can order items, staff, vehicles and generic resources and create manual lines (purchase order line items without reference to a job). When ordering resources, sub-rentals and job costs from easyjob processes (purchase order line items in reference to a job) you can bundle all relevant job line items and order them from your supplier.
When ordering, purchase and sub-rentals (in different Groups) options are available.
Creating a purchase order
1. easyjob Menu Purchase Order Create Purchase Order
Editing a purchase order
1. easyjob Menu Purchase Order Edit Purchase Order
2. Selecting a desired purchase order
3. Ok
In addition to the normal filtering of the view (from, until, status, manager, company, site, supplier), the reference filter box can be checked for the keyword search.
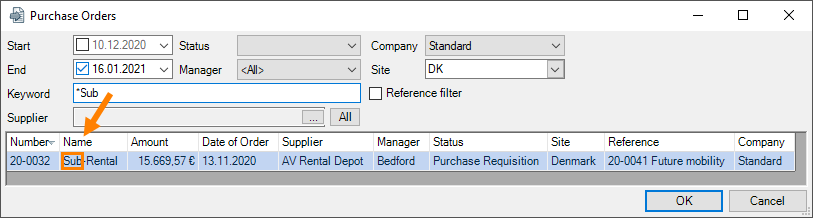
If checked, also the reference is included in the keyword search.
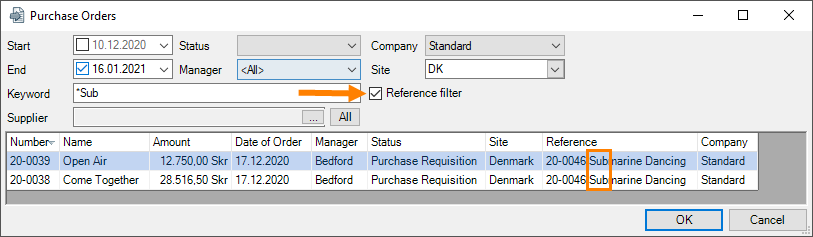
Deleting a process order
1. easyjob Menu Purchase order Delete purchase order
2. Select the purchase order to delete
3. Ok
Copying a purchase order
1. easyjob Menu Purchase Order Copy Purchase Order
2. Select the purchase order to copy
3. Ok
Main Data
The main data of a purchase order includes first the Name that – if the purchase order was created from an easyjob process – will be automatically filled with the name of the process (e.g. the job name). The Manager is usually the user working on the purchase order (e.g. from the purchasing department), in addition the Initiator (e.g. from the specialist department that created the purchase requisition) can be defined. A purchase order can have four possible Statuses (Purchase Requisition, Order Request, Purchase Order and Cancellation). Next to the purchase order Amount , you can check the Paid box. You can define various Dates such as the validity of the request or the latest delivery date. When the delivery has been received, the purchase order can be marked as Finalized .
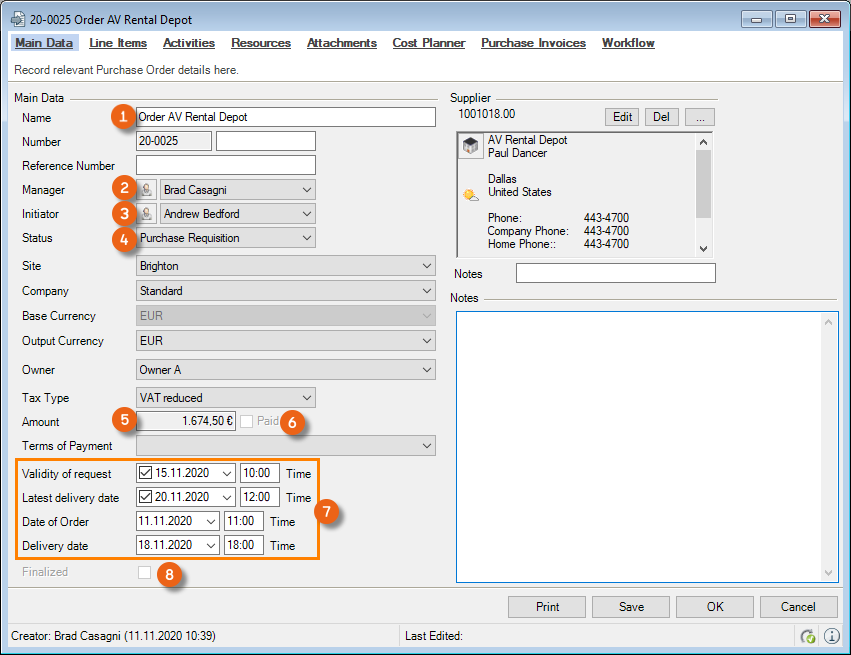
With the Purchase Order status, an inventory entry will be created for the items. The delivery date taken from the purchase order is used for the inventory entry date. Changing the delivery date results directly in changing the item inventory entry date.
Standing order
A particular type of purchase order is a Standing order. If you assign a purchase invoice for a normal purchase order, the purchase order is blocked and changes are no longer possible. A standing order, on the other hand, allow allocation and adjustment to individual line items even afterward. New line items can also be created in the standing order directly from the purchase invoice.
The standing order is activated by checking the box in the den main data. It must have a period of validity . Possible purchase order line items are general costs or manual .
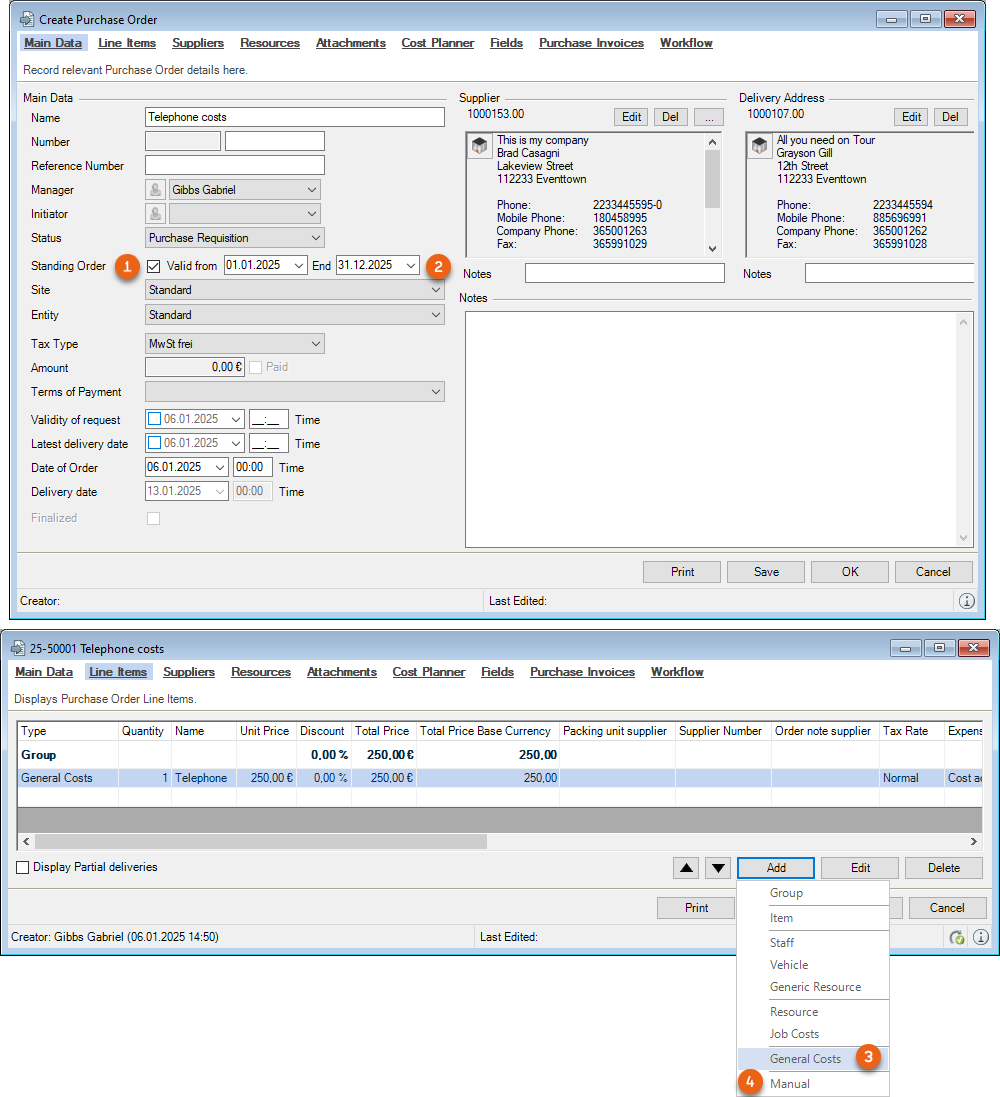
You need the Controlling Center module to create purchase invoices in easyjob to which standing orders can be assigned.
Assigning purchase invoices to standing orders
1. easyjob Menu Purchase Order Create Purchase Order
2. Select the standing order
3. Define the validity and the supplier
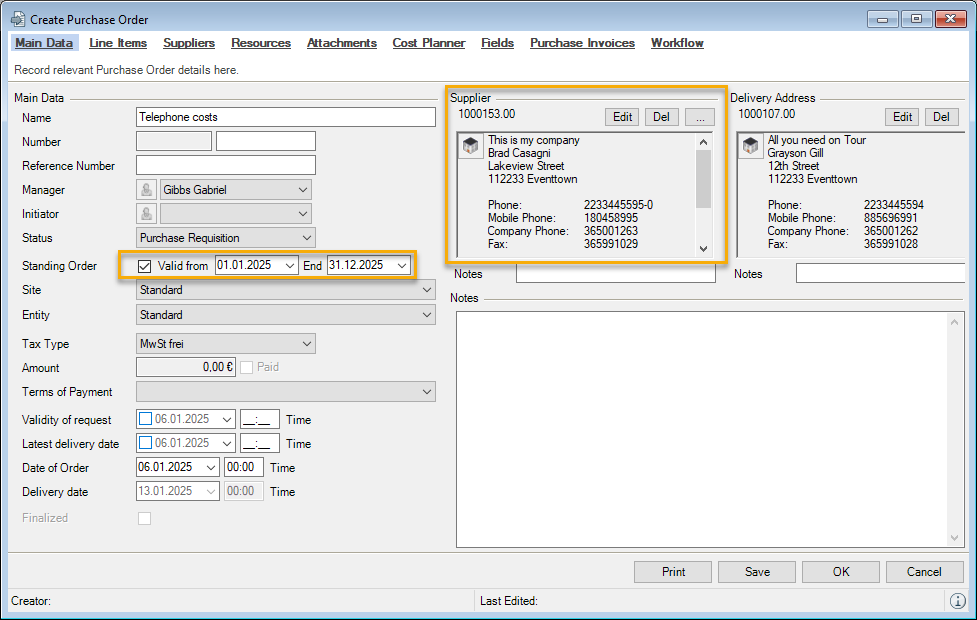
4. Line Items tab
5. Add e.g. General Costs
6. Define the price and a group if necessary
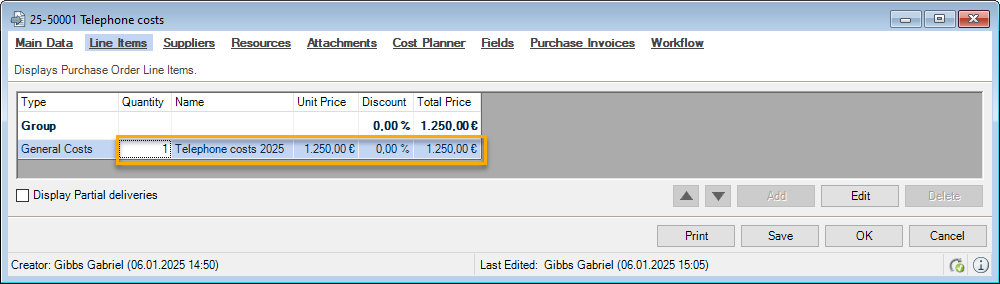
7. Order status on the Purchase Order
8. easyjob Menu Controlling Create Purchase Invoice
9. Line Items tab

10. Click on the line item (right mouse button)
11. Crease the Purchase Order Line Item

12. Select the corresponding purchase order
13. Ok

14. Select an available group or create a new group
15. Ok
16. The line item of the purchase invoice was added to the standing order

Purchase order status
The purchase order can have one of four different statuses.
| Status | Order field | Description |
|---|---|---|
| Purchase Requisition | open | In this status, the Purchase Requisition (Requirement) is presented. This is a request to the Purchase department to purchase a material or service in a certain quantity by a certain date. |
| Order Request | open | In this status, a Request is sent to one or multiple suppliers for the required material or service. |
| Purchase Order | disabled | In the Purchase Order status, the supplier proposal is accepted. From this moment, no changes may be made to the relevant fields (line items, amount, latest delivery date). When the delivery date is entered, an inventory entry is created for the items |
| Cancellation | disabled | The purchase order is canceled. For archiving purposes the workshop activity should be kept in the database. |
If the purchase order is Finalized, the delivery date is set by default to today. As a result also the delivery date is blocked and can no longer be changed.
If one or more purchase invoices are assigned to a purchase order (easyjob Controlling Center) and if these purchase invoices are completed, also the purchase order is automatically closed (with the exception of standing orders).
Adding an additional delivery address
In the main data, you can enter a certain delivery address next to the supplier.
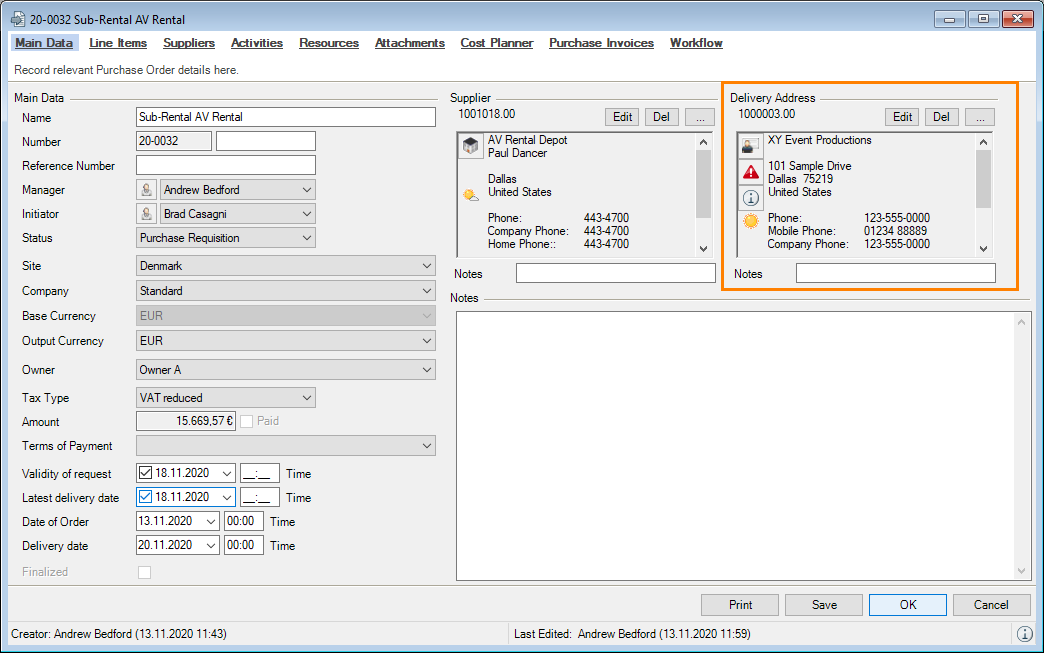
Line Items
The individual line items are divided into Types and are combined to form Groups . The type can be adapted for the respective line item using a dropdown menu . The groups as well as the individual line items can be sorted as required . The individual purchase order line item custom fields can be adapted in the program settings. You can change the Tax Rate as required for each line item. If you right click the line item, you can edit it or open the referenced process (e.g. the item).
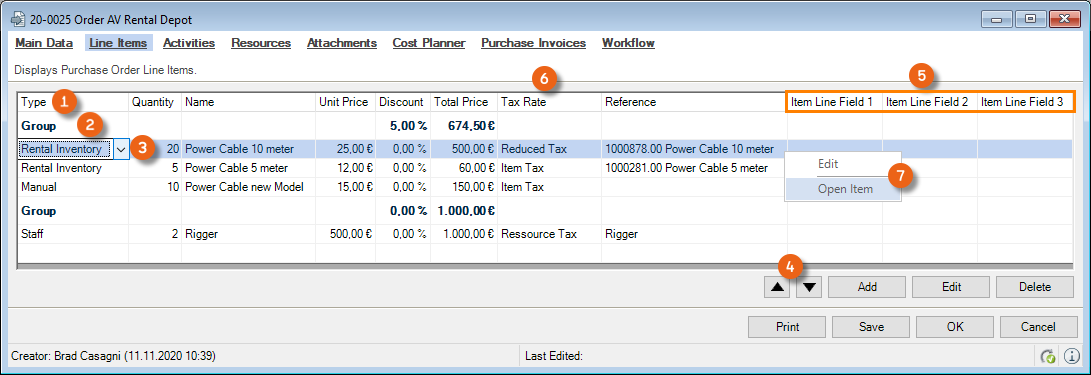
You can give a discount to the entire Group or to the Items . The reference to an easyjob process is displayed under Reference . When adding Items e.g. Item Number and Item Name , when ordering Staff without a job reference the name (the same applies for Vehicles and Generic Resources without a job reference ). When ordering a line item that is a Resource or Job Costs or a sub-rental, you must select a job. This is used to generate the Reference from and Reference until dates. Manual purchase order line items do not have a reference .
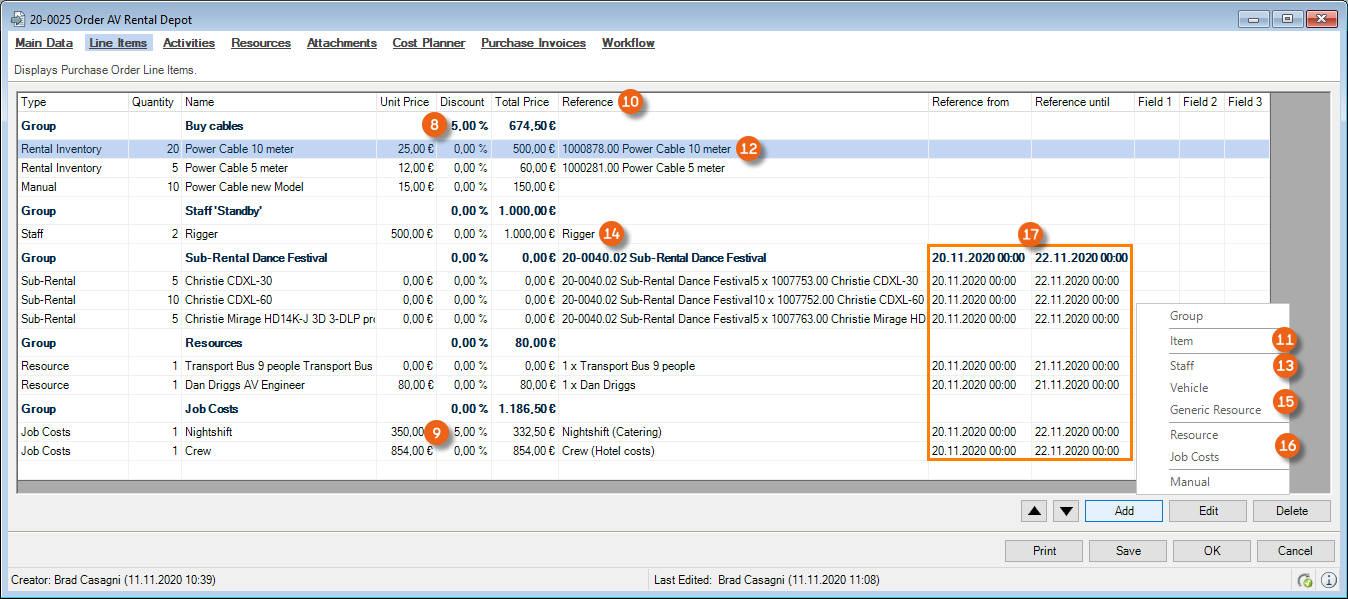
An intelligent search is performed to support you when typing in the name in a purchase order line item.
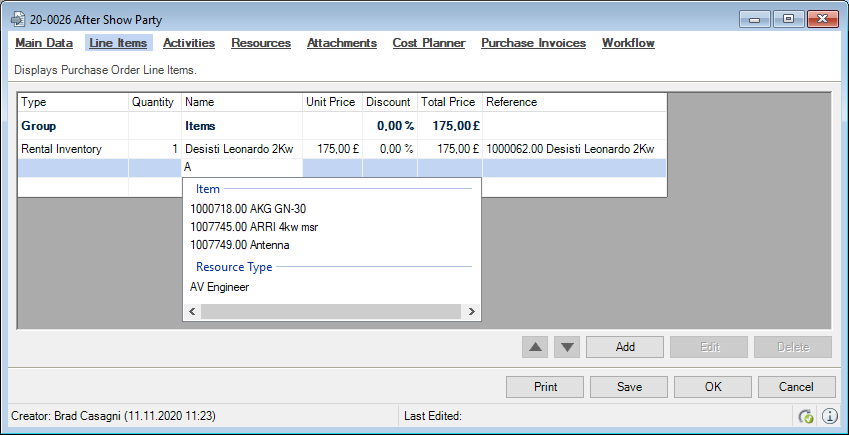
Editing order groups
The order group can contain an individual Name and a Description . You can also define a Discount or a Total Price for the group, as well as a Report text .
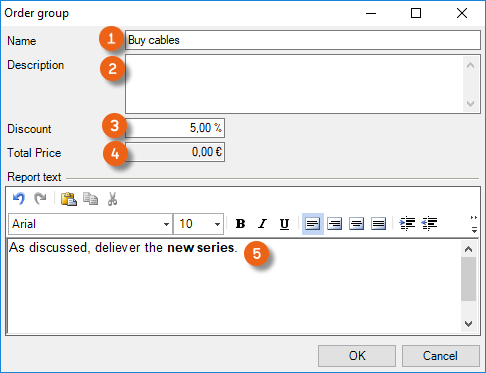
Editing an order group
1. easyjob Menu Purchase Order Edit Purchase Order Select Purchase Order
2. Edit Line Items tab
3. Select the group from the list
4. Edit
5. Change the entries as necessary
6. Ok
Editing purchase order line items
You can make all entries for a purchase order line item in a separate window. In addition to the columns provided in the list, you can also select an image, which must have first have been attached to the order, and define a report text.
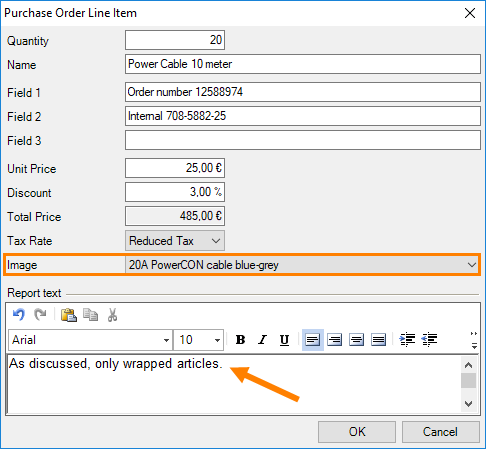
Editing line items
1. easyjob Menu Purchase Order Edit Purchase Order Select Purchase Order
2. Edit Line Items tab
3. Select the entry
4. Edit
5. Change the entries as necessary
6. Ok
Ordering items
When ordering items, a difference is made between rental and sales inventory. This entry is required for the automatic inventory entry.
Adding items to the purchase order
1. easyjob Menu Purchase Order Edit Purchase Order Select Purchase Order
2. Edit Line Items tab
3.
4. Items
5. Select the item to be ordered
6. Ok
Your Own number for the item is displayed in the reference column. Change the rental or sales inventory type as necessary. When adding an item from the master data, the purchase price is taken from the master data or from the supplier assignment.
Ordering staff, vehicles and generic resources
You must assign the appropriate resource for this type of purchase order.
Adding staff, vehicles and generic resources to a purchase order
1. easyjob Menu Purchase Order Edit Purchase Order Select Purchase Order
2. Edit Line Items tab
3. Add
4. Staff
5. Select the appropriate entry
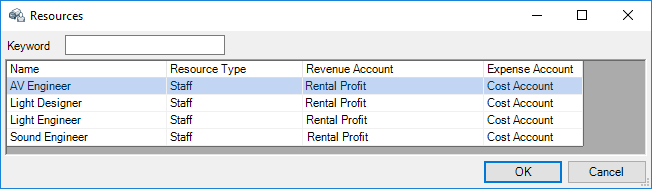 or
or
4. Vehicle
5. Select the appropriate entry
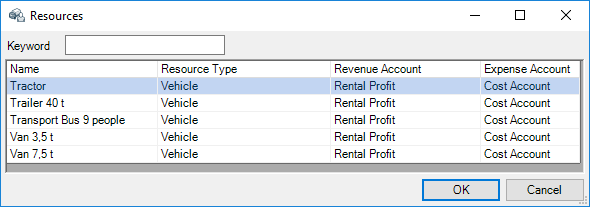 or
or
4. Generic resources
5. Select the appropriate entry
6. Ok
7. Enter the corresponding price and quantity
Ordering resources and job costs
You have the option to select the Resource type or Job Costs.
Adding resources and job costs to a purchase order
1. easyjob Menu Purchase Order Edit Purchase Order Select Purchase Order
2. Edit Line Items
3. Add
4. Resource
5. Select the appropriate entry
 or
or
4. Job Costs
5. Select the job and the suitable entry.
6. Ok
Ordering resources from a project or job
1. easyjob Menu Projects Select Project Resource Tab
2. Open the resource assignment context menu
3. Purchase Order
4. Create new Purchase Order or Attach to existing Purchase Order
5. The purchase order is opened
Ordering resources from a resource plan
1. easyjob Menu View Resource Plan
2. Select one or more (the same address) assignments
3. Open the resource assignment context menu
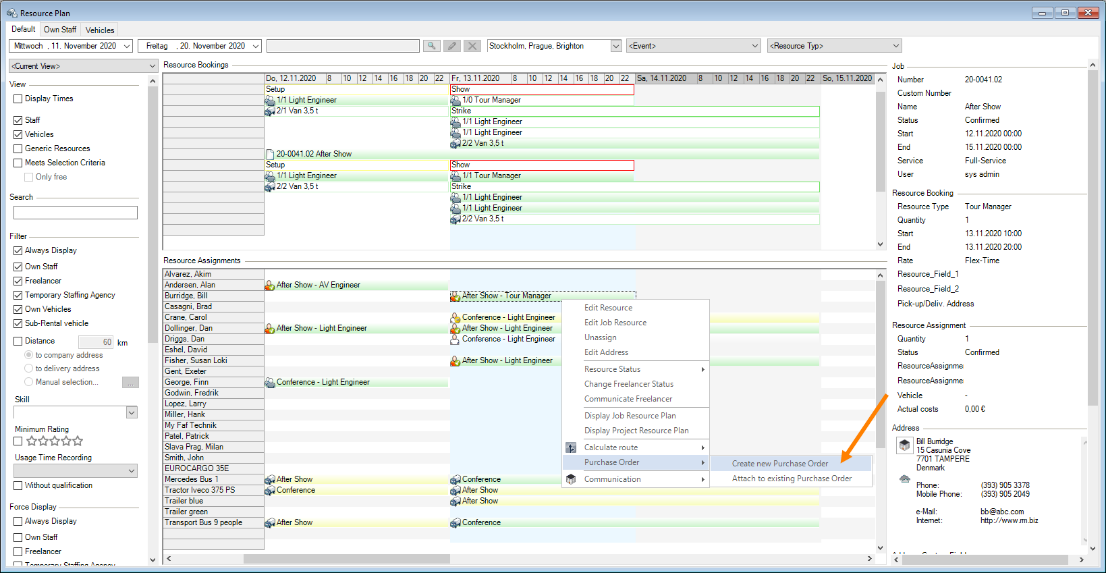
4. Purchase Order
5. Create new Purchase Order or Attach to existing Purchase Order
6. The purchase order is opened
Ordering job costs from the job
1. easyjob Menu Projects Select Project Select Job
2. Job costs tab
3. Open the context menu
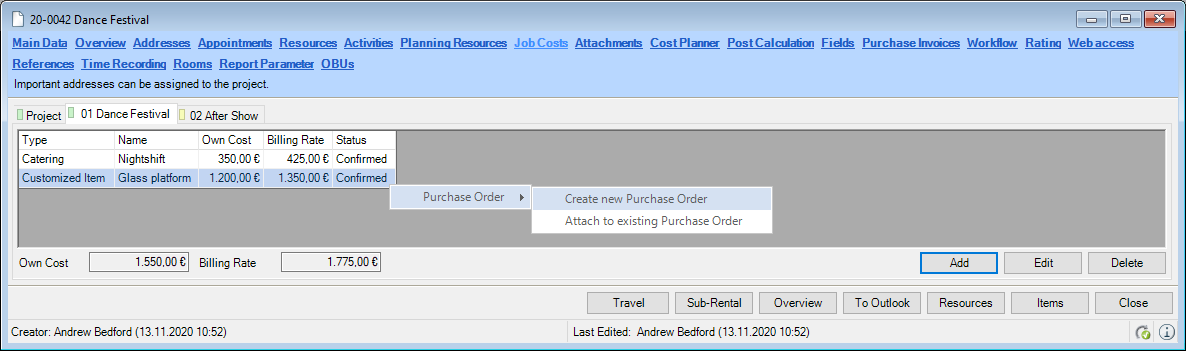
or
2. Job Costs tab Add Purchase Order Icon
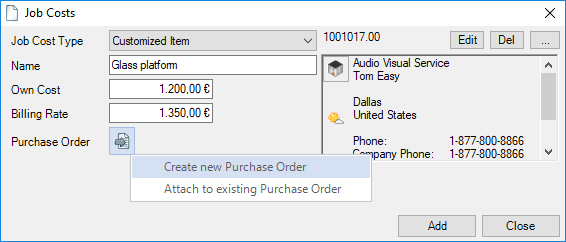
4. Create new Purchase Order or Attach to existing Purchase Order
5. The purchase order is opened
The costs are applied to the respective job.
If there are differences between a purchase order and an easyjob process (e.g. something is changed later), this is displayed in the context menu of the purchase order or the purchase order icon is displayed in red. This also applies for sub-rentals.
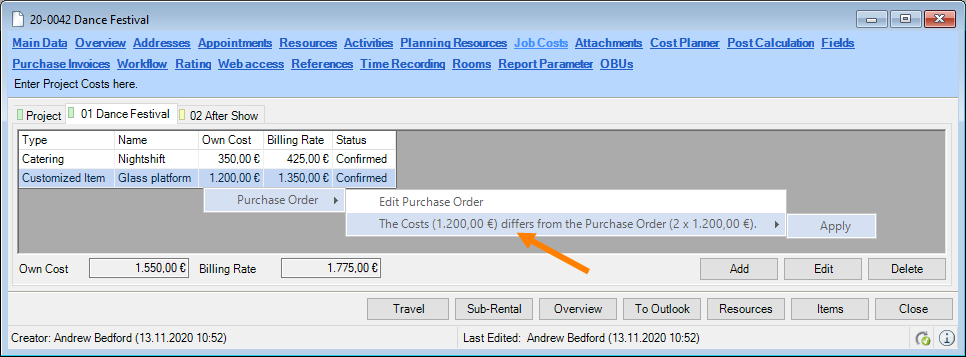
All purchase orders that are still open for the supplier are also displayed for selection in the purchase order context menu.
Manual purchase order line items
You can add line items manually.
Adding manual line items to a purchase order
1. easyjob Menu Purchase Order Edit Purchase Order Select Purchase Order
2. Edit Line Items tab
3.
4. Manual
5. You can make the entries directly with a mouse click.
6. Ok
Purchase order from a sub-rental job
Sub-rentals can only be ordered from a job.
Creating a purchase order form a sub-rental
1. easyjob Menu Projects Select Project
2. Tab with Sub-Rental job
3. Click the Purchase Order Icon in the main data for the sub-rental.
4. Select Create new Purchase Order or Attach to existing Purchase Order or Pending Purchase Orders for the supplier
5. The purchase order is opened
In case of a Sub-Rental Order lock schedule
With this setting, the sub-rental job schedule is automatically locked when changing the ordering process status to purchase order.
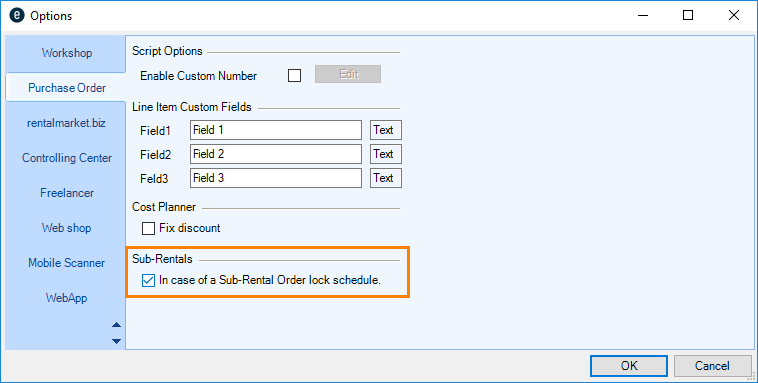
Purchase order from a rental/sales job
You can also create purchase orders from a rental or sales type job. Also free lines and expendable items can be ordered.
Creating purchase orders from rental/sales jobs in the bill of items:
1. easyjob Menu Projects Select Project Select Job
2. Items
3. Open the context menu in the bill of items for an item
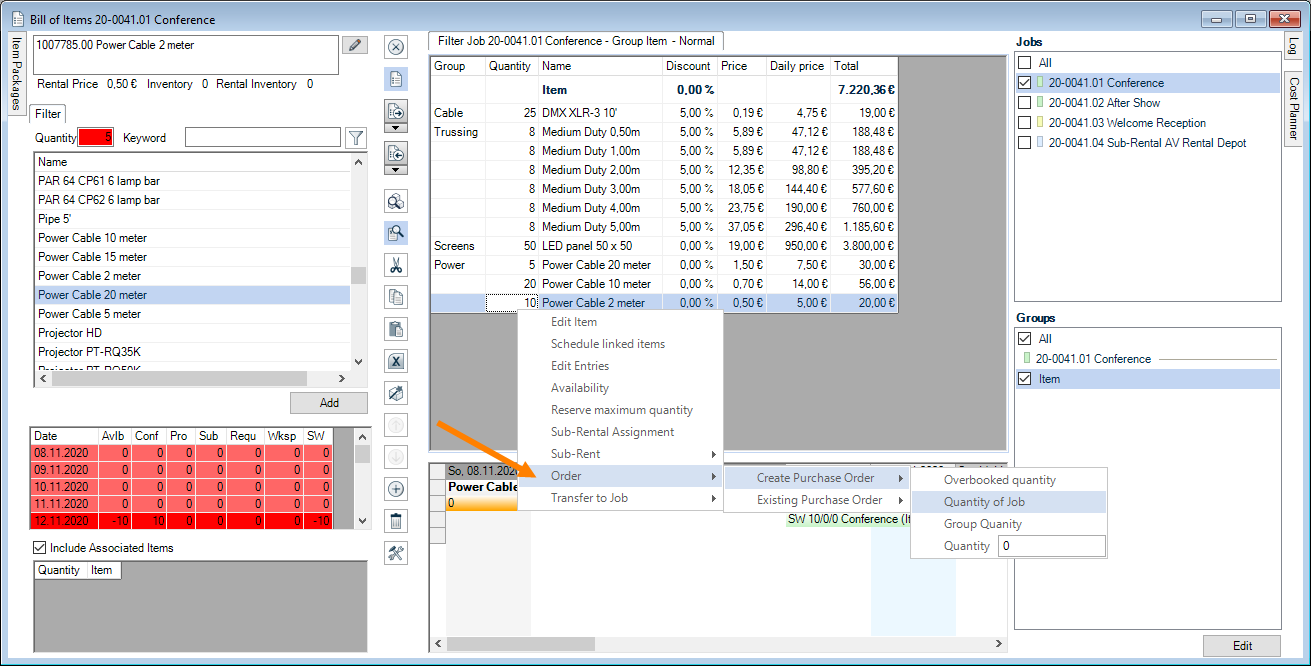
4. Order
5. New Purchase Order or Existing Purchase Order
6. Select the desired quantity
7. The purchase order is opened
Purchase order from navigator view Below minimum inventory
You can create a purchase order directly from the navigator view.
Creating a purchase order from the navigator view
1. easyjob Menu Navigator
2. Purchase orders
3. Select "Expendable/Sales or Rental Item below minimum inventory requirements"
4. Open the context menu for the item
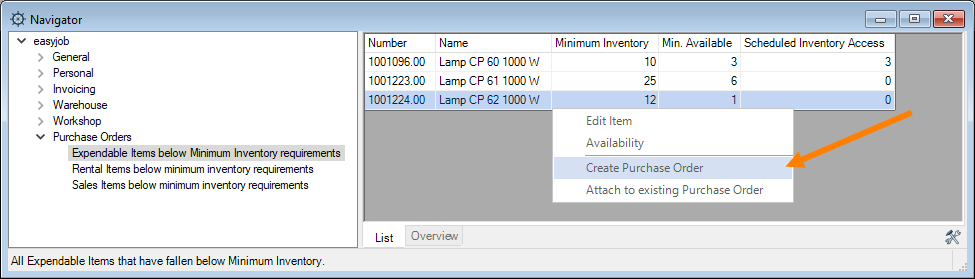
5. Create Purchase Order or Attach to existing Purchase Order
6. The purchase order is opened
Suppliers
An order request can be sent to several suppliers at the same time. To do so, you can add the suppliers to an extra Suppliers tab. The supplier entered in the main data will be displayed highlighted . You can enter the Proposed Price of the respective supplier and assign a Reference Number (e.g. Proposal number) .
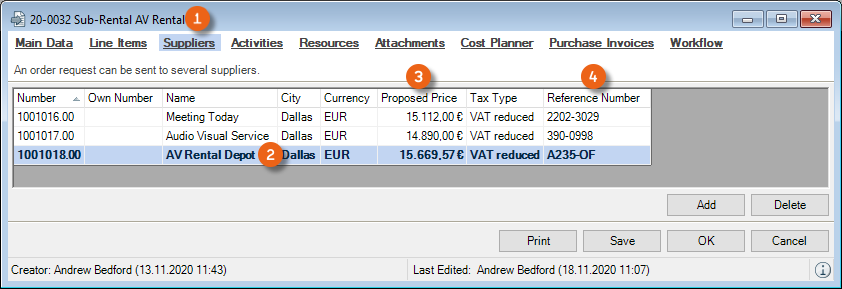
Resources
You can assign resources to a purchase order. More information can be found in chapter Staff and Transportation Planning.
Attachments
More information can be found in the easyjob manual in chapter Attachment Management.
Cost planner
The total price for all line items is calculated in the cost planner.
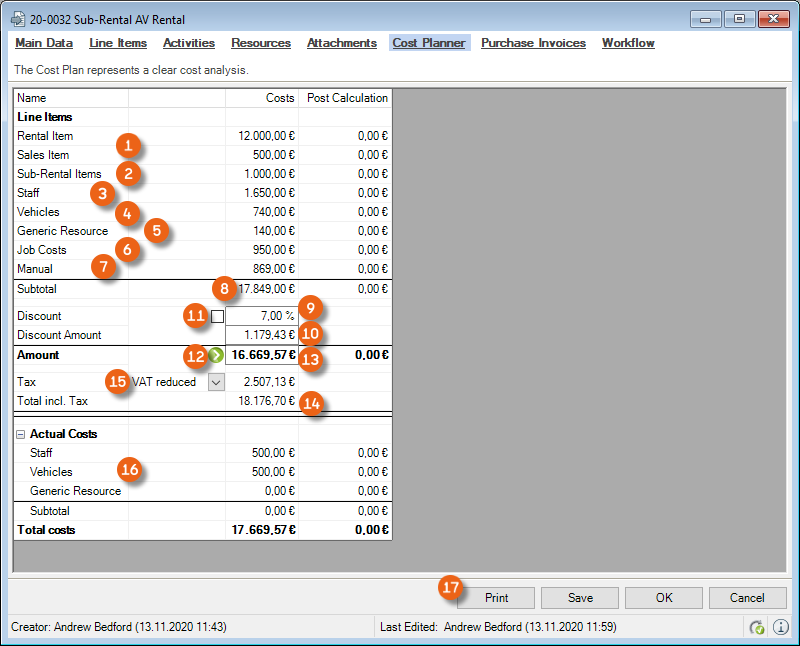
The Rental and Sales Items , the Sub-Rental Items , Staff , Vehicles , Generic Resources , Job Costs and the Manual Line Items are added inclusive of the entered discounts and added to the subtotals . The supplier discount is deducted from the subtotal as a percentage or an amount . You can change and fix the rebate . In the easyjob program settings, it is possible for this box to be checked by default. Click to transfer the calculated amount to the total . The total incl. tax is calculated on the basis of the selected tax .
Furthermore, the actual costs for staff, vehicles and generic resources are displayed, e.g. if the purchase order should be picked up.
You can Print directly from the tab. It will be possible to select the reports that are available for this.
Partial deliveries for purchase orders
A purchase order can be created with multiple partial deliveries . This makes is possible to divide the Quantity of the ordered item into different amounts - depending on the Delivery status (Ordered, Missing parts, Delivered (e.g. pallet in the warehouse), Checked (e.g. pallet counted) and Return) – with different Delivery dates , Delivery sites and Delivery addresses .
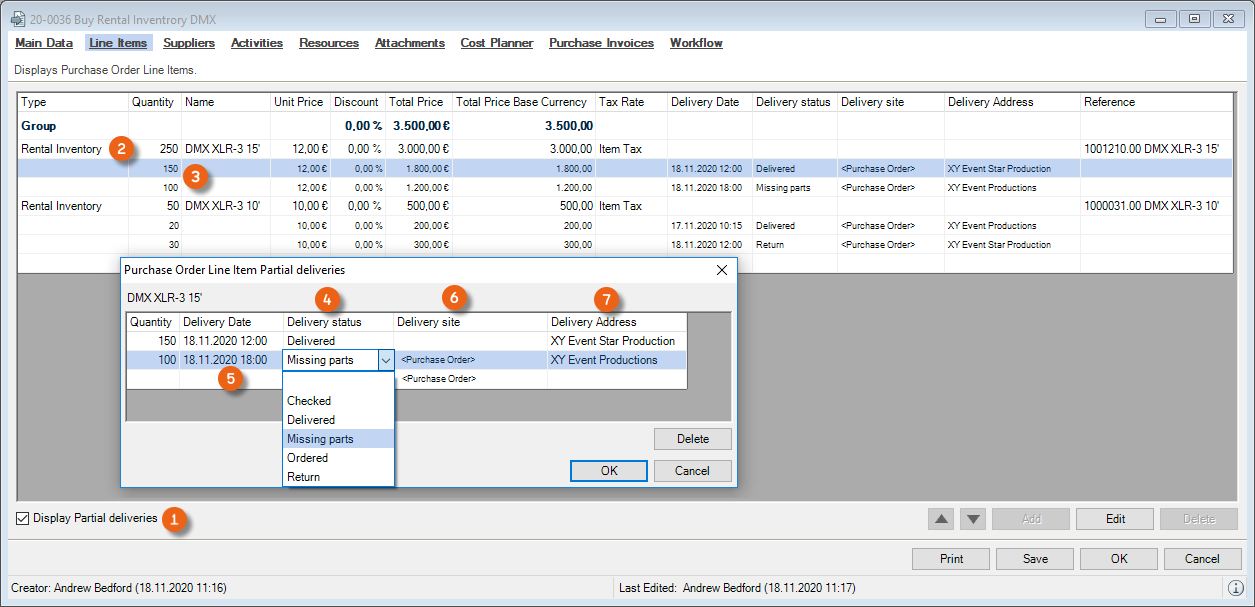
You can enter the different Delivery dates for the partial deliveries already in the Order request or Purchase Requisition status and leave the delivery status entry empty .
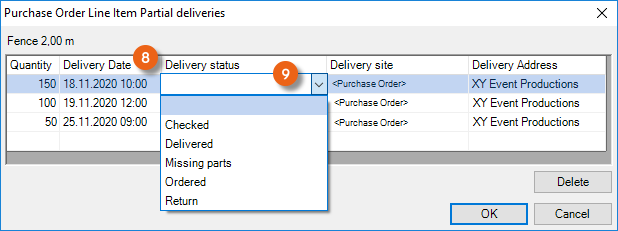
If the Purchase Order status is set, also the delivery status is set to Ordered .
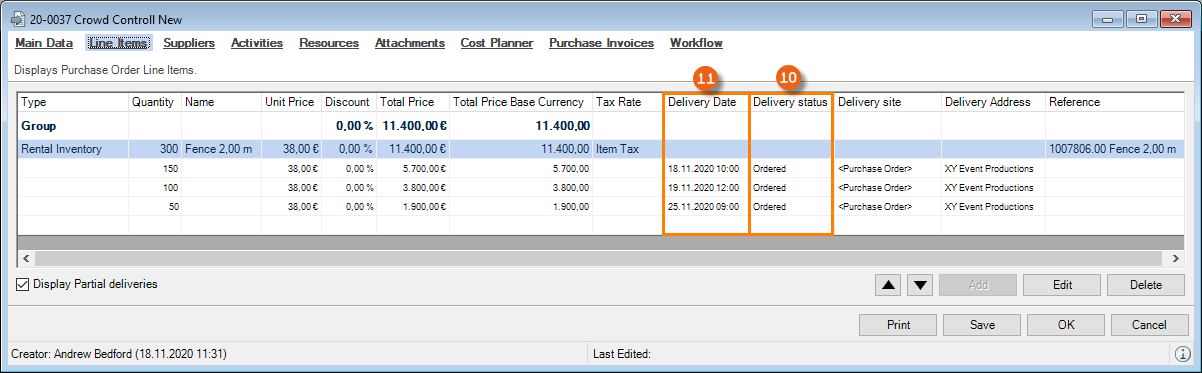
The delivery dates and the delivery status are applied to the inventory entry.
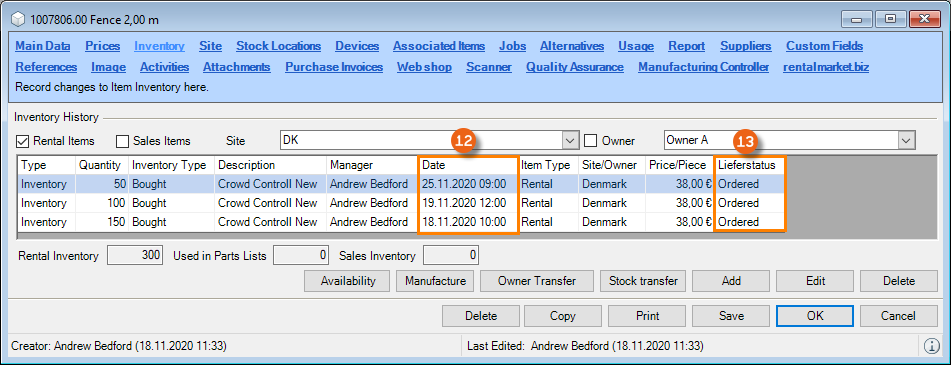
Creating partial deliveries for purchase orders
1. easyjob Menu Purchase Order Edit Purchase Order Select Purchase Order
2. Edit Line Items
3. Check Display Partial deliveries
4. Right click the partial delivery line
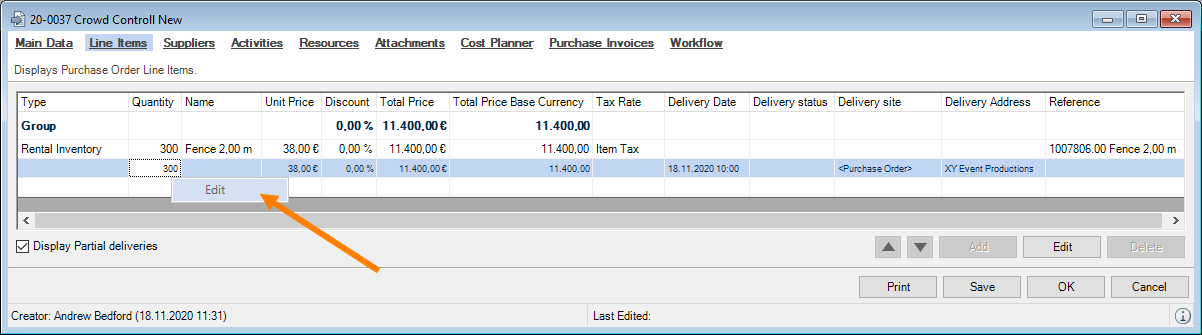
5. Edit
6. Enter the data for the partial deliveries
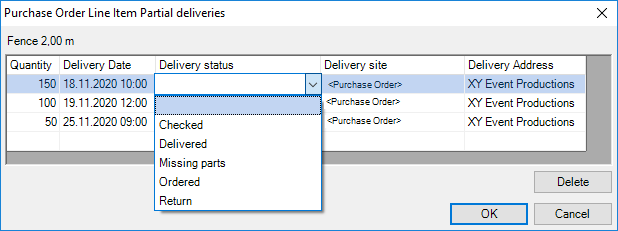
7. Ok
After you have received one or multiple partial deliveries, you can edit them and update the current delivery situation. Your first partial delivery was delivered and checked . Your second partial delivery was delivered and has missing parts . Your third partial delivery was returned . In the case of missing parts or a return, enter the date you expect for the missing parts of the purchase order.
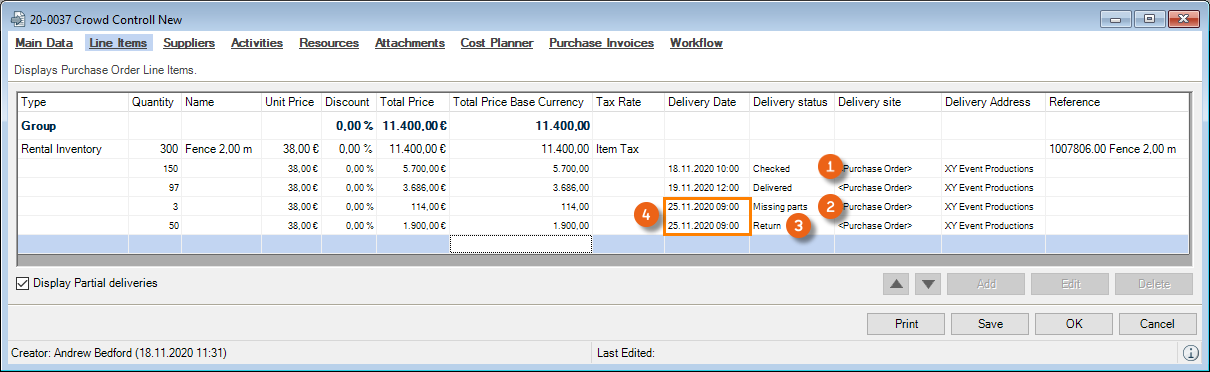
The inventory entries will be made accordingly. The delivery status is displayed.
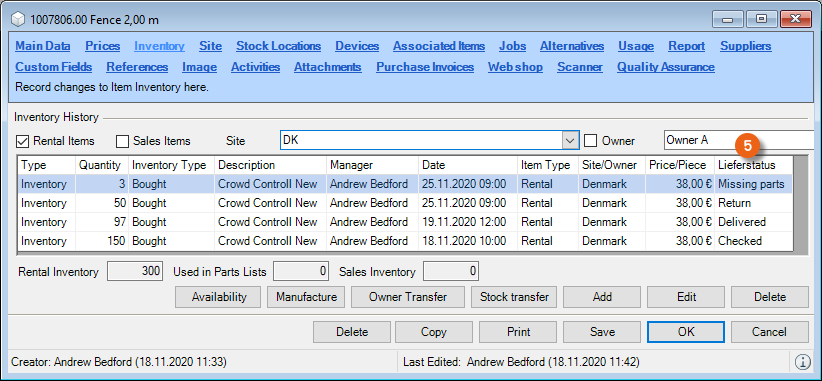
No inventory entry due to an optional delivery date
In some situations, a delivery date cannot yet be defined. For example for a return or missing parts. You can leave the delivery date open for partial deliveries. Uncheck the box for the date selection.
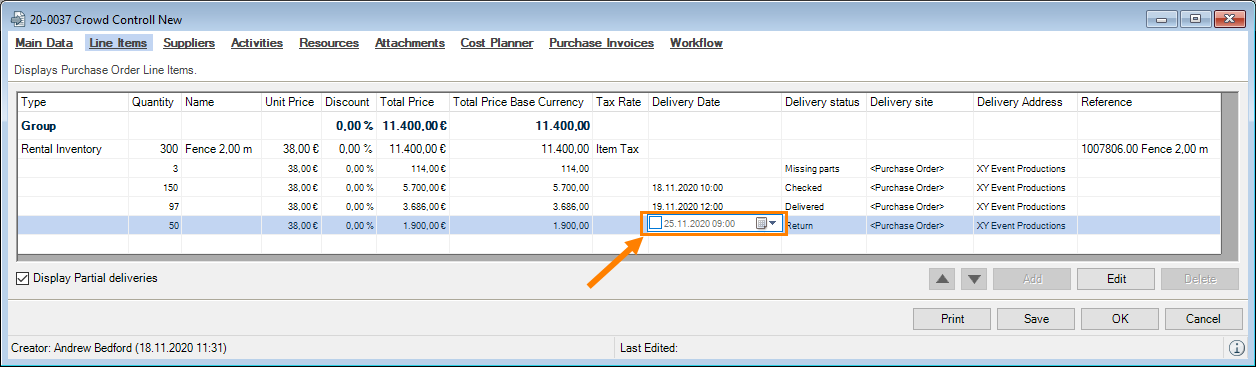
As soon as you have information about the delivery date, you can add it.
Navigator and easyjob Today views
Various customized and general views are available in the Navigator and in easyjob Today to manage your purchase orders better.

Inventory Management
In easyjob, inventory is created as items and devices. For a better overview, the items are combined in subcategories. Each item can be assigned to as many devices as you want for clearer identification.
Inventory terminology
No content for this section.
Items
The item is booked in sales and rental projects. For clear assigning and tracking, you can assign as many devices to an item as you wish.
Device
For a clear assignment of serial numbers, inventory numbers, etc. each item can be assigned as many devices as needed.
Expendable Items
Under Options, you can define if an item is used as an expendable item in the Item Main Data View. Expendable items are calculated with the sales price and taken from the inventory upon check-out. Expendable items include tape or a replacement bulb.
Transport Container
An item that is defined as a transport container will be populated with items and devices when loaded. With an assignment, transport container and content labels can be printed.
Item Package
An item package contains a series of items. With the package, all corresponding items are booked automatically in the bill of items.
Standard Associated Items
You can assign as many associated items as you want to each item. The associated item is booked and added as its own line item.
Linked Associated Items
Linked associated items are booked in the bill of items linked to an item. Depending on the setting, the associated item can be changed as assigned fixed or variable when booking. In addition, the availability of the linked associated item is taken into consideration. A linked associated item can include a spare lens or a remote control for a projector.
Rental Inventory
Rental inventory is inventory that is available for rental. If the item is used as a linked associated item with the corresponding properties, the respective number is taken from the inventory and then the rental inventory is calculated.
Subcategories
Items are grouped into subcategories. With sub-categories, items are displayed in a structured manner in various lists and can be printed.
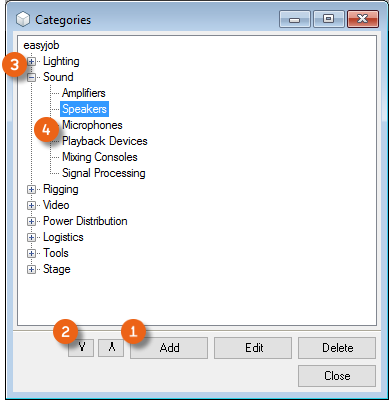
You can create as many subcategories as necessary and sort them within the current level using the arrow keys . The subcategories are managed with the category and the subcategory on two levels.
Creating a new category
1. easyjob Menu Master Data Subcategories
2. the easyjob tree view
3. Add
4. Give the category a name
5. Ok
Creating a new subcategory
1. Select the category to which you want to add the subcategory
2. Add
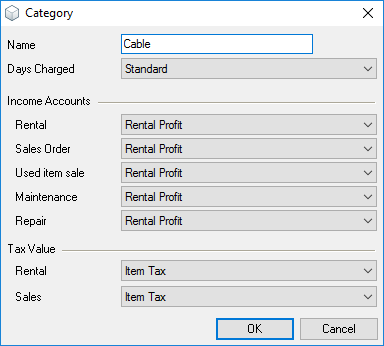
3. Give the subcategory a name and enter any other data
4. Ok
Items
A series of properties are assigned to each item.
Creating a new item
1. Easyjob Menu Master Data Items
2. Add
Main Data
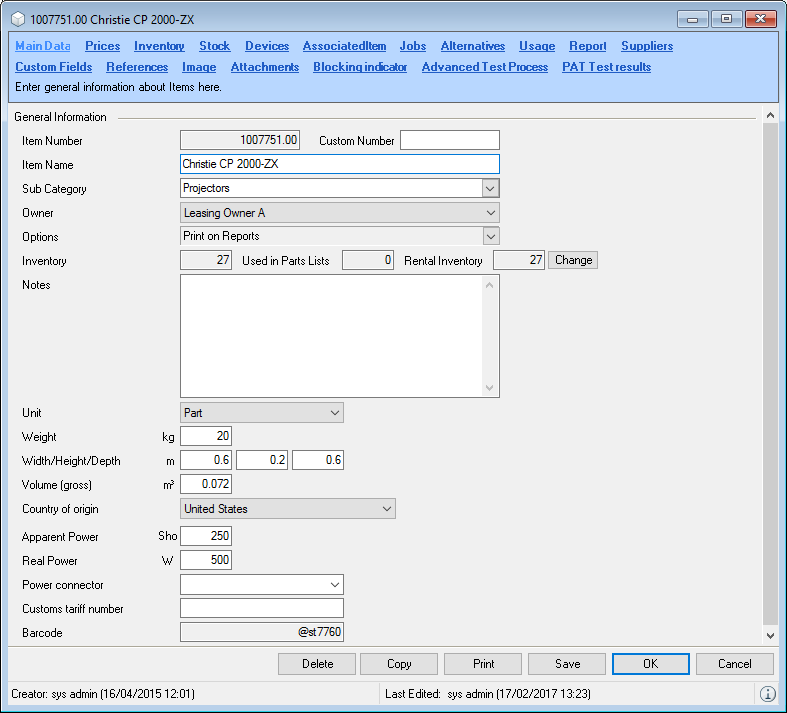
First determine the Name of the item. Enter a clear and continuous name for the item that can also be understood by your customers.
We recommend creating items using the following syntax:
Manufacturer name, type name.
Examples:
- Eurotross FD 32 1 Meter
- Barco SLM R12 Projector
- Shure SM58 Microphone
Using the wildcard * in front of the type name, you can find items also without using the manufacturer name.
You can create an individual Custom Number for your items. To prevent creating duplicates, it is possible to activate the custom number duplicate check.
1. easyjob Menu Tools Settings
2. Items
3. Check the Custom Number Duplicate Check box in the General area.
4. Ok
A restart is necessary to activate the function.
Select the Subcategory to which the item should belong. If your item has multiple owners, select the respective Owner. More information about Owners can be found in chapter Inventory.
Under Options, you can define various properties of the item.
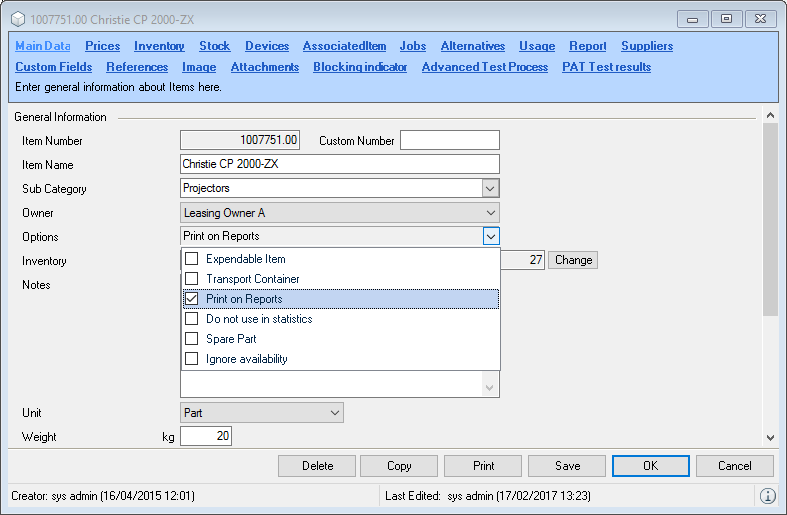
Expendable Items and the Transport Container were already explained in Inventory terminology and will be further described in chapter Scheduling and Site Management. In general, the availability check includes Expendable Items. The Printable box is a variable for customized reports. You can query the variable in reports in order to hide an item from offers and print it on the delivery note. In the bill of items, you can set the Printable control character according to the job for each item. See also Customizing the bill of items to requirements.
To prevent small parts from appearing at the top of statistics, for example usage, you can select Do not use in statistics for certain items. More information can be found in easyjob Business Information Center manual .
Spare part
If you define an item as a Spare Part, it can be used in workshop activities. The inventory deletion is booked in the sales inventory. There is a minimum inventory for spare parts, and if the amount goes below this level, you will automatically receive a reminder.
Excluding an item from availability
Excluding an item from availability that the overbooking of this item is generally not displayed. (This box should only be checked in exceptional cases.) The item will then not be displayed in the overbooked list and during the On-Fly Check as overbooked.
You can customize the Inventory from the main data with change.
You can define the Unit for each item. In addition to parts, also hours, meters, liters, etc. are available. The units are displayed in a column in the Bill of Items and transferred as a field in the Report Designer. If you need additional units, these can be provided by the support team.
The Weight and the Transport Volume (calculated from Width/Height/Depth, but this can be manually adapted) are displayed in the total view and transferred to the jobs are parameters. This information is used to select the correct means of transport. Please note that the weight of Linked Items should also be calculated, as these are not included in the totals.
The Country of Origin is used for ATA carnets. The Apparent and Real Power are used in workshop activities and displayed as the total power absorption in the total view for the job.
In addition, you can also record the Customs tariff number.
The Barcode field content is generated automatically.
Prices
Price calculation was already described in detail in chapter Item master data price.
Items with no discount
With the no discount option, an item can be excluded from all discounts.
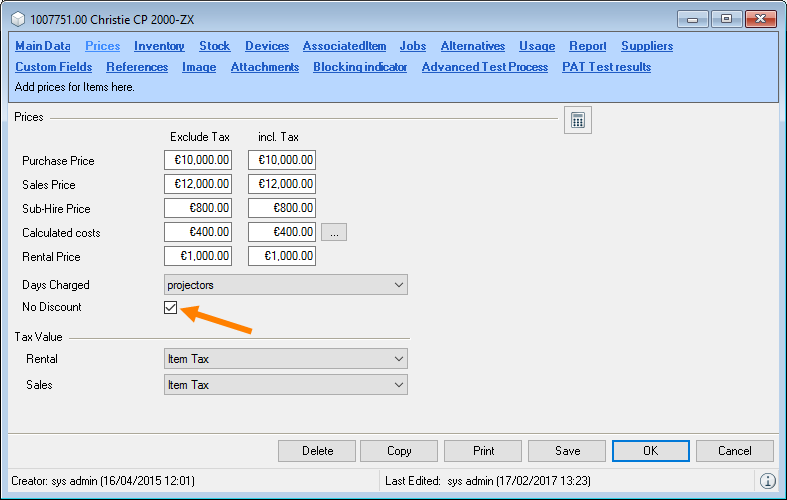
Excluding an item from all discounts
1. Easyjob Menu Master Data Items
2. Item and Edit
3. Price tab
4. Check the No discount box.
5. Save
Inventory
Item inventory is divided into rental and sales inventory.
Check the rental or sales item box to indicate which inventory type should contain the item. For a rental job, the bill of items will only display rental items. Only sales items for a sales job.
The respective Rental Inventory or Sales Inventory is calculated on the basis of the individual inventory entries. For each inventory correction, we recommend not to edit a current entry, but to create a new inventory entry.
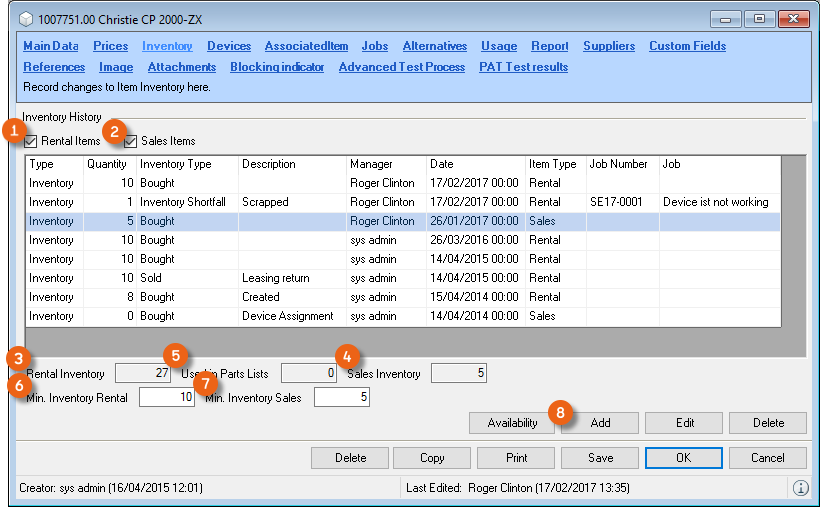
The rental inventory is calculated from the inventory of the rental item, less the Used in Parts Lists items. You can determine a Minimum Inventory for rental items and sales items . If this goes below the minimum, you can identify all items that are below the min. inventory with a view in the Navigator and in easyjob Today.
Entering the minimum inventory
1. Easyjob Menu Master Data Items
2. Select and item and Edit
3. Stock tab
4. Enter the corresponding data directly in the cells
5. Save
Create an inventory change with Add .
In addition to the quantity, you can use the dropdown menu to define the Type (e.g. purchased, sold, lost, etc.) and specify if it concerns the rental or sales area. Each device can be assigned to its respective Owner .
With Save you complete the inventory change and can directly assign the associated Devices using the corresponding tab . Based on the assignment, the inventory entry or inventory deletion is made for the device.
Creating inventory entries and deletions
1. Easyjob Menu Master Data Items
2. Item and Edit
3. Inventory tab
4. Add
5. Enter the relative data
6. Save
For a device change of inventory, e.g. add as series
7. Device tab
8. Series
9. Enter the corresponding data
10. Ok
More information can be found in chapter Devices.
Owner management
Owner management makes it possible to assign individual devices to different owners. The devices can be transferred between the owners. With the Business Information Center, you can calculate sales from projects according to owner.
Activating owner management
1. easyjob Menu Tools Settings
2. Functions
3. Check the Owner Management box.
4. Ok
easyjob must be restarted for activation.
Managing the Item Owners in the master data
1. Easyjob Menu Master Data Item Owners
2. Select an owner with Edit or create a new owner with Add .
3. Give the owner a name
4. Assign an address to the owner
5. Optionally, the Leasing selection can be made
6. Ok
Please observe the following notice before activating owner management:
After activation, it is possible to assign devices of an item to different owners. Assignment takes place in the item master data.
Determining the owner of devices for a change of inventory
1. Easyjob Menu Master Data Items
2. Select an item and confirm with Edit.
3. Inventory tab
4. Add
5. Enter the corresponding data
6. Select the owner
7. Ok
You can display or hide the various owners as necessary. To do so, check the box in the item on the Inventory tab.
Transferring devices to another owner
1. Easyjob Menu Master Data Items
2. Select an item and Edit
3. Inventory tab
4. Owner Transfer
5. Select the old and new owner
6. Specify the date and quantity
7. Ok
The transfer is shown accordingly in the inventory overview
Leasing
With owner management, you can also create devices with leasing contracts. To do so, when creating the owner in the master data, select the Leasing property.
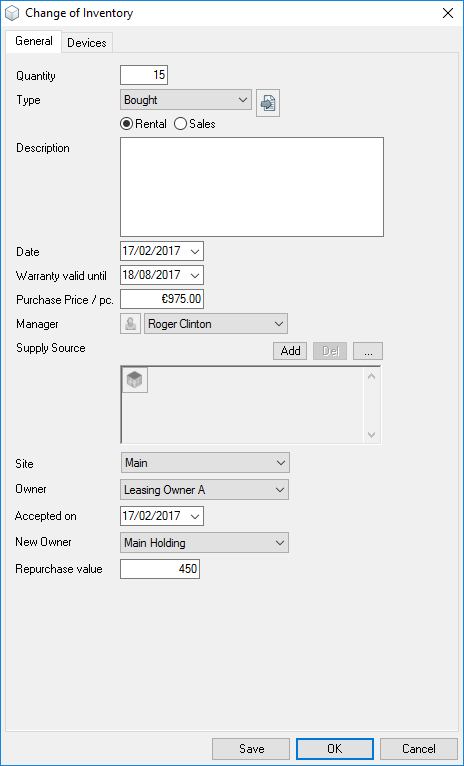
Adding an inventory entry with a leasing owner
1. Easyjob Menu Master Data Items
2. Select and item and Edit
3. Inventory tab
4. Add
5. Enter the corresponding data
6. Select the leasing owner
7. Define the Acquisition Date, the New Owner and the Redemption Value
8. Ok
Devices
In the item inventory, you can enter how much inventory you have of an item. If you save the item on the basis of a serial number/inventory number, the item is assigned to the corresponding device. When loading and unloading, you can chose if you want to load or unload the item or one of the corresponding devices.
When using a barcode scanner, decide based on the barcode if the item should be loaded as a bulk item or as a device. For this you can print the barcode from the item form or from the device.
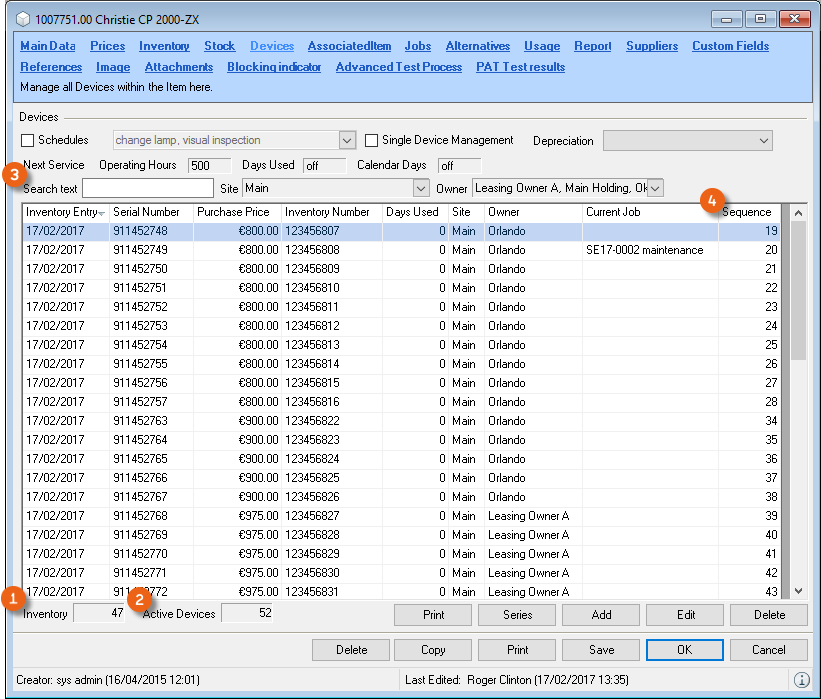
The device list shows you the inventory and how many active devices you have in inventory. Active devices are all devices that have not been assigned an inventory deletion.
The Search Text field makes targeted access to your devices possible
If you would like to manage the entire inventory of an item as devices, please note that the inventory is equal to the quantity of active devices.
A Sequential Number is assigned to devices to identify them faster. For each item, the sequential number of the first device starts with one.
The sequential number is displayed in the Bill of Items and is available as a field and variable in the Report Designer in order to print it, for example, on a barcode label or return note.
Creating a device
Creating a new device
1. Easyjob Menu Master Data Items
2. Item and Edit
3. Device tab
4. New
The Inventory Entry and Deletion is the assignment of an inventory entry (selection via the dropdown menu). On this basis you can always see which devices have been booked out or in and when. You can select the inventory entry or deletion in the device or create it from the corresponding inventory entry. The selection is optional. We recommend using the data.
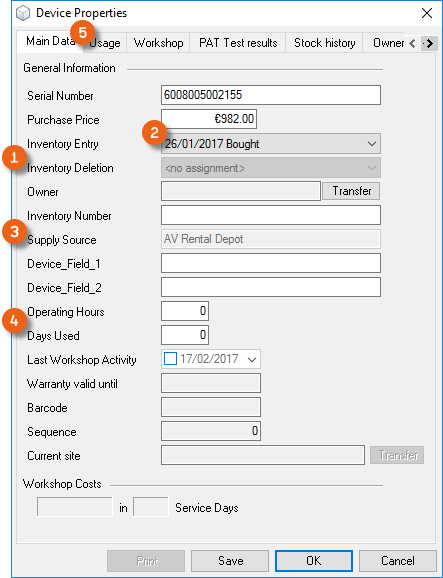
The Supply Source is taken from the supplier data of the inventory entry.
The Operating Hours and Days Used can be entered manually. When using the barcode scanner, the data is automatically adjusted. The barcode field is generated by easyjob.
On the Usage tab , you can see the jobs where the item was used, with days used and operating hours. The Operating Hours are assigned via the barcode scanner upon return.
You can also assign the operating hours manually
1. Easyjob Menu Master Data Items
2. Item and Edit
3. Device tab
4. Device and Edit
5. Usage tab
6. Select the job for which you want to enter the operating hours
7. Edit
8. Enter the accrued operating hours
9. Ok
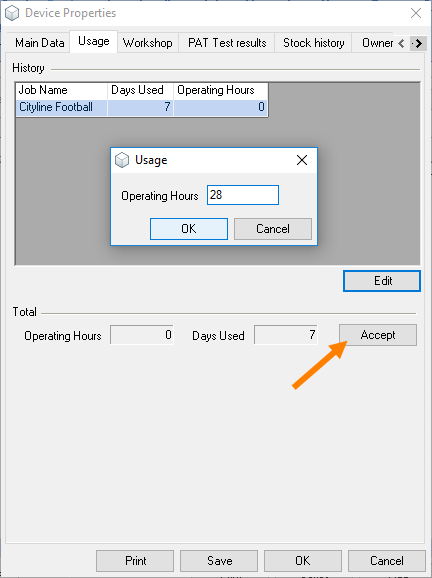
With Apply, the sum of the operating hours and the days used is applied in the main data of the Device Properties.
Creating a device series.
If you use items without an assigned serial number as devices, you can create multiple devices together.
This function saves much time when using the barcode scanner. Create the new devices as a series and then print the device barcodes. With the assign serial number function on the barcode scanner, scan the easyjob device barcode and then the serial number barcode printed by the manufacturer. This will automatically fill in the serial number in the device master data.
Creating a new device
1. Easyjob Menu Master Data Items
2. Item and Edit
3. Device tab
4. Series
5. The quantity is present based on the difference between the inventory and the active devices. The serial and inventory numbers can be generated automatically. For this, the number must be entered as a numerical value.
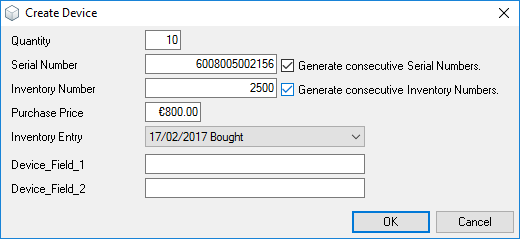
6. Ok
Individual device management
With individual device management, you can synchronize your item inventory and your active devices. If your inventory corresponds to the quantity of active devices in every stock location, activate individual device management in order to be certain that the item quantity is always synchronized with your active devices.
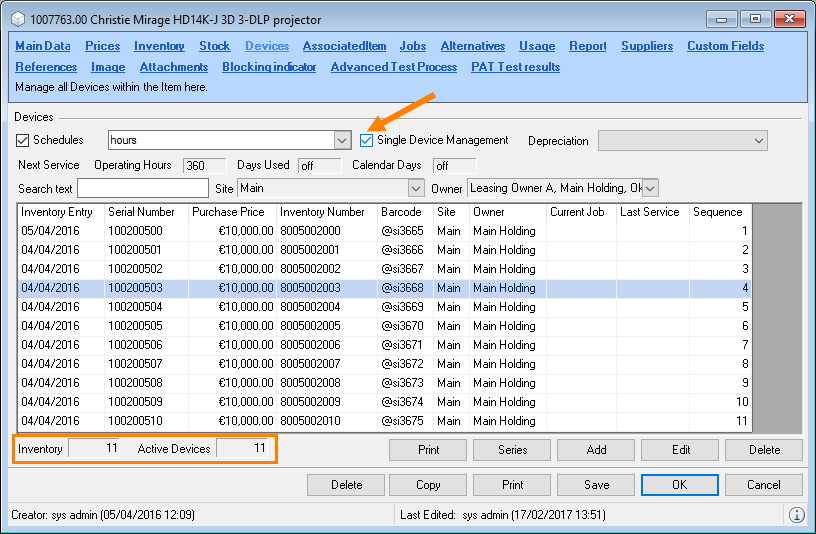
If there is a difference between the Inventory and the number of Active Devices, you must first solve this. Only then can you can activate individual device management.
Activating individual device management
1. Easyjob Menu Master Data Items
2. Item and Edit
3. Device tab
4. Check the Individual Device Management box
5. Save
Associated Items
Associated items are items the are booked automatically with an item. You can find a more detailed description in chapter Associated Items and Item Packages.
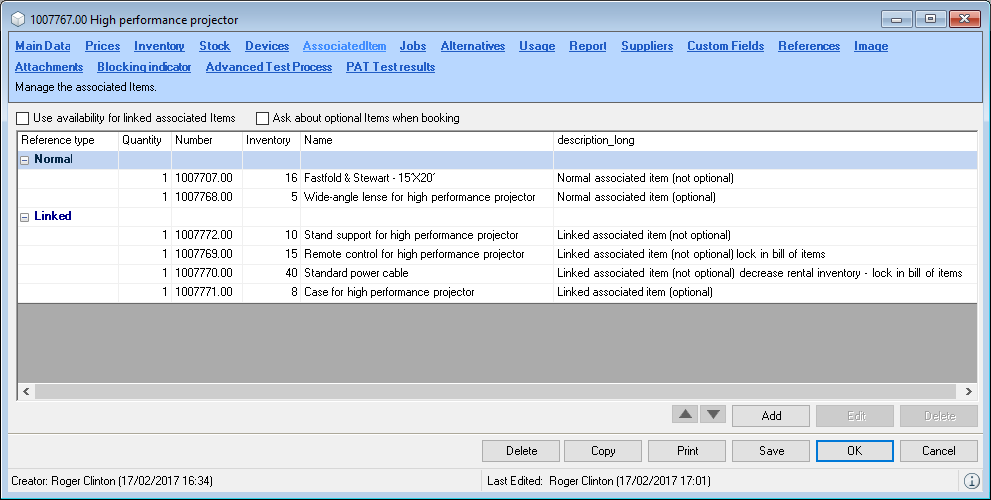
Adding an associated item
1. Easyjob Menu Master Data Items
2. Item and Edit
3. Associated Items tab
4. Add
5. Select the item as well as the type and enter the quantity
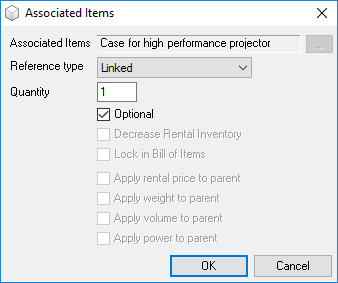
6. Ok
Clear assignment of linked associated items
You can assign the devices of the linked associated items to each Device.
Assigning device linked associated items
1. Easyjob Menu Master Data Items
2. Item and Edit
3. Device tab
4. Open the device's context menu
5. Assign linked devices.
6. Assign the desired device of the linked item to the device
7. Ok
Jobs
The jobs for the item are displayed on this tab. You can limit the list using the date. You can double click to edit the job.
Alternatives
Alternative items can be used instead of the item. This could happen in the case of an overbooking. More information about this topic can be found in Chapter Using alternatives.
Adding alternative items
1. Easyjob Menu Master Data Items
2. Item and Edit
3. Alternatives tab
4. Add
5. Select the alternative item
6. Ok
Usage
In this view, you can see the usage, days used as well as income from the individual jobs, grouped by job status, over a selected time period. To update, click Refresh.
The basis of computation is further explained in the easyjob Business Information Center.
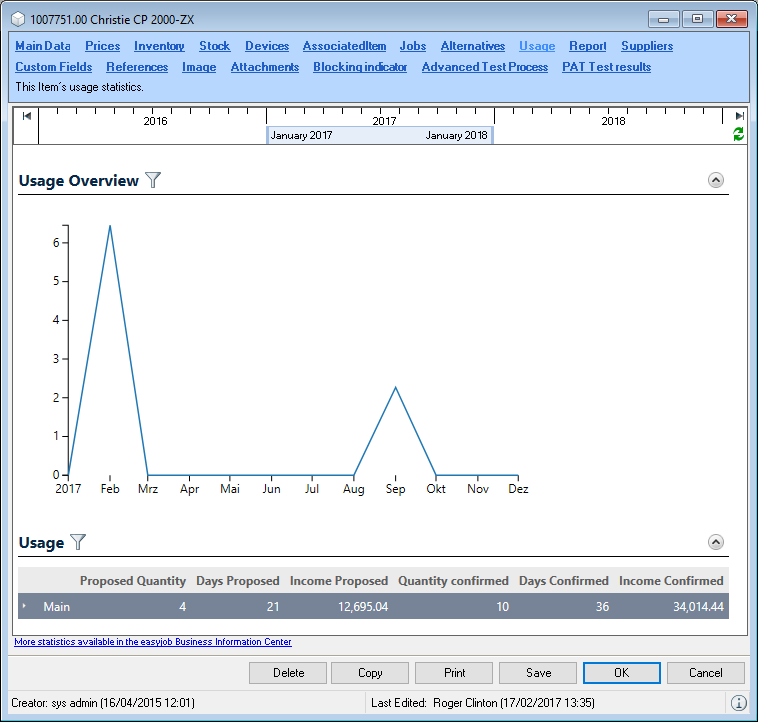
Report
The report text field provides you with a formatable text field for the item. You can use the text field as you wish.
An example for the contents of the text field could be a descriptive item name. You could define for an offer report that only items with a text content are printed. Therefore you can provide customers who are not familiar with technical item names with a readable offer.
Suppliers
You can assign as many suppliers as you wish to each item for sub-rental and for purchase . With the arrow keys you can sort the list line items as needed to prioritize them . In addition to the price, you can also enter the supplier item number and the manufacturer .
Prioritization can be used with the sub-rental optimizer. Additional Information can be found in chapter Sub-rental wizard.
Adding new suppliers
1. Easyjob Menu Master Data Items
2. Item and Edit
3. Supplier tab
4. Add
5. Select the supplier
6. Ok
You can added the supplier price and item number directly in the corresponding field.
Custom Fields
More information about this topic can be found in Chapter Reminder Screen
With the Reminders window you can remind yourself about important easyjob jobs. The status bar displays the current quantity of your reminders. You can click on it to open the Reminders window and process the jobs, e.g. Create Purchase Order – on the basis of Navigator and easyjob Today views. The Reminders screen also stays open when opening the respective job. You can select the time interval after which the reminders window should be displayed and save with Snooze . With Settings you can define the jobs you want to be reminded about.
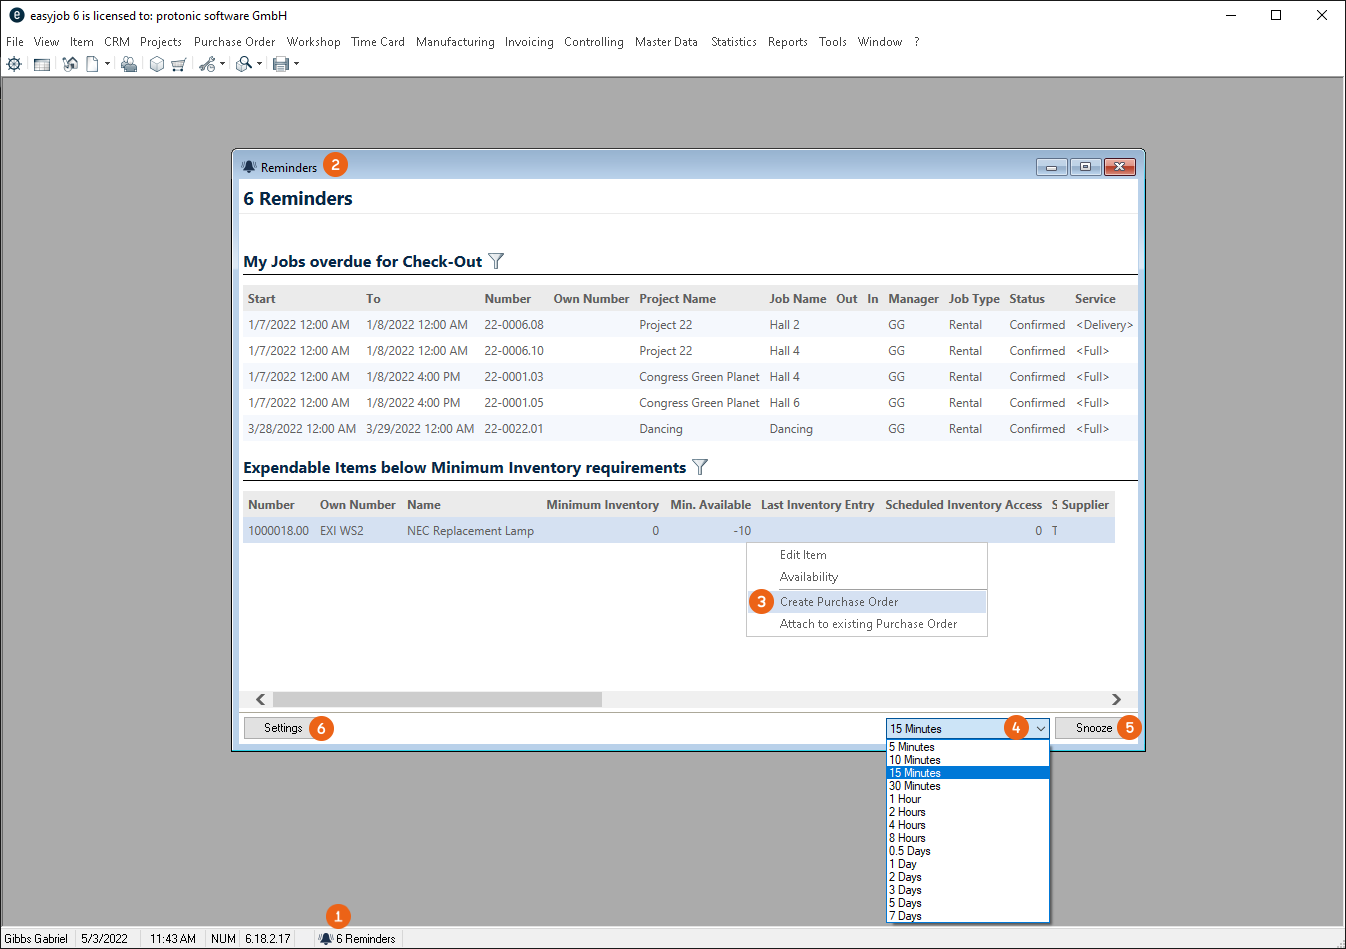
Settings opens in your User Settings in the Reminders section. All active Reminders are displayed here. The filter options for the individual views are the same as for the Navigator and easyjob Today view. With Add you can select a new View and confirm it with OK . Marked views can be deleted .

Configuring your own reminders
9. easyjob Menu Extras User options Reminders
10. Add
11. Select the required Jobs and filter them if necessary.
12. Ok
easyjob must be restarted to activate the changes.
Configuring reminders for users
15. easyjob Menu Extras User Rights Management Reminders
16. Select the user
17. Edit
18. Reminders tab

19. Add
20. Select the required Jobs and filter them if necessary.
21. Ok
If the user has the Configure personal reminders right, they can change the set Reminders accordingly here.
References
References provide an overview of the linked associated items, normal associated items, item packages or schedule views where this item is used.
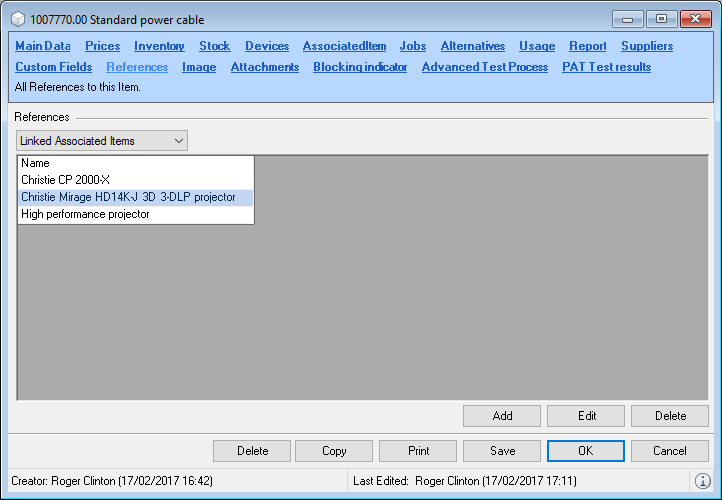
Images
The item image can be displayed in the schedule view and include on reports. By selecting the image, a document entry is automatically created. You can also select an image from existing documents.
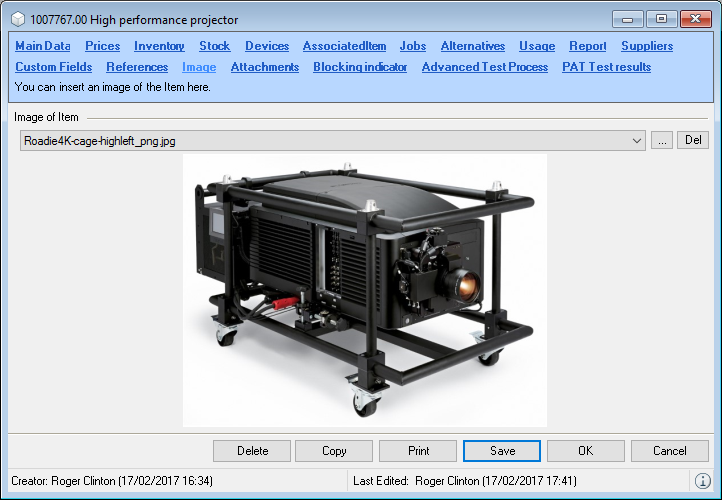
Attachments
More information can be found in chapter Attachment Management.
Taking items out of service using the exchange function
With this function, you can take disused items out of service. With the exchange, the items existing in all jobs will be replaced with the new item. There are various setting options for Replace Item . The behavior in the various areas (Master Data and References ) is explained in more detail in the following tables. Corresponding log entries are created. In the window you can select if the disused Item should be kept , deactivated (easyjob and "Deactivate" user right required) or deleted (user right "delete" required). If no Devices are checked and keep or deactivate is selected, replacement of Only future data is possible and the Inventory selected is grayed out.
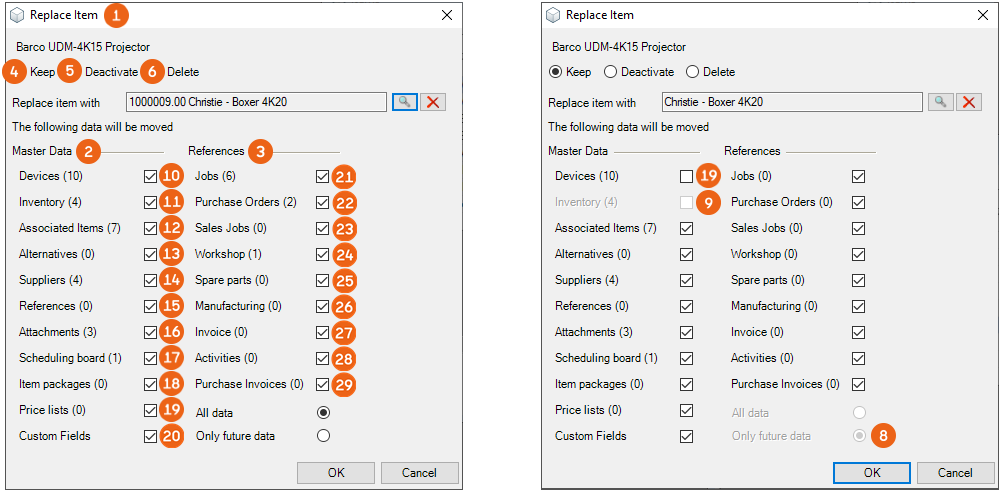
| Replace Item | Only future data | |
|---|---|---|
| Devices | If devices are taken over but there are no Inventory entries, the devices receive a new Inventory entry from the new Item. (Last purchase or Inventory Entry). | |
| Inventory | If inventory entries are received, the previous item receives a new entry. (Not when deleting the previous item). All owner entries are also taken over. | |
| Associated Items | References are taken over when they are not already present in the previous composition. The quantities are not increased. The assignments of the devices of the associated items are taken over. | |
| Alternatives | It they are taken over with the main item, they are taken over in the associated items only if they did not already exist. | |
| Suppliers | These are taken over if they do not already exist. | |
| References | Associated items are seen here only if the item itself is used. | |
| Attachments | All attachments are taken over. This image remains unchanged. | |
| Scheduling board, Item packages, Price lists | These are taken over if they do not already exist. | |
| Custom Fields | Custom fields 1,2 and 3 up to 4000 characters are attached to the existing user field.Custom Fields 4 and 5 are only taken over if there is a 0 in the previous field.Notes of up to 500 characters are attached. | |
| Jobs (Rental, Sub-Rental) | Requirement for taking over the replaced item in the bill of items- the replaced item is not yet available in the group- the replaced item is not yet available as a linked associated item of the main item If the item to be replaced already exists in the Bill of Items, the quantities are added up.Partial delivery entries will also be created or increased.Corresponding inventory entries are redirected, e.g. to expendable items or in case of a warehouse transferIf devices are taken along (all data active), items that were already loaded are ignored.If no devices are taken along, all booked, future devices will be deleted.Log entries are created accordingly in the Bill of Items. | Reference point: check out date and not loaded |
| Purchase Orders | All line items are taken over that do not yet exist in the Group.If no devices are taken along, no purchase orders are taken over that contain devices. | Reference point: delivery date |
| Sales Jobs | See Jobs. | |
| Workshop | They are taken over. | Reference point: start date |
| Spare parts | They are taken over if they do not already exist. | Reference point: start date |
| Manufacturing | Line items are taken over if they do not already exist. | Reference point: Start date and, calculation or confirmed status |
| All items are replaced in the bill of items | Reference point: check out date | |
| Invoice | All line items of the Item type are taken over | Reference point: invoice date |
| Activities | All activities that are directly assigned to the item are taken over. | Reference point: start date |
| Purchase invoice | All line items that are directly assigned to the item are taken over. | Reference point: document date |
Replacing items by means of exchange
1. easyjob Menu Master Data Items
2. Select an item and Delete
3. Select Exchange in the context menu
...
or
1. easyjob Menu Master Data Items
2. Select an item and Edit
3. Delete
4. Select Exchange in the context menu
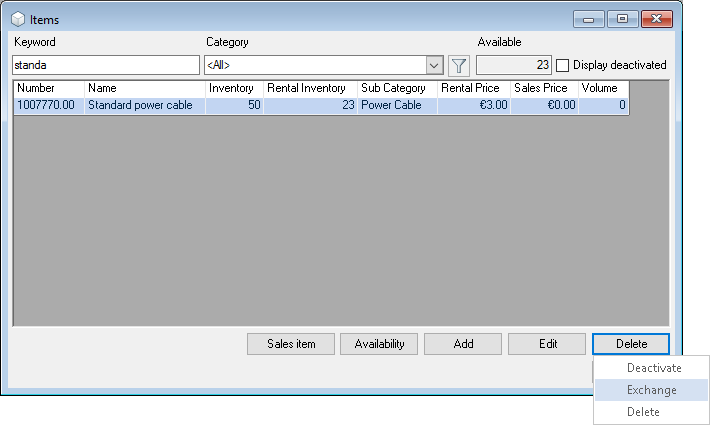
5. Click the magnifying glass and select the item to be exchanged
6. Define the areas in which the item should be replaced
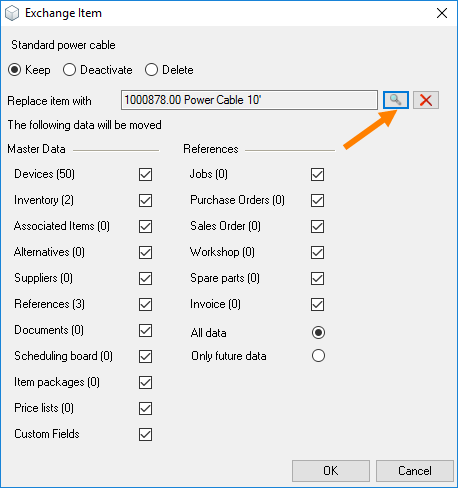
7. Ok
Item blocking indicator
To prevent certain items from being sold, they can be marked with a blocking indicator.
In the following example, the item will no longer be displayed to be used for sale
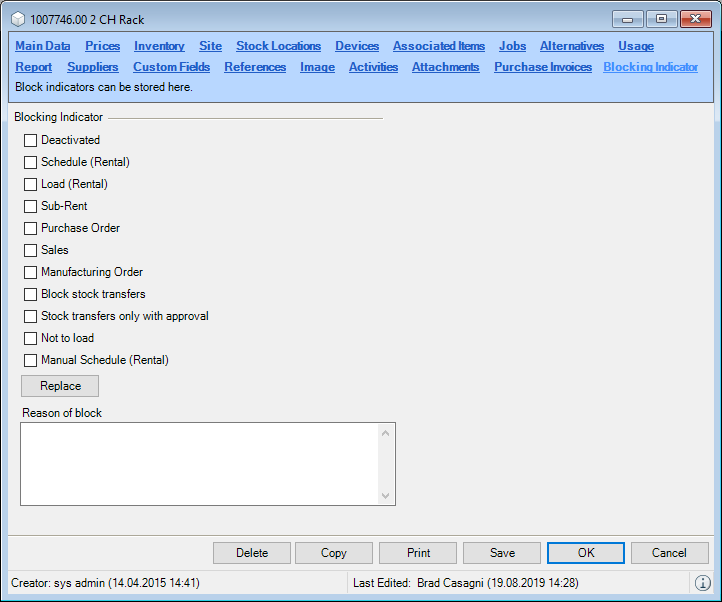
Setting an item blocking indicator
1. easyjob Menu Master Data Items
2. Select an item and Edit
3. Blocking Indicator tab
4. Check the box for the areas where you no longer want to use the item
5. Save
With the Manual Schedule (Rental) blocking indicator, you can ensure, for example, that an item will only be automatically booked in combination with a main item.
The Not to load item blocking indicator indicates that an item should not be loaded. This function can be used, for example, for fixed installations in rooms.
When changing blocking indicators, a log entry is made for the item wi:4390 and a comment field is provided for entering the reason wi:4391.
You can also deactivate individual items. The item will no longer be shown in the master data or for booking. It will remain in existing jobs.
Copying an item
When creating similar items, you can copy the item to save additional data entries.
Customizing supplier priority
1. easyjob Menu Master Data Items
2. Select and item and Edit
3. Copy
4. Enter a new name, the inventory as well as which data should be copied
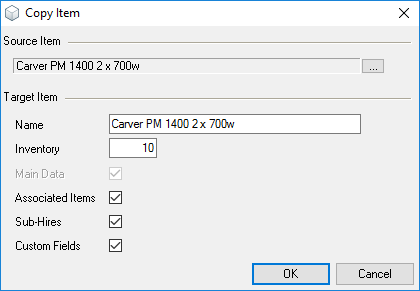
5. Ok
After the entry, the master data page for the new item will appear.
Printing a barcode
You can print item and device related barcodes.
1. easyjob Menu Master Data Items
2. Select an item and Edit
3. ...
Printing an item barcode.
3. Print
4. Select the barcode report
Print the device barcode.
3. Device tab
4. Select the Device
5. Print
Sales Position
With this function, you can create proposals without booking specific items in the bill of items. Sales Positions are a type of place holder with which salespeople can offer a service (e.g. Projector S, M, L or XL, Public address system 50 sq. m, 250 sq. m or 500 sq. m) without needing to have knowledge of the technical data of the item that is actually required. The so-called virtual items can be assigned Variants (various projectors, lenses, speakers, power amplifiers, wiring, etc.) in the bill of items. In the bill of items, the sales items are released via scheduling and therefore also the selection of the actual items that should be used.
Creating a Sales Item
1. Easyjob Menu Master Data Items Sales Item
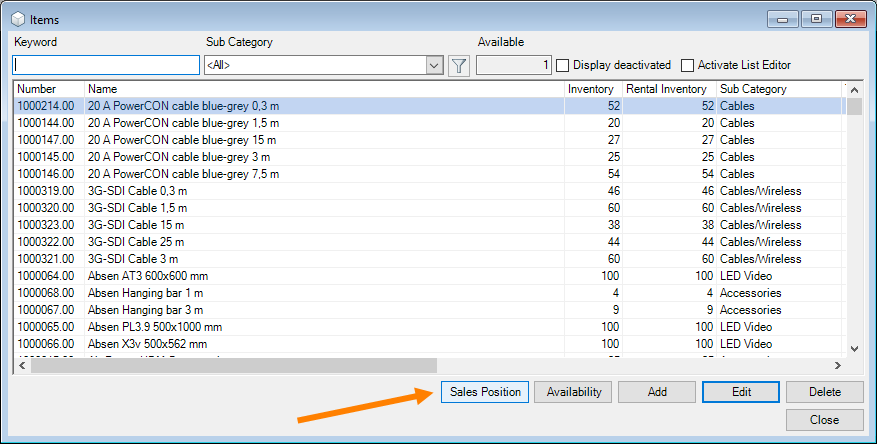 Enter a Name
2. Add the price or other details
3. Save
A quantity is not required for the sales items, as the availability of the sales items is calculated based on the assigned variants and the items contained there.
Sales Item variants
To be able to enter actual items in the sales item, you can create various Variants in the master data of the sales item. Select Variant 1 and change the designation if necessary. With Add you can assign Variant 1 to the actual item . Afterwards create as many Variants as required or a new designation and assign the Variants to the corresponding items . You can use the arrow keys to change the order of the variants or Delete a variant if required. After a sales item is assigned to a variant via the bill of items, the availability of the sales item will be calculated. You can select the High availability of a variant or the Total availability of all variants . In the bill of items, you can add the sales item like a normal item (or, e.g. in the cart).
Adding items to variants for sales items
1. Easyjob Menu Master Data Items
2. Select a sales item Edit
3. Variants tab
4. Click on New variant or an existing variant
5. Add
6. Select the item for the variant
7. Ok
Sales items in the bill of items
You can add sales items in the bill of items just like normal items. The sales items are highlighted . In addition in Settings you can activate the Sales Positions Variants part. More information can be found in Customizing the bill of items to requirements). Under Display Options , select Assignments .
After activating settings, when you click the Sales Item line, the Sales Item Variant part displays the available variants for this item. After selecting a Variant , you can assign it to the sales item with Add . The released items of the sales item will be highlighted below the sales item . You also have the option to select from the various item variants (check the box) , define the quantity and assign it to the sales item.
Items must be assigned from a sales variant at the latest before starting the loading process.
Availability calculation for sales items
The availability of sales items can be calculated in two different ways. You can decide between the High availability of a variant or the Total availability of all variants.
High availability of a variant
With high availability of a variant the availability of all variants is calculated and the availability of the variant is used that has the highest availability. The availability in the example results from the highest availability of the available variants. In this case, Variant 3 has the highest availability. Specifically, more projectors are actually available, however the lower quantity of lenses determines the actual availability of Variant 3 .
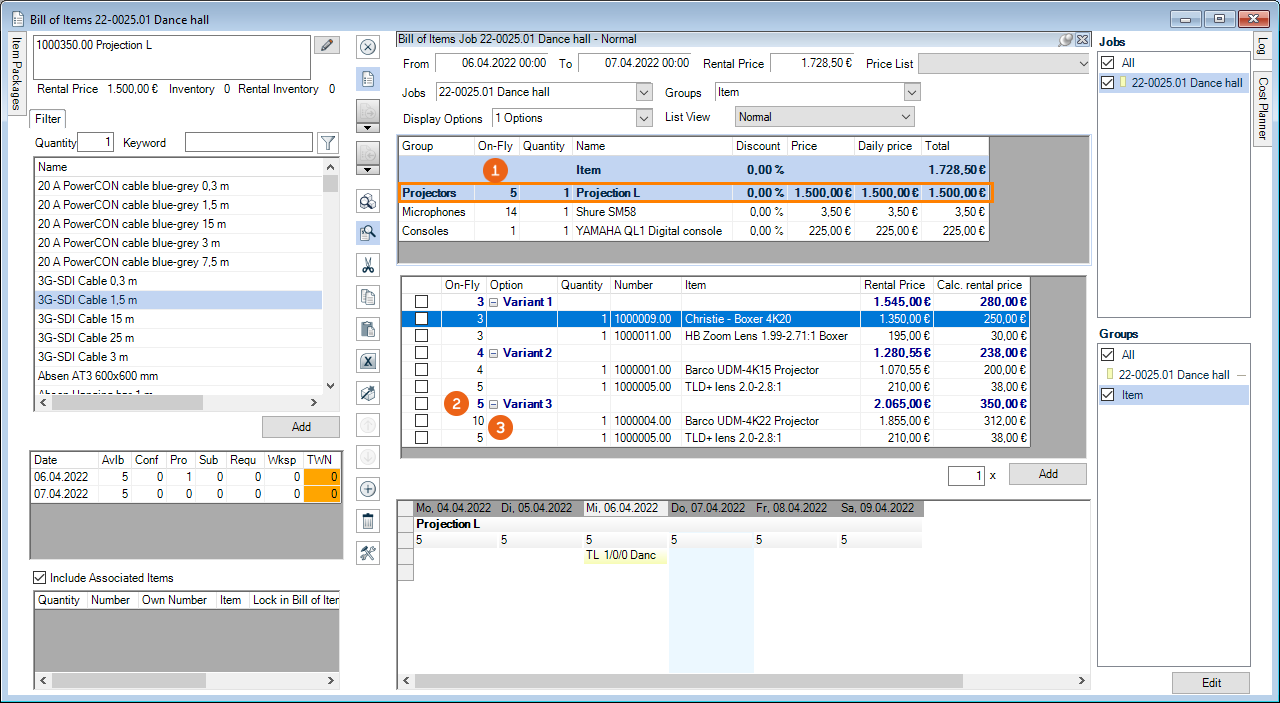
Total availability of all variants
With Total availability of all variants, the availability of all variants is calculated and their availabilities are added together. The availability in the example results from the sum of the availabilities of Variant 1 , Variant 2 and Variant 3 . In the case of Variant 3, more projectors are available, however the lower quantity of lenses determines the actual availability of Variant 3.
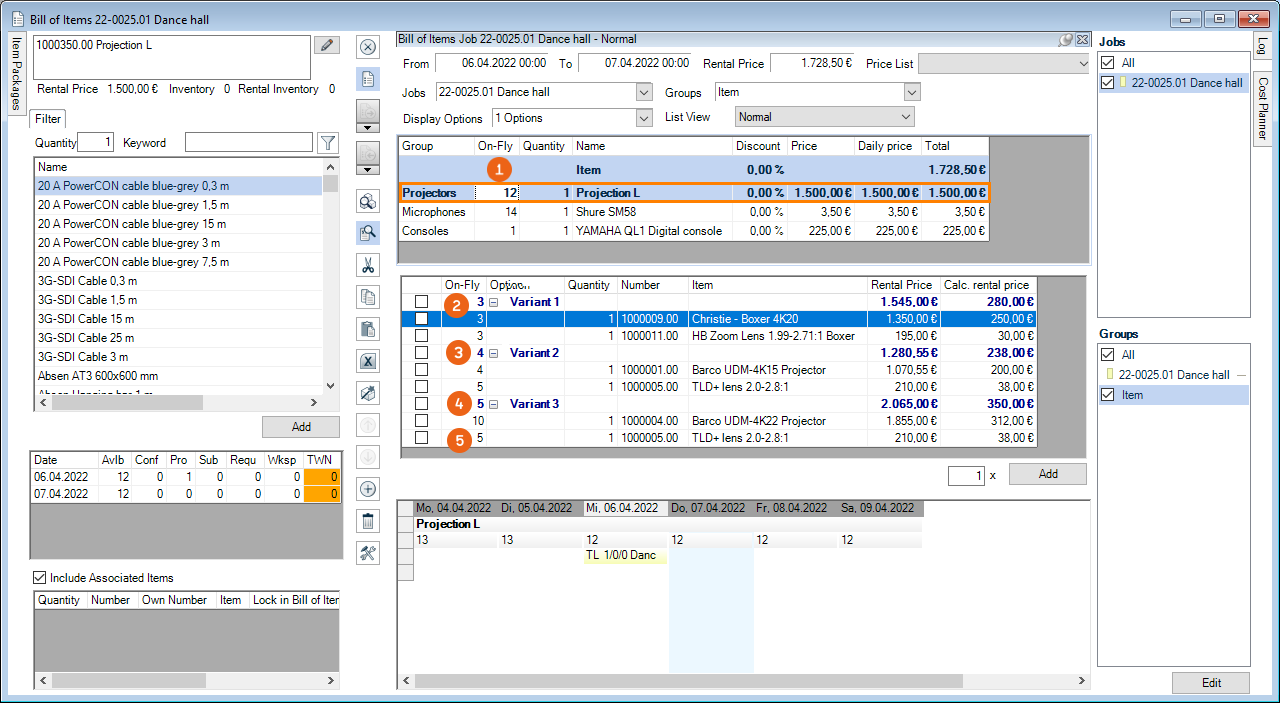
Entering the availability calculation for the sales item
1. Easyjob Menu Master Data Items
2. Select a sales item Edit
3. Variants tab
4. Select High availability of a variant or Total availability of all variants
5. Ok
Inventory
You can carry out the inventory using the easyjob inventory function or using the barcode scanner.
The inventory solution integrated in easyjob exports the items (or the devices) to be counted to Excel. Enter the determined quantity in Excel and import the data back to easyjob.
Data export for manual compilation in Excel
Select the file name of the excel file and select Export in the options . With the options, you can make the selection between the Item and Custom Number as well as between the Sales and Rental Inventory. With Display Devices, you can also list the available devices. You can make an additional selection via the Subcategory. The Preview shows you the result in advance. All items in stock will be displayed in the inventory list with the calculated inventory amount. For devices, the current Job is displayed and the number count filled with 1. In addition, the Device Sequence is provided in an additional column.
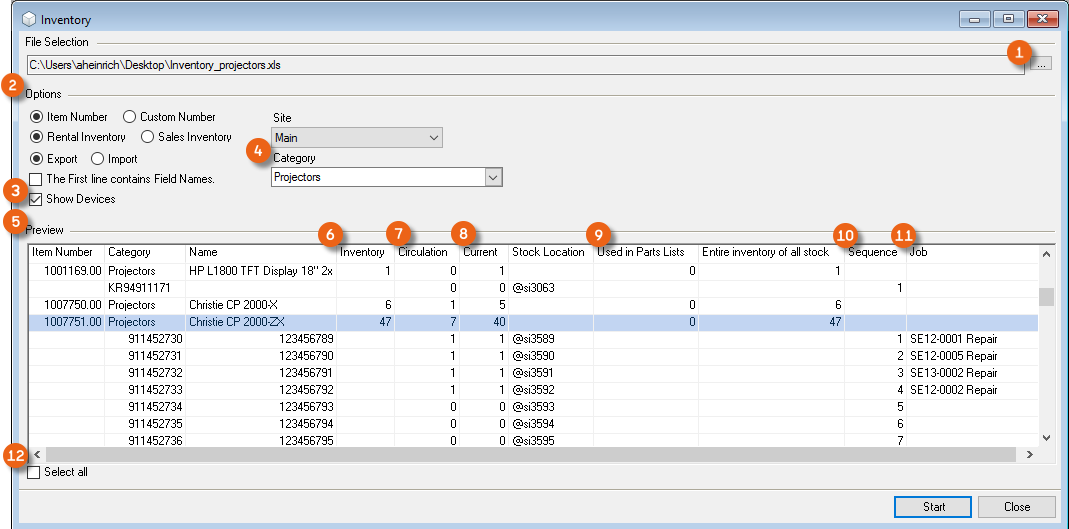
Basis of Computation:
| Inventory | Inventory minus Used in Parts Lists |
|---|---|
| In circulation | The quantity of items that are currently in confirmed jobs. |
| Current | The quantity available in stock |
You can select certain items or all by checking the box
Start inventory export
1. easyjob Menu Tools Inventory
2. Select the export file …
3. Select the Export option
4. Decide if devices should be displayed Display devices
5. Select the item to be exported
6. Start
Performing counts
Open the Excel table and enter the counted amount in column F.
Be careful not to count the items used in the linked associated items.
Data import of the amounts counted in Excel
Start the inventory import
1. easyjob Menu Tools Inventory
2. Select the Import option
3. Select the import file ...
4. Select the lines you want to import
5. Start
The inventory entry is created in the item master data based on the differences.
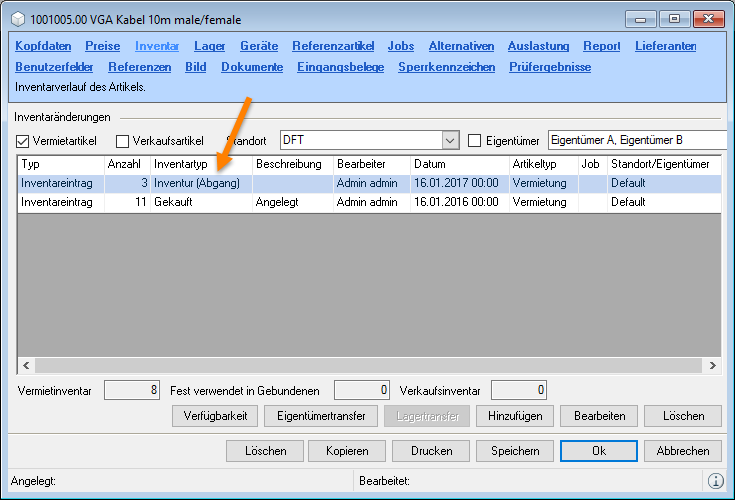
Create Inventory Job
You can carry out the inventory creating an inventory job. Therefor all needed items for a particular period will be booked in an inventory job. The inventory job will be set to Not to invoice and Check-Out automatically. The standard unloading process (via easyjob or via Scanner) will be used for the inventory, missing items can be treated in the same way like unloading a job. See also Unloading Jobs.
Create Inventory Job
1. easyjob Menu Tools Create Inventory Job
2. Select the name, start and end date as well as a the inventory type
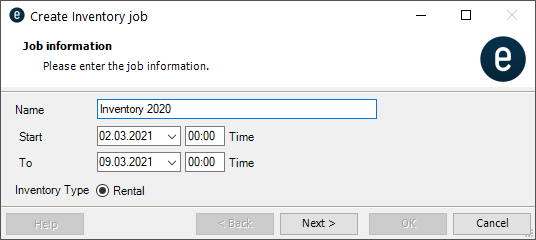
3. Next
4. Select how an item should be added
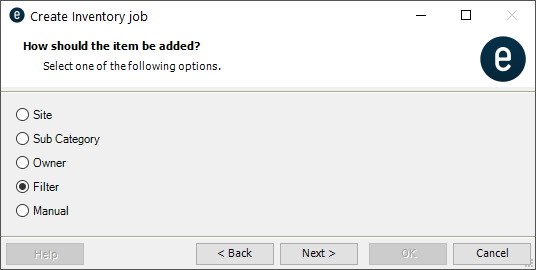
5. Next
6. Use a Filter if needed or select via Manual the needed items
7. Next
8. Add more items or click Start
9. The selected items are displayed in the preview
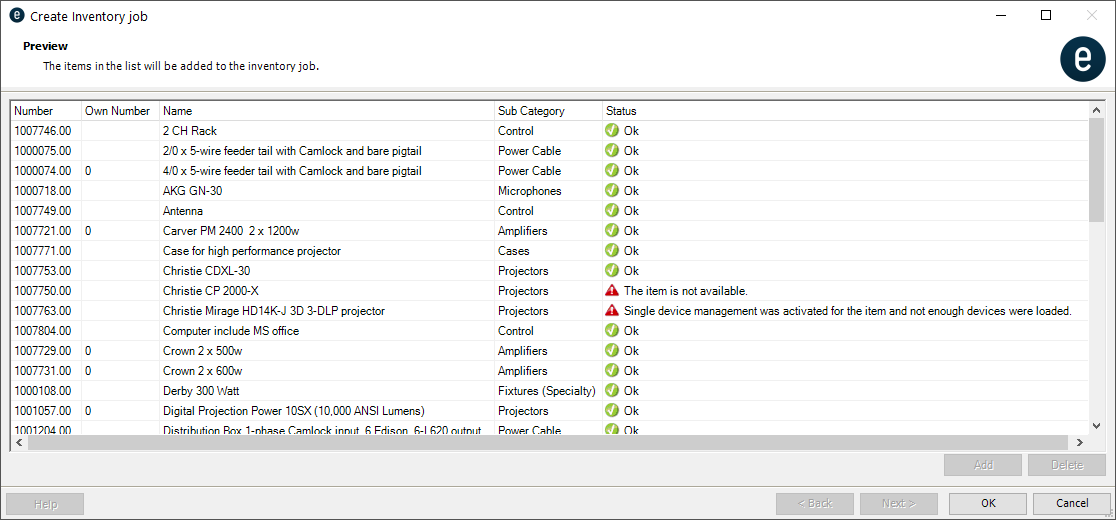
10. Ok
Scheduling and Site Management
Scheduling terminology
No content for this section.
Return Time
With the return time, you can indicate from what time the Available 1 Day later box should be automatically checked.
Item available one day later
Items are again available on the day of return. If more time is required or if the return is too late in the day for a new rental, the items will be calculated as available on the next day when this box is checked.
Check-out
A job receives the check-out status after all items are loaded and the items have left the warehouse.
Check-In
A job receives the check-in status after all items are unloaded and the items have been returned to the warehouse.
Loaded
The loaded quantity of an item shows how many items have already been loaded either manually or with a barcode scanner.
Unloaded
The unloaded quantity of an item indicates how many items have been unloaded manually or with a barcode scanner
Scheduled
Scheduled is the quantity of items that have been scheduled for the corresponding job.
On-fly Check
The On-Fly check shows the minimum availability of an item over a defined time frame.
Checking availability
Item availability is displayed in various locations in easyjob.
You can also manually start an availability check at any time.
Checking item availability
1. easyjob Menu Items Availability
2. Select and item … and determine the time frame
If you select a day, you will see the use of the item for the individual jobs.
To calculate item availability in consideration of current proposals and sub-rental requests, click the Include Proposals box.
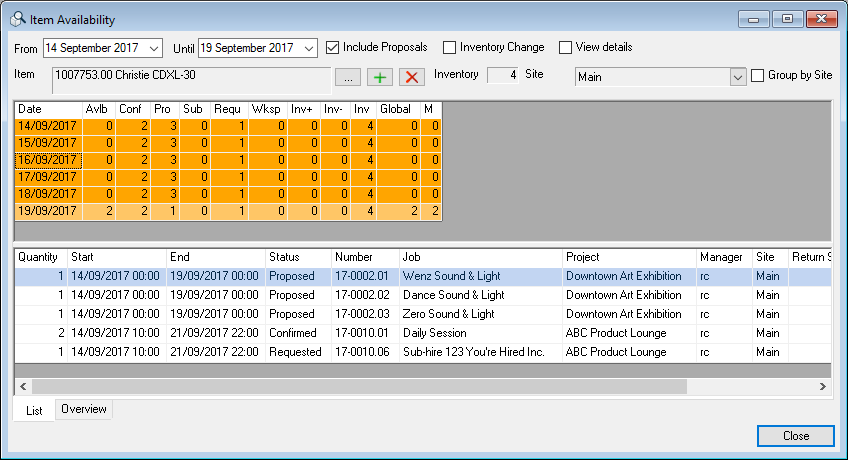
The list can also be displayed graphically. For this select the Overview tab.
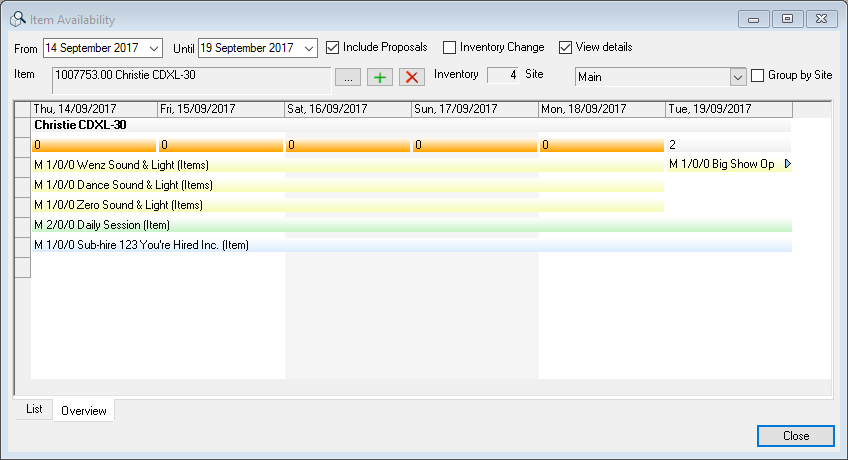
The Change of Inventory and View details (e.g. setup, test, etc.) options make it possible to display additional information.
Calculating availability
Availability is calculated based on the use of the item in jobs as well as the job status. All data is provided in real time from the database.
The item is available for rental on the day of return . If the item is returned on this day at a time too late to be rented again, check the Available 1 Day later box The job will be displayed as available in stock one day later than the end date.
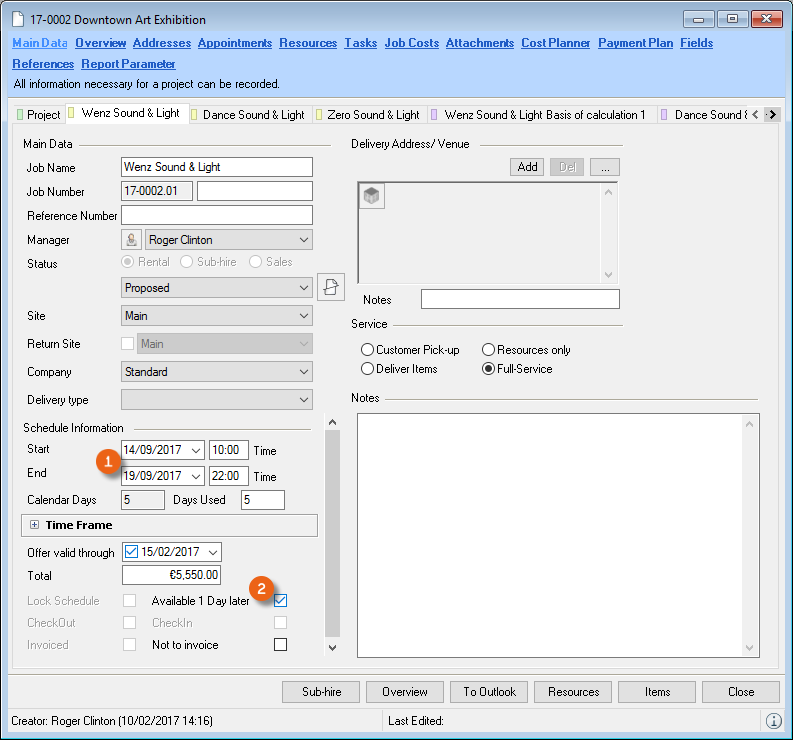
With the return time, you can predefine the time this box should be automatically checked in the program settings.
Presetting the return time
1. easyjob Menu Tools Settings
2. Jobs tab
3. Enter the Return Time under Scheduling
4. Ok
easyjob must be restarted for activation.
The start and end date of the entire job is crucial for the calculation. Tentative items are generally not included in the Availability Check. You can decide if Proposals and Requested Sub-hies should be included in the Availability Calculation by checking the corresponding Include Proposals box.
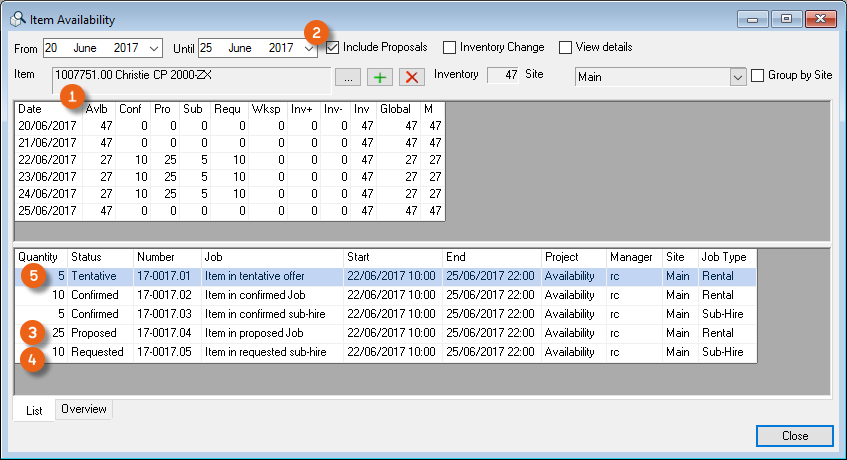
You can activate the setting in the user settings. In the Bill of Items, under Available and with Overbookings, all proposals will be automatically considered during the availability check.
Presetting Include Proposals
1. easyjob Menu Tools User Settings
2. General tab
3. Set the filter by checking the Include Proposals box
4. Ok
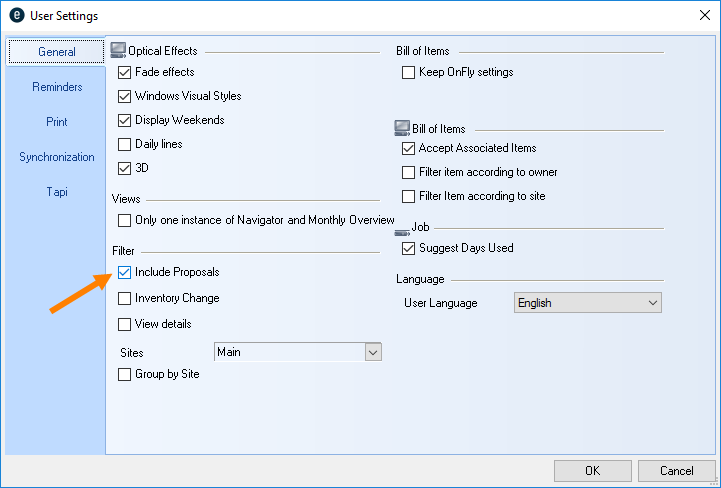
easyjob must be restarted for activation.
Intentory entries and deletions can be displayed in the item availability check overview . By checking the Change of Inventory box, you activate the display. Inventory Entries are shown with a green arrow inventory deletions with a red arrow .

| Column | function | Calculation |
|---|---|---|
| Avlb* | Availability | Rental inventory - quantity in confirmed jobs + sub-rental quantity - quantity in the workshop +/- inventory. |
| Conf | Confirmed | Quantity in confirmed jobs. |
| Pro | Proposed | Quantity in proposed jobs (without free offers). |
| Sub | Sub-rentals | Quantity in sub-rentals. |
| Req | Requested sub-rental | Quantity in requested sub-rentals. |
| Lead | Lead time | The item requires a certain preparation time prior to rental in order to be ready for use. |
| Follow | Follow up | The item requires a certain post-processing time after rental in order to be ready for use again. |
| Serv | Service (workshop) | Quantity in Workshop Activities. |
| Inv + | Inventory entry | Quantity in inventory entries (purchase, inventory correction ,etc.). |
| Inv - | Inventory deletion | Quantity in inventory deletions (sales order, scrap, etc.) |
* If proposed and requested sub-rentals are taken into consideration, the calculation is: Rental inventory - Quantity in confirmed jobs - quantity in offered jobs + quantity in sub-rentals + quantity in requested sub-rentals - quantity in the workshop +/- inventory.
Exact to the minute/hour availability check
In order to schedule in a more exact manner, you can change the basis of the availability check.
1. easyjob Menu Tools Settings
2. Bill of Items tab
3. Select the desired basis
4. Ok
easyjob must be restarted to activate the changes.
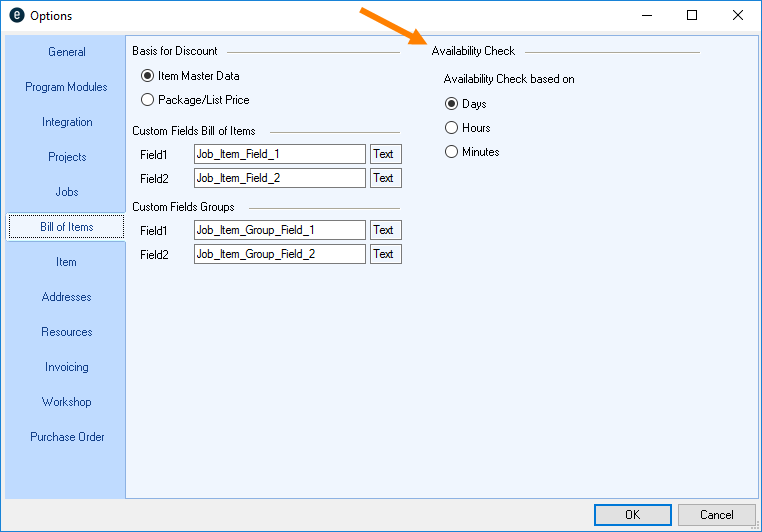
Sample Job with varying rates and discounts
The item can be found 2 times in a sub-rental, 10 times in a two-day job with the Item available 1 Day later box checked and once in a two-day job.
An inventory entry of 4 is entered in the item master data for September 17, 2016.
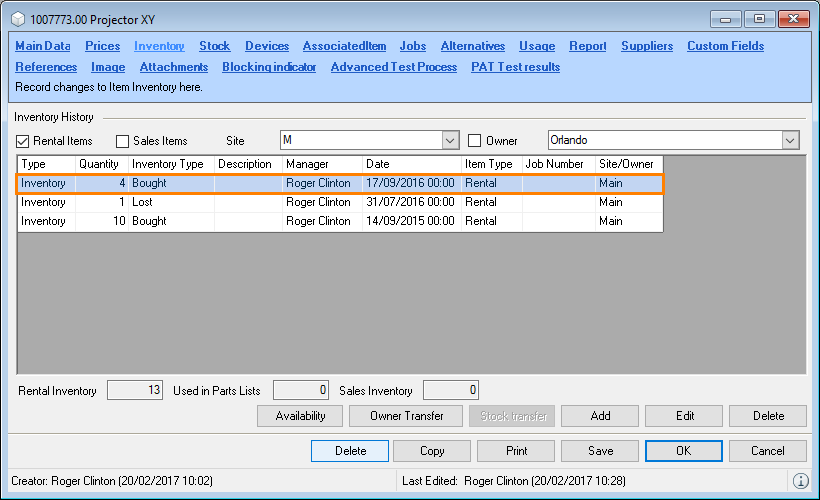
Graphical view of availability
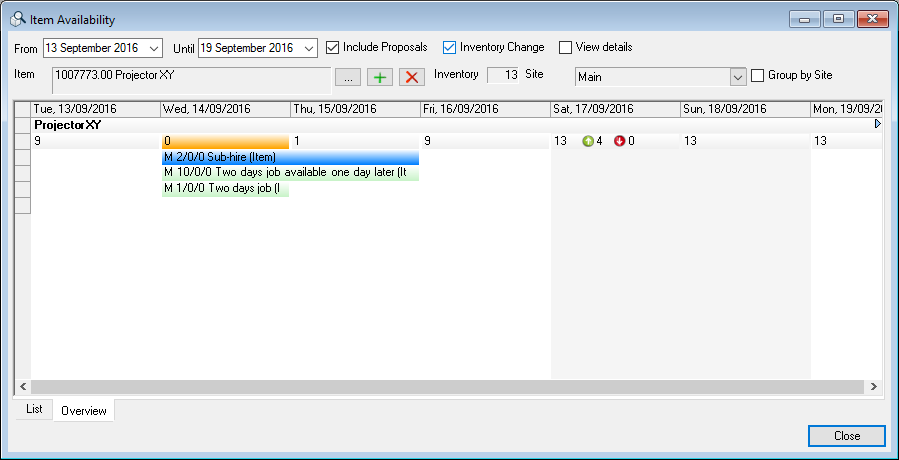
Table view of availability
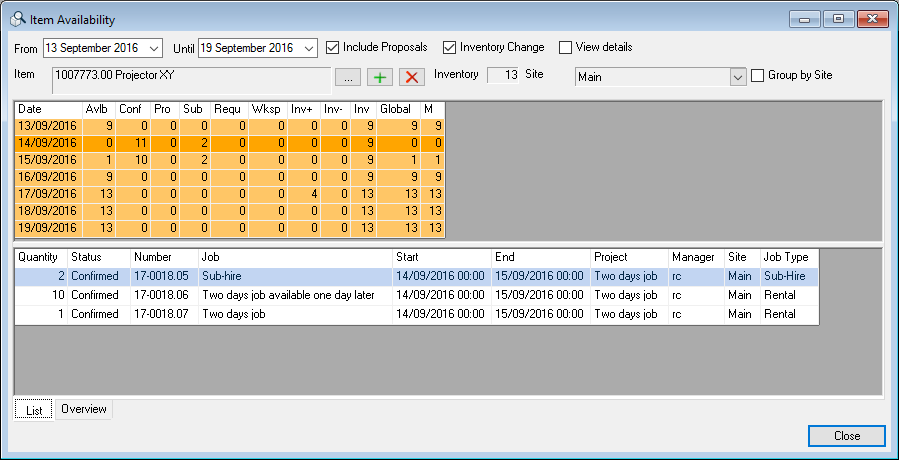
Calculation
| Date | Available | Invoice | ||
|---|---|---|---|---|
| 2016-09-13 | 9 | 2015-09-14 bought | + | 10 |
| 2016-07-31 inventory | - | 1 | ||
| = | 9 | |||
| 2016-09-14 | 0 | Rental Inventory | + | 9 |
| 2 in Sub-Rental | + | 2 | ||
| 10 in two-day jobs with availability 1 day later | - | 10 | ||
| 1 in a two-day job | - | 1 | ||
| = | 0 | |||
| 2016-09-15 | 1 | Rental Inventory | + | 9 |
| 2 in Sub-Rental | + | 2 | ||
| 10 in two-day jobs with availability 1 day later | - | 10 | ||
| = | 1 | |||
| 2016-09-16 | 9 | Rental Inventory | + | 9 |
| = | 9 | |||
| 2016-09-17 | 13 | Rental Inventory | + | 9 |
| 2016-09-17 bought | + | 4 | ||
| = | 13 |
On-fly Check
The On-fly check is available in some forms (also in the bill of items). The On-Fly check calculates the minimum availability of an item within a time frame. In the example of item selection in the job bill of items all items with minimum availability on the basis of the job time frame are calculated and color coded.
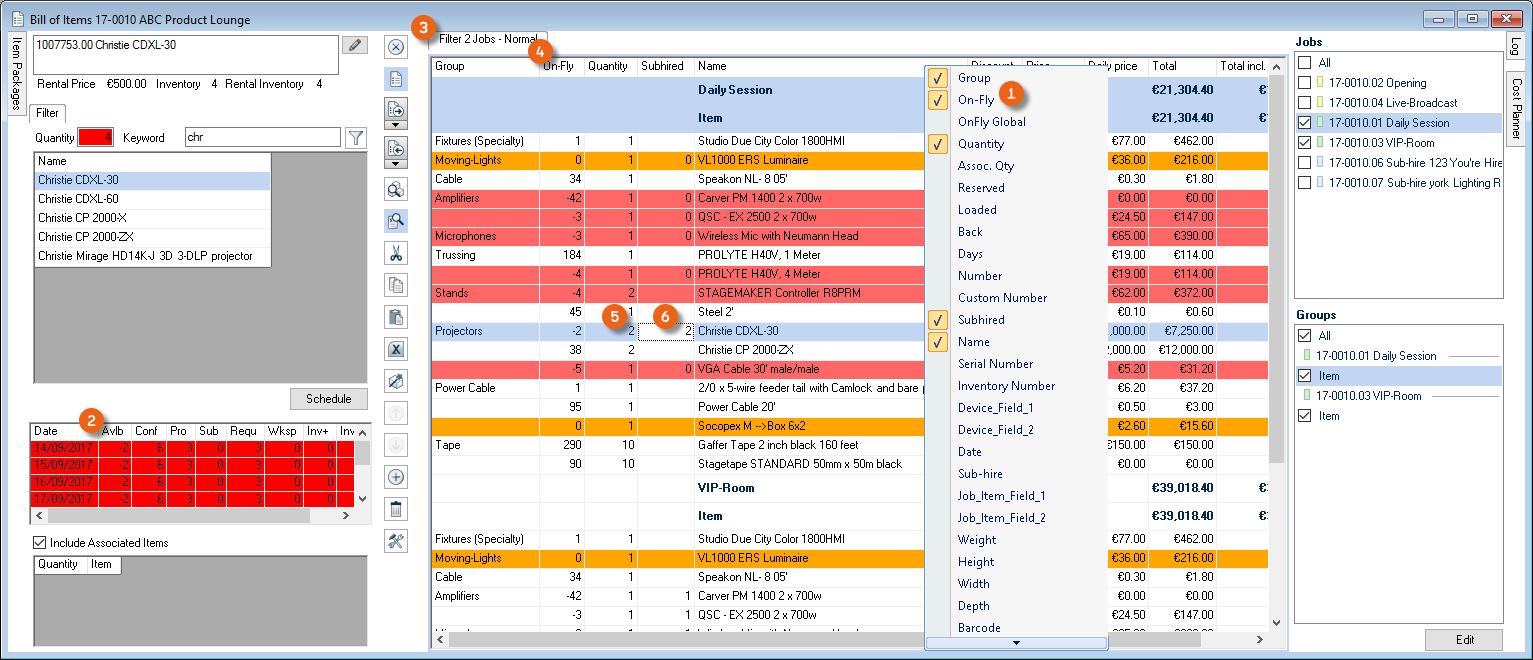
Activating OnFly in the bill of items
1. easyjob Menu View Jobs
2. Select a job and Edit
3. Open the bill of items and Items
4. Open the context menu in the column heading
5. Select On-Fly
If you sub-rental or reserve overbooked items , they will no longer color coded as overbooked in the job bill of items .
Colors
If an item is not available on a certain day during a selected time frame, the complete list will be colored light orange. The zero availability lines are colored dark orange.

If a negative amount of an item is available on a day, the complete list will be colored light red. The negative availability lines will be colored dark red.

Determining overbookings
Open the overbooking window to determine which items are overbooked on which day or during which time frame.
Determining overbookings for a day
1. easyjob Menu Items Overbookings
2. Select a time frame.
The items overbooked in a time frame will be shown in a list with the overbooked quantity .
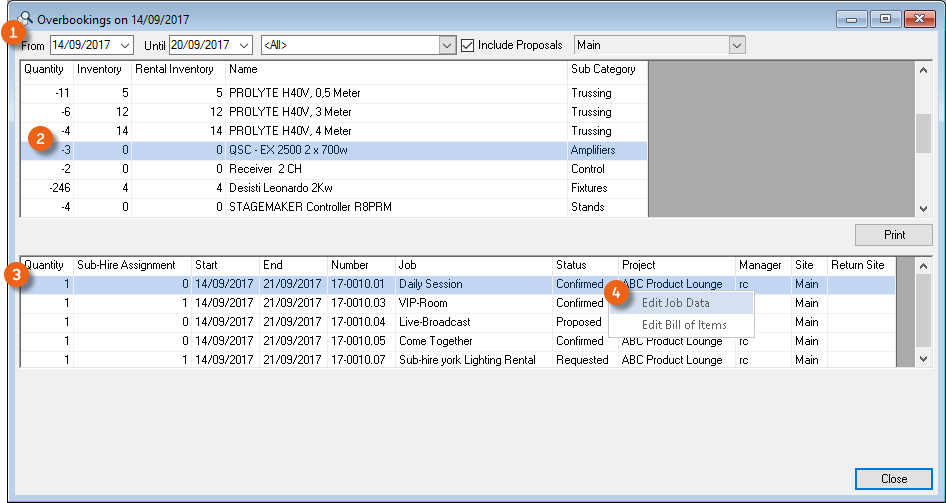
After selecting an item, you will see the jobs in which the item is used. Use the context menu to navigate the job.
Also in the monthly overview you can calculate overbookings for a selected time frame.
Calculating overbookings in the monthly overview
1. easyjob Menu View Monthly Overview
2. Select the desired schedule time frame .
3. Click Display overbookings in the Overbookings group.
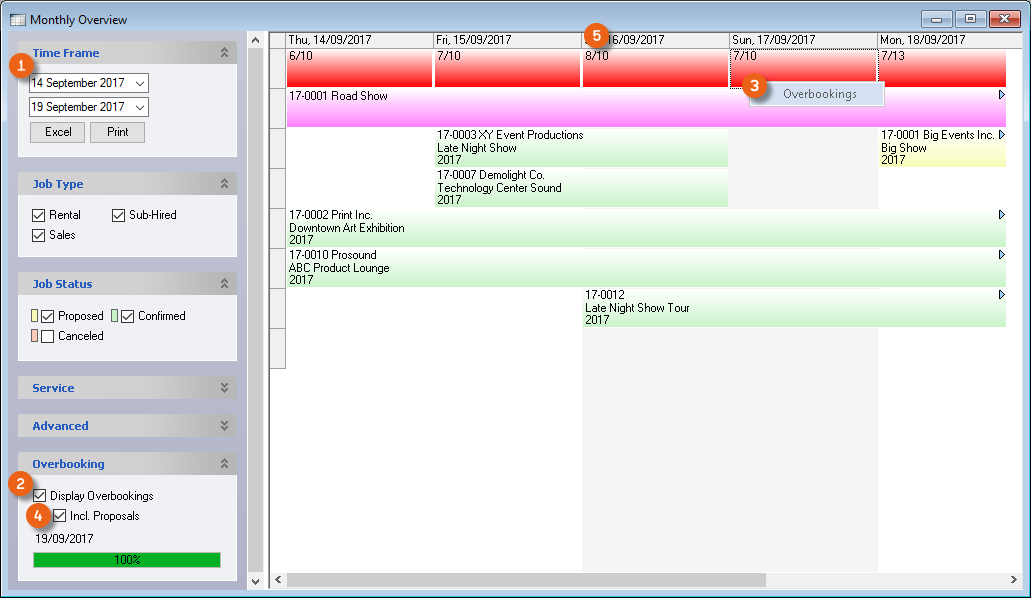
Use the context menu for an overbooked day to open the overbooking wizard.
It is also possible to calculate the proposals in consideration of overbookings. The overbookings in proposals are separated by backslash .
Overbooking warning when moving the job time frame
easyjob will provide a warning if there are overbookings when moving a job time frame. As this function can slow down moving, there is a setting for this.
1. easyjob Menu Tools Settings Jobs
2. Check the Overbooking warning when changing the timeframe
3. Ok
easyjob must be restarted to activate the changes.
Using alternatives
No content for this section.
Scheduling Board
The scheduling board is a powerful tool that helps you maximize the usage for your equipment.
The scheduling board groups all items into a preset scheduling group together and shows the use of the item in the individual jobs.
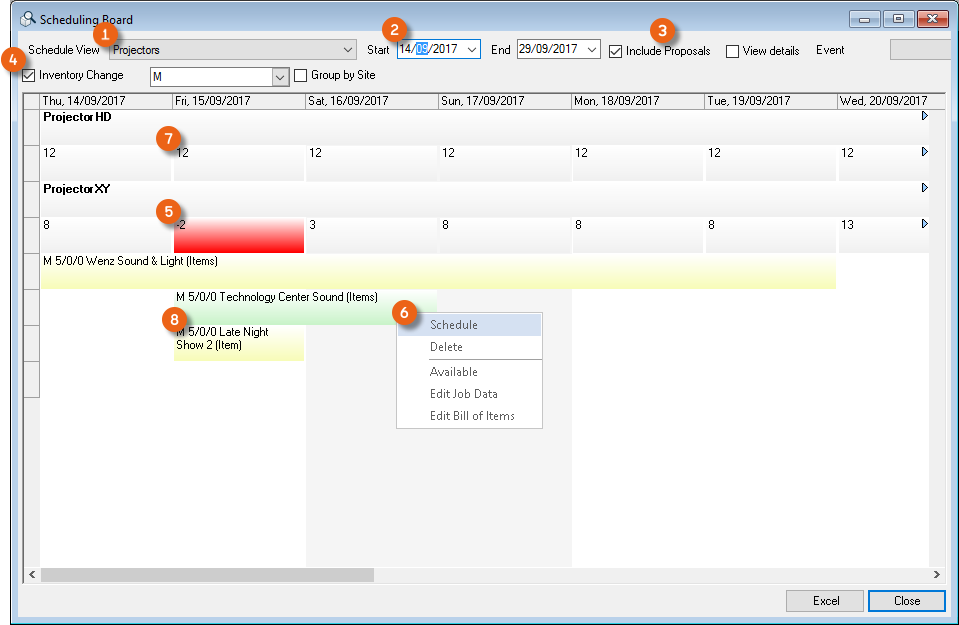
Your last view is saved in the Scheduling Board. You can continue to work directly by reopening the scheduling board .
Opening the scheduling board
1. easyjob Menu Items Scheduling Board
2. Select a schedule view and a time frame
3. Select the desired options
4. Include Proposals View details Change of Inventory
If an item, such as projector XY, for example, is overbooked , you can exchange it with an alternative item with Schedule . In this view you can see that the HD Projector is available for the same time frame.
Exchanging items with alternatives
5. Open the context menu for the item to be exchanged Schedule
6. Select the item that should be exchanged with with selected item
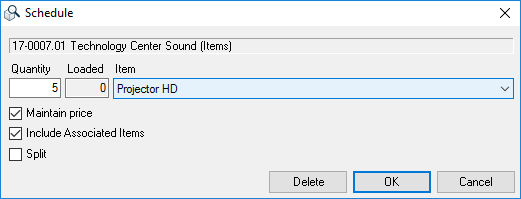
7. Check the Maintain price box to calculate the new item using the old item price
After the exchange, the overbooking is solved by using an available item. The relevant job is assigned to the exchange item (e.g. HD projector).
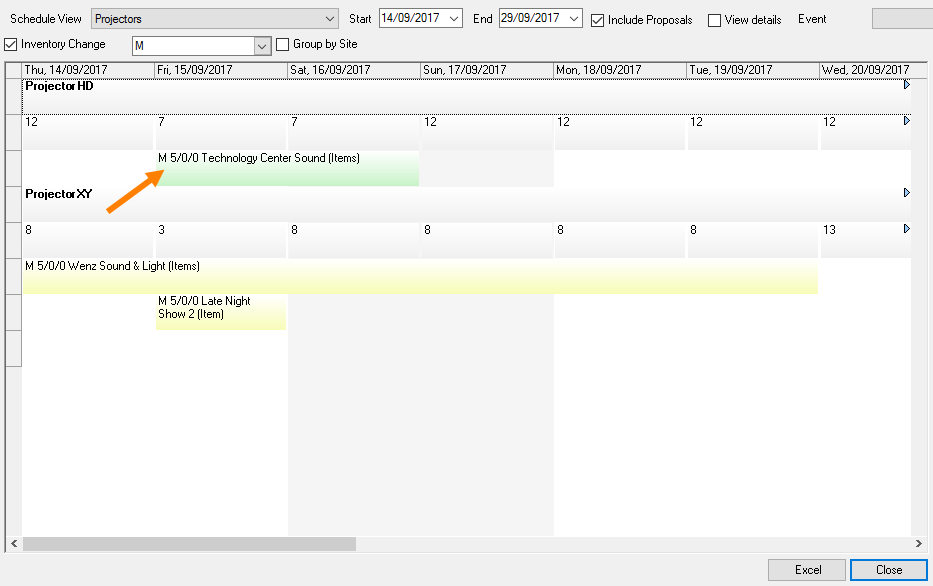
In addition to the exchange, also the split function is available. By splitting an item, you can customize the quantity of the current item and book an additional one in the quantity difference. To do so, check the Split box.
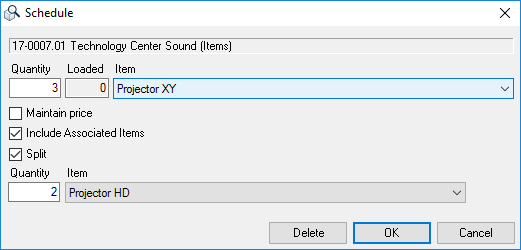
Managing schedule views
1. easyjob Menu Master Data Schedule Views
2. Select a schedule view with Edit
3. Or create a new one with Add
4. Give the schedule view a name
5. Add
6. Select the item that you would like to add to the schedule view
7. Use the arrow keys to sort the line items in the list
8. Close
9. Ok
Items in circulation
With the items In Circulation list you can see which item is booked in which confirmed jobs on a selected day.
Select an item to see in which jobs it is used.
Displaying items circulation
1. easyjob Menu Items In Circulation
2. Select a date
Sub-rental shortages
If in a time frame all items are overbooked and no alternatives are possible, you can create a sub-rental. Sub-rentals are processed in easyjob via a job. Create a new job and define it as a sub-rental. More information can be found in chapter Projects and Jobs.
Over the time frame of a job, all items from the bill of items for a sub-rental job will be increased by the corresponding quantity in the inventory, if the rented items have gone through check-in and check-out. For additional information, see also (Un-) Loading & Individual Device Tracking.
In the sub-rental job, the supplier is selected instead of the delivery address/venue.
You can create sub-rentals manually, using the sub-rental wizard or from the overbooking list.
Creating sub-rentals manually
Creating a sub-rental manually
1. easyjob Menu Projects Edit Project
2. Open the corresponding project
3. Select Create Job in the context menu
4. Give the job a name
5. Set the status to Sub-Rental
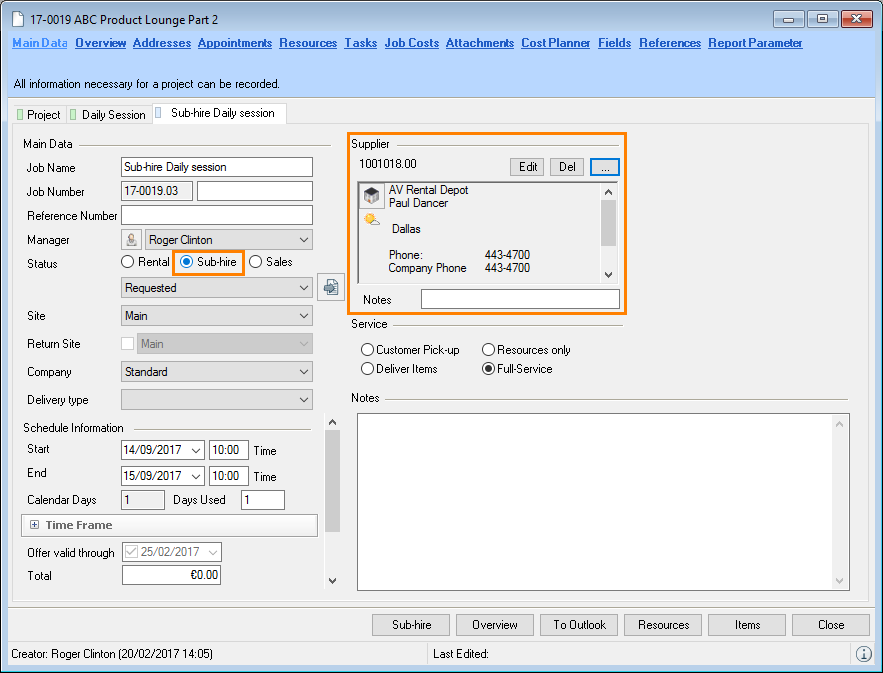
6. Select the supplier
7. Open the bill of items and book all items
If a sub-rental is necessary for a confirmed project, you can book the item to the sub-rental from the confirmed job using the context menu. For an item select Overbooked quantity to book the entire overbooked quantity, select Quantity of Job to transfer the quantity from the job, click Group Quantity to transfer the quantity from the group or enter the Quantity manually.
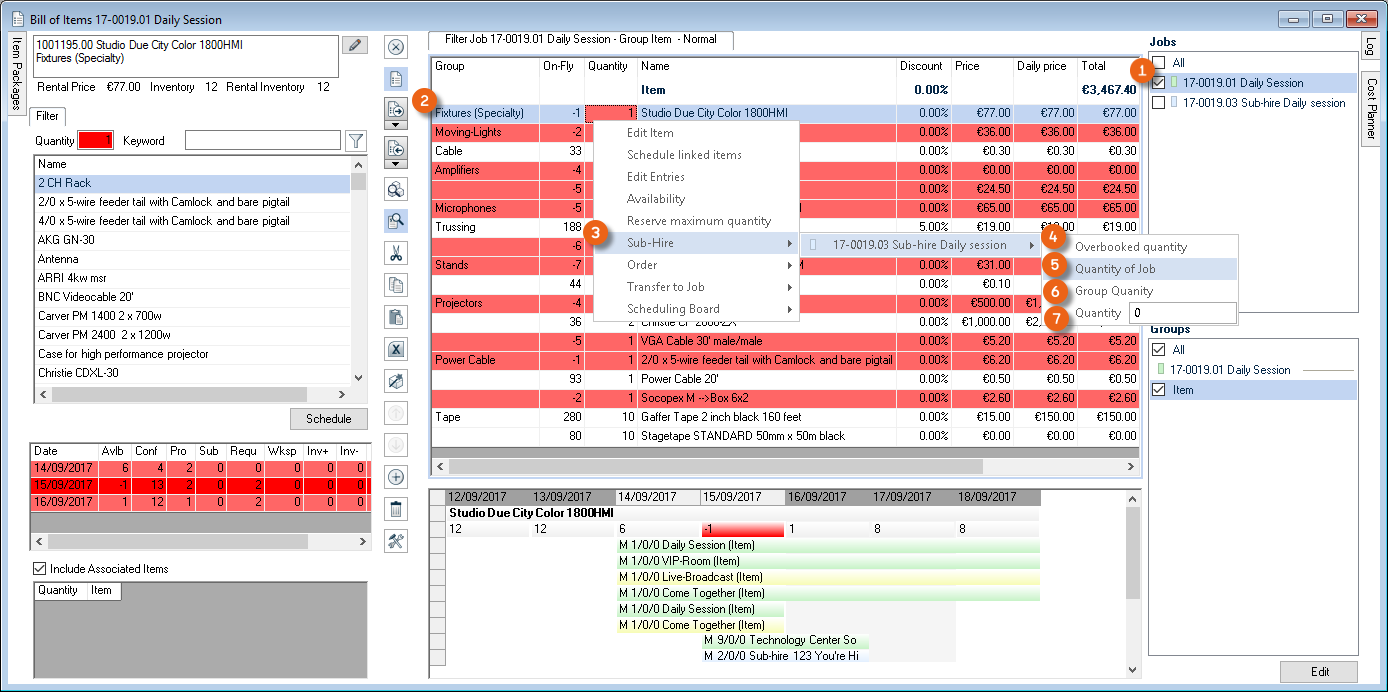
Sub-Rental of Associated Items
For the sub-rental of a Main Item the Linked Associated Items and the normal, non-optional Associated Items are booked automatically with it in the sub-rental job.
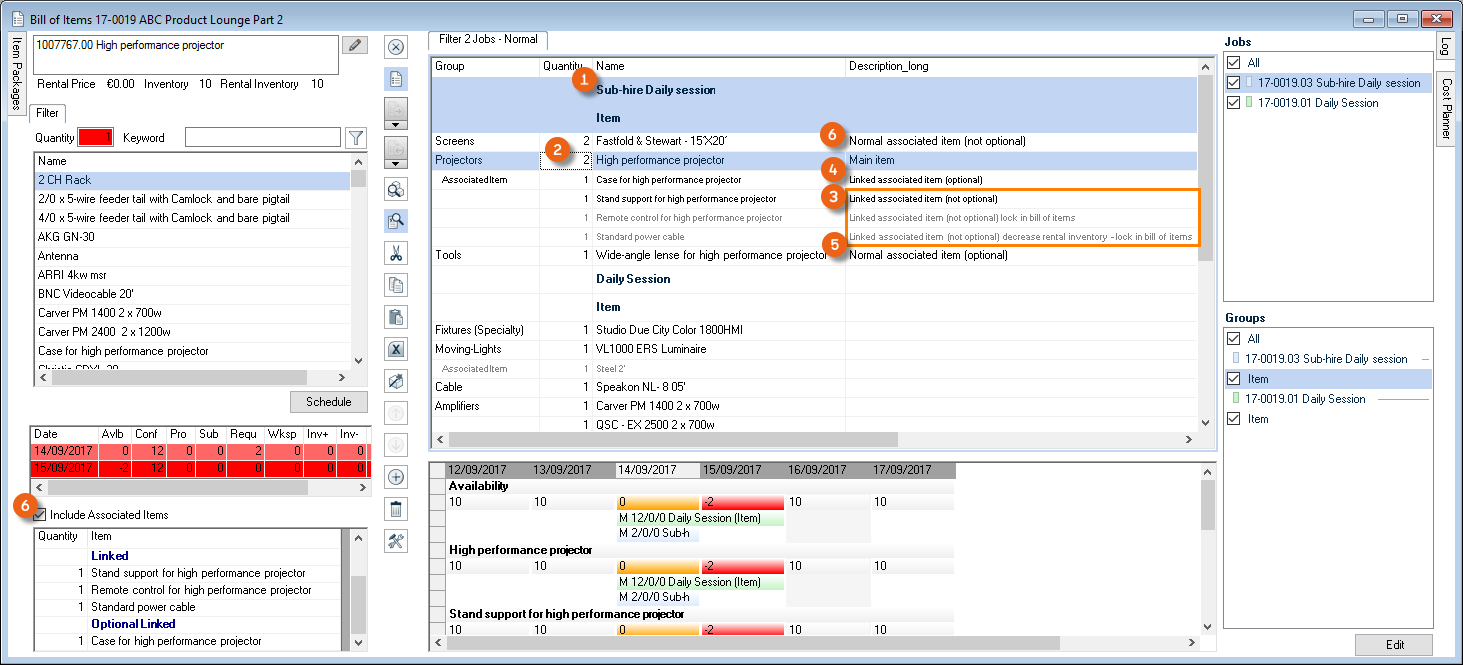
Associated items with the property Optional will be requested via a dialogue window.
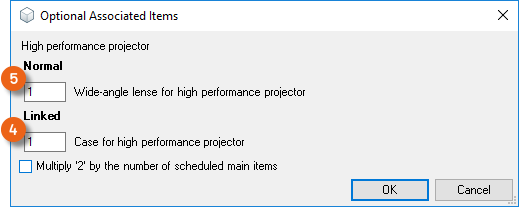
Normal, non-optional associated items will be controlled depending on the setting of the switch Include Associated Items
Sub-rental wizard
Creating a sub-rental using the Sub-Rental-Wizard
1. easyjob Menu Projects Edit Project
2. Open the corresponding project
3. Sub-Rental
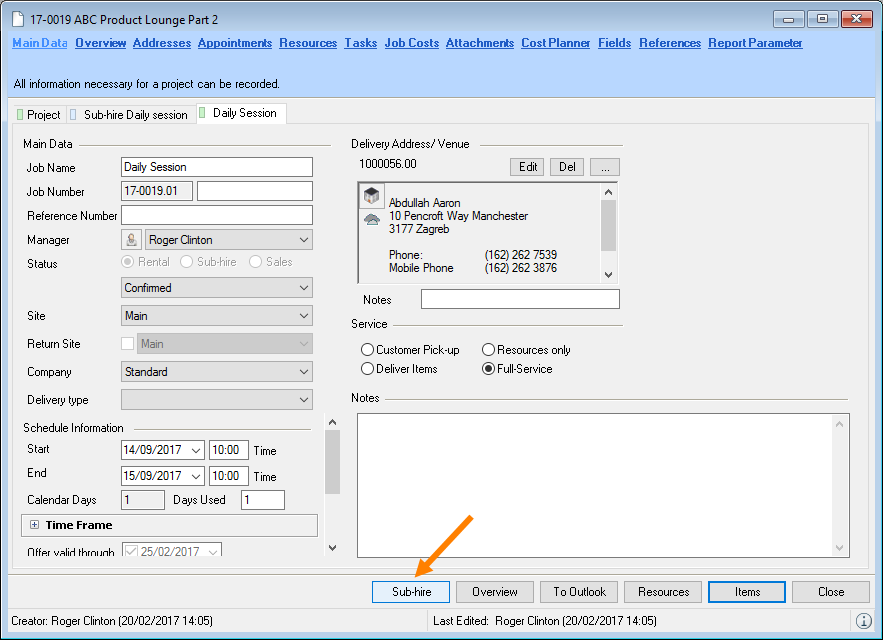
The Sub-rental wizard can be started directly from the bill of Items toolbar.
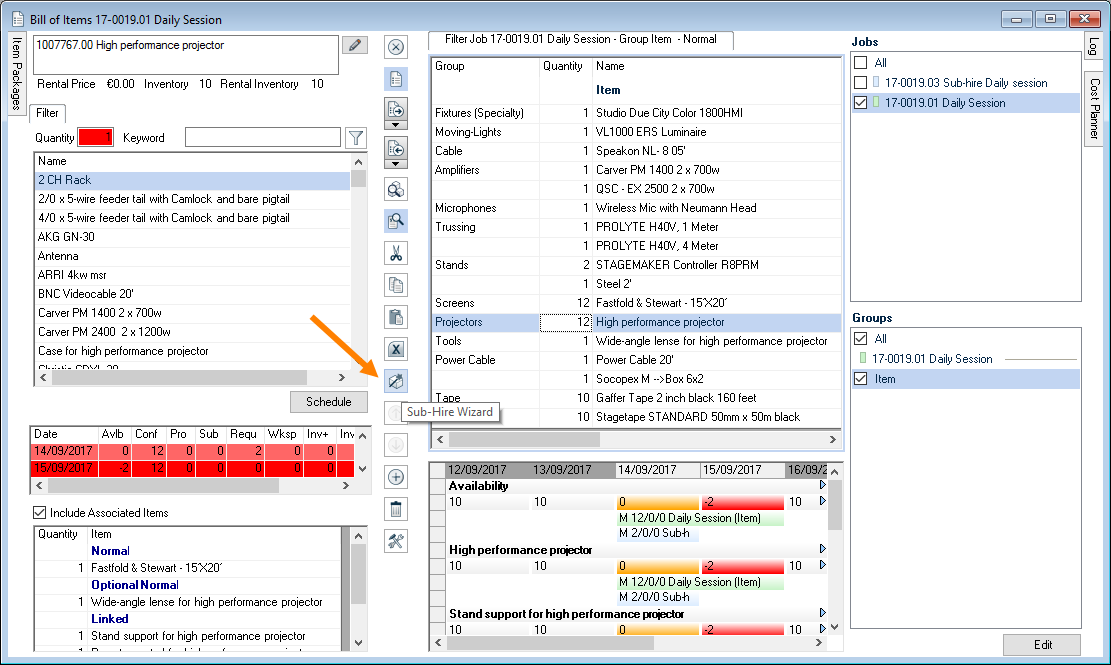
The sub-rental optimizer runs through various sub-rental variants and creates a recommendations list based on the entered parameters. The recommendations list is based on the item-supplier assignment from the item master data.
The following parameters are used for the ranking:
1. Distance from the supplier based on the distance entered in the address master data
2. Duration of the route based on the distance/hour in the vehicle settings
3. Vehicle costs for the used vehicle
4. Sub-rental price of the supplier's item
5. Ranking of the item supplier
6. Overview of the overbooked items that the supplier can offer
Based on these parameters, the individual factors are prioritized and a ranking is created.
Determining parameters
Enter the Max. quantity of sub-rentals per suggestion, as well as the Max. quantity of suggestions per group that should be taken into account.
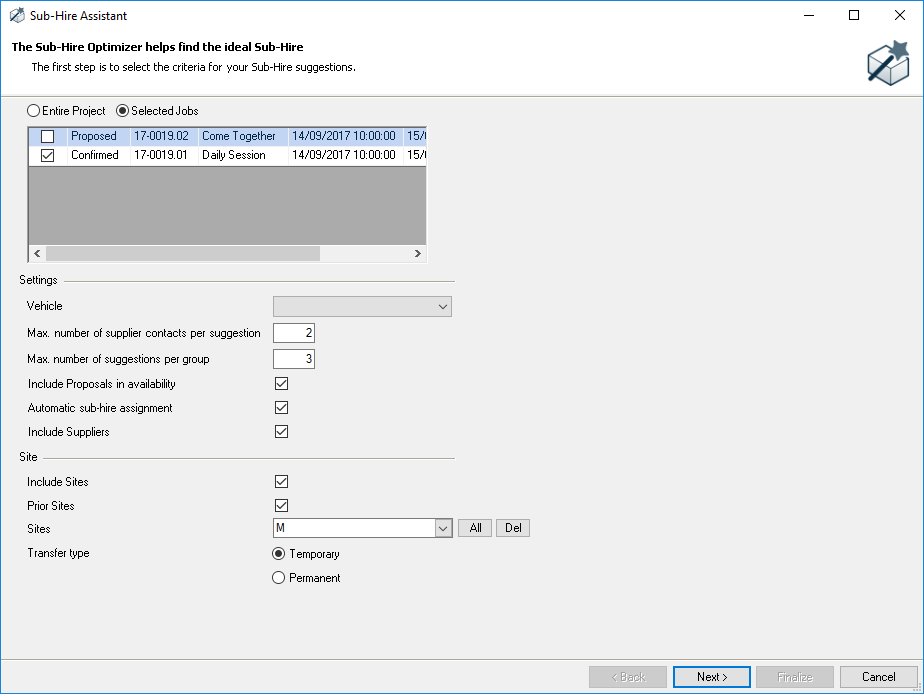
By default, only confirmed jobs are taken into consideration. In order to take also proposed projects into consideration, select Include Proposals in availability. The sub-rental wizard can assign the individually sub-rented items to the current job. Check the box for Automatic Sub-rental Assignment. After the wizard is finished, the sub-rental items will be assigned to the corresponding rental items. If the sub-rental wizard does not suggest a supplier, uncheck the Include Suppliers box, click Next, select the desired item and add the supplier with Add.
Suggestion overview
Based on the overbooked item and the parameter entered in the previous step, the suggestions are calculated. In Suggestion criteria indicate which parameter should be prioritized with a higher significance.
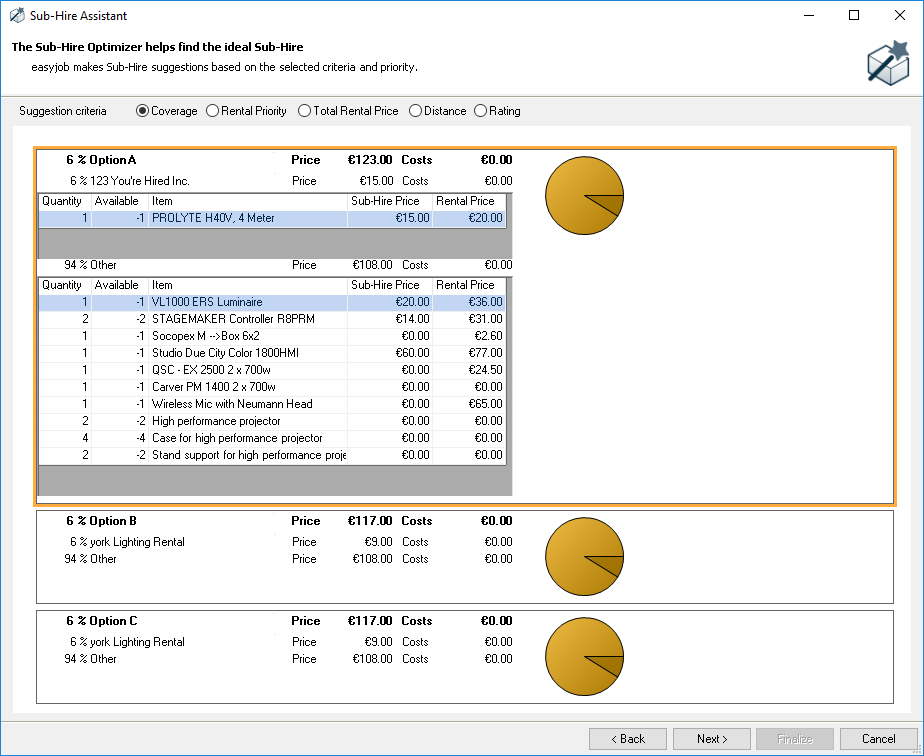
Click the respective supplier to view the suggested items. The selected suggestion is highlighted in orange. Click Next to accept the suggestion.
Making changes to suggestions
On the right side, the suggestions are grouped by supplier . The list on the left side shows the items that still must be inquired from suppliers . You can add a selected item to a supplier via Drag & Drop. After selecting an overbooked item, additional suppliers will be suggested . You can drag and drop the suggested suppliers to accept them.

Sub-hiring items from the overbooked list
In order to quickly accept overbooked items in an existing sub-rental, you can accept the article via the context menu of the overbooked item in the appropriate sub-rental.
Accepting overbooked items in a sub-rental
1. easyjob Menu Items Overbookings
2. Select an item
3. Via the Sub-Rental context menu
4. Select the sub-rental job
5. Ok

Assigning Sub-Rented Equipment
In order to see in the packing lists which quantity of items are from sub-rentals, in the bill of items you can specify for each item from which sub-rental the item should be taken.
Assigning sub-rental items to rental items
1. Bill of items
2. Select the sub-rented item
3. Open the context menu and Sub-rental Assignment
4. Select the sub-rental jobs for the item
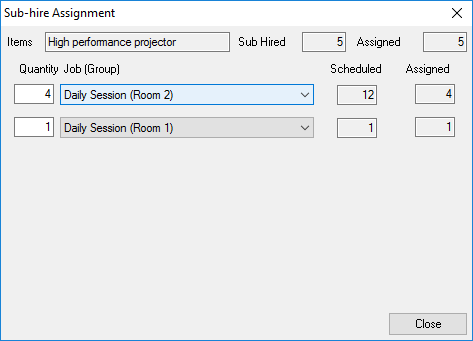
Partner availability
With partner availability in the bill of items you can display the availabilities of partner/supplier items in a corresponding job period. A requirement for this function is the assignment of the Suppliersitem number (your partner/supplier must also use easyjob and have a login created for them) and the easyjob partner web access, activated for you and your partner/supplier, via the Web app. easyjob Web Access must be activated and configured in server management. Details can be found in easyjob web access service.
First activate easyjob Partner Web Access in program settings.
Activating easyjob Partner Web Access
1. easyjob Menu Tools Settings
2. Integration
3. Check the box for easyjob Partner Web Access
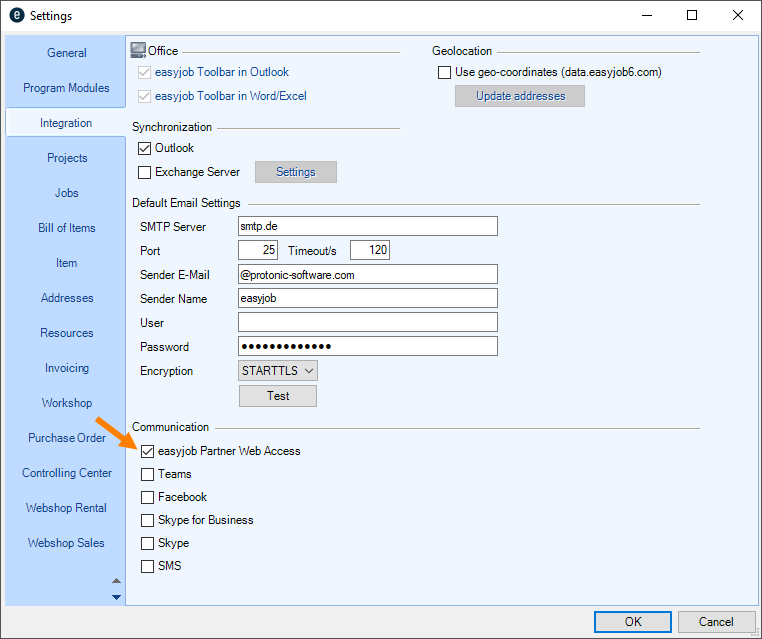
Providing a customer/partner with easyjob Web Access as a supplier/partner
To allow your customer/partner to have easyjob Web Access, provide your customer/partner in the address master data under Web Access with login data in the form of an e-mail address (this is applied automatically from the main data or the contact) and a password . You can create/change the password accordingly by clicking on 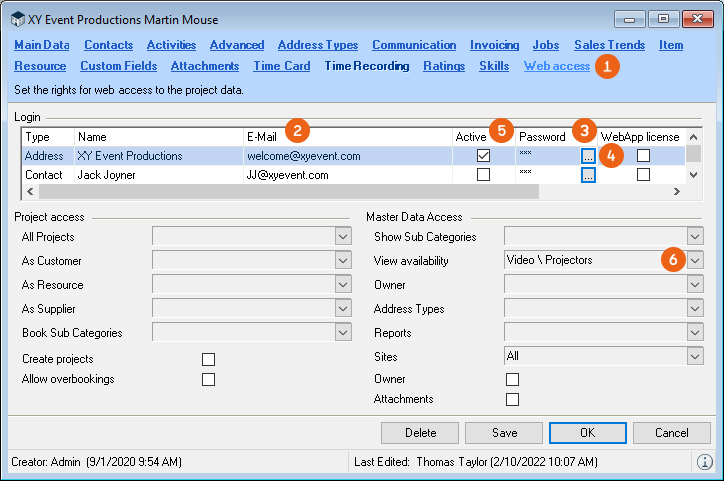 . Then activate access . You can also select the sub categories for which your customer/partner may view the availability of your items. Provide your customer/partner with the login data (public WebApp Url, user id e-mail and password).

Providing easyjob Partner Web Access for customers/partners
1. easyjob Menu Master Data Addresses
2. Select the corresponding partner/customer.
3. Edit
4. Web Access tab
5. Enter the corresponding data
6. Save
An additional WebApp license is not required for easyjob Partner Web Access. You can activate access for your partner/customer also without a license.
Setting up easyjob Web Access as a customer/partner
After you, as a customer/partner, have received the login data (public WebApp Url, user ID e-mail and password) for your partner/supplier, enter the corresponding parameters (public WebApp Url , user ID and password ) that your partner/supplier gave you in the address master data of your partner/supplier under Communication. With Test you can check if the connection is functioning.
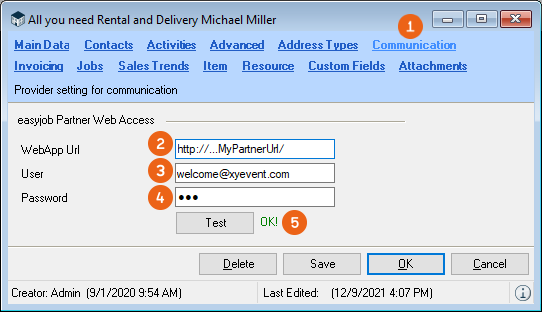
Setting up easyjob Partner Web Access in the address master data
1. easyjob Menu Master Data Addresses
2. Select the corresponding supplier
3. Edit
4. Communication tab
5. Enter the corresponding data
6. Save
After easyjob Partner Web Access has been set up successfully, your will see in the Available column in the Supplier part of the Bill of Items the availability of the corresponding Item of your partner/supplier (you can find more information about how to manage parts of the Bill of Items under Customizing the bill of items to requirements).
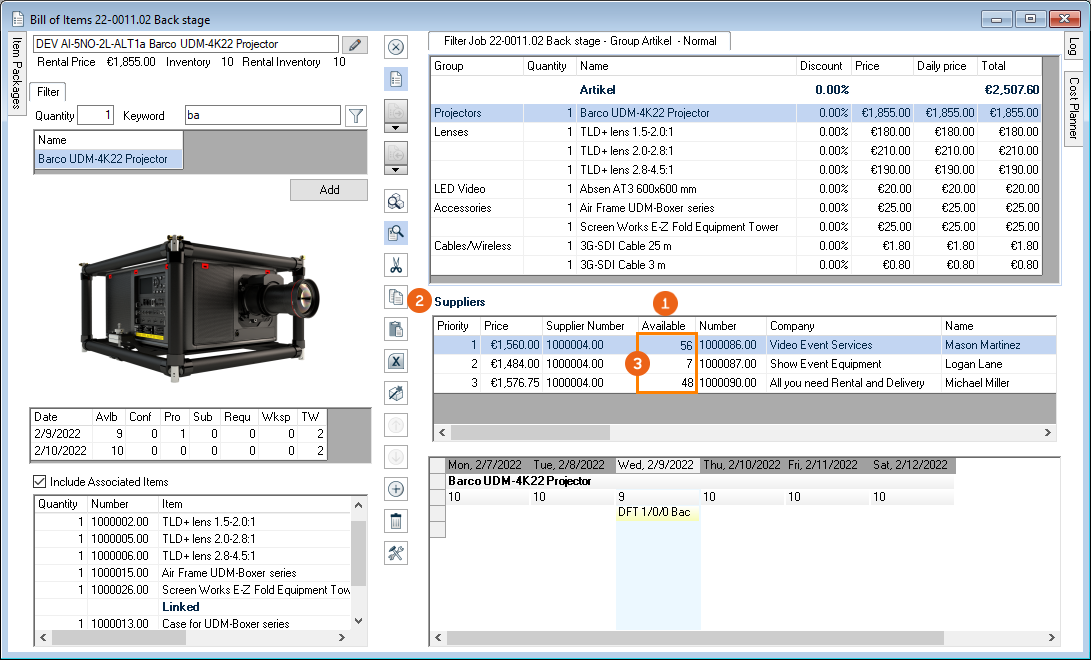
Bill of Items
The items for an individual job are assigned in the bill of items. You can also load and unload items using this interface. More information can be found in chapter (Un-) Loading & Individual Device Tracking.
On the left side you can see the items in your stock, and the right side shows the items booked in the job.
You can use the filter function to filter the item to be booked . After selecting an item, the availability is calculated for the job time frame and displayed in a table. Associated items can be booked with each item. All references are displayed for the current item . The toolbar in the middle displays additional functions. The job bill of items displays all items booked for a job. The graphical availability overview shows the items booked in the corresponding job.
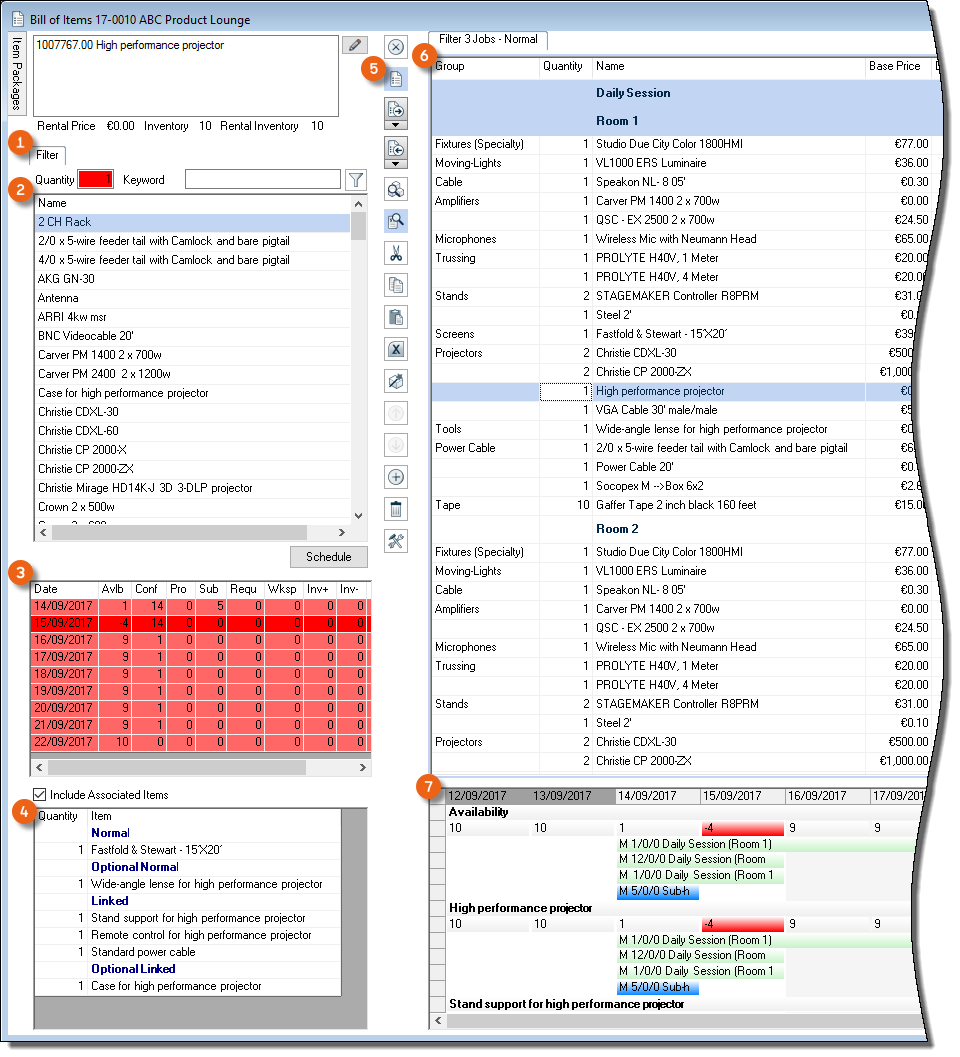
You can always switch between the individual jobs of the project from the bill of items, or display multiple jobs by checking the boxes. For a further sub-division of the items, you can create additional groups within a job.
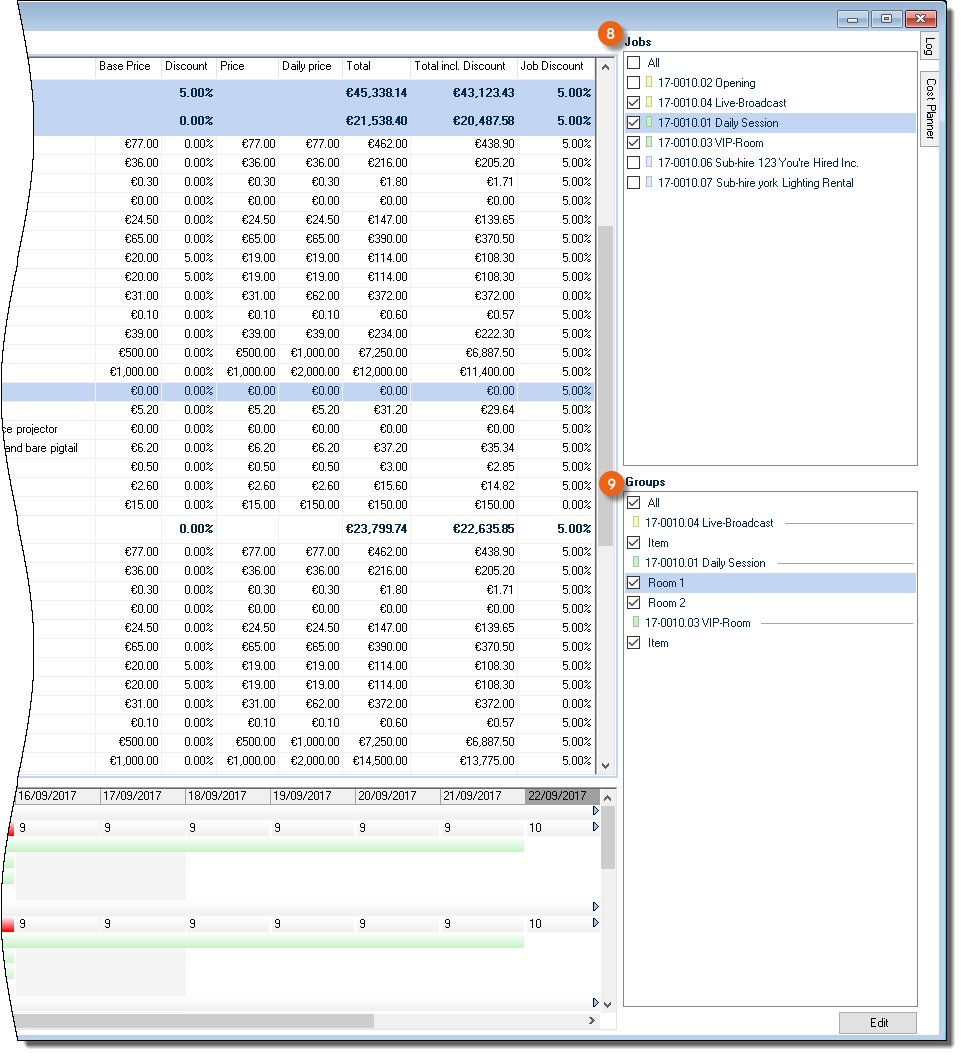
You can customize the order and size of the windows and views. More information can be found in chapter Customizing the bill of items to requirements.
Open the bill of items
1. easyjob Menu Jobs
2. Select a job and Edit
3. Items
4.
Shortcuts and operating concept
The bill of items are designed for quick use with the keyboard and mouse. The following screenshot describes the cursor sequence when booking an item with the keyboard.
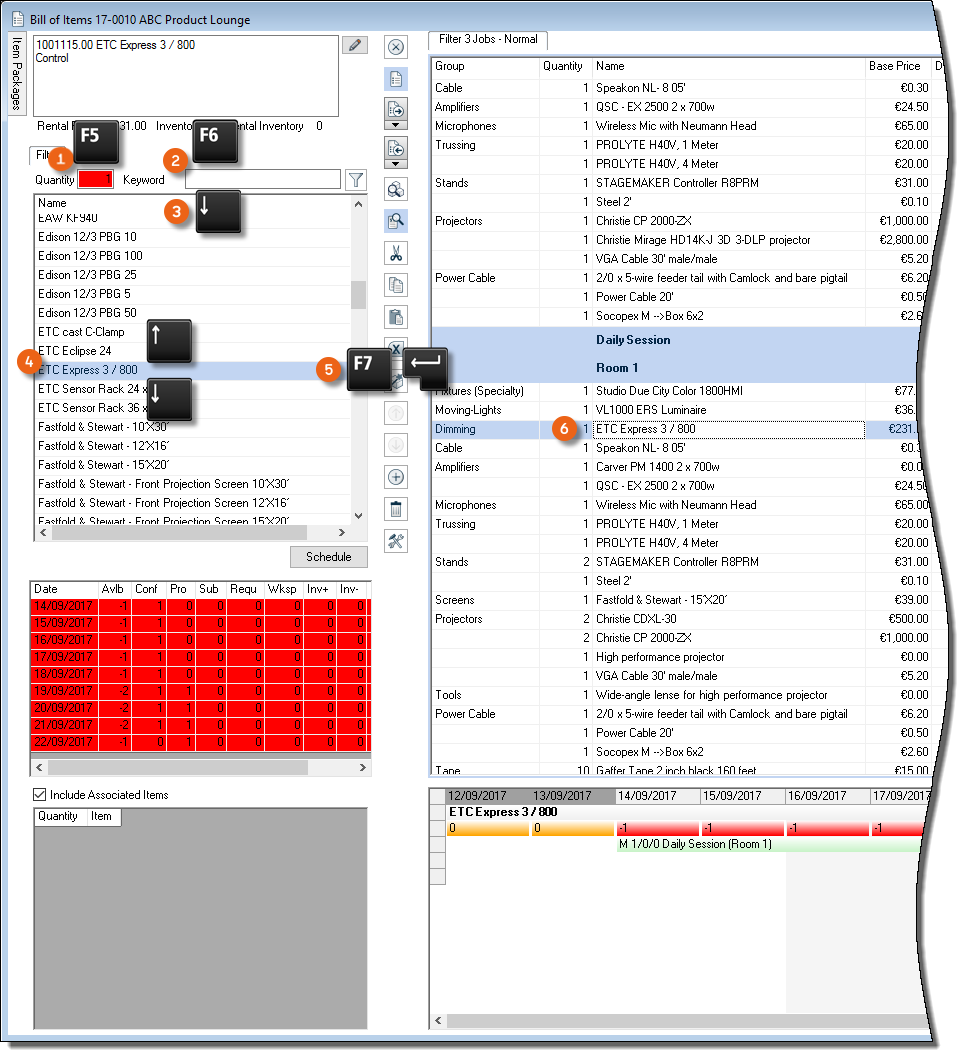
If the focus is on a job bill of items, you also can enter a number to update the quantity. You can also book multiple items for a selection.
1. Use 
 to select the desired item
2. Enter the quantity
3. Book the desired quantity of the item with 
4. Use 
 to select the next desired item
5. Enter the quantity
6. Book the desired quantity of the item with 
7. etc.
 | Open the manual |
|---|---|
 | Edit mode for the current cell. E.g. Quantity or discount cell |
 | Cursor on the item quantity |
 | Cursor on the item name |
 | Book an item |
 | Start the availability check for the current item. |
 | Delete the selected line |
Additional Filter and Job Bill of Items Settings
Additional settings can be made by clicking Filter or Job Bill of Items . By using the pin board pushpin icon the settings window stays permanently open or closed. You can use the Filter for item selection to preselect the Subcatetory, the Barcode, Sites and the Owner . Multiple settings are available to you in the Job Bill of Items . You can select which Jobs and which Groups are displayed for you in the Job Bill of Items. In View options it is possible to preset additional information (e.g. associated items, devices, etc.). With Partial Deliveries you can display certain partial deliveries or partial returns.

The Price List and the List View (e.g. to be unloaded) can be changed. These presetting can also be displayed separately (e.g. Jobs and Groups ).
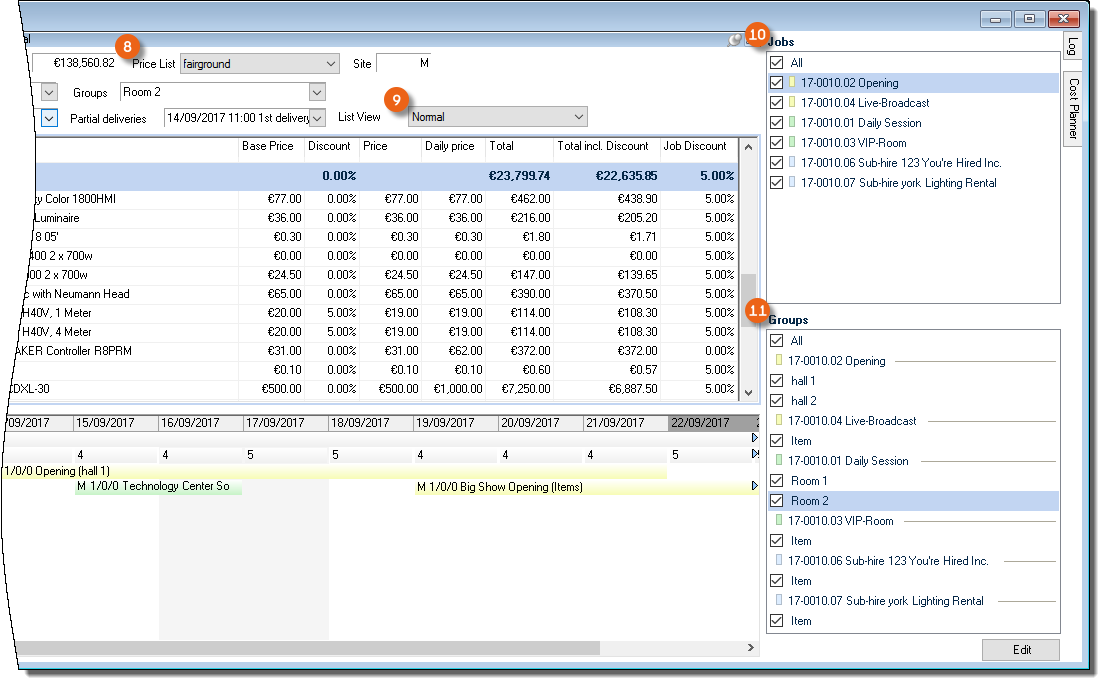
Filtering items according to owner
In the bill of items, you can filter items according to owner. Enter the owner of the item in the respective master data.
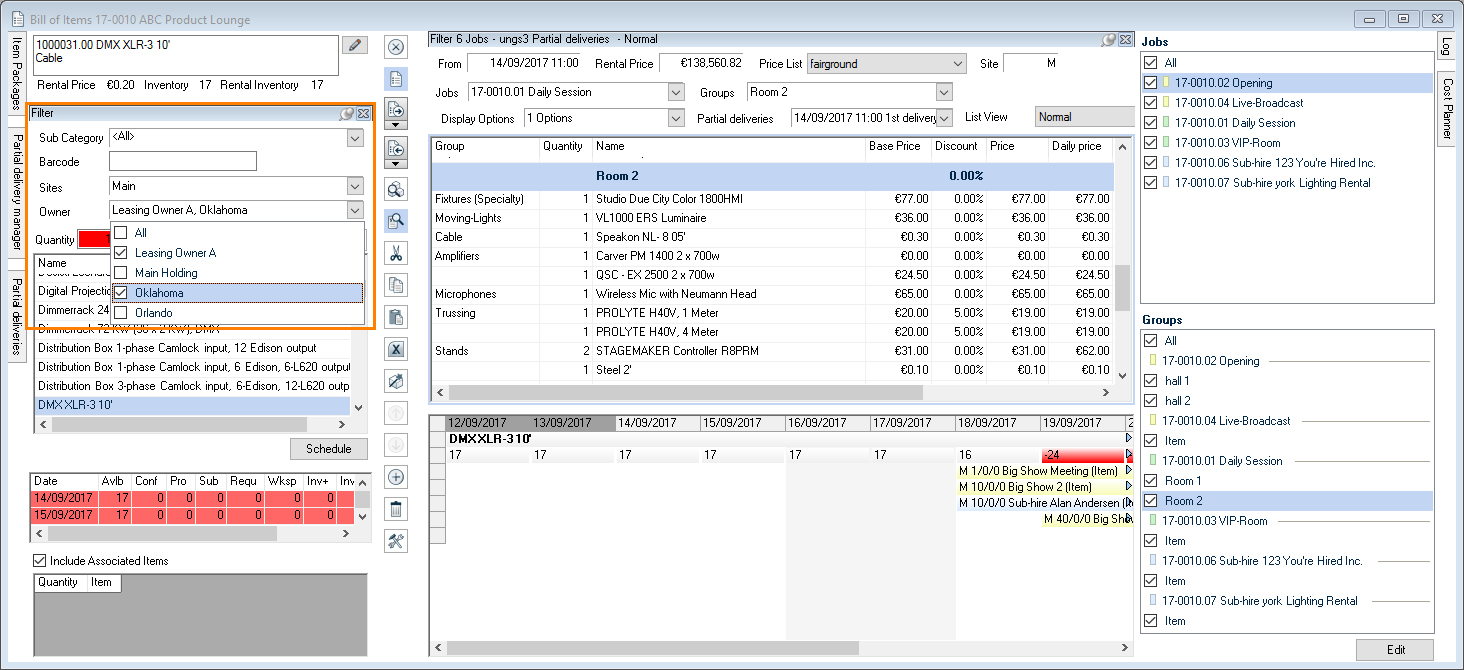
Managing item owners
1. easyjob Menu Master Data Item Owners
2. Select an existing owner with Edit or create a new entry with Add.
3. Enter a name
4. Ok
Booking an item
When booking, the item is added with the entered Quantity. If the item already exists in the job, it will be increased by the entered quantity.
Upon selection, an OnFly-Check determines if there is a sufficient quantity of the item in stock. If the item is booked to 0 the background will be colored orange, and red if overbooked.
Various methods can be used to book items in a job.
Booking items in a job using the keyboard
1. Select the quantity and the item
2. Book the item with  or
or 
Booking items via Drag&Drop
1. Select the quantity and the item
2. Drag&Drop the item on the bill of items
Scheduling alternative items
This function makes it possible to book alternative items. If it is not clear if the customer would prefer an HD projector instead of the proposed projector , you can already book them in the job using the Schedule alternatives context menu . The HD projector will be shown as a line item in the bill of items, but will not be included in the total or in the availability check.
To display the alternatives, select the Alternatives settings in the Display Options. Alternative scheduling is only possible in proposals.
Reservation function for items in a job
If a sufficient quantity of items are available for your job A, you can reserve them for your confirmed job A in the context menu with Reserve maximum quantity. With the property Reserved (it can be displayed as a column above the context menu in the column heading ) the selected items in your job A will no longer be displayed in general as overbooked. If the same Item is booked in another job B, it will be shown as overbooked only in Job B.
We have implemented these functions based on many customer requests. In general, we recommend using them only in exceptional cases. If you set a projector as Reserved for a short rental time frame, and at the same time this projector is required for a longer rental time frame, it will be necessary to sub-rent a projector for the longer rental time frame, which is not cost effective.
Schedule device in advance
The Schedule devices in advance function makes it possible to book the respective devices during the preliminary stages of a workshop activity in the confirmed job. This function can be used, for example, if your customer wants to have exactly the same device again, or for the advanced creation of a carnet. Click the Settings icon on the toolbar and activate the Devices und Device use windows. For details, see also Customizing the bill of items to requirements.
Select the concerned itemfrom the Job Bill of Items. The available devices will be displayed in the Devices list . After selecting a deviceuse Scheduleto assign the device to the item. With Device use, you can display the previous and following jobs for the device.wi:5128
Splitting an item in individual groups
In addition to splitting a project into individual Jobs , there is also the option of sub-dividing the item into individual Groups in order to further subdivide the material. By default, when a job is created, the first group is created using the Item name. You can manage the Groups via Edit . Create a new Group via Add . You can sort the individual groups in the order you wish in the list using the arrow keys . In addition, you can check the Printable box to hide the group in individual reports. By checking the Items sortable box, you deactivate standard sorting in the group by category, subcategory and item name and can sort the items as you wish in the job bill of items. In addition it is also possible to enter fixed Item Totals for the group or discounts for a group you created. An item group can also be identified as an Alternative . Additional Information can be found in chapter Item group prices .
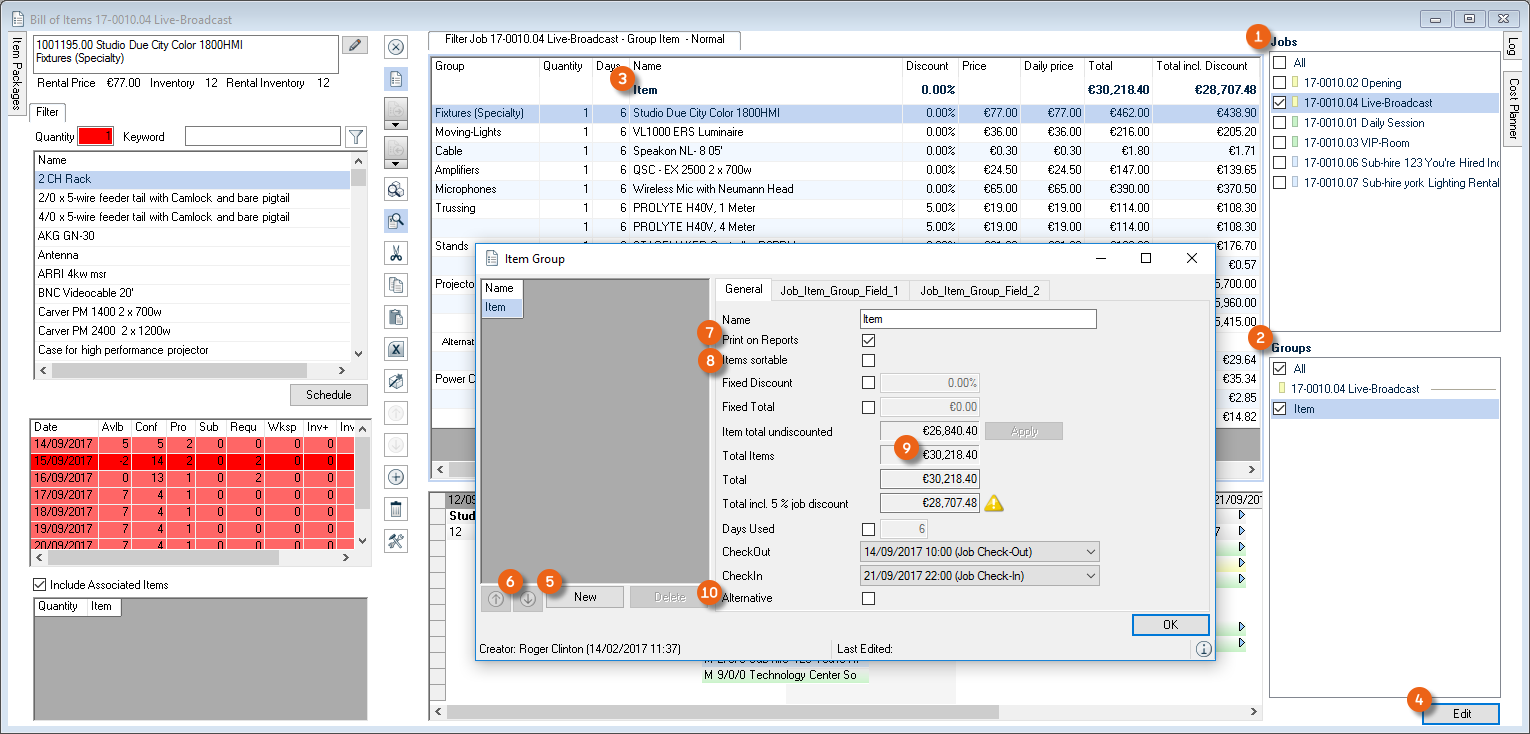
Adding additional groups
1. easyjob Menu Jobs
2. Select a job and Edit
3. Items
4. Edit in the Groups window
5. Add
6. Give the group a name and set the desired parameters
7. Close
If there is more than one group in the bill of items, they will be displayed in the Groups window. Check the box to determine which groups should be displayed. New items will be booked in the blue group . With the item context menu Transfer to Group you can move the items back and forth between the individual groups .
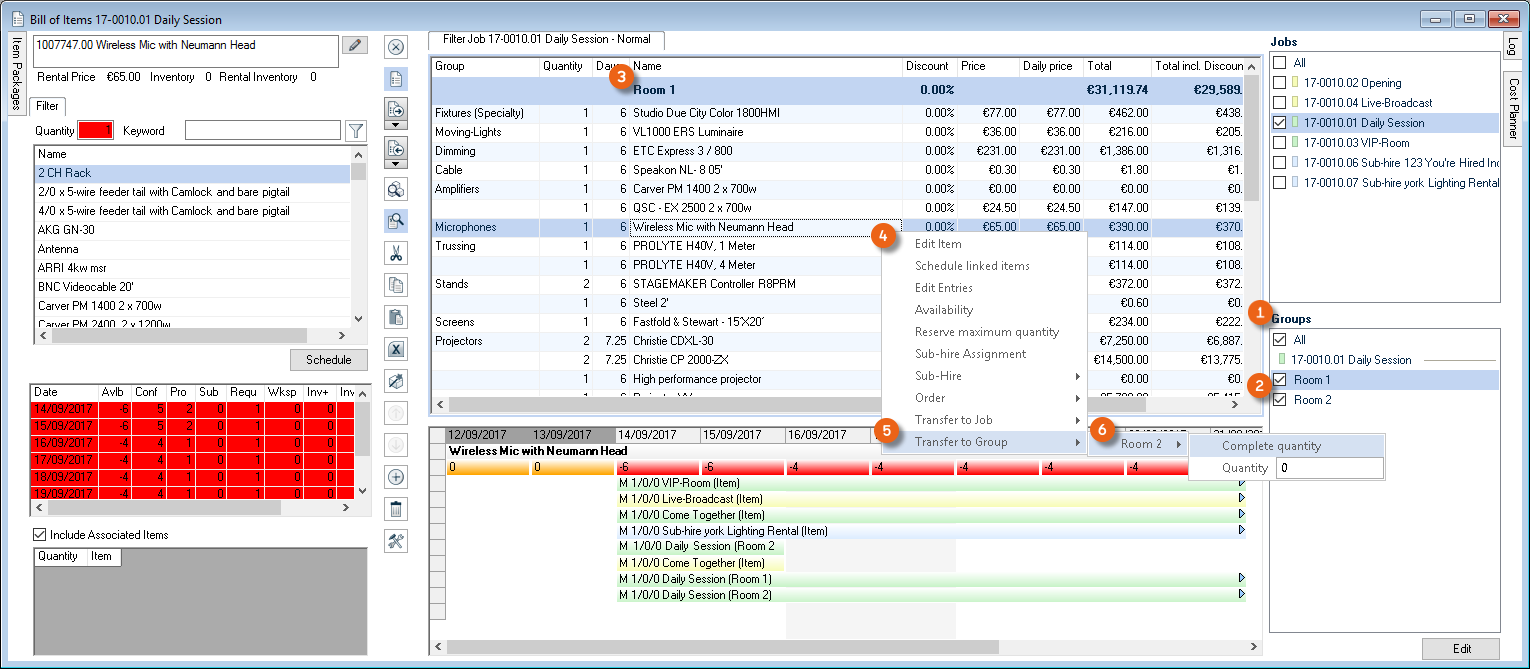
Sorting items
The items are sorted in the following order by default:
Category, Subcategory and Item Name.
You can also sort the items as you wish.
Items sortable
1. easyjob Menu Jobs
2. Select a job and Edit
3. Items
4. Edit in the Groups window
5. Select the desired group
6. Click the Items sortable box
7. Close the window
8. Sort the items using the Move Up/Move Down icons on the toolbar
Free text lines
In addition to items from the master data, you can also insert free text lines.
Adding new text lines
1. easyjob Menu Jobs
2. Select a job and Edit
3. Items
4. Click the line item in the job bill of materials where you want to add a line
5. select the Add new line toolbar icon
6. Give the free line a name
7. Change its position using the Move Up/Move Down toolbar icons
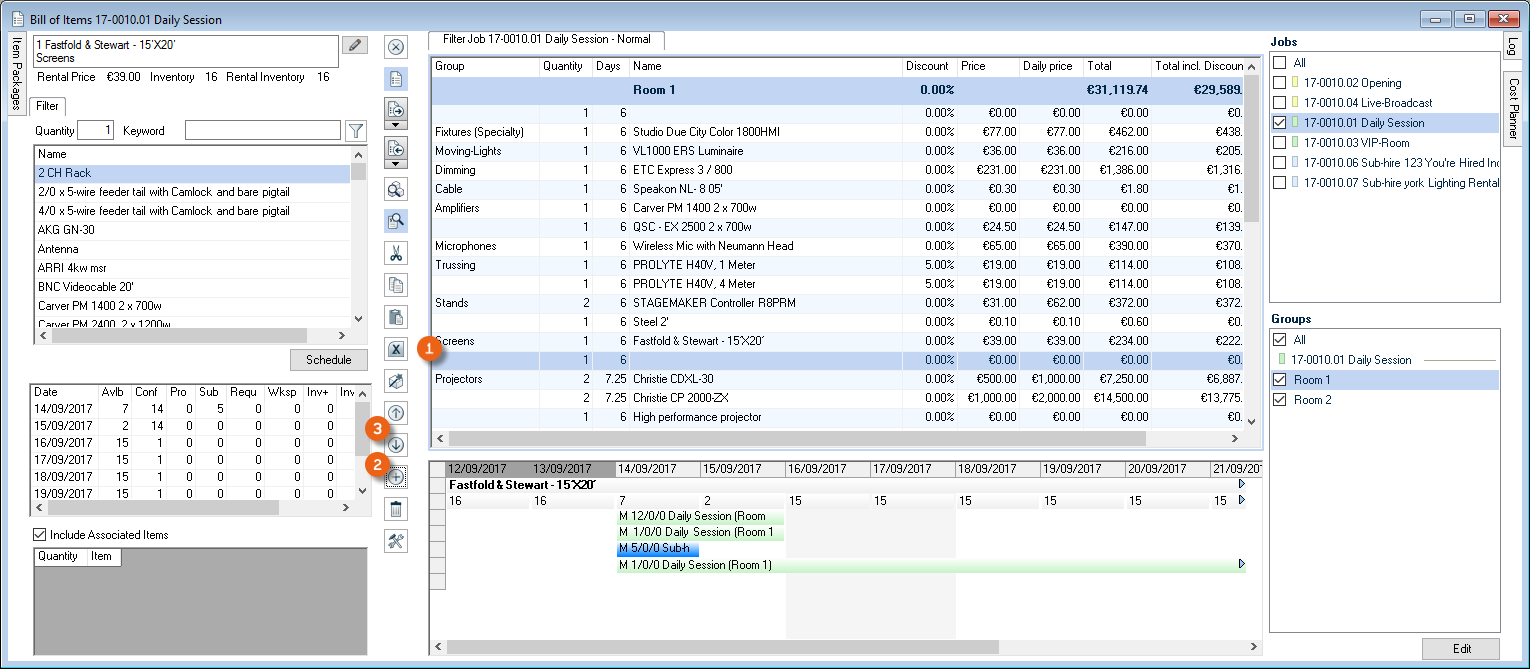
You can now also enter Days, a Discount, Weight, Volume and the Unit in the inserted free text line.wi:7042 It is also possible to assign previous items from a different category to the free line. wi:5183When adding, a quantity of 1 is entered by default.
Bill of items toolbar
Various symbols are used in the bill of items:
 | Editing Items | ||
|---|---|---|---|
 | Close | ||
 | Scheduling (active) |  | Scheduling (inactive) |
 | Loading (active) |  | Loading (inactive) |
 | Unloading (active) |  | Unloading (inactive) |
 | Calculate OnFly availability | ||
 | Include proposals in the availability check (active) |  | Include proposals in the availability check (inactive) |
 | Cut | ||
 | Copy | ||
 | Paste | ||
 | Import / Export | ||
 | Sub-rental wizard | ||
 | Line up (active) |  | Line up (inactive) |
 | Line down (active) |  | Line down (inactive) |
 | Insert a new line | ||
 | Delete line | ||
 | Settings |
Many of the icons indicated above are self explanatory. Therefore only a selection of the symbols will be described below.
Editing Items
Use this icon to go directly to the master data of the item in order to edit it.
Scheduling, Loading and Unloading
In the bill of items, you can Schedule, Load and Unload items. The icons show the status of the selected jobs. Loading is only possible in confirmed jobs.
Calculating OnFly availability
Availability is calculated based on the use of the item in jobs as well as the job status.
Include proposals in the availability check
This setting determines if proposals should be included in the availability check.
Import / Export
With the Import/Export function, it is possible to import and export job bill of items via an Excel data exchange. This can be used to send an inventory list to a third party, who returns the required material in the inventory list. These excel files can be imported in the bill of items.
Please note that the first column of the import file must contain the quantity and the second column must contain the item or custom number.
Importing a bill of items from excel
1. easyjob Menu Jobs
2. Select a job and Edit
3. Items
4. Import /Export icon from the toolbar
5. Select the Excel file ...
6. Select the Import option
7. Start
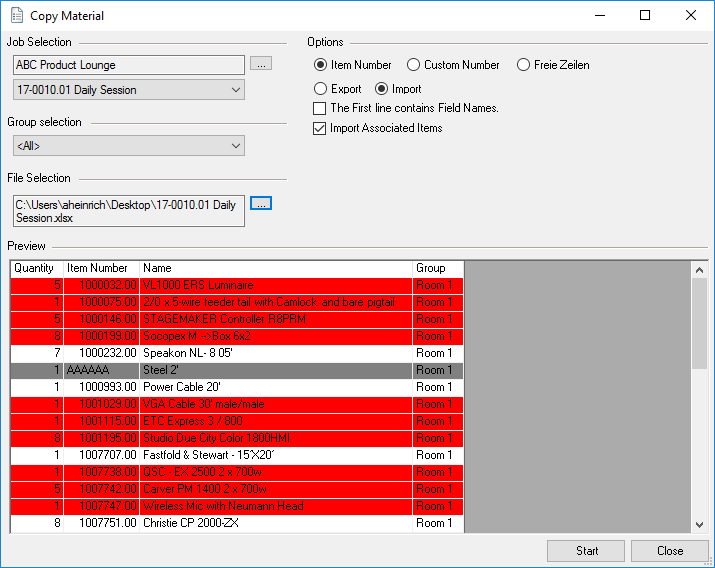
If an item is not found based on an item number, the item will be highlighted in gray and not imported. Overbooked items will be highlighted in red. Items whose desired quantity corresponds with the available inventory are highlighted in orange.
Sub-rental wizard
The sub-rental wizard can be started with this icon. More information can be found in chapter Sub-rental wizard.
Customizing the bill of items to requirements
The bill of items was designed so that you can create your screen view according to your requirements and your screen size as required.
In the job bill of items you can display and hide multiple column headers. Right click a line item in the column header and activate or deactivate the required column by checking or unchecking the box.
In your bill of items, various icons are available to add windows, to reposition them, pin them to the side or delete them.
 | Settings |
|---|---|
 | Position the window within an existing window As a tab At the top of the window At the right window edge At the bottom of the window At the left window edge |
 | Position the window at the top of the screen* |
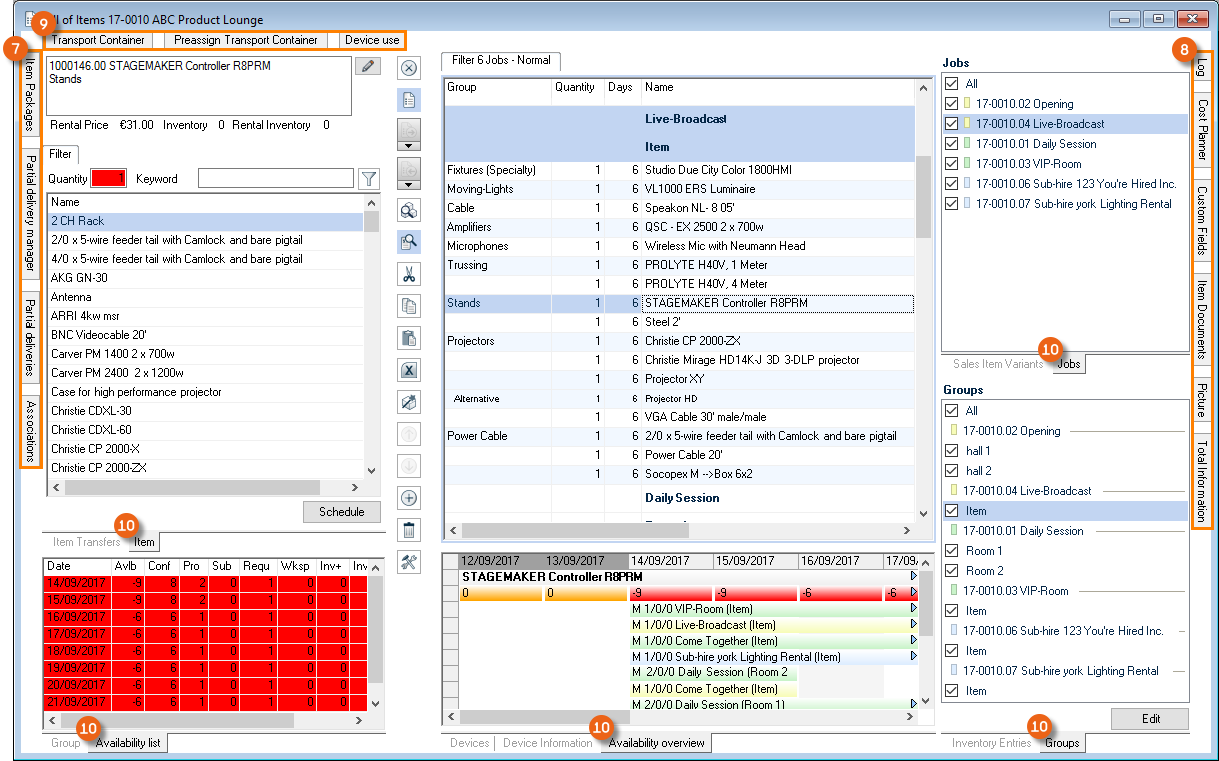 | Position the window to the right screen edge* |
 | Position the window at the bottom of the screen* |
 | Position the window to the left screen edge* |
 | Window displayed (pinned on the pin board) |
 | Window hid (auto hide), tab displayed to the side or at the top of the screen (with MouseOver – the window appears) |
*With the full screen view of the bill of items
The settings for every mode (scheduling, loading or unloading) are stored separately from each other. Each mode has a predefined Default status that can be restored at any time. Click settings on the toolbar to open the Bill of Items Settings . Select the desired window from the list and switch it on or off . You can display multiple job bill of items and order them.

Left click the top edge of the screen of the window to be positioned and hold it down. Now move the window with the cursor (MouseOver) over the icons to . You can anchor the new window within an existing window along the vertical or horizontal window edge . In the Total view you can anchor the window on the outer screen edge vertically or horizontally . Pull the window to the desired position. Depending on the selected icon, the new position is displayed in blue . If the position is correct, release the left mouse button or repeat the process.

You can also also pin the window to the left , right or upper edge of the screen. To do so, position the window as described on the desired side on the edge of the screen and in this window, activate Auto Hide using the pin board pushpin icon. You can also order multiple windows behind each other like index cards. You can then switch the view between the individual windows in any order by clicking the respective tab .

Customizing the bill of items to your requirements
1. easyjob Menu Jobs
2. Select a job and Edit
3. Items
4. Select the Schedule, Load or Unload mode using the toolbar
5. Click the Settings icon on the toolbar.
6. Select the window you want to add or delete
7. Position the window
8. Saved the new setting with Close.
Restoring the default settings
1. easyjob Menu Jobs
2. Select a job and Edit
3. Items
4. Select the Schedule, Load or Unload mode using the toolbar
5. Click the Settings icon on the toolbar.
6. Click Standard
Job Bill of Items
The job bill of items shows the items booked for the job. In the header of the tab, you can MouseOver to open and edit the settings overview. If the window should remain open, use the pin board pushpin icon. See also Additional Filter and Job Bill of Items Settings.
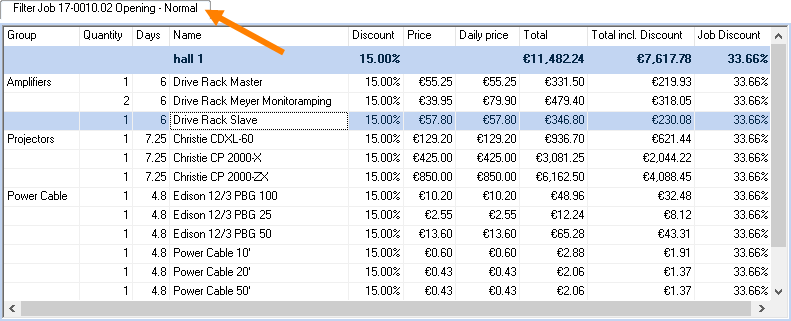
Availability list
After selecting an item, the availability is calculated for the job time frame and displayed in a table. More information can be found in Calculating availability.
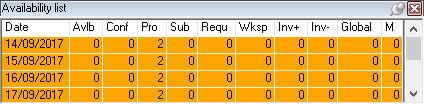
Availability view
Here the booked items are shown in their respective jobs in a graphical overview. More information can be found in chapter Calculating availability.
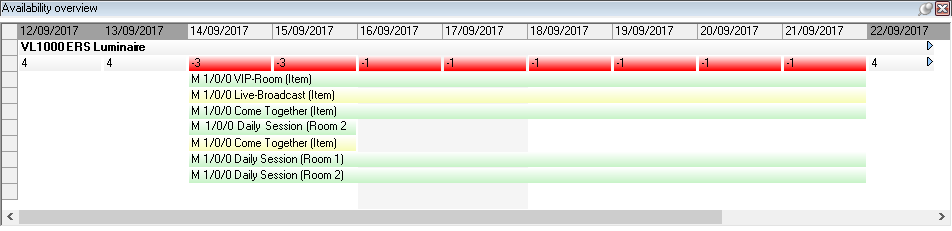
References
All references are displayed for the current item. More information can be found in Associated Items and Item Packages.
Cost Planner
The income and costs are calculated in the cost planner. More information can be found in chapter Cost Planner for Projects and Jobs - User Concept.
Jobs
You can always switch between the individual jobs for the project or display multiple jobs by checking the boxes.
Groups
For a further sub-division of the items, you can create additional groups within a job. More information can be found in chapter Splitting an item in individual groups.
Partial deliveries
You can display a part to create and manage partial deliveries. More information can be found in Partial deliveries .
Transport Container
An item that is defined as a transport container will be populated with items and devices when loaded. With an assignment, transport container and content labels can be printed. Additional Information can be found in Assigning a transport container.
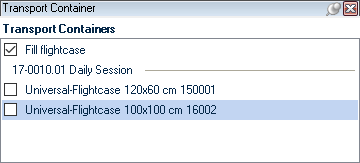
Item info
Some information about the selected item is displayed. For more information about how to make changes can be found in chapter Items.

Item image
The image saved in the item will be displayed. More information can be found in chapter Images.
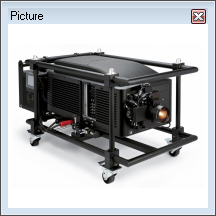
Custom Fields
The custom field information entered in the item is displayed.
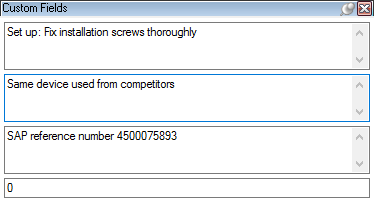
Item Attachments
The attachments entered in the item are displayed. Additional information can be found in chapter Attachment Management.

Log
With the log view you can see at a glance who booked, deleted, loaded or unloaded an item in the a bill of items or changed the quantity, and when. The barcode scanner logs are also displayed.
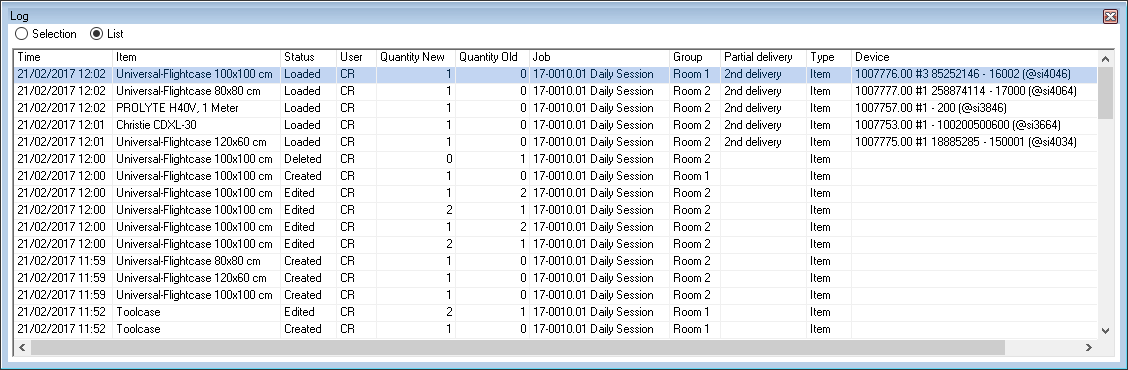
Item Packages
Item packages are booked as their own item group in a job. More information can be found in chapter Associated Items and Item Packages.
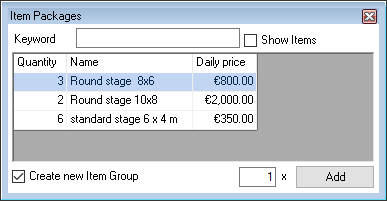
Devices
The device list shows the available devices. Additional information can be found in chapter Loading items and devices.
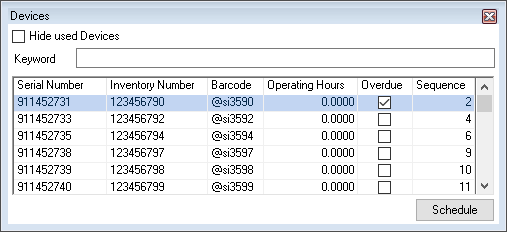
Device info
This overview shows the job where the device is currently loaded and provides information about the Last Check, Next Check, Days Used, Operating Hours and Calendar Days.
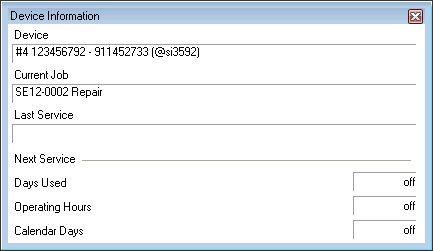
Device use
With Device use, you can display the previous and following jobs for the device. It can be used with the function Schedule device in advance .

Total Information
The total information contains information about the total of the max. volume, weight, line item quantity, price, power input and custom fields for the item.
Please note that linked associated items are not included.
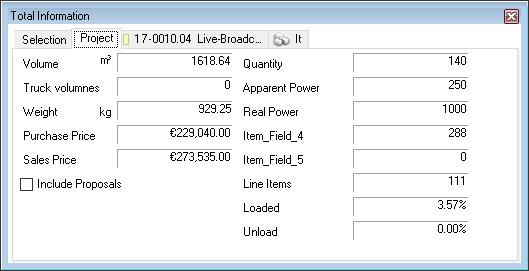
You can display the total for the entire project , the job as well as for individual groups. To do so, select the corresponding tab.
Group
The selected Group is displayed in this part with all details.
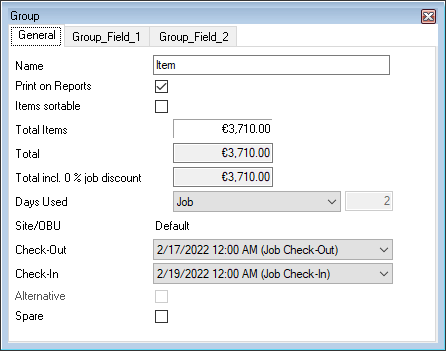
Suppliers
This overview shows details about the corresponding Supplier stored in the master data for the selected item. Partner availability for the item can also be displayed. See also Partner availability .

Subcategories
This window also permits additional filtering of the current view. All items are hidden in the Item window as well as in the bill of materials that belong to a sub category that is deactivated in this window.
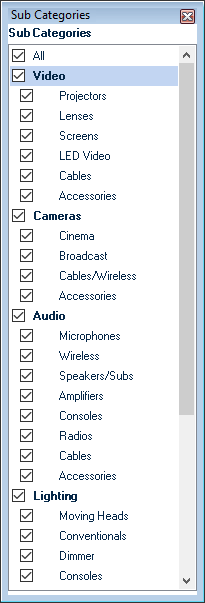
Associated Items and Item Packages
easyjob offers the following possibilities for booking connected items.
Standard Associated Items
Linked Associated Items
Item Packages
The screenshot shows an overview of the various associated items.
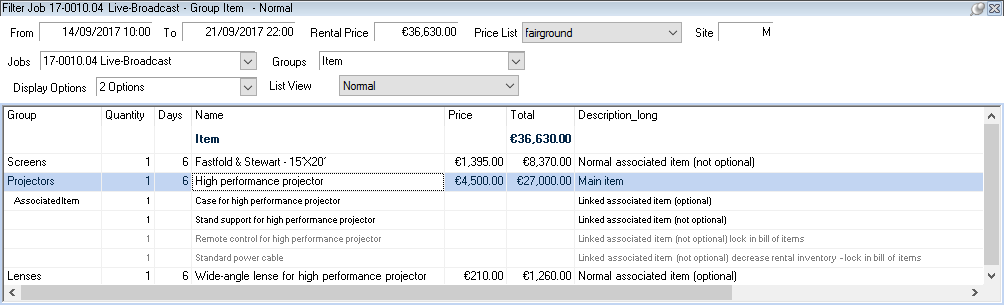
The content of the item package can be grouped in an item group.
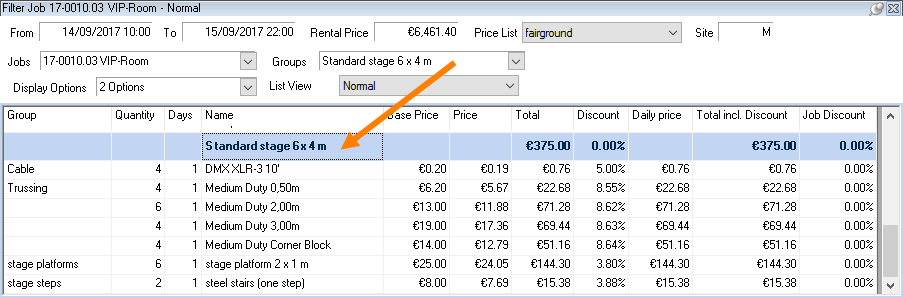
Linked associated items are displayed in connection with the main item and can be changed in the bill of items. Alternatively, the availability of the higher-level item, the availability of the linked associated items can be considered.
Linked Associated Items (Reduce Rental Inventory - Lock in the Bill of Items) are displayed in connection with the main item and cannot be edited later in the bill of items. The availability of this associated items will not be considered, therefore the associated item is removed from the rental inventory.
Standard associated items are optionally booked with the main item in the corresponding quantity and shown separately from the main item. The availability is calculated separately from the main item.
A Linked or Standard Associated Item with the property Optional is requested via a dialog.
Item packages are booked as their own item group in a job. Each item in the item package can contain its own associated items.
Using the various types
The decision regarding which type to be used must be made for each case.
The following table compares the various types.
 | |||||||
|---|---|---|---|---|---|---|---|
 |  | ||||||
 |  |  |  |  |  |  | |
| Displayed by main item | No | No | Yes | Yes | Yes | Yes | / |
| Creation of own item groups upon booking | No | No | No | No | No | No | Yes |
| Use Availability of the Linked Associated Items possible | / | / | Yes | No | No | Yes | / |
| Can be changed as required after booking | Yes | Yes | Yes | Yes | No | No | Yes |
| Request when Booking Optional Associated Items | No | Yes* | No | Yes* | No | No | No |
| Own price, weight, volume and power are considered | Yes | Yes | Optionally | No | Optionally | Optionally | / |
| Can contain own associated items | Yes** | Yes** | No | No | No | No | Yes |
| On-fly Check upon booking | Yes | Yes | Yes | Yes | Yes | Yes | Yes |
| Additional booking with Drag&Drop | Yes | Yes | Yes | Yes | No | Yes | / |
| Must be individually scanned when loading/scanning | Yes | Yes | Customizable | Yes | No | Customizable | Yes |
| Is displayed in connection to the main item | No | No | Yes | Yes | Yes | Yes | Yes |
| Device based assignment in the master data | No | No | Yes | No | Yes | Yes | No |
*This is selected by checking a box on the tab of the associated item
**Normal associated items can contain linked associated items
In addition, you can determine if the rental price, weight, volume and/or output should be added.
Managing and booking item packages
An item package is a group of different items that can be used as a job bill of items template. Items are grouped in item packages. This makes it possible to quickly book a complete package of items with a fixed price for a job.
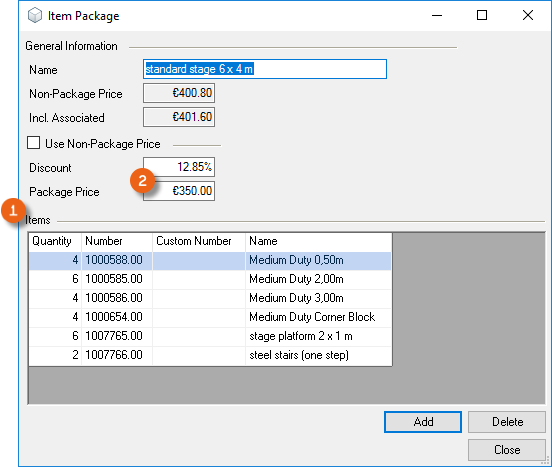
Managing item packages
1. easyjob Menu Master Data Item Packages
2. Select an item package with Edit or create a new one with Add
3. Enter a name for the item package
4. Book the desired item with Add.
5. Close
Each item package is identified with a clear name.
More information about calculations can be found in chapter Item master data price. You can add as many items to an item package as you like. Associated items are automatically considered when booking and do not need to be added.
Booking item packages in the bill of items
1. easyjob Menu Jobs
2. Select a job and Edit
3. Items
4. Item Package
5. If necessary, you can activate Show items
6. The Create new items group box is automatically checked
7. Select the item package
8. Enter the necessary quantity.
9. Add
10. A separate item group is created for the item package
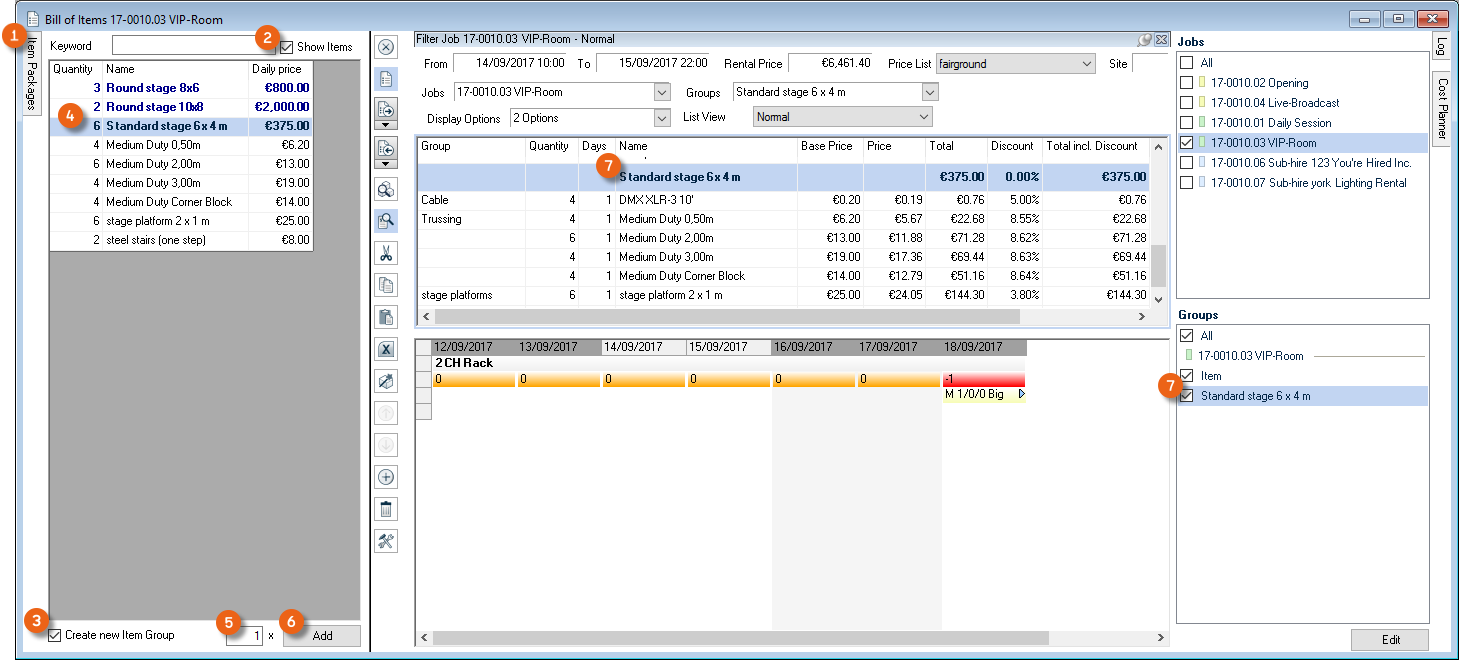
Standard Associated Items
Upon booking, the associated item is automatically booked in a corresponding quantity with the main item and shown independently as a line item. If a different main item contains the same associated item, upon booking the corresponding new quantity is automatically added. The availability check is the same as for a normal item.
With associated items, the dependency quantity can be entered with decimal places. For example, an associated item is assigned 0.5 times to a main item. When booking, this must be rounded to a whole number.
The price and weight of the associated item are calculated as for a main item.
When loading and scanning, the associated item is considered like a main item.
Optional Associated Items
The associated item with the property Optional can be both a linked as well as a standard associated item. It is asked via a dialog when booking the main item. To do so, in the main item, the box Ask about optional associated items when booking box must be checked.
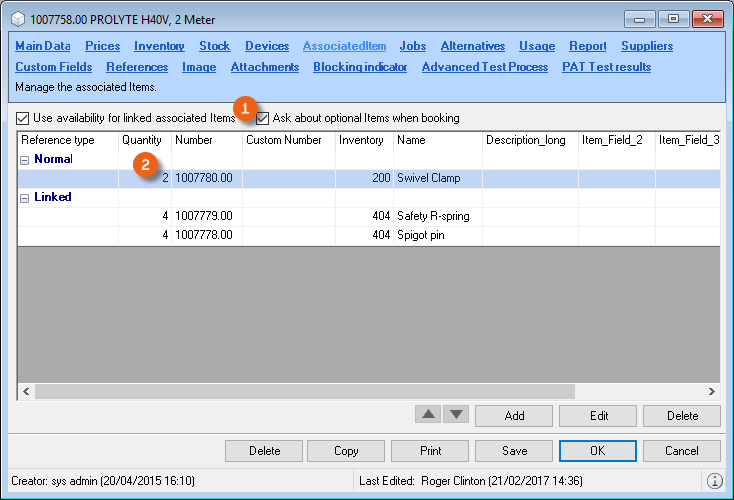
The corresponding quantity of each optional associated item for the main item can be changed as required .
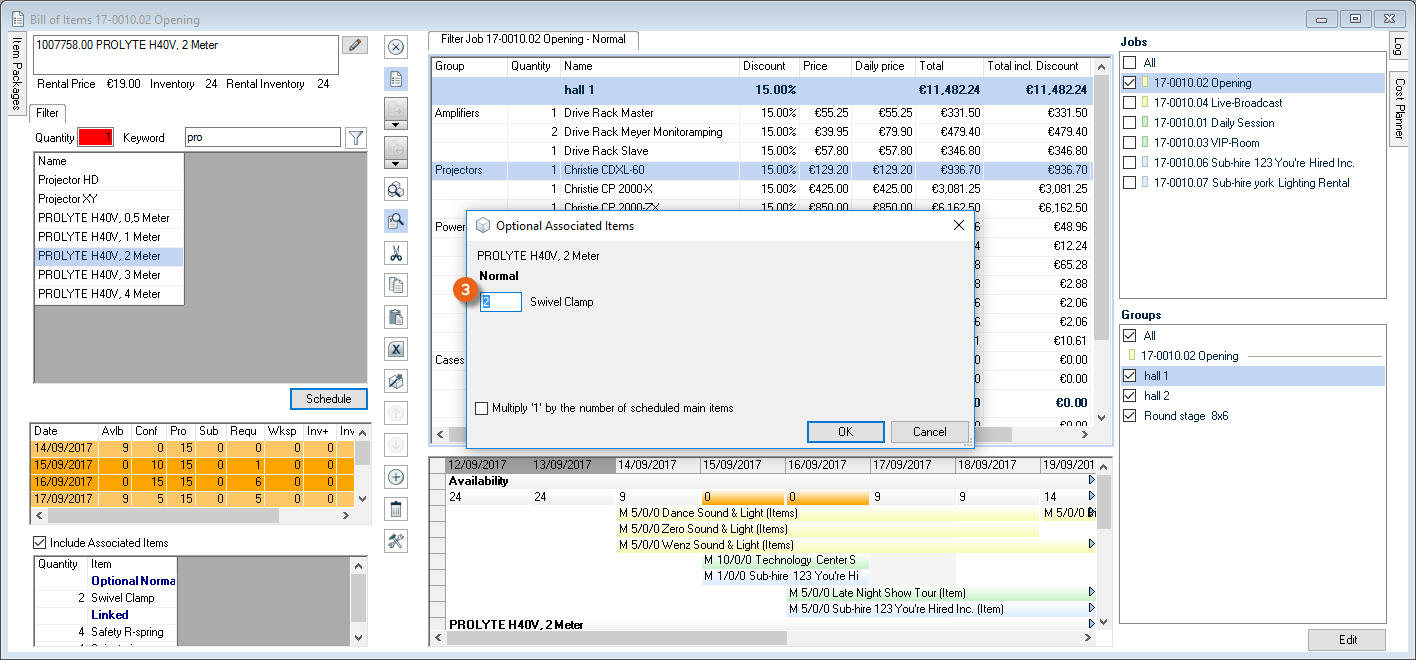
In addition, the quantity of the optional associated item can be multiplied with the quantity of the main item.
The display, availability calculation, loading and scanning is the same as for associated items.
Linked Associated Items
Linked associated items have different properties . They are displayed in connection with the respective main item. When creating them, you can determine if the rental price, weight, volume and power should be considered for the main item .
The availability of the individual linked items can be considered in the availability of the main item. To do so, check the Use availability of the linked associated items box.
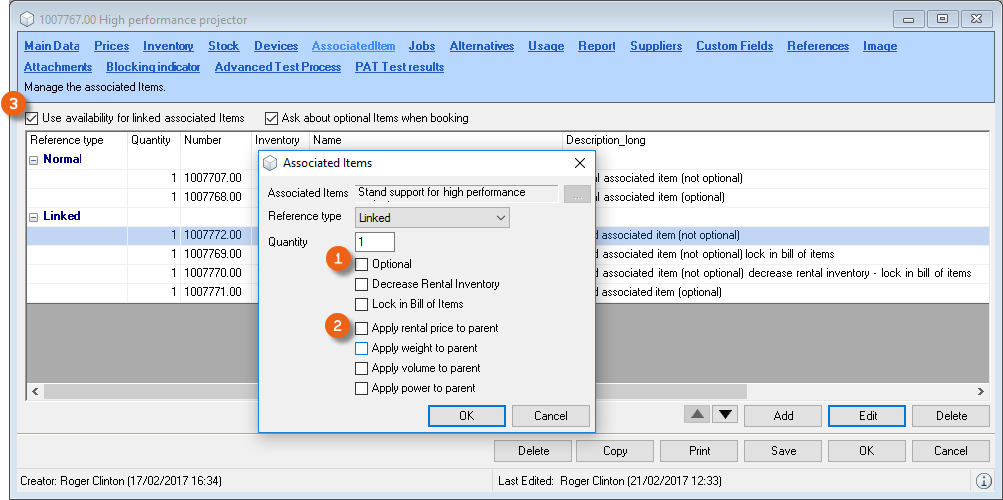
When activating this option, in addition to the availability check for the main item, also the availability of the individual linked items will be displayed.
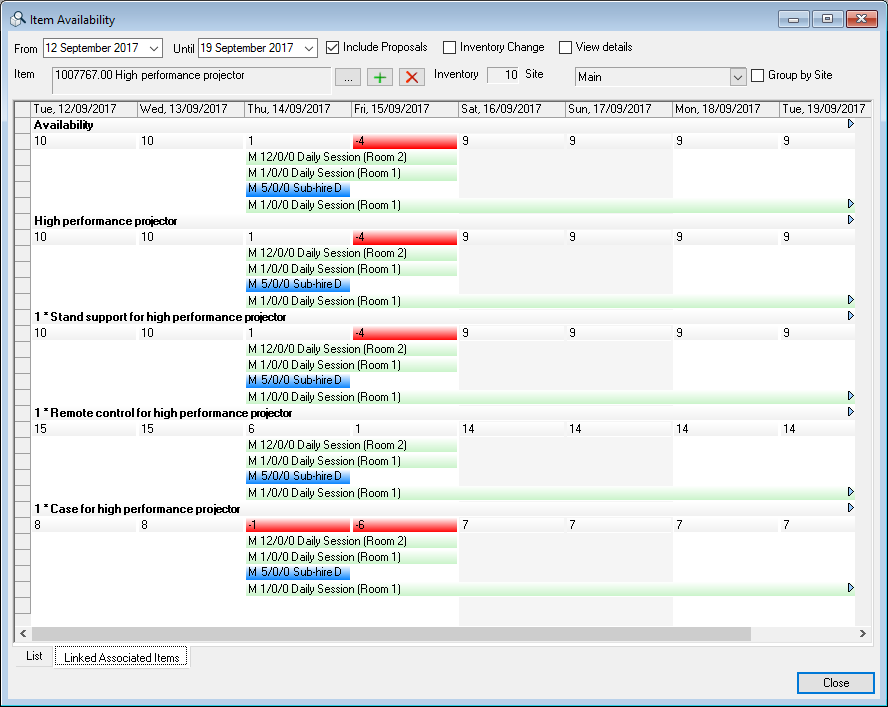
A linked associated item can be customized at a later time in the bill of items.
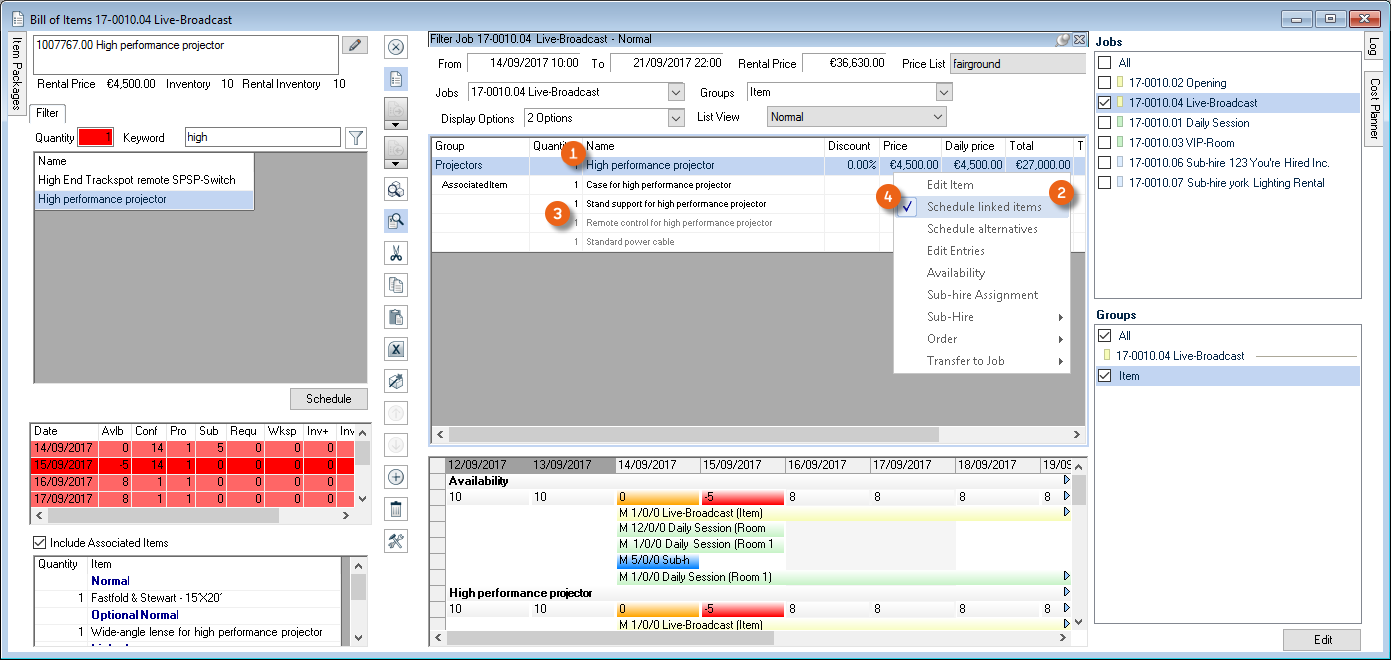
Customizing linked associated items in the bill of items
1. easyjob Menu Jobs
2. Select a job and Edit
3. Items
4. Open the context menu for the main item
5. Schedule linked associated items
The remaining items in the bill of items will now be deactivated
6. Booking additional items, changing the quantity of an item or deleting is now possible
7. Leave the operating mode by unchecking the box Schedule linked associated items in the context menu of the main item
When loading, the individual linked associated items do not need to be taken into consideration. More information about scanning optional associated items can be found ineasyjob Scanner App manual.
Linked Associated Items (Reducing rental inventory)
Linked associated items with the property Reduce Rental Inventory are displayed in gray upon booking in relation to their main item. The availability of this associated item is not considered, as the quantity of the used associated item is already deducted from the rental inventory. It is not possible to make a subsequent change in the bill of items to linked associated items with the properties Reduce Rental Inventory and Lock in Bill of Items.
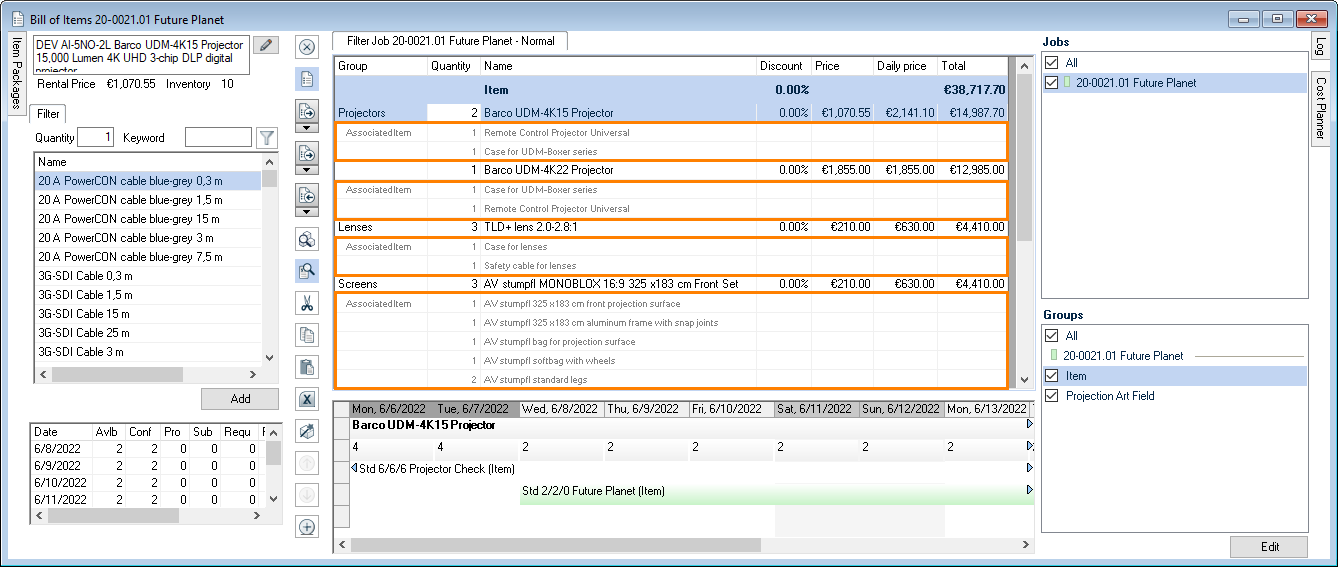
The rental price, weight, volume and power can also be considered if selected.
A direct assignment to the individual devices can be made in the master data. When scanning and loading an item, the associated items do not need to be taken into consideration. A serial number related output on the delivery note is made automatically based on the assignment from the item master data.
For a concatenation of linked associated items with the Reduce Rental Inventory property, there is a maximum possible number of 3 levels. If, for example, item A has a associated item B (1st level), associated item B also has its own associated item C (2nd level) and associated item C in turn has a associated item D (3rd level), the rental inventory is calculated correctly. From the 4th level (when associated item D is still assigned a associated item E), a correct calculation is no longer possible.
| Items (Ex:) | Associated Items (Ex:) | Level | Calculation |
|---|---|---|---|
| Radio | Battery | 1 | Correct |
| Battery | Battery charger | 2 | Correct |
| Battery charger | Power plug | 3 | Correct |
| Power plug | Euro adapter | 4 | Not possible |
A maximum of 3 levels are possible for a chain of associated items (reference type "Linked" and "Reduce Rental Inventory").
Shopping cart
For immediate price and availability information, you can use the easyjob shopping cart. You can open the corresponding project from the shopping cart.
Opening the shopping cart
1. easyjob Toolbar Shopping Cart Icon
2. Select the time frame
3. Select a customer
4. Select the requested item with Add
5. Create project
The shopping cart will calculate the availability and price for each item.
Partial deliveries
Deviating from the job time frame, you can define additional appointments for partial deliveries and partial returns. You can schedule two devices of an item for delivery date X and the remaining three items for delivery date Y.
Activating partial deliveries
1. easyjob Menu Tools Settings Program Modules
2. Check the Partial delivery box
3. Ok
easyjob must be restarted to activate the changes.
Scheduling partial deliveries
Displaying the Partial Deliveries window in the bill of items;
1. easyjob Menu Jobs
2. Select a job and Edit
3. Items
4. Click the 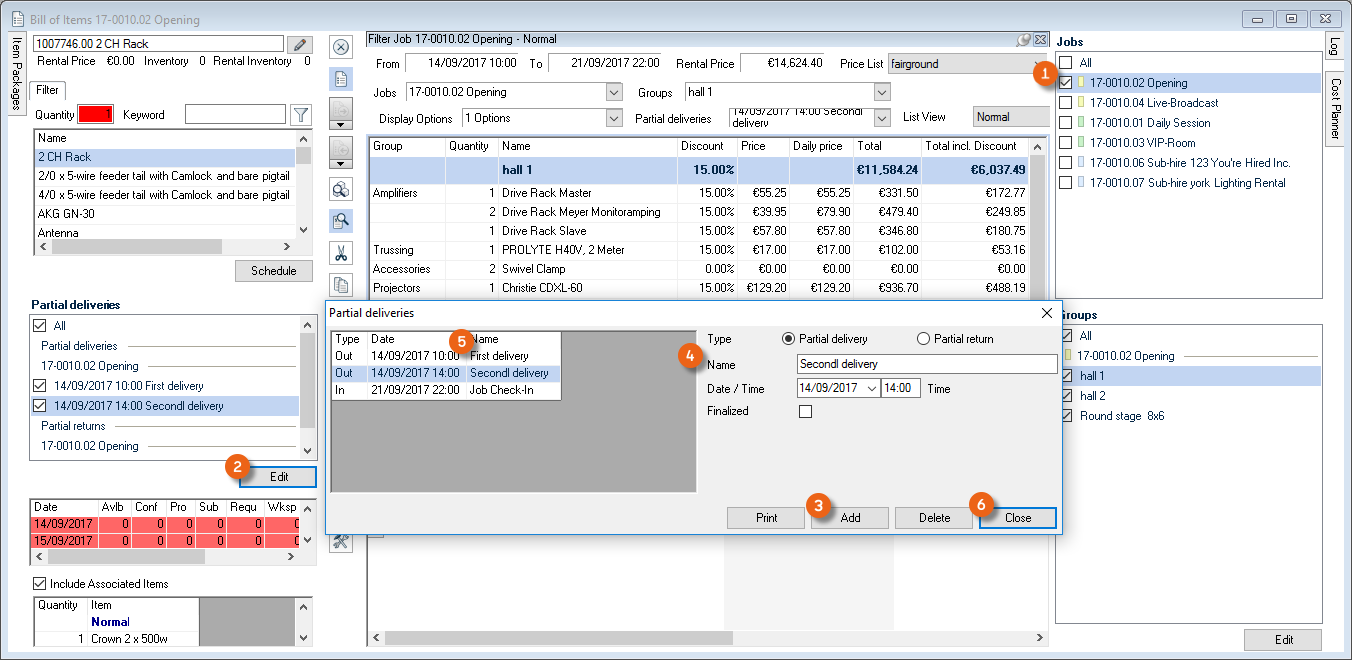 icon on the toolbar.
5. Activate the Partial Deliveries window
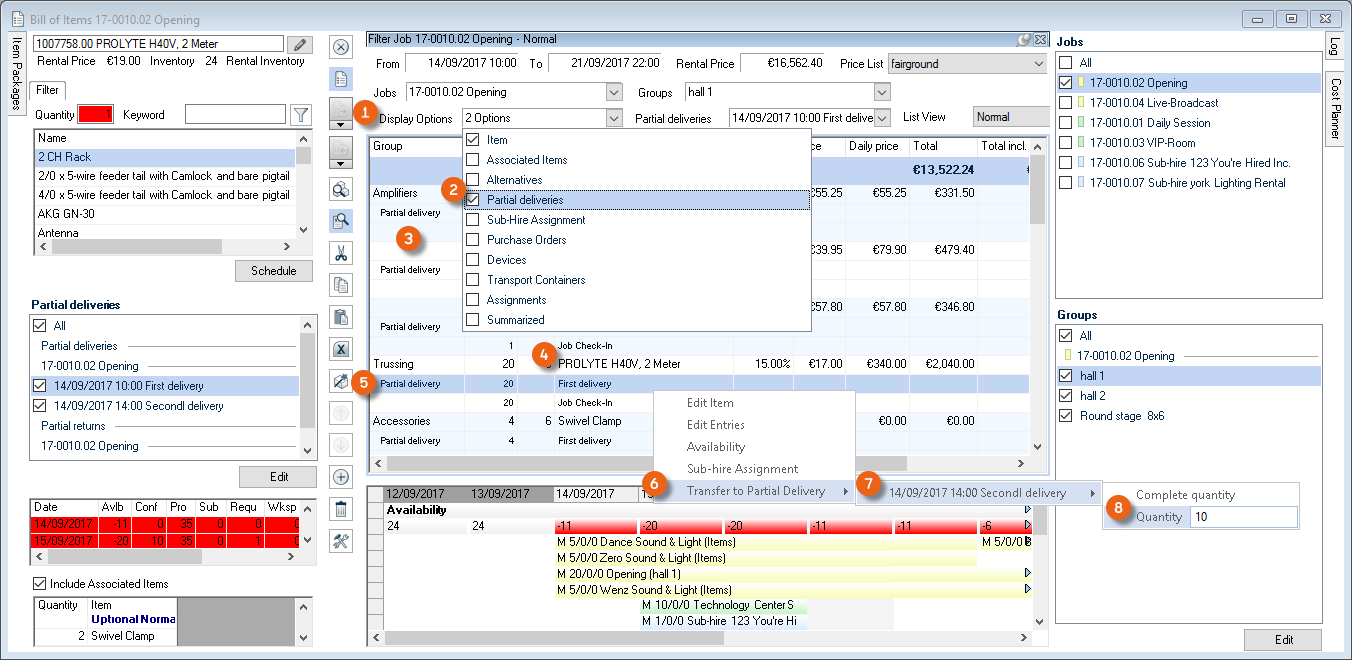
Adding new partial deliveries
1. Select the job for which you want to define a Partial Delivery
2. Click Edit in the partial deliveries window
3. Add
4. Enter a name, define the type as well as the date and time of the partial delivery .
5. If necessary, change the Job Check-Out name .
6. Confirm with Close
Displaying partial deliveries
In order to assign different partial deliveries to your item, activate this in the Job Bill of Items display options.
1. easyjob Menu Jobs
2. Select a job and Edit
3. Items
4. 'Job…' in the heading of the job bill of items window
5. Click Display options
6. Check the Partial Deliveries box.
7. All partial deliveries will be displayed in the bill of items .

Assigning a new partial delivery to an item
8. Click the Partial Deliveries line for the desired item
9. Open the context menu Transfer to Partial Delivery
10. Select the partial delivery and enter the item quantity
11. The item will be transferred accordingly
Preselecting partial deliveries in groups
If your job consists of multiple groups, you can previously assign a partial delivery to a group.
Additional information about creating groups can be found in chapter Splitting an item in individual groups.
1. easyjob Menu Jobs
2. Select a job and Edit
3. Items
4. Edit in the Groups window
5. Assign the desired partial delivery to the group
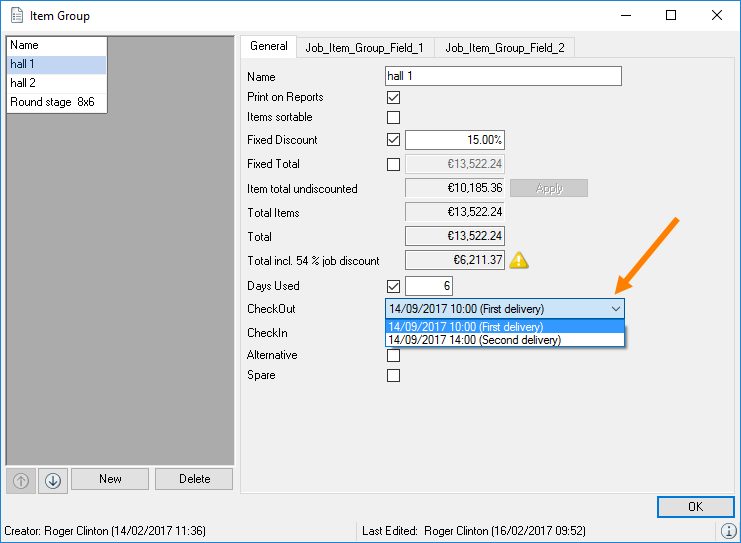
When booking, the partial delivery will be assigned to all items in the group. Another partial delivery can be subsequently assigned to the items.
(Un-) Loading & Individual Device Tracking
Missing items are transferred to new jobs for subsequent invoicing and to ensure a correct availability display. Jobs with a Sub-Rental and Rental status can be loaded and unloaded.
Due to device assignment upon loading, you can view the entire history of the devices at a later point in time.
A device can be issued only once at the same time. You can job a device to another job only after unloading it.
easyjob has multiple possibilities for loading and unloading.
1. Manual loading and unloading
2. Manual loading and unloading using a barcode scanner, with keyboard entry simulation*
3. Batch mode for barcode scanner with memory function*
4. Barcode terminal with real time and off-line functionality*
5. Barcode terminal in hybrid mode*
The next chapter will provide more information about points 1 and 2. Additional Information can be found in easyjob Scanner App manual.
*optional barcode hardware required
Loading/unloading terminology
No content for this section.
Check-out
A job receives the check-out status after all items are loaded and the items have left the warehouse.
Check-In
A job receives a check-in status after all items are unloaded and the material has been returned to the warehouse.
Loaded
The loaded quantity shows how many items have already been loaded either manually or with a barcode scanner.
Unloaded
The unloaded quantity shows how many items have already been unloaded either manually or with a barcode scanner.
Checking out a job manually
If you do not want to issue items and devices manually using the Job Load module, you can set the job check-out status manually.
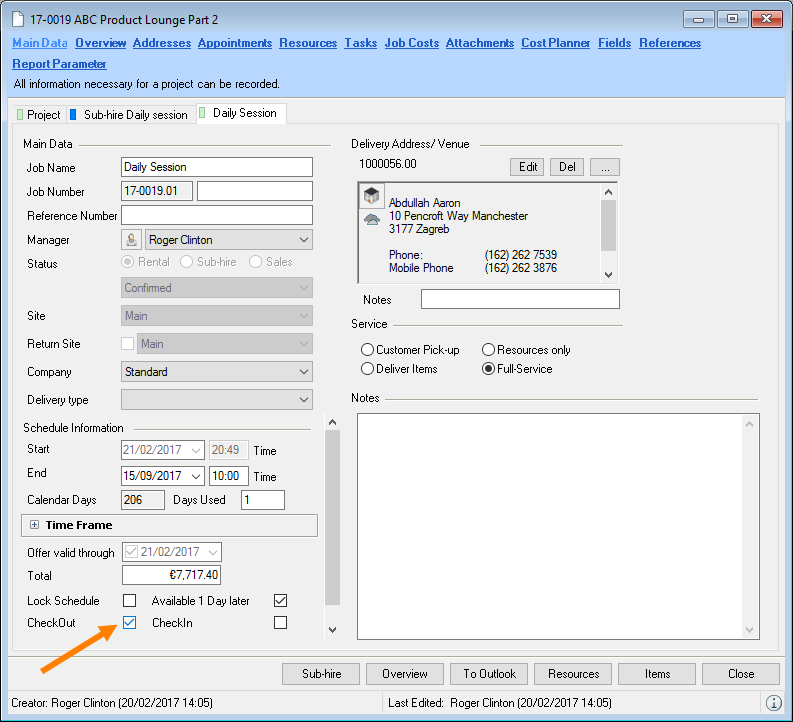
Checking out a job manually
1. easyjob Menu View Jobs
2. Job and Edit
3. Job main data and check the Check-Out box
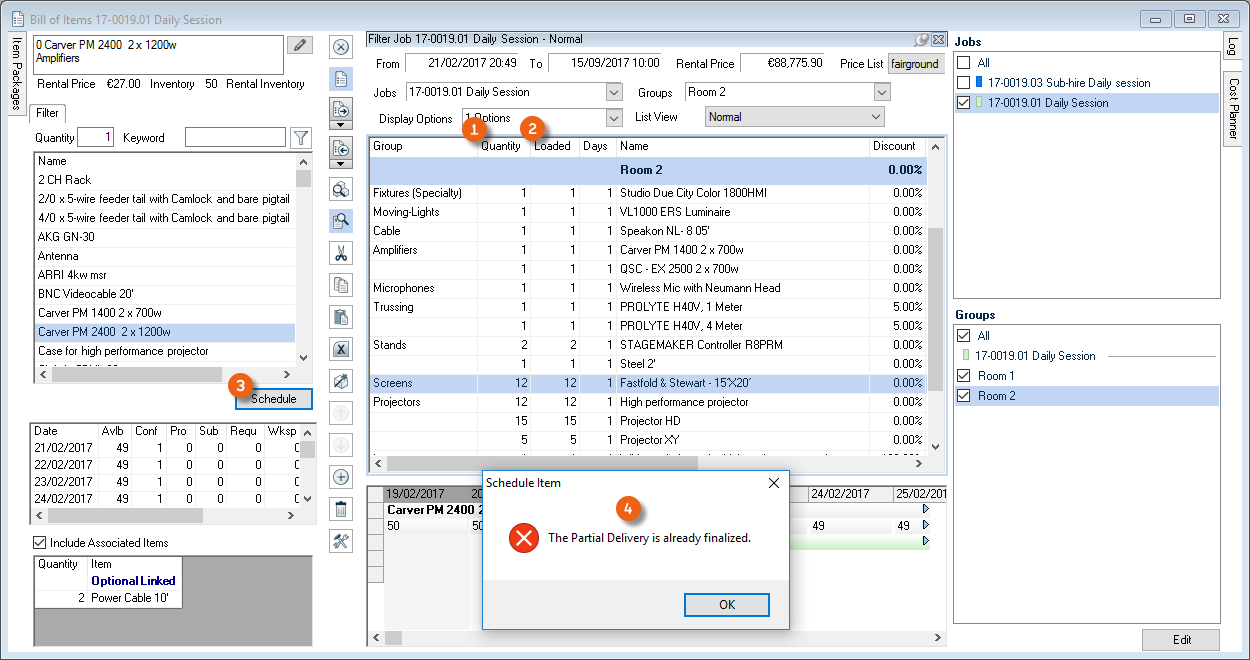
During check-out, the scheduled quantity is transferred to the Loaded quantity . The expendable items that were used are removed from the inventory. The bill of items is blocked from editing in Scheduling mode.
If you want to reset the check-out status, all items and devices remain loaded. It is possible to add a new item. The quantity of existing items can only be changed when you manually cancel the item using the load job function.
Checking in a job manually
If you do not take back the items and devices manually using the Unload Job module, you can manually set the job Check-In status. A job can only be checked in if the job has been checked out.
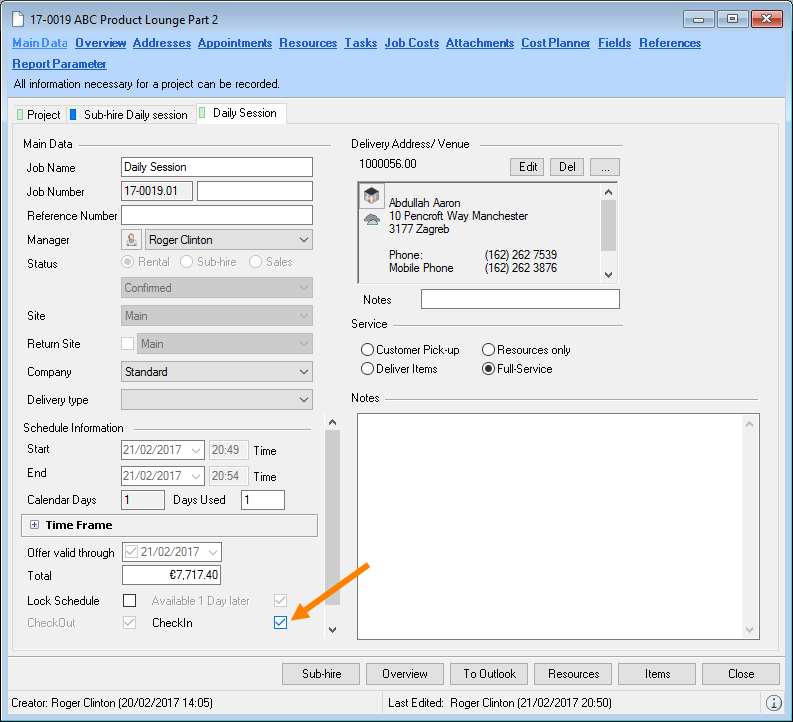
Checking in a job manually
1. easyjob Menu View Jobs
2. Job and Edit
3. Job main data and check the Check-In box
When checking-in, the loaded quantity of the item is updated based on the unloaded quantity. Unloaded devices are also unloaded.
Loading Jobs
When loading, the quantity of the individual items is entered in order to trace the individual devices. The content of the transport container is also determined.
Opening Load Job
1. easyjob Menu Projects Load Job
2. Job and Ok
3. The bill of items appears in Load mode  .
.
In general, only confirmed jobs can be loaded.
Loading an item
The Load Job mode is integrated and preset in the bill of items. It can be activated by clicking on the icon on the toolbar. You can customize the windows and views. More information can be found in chapter Customizing the bill of items to requirements.
On the left side you can find the item info , which displays the selected item, the item list if additional items are required, the device view as well as the availability view for the selected item. In the middle, there is a job bill of items with items that are already loaded and directly beneath the job bill of items with items that are To be loaded.
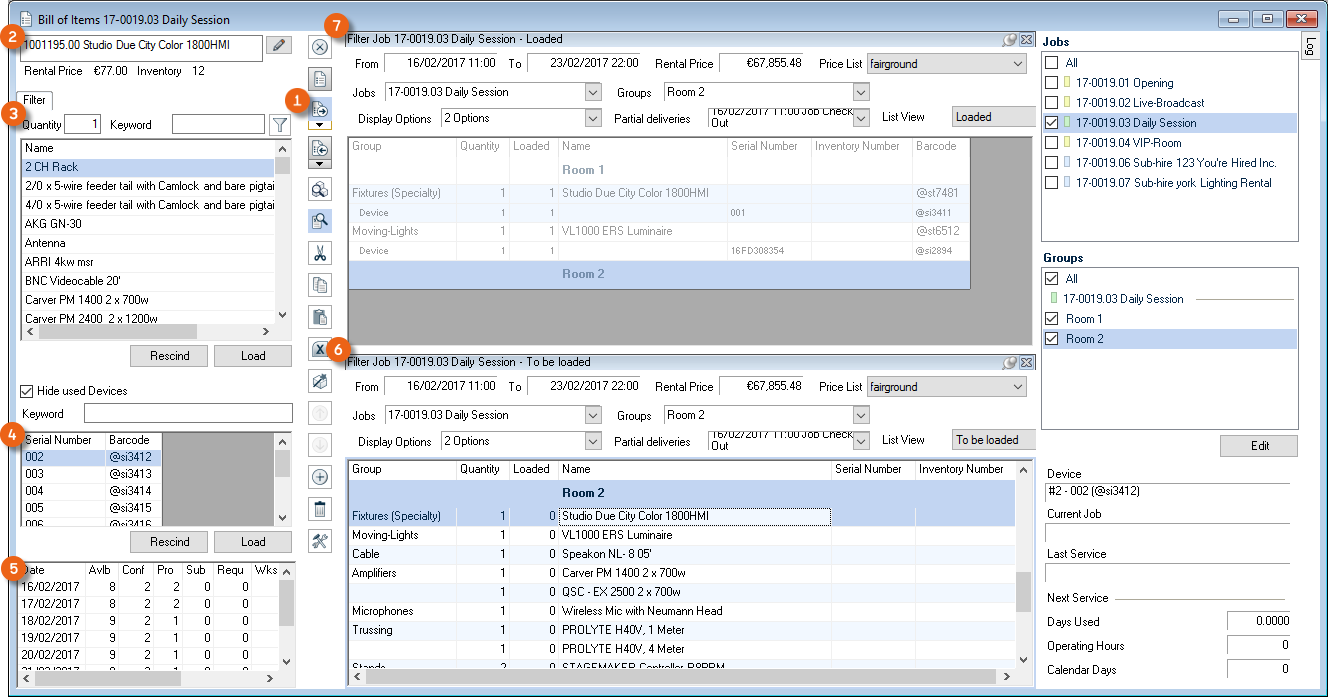
After loading an item, it is moved from the To be loaded list to the Loaded list.
Loading items and devices
There are multiple possibilities for loading an item or device.
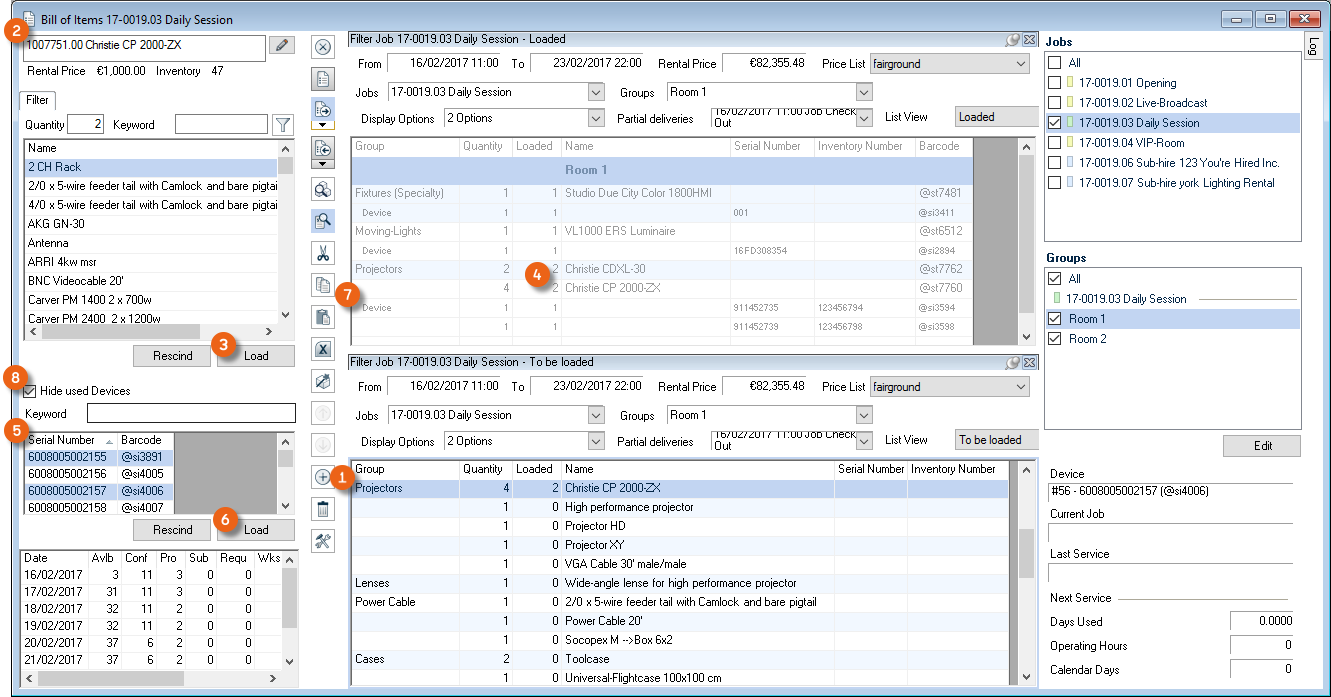
Loading an item through item selection
1. Select an item from the To be loaded job bill of items
2. The selected item is displayed in the Item info
3. Click Load or double click.
4. The item will be loaded and will appear in the Loaded bill of items.
Loading a device through item selection
1. Select an item from the To be loaded job bill of items
2. The selected item is displayed in the Item info
3. Select the desired devices
4. Click Load
5. The item with the selected devices will be loaded and appears in the Loaded job bill of items
Hide Used Devices you can control if you also want to have devices displayed that are already booked in a job.
Loading an item or device from the barcode field
1. Select the barcode field
2. Scan the item or the device barcode
When overloading or loading unscheduled items, the following screen will appear.

Here you can decide if the item should be loaded or if the process should be ended.
Linked Associated Items can be separately loaded and unloaded.
Assigning a transport container
The assignment of the transport container content make it possible to print a list of which items/devices are in which transport container. You can assign devices and items to transport containers. Due to the clear assignment, the transport containers must be loaded as a device.
An item is defined in the master data as a transport container. More information can be found in chapter Items Main Data.
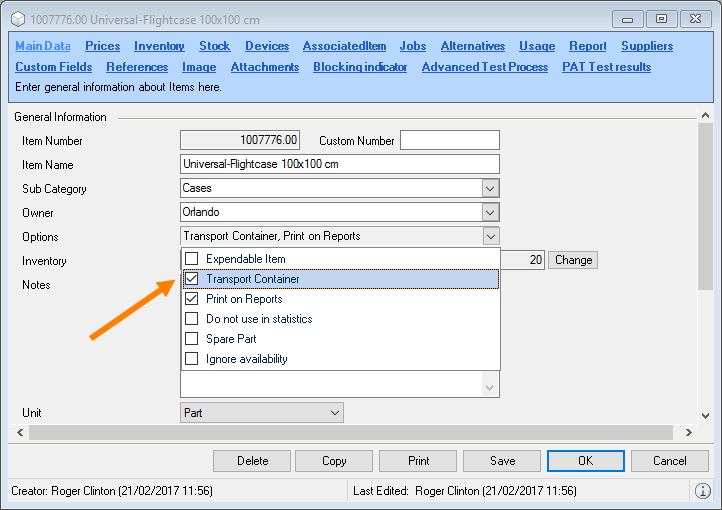
Displaying and positioning the Transport Container window
1. easyjob Menu View Jobs
2. Job and Edit
3. Items
4. Switch to load mode using the toolbar icon
5. Open the Bill of Items Settings using the toolbar icon.
6. Activate the Transport Container window.
7. Position the window
8. Click Close in the bill of items settings window.
Activating the Transport Container column in the Loaded view
1. easyjob Menu View Jobs
2. Job and Edit
3. Items
4. Switch to load mode using the toolbar icon
5. Move the mouse to the header of the Loaded job bill of items
6. Open the display options context menu .
7. Check the Devices and Transport Container boxes
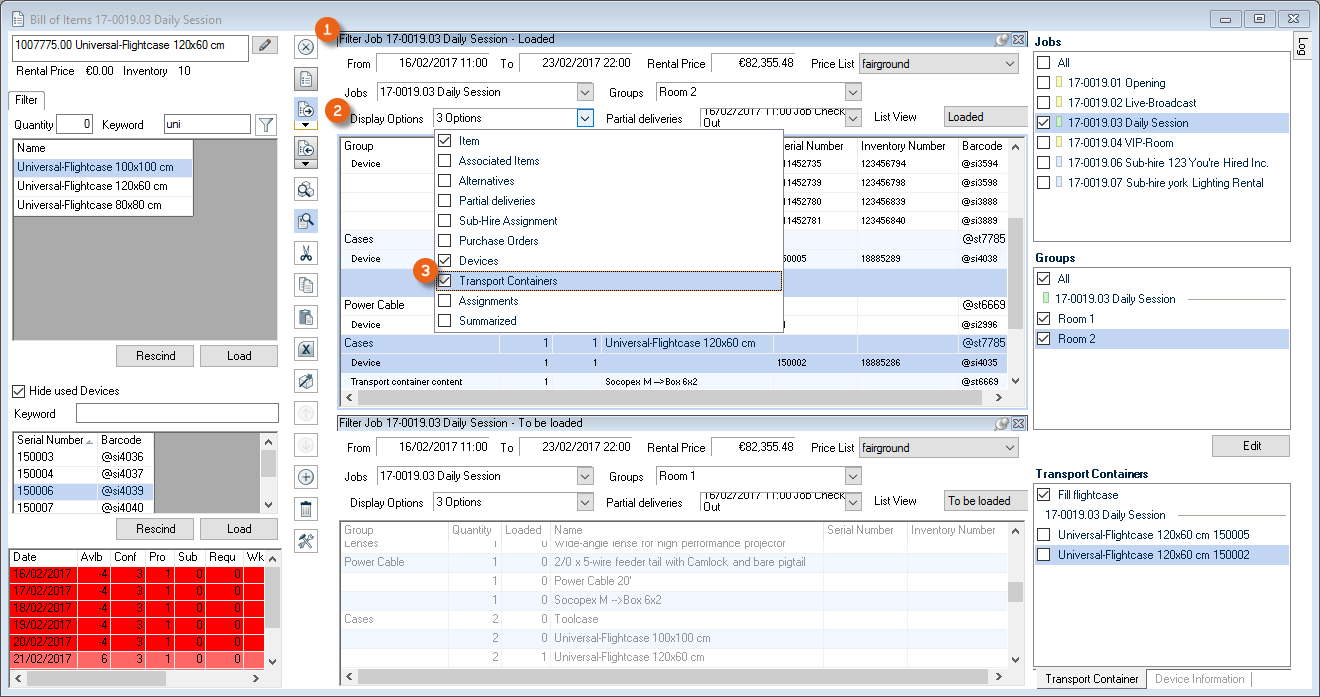
If you load a device with the Transport Container property, you can then directly assign additional items/devices to this device (e.g. a case) .
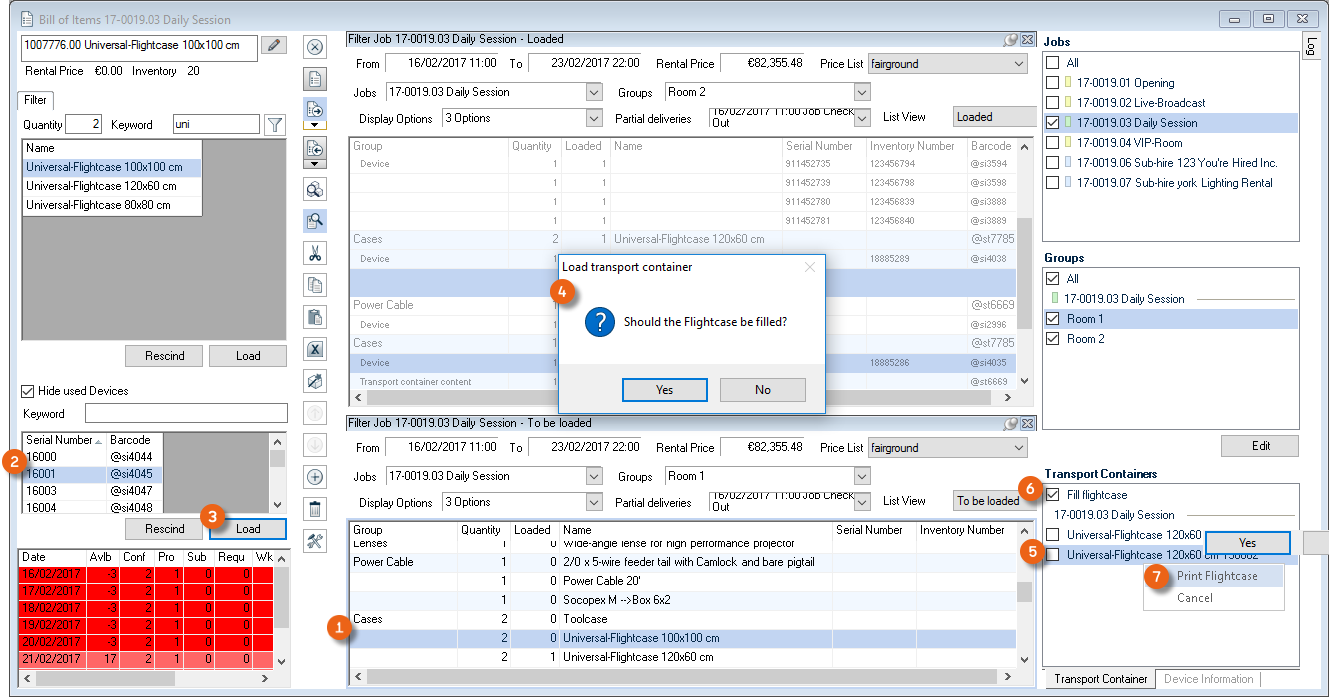
You can load items and devices to the colored device .
Assigning items and devices to a transport container
1. Select the device of a loaded transport container in the Transport Container window
2. Check the Load transport container box
3. Load the items and devices you want to assign to the transport container
4. End the transport container mode by deactivating Load transport container
Via the context menu , you can print out the transport containers directly on your printer.
Creating a workshop activity directly from the loading/unloading process
When loading and unloading a device, a workshop activity can be created. If service is due for this device, you will receive a notice and transfer the device directly to the workshop.
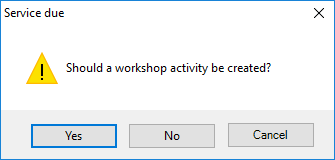
Loading partial deliveries
If you have loaded all items/devices from the First Partial Delivery. The message if it should be checked out will appear.
Alternatively, you can create a corresponding partial delivery with Finalize Loading.

Canceling an item
To exchange a device or change the quantity of a loaded item, you can cancel an already loaded item.
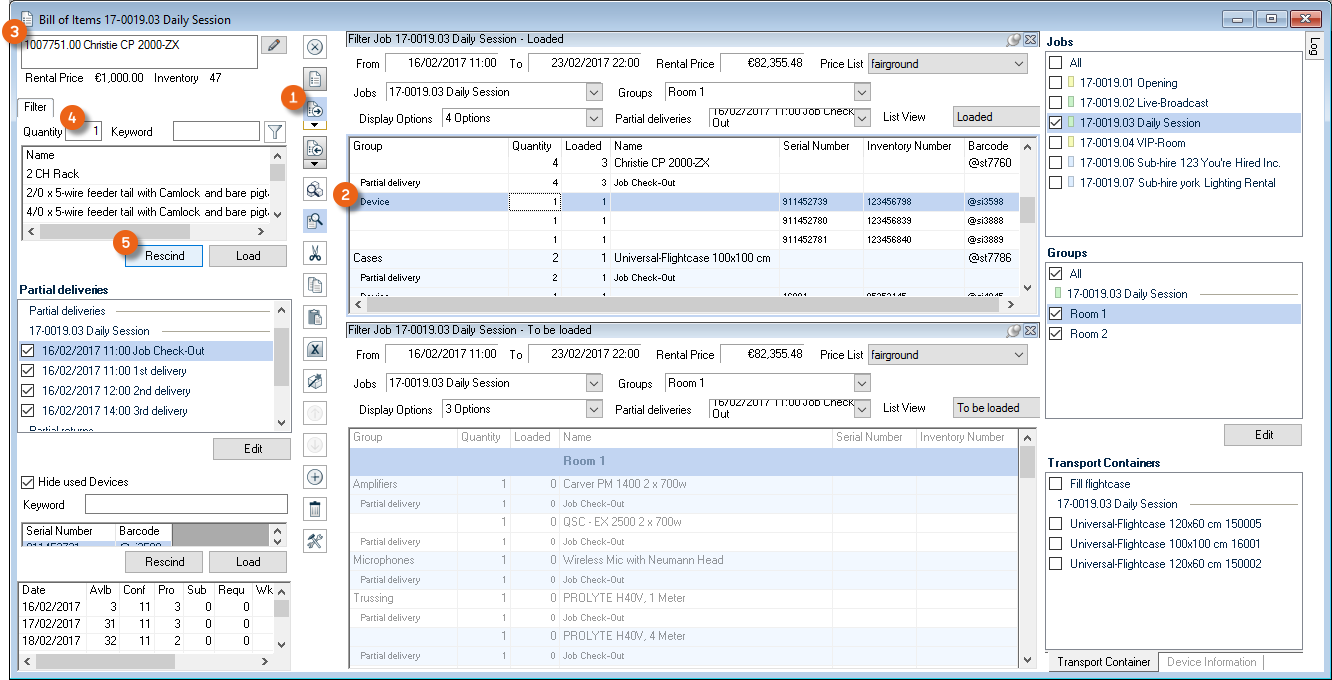
Canceling loaded items/devices
1. easyjob Menu View Jobs
2. Job and Edit
3. Items
4. Switch to load mode using the toolbar icon
5. Select the device / item
6. Enter the quantity
7. Cancel
Finalize – Quick load, adjust target figures or transfer not loaded item to a new job
When you have finalized a loading process, you can finalize the job with Finalize Loading. This dialog opens automatically when the last device or the last item has been loaded in the bill of items. Loading Finalizing checks if all scheduled items have been loaded. If not all items have been loaded yet, you will be asked if the item should be Quick loaded, if the Target Figures should be adjusted or if the not loaded item should be transferred to a new job.
With the quick load, the loaded quantity is updated from the scheduled quantity. If you have manually counted all items and do not want to assign devices.
When adjusting the target figures, all items not loaded are deleted from the bill of items and the target figure is updated based on the loaded item quantity.
You can also transfer unloaded items to a new job.
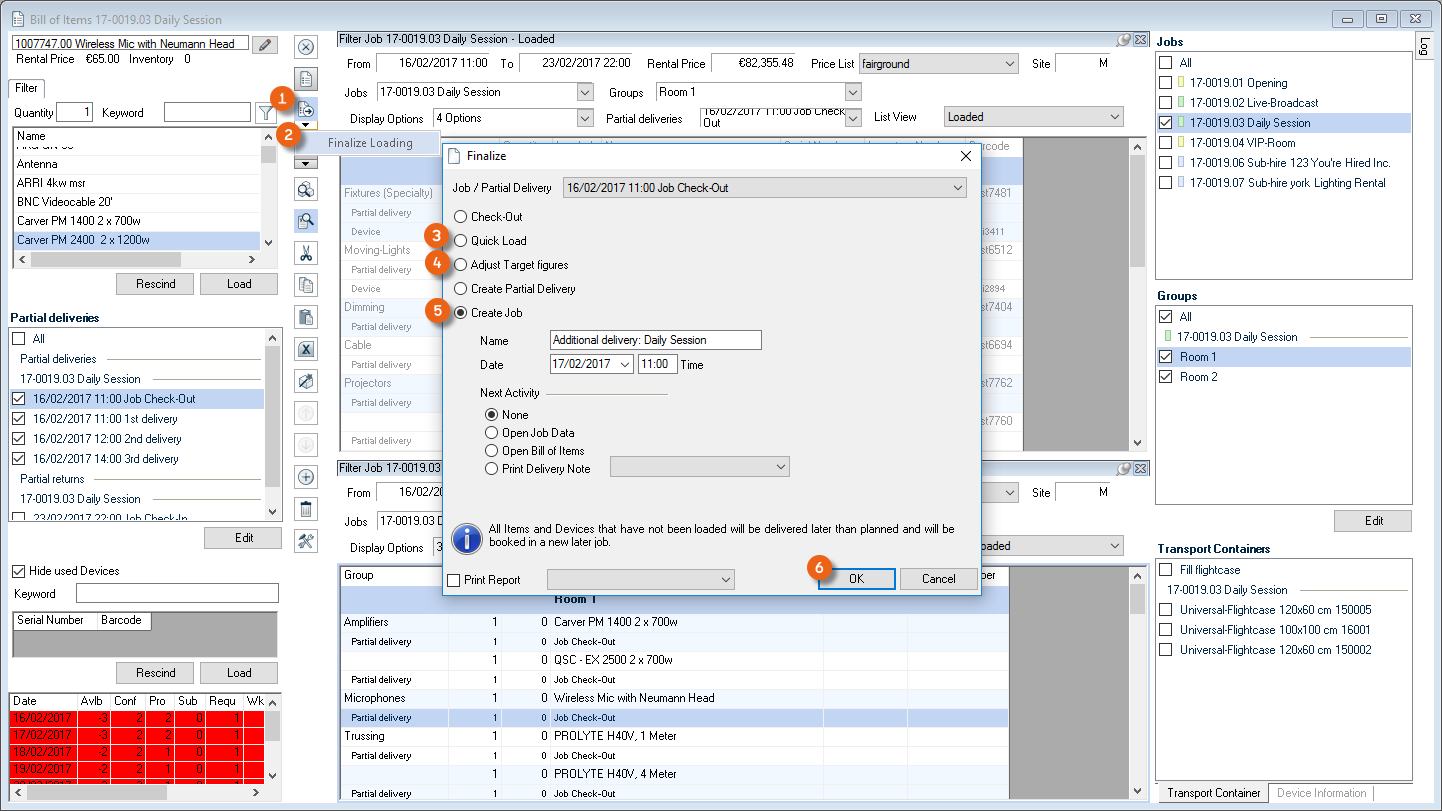
After it is finalized, the loaded job is checked out.
Quick loading an item, adjusting the target figures or creating a job
1. easyjob Menu View Jobs
2. Job and Edit
3. Items
4. Switch to load mode using the toolbar icon
5. Right click the arrow of the Load icon on the bill of materials toolbar
6. Finalize Loading
7. Quick load or Adjust Target Figures or Create job
8. Ok
Unloading Jobs
During the unloading process, the quantity of the returned items and devices is processed.
Open Unload Job
1. easyjob Menu Projects Unload job
2. Job
Or click the Unload toolbar-icon in the bill of items.
Unloading items
In job unloading mode, you can see all the items and devices to be unloaded or that were already unloaded .
After selecting an item, the quantity will be displayed from the difference between unloaded and returned.
Unloading items and devices
There are multiple possibilities for unloading an item or device.
Unloading an item from the bill of items
1. item from the bill of items
2. Enter the quantity
3. Double click the entry or Unload
Unloading a device from the bill of items
1. Device from the bill of items
2. Double click the entry or Unload
Unloading an item or device from the barcode field
1. Select the barcode field
2. Scan the item or the device barcode
Option to enter the Operating Hours
When unloading, it is possible to enter the operating hours for your devices. To do so, you must set various parameters in the item main data. More information can be found in chapter Items Devices.
Unloading partial deliveries
Unload as usual. While unloading finalize. It is also possible to create an additional partial return.
Finalizing
When you have finalized the unloading process in Unload mode , end the job with Finalize Unloading . Finalizing checks if all loaded items have been unloaded. If not all items have been unloaded, you will be asked what should happen with the remaining amount.
Quick Unload
If you are sure that all items have been returned, you can unload the items quickly. With the quick unload, the unloaded quantity is updated with the loaded quantity. If the bill of items contains expendable items, you can permit or exclude this by checking/unchecking the box.
Unloading items quickly
1. easyjob Menu Projects Unload Job
2. Job and Edit
3. Items
4. Right click the Unload icon on the bill of items toolbar
5. Finalize Unloading
6. Quick Unload
7. You can also check the Include Expendable Items box
8. Ok
Reloading
All items and devices that are not unloaded will be transported directly to another job and loaded in it.
Reload items
1. easyjob Menu Projects Unload Job
2. Job and Edit
3. Items
4. Right click the Unload icon on the bill of items toolbar
5. Finalize Unloading
6. Reload corresponding job and Ok
7. Ok
Early return delivery
When creating an early return delivery job, all already unloaded items are added to a new job and removed from the existing job. The early return delivery job receives the start date from the original job and the current day as the end date. All items and devices are automatically loaded and unloaded.
Select this action when partial amounts are returned early.
Creating a missing items job
When creating a missing items job, all unreturned items and devices are inserted in a new job.
You can select this action when partial amounts will be returned at a later date.
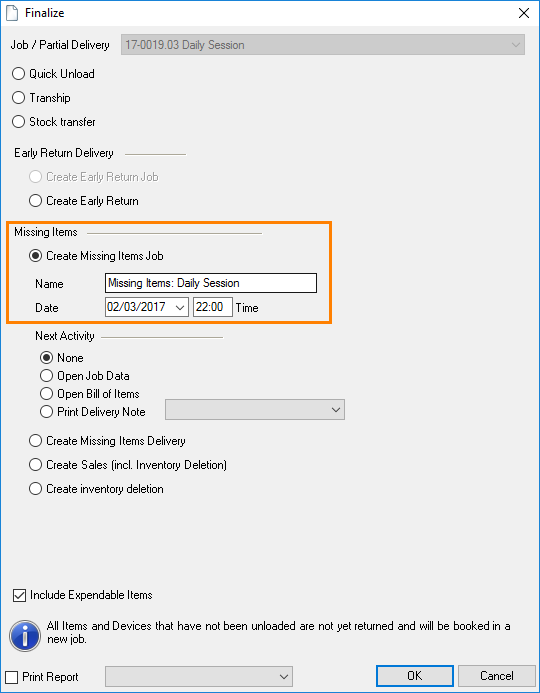
Select a new return date and a new name for the new job. The missing items are automatically loaded in the new job and the job is checked out.
Creating a missing items invoice
If items are not returned, the missing amount can be invoiced. The items are added to the invoice with the sales price and removed from the inventory.
Creating a missing items inventory deletion
When unloading Missing Items, you can correct the inventory directly.
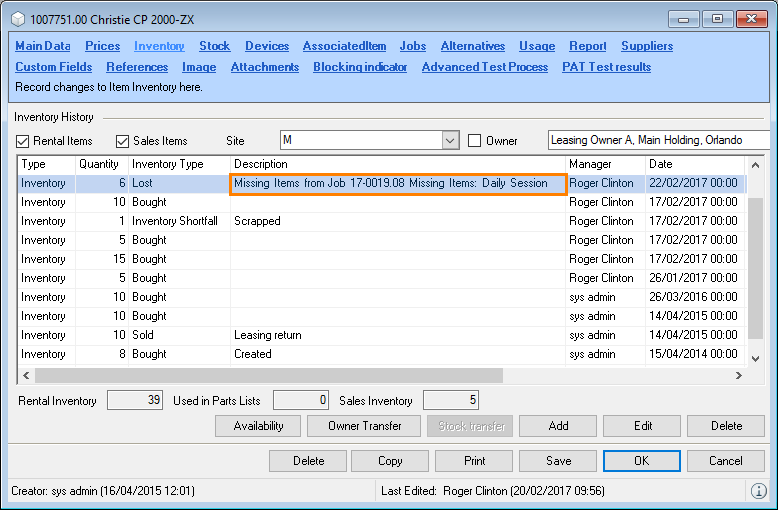
Important notice
If items are turned later, make sure to create an Early return delivery job or a Missing items job. If this is not done, there will be problems with the availability check, as the item availability will be calculated based on the job's return date.
Tracking devices
With track device, you can see which device is in transit with which job.
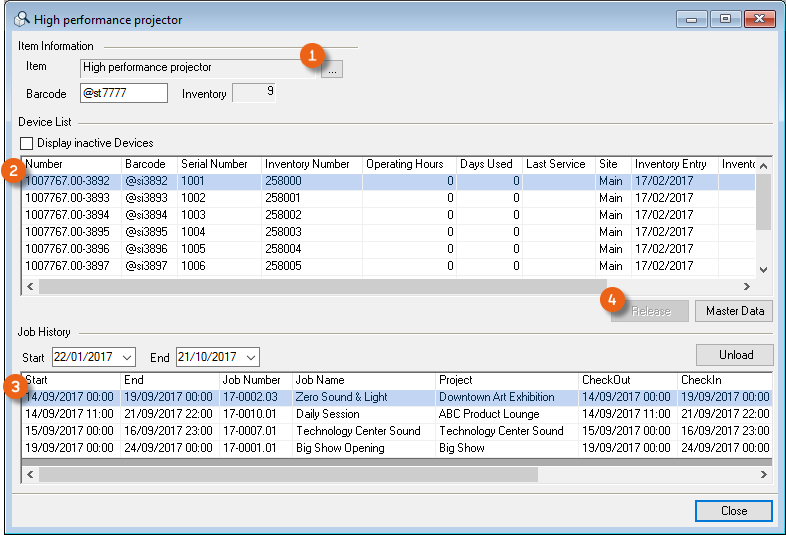
If a device is not released as it was not checked in, you can Release the device again from here.
Track a device
1. easyjob Menu Items Track Device
2. Select the item
3. the selected item Ok
4. Select the device
5. The job history is displayed for the selected device
6. Close
Staff and Transportation Planning
As resource planning differs from item scheduling, the functions are implemented independently of each other.
The resources are booked in two phases. In the first phase, the individual resource types are booked in the job. The price is calculated based on the resource type. If the order is confirmed, you then start assigning staff and/or transportation.
Resource Types
The resource type describes the different types of the necessary specialized staff and vehicle types.
Managing resource types in the master data
1. easyjob Menu Master Data Resources
2. Select a resource type you want to Edit or create a new one with Add
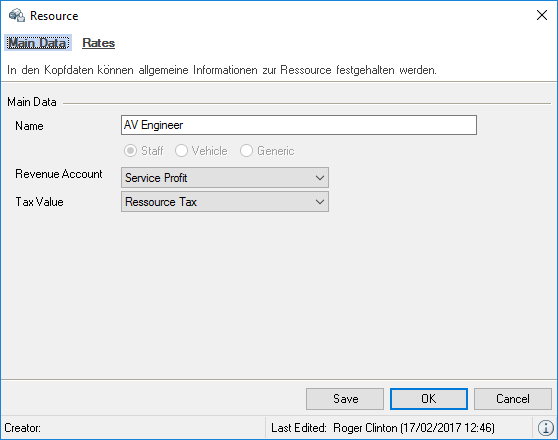
In the main data, specify the name (e.g. light engineer), the type (staff, vehicle or generic), the revenue account and the tax rate.
Set as many rates as you want for each resource type. A separate tab is created for each rate.
You can set rates in combination with daily, hourly and kilometer prices. The entered data is used as a template when booking resources in jobs and can be customized later in the job.
Rates
Managing rates in the master data
1. easyjob Menu Master Data Rates
2. Select a rate you want to Edit or create a new one with Add
You can select from one of four basis of computation for each rate.
In the case of an activated fix price for a rate, the base price is simply added and not multiplied by the number of hours or days.
Standard rate
With a standard rate you can determine the daily, hourly and kilometer price for the resource type. The rate is entered in the resource planner as follows:
Time dependent rate
With a time dependent rate you can specify which rate should be calculated at which time of the day.
In addition, you can also specify for the resource type if a price should be entered separately for each line (Price per Unit) or if a factor should be calculated based on the basic rate for the individual lines (Factor per Unit).
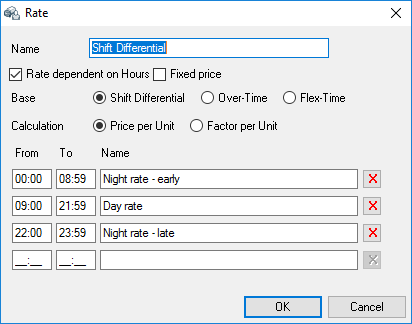
The rate is entered in the resource planner as follows:
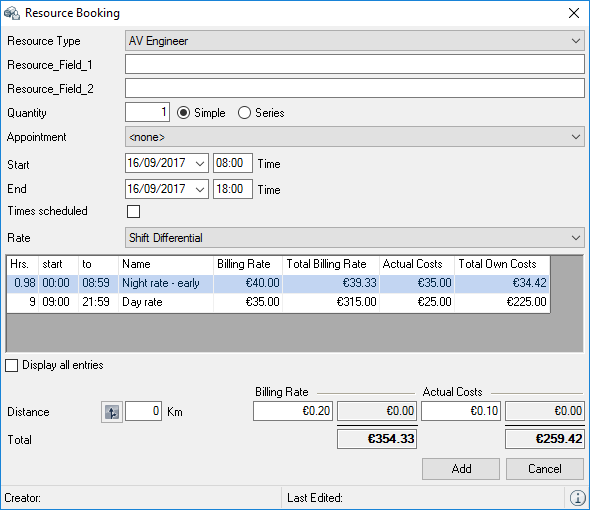
Sliding scale rate
With a sliding scale rate you can determine after how many hours which hourly rate should be calculated.
In addition, you can also specify for the resource type if a price should be entered separately for each line (Price per Unit) or if a factor should be calculated based on the basic rate for the individual lines (Factor per Unit).
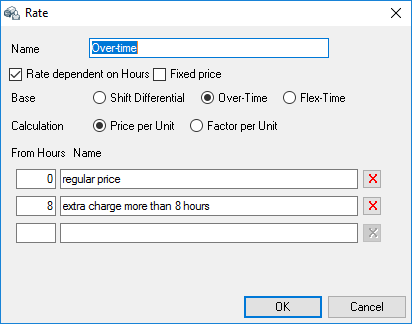
The rate is entered in the resource planner as follows:
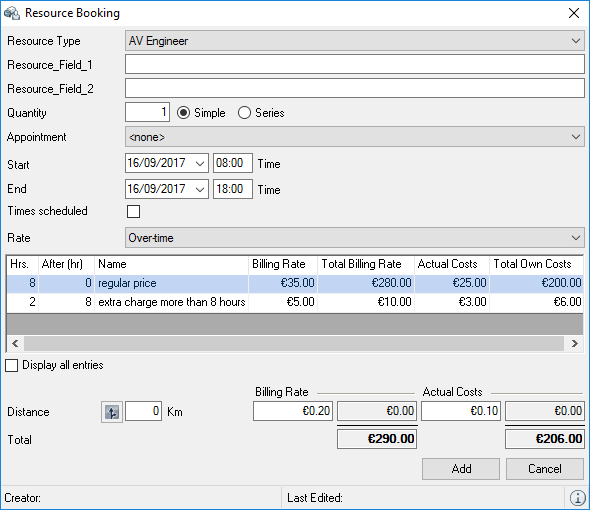
Threshold rate
With the threshold rate you can determine up until how many hours which hourly rate should be calculated.
In addition, you can also specify for the resource type if a price should be entered separately for each line (Price per Unit) or if a factor should be calculated based on the basic rate for the individual lines (Factor per Unit).
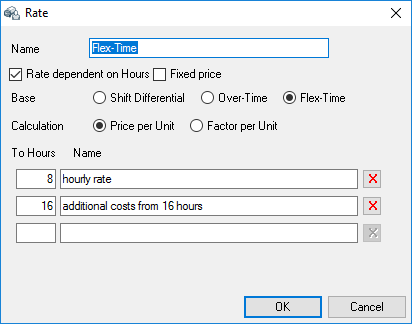
The rate is entered in the resource planner as follows:
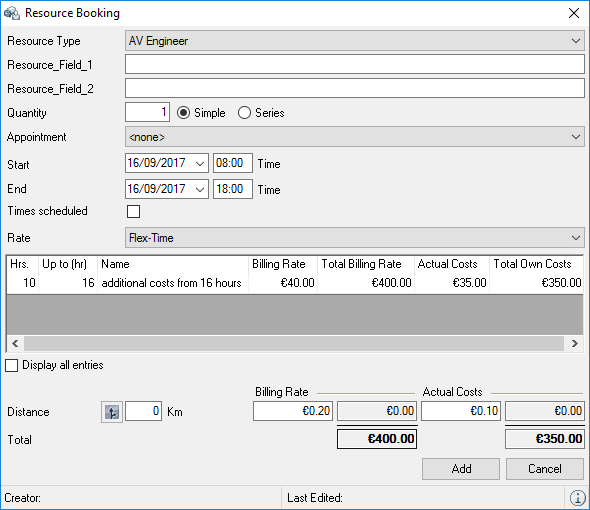
Customizing staff master data
Internal and external personnel are managed in the address master data.
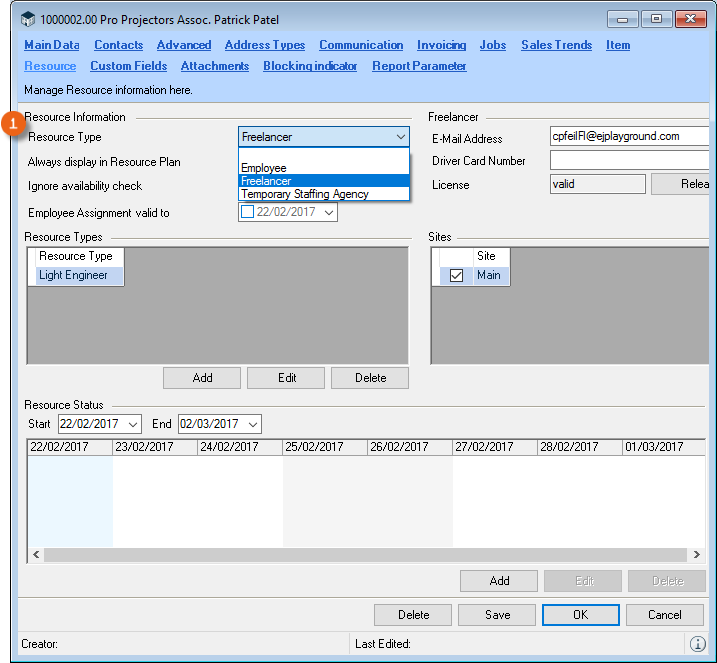
On the Resource tab you can specify which Type of employee belongs to this address.
Employees
You can prioritize your own employees in the resource planner.
Freelancers
Freelancers are external, self-employed employees. You can filter the resource planner based on the settings. You can also include the settings for the Freelancer Communication Pack. More information can be found in Freelancer Communication Pack Manual.
Temporary staffing agencies
Temporary staffing agencies are companies that have a large amount of resources available. So you do not have to make multiple assignments with a temporary staffing agency, you can enter the quantity of staff with the assignment.
Managing absences
With resource planning, you can account for staff absences. You can assign as many absence time frames in an address as you wish. The absences are managed with the resource status.
The assigned resource status is displayed in the resource assignment as well as in the address book.
Assigning a resource status to an address
1. easyjob Menu Master Data Addresses
2. Address
3. Edit
4. Resource tab
5. Add in the Resource Status area
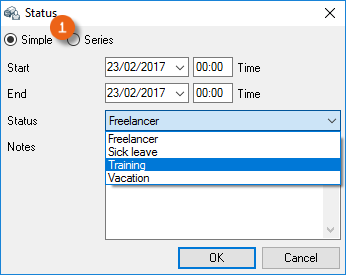
6. Select the type and the time frame or enter a series , which can be used, for example, to create a school day every Monday for a vocational student
7. Add a note if necessary, it can be found in the resource plan.
8. Ok
When adding a resource status a check is performed if there are already bookings. If this is the case, a warning appears.
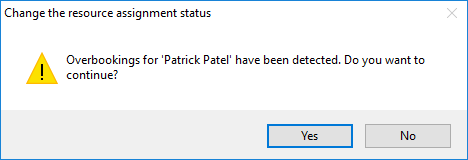
The individual status types are managed in the master data.
Managing resource status types
1. easyjob Menu Master Data Resource Status
2. Select a resource status with Edit or create a new one with Add
3. Give the resource status a name and select if it is a staff or vehicle related status. A color can be selected for each resource status for a better overview.
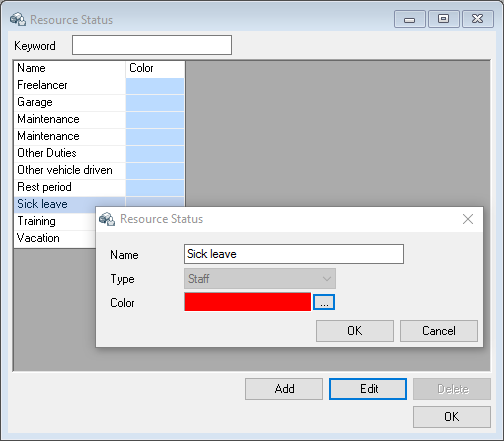
4. Ok
Assigning resource types to an address
In order for the resource planner to assign appropriate addresses, the resource types that would come into consideration are assigned in the address master data.

Assigning resource types to an address
1. easyjob Menu Master Data Addresses
2. Address
3. Edit
4. Resource tab
5. Add in the Resource Type area
6. Select resource type
7. Ok
In addition, you can save the costs of the individual rates for each staff member.
Defining the costs of a staff member
1. Select a resource type in the Resource Type area
2. Edit
3. Enter the costs in the list
Ok
Excluding staff from availability checks
By excluding a person from the availability check, you will no longer receive an overbooking warning.
Excluding addresses from availability
1. easyjob Menu Master Data Addresses
2. Edit
3. Resource tab
4. Check the Ignore availability check box
5. Ok
Vehicle Master Data
Vehicles are managed with the vehicle master data. By default, only current vehicles are displayed on the basis of inventory entry and inventory deletion . In this way you can enter a scheduled purchase or sale as well as rental periods. In the drop-down menu other filter settings can be selected and, for example, only have sub-rented vehicles displayed. You can indicate them in the vehicle master data as Rental Vehicles and you can also enter the supplier here (e.g. leasing). You can upload the associated documents on the Attachments tab.

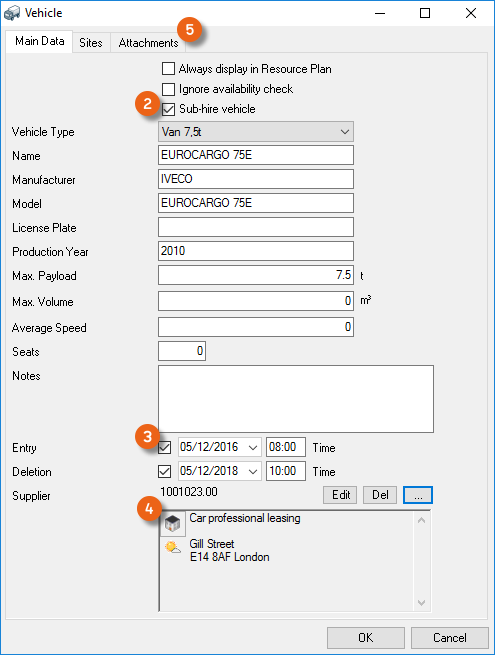
Managing vehicle master data
1. easyjob Menu Master Data Vehicles
2. Select a vehicle to Edit or create a new one with Add
3. Select the vehicle type and give the vehicle a name
4. Ok
Vehicle display options
You can define in the disply options, which information is shown for vehicle booking.
Customize vehicle display options
1. easyjob Menu Tools Settings Resources tab
2. Click Edit in the Vehicle display options

3. Add the desired display option via Drag&Drop to one of the three lines. Multiple variables (e.g. also a blank space) can be used on a line. The preview shows the result
4. To remove the display, mark the position and delete it
5. Close
easyjob must be restarted to activate the changes.
It is always possible to restore the Default Setting .
Excluding vehicles from an availability check
By excluding vehicles from the availability check, you will no longer receive an overbooking warning.
Excluding a vehicle from availability
1. easyjob Menu Master Data Vehicles
2. Vehicle Type and Edit
3. Check the Ignore availability check box
4. Ok
Resources in a Job (purchase order and workshop)
Resource planning takes place in two phases. In the first phase, the individual resource types that are necessary are booked in the job. After the order is confirmed, the individual staff members and vehicles are ordered in the second phase.
The resource type can be displayed with the hourly rate or as a full day entry by checking the Display Times box accordingly. The resources in a project can also be represented as a list . Appointments (CRM) can be displayed by checking the Show appointments box.
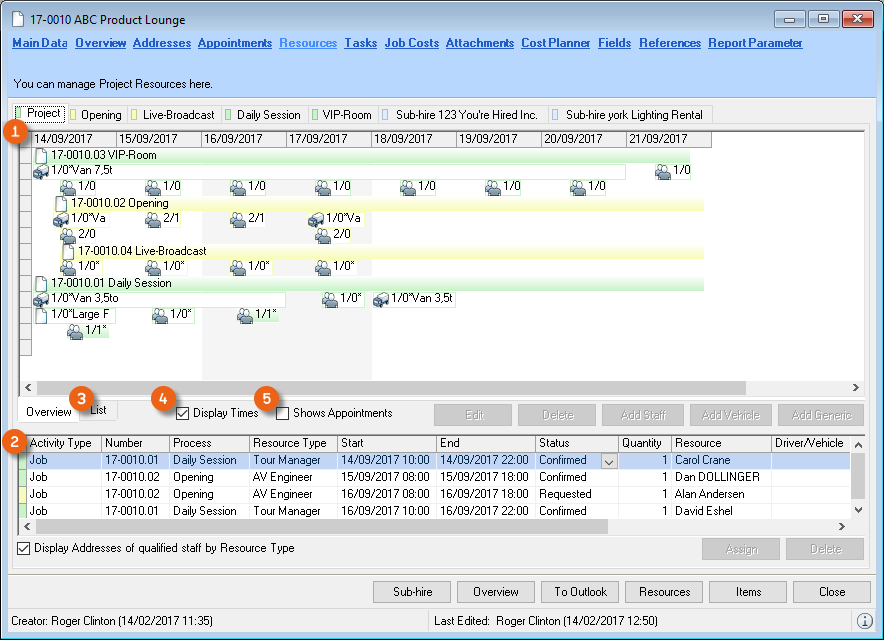
Booking a resource type in a job
You can add as many resources as you want for a job.
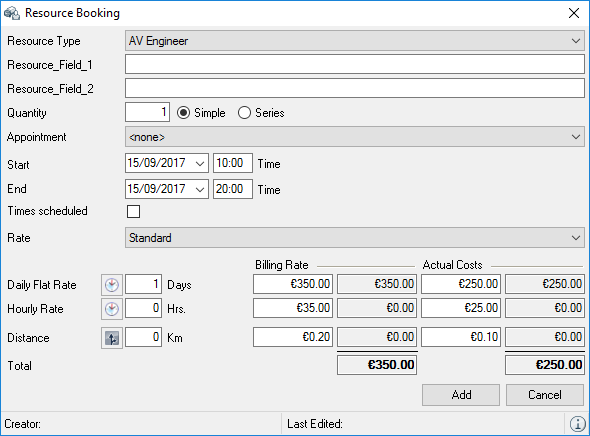
Inserting a new resource type in the job
1. easyjob Menu View Jobs
2. Job and Edit Resources tab
3. Add Staff or Add Vehicle
4. Select the Resource Type and the Rate
5. Customize the costs and actual costs
6. Add
If you need a resource every day at the same time for a longer period of time, you can create the resource as a series. In that case, a resource type with the start and end date is inserted for every day between the start and end date.
If you want to use the scheduled item planner from the job, you can assign the scheduled item to the resource.
Excluding an address from the availability check
By excluding an address from the availability check, you will no longer receive an overbooking warning.
Excluding addresses from availability
1. easyjob Menu Master Data Addresses
2. Address and Edit
3. Resource tab
4. Check the Ignore availability box
5. Ok
Assigning staff and vehicles
If the job is confirmed you can begin to assign staff and vehicles. Based on the colored background you can see if the quantity of necessary staff or vehicles has already been assigned and confirmed. If the necessary quantity has been assigned and confirmed, the resource is filled in.
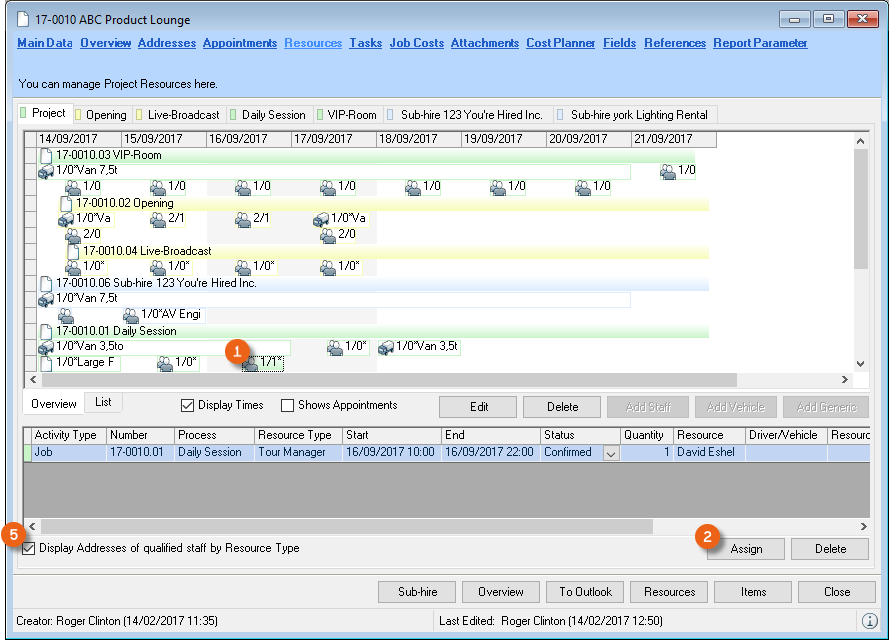
Assigning resource addresses
1. easyjob Menu View Jobs
2. Select the job and Edit
3. ! Resources
4. Resource Assign
5. Select the desired address Ok
The address book displays by default only the addresses for the selected resource based on the assigned resource types within the master data. To display all addresses from the address book, uncheck the Display Addresses of qualified staff by resource type box When assigning an address you can see if the person is already booked for another job or unavailable due to another reason .
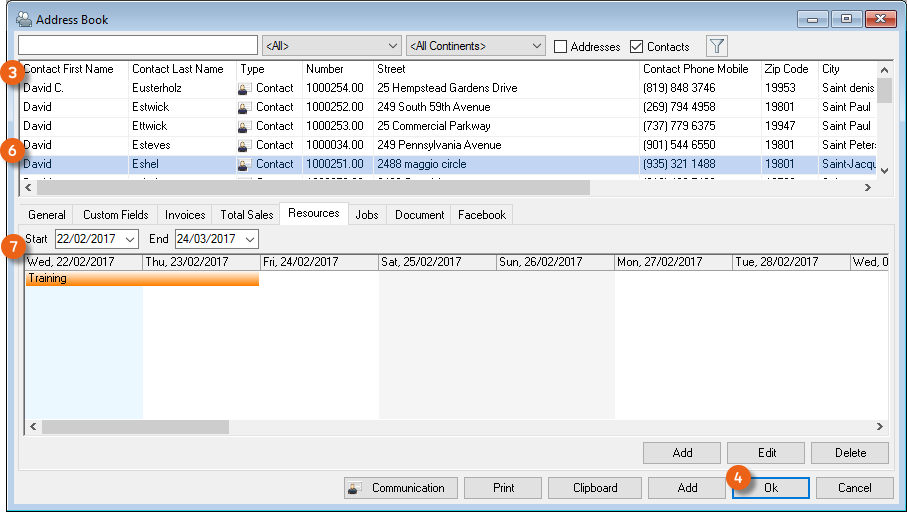
After assigning an address, the address will be given the status Preferred. You can change this in the status column . Once the necessary number of people are confirmed for a resource, the resource field will be filled in . You can also add actual costs , if they differs from the planned costs.
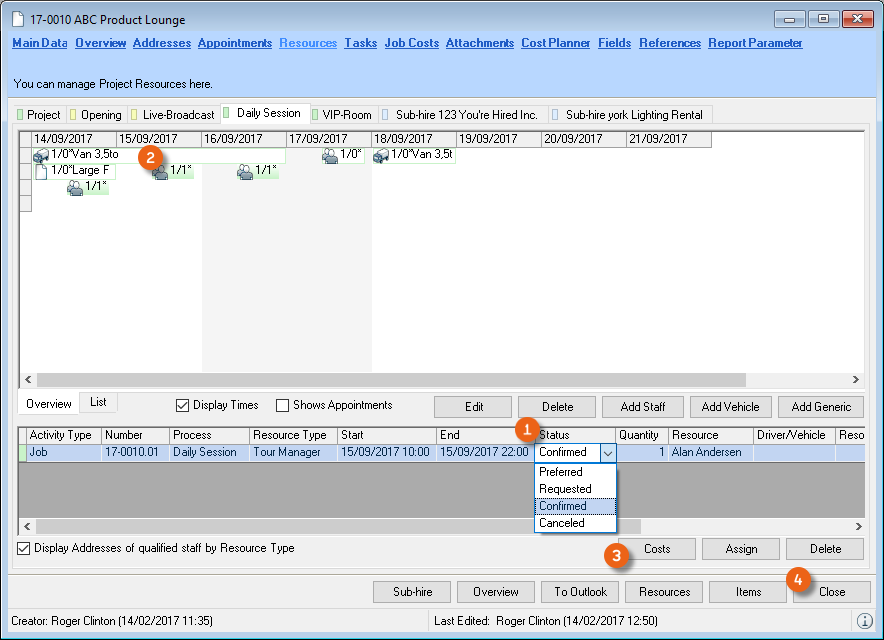
Log View
To obtain a better overview of resources (e.g. canceled sound engineer), use the detailed log view for resources.
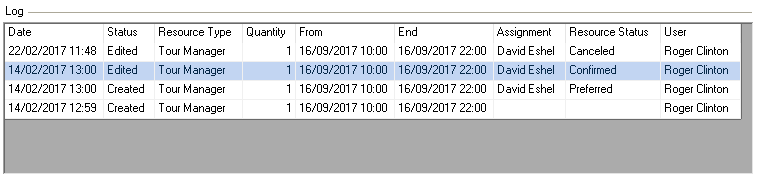
Open the detailed log view
1. Double click a resource type in the project overview
2. Information icon in the status bar of the resource window
Resource Plan
In addition to resource assignment in a job, you can also plan resources in the resource plan across all jobs.
The resource plan is used to provide you with the information that you currently require and can be customized based on your needs.
In the preset standard view you will have displayed – based on the filter settings of the global filter – for example the resource booking , resource assignments (staff) and resource assignments (vehicle) areas. The per area filter settings represent the set filter for the area in the active view . The filter display is updated by clicking the respective area. In addition you will find detailed information about the element you are currently editing.

Start the resource plan
1. easyjob Menu View Resource Plan
Advanced operating concept for the Resource Plan: the column widths can be changed with STRG + mouse wheel It is possible to zoom in/out using the key combination STRG + SHIFT + mouse wheel.
Booking staff or vehicles
Booking a vehicle is basically identical to booking staff. For this reason only booking staff is described below in more detail.
Booking staff based on the resource type
1. easyjob Menu View Resource Plan
2. Standard workspace
3. Enter the time frame for which you want to book a resource
4. Resource Booking area
5. a line item for assignment
6. The resource assignment area will only display staff members who fit the selected resource type .
7. Drag&Drop the resource type to the staff member or the staff member to the resource type.
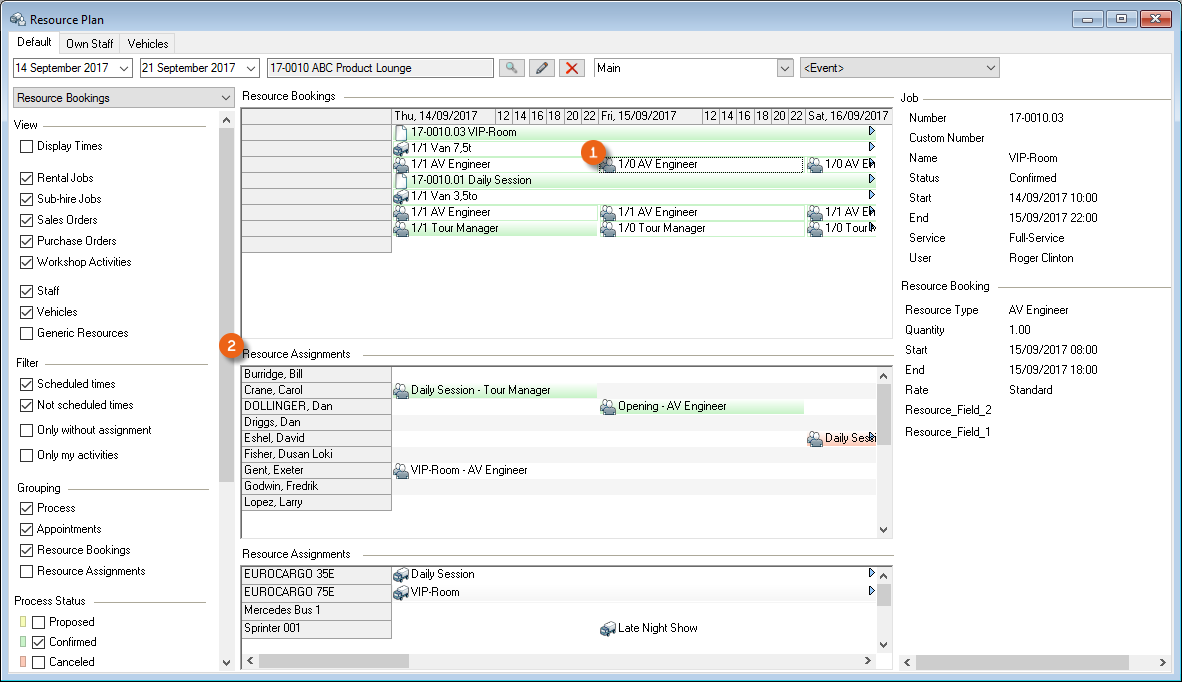
In order to assign a resource to multiple workshop activities faster, it is now possible with multi-select to select multiple entries at the same time.
Individual workspace per user
Each user can create an individual workspace. This makes it possible, for example, to distinguish the staff overview for all projects from a large project.
As is the case for the bill of items, various options are available for setting up the workspace. The layout and filter settings are stored for each user per workspace.
Customizing or newly creating the resource plan for the individual workspace
1. easyjob Menu View Resource Plan
2. right click Standard
3. Settings or New workspace Standard template
4. Give an individual name to your workspace
5. Customize the settings as you wish
6. Position added areas if needed
7. Check or uncheck the box for automatically saving your settings
8. Close
You can change the names for the resource booking, resource booking list, resource assignment and resource assignment list areas. This makes it possible to create the resource assignment are four times in a new workspace (e.g. overall view ) and give the areas different names (e.g. staff assignments , own vehicles , sub-rental vehicles and generic resources ). It will then be possible to select the resource assignment areas you created and by checking or unchecking the box, customize them to suit your needs.
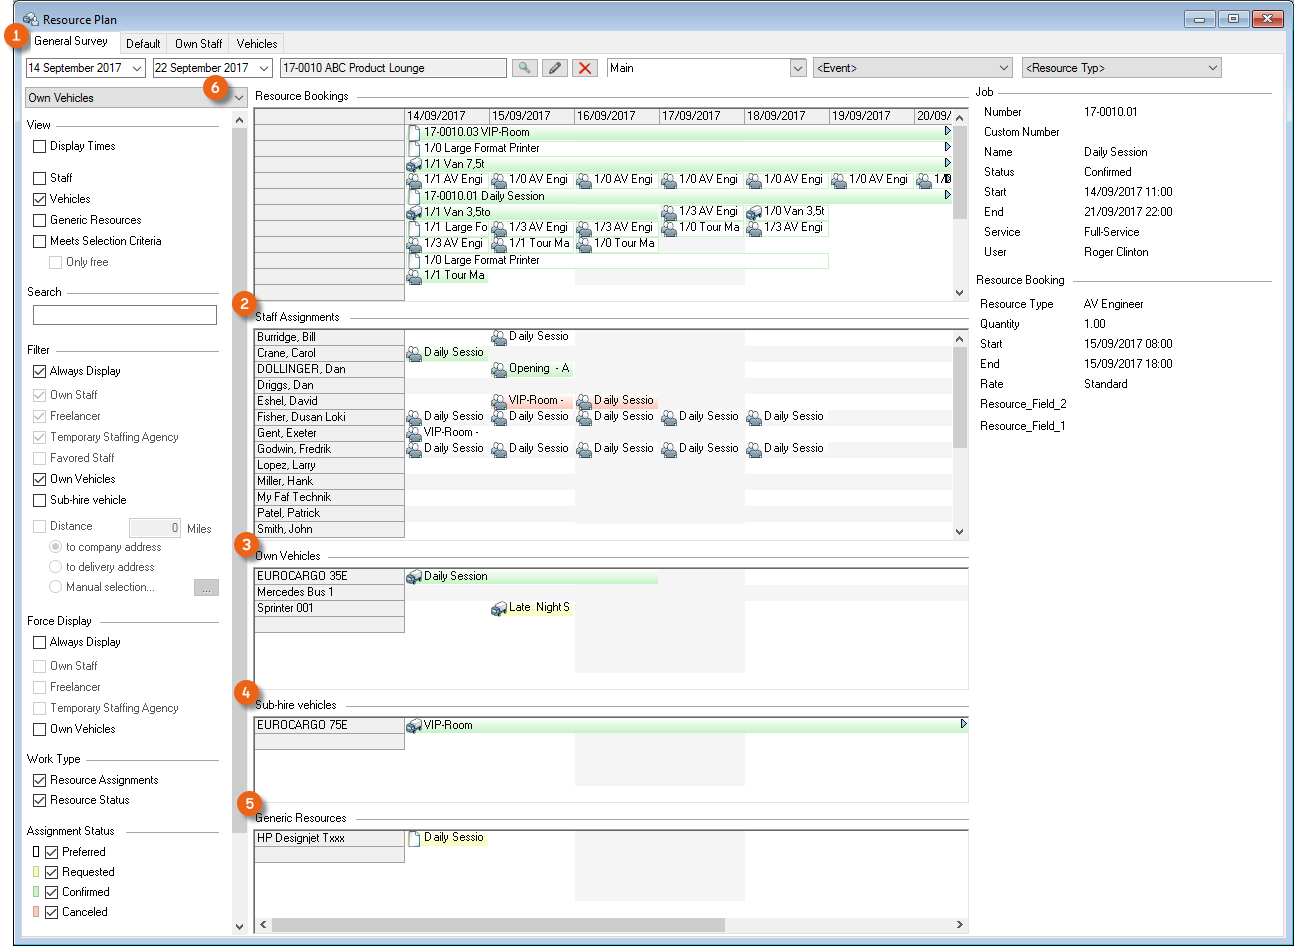
The Resource Information , Address Rates , Totals , Filter areas and the respective resource booking Log can be displayed and filtered if necessary and individually positioned.
In the manual also see chapter Customizing the bill of items to requirements.
Global filter and per area filter
There is a global filter to , as well as a per area filter .
The global filter to makes it possible to filter according to:
- Time frame
- Reference
- Site (multi-site)
- Event
The event filter makes it possible to more efficiently make staff arrangements for multiple projects of an event.
- Resource Type
The resource type filter filters all displayed data according to a resource type. This makes the view clearer when you want to schedule a specific resource type.
The per part filter settings are stored individually for each area and in every workspace. You can select if the Active View or a certain filter setting of another area should be permanently displayed.
Additional Settings
View, filter, grouping and forcing settings provide a wide range of possible uses. There are various settings for the resource booking, staff assignments and resource information activities.
Resource Booking
View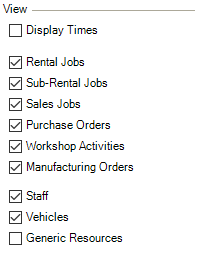 | Settings can be made in the View area regarding what type of information should be displayed and if the data in the area should be filtered in other areas based on the selection. Here it is possible to display only Sales Orders, Purchase Orders and/or Workshop Activities. |
|---|---|
Filter | The filter settings define which data should be filtered. When booking a resource in a job (by checking the Scheduled times box), you define if the entered times are provisional or if they are already final. You can also display the resources with this property here. By checking the Only my activities box, only the workshop activities are displayed for which the current user is the Job Manager. |
Grouping | Grouping defines on which level the data should be displayed together. |
Process Status | In general, filter only confirmed jobs, as staff is not scheduled for proposed or canceled projects. |
Assignment Status  | To check which resources you have requested but that are not confirmed, you can filter the view by resource status. |
Advanced display options  | See Advanced display options. |
Resource Assignments
View | Settings are carried out in the View area regarding what type of information should be displayed and if the data in the area should be filtered in other areas based on the selection. If you check the Meets selection criteria box, you will only see staff that meet the criteria for the selected resource type. By checking the Only display available box, the display will be limited to staff members who are available at the corresponding point in time. |
|---|---|
Filter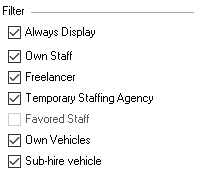 | The filter settings define which data should be filtered. With the boxes Always Display, Own staff, Freelancers and Temporary Staffing Agencies, you can also display the corresponding staff types. |
Distance filter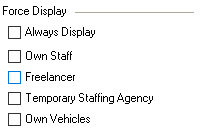 | The distance filter can be used to search for optimal staff in the area of the company address, the delivery address/venue or a manually selected address. In the program settings, activate the Geolocation area:7. easyjob Menu Tools Settings 8. Integration9. Click the Use Geo-Coordinates boxThe distance is calculated as a linear distance. |
Forcing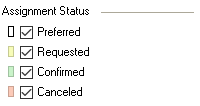 | The settings in Forcing define that staff/vehicles are also displayed even though the filter settings would filter out the data. |
Job Description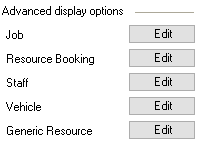 | Here you can completely hide the Resource Assignments in the area. With Resource Status you can also see absences assigned to a person, such as vacation, sick days, etc. Appointment/task type CRM activities can be displayed for staff. |
Assignment Status  | To check which resources you have requested but that are not confirmed, you can filter the view by resource status. |
Advanced display options  | See Advanced display options. |
Resource Information
View 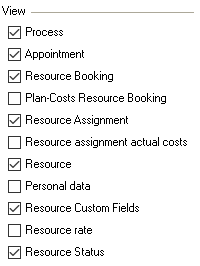 | Here you can select the content to be displayed in the Resource Information area. |
|---|
Advanced display options
The content of the lines can be set individually per area This makes it possible to display the project in the case of a detailed staff view of staff and to display the resource type for a view of a selected project.
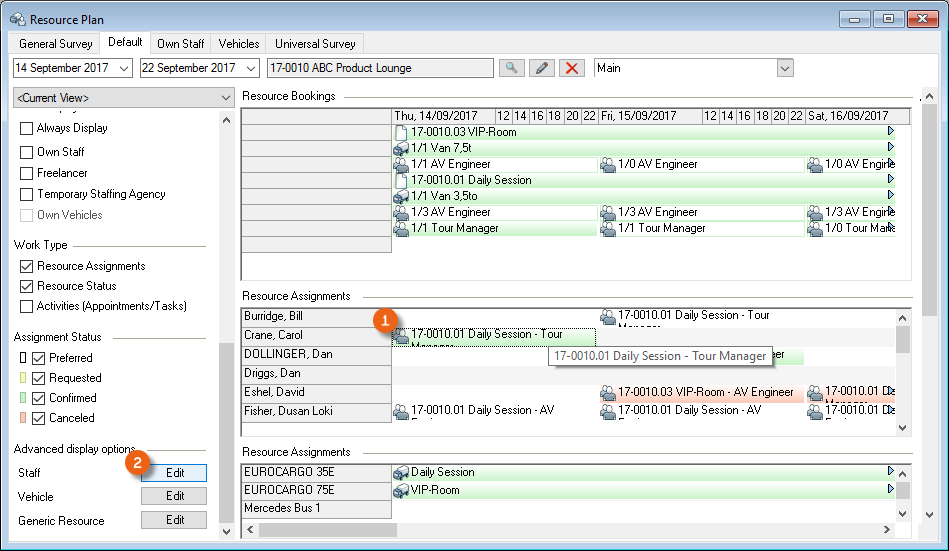
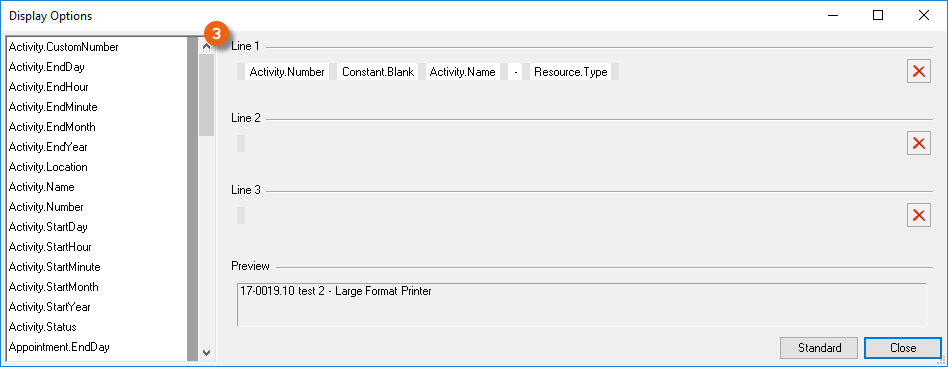
If the content does not fit in the cell, a pop-up window appears when moving the mouse over the cell to display the complete content of the first line. wi:7095
Document Output
Reports are displayed in easyjob on the basis of templates. Reports can include proposals, packing lists, delivery notes and invoices. During the easyjob installation, various sample templates will be created in the individual program modules.
These documents can be printed or saved in various electronic formats, including .pdf.
When an offer should be issued from a project, a print job is created.
In the easyjob print menu, the individual reports are grouped into seven areas - job/project, resources, master data, invoicing, sales orders, purchase orders and workshop.
Selecting the report from the menu
1. easyjob Menu Reports
2. Area
3. Template
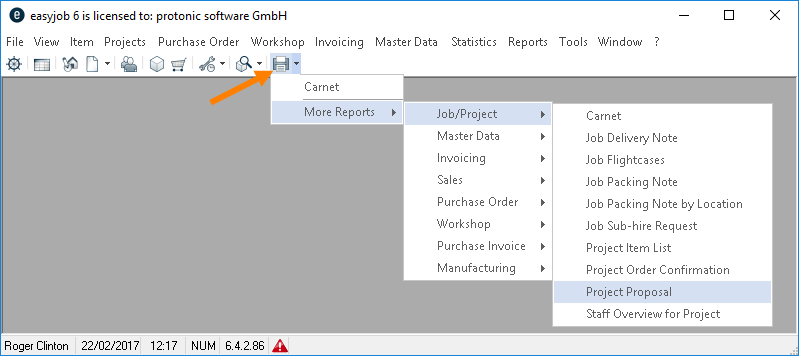
Selecting the report from the toolbar
1. easyjob Menu Reports Toolbar
2. Area
3. Template
When selecting from the toolbar, easyjob automatically recognizes the currently open workshop activity. You do not need to select the desired dataset. When the offer is output, the open project is used.
The report parameter dialogue will appear after selecting the desired template.
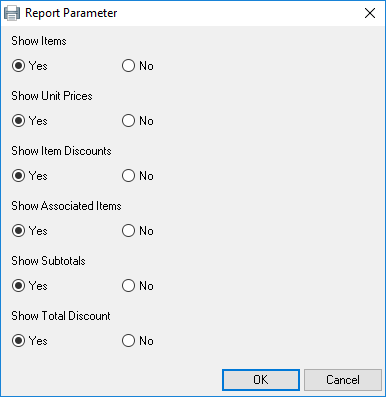
The print dialogue will ask for additional parameters.
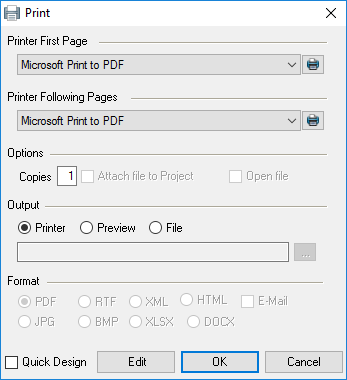
The desired output medium is determined here.
If for example the first side of the printout should be on letterhead with the company logo and the following sides should be on white paper, various printers can be selected.
Open the output file directly with Open file.
You can also output to a printer or use it in an electronic document. The electronic document can also be attached to an email. easyjob uses the computer's standard email application.
The document can also be saved by attaching it as a reference to a project.
Attachment Management
In every easyjob process with Attachments tab, you can record and call up attachments from external windows programs. Attachments can be CAD drawings, Excel tables, images or PDF documents. The corresponding application must be installed in the computer to open the document. In order to keep the database as small as possible for quicker database queries, a reference to the file is saved for the attachment.
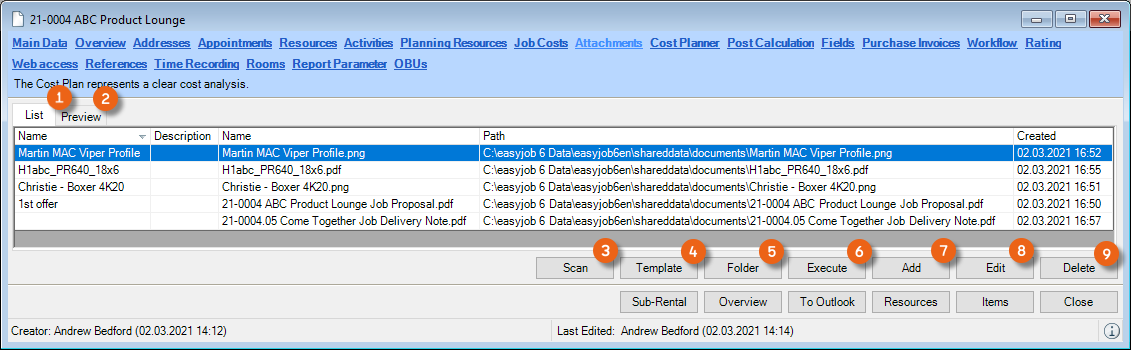
All assigned data references are displayed in the list . If a preview is possible, it will be displayed. With the Scan option, you can scan attachments directly to the process. Also Templates (e. g. checklists) can be attached to projects. With Folder you'll open the file path of the attachments. An existing attachment can be opened by double clicking on it or by clicking on Execute . With Add you choose, if the file should be moved/copied to the designated folder, or if the file be kept in the source folder . Edit can change the name or add an description. Attachments can also be deleted . With the help of Properties you can open the Windows file properties and edit them.
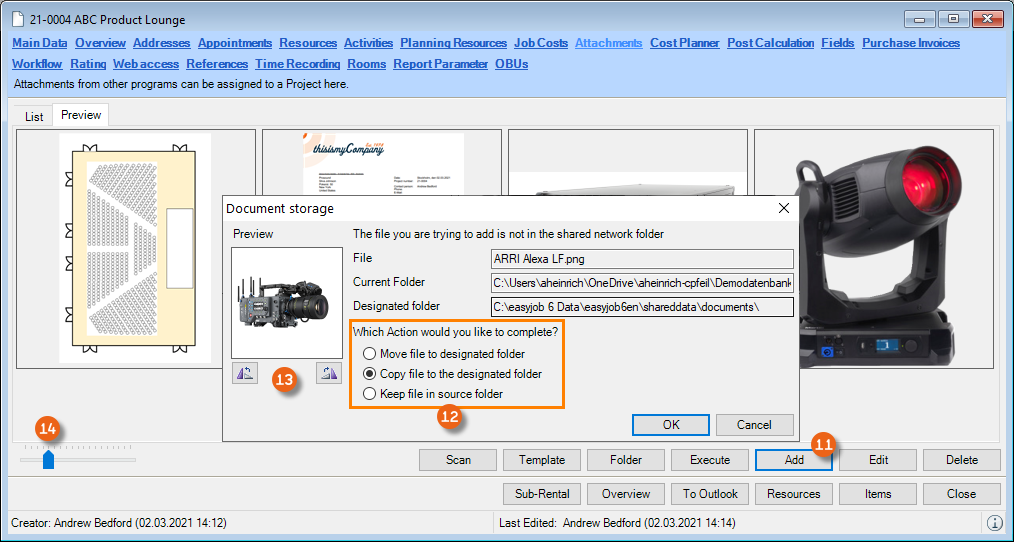
When adding you can rotate the inserted image . You can scale the image as necessary in the preview .
easyjob uses the standard Windows functions to preview an attachment. Therefore it depends on the installed applications which files can be previewed.
Adding an attachment
1. easyjob Menu Projects/Purchase Order/Workshop/Master Data Items/etc.
2. Edit process
3. Select the process
4. Ok
5. Attachments
6. Add
7. Select the attachment
8. Open
Adding an attachment to a process from the print dialog
1. easyjob Menu Projects/Purchase Order/Workshop/Master Data Items/etc.
2. Edit process
3. Select the process
4. Ok
5. Print
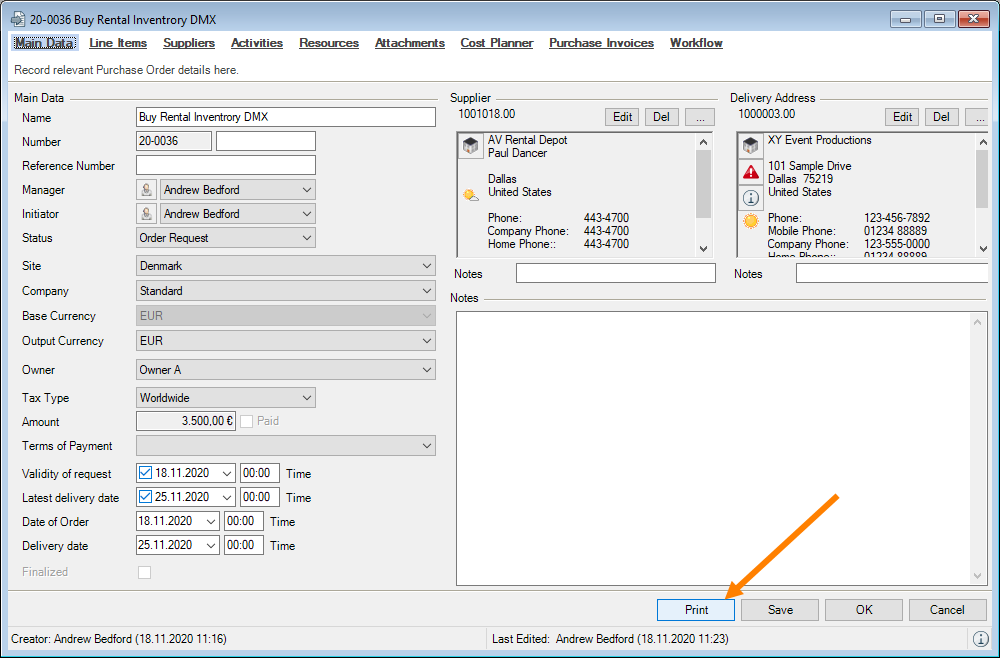
6. Output File
7. Check the Attach file to Project box
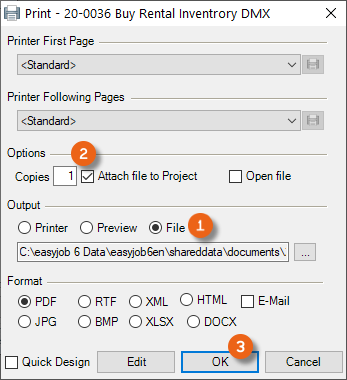
8. Ok
Document type
You can define an additional property for your attachments, the Document type . This defines the document type (e.e. manual, item image, purchase invoice, invoice, etc. ) of the current document. You can also classify the type of document in the master data as confidential. In this way, you can select in many easyjob areas if this document should be displayed or used there (in the case of confidential documents, only for users who have the right View confidential). You can also define here if the document should be Printable .
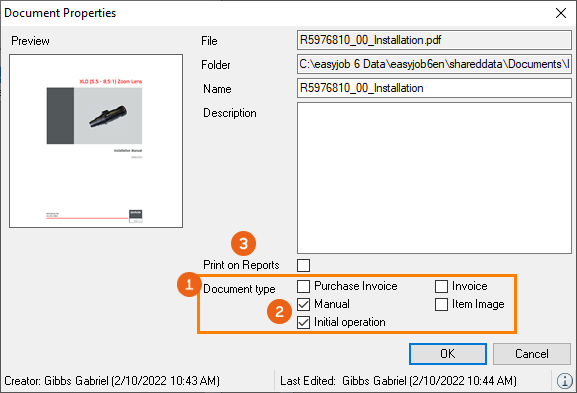
You can manage the document type in the easyjob master data. You can use an available document type or add a new one.
Adding a document type
1. easyjob Menu Master Data
2. Document type
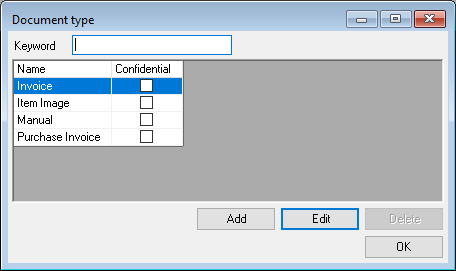
3. Add
4. Enter the desired name
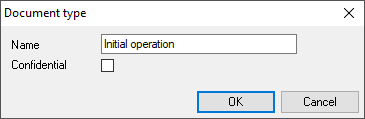
5. Ok
Statistics
The easyjob statistic functions are based on the easyjob Business Information Center. You can find a detailed manual at easyjob Business Information Center manual.