easyjob Barcoding
Documentation
Identifying and tracking items with barcodes
In order to meet a wide range of requirements, we have implemented three different options in easyjob for processing barcodes. You can find an overview of the three barcode processing options below.
Barcode terminals with the easyjob Scanner App
With the easyjob Scanner App you can use the scanner functionality for almost any end device with a camera (at least Android 6.0). Processional barcode terminals also work with the app and have a display and keyboard entry. Functions such as availability check, inventory, entering material that requires repair, assignment of serial numbers and checking jobs in and out are available. The barcodes and packing lists, as well as the digital signature on the display, can be printed out via the Scanner App. You can find more details in the easyjob Scanner App manual . The user receives a confirmation immediately after a barcode is processed.
Offline processing with the batch scanner
With a batch scanner, all scanned barcodes are stored on the device. The device does not have any additional intelligence. A signal tone will signal that the barcode was correctly processed. After all barcodes have been scanned, the barcodes are read and processed using the easyjob batch mode. Any existing conflicts are identified and must be resolved.
Manual scanner via the easyjob user interface
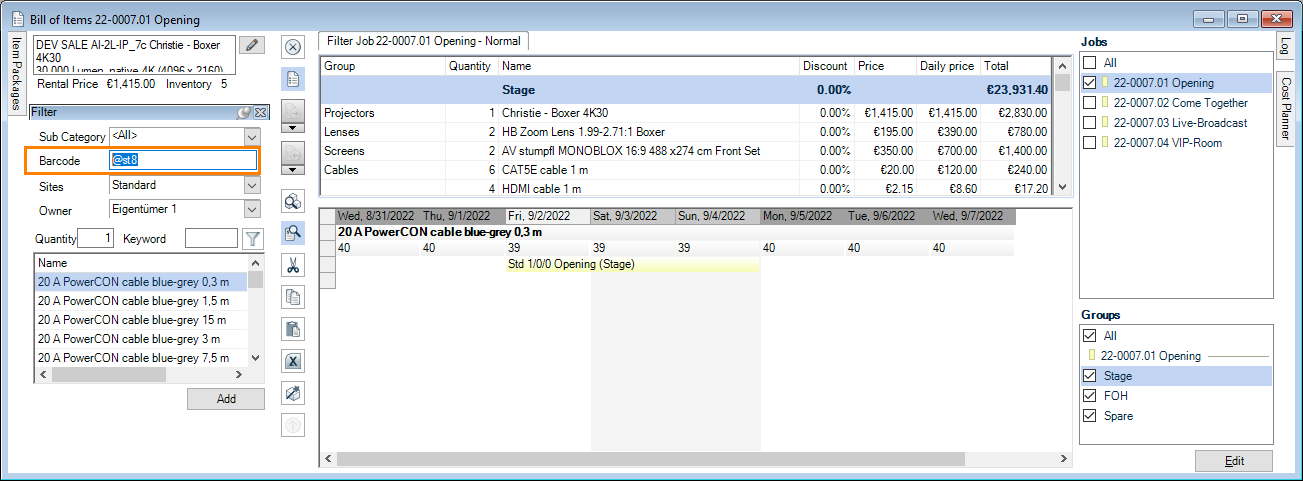
Barcodes can be processed in the easyjob Bill of Items using the barcode field. This requires the use of the barcode scanner, which emulates the entry of the information via a keyboard. We recommend this option only if necessary as visual contact with the computer is necessary in order to react to possible conflict messages.
Variants of barcode processing, comparison view
| easyjob Scanner App | Batch scanner | easyjob User Interface | |
|---|---|---|---|
| Real time capability | Yes | No (only offline) | Yes |
| Speed of the scanning process | Fast | Fast | Fast |
| Working comfort in the warehouse | Very good, as there is direct feedback and management of easyjob processes in the app - a computer is no longer necessary | Advantageous for users who are not familiar with easyjob, as decisions only have to be made after the data is imported in the software. | Limited as a computer is necessary |
| Entering the quantity | Via numerical import in the device and Numbers for barcodes. | Enter the quantity by scanning special barcodes. See also Numbers for barcodes. | Manually on the computer and entering of the quantity by scanning the special barcodes. See also Numbers for barcodes. |
| Information feedback | In real time on the display. | Generally no. Conflicts are first shown when reading out the memory. | Via dialogue in the easyjob software on the computer. |
| Conflict potential | Very little | High | Very little |
| Parallel work on the same and different workshop activities | A barcode terminal with the easyjob Scanner App is required for each user | A batch scanner is required for each user | A computer is required for each user |
| Supported hardware | See the list in the manual Supported barcode terminals. | Scanner with batch mode (e.g. Zebra CS3000). | All barcode scanners that emulate keyboard entry |
| Supported barcodes | 1D/2D depending on the scanner hardware | Usually 1D. | 1D/2D depending on the scanner hardware |
| License | Each scanner requires an easyjob Mobile Scanner license | One-time easyjob batchLoad license | Included in the basic module |
| Installation | easyjob Mobile Scanner App | Installation is not necessary | Installation is not necessary |
| Installation effort | Somewhat higher (download Scanner App, assign the device scanner license and configure easyjob services) | Little | Little |
| Connection to easyjob | Access to easyjob services | USB | USB |
Individual devices and bulk items
The type of barcode determines if an object is processed as an individual device or a bulk item. Devices and item barcodes can be printed in the item master data. A device barcode identifies the respective device. An item barcode is used when an item is issued as a bulk item. The respective quantity can be selected on the Scanner App before scanning. See also Numbers for barcodes.
1D or 2D barcodes
Barcode format
1D barcodes are generated by default in format code 128. The value behind the barcode is generated by easyjob. Barcodes can be generated for items, devices, projects, jobs, addresses and users. Each dataset number is generated in a special syntax (e.g. @x112) so easyjob can quickly select the data sets. See also Barcode processing.
Unique Company Identifier (UCI)
When creating the easyjob customer number (licensing), the Unique Company Identifier (UCI) is automatically assigned. It is set before the @symbol when creating the barcode (e.g. PS@st19331) and is therefore unique and unambiguously identifiable worldwide Its uses include, e.g., data exchange (delivery notes, etc.) between companies that use easyjob. The Prefix is hidden when scanning barcodes with the easyjob Scanner App. The Unique Company Identifier is created automatically when creating the barcode from the easyjob barcde report template.
Barcode printing
The thermotransfer printers provide the best price/performance ratio. A transfer ribbon (carbon ribbon) transfers the information in black onto the label. The labels are generated directly in easyjob using the List&Label Designer. The appearance and respective information can be individually customized using the report designer. The label material is very robust and difficult to remove. Due to the enormous amount of stress placed on the equipment in the industry, it is also possible for the label material to be affected and require replacement.
RFID
In general, integrating an RFID portal is possible. It is not included standard in easyjob. If you are interested in its integration, we are happy to check if and for what cost a connection with easyjob is possible.
easyjob Scanner App
The easyjob Scanner App is a completely new developed barcode scanner software for easyjob. The Scanner App is technically based on HTML and App frameworks for Windows, Android and iOS.
With the easyjob Scanner App, you can easily use the scanner functionality on any of your end devices. For example, you can easily check availability, identify material that requires repair and check jobs in or out directly in the app. Everything you do in the easyjob Scanner App is processed in real-time. The bi-directional capability enables you to work freely without contact with the base station.
For normal warehouse operation, we recommend the further use of the professional terminals from Zebra and Honeywell.
Functions no longer available
Due to the completely new architecture, the following functions have been omitted:
- Offline mode
- Windows Mobile support
Further use of the previous barcode terminal
Error corrections for the previous Window Mobile Scanner will be continued for easyjob 6. New functions will no longer be implemented. Support will be discontinued in the next new main version.
The easyjob Scanner App can only be installed on Android and iOS devices or on Windows computers. Due to the old platform, Windows Mobile can no longer be used. There are Windows Mobile devices that can be updated on Android for a license fee. This includes the Intermec/Honeywell CN 51 device that has been recommended by protonic software for many years
Hardware recommendation
For worry-free use in the warehouse, we still recommend a robust hardware version (e.g. barcode terminals from Zebra and Honeywell). A professional scanner guarantees faster processing in comparison to the camera of a handheld device.
Supported barcode terminals
In addition to phones, we support various barcode terminals manufactured by Zebra and Honeywell. As there are many devices, we could not test the App with all the devices.
For Android, at least version 6.0 is required.
The following list is based on the compatibility information that the manufacturers provided to us with the development tools, and therefore there is no guarantee. The models on which we can also test the functionality are marked with an X.
Scanning with the camera
All cell phones with Android version 6.0 or higher.
Intent Action Framework
Some scanners support the Intent action function, e.g. Honeywell CK65 or Honeywell CT60. See also Various options for barcode processing.
| Illustration | Manufacturer | Name/link | tested |
|---|---|---|---|
 | Honeywell International Inc | Dolphin CT60 Android 7.1.1 | |
 | Honeywell International Inc | Dolphin CN80 Android 7.1.1 | |
 | Honeywell International Inc | CN51 Android 6.0 | X |
 | Honeywell International Inc | CK75, CN75 and CN75e Android 6.0 | |
 | Honeywell International Inc | EDA50, EDA50K, EDA70 Android 7.1.1 | |
 | Zebra Technologies Corp. | MC3300 | |
 | Zebra Technologies Corp. | TC70 | |
 | Zebra Technologies Corp. | TC 72 | |
 | Zebra Technologies Corp. | TC 21 | X |
Additional models of supported barcode terminals
| Manufacturer | Name | tested |
|---|---|---|
| Honeywell International Inc | Dolphin CT50 Android 4.4 and Android 6.0Dolphin CT40 Android 7.1.1Dolphin CT60 Android 7.1.1Dolphin CN80 Android 7.1.1Dolphin 75e Android 4.4 and Android 6.0CN51 Android 6.0CK75, CN75 and CN75e Android 6.0EDA50, EDA50K, EDA70 Android 7.1.1EDA51 Android 8.1.0 | XX |
| Zebra Technologies Corp. | ET5X – Android MarshmallowMC33 – Android Nougat, OreoPS20 – Android OreoTC20 – Android NougatTC21 – Android 11TC25 - Android NougatTC26 – Android 11TC51 - Android Marshmallow, Nougat, OreoTC52 - Android OreoTC56 - Android Marshmallow, Nougat, OreoTC57 - Android OreoTC70x - Android Marshmallow, Nougat, OreoTC72 - Android OreoTC75x - Android Marshmallow, Nougat, OreoTC77 - Android OreoVC80x - Android Nougat, OreoWT6000 - Android Nougat | XXXX |
| DS6878-DLDS6878-SR Cordless Bluetooth 2D ImagerDS8178-SRDS2278-SRDS3608-DP DS3678-DP Ultra Rugged ScannersDS3608-ER DS3678-ER Ultra Rugged ScannersDS3608-HP DS3678-HP Ultra Rugged ScannersDS3608-HD DS3678-HD Ultra Rugged ScannersDS457 SeriesDS4800 SeriesLI2208LI3608-ERLI3608-SRLI3678-ERLI3678-SR |
As of 2022/there may already be successor models
Licensing
No license is required for simulation as a scanner or tablet for testing and training purposes. For use as an App (Android, iOS or Windows), a license is required for each device.
The easyjob Scanner App license is identical to the easyjob Mobile Scanner license. Both can be assigned to supported scanner end devices.
Installation and configuration
No content for this section.
Configuring easyjob services
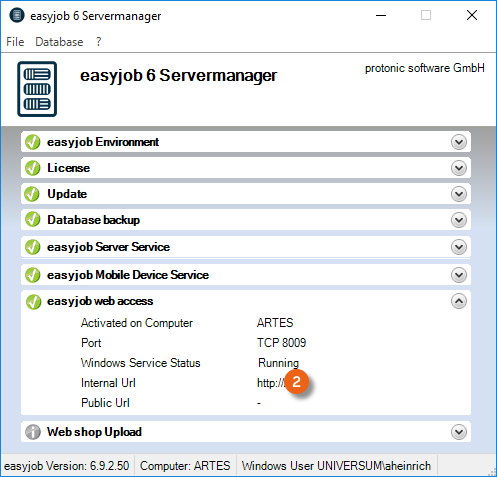
To be able to use the easyjob Scanner App, the easyjob Mobile device, easyjob web access and easyjob print server services must first be activated and configured, if this has not already been done. Details can be found in Installation and Configuration manual.
Configure the Windows Firewall
Learn how to configure a Windows firewall here Configure Windows the Firewall.
Configuring a non-Windows firewall
We have compiled support for the configuration of a non-Windows firewall here for you Configure a non-Windows firewall.
easyjob program settings
In the easyjob program settings, you have an overview of all scanners and can make further settings for your devices.
1. easyjob Menu Tools Settings
2. Mobile Scanner
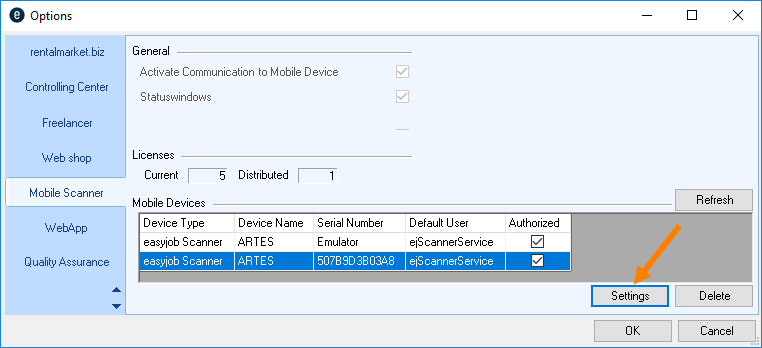
With the local easyjob settings activate communication between easyjob and your mobile devices . You can display the scanner status of your devices also upon program start . Administrator rights are required to activate these settings. See also Controlling mobile devices with easyjob. The overview shows how many licenses your have and how many of them are actually being used. Details can be found in Assigning the license .
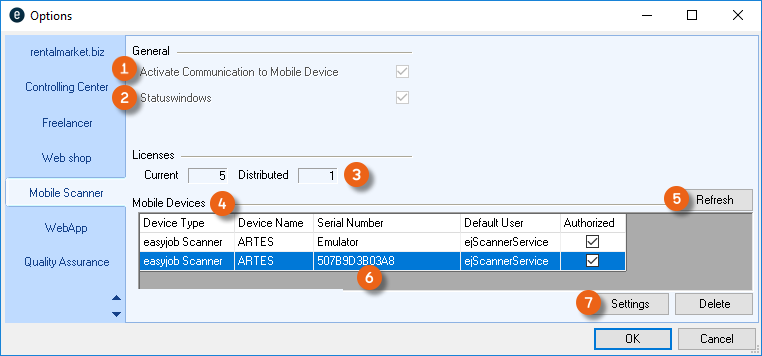
All available scanners are listed in the scanner overview . You can refresh this view when, for example, you have just set up a new scanner. The serial number is the character string generated by the respective operating system in the new easyjob Scanner App. You can make additional Settings for the selected scanner. See Settings for mobile devices.
With the previous Windows Mobile scanners, the actual serial number was transmitted, but with Android and iOS that is no longer possible. If you delete the easyjob Scanner App from your end device, for example, and then reinstall it, it will be considered a new device in easyjob, because the App generates a different serial number.
Settings for mobile devices
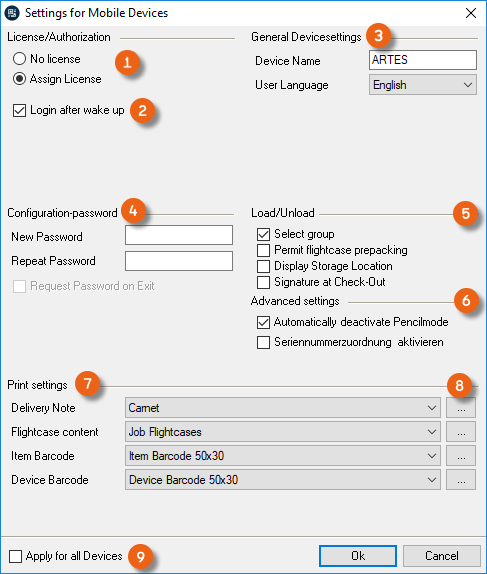
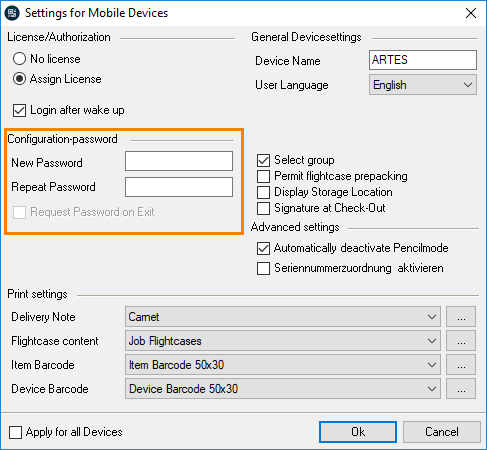
Here you can manage your individual settings for each scanner. You can assign a license to the respective device and define the login after wake-up . In the general device settings you can see the device names and can adapt the location of the scanner. You can protect the configuration with a password. See also Configuration password. .Presettings are possible for loading/unloading , pencil mode and serial number assignment . Furthermore, you can make a selection from various reports and their printer settings . To avoid having to configure every new device, you can apply settings to all devices .
Assigning the license
The devices are licensed separately.
Assigning a license to a device
1. easyjob Menu Tools Settings
2. Mobile Scanner
3. Select the desired device
4. Settings
5. Select Assign license
6. Ok
The device will be licensed the next time the easyjob Scanner App is started
Configuration password
Access to the easyjob Scanner App configuration is limited by a configuration password. With this setting, access in the easyjob Scanner App to Extras – Options is password protected.
You can manage the configuration password in the program settings.
1. easyjob Menu Tools Settings
2. Mobile Scanner
3. Settings
4. Enter a password
5. Ok
easyjob must be restarted to activate the settings.
Download the easyjob Scanner App
The Android and the iOS Apps are available for installation in the respective App Stores (e.g. Google Play Store or Apple Store). On the Windows operating system, the App is installed on the local computer via an easyjob update. The functionality is available from easyjob Update 6.9.2.46.
The name of the app is easyjob Scanner.

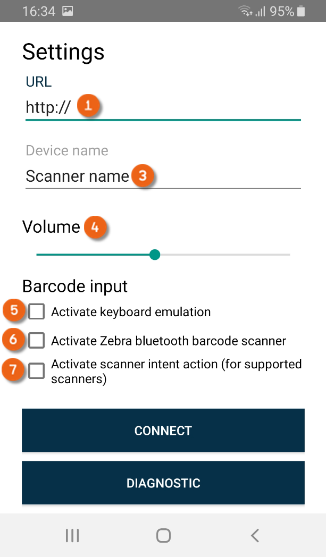
After downloading it, you will be requested to enter the URL from the server manager of the easyjob web access service .. See also Configuring easyjob services. Furthermore, a device name is automatically assigned, which can be changed if necessary. For some devices, you can customize the volume of the scanner's confirmation beep. The settings for the barcode input are explained in more detail in Various options for barcode processing.
Opening the easyjob Scanner App via the Windows operating system

If your scanner does not have Google Play Services installed, you can receive an installation file (APK file) from the easyjob web access service (available from easyjob Version 6.10.2.64 and higher).
Access it with your scanner using the URL http://Servername:Port/scan/. You can download the APK file from the website of the web access service. Click the downloaded installation file to install the easyjob Scanner App. Please note that it may be necessary to activate the option for installing from unknown sources in the security settings of your scanner.
Various options for barcode processing
No content for this section.
Automatic
If you use a Honeywell or Zebra scanner (see the list of supported barcode terminals) or a Cognex MX-1000/MX-1502 scanner, then the easyjob Scanner App automatically communicates with the respective Scanner Engine. No further settings are necessary in the easyjob Scanner App.
Keyboard emulation
If this Option is activated, the easyjob Scanner App evaluates all keyboard inputs after start and as soon as the characters @ or $ are read. All subsequent inputs are seen as barcode inputs, until the barcode input is ended with the Enter command (CR LF = Carriage Return Line Feed). Your scanner must be set up properly so that it can output the scanned barcode as a keyboard entry.
•If your barcode cannot start with the @ character, it may be possible in the scanner (see the instructions for your scanner) to select a so-called prefix character. Select $ (dollar sign) as the prefix.
Zebra Bluetooth barcode scanner - Android only
If you use the app on a tablet or a handheld device and also want to use a wireless scanner via Bluetooth (currently, only Zebra and Android devices are supported), please first install the corresponding app provided by Zebra. Afterwards, start installing the easyjob Scanner App and check the box for activate Zebra-Bluetooth Barcode-Scanner . The easyjob Scanner App will attempt to connect with the wireless scanner manufactured by Zebra via Bluetooth. As there are many devices, we could not test the App with all the devices.
Intent action - Android only - (easyjob Version from 6.12.2.19 and Android easyjob Scanner App from 6.0.9)
If you scanner is able to send a so-called Intent action, then activate the Option Activate intent action .
Afterwards, perform the following actions in the App's settings window
1. Copy (copy the displayed character string to the cache)
2. Connect
3. Close the App
Open the scanner settings (usually under Android settings) for the device. The scanner engine can be activated here. At this point you can also make other scanner settings, such as the barcode types. The character string copied before to the cache must be entered in the Intent action field (the name may vary).
4. Open the easyjob Scanner App
5. Log in with your user name and password
6. Dashboard
7. Scan any barcode (e.g. easyjob Item Barcode)
The scanner is ready to be used when the barcode can be processed without an error message.
User rights and Login
The mobile access right is assigned in the easyjob user settings.
Assigning rights
1. easyjob Menu Tools Manage Users
2. Select a user Edit
3. Rights
4. WebApp
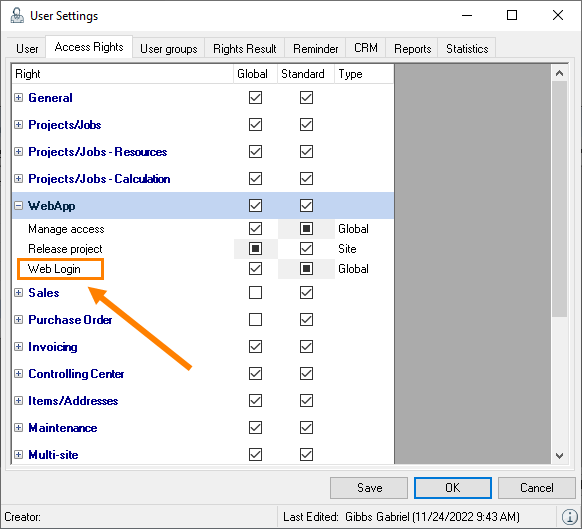
5. Check the box for Web Login
6. Save
7. Ok
User login
After starting the easyjob Scanner App, you will be asked for your user name and password. The are the same as the ones you use in easyjob.
You can change the user at any time.
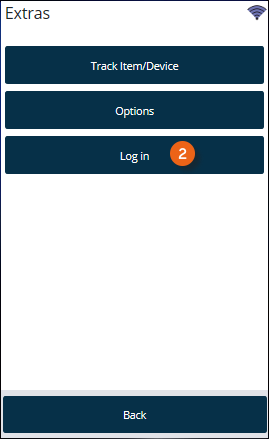
Changing the user
1. easyjob Scanner App start screen
2. Extras
3. Log in
4. Enter the new user name and password
5. Log in
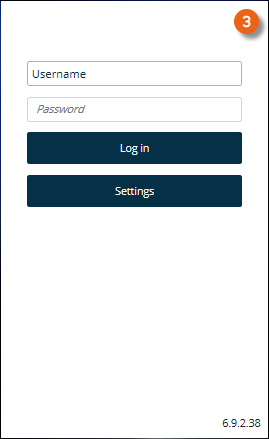
Scanner App Simulator
In test mode, you can extensively simulate all functions of the easyjob Scanner App without a license. To do so, start the Barcode scanner application from the easyjob program directory.
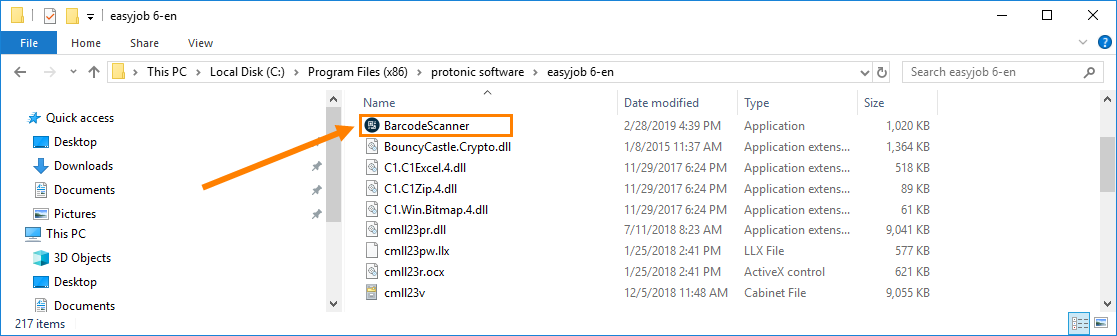
Create the corresponding link on your desktop.

For test mode, at least easyjob® Version 6.9 is necessary. Keep in mind that the simulation turns off automatically after 15 minutes.
Simulator Settings
In the simulation, you can select between the scanner and tablet views , enter any existing barcode (e.g. @si3318) , test the functions in the menu or directly select the reference type and then the suitable process in easyjob by clicking the implemented button .
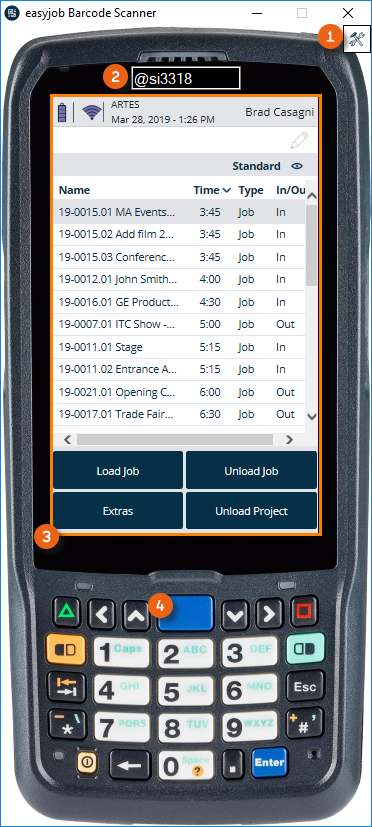
Activating the easyjob Scanner App
1. easyjob Barcode Scanner Icon setting
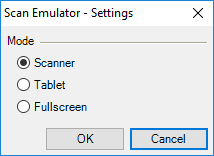
2. Select scanner or tablet
3. Ok
Fullscreen mode is only active with a valid license.
Controlling mobile devices with easyjob
The scanner status overview in easyjob provides you with an overview of the individual barcode scanners.
Opening the scanner status overview
1. easyjob Menu
2. View
3. Scanner Status
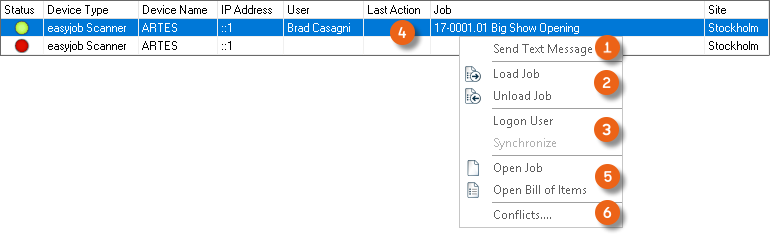
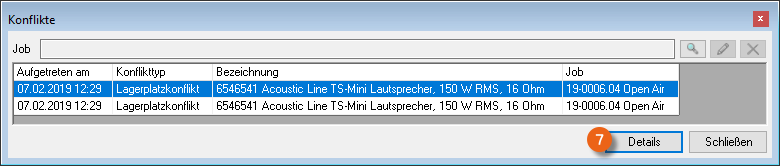
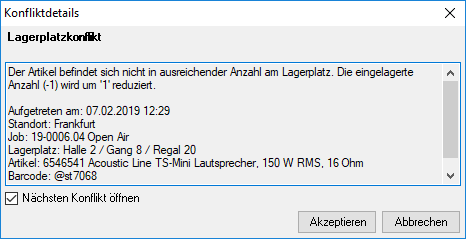
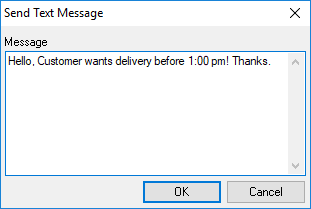
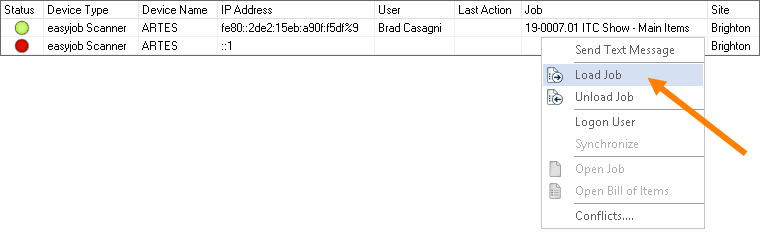
You can send messages to the barcode scanner , give commands to load a job, unload a job and to log-in a user . You can open the job that is currently being processed , and its Bill of Items . Furthermore, you receive an overview of any conflicts and their details (e.g. regarding storage location management ).
Messages that are sent in easyjob are displayed on the device in barcode mode.
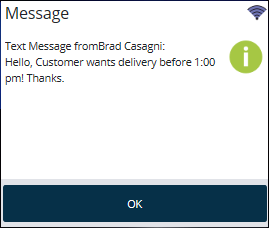
The easyjob Scanner App connects with the server every 15 seconds. The maximum time for sending the message until it is displayed on the device is 15 seconds.
Improvements to warehouse conditions
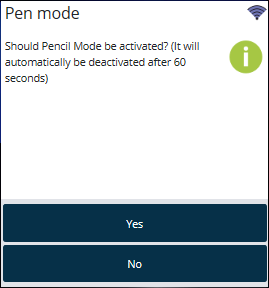
In order to make the use of the easyjob Scanner App ergonomic also in the warehouse, the pencil mode can be deactivated during barcode scanner operation. When the pencil mode is not active, the detailed pencil operation options are deactivated. For quick operation (e.g. also when wearing gloves) there is a large selection area available on the touch screen.
You can manage the deactivation of the pencil mode in the program settings.
Managing pencil mode
1. easyjob Menu Tools Settings
2. Mobile Scanner
3. Settings

4. Set or remove the check for Automatically deactivate pencil mode
5. Ok
easyjob must be restarted to activate the settings.
Pencil mode
The status of the current mode is shown on the status/toolbar with an icon.
| Pencil mode | Symbol |
|---|---|
| inactive |  |
| active |  |
Inactive pencil mode characteristics
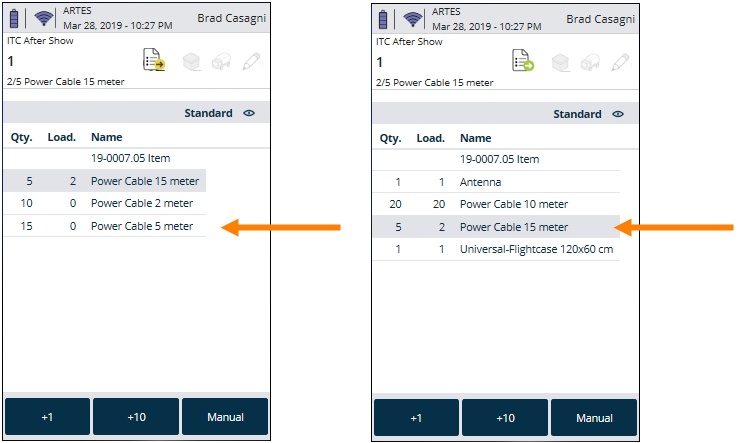
When pencil mode is inactive, the lists are divided into three areas.
By simply touching the lists, the view in the loading and unloading mode switches automatically between the items loaded and to be loaded or items unloaded and to be unloaded .
By pushing down for a few seconds in the upper and lower sections , the lists will automatically scroll in the direction of the displayed arrow.
By pushing down for a few seconds in the middle section, pencil mode will be activated.
Active pencil mode characteristics
With an activated pencil mode, the position that is tapped can be edited. When loading a job, e.g., the currently selected item is loaded.
Barcodes
Barcode processing
The barcodes will analyzed in the following manner and order. If one of the objects is found the editing starts.
| Order | Object | Syntax | Content ##### |
|---|---|---|---|
| 1 | Job | @jb##### | Dataset ID |
| 2 | Project | @pj##### | Dataset ID |
| 3 | Address/User | @ad##### | Dataset ID |
| 4 | Items | ##### | Item barcode field |
| 5 | Device | ##### | Device barcode field |
| 6 | Device | ##### | Device serial number |
If a device barcode cannot be read, the serial number barcode of the manufacturer can also be scanned.
Acoustic message when scanning
In order to make the scanning process in the warehouse as effective as possible, an acoustic and mechanical confirmation is provided after the scanning process.
| Positive confirmation | In the case of a positive confirmation, the easyjob Scanner App emits a 5,000 Hz tone for 0.2 seconds. After a positive confirmation is received, the next scanning process can start. |
|---|---|
| Warning | In the case of a warning or an error, the easyjob Scanner App emits a 500 Hz confirmation tone for 0.5 seconds. In addition, for devices with vibration support, the tone will be followed by a brief vibration.In the case of a warning, a notification will appear on the display. |
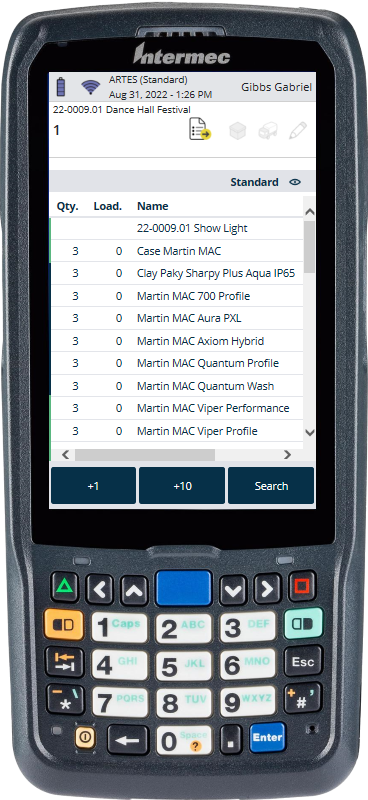
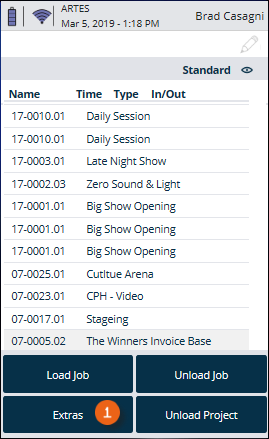
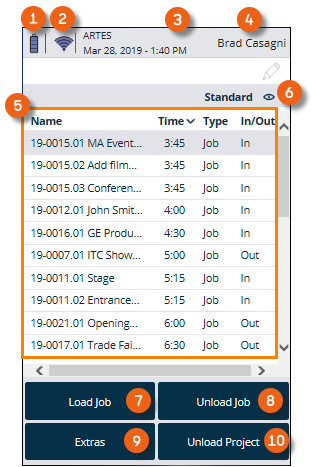
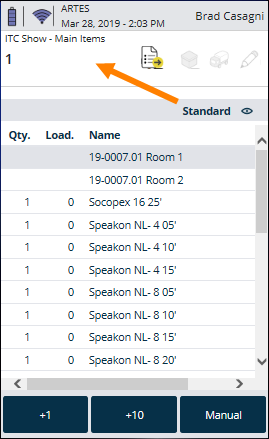
Start screen
After you have logged into an end device with the easyjob Scanner App, the start screen is displayed. The status bar provides information about the power level of the battery or the rechargeable battery , the quality of the server connection , the current date, time and the logged in user . The jobs to be loaded and unloaded are shown in the central area . The type of view (content and character width) can be customized . The Load job, Unload job, Unload project and Extras action buttons take you directly to the different easyjob Scanner App functions.
Customizing the view
You can customize the view. By double clicking the column heading, you can sort it in ascending or descending order.
Customizing the view
1. easyjob Scanner App start screen
2. Standard
3. Edit (pencil symbol) or Add (plus sign)
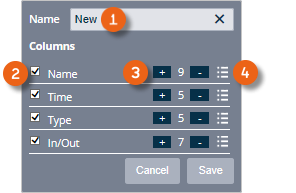
4. Enter or change the name
5. Display or hide the row
6. Customize the number of characters
7. Change the column order
8. Save
Loading/Unloading Jobs
No content for this section.
Loading Jobs
There are various actions that can start the loading process.
Start loading a job from the easyjob Scanner App
1. easyjob Scanner App start screen
2. Load job
3. Set a filter as required
4. Select the desired Job
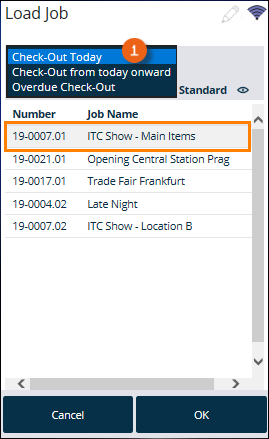
5. Ok
Start loading a job with the scanner
1. Scan the job barcode from the delivery note or the packing list
Start loading a job via easyjob
1. easyjob Menu
2. View
3. Scanner Status
4. Select a scanner
5. Load job
6. Select the job to be loaded
Using the loading and unloading function
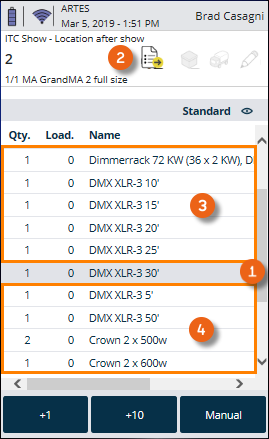
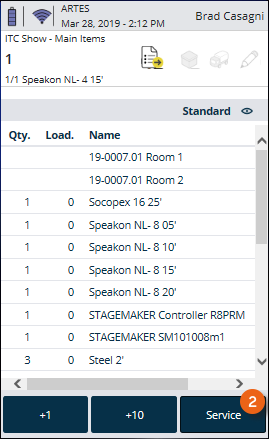
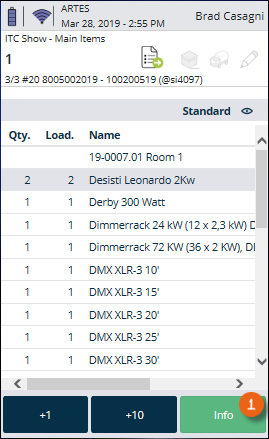
The job loading and unloading mask is designed so that as many functions as possible can be positioned on a small display.
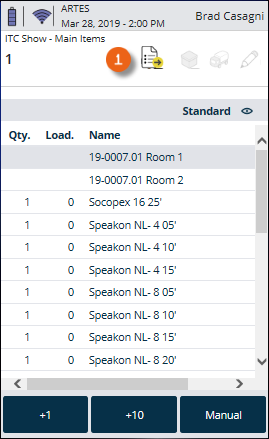
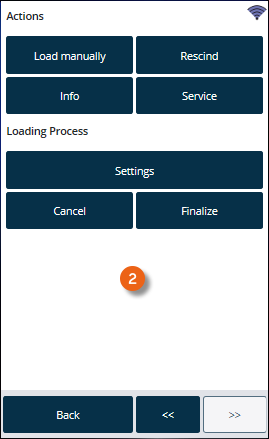
Clicking the status bar opens the quick jump form .
With the +1 and +10 keys, you can preallocate the number that should be scanned.
Various icons show the different statuses on the job loading and unloading mask.
| Symbol | |
|---|---|
| Current list view |       |
| Device display in the item list |   |
| Transport container mode |   |
| Pencil mode |   |
| Battery status |      |
| Server connection |       |
List Views
The list views in the loading and unloading mode can be toggled as needed. The easyjob Scanner App automatically switches to the respective list view.
| Toolbar | Selection | Description |
|---|---|---|
 | All | All items from the bill of items are displayed |
 | To be loaded | All items to be loaded are displayed |
 | Loaded | All loaded items are displayed |
 | Loaded | All loaded items and devices are displayed |
 | To be unloaded | All items to be unloaded are displayed |
 | Unloaded | All unloaded items are displayed |
 | To be unloaded | All items and devices still to be unloaded are displayed |
 | Unloaded | All unloaded items and devices are displayed |
 | Transport container content | The content of a transport container is shown |
 | Transport container content | The content of a transport container with loaded devices is displayed |
 | Transport Containers | An overview of the loaded transport containers is displayed |
 | Transport Containers | An overview of the loaded transport containers with devices is displayed |
Toggling manually between list views
Toggling manually to the list view
1. Briefly tap your finger in the middle of the display
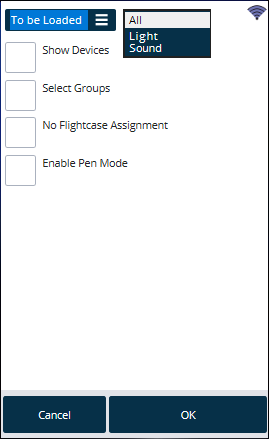
Toggling list views via settings
1. Toolbar
2. Settings

3. Select the desired view

4. Ok
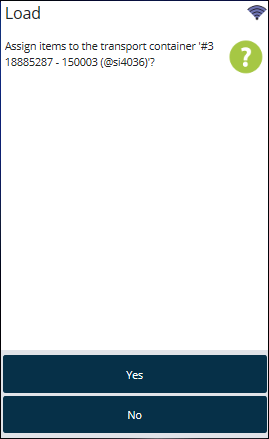
Loading and unloading transport containers
For the loading process, items in packages (e.g. flight cases) can be packed together. To ensure clear assignment of the transport container, a device must be created for each transport container. In addition, the item must be defined as a transport container in the master data. Items and devices can be assigned to a transport container.
After the transport container is scanned, a query is made to open it.
The status bar icon shows if there is currently an active transport container for loading.
| Transport container mode | Symbol |
|---|---|
| inactive | 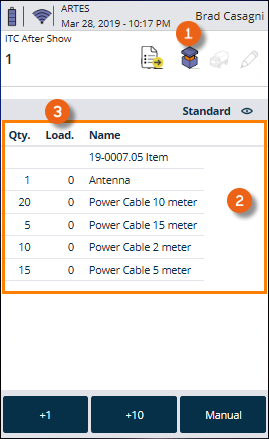 |
| active | 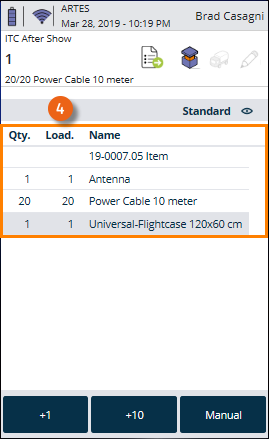 |
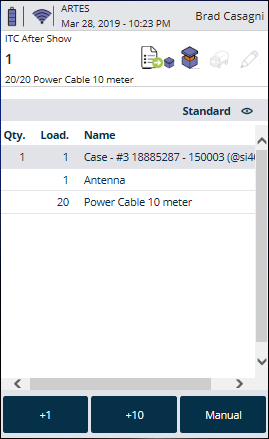
When transport container mode is active , when toggling the list view (briefly tap in the middle of the display) from the Bill of Items view the transport container content view and of the items assigned to the active transport container are updated and displayed.
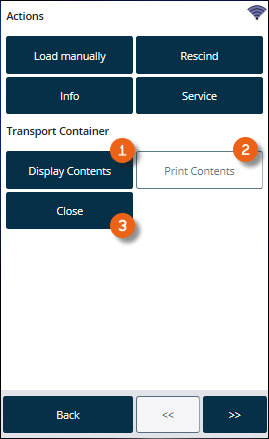
The quick-jump form is used to display the contents of the transport container , print the contents of the transport container and manually close the transport container .
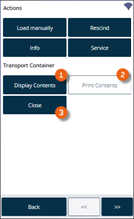
A new scan of the transport container or a scan of a new transport container will conclude the active transport container mode.
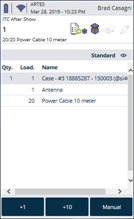
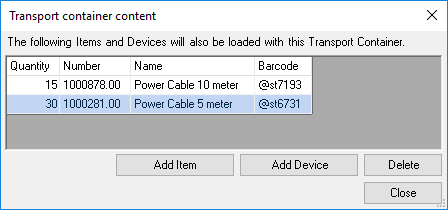
The transport container list shows the content of the transport container assigned to a job.
Deactivate Assign Items to this Transport Container
If you do not want to assign items to this transport container in the current loading process, the Assign Items to this Transport Container function can be deactivated
Booking items manually in a workshop activity
If an item is defective, you can book an item in the workshop from a loading or unloading process.
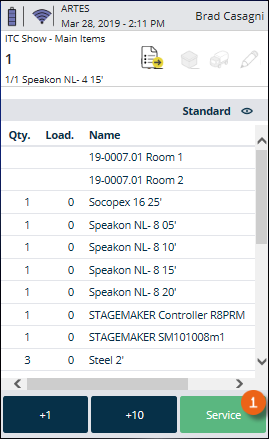
The active status of the workshop booking mode is displayed by the "service" button status (active /inactive ).. In an active status, all newly scanned items and devices will be booked in the workshop.
Activating the workshop booking mode:
1. Toolbar
2. Service
Loading and overloading unscheduled items
During the loading process unscheduled or too many items can be scanned intentionally or accidentally. A message is shown in this case.
The message also displays current availability of the item.
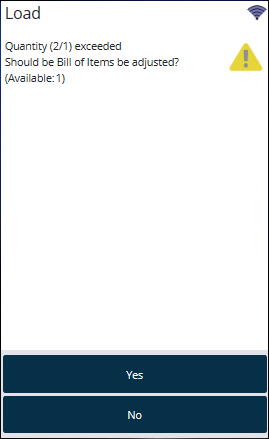
If you do not schedule small parts in advance but load them spontaneously during the loading procedure, this message can be deactivated for certain items.
For this you can activate the setting "Deactivate warning for unscheduled items" in the easyjob item master data. See Loading and loading linked associated items.
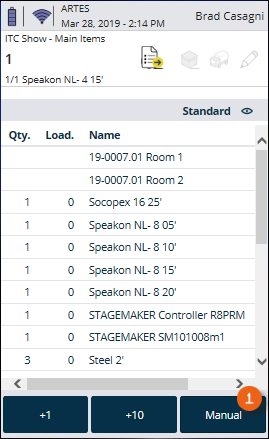
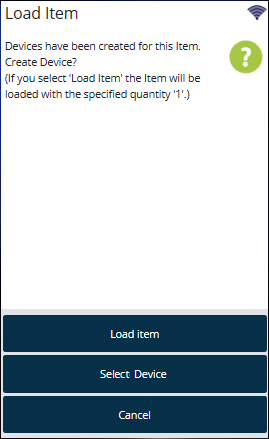
Manually loading and unloading items and devices
In addition to scanning an item's barcode, an item can be manually added, loaded or unloaded.
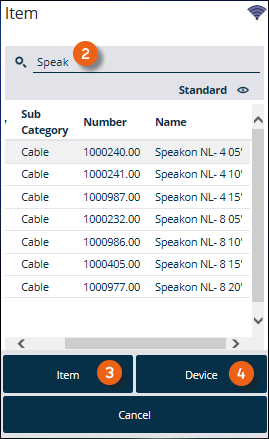
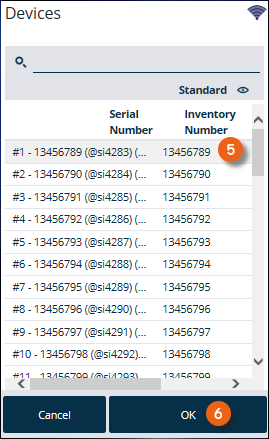
Selecting an item manually
1. Manual
2. Enter the name of the item
3. Item to accept the item
or
4. Device
5. Select a device
6. Ok
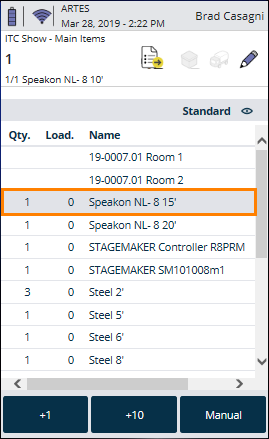
Load an item in active pencil mode from the load list:
1. Select the line to be loaded
2. If the item contains devices, you can select the item or a device.
Loading and unloading parts lists
Parts list items are not loaded and unloaded, as they are directly connected to the relative main item. When printing the delivery note, the devices of the part list item can be issued based on the assignment from the item master data.
Loading and unloading normal and optional associated items
Normal and optional associated items are scheduled like normal items in the bill of items. When loading and unloading the items are handled like normal items.
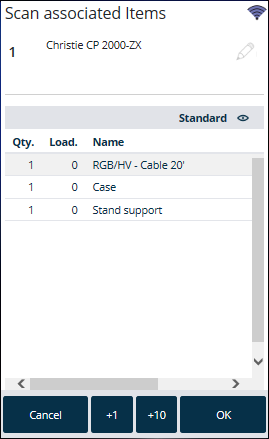
Loading and loading linked associated items
You can chose between various possibilities for loading and unloading linked associated items. They can be defined in the item master data. The following options are available: do not scan , always scan and scan on change .
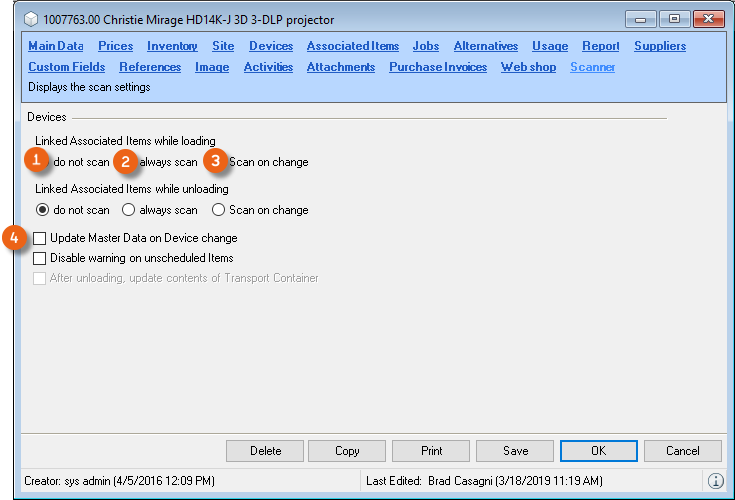
Do not scan
With this setting, the linked associated items are automatically loaded or unloaded together. The devices of the linked associated item are automatically loaded or unloaded based on the master data assignment.
Always scan
Here, the barcode scanner will prompt to scan all linked items and devices after an item scanning process
Scan on change
With this setting, the prompt appears only if an assignment is changed manually in the bill of items.
Update Master Data on device change
Here the master data will be updated based on the returned device assignment. Devices of linked associated items will be reassigned when unloading.
Make the scanning settings for the linked associated items
1. easyjob Menu
2. Master Data
3. Items
4. Select an item
5. Scanner tab
6. Modify the desired Settings
Loading and unloading items due for maintenance
A warning will be given if devices due for maintenance are loaded or unloaded.
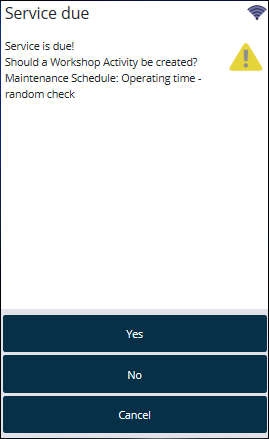
Create a Workshop Activity, a workshop activity will be created for the device instead of a loading activity.
Loading items from multiple groups laden
The same item can be used in multiple groups of a job. When loading an item from multiple groups, the group to be loaded will be requested.
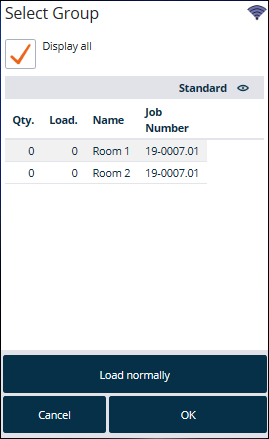
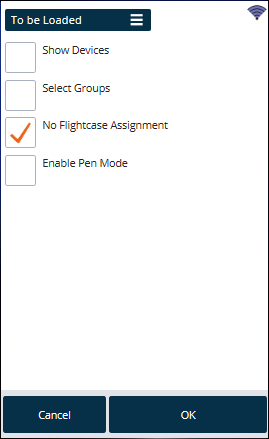
The group request can be manually activated and deactivated in the load process settings.

When the group request is deactivated, the groups will be populated according to its sorting order. In addition, it is possible in the easyjob program settings to deactivate the Select group function in general.
Deactivating the select group function
1. easyjob Menu Tools Settings
2. Mobile Scanner
3. Select the scanner
4. Settings
5. Deselect Select group
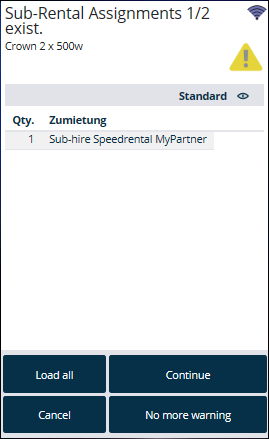
Assigning sub-hired equipment
A dialogue will open after scanning an item with a sub-hire assignment.
Track item and availability
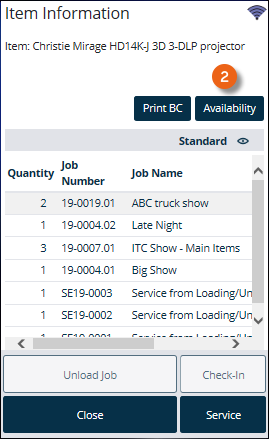
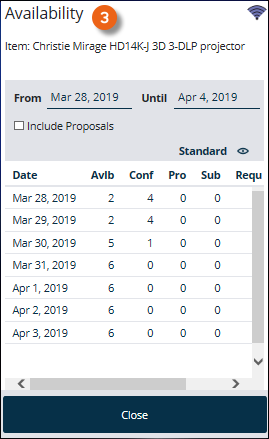
An item can be tracked during the loading and unloading process.
Activating the item track mode
1. Toolbar
2. Info
The active status of the item info mode is shown by the status of the info button. With an active status, the item information (in which job is the item booked and how often) and also the availability is displayed for the newly scanned item.
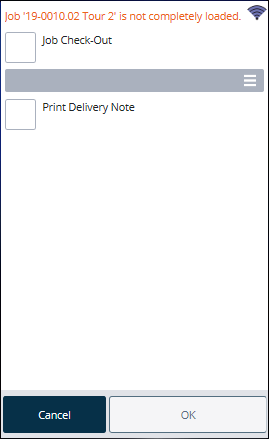
Checking out a job
After all scheduled items have been loaded from the current job, the loading process is completed with the check-out process.

If you want to manually add further items to the job, stop the process with cancel.
Manually checking out a job
If not all items have been loaded from the job and the loading process should be finalized, you can perform the check out process manually.
Initiate the check-out process with the barcode scanner:
1. Scan the barcode of the current job or another job
Initiating the check-out process via the Scanner App:
1. Toolbar
2. Finalize
Quick Load or Adjusting Target Figures
If not all the scheduled items have been loaded when checking out a job manually, the Quick Load or Adjust Target Figures options can be selected.
Quick Load
With quick load, the loaded quantity is compared with the scheduled quantity. This means that easyjob identifies all items as loaded.
This function can be limited via the User Access Rights with the Quick Load/Quick Unload access right.
Adjusting target figures
With adjusting target figures, the scheduled quantity is compared with the loaded quantity. All items that have not been loaded will be deleted.
This function can be limited via the user access rights with the access right Quick Load/Quick Unload.
Printing the delivery note
After the process is complete, the delivery notes defined in the program settings will be sent to the printer.
Unloading Jobs
Various actions can activate a job unloading process.
Start job unloading in scanner mode
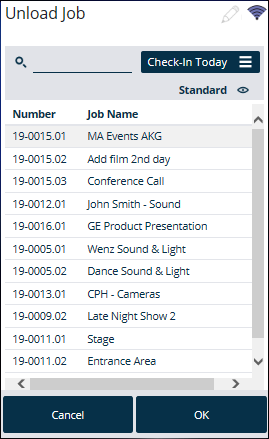
1. Unload job
2. Select the desired job
3. Ok
Start job unloading with the scanner
1. Scan the job barcode from the delivery note or the packing list
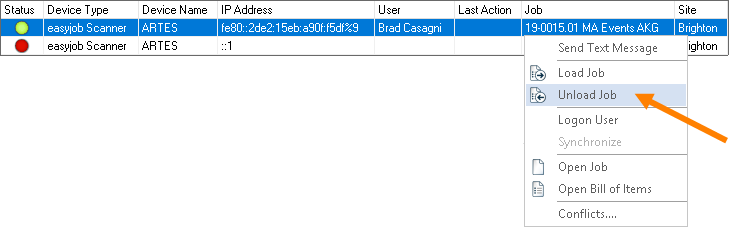
Start job unloading with easyjob
1. easyjob Menu
2. View
3. Scanner Status
4. Select a scanner
5. Unload job
6. Select the job to be loaded
Unloading projects
Unload Project makes it possible to unload multiple jobs from a project at the same time.
Various actions can activate the project unloading process.
Start project unloading from scanner mode
1. Unload project
2. Select the desired project
3. Ok

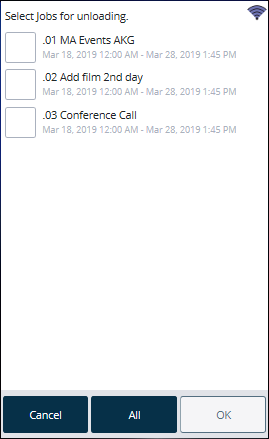
4. Select the desired jobs
5. Ok
Start project unloading with the scanner
1. Scan the project barcode from the delivery note or packing list
You can select the jobs to be unloaded before starting the unloading process
The scanned items will be unloaded one after the other in the order of the jobs or the quantity to be unloaded will be distributed across the individual jobs.
Manual check-in
No content for this section.
Checking in a job manually
If not all items have been unloaded from a job and the unloading process should be finalized, the check-in process can be activated manually.
Initiate the check-in process with the barcode scanner:
1. Scan the barcode of the current job or another job
Initiating the check-in process with the Scanner App
1. Toolbar
2. Finalize
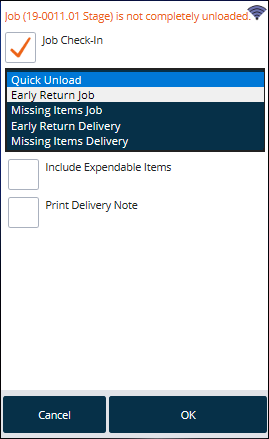
Quick unloading and missing items
If when checking in a job manually not all scheduled items have been loaded yet, the options Quick unload, Early Return Job, Missing Items Job, Early Return Delivery and Missing Items Delivery are available.
Quick Unload
With quick unload, the unloaded quantity will be compared with the loaded quantity. This means that easyjob will mark all loaded items as unloaded. This function can be restricted in the user rights with the Quick Load/Quick Unload right.
Early return delivery
In the case of an early return delivery of items, you can either create an early return job or an early return delivery (partial delivery). Select this action when partial amounts are returned early.
Early return delivery – create job
When creating an early return delivery job, all already unloaded items are added to a new job and removed from the existing job. The early return delivery job receives the start date from the original job and the current day as the end date. All items and devices are automatically loaded and unloaded.
Early return delivery – create partial delivery
Deviating from the job time frame, you can define additional appointments for partial deliveries and partial returns. You can schedule two devices of an item for delivery date X and the remaining three items for delivery date Y.
Creating a missing items job
With a missing items job, all not yet unloaded items and devices will be booked in a new job and marked as unloaded. All of the unloaded items and devices will be compared with the scheduled quantity in the original job.
Invoicing a missing items job
All of the items that are not unloaded will be transferred to an invoice with the sales price. The amounts will be corrected in the item inventory.
Inclusion of expendable items
If expendable items were not included when creating a missing items or return delivery job, the scheduled amount must be corrected with the difference between the loaded and unloaded quantity. The difference in the amount will be corrected in the item inventory.
Advanced barcode functions
For the loading and unloading functions, easyjob Scanner App offers a series of useful barcode functions with Track item/device and Assign serial number.
Assigning a serial number
With this function, the device's serial number is assigned based on the scanned easyjob barcode. The use of advanced functions can be activated in the easyjob program settings.
Activating serial number assignment
1. easyjob Menu Tools Settings
2. Mobile Scanner
3. Select the scanner
4. Settings
5. Check the Activate serial number assignment box

6. Ok
Assigning a serial number
1. Create the new devices in easyjob
2. Print the device barcode and label the device
3. easyjob Scanner App start screen
4. Extras
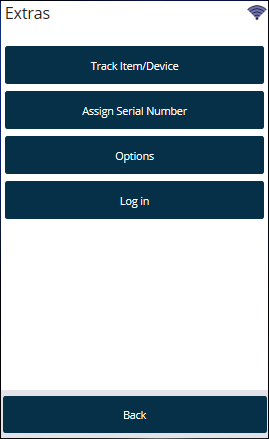
5. Assign serial numbers
6. Scan the device barcode
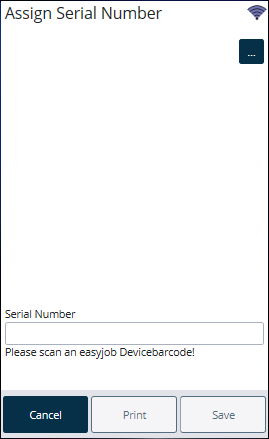
7. Scan the serial number barcode
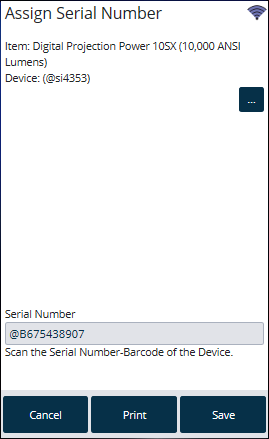
8. Save
Numbers for barcodes
To be able to work even more efficiently with the scanner, it is possible to generate quantities for barcodes. The barcode consists of the characters @qty and then the corresponding quantity, e.g. for 100 @qty100. First scan the barcode for the quantity (e.g. 250) and then the item. In this way, the item is unloaded 250 times. You can also scan multiple barcode quantities in succession, they are then added to the scanner. Therefore 5 and 50 are 55.


or
100 and 250 are 350.


We recommend using a report and to enter the frequently used quantities on an A4 sheet and to attach it to the corresponding shelves/cases.
Filtering by subsection when loading
A scanner can be assigned to different subsections. Accordingly only the items belonging to the subsection will be displayed for loading
Assigning scanners to subsections in the settings
1. easyjob Menu Tools Settings
2. Mobile Scanner
3. Select the desired device
4. Settings
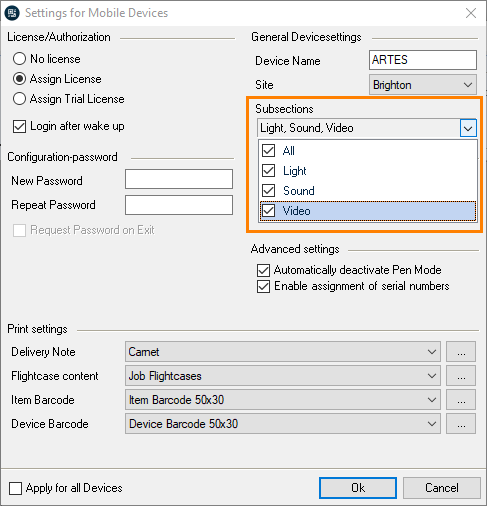
5. Subsections
6. Create the desired Subsection
7. Ok
The subsections to be loaded can be filtered again in the settings
1. easyjob Scanner App start screen
2. Load job
3. Select the desired Job
4. Ok
5. Statusbar
6. Settings
7. Set the desired subsection filter
8. Ok
Assign the transport container contents in the Master Data
Items and devices can be assigned to a transport container in advance.
Assigning devices or items to a transport container
1. easyjob Menu
2. Master Data
3. Items
4. Select the required item
5. Ok
6. Devices
7. Add the desired item/device
8. Ok
Items and devices that are assigned to a transport container are automatically loaded together with it.
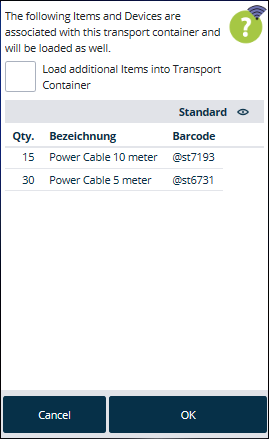
If necessary, additional items can be loaded in the transport container.
When unloading, the content of a transport container can be reassigned.
Barcode Info
With the Barcode Info function, you can reach a new level with your barcodes. By using 2D barcodes (QR codes), anyone who has a smartphone can scan the barcode on one of your items and obtain useful information about your item on a WebApp website. You decide what information should be provided. You can select from technical data, item comments, rental or purchase prices, test results, contact info, footnotes (e.g. website credits), pictures of the item, manuals, etc.
Requirements and license
To be able to use the functionality of the Barcode Info, you need a local or cloud-based easyjob environment, version 6.16.2.66 or later using Edition M, L or XL (The use of the document type function - display of item pictures, manuals, etc. is possible from version 6.17.1.5, see Providing additional item documents (e.g. manual)). To scan the barcode, you and your customers require a standard smartphone (browser-enabled), which can read and process a 2D barcode (QR code).
Installation and activation
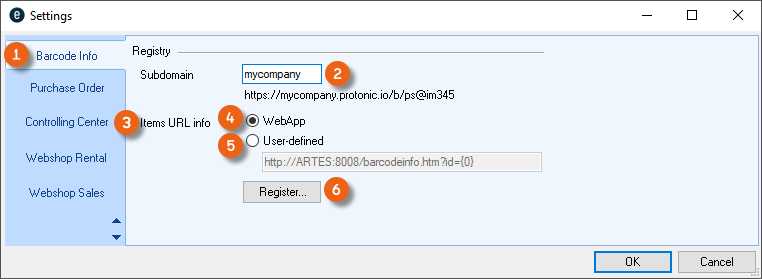
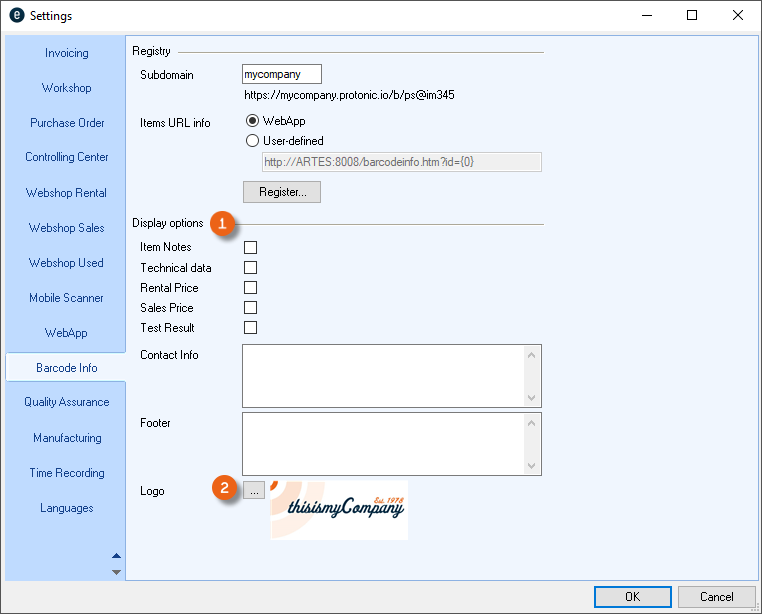
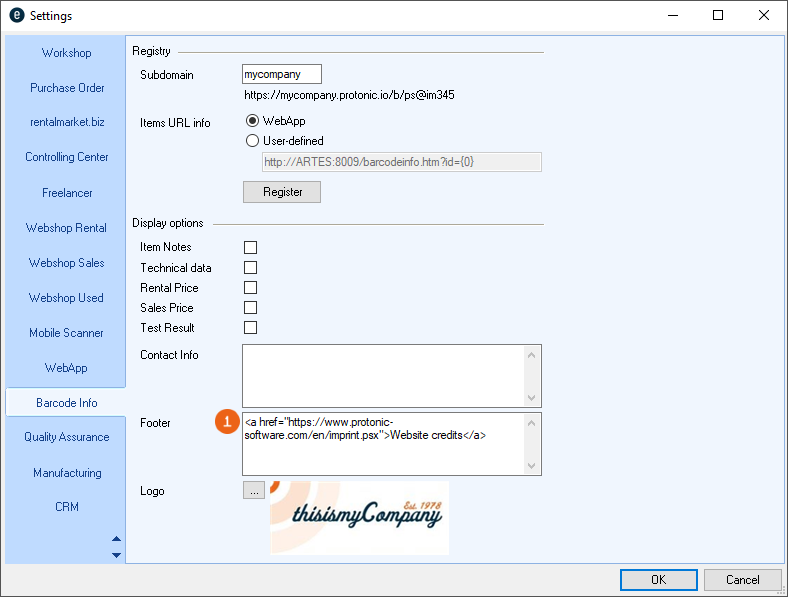
Go to the easyjob program settings to activate the Barcode Info function. A separate installation is not required. Add a subdomain (e.g. the name of your company ) to the URL. You can chose if you want to register Items URL info that can be accessed using the easyjob WebApp . You can use the display options already provided by protonic software, or you can create your own WebApp website. Alternatively, you can create a user-defined website and save your information there.
You can find information about the settings and use of Barcode Info about the Items URL Info of the WebApp website and about how to create a user-defined WebApp website on the following pages. Refer to chapter Creating your own Items URL info website . for information on what you must observe when you want to use a user-defined Items URL Info.
Activating Barcode Info for the WebApp website
1. easyjob Menu Tools Settings
2. Barcode Info tab
3. Add Subdomain
4. Select the WebApp for the Items URL Info
5. Register
6. Ok
easyjob must be restarted to activate the settings.
Configuring the easyjob service
To be able to use the easyjob Barcode Info via WebApp, the easyjob Web Access service must first be activated and configured in the Service Manager Configuring easyjob services..
A functional public URL must be set up in order to be able to use the Barcode Info Service.
Configure the Windows Firewall
If required, configure the firewall for this service. See also Configure the Windows Firewall.
Configuring a non-Windows firewall
We have compiled support for the configuration of a non-Windows firewall here for you Configuring a non-Windows firewall.
Creating barcodes for Barcode Info
To be able to use the Barcode Info function, you must create 2D barcodes (QR codes) for your items and devices. The report variables v.Artikel.Barcode_Info_Link and v.Artikel.Gerät.Barcode_Info_Link are available for the creation of barcode labels.
Go to the easyjob program settings to activate Barcode Info before creating the barcode. See also Installation and activation.
Please only use the barcode template provided by protonic software. It also includes the Company Identifier (UCI). With the UCI, you can clearly assign your items and devices to your company and permit the use of additional cross-system functions, such as data exchange via the digital delivery note and many other uses that will provide for you in the future.
See also Unique Company Identifier (UCI).
Updating the easyjob Scanner App
The easyjob Scanner App has already been for updated for scanning the new 2D barcodes (QR Codes) for the items and devices for loading and unloading. For the standard scanning processes, the scanner reads the relevant information, for example https://mycompany.protonic.io/b/ps@de177 becomes ps@de177.
User defined Items URL info
In addition to our proposal for the Barcode Info displayed via the Items URL info on the WebApp website and the existing display options, you have two additional options for managing the content of your Items URL info.
Customizing the Items URL Info WebApp website
If you want to make individual changes to your Items URL info for the WebApp website (e.g. to integrate your company's CSS) then contact our Support, we will be happy to prepare a proposal for you.
Customizing the Items URL Info WebApp website yourself
If you want to customize the Items URL Info for the WebApp website yourself, please observe the following information and settings.
Provision of static files
After calling up and updating the real-time data via the JSON WebApi interface, the easyjob Web access service also makes static files available to provide HTML, CSS, JS and other files to the end user. As soon as a user wants to access the easyjob Barcode Info page, the respective files are taken by default from the following directory: {easyjob Installations path}\WebApi\Web\.
Example: C:\Program Files (x86)\protonic software\easyjob 6\WebApi\Web
The content of this folder (incl. subfolder) is provided by the easyjob Web access service via the internal and external URL set in the easyjob Server manager.
Example (related to the standard values used above) calling the URL:
http://localhost:8008/index.htm returns the content of the HTM file from the path
C:\Program Files (x86)\protonic software\easyjob 6\WebApi\Web\index.htm.
All the files necessary for the functions of the Barcode Info page are located in the path
{easyjob Installations path}\WebApi\Web\ and are called:
- barcodeinfo.htm
- css\BarcodeInfo.css
- js\misc\BarcodeInfo.js
This file can be modified and saved in the \Customizing\web\ folder.
By default, the barcodeinfo.htm file from the web access service is used to display the barcode information. See also Linking static files.
Linking static files
If you would like to overwrite certain files in this folder or make your own files available via the internal and external URL of the web access service, then it is not sufficient to overwrite them once in the easyjob installation directory as these files are updated during every easyjob update and the changes that are made would be lost.
In this case, the easyjob Web access service offers the option to save the changed and/or new files in a predefined folder. The path to the folder is comprised of the path to the path to the global data directory and \Customizing\web\.
You can find the path for the global data directory in the easyjob Server Manager under Global Data Directory and then the Local Director .
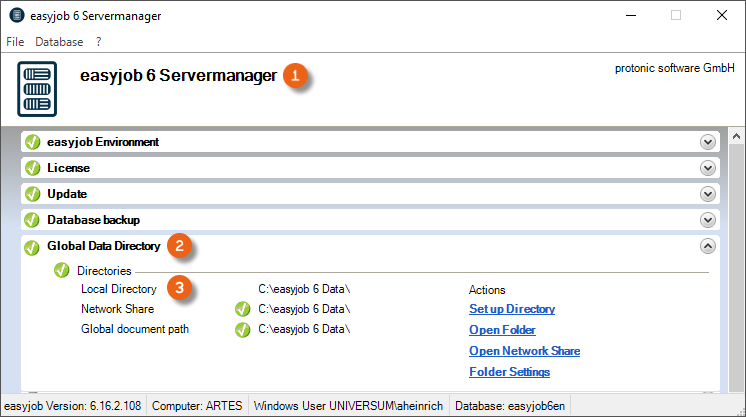
The Customizing folder and the web folder do not exist, therefore these folders must be created accordingly.
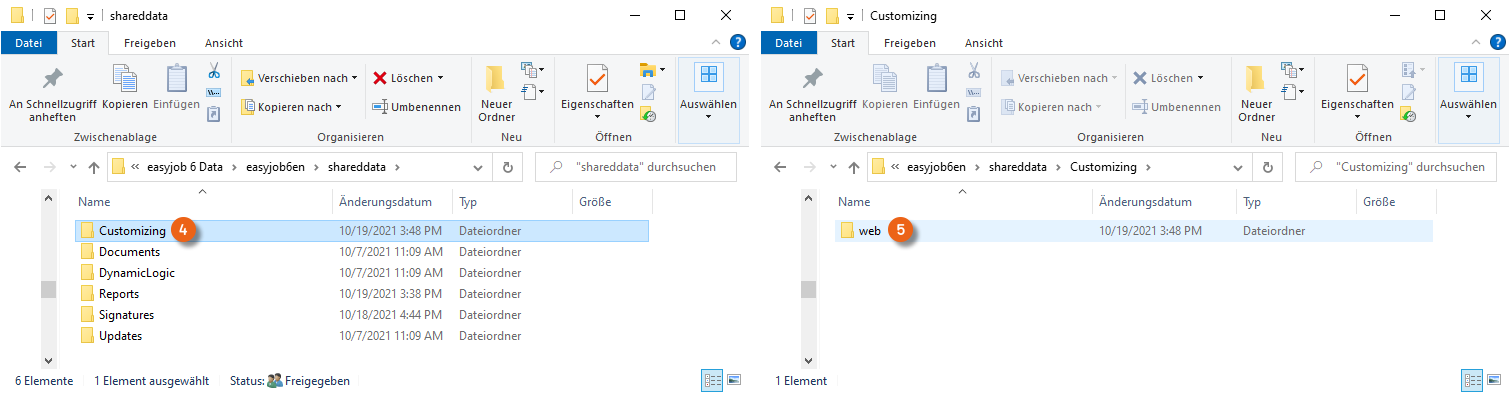
If you want to overwrite the files in the sub-orders, the folder structure must be copied to \Customizing\web\. After you have saved the new file, restart the easyjob Web Access Service.
When you overwrite easyjob files, this can mean that future error corrections are not used or new features cannot be used!
Representation of the data provided by the Web access service
If you do not only want to make visual changes, but also how the data provided by the Web access service is displayed, then you must completely rewrite the barcodeinfo.htm file.
In the following examples, the space holder {webapiurl} must be replaced with the internal or external URL of the easyjob Web access service.
When forwarding to the barcodeinfo.htm page, the scanned barcode is always attached as a parameter. Example: http://{webapiurl}/barcodeinfo.htm?id=@st3334
This parameter is used to query all available information for this barcode in the easyjob Web access service. To do so, a GET request must be sent to the following URL: http://{webapiurl}/api.json/barcodeinfo/details/?id=@st3334. The authentification of the users or an access token is not required for this GET request.
In the following example, the answer to the GET request is shown on the right side in JSON format, and the left side shows how the standard barcode information page visually displays the information and which field names are used for it..
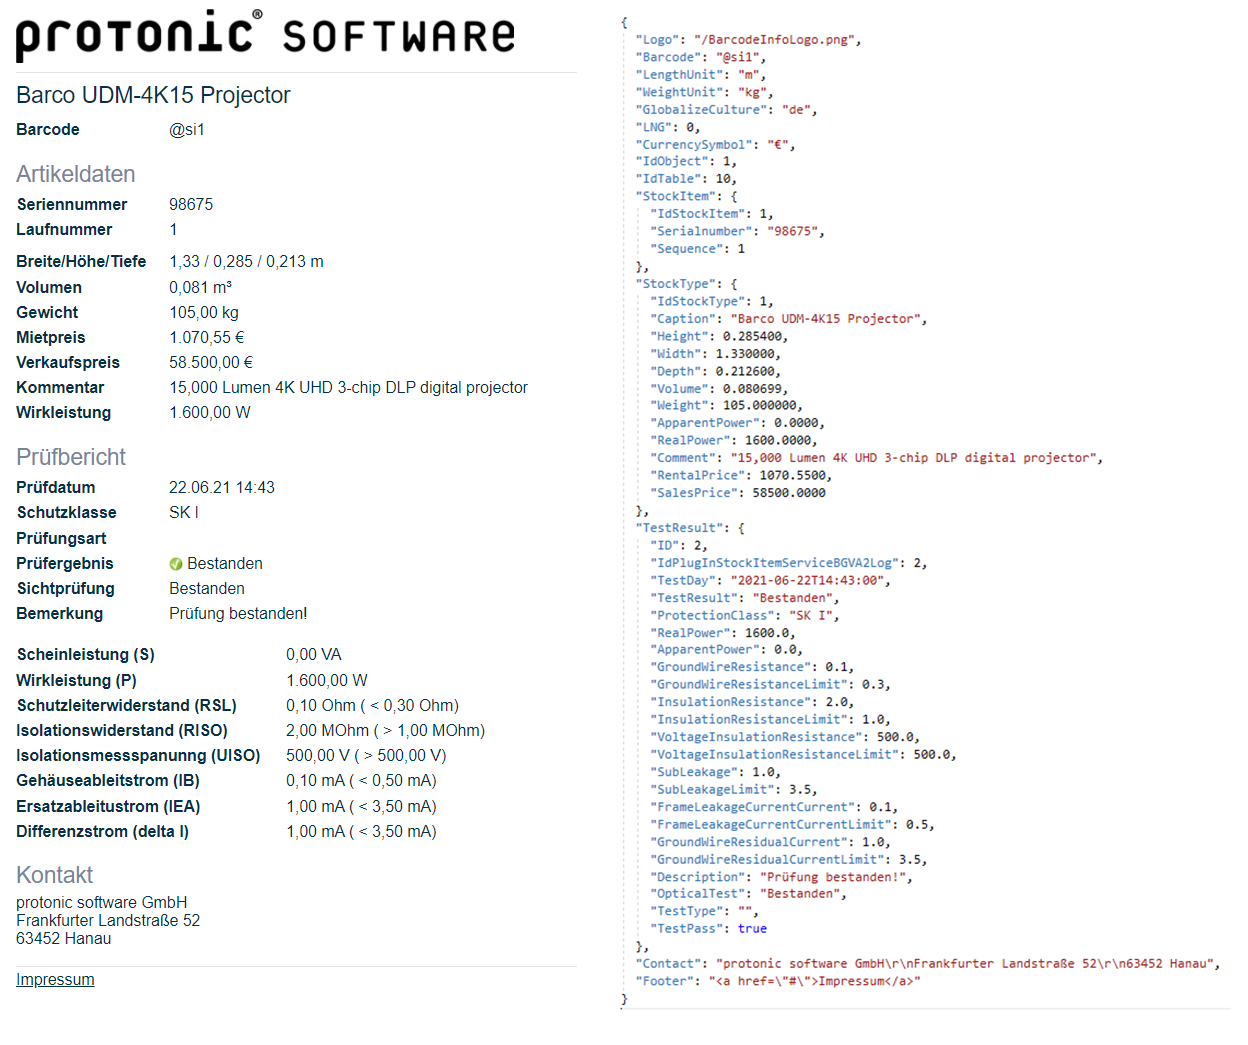
More detailed information can also be found in the js\misc\BarcodeInfo.js file.
Creating your own Items URL info website
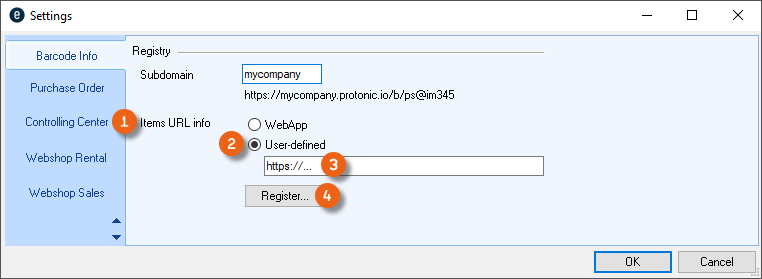
If you would like to create your own Items info website, in Program settings, under Items URL info select User defined , enter the URL and click Register .
Activating barcode info for your own website
1. easyjob Menu Tools Settings
2. Barcode Info tab
3. For the Items URL info, select User defined
4. Enter the URL
5. Register
6. Ok
easyjob must be restarted to activate the settings.
Barcode Info application examples
By expanding a normal item or device barcode into a WebApp address, you can chose which information should be displayed as soon as the barcode is photographed with a standard smartphone.
Standard with company logo
There are various display options in the easyjob settings for Barcode Info. You can have your logo displayed on the Barcode Info page .
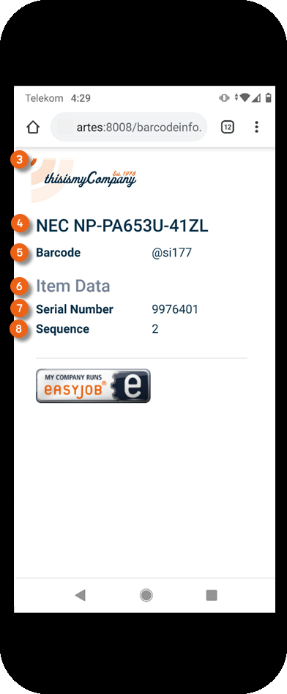
By default, the item name , the barcode and from the device item data the serial number and sequence are displayed.
Selecting the company logo to display on the Web App website
1. easyjob Menu Tools Settings
2. Barcode Info tab
3. Click the three dots 
4. Select the desired file in PNG format
5. Ok
Restart the easyjob Web access service so that the changes are applied.
easyjob must also be restarted to activate the settings.
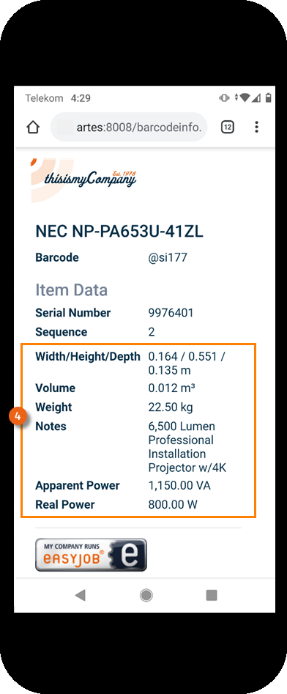
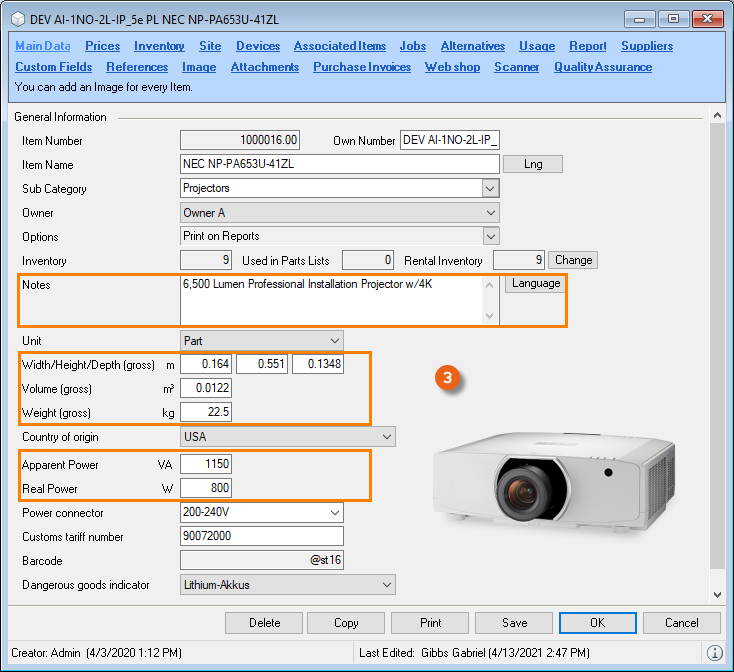
Item notes and technical data
As display options, your can display Item Notes and the Technical Data from the item master data on the Barcode Info page .

Selecting item notes and technical data to display on the WebApp website
1. easyjob Menu Tools Settings
2. Barcode Info tab
3. Select Item Notes and Technical Data
4. Ok
Restart the easyjob Web access service so that the changes are applied.
easyjob must be also restarted to activate the settings.
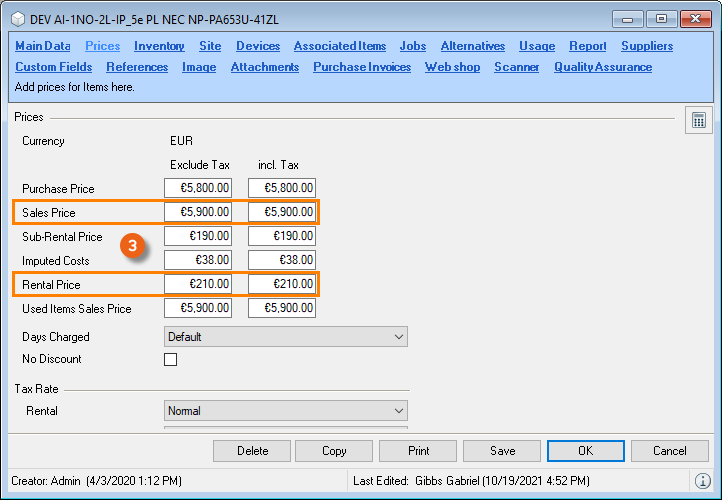
Rental price and sales price
Other display options include the rental price and the sales price for the item. The prices without tax from the item master data are displayed on the Barcode Info page .
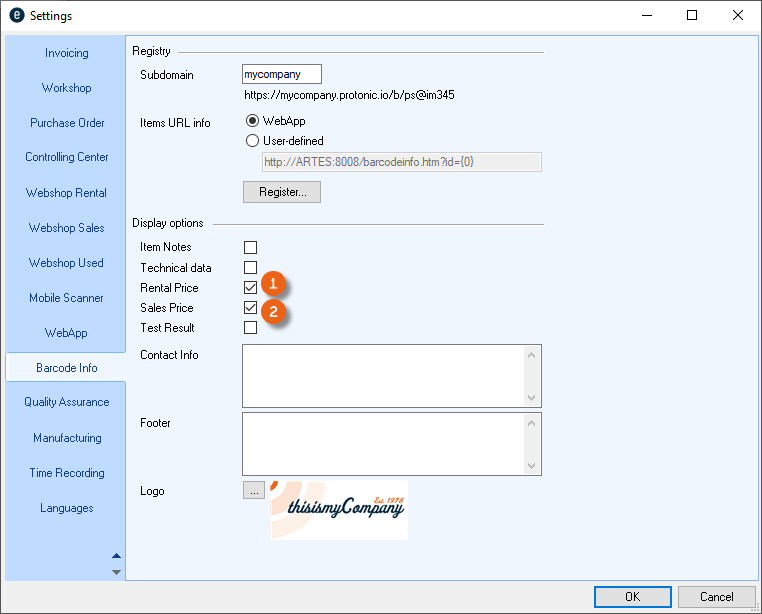

Selecting item notes and technical data to display on the WebApp website
1. easyjob Menu Tools Settings
2. Barcode Info tab
3. Select the rental price and sales price
4. Ok
Restart the easyjob Web access service so that the changes are applied.
easyjob must be also restarted to activate the settings.
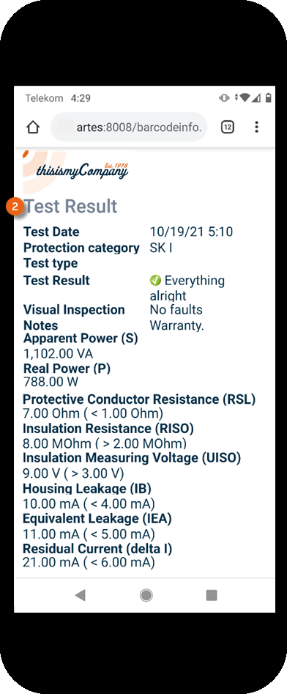
Test results
You have the option to display the current test results for the Advanced Test Process on the Barcode Info page for a device.
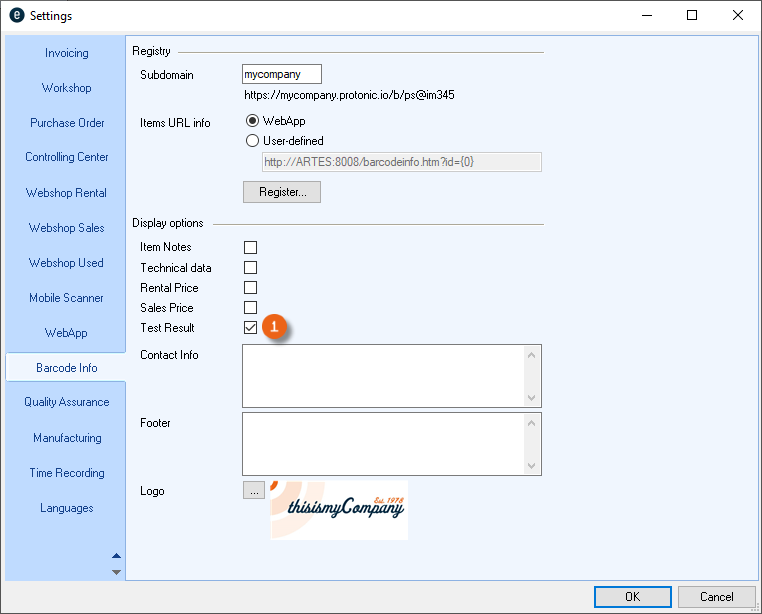
Selecting the test results to display via the WebApp website
1. easyjob Menu Tools Settings
2. Barcode Info tab
3. Select the Test result
4. Ok
Restart the easyjob Web access service so that the changes are applied.
easyjob must be also restarted to activate the settings.
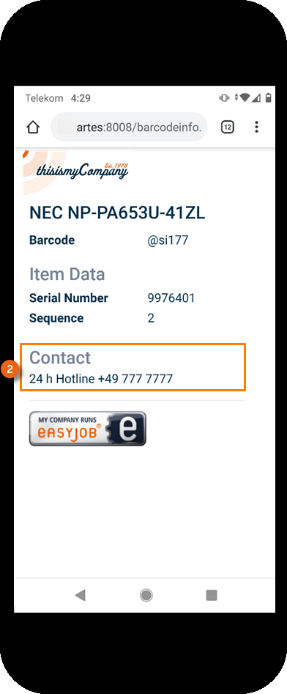
Contact information (e.g. service phone number)
Contact Info can be added under the display options (e.g. a service phone number). This will also be displayed as the contact on the barcode info page.
If, for example, one of your customers requires support for a projector, they can use their cellphone to scan the QR code on the projector to find the service phone number to ask for help. It is possible to have "For help scan here and call" or "Scan me if you have a problem", etc. written below the barcode.

Selecting the contact info to display on the the WebApp website
1. easyjob Menu Tools Settings
2. Barcode Info tab
3. Enter the desired information in the Contact Info field
4. Ok
Restart the easyjob Web access service so that the changes are applied.
easyjob must be also restarted to activate the settings.
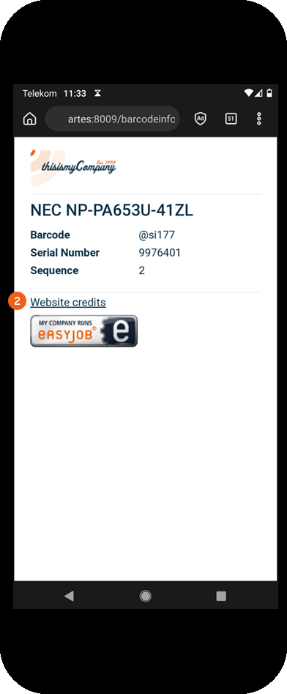
Footer
In the easyjob settings for the Barcode Info, you can add an entry in HTML format as a footer for website credits, data protection statement or your general terms and conditions, for example.
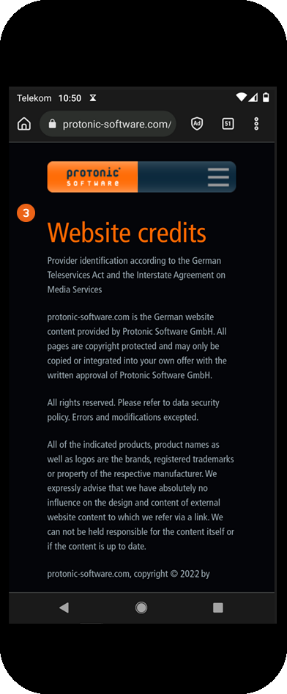
Example: Website credits
Example: Data protection statement
The link provides direct access to the website credits of your website .
Selecting a footer to display on the WebApp website
1. easyjob Menu Tools Settings
2. Barcode Info tab
3. Enter the desired link in HTML format in the Footer field
4. Ok
Restart the easyjob Web access service so that the changes are applied.
easyjob must be restarted again to activate the settings.
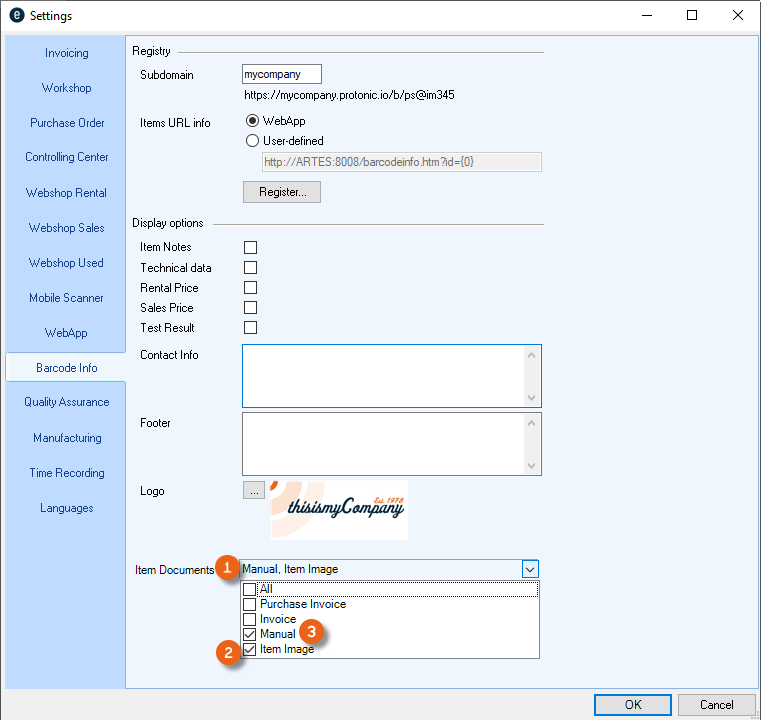
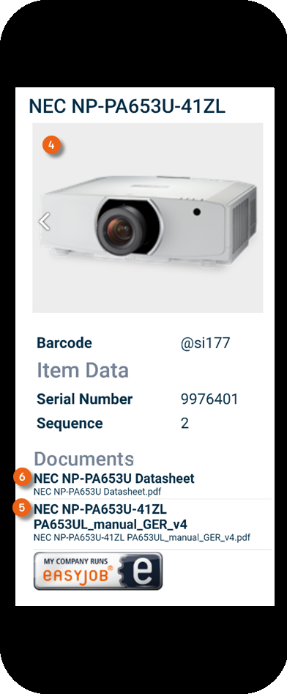
Providing additional item documents (e.g. manual)
With the Item Documents option, you can provide additional information on the barcode info page. You can define the type of document to be displayed. If you select Item Image , all documents will be displayed that are an Item image . Documents that are a Manual (manuals, data sheets or operating instructions) will be displayed as a link to the PDF document . See also easyjob 6 manual document type.
Selecting documents to display on the WebApp website
1. easyjob Menu Tools Settings
2. Barcode Info tab
3. Select the document type that should be displayed for the item
4. Ok
Restart the easyjob Web access service so that the changes are applied.
easyjob must be also restarted to activate the settings.