easyjob Controlling Center
Documentation
Controlling Center
The Controlling Center consists of various parts. The heart of the Controlling Center is purchase invoice management. With purchase invoice management, all incoming invoices are processed and assigned to the various areas (project costs, sub-hires, workshop activities, purchase orders, etc.).
The costs can be easily analyzed in the applicable program module. This matching process also enables data to be automatically posted to the appropriate accounts. Data can be electronically submitted to your accounting professional as well.
Each purchase invoice can assigned using the scanner. When assigning purchase invoices to projects, an authorization workflow is started so that the project leaders can confirm or reject the cost assignment.
A cash book is also integrated that links cash transactions with invoices and purchase invoices.
Installation and activation
Go to the easyjob program settings to activate the easyjob Controlling Center module and the Cash Book The Cash Book function is coupled with the Controlling Center module A separate installation is not required.
Activating the Controlling Center module and the Cash Book
1. easyjob Menu Tools Settings
2. Functions tab
3. Select the Controlling Center and Cash book
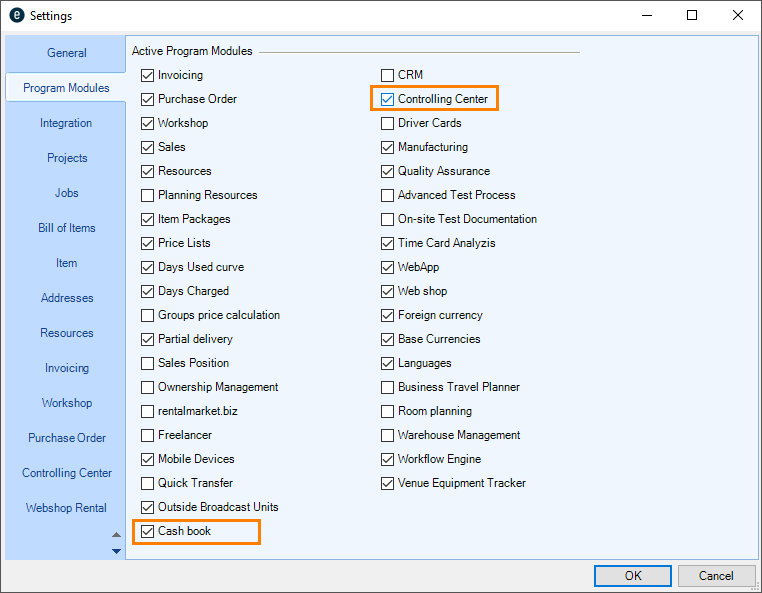
4. Ok
easyjob must be restarted to activate the settings.
Configuration and settings
No content for this section.
User settings
There are various Controlling Center rights available in the User Rights Manager.
Assigning user rights for the Controlling Center
1. easyjob Menu Extras User Rights Management
2. Select a User
3. Edit
4. Rights tab
5. Controlling Center
6. Assign the desired rights
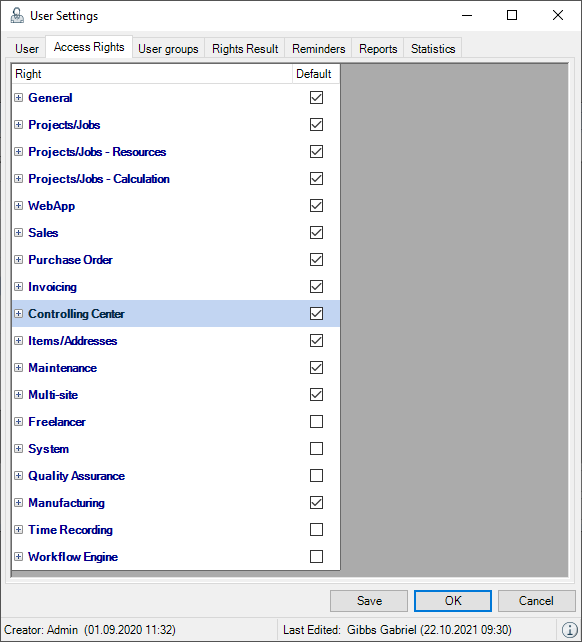
7. Save
8. Ok
There is a separate user right setting for the Cash book function.
Assigning the user right for the cash book
1. easyjob Menu Extras User Rights Management
2. Select a user
3. Edit
4. Rights tab
5. Assign the desired rights
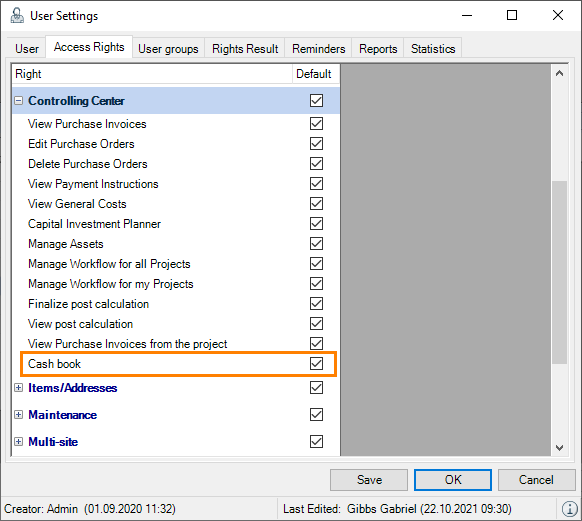
6. Save
7. Ok
Program Settings
No content for this section.
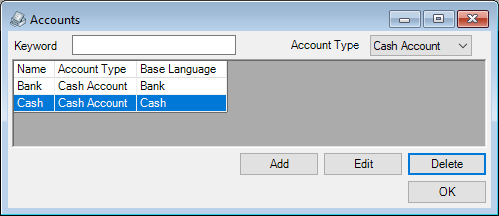
Chart of accounts
The Chart of accounts is used to assign accounts between easyjob and your accounting. Different expense accounts are required depending on the type of company. If you outsource your accounting to an external service provider (i.e. an accountant), you must synchronize the individual accounts with your accountant's office.
Then you can create the required accounts:
1. easyjob Menu Master Data Accounts
2. Add
3. Enter a unique name
4. Select Expense Account as the account type
5. Enter the account number
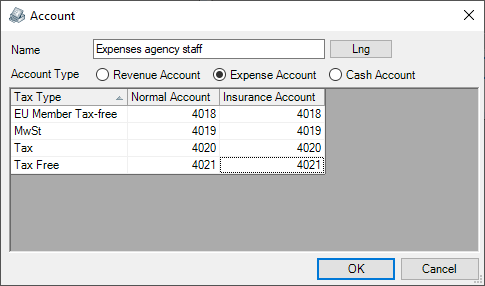
6. Ok
Repeat the procedure until all accounts have been created.
On the basis of the created accounts, the preset account will be selected automatically in the purchase invoice upon assignment of the purchase invoice line item.
Standard Expense Accounts
To make automatic account assignment possible when exporting data to the accounting department, the individual expense accounts can be pre-defined for the various easyjob program modules and areas. The predefined expense account is used automatically when assigning a purchase invoice.
Use is basically identical for the income accounts. As expense account assignment is generally done in more detail, various expense accounts can be selected in the various program modules and areas.
There are standard expense accounts for Sub Categories (material), Resources, General Costs, Job Cost Type and for additional standard expense types.
The settings are modified in the easyjob Master Data.
Standard Expense Account Categories
Defining expense accounts for subcategories:
1. easyjob Menu Master Data Subcategories
2. Select the required Mutternwarengruppe
3. Select the subcategory
4. Edit
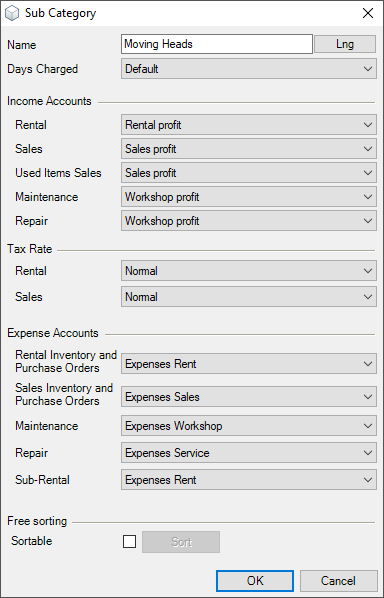
5. Define the required expense accounts
6. Ok
Five different expense accounts can be assigned to each category.
Rental Inventory and Purchase Order
When assigning a purchase invoice to a rental inventory entry purchase order or directly to an inventory entry in the master data, the selected expense account is assigned.
Sales Inventory and Purchase Order
When assigning a purchase invoice to a sales inventory purchase order or direct to an inventory entry in the master data, the selected expense account is used.
Maintenance
When assigning a purchase invoice to a maintenance workshop activity, the selected expense account is assigned.
Repair
When assigning a purchase invoice to a repair workshop activity, the selected expense account is used.
Sub-rental
When assigning a purchase invoice to a sub-rental purchase order or a sub-rental job, the selected expense account is assigned.
Standard Expense Account Resources
Defining the expense accounts for resources
1. easyjob Menu Master Data Resources
2. Select the required resource
3. Edit
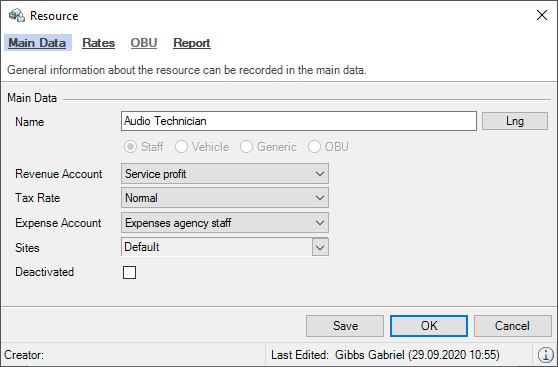
4. Define the required expense accounts
5. Save
6. Ok
The corresponding expense account can be selected for each resource type. When assigning a purchase invoice from an external service provider, the selected expense account is used.
Standard Expense Account General Expenses
Defining the expense accounts for general expenses
1. easyjob Menu Controlling General expenses
2. Add
3. Enter a Name
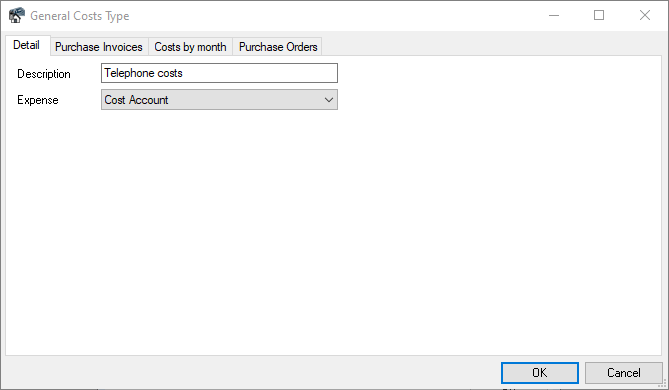
4. Define the required expense account
5. Ok
The corresponding expense account can be selected for each general expense type. When assigning a purchase invoice to the general expense type, the selected expense account is used.
In addition, all purchase invoices assigned to the general expense type and the general expenses grouped by month can be viewed.
Standard Expense Account Job Cost Type
Defining an expense account for the job cost type
1. easyjob Menu Master Data Job Cost Types
2. Select the required job cost type
3. Edit
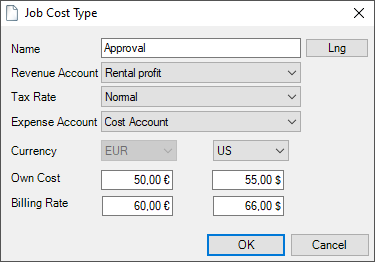
4. Define the required expense account
5. Ok
The corresponding expense account can be selected for each job cost type. When assigning a purchase invoice to a job expense entry, the selected expense account is used.
Additional Standard Expense Types
Additional expense accounts are recorded in the program settings.
1. easyjob Menu Options Controlling Center
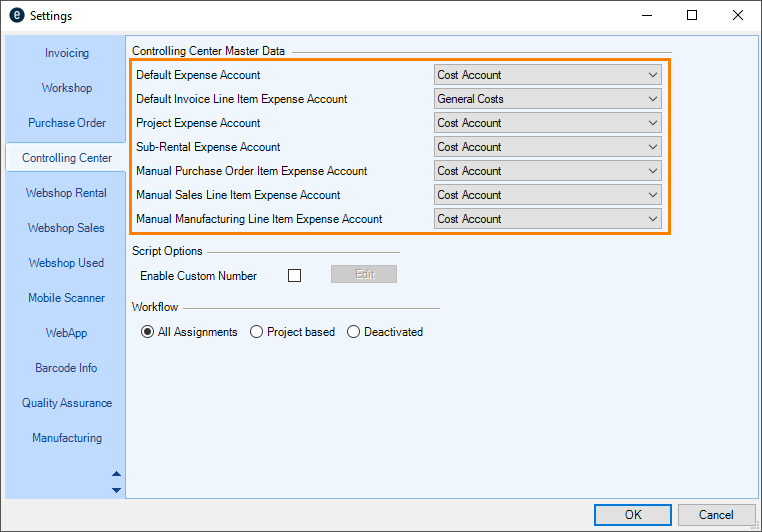
2. Define the required expense accounts
3. Ok
easyjob must be restarted to activate the settings.
Details about additional standard expense types
No content for this section.
Standard Purchase Invoice Line Item Expense Account
When creating a new purchase invoice line item, the expense account is pre-selected in the purchase invoice.
Standard Purchase Invoice Line Item Invoice Line Item Type
When creating a new purchase order line item, the line item type is pre-selected in the purchase invoice.
Project Expense Account
When managing purchase invoices, a purchase invoice can be assigned to a project without qualifying it. As the assignment does not belong to sub-rental, job costs or resources, the selected expense account will be used for it.
Sub-rental expense account
If items are sub-hired that are not contained in the master data, this expense account is used.
Manual Purchase Order Item Expense Account
If a manual line item is added to a purchase order, none of the item's standard expense accounts may be used. The expense account is used for this.
Manual Sales Line Items Expense Account
If a manual line item is added to a sales order, none of the articles standard expense accounts may be used. The expense account is used for this.
Creating a cash book account
Before you can use the cash book, you must create a Cash Account type of account for the cash book account and then activate it for the cash book.
Activating the cash book account
1. easyjob Menu Master Data Accounts
2. Filter by the Cash Account type of account
3. Select the account
4. Edit
5. Check the Cash book box
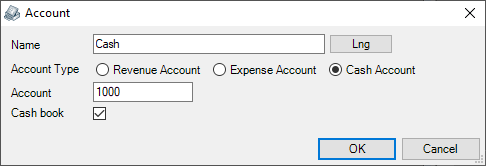
6. Save
7. Ok
CC Workflow settings
To ensure the checking of Received Invoices, an authorization process is started when assigning Purchase Invoices. In the program settings you can define the types of assignment positions that activate the CC workflow when they are created and therefore must be confirmed later.
1. easyjob Menu Options Controlling Center
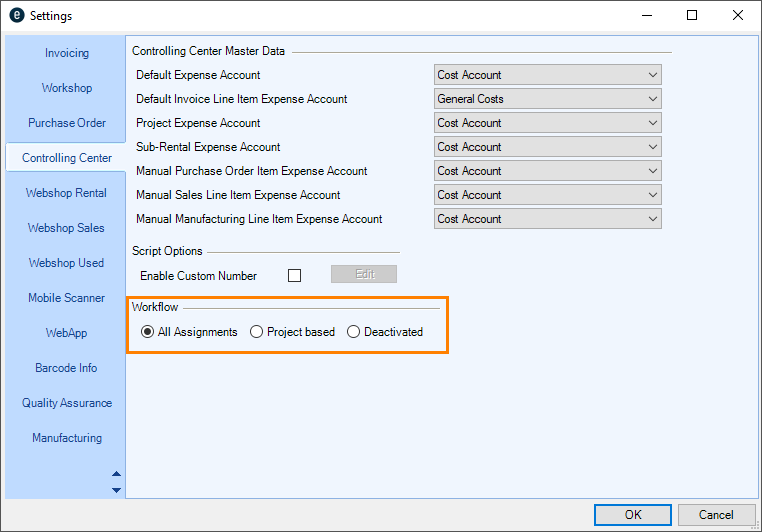
2. Define the required workflow setting
3. Ok
easyjob must be restarted to activate the settings.
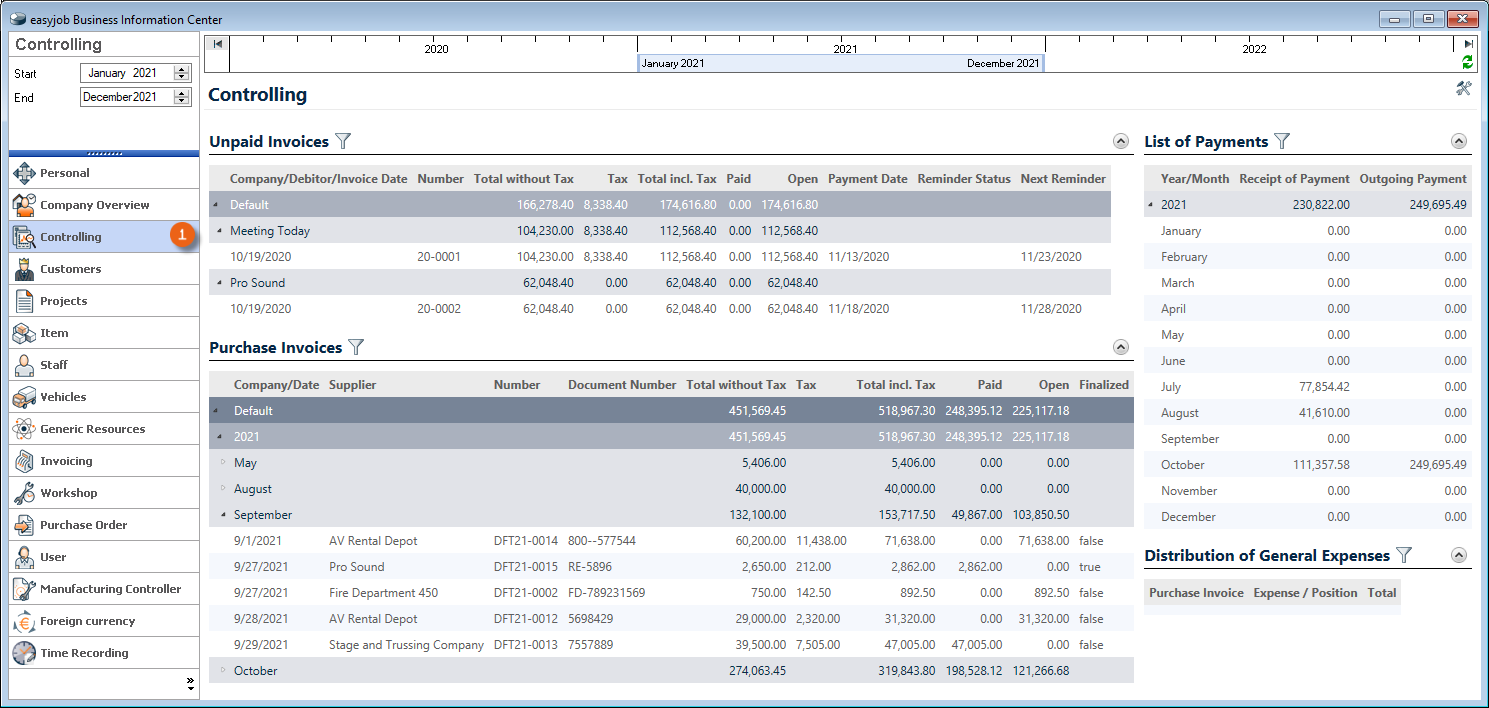
Controlling Center Cockpit
The Controlling Cockpit is the main way to access the Controlling Center features. The various area of the Controlling Center can also be opened from the easyjob Menu.
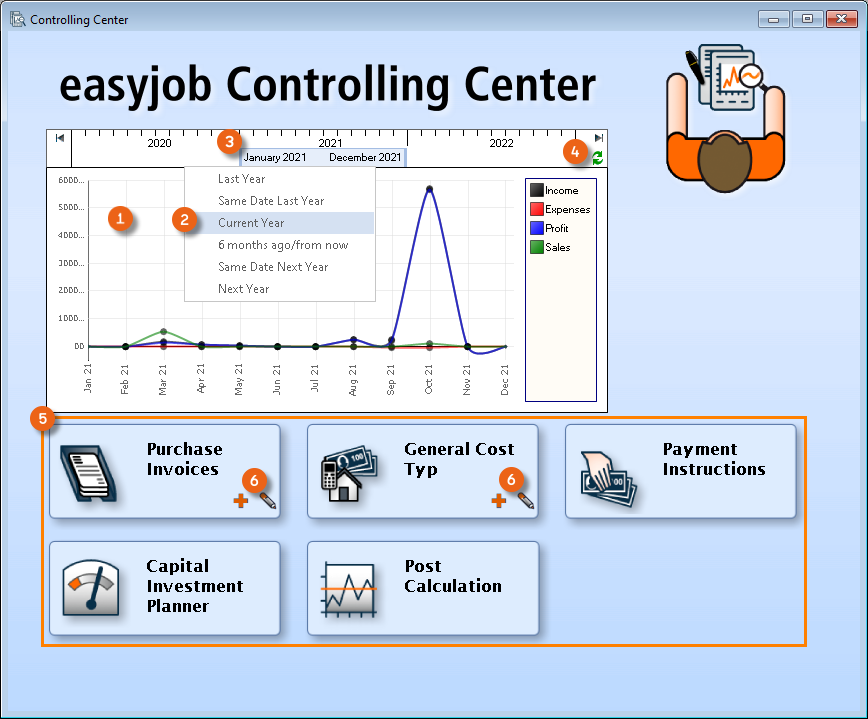
The overview graphic provides a brief overview of the company's financial situation. Various lines calculate the current income and expenses, resulting in monthly profit. The corresponding numbers are calculated from the scheduled income, from confirmed projects and sales orders as well as from scheduled expenses. The current year is automatically displayed. In addition to the predefined time windows from the context menu, you can use the mouse to move the timeline as preferred. To calculate the period click Refresh . The buttons make it possible to quickly navigate the various Controlling Center areas. Clicking the button will open the respective program area. It is also possible to create a new data set or edit an existing data set for purchase invoices and general expenses.
Purchase Invoice Management
A purchase invoice is used as the basis for many areas in the Controlling Center. You must register the content of every invoice you receive as a purchase invoice in easyjob. By assigning the purchase invoice to the individual easyjob modules and areas, cost control, project post calculation as well as purchase invoice export to the accounting department can be carried out. Furthermore, the respective project leader can use an authorization workflow to decide if the scheduled purchase invoice is correct. The payment instructions are calculated based on the payment terms. It is also possible to attach the original purchase invoice to the documentation using the document scanner. An advantage of entering the original purchase invoice is that by simply pressing a button, you can access the purchase invoice as well as the ergonomic assignment of the purchase invoice line item. For the assignment, visual contact is not necessary between the purchase invoice, screen and the keypad.
Creating a purchase invoice
1. easyjob Menu Controlling Create Purchase Invoice
or
1. easyjob Menu Controlling Center Add Purchase Invoice icon
2. Enter the required data as described in the following sections
3. Ok
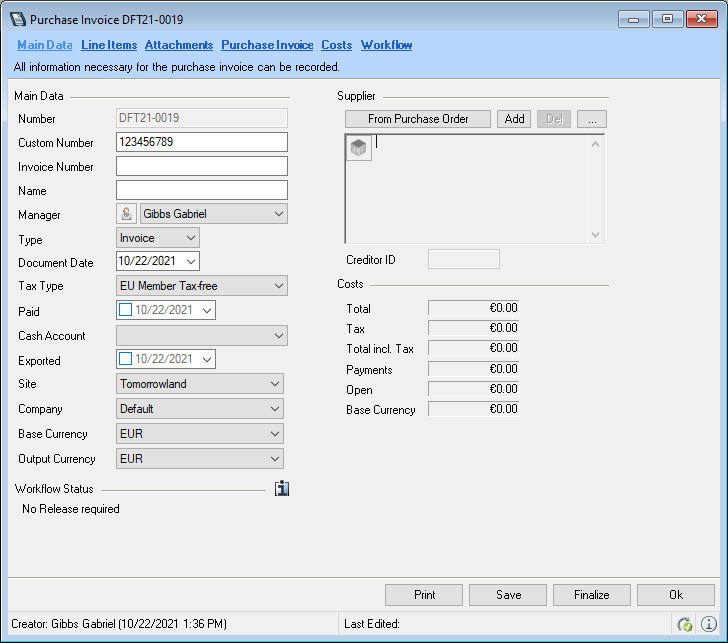
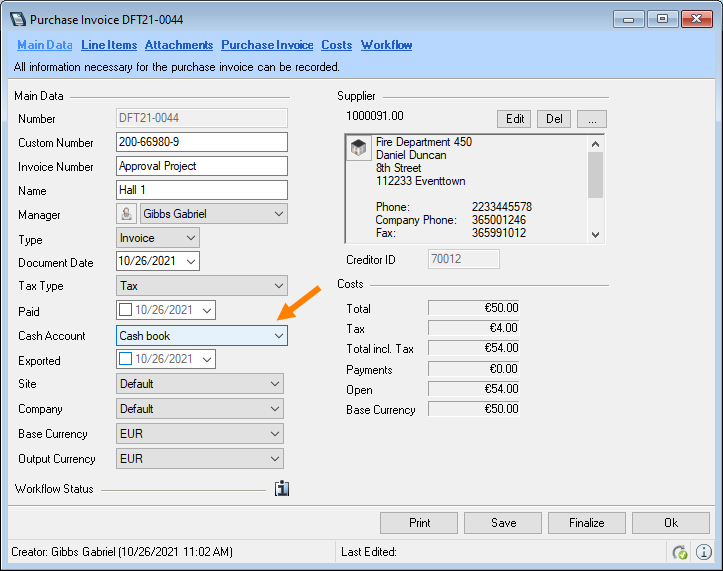
Main Data
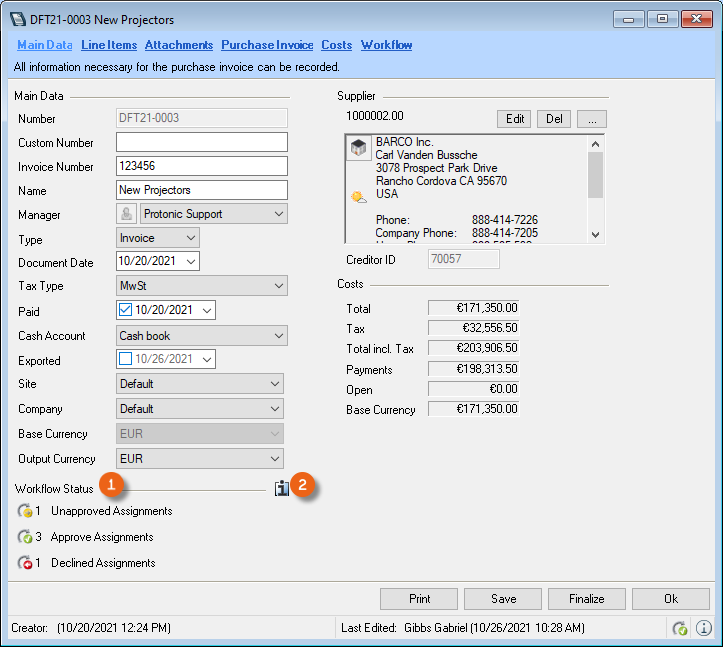
Enter the Invoice number , the Supplier and the Tax type in the Main data . When selecting the supplier, you can directly assign the corresponding Purchase Order . The address name or the name of the Purchase Order is used to create the Name upon assignment of the address, and can be changed at any time. The tax rate is selected as a presetting for the individual purchase invoice line items. If a purchase invoice line item has various tax rates, the tax can be corrected manually for the document line item. Furthermore, you can enter the Type (invoice or credit) and the Date of the document. The Payment Date and the Cash Account used for the payment, as well as an overview and the status of the Costs are also displayed in the main data. You can also see the Workflow Status .
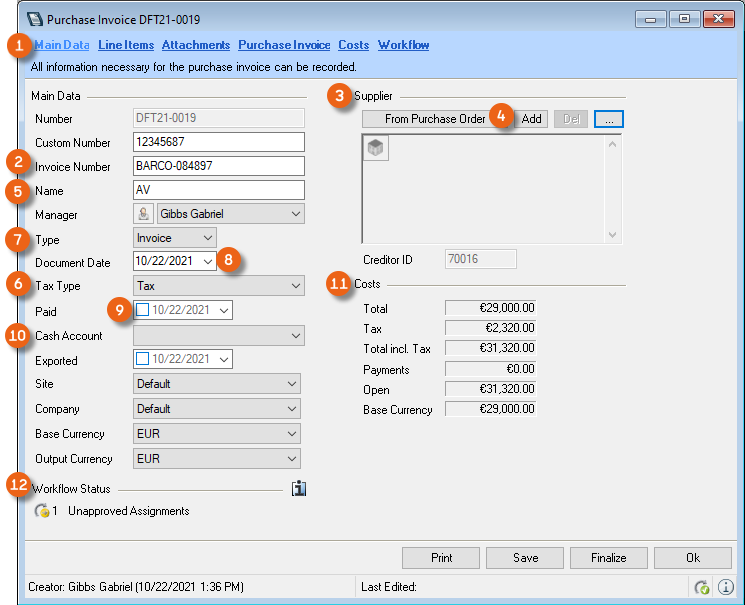
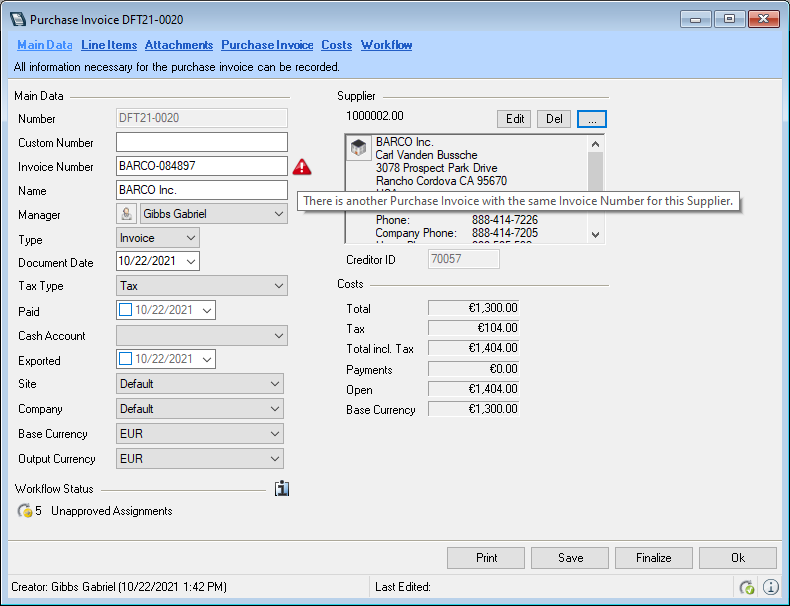
Warning if the invoice number is the same
To prevent invoices from being recorded twice, a corresponding warning is displayed if the same invoice number is used for a supplier.
Line Items
The number of line items you create depends on the level of detail with which you will later carry out your controlling. You can create a line item for each individual sub-rental item in a supplier invoice, for example, or combine all sub-rental items for a job in one line item.
In order to quickly and easily enter the purchase invoices, we recommend creating as few individual line items as possible. With the Business Information Center, easyjob provides a detailed evaluation of all possible combinations so that you can limit yourself to what is necessary when creating purchase invoices.
It is possible to used the scanned purchase invoice to graphically create line items quickly and simply (see also section Document) or to enter the line items manually.
Adding purchase invoice line items manually
1. easyjob Menu Controlling Create Purchase Invoice
2. Line Items tab
3. Add
4. Enter the desired data
Purchase Invoice Line Item Distribution
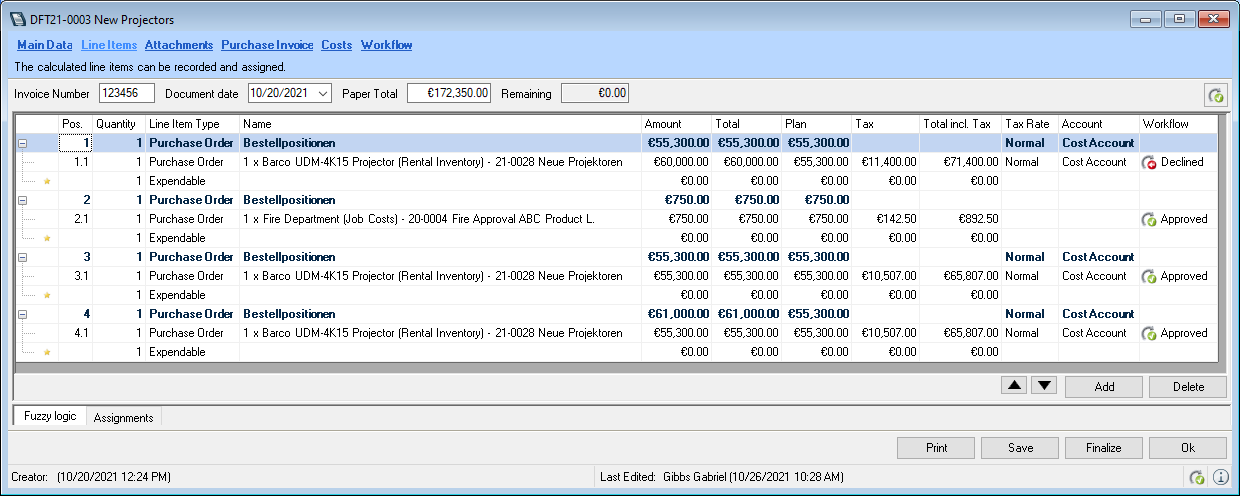
The detail with which you want to enter the purchase invoice line items depends on the requirements of the individual reports. In principle, you can also create a purchase invoice line item, for example, for a rental invoice with multiple items. If a supplier has summarized multiple services in one line item , you can divide this into different services using sub-line items.
In the purchase invoice line item you can enter the quantity, line item type, name, amount, tax rate and the revenue account. If you enter the purchase invoice line item via a document, you can keep the name open, as you can view the original text in the display window at any time. You can change the order of the line items using the arrow keys . The tax is automatically pre-selected based on the data in the document header (from the supplier's master data.
Based on the selected account, the expenses will be assigned to an account when exported to the accounting department. If you want to assign services to the respective line items, do not select the account and line item type field.
Data export is based on the account information from the service assignment. Then you can also leave the amount field open. The field will be calculated automatically based on the assignment.
Service assignment (automatic)
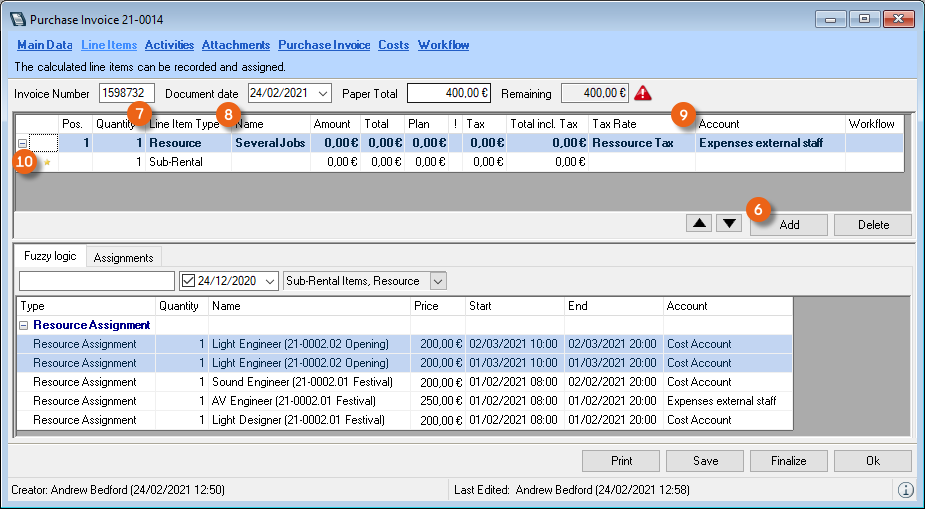
Based on the service assignment (connecting activities in easyjob with the purchase invoice), expenses are displayed and calculated in the corresponding easyjob program module. For a quick assignment, easyjob Fuzzy Logic makes suggestions based on the current purchase invoice and the available information (supplier). Enter the invoice amount in the Paper Total field. The Fuzzy Logic lists all activities that are connected to the supplier and that could apply for the purchase invoice. Various filters such as the Process (sub-rental, sub-rental item, job costs, etc.), the Date (preselected from a period minus two months) and a keyword filter (you can use the wildcards * and ?. * replaces the rest of a word and ? replaces a letter with a variable text) help provide a better overview.
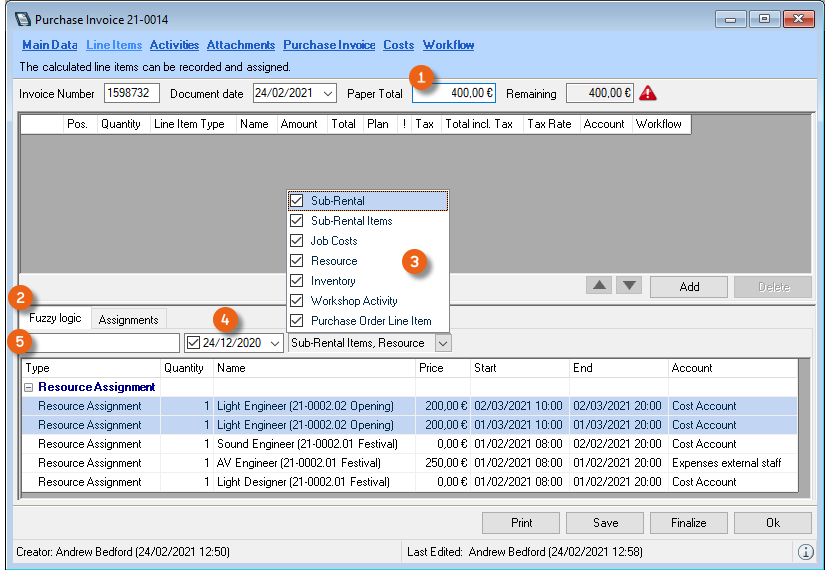
The following logic is used for the analysis
Sub-rental or sub-rental item
All sub-rental type jobs (or the contained items), all purchase orders for sub-rental type jobs (or the items) without the service assigned to the selected supplier.
Job Costs
All job costs from the past from the selected suppliers that do not have the service assigned during the previous and next six months are displayed.
Resource
All resources without the service assigned to the selected supplier. Vehicles are suggested when the delivery address corresponds with the address entered for the vehicle. The vehicles are displayed with a license plate number.
Sales or Sales Line Items
All sales type jobs (or their sales line items), all purchase orders for sales type jobs (or their sales line items) without the service assigned to the selected supplier.
Inventory
All inventory entries for which the selected supplier was defined as the supply source.
Workshop
All workshop activities in progress without the service assigned, in which the selected supplier is selected as the address of the maintenance provider.
Purchase Order Line Items
All purchase orders in progress without the service assigned to the selected supplier.
Corporate structure assignment via fuzzy logic
When using the easyjob CRM module, the address of the parent companies and subsidiaries will be displayed. See also easyjob CRM Parent address and Subsidiaries.
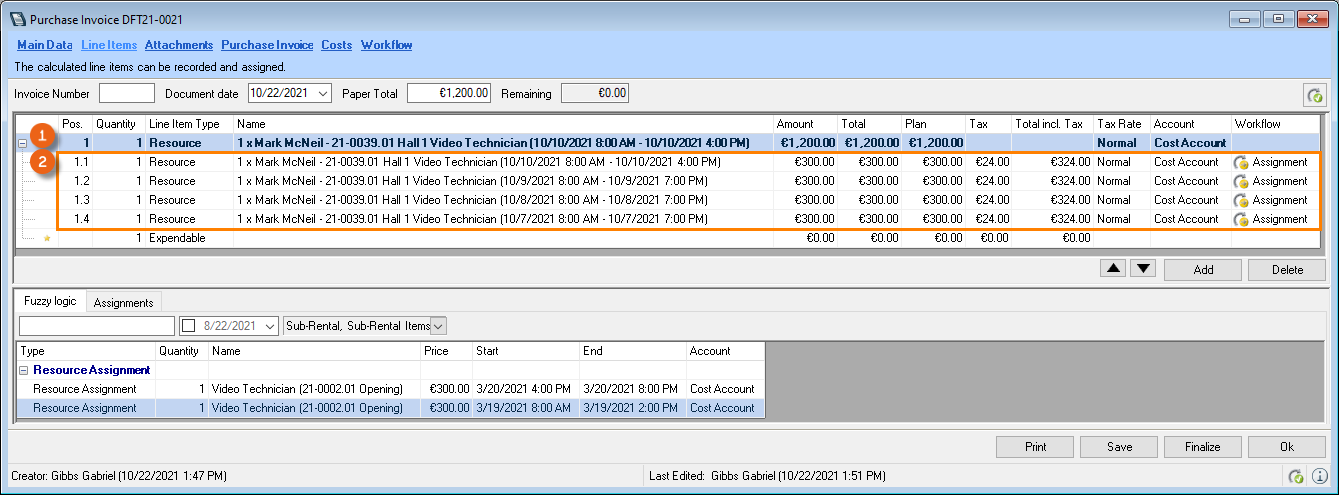
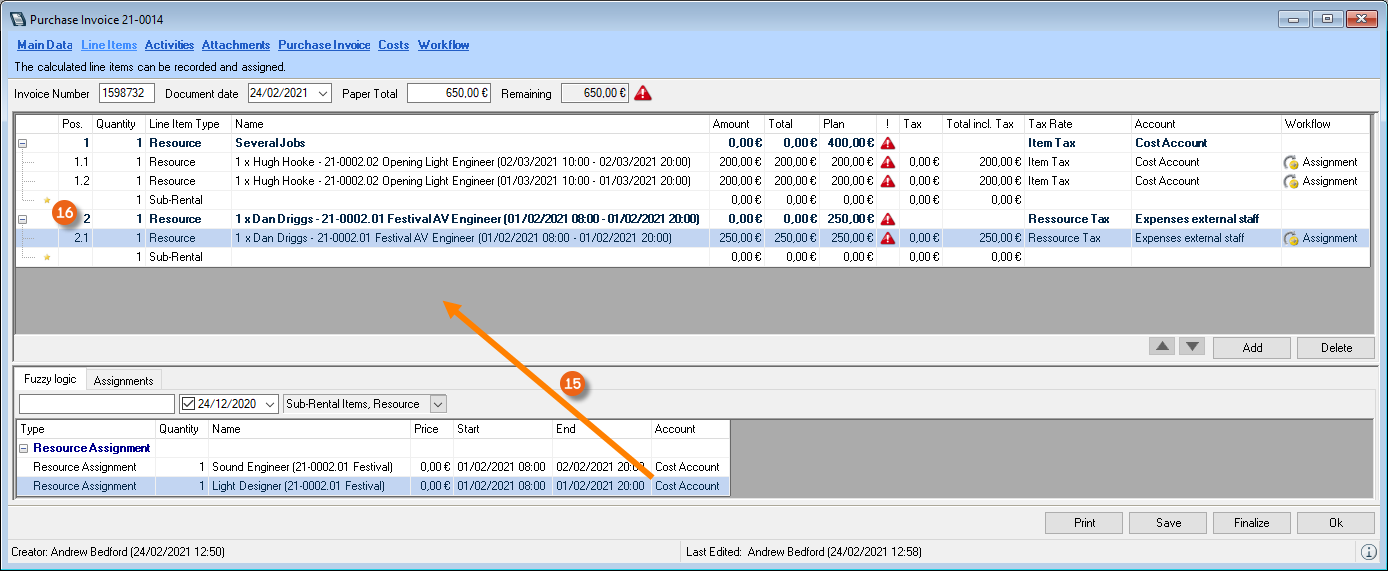
Create and assign a purchase invoice line item via fuzzy logic:
Add a new Line Item as done for an invoice and customize the Line item type , the Name and the Account as required. A new sub-line item is created automatically and marked with a star .
You can Drag&Drop the appropriate line items from the Fuzzy Logic in succession to the free Unterpositionen . The Line Item type and the account are applied from the main line item and can then be customized. A Warnhinweis shows the difference between the planned amount and the current amount. By right clicking the symbol, you can open the sub-menu and decide how to distribute the difference (proportionately to the quantity or proportionately to the costs). With Apply total, you can apply the planned total.

Alternatively, the assignments suggested by the Fuzzy Logic can be dragged and dropped to the empty field in the Purchase Invoice Line Item window. easyjob creates a separate entry for each assignment.
Service assignment (manual)
The service assignment can be carried out manually. To do so, select the Assignments tab and the Line item type (e.g. purchase orders) to which you want to assign the services. Select a Purchase Order and drag and drop the line items to the free field . A corresponding main line item is created automatically with the relative sub-line items and the selected purchase order line item is assigned to the purchase invoice.
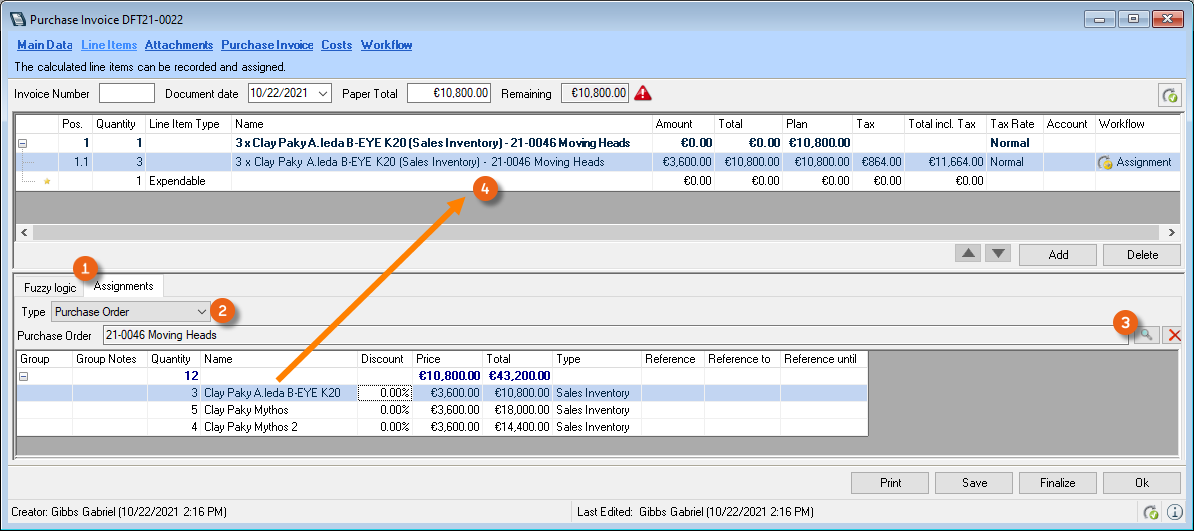
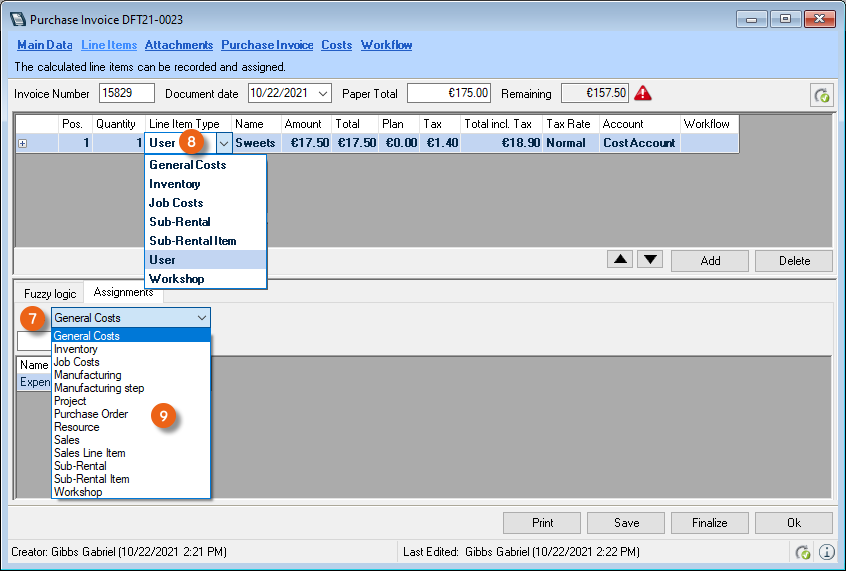
In addition to the easyjob activities (Purchase Order, Inventory, etc.) you can also assign your purchase invoice to General costs . If you cannot assign a Purchase Invoice Line Item to any easyjob activity, select the User line item type.
Afterwards, the individual service assignments and their connections are shown in easyjob.
Service assignment -General expenses
General expense services such as telephone bills or similar will be assigned to the general expenses.
| Expense calculation | Investment planning |
|---|---|
| Expense account | The expense account is assigned on the basis of the selected general expense account. |
| Purchase invoice display | General expenses |
Service assignment - User
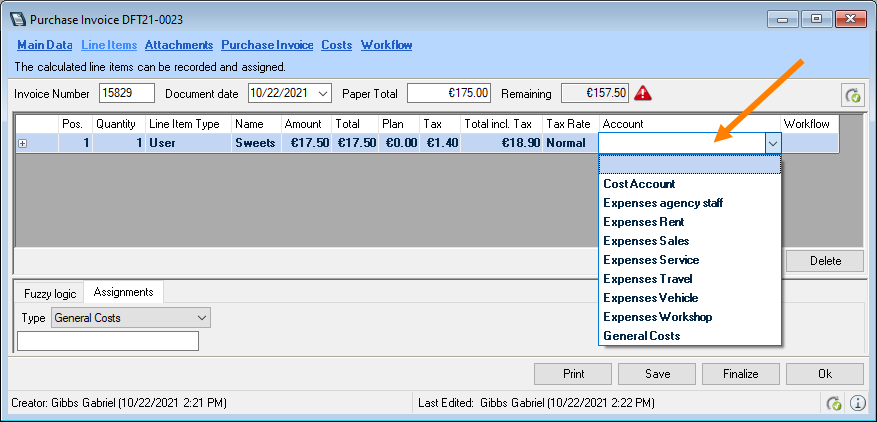
If you cannot assign any object in easyjob to a purchase invoice line item, select User.
| Expense account | The account is pre-selected on the basis of the Expense account manual purchase invoice line item program setting |
|---|
Service assignment - Purchase order
Purchase invoices that you receive based on purchase orders executed thorough easyjob purchase orders can be assigned to the corresponding purchase orders.
| Expense calculation | In the project cost plan, these assignments are included in the real costs of staff or transportation. |
|---|---|
| Expense account | Purchase order line item from item master data for rental inventory:The expense account is pre-selected from the item sub category on the basis of the rental inventory and purchase order account settings.Purchase order line items from item master data for sales inventory:The expense account is pre-selected from the item sub category on the basis of the sales inventory and purchase order account settings.ResourcesThe expense account is pre-selected on the basis of the expense account assigned to the resource type.Manual Purchase Order Line Item:The account is selected on the basis of the Expense account manual purchase order line item program setting. |
| Purchase invoice display | Project, Sales, Purchase Order, Item Master Data |
Service assignment - Inventory
If you want to assign a purchase invoice for purchasing an item for the rental or sales stock and you do not have a purchase order a or sales order, the service can be assigned an inventory entry.
| Expense account | Sales inventory entry:The expense account is pre-selected from the item category on the basis of the rental inventory and purchase order account settings.Rental inventory entry:The expense account is pre-selected from the item category on the basis of the sales inventory and purchase order account settings. |
|---|---|
| Purchase invoice display | Item Master Data |
Service assignment - job costs
With job service assignment, supplier services are assigned to the job costs.
| Expense calculation | In the project cost plan, these assignments are included in the real costs of the job costs. |
|---|---|
| Expense account | The expense account is pre-selected on the basis of the expense account assigned to the job cost type. |
| Purchase invoice display | Project |
Service assignment - Project
Each project can be assigned many different costs for services through job, resource and sub-hire costs.
If an assignment is not exactly possible or if there is a document that cannot be assigned to any of the listed activities, you can make a general service assignment to the project.
| Expense calculation | In the project cost plan, these assignment are included in the real costs of the job costs. |
|---|---|
| Expense account | The account is pre-selected on the basis of the project expense account program setting |
| Purchase invoice display | Project |
Service assignment - resources
By assigning a service to a resource, you assign the purchase invoice line item as a cost to an invoice for a project resource.
| Expense calculation | In the project cost plan, this assignment is included in the real cost of staff or transportation. |
|---|---|
| Expense account | The expense account is pre-selected on the basis of the expense account assigned to the resource type. |
| Purchase invoice display | Project |
Service assignment - sales or sales line items
By assigning a service to a sales project, you assign the purchase invoice as a cost for a sales order or to the individual sales line items.
| Expense account | Manual sales line items:The account is pre-selected on the basis of the Expense account manual sales line items program setting.Sales line item from item master dataThe expense account is selected from the item category on the basis of the sales account settings. |
|---|---|
| Purchase invoice display | Sales Order, Purchase Order, Item Master Data, Item Inventory |
Service assignment - workshop
By assigning a service to a workshop activity, you can enter the purchase invoice line item as a cost to an invoice that you received for a workshop activity.
| Expense account | The expense account is pre-selected on the basis of the item category account settings. If it concerns maintenance or repair, the respective maintenance or repair expense account is used. |
|---|---|
| Purchase invoice display | Workshop Activity and Item Master Data |
Service assignment - sub-rental or sub-rental item
With a sub-rental service assignment, you assign the purchase invoice line item as a cost for the entire sub-rental or for the sub-hired equipment.
| Expense calculation | In the project cost plan, these assignments are included in the real cost of the sub-hired equipment. |
|---|---|
| Expense account | The expense account is pre-selected on the basis of the sub-rental account settings. |
| Purchase invoice display | Project and Item Master Data |
Service assignment not known initially
It is possible in individual cases that your accounting department must select the correct expense account. To do so, you an select an empty entry.
With the Navigator view, all purchase invoices with an empty entry can be determined. See also section Overviews in Navigator and easyjob Heute.
Attachments
As in many of the easyjob program modules, you can assign as many documents to a purchase invoice as you want.
It is also possible to scan and import the original document in the purchase invoice.
See also easyjob 6 manual document type.
Document
No content for this section.
Assignment of the purchase invoice
To automatically apply line items from the scanned invoice or the invoice in PDF format, the concerned invoice must first be added to the Documents tab. Then you can select the document as a purchase invoice.
Adding the invoice
1. easyjob Menu Controlling Edit Purchase Invoice
2. Select the purchase invoice
3. Ok
4. Documents tab
5. Add
6. Add the desired document
Selecting the added invoice as the purchase invoice:
1. easyjob Menu Controlling Edit Purchase Invoice
2. Purchase invoice tab
3. Documents
4. Select the deisred document
Processing a collective document
If you want to create multiple purchase invoices at the same time, scan all the desired documents at once. With the Process collective document function you can easily create the corresponding purchase invoices from all invoices. After scanning, select the file of your created collective document . Use the arrow keys to navigate the various pages, enter the invoice number, date and invoice amount as well as the supplier and in the case of multi-page invoices, always click New purchase invoice on the first page (for one-page invoices also on the first page). At the end, click Create purchase invoices .
Processing a collective document
1. easyjob Menu Controlling Sammeldokument verarbeiten
Assigning individual line items in the purchase invoice
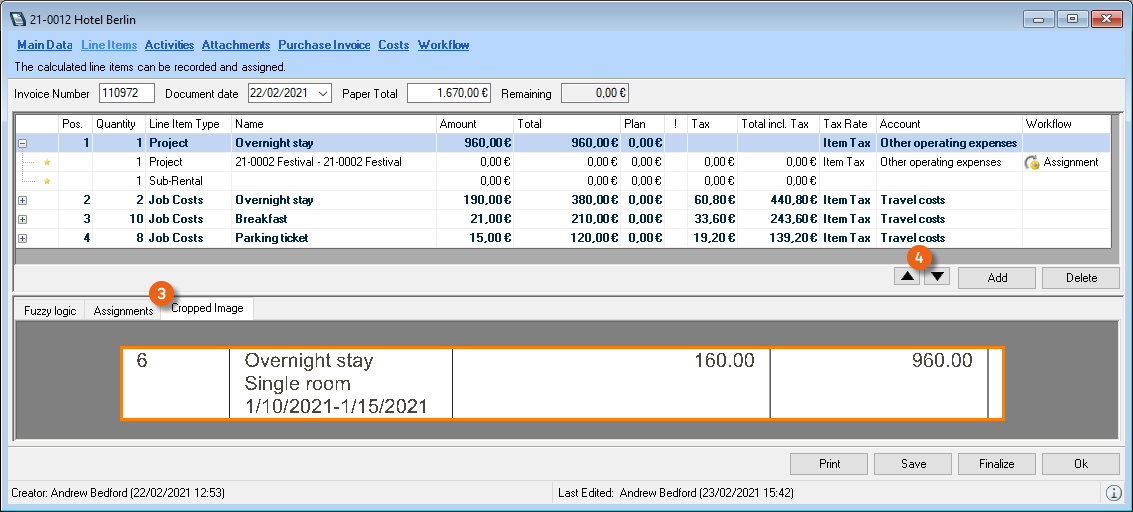
In order to make to easier to assign the individual line items to the respective cost types at a later time, you can graphically divide the original document into individual portions. In the tools list, you can customize the view so that you can see the purchase invoice line items correctly on your screen. Selecting with the mouse (pull down the frame), you can create a new Line Item. If there are multiple line items on a document that you want to combine, you can expand the selection over multiple lines. After assigning the area, the line item number is automatically added (e.g. 1). The line item can be updated through a manual entry in the text field. The results row displays the files that can be selected that were automatically detected for the respective field. Use the arrow key to open the selection and assign the suitable value. If the purchase invoice consists of multiple line items, you can duplicate the selection via the menu .
After duplication, the new line item is created in the same way as the first line item and numbered sequentially . The selection made under line item 1 is usually displayed in the results row. If necessary, the line item contents can be customized using the arrow keys of the individual cells . Continue with duplication until all line items have been entered. If the purchase invoice consists of multiple pages, you can select it via the tool menu . It is also possible to delete individual or all selected line items . All created elements are displayed on the Line item tab. See also section Line Items .
Costs
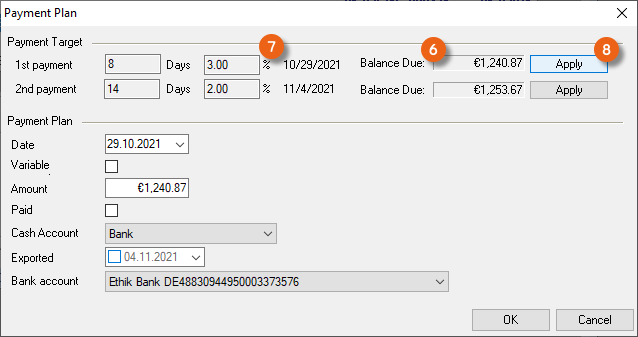
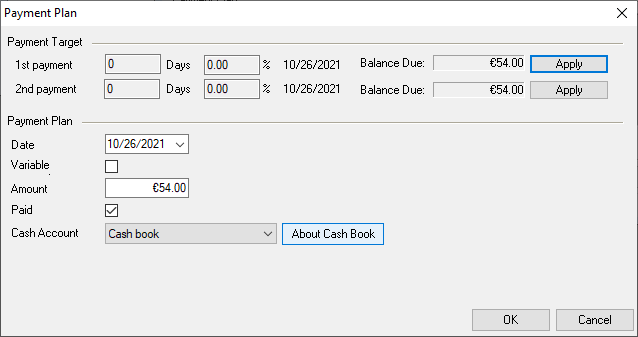
The sum of the individual line items is summarized on a line in the cost overview . The line items list is displayed grouped by accounts and the payment target is taken from the address master data (Supplier payment method). If the purchase invoice was created based on a purchase order, the payment target for the purchase order is applied. If there are multiple purchase orders, this is the payment target for the first line item. If you select a payment type with a blank entry , you can change the terms of payment . The result can be added as the Payment Plan .
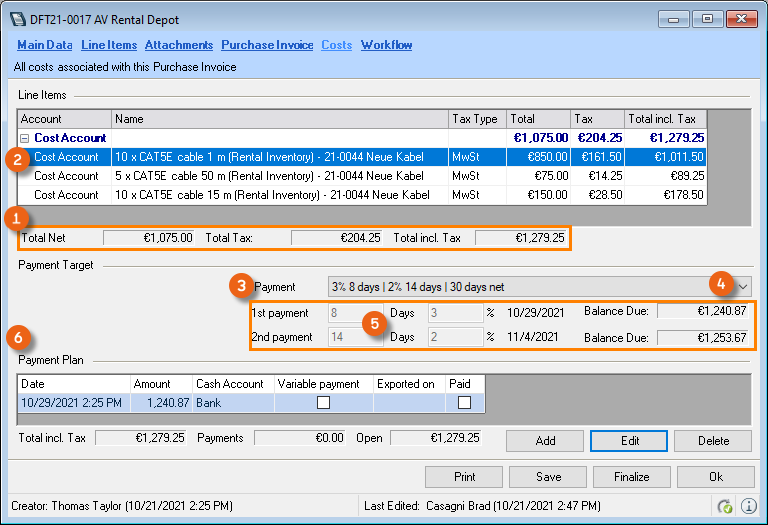
In the payment plan, determine when and for how much the transfer should be made. Based on the payment target, the Amount and Date of the payment is suggested. With Apply you start the preparation of the payment instructions, which can then be finalized under Controlling Center Payment instructions. Furthermore, you can select your cash account and the supplier's bank account (in the address master data)
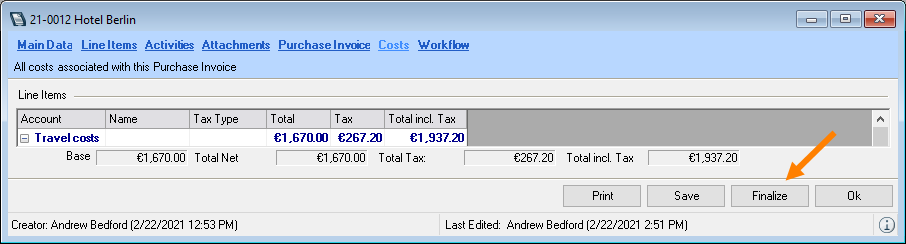
Finalizing a Purchase Invoice
When a purchase invoice is finalized, the purchase order can no longer be edited and is prepared to be exported to the accounting department. Upon finalization, it is checked if the purchase invoice corresponds with the export definitions for the data export configured in the master data. The cash account entered for the payment plan is automatically set in the main data of the Purchase Invoice.
Overviews in Navigator and easyjob Heute
There are many filters in Navigator and easyjob Today in order to maintain an overview of all purchase invoices. Click the Settings icon and drag & drop the desired filter to the Navigator area .
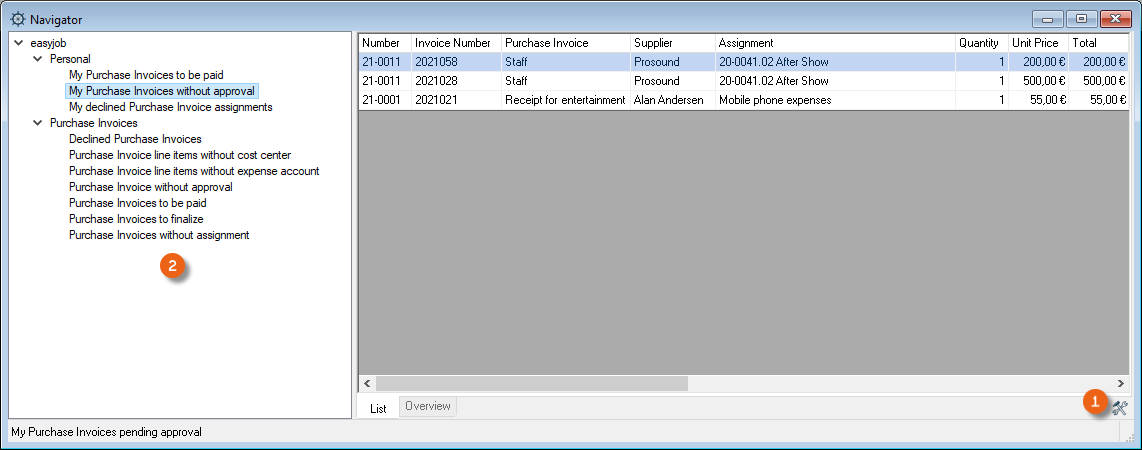
In the personal area:
- My purchase invoices without release
- My purchase invoices to be paid
- My declined purchase invoice assignments
In the general area:
- Purchase invoices without release
- Declined purchase invoices
- Purchase invoice without assignment
- Purchase invoices to finalize
- Purchase invoices to be paid
- Purchase invoice line items without expense account
- Purchase invoice line items without cost center
The same overviews are available in easyjob Today. You can perform additional work steps using the context menu.
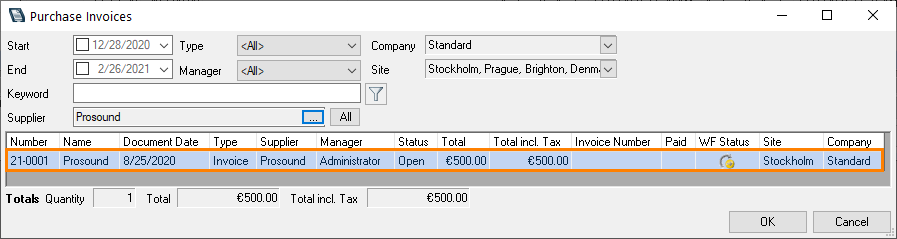
Purchase invoice overview
In the Purchases Invoice view, you will have an overview of all invoices and can filter them according to various criteria. In addition to the period , a keyword filter or the supplier you can limit the display in addition to the type (Invoice or Credit) and the Operator .

Open the purchase invoice overview
1. easyjob Menu View Purchase invoices
or
1. easyjob Menu Controlling Edit Purchase Invoice
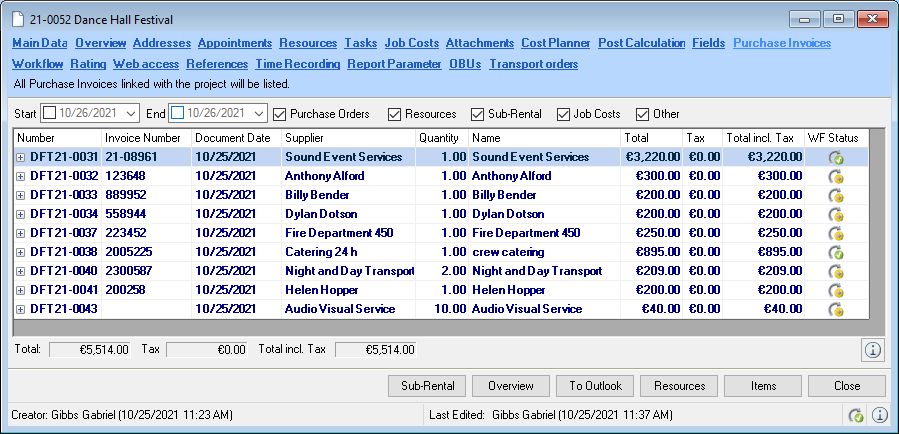
The processed purchase invoices are displayed via the service assignments in the various easyjob areas (purchase order, workshop, etc.). An additional Purchase Invoice tab is shown in the forms (here in the project example) With the selection, the period as well as the Process can be filtered in the purchase invoice lists. The assigned external services are displayed according to purchase invoices. The context menu is used to open the corresponding purchase invoice. You can view the workflow status and approve it if necessary . In addition, the total of the listed costs can be calculated .
Further purchase invoice views
The assigned purchase invoices can also be navigated using some forms. In job costs, a purchase invoice icon is displayed for the assigned costs.
Click the icon to open the purchase invoice.
E-invoice import
In addition to the conventional purchase invoices, you can also import e-invoices. You can import one or multiple files via Read files . Their possible formats are .pdf and/or factur-x.xml. After importing, easyjob automatically performs various checks. The Date and Amount are taken from the imported file. A duplicate check of the creditor is integrated with the Number . Creditor identification takes place using the VAT number entered in the address master data. In addition, the corresponding Purchase orders (comparison with the purchase order and reference number), Projects , Entity (via the VAT number) and Site are automatically assigned. The assignment of a Project is used for pre-filtering in the purchase invoice (to be able to find certain assigned purchase orders faster, for example) and does not have any effect on the purchase invoice data.
Once the entry is successfully assigned, this is indicated by a green checkmark  . Via the context menu it is possible to open the Document or the Copy as well as delete the X_Invoice .
Everything is displayed in the E-invoice data master data and the E-invoice data line items that was transferred via the e-invoice.
The Assignment provides support when selecting the corresponding data in easyjob. A new creditor can be created from the imported data if necessary  . If an existing address is selected for the creditor , the VAT number (or other data, such as a bank account) transferred from the e-invoice is automatically added to this address (existing entries are not updated).
Multiple, individual or amounts without warning can be created with the action Selection (context menu) and Create as purchase invoice(s) . After creating the purchase invoice, it can be opened via the context menu and processed as usual.
Activating e-invoice import
1. easyjob Menu Tools Settings
2. Controlling Center tab
3. Check the box EN16931 XInvoice Import
4. Ok
easyjob must be restarted to activate the settings.
Importing and creating an e-invoice
1. easyjob Menu Controlling E-invoice Import
2. Import files
3. Select the desired files
4. Open
5. Select the desired assignments
6. Create
The imported E-invoice document (format: pdf or factur-x.xml ) is stored automatically in the created purchase invoice under Attachments.
The XML-file must be contained in the .pdf format so that the document can be imported as an E-invoice.
General expense management
See section Standard Expense Account General Expenses.
Payment instructions
The payment instructions can be scheduled on the basis of the processed purchase invoices.
You can start the payment instructions from the Controlling Center or using the easyjob menu.
1. easyjob Menu Controlling Center
2. Payment instructions
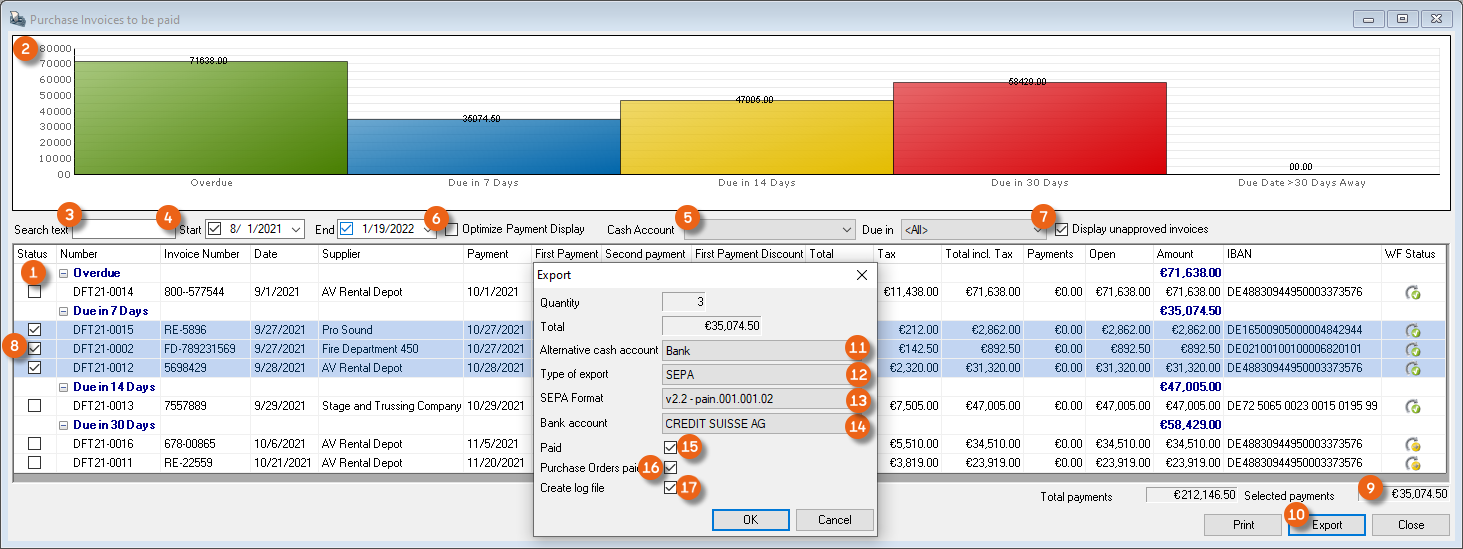
The payment list groups the individual purchase invoices into various time categories of "Overdue", "Due in 14 days", "Due in 30 days" and "Due in more than 30 days". In addition, the sum of all the invoices is represented graphically according to the due date. Different filters such as Search text , Period , Cash account and Unapproved invoices are available. By checking the box Display optimized payments , the payment instructions are scheduled according to liquidity. If the switch is activated, the payments are recalculated on the basis of cash discounts. Check the box for the payment instructions you would like to execute. The total row shows the total amount of the selected payments . Pressing Export opens a window where additional information such as Alternative cash account , Export type (Sepa or Excel), SEPA format and the Bank account can be entered. By checking the Paid and Purchase Orders paid boxes, the the corresponding purchase invoice or purchase order is marked as paid. You can also select Create log file . These are created with the name SEPA_Log_CurrentDate and contain all relevant information for the SEPA Export (Excel Format).
Investment planning
Investment planning provides you with support for investment decisions regarding rental equipment. You can start the investment planning from the Controlling Center Cockpit or using the easyjob menu.
1. easyjob Menu Controlling
2. Investment planning
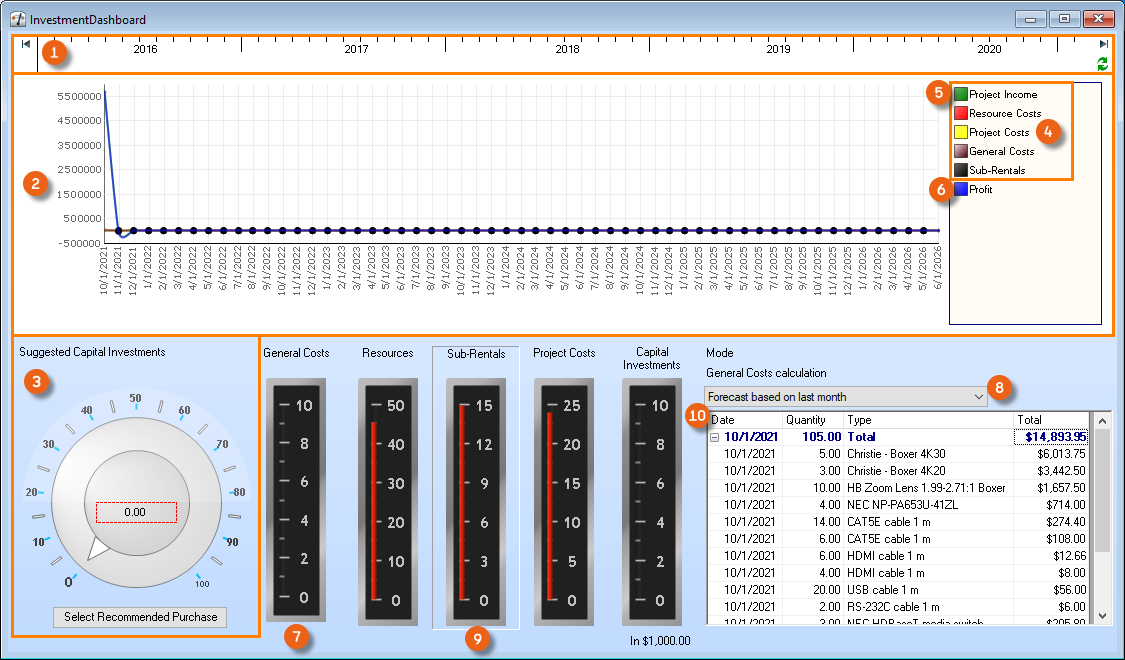
The investment planning is divided into various areas.
Time frame selection
Cost and income chart
Selection of the items for investment
Detailed cost calculation
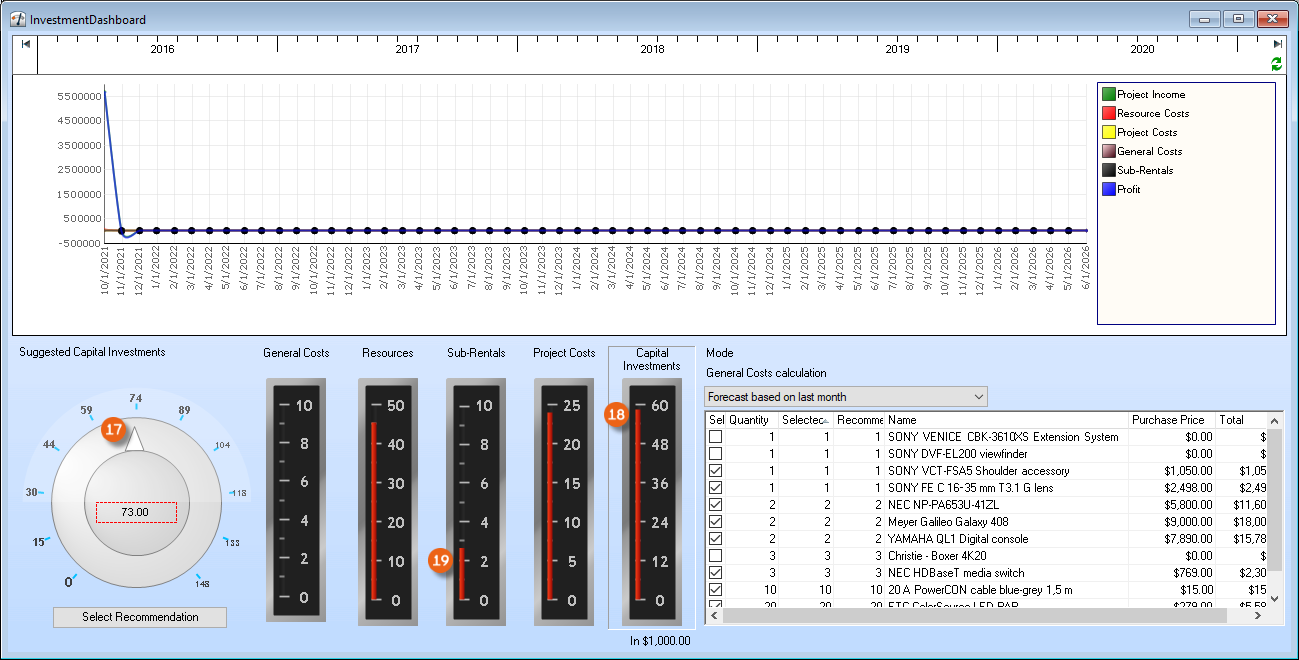
The statistics calculate the scheduled project income, resource costs, project costs, general expenses and sub-hire costs of external equipment . The monthly profit is calculated on the basis of the costs. In order to better assess liquidity based on monthly profit, a future projection is made of the general expenses either based on the last month or the last year . To view details about resources, sub-rentals, project costs or investments, click the respective area (e.g. sub-rentals) . The details are displayed in the right window. The items recommended for investment are taken from the recommended purchase statistics from the easyjob Business Information Center.
You can see the basis of computation here:
1. easyjob Menu Business Information Center
2. Settings
3. Recommended Purchases statistics
4. Design
For the next step click Select recommended purchases . The list shows all purchase recommendations for the selected period . You can select your favorite items using the checkbox . If you want to select all purchase recommendations, check the All box. Click close purchase recommendations .
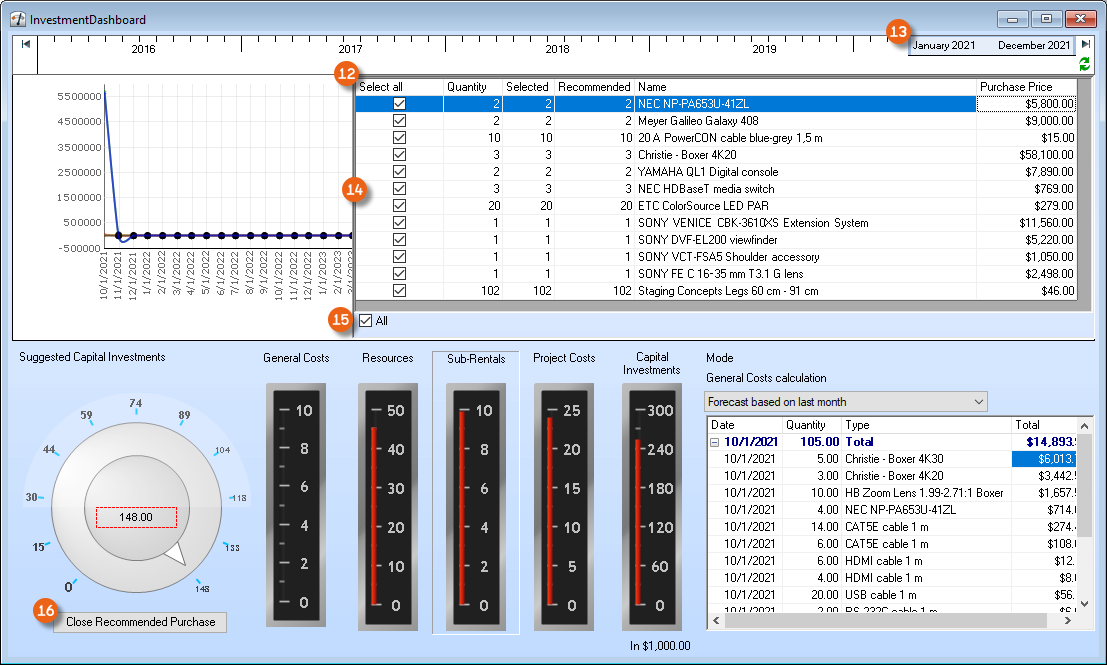
After selecting the suggested items, you can use the scroll wheel to select the quantity of the items to be included in the calculation. All numbers will be recalculated based on the selection. With larger investments , the necessary expenses for sub-rentals are lower, and they are higher for smaller investments.
easyjob Business Information Center
The easyjob Business Information Center provides a few reports in the Controlling area.
1. easyjob Menu Statistics Business Information Center
2. Controlling
If you use the Business Information Center module, you can group the individual reports. A separate license is required.
More information can be found in easyjob Business Information Center Handbuch.
Enhancement of the basis of computation
In statistics, many income side amounts are calculated. Without the Controlling Center, the Business Information Center only takes the scheduled costs into account.
By activating the Controlling Center, the scheduled and real costs are considered together. For costs with a service assignment from the purchase invoice, the real costs are considered, for unassigned costs the scheduled costs are considered.
If, for example, a job consists of two job cost entries, for the first the service assignment is entered via the purchase invoice and for the second there is not yet an assignment, therefore the real costs are considered for the first entry and the scheduled costs are considered for the second entry.
Data export to the accounting department
With data export, all finalized purchase invoices are transferred to the accounting department. It is implemented in the same manner as when exporting invoice data.

In addition to invoices and processed payment receipts, also finalized purchase invoices can be selected for the data export. The cost accounts will be used from the purchase invoice line item or the service assignment depending on if the purchase invoice was processed on a line item level or with a service assignment.
Exporting purchase invoices
1. easyjob Menu Invoicing
2. Export
3. e.g. Datev
4. Select t he desired purchase invoices
5. Start
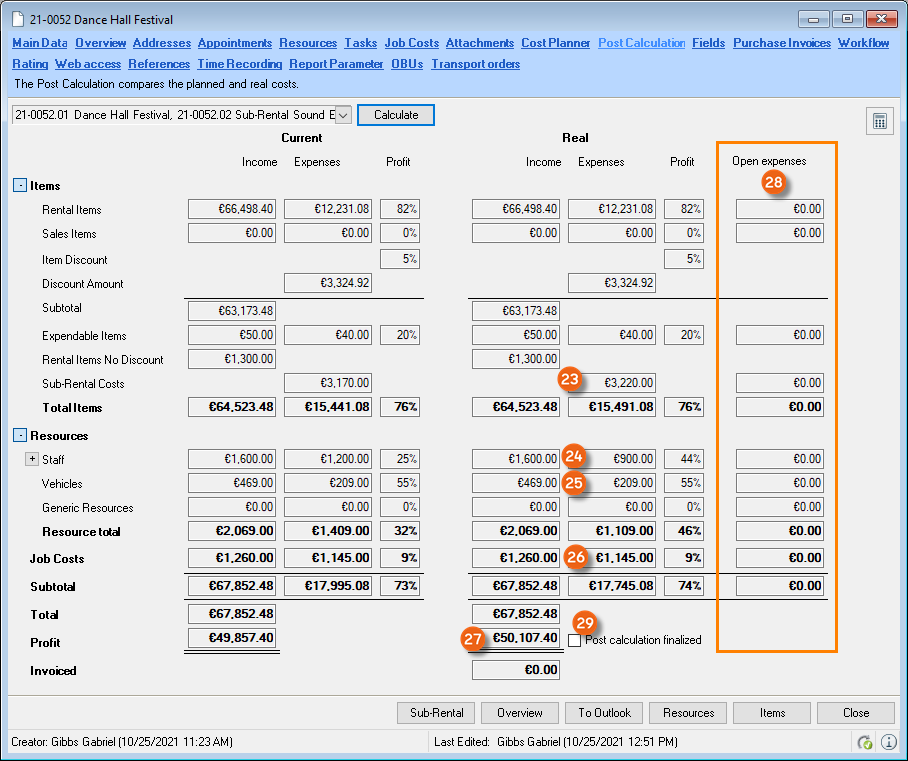
Project post calculation
With the easyjob Controlling Center you can assign, in addition to the default Cost plan , also the real costs via a service assignment in the purchase invoices to your project in the Post calculation . You can select for which job the post calculation should be displayed. Press Calculate to update the post calculation with the job selection. For comparison, the current Cost plan overview is shown on the left side under Current and the actual Overview is shown on the right side with the open Expenses . Under Real, the respective cost line items from the purchase invoices are displayed as soon as they are available. More details can be found at the bottom of various Tabs regarding the possible costs or Unassigned costs Currently, no expenses are assigned (except for imputed costs for own rental items ). Costs are missing (purchase invoices) for Expendable items , Sub-rentals , Staff , Vehicles and Job costs .
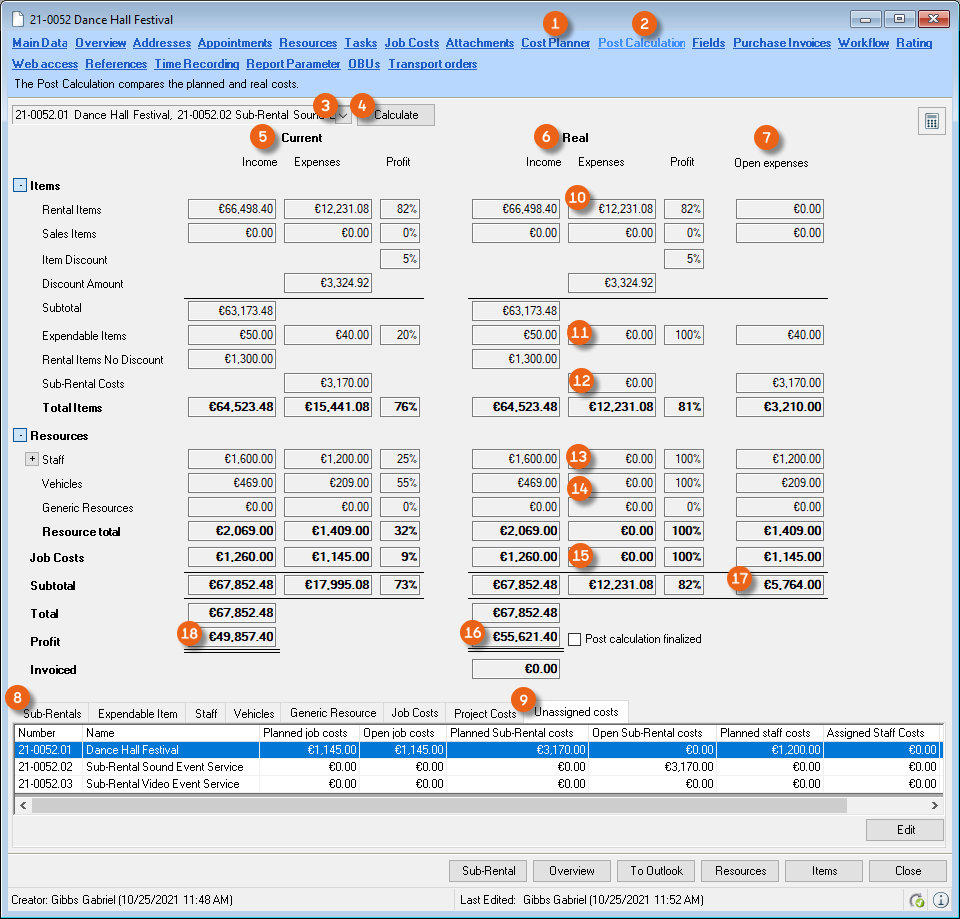
The total in the actual Overview before cost assignment is higher than what is indicated in the Cost plan by an amount equal to the amount of the open Expenses . Costs for canceled jobs for which purchase invoices were already created are also shown.
If you made a general service assignment to the project, these will be included in the calculation of the actual costs of the job costs.
After recording the purchase invoices and assigning them to the project, the actual expenses are displayed in the post calculation.
Purchase invoices are created and assigned for Sub-rentals , Staff , Vehicles and Job costs .
The sub-rental costs were higher than the scheduled expenses . Staff costs were 300.00 Euro lower (strike went faster than scheduled). The expenses for vehicles and job costs corresponded to the planning . In total, the costs were 250.00 Euro lower than scheduled. The actual Result increased accordingly. You can display the changes in the actual expenses in the sub-rentals and staff and directly access the purchase invoice by clicking Edit.


If there are no more open expenses check the Post calculation finalized box. From this moment,no more purchase invoices can be assigned to the project and a corresponding message appears.
Calculation Basis in job
In the project, for every job you can automatically create a new job with the Calculation basis status or create it manually. At the moment of creation, this job is "frozen" in the background. All jobs for which a calculation basis was created will also be shown In the post calculation, under Planning .
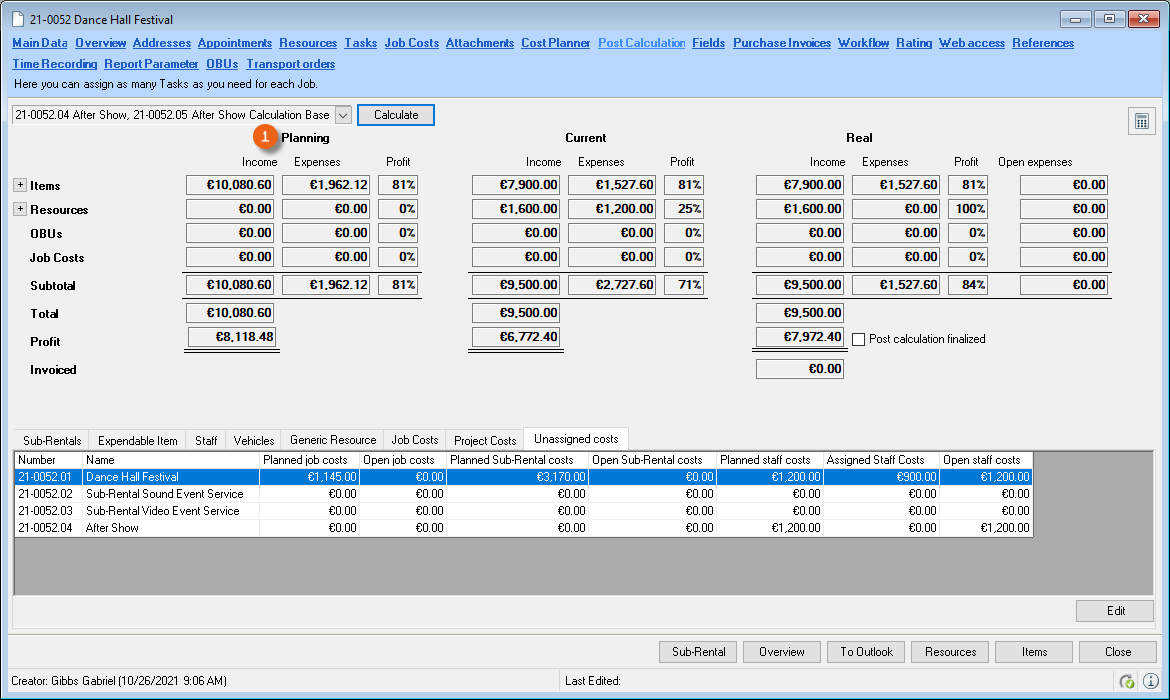
In program settings, you can set if the calculation basis should be queried or be automatically created when confirming a job.
Calculation Basis settings
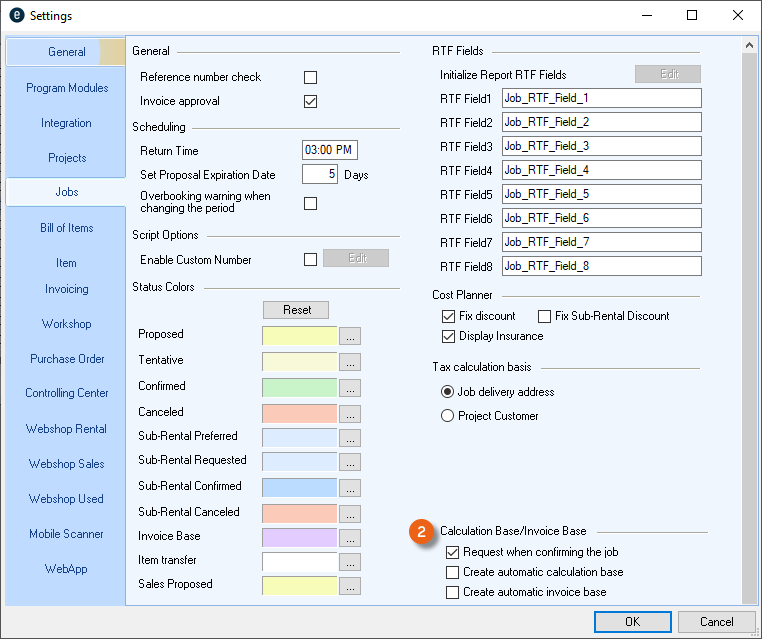
1. easyjob Menu Tools Settings
2. Jobs tab
3. Modify the desired Settings
4. Ok
easyjob must be restarted to activate the settings.
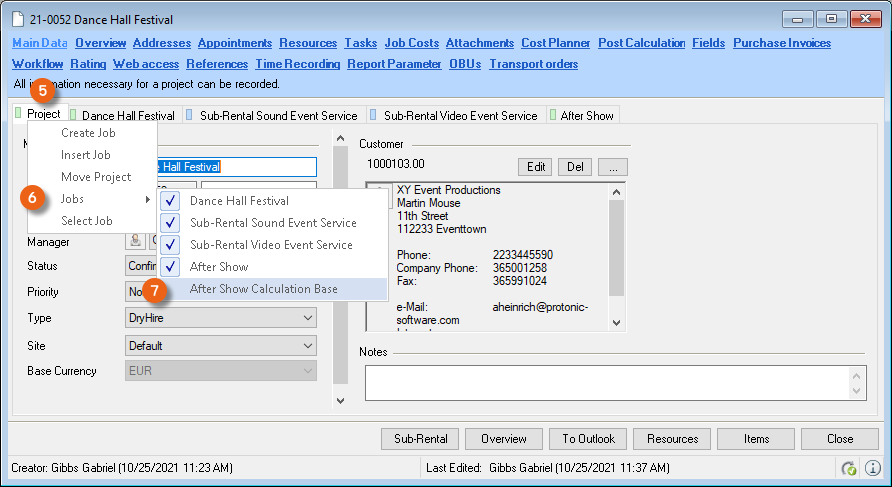
After you have created a Job and used it as a calculation basis, select Create calculation basis . in the Jobs context menu. Then change the job (e.g. more resources and/or items ). On the basis of this change, afterwards you can compare the calculation basis with the current job content .

The Job differences overview is functionally identical to the invoice base. You can find more details in the easyjob manual Abrechnungsbasis.
To display the calculation basis as a tab, right click the Project tab , select Jobs and check the box for the desired Calculation basis .
CC Workflow process
To ensure the checking of received invoices, an authorization process is started when assigning purchase invoices.
The workflow status is displayed using the following icons:
 | Workflow started. Waiting for authorization or rejection. |
|---|---|
 | Purchase Invoice Assignment authorized |
 | Purchase Invoice Assignment rejected |
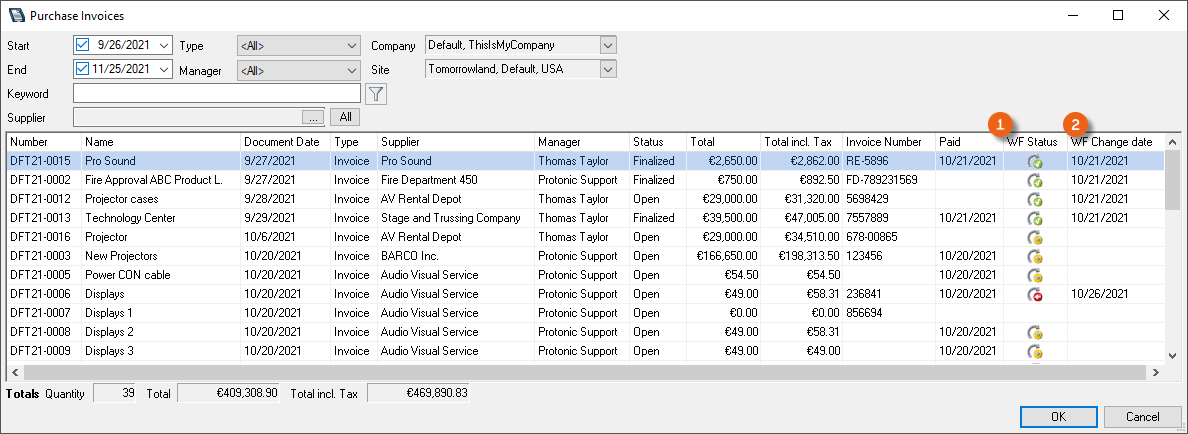
In the purchase invoice overview, the WF Status , as well as the change date are both displayed.
Open the purchase invoice overview
1. easyjob Menu View Purchase invoice
or
1. easyjob Menu Controlling Edit Purchase Invoice
Authorization workflow overview
The status of the current workflow is shown in various views.
Authorization workflow status in a project
The purchase invoice assignment list in the project shows the status of the authorization workflow (WF status) in the last column.
Authorization workflow status in purchase invoice line items
The authorization status of each line item is shown in the purchase invoice.
Authorization workflow status in the purchase invoice
The main data of the purchase invoice displays an overview of the current workflow status of the assignments. You can view additional details by clicking the info icon .
Authorization workflow status in the Navigator and easyjob Today
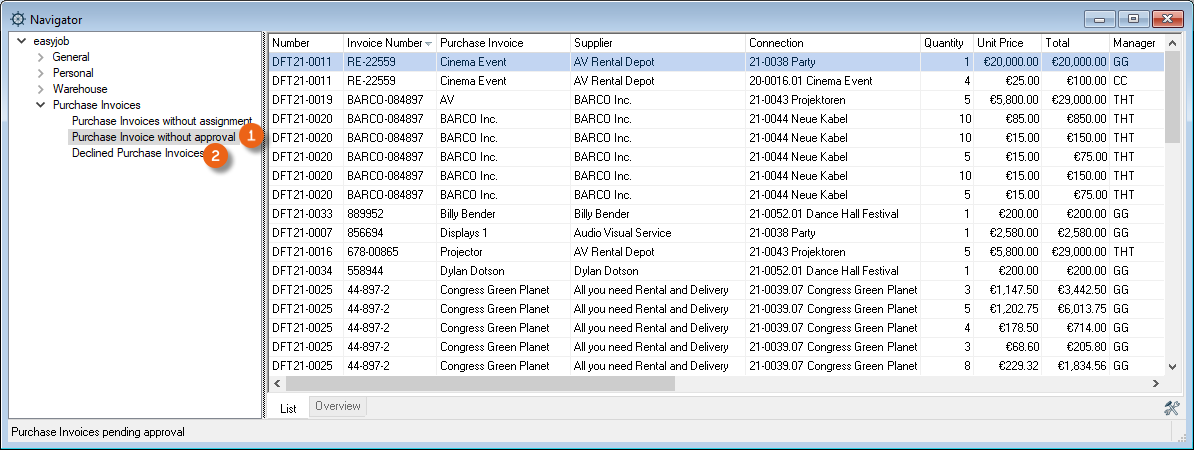
The Navigator and easyjob Today list all assignments that have not been authorized in the Purchase Invoices without authorization view. In addition, all purchase invoices with a rejected authorization are shown in the Rejected purchase invoices view.
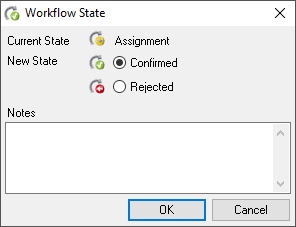
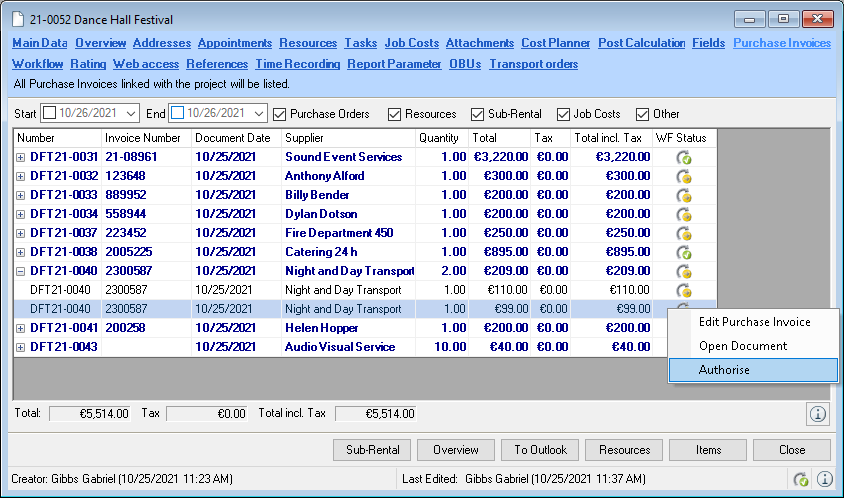
Authorize and reject assigned purchase invoices
The assignment is authorized or rejected via the workflow dialogue. You can also add a comment.
Authorization from the project
1. easyjob Menu View Projects
2. Select the project
3. Edit
4. Purchase invoices tab
5. Open the context menu and authorize.
Authorization from the purchase invoice
1. easyjob Menu Controlling Edit Purchase Invoice
2. Select the purchase invoice
3. Ok
4. Line items tab
5. Double click the workflow status
6. Select confirm
7. Ok

Authorization from the navigator
1. easyjob Menu Navigator icon
2. Purchase invoices without authorization
3. Open the context menu
4. Workflow
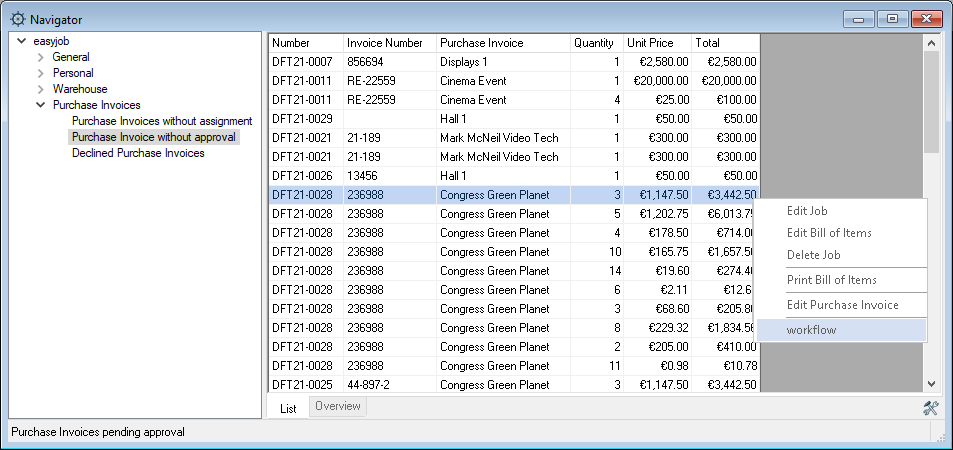
5. Select confirm
6. Ok
Automatic assignment with a CC workflow process
With an active CC workflow process, the following users are requested to release the purchase invoice.
| Assignment - Line item type | Responsible for the release |
|---|---|
| General expenses | Purchase Invoice Manager |
| Purchase Order - Items, Staff, Vehicle generic resources, General costs, manual | Purchase Order Manager |
| Purchase Order - Resources, Job Costs, Sub-Rental, Items from Bill of Items | Project Manager |
| Inventory | Inventory Entry Manager |
| Job Costs | Project Manager |
| Project | Project Manager |
| Resource | Project Manager |
| Sales Order | Project Manager |
| Sales Line Items | Project Manager |
| Workshop | Workshop Activities Manager |
| Sub-Rental Items | Project Manager |
| Sub-hires | Project Manager |
Alternative release workflows
The Workflow Engine module provides options for an expanded release process, e.g. that has multiple release levels, automatic release when the invoice total is equal to the purchase order total, or to change the release managers. For more information, please contact our Support. Alternatively, you can activate one of the available release workflows More information can be found in easyjob Workflow Engine Purchase Invoice Line Item Authorization .
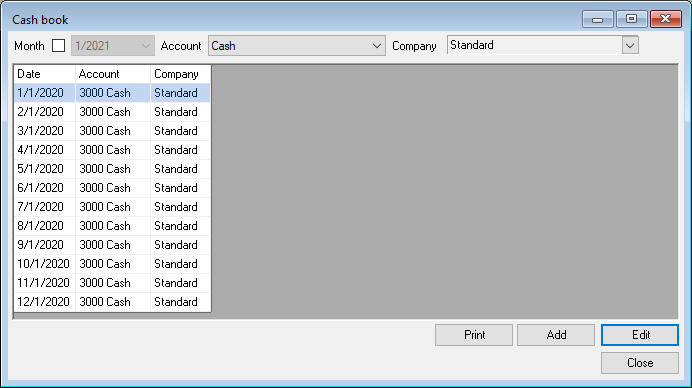
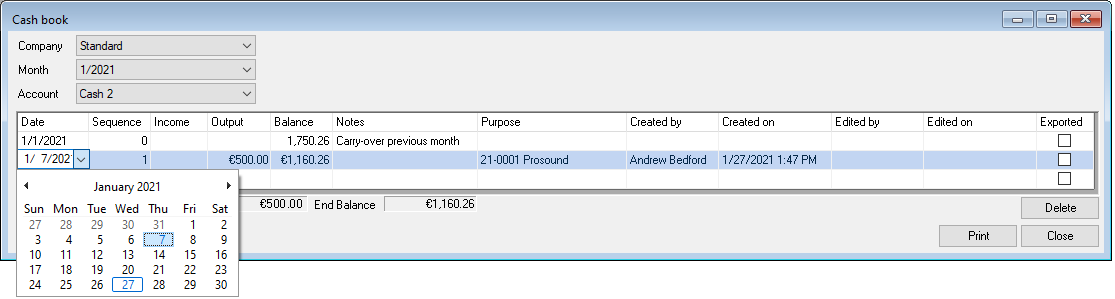
Cash book
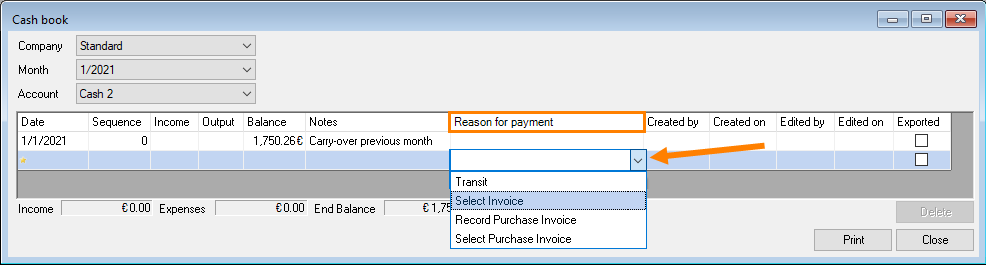
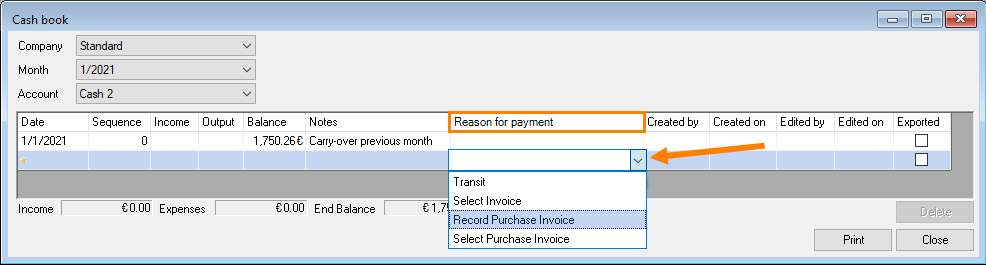
With the Cash book function, you can document your cash transactions according to standard accounting practices and link them with invoices and purchase invoices from easyjob. Select the Company , Month and corresponding Account Create a new entry by first defining the Reason for payment. You can select between Transit (from one cash account to another), Invoice and Purchase invoice . You can also create the purchase invoice directly from the cash book. The entry can only be made chronologically. The Date of the current entry may not precede the date of the previous entry. The lines are automatically assigned a Sequence number . Income/Output can be entered directly in the field. You can add a Comment . The Reason for payment automatically includes the dates of the assigned purchase order or activity. A log documents when and by whom the entry was created and edited . It is only possible to delete the last entry if the window is open, after it is closed the entry can no longer be changed. You can print directly from the view. If the entry was already exported , this is indicated by a checkmark. You can open the Invoice or the Purchase Invoice using the context menu. The payment receipt is set when posting.

No changes cannot be made retroactively. If you create an entry during the current month, for example, from this moment you cannot make any entries for the previous month.
Opening the cash book
1. easyjob Menu Controlling Cash book
Adding a new month for cash book entries
1. easyjob Menu Controlling Cash book
2. Select the account/company and the month
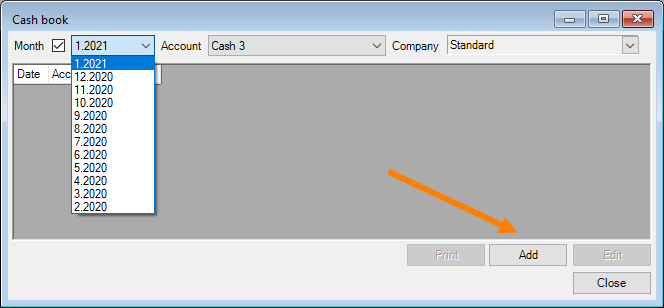
3. Add
4. Make your cash transaction
5. Close
Making cash book entries for an already added month
1. easyjob Menu Controlling Cash book
2. Use the filter to select the required account/company and the month
3. Open
4. Make your cash transaction.
5. Close
Creating an invoice as a cash book entry
1. easyjob Menu Controlling Cash book
2. Use the filter to select the required account/company and the month
3. Open
4. Click Select invoice in the Reason for payment column
5. Select the corresponding invoice
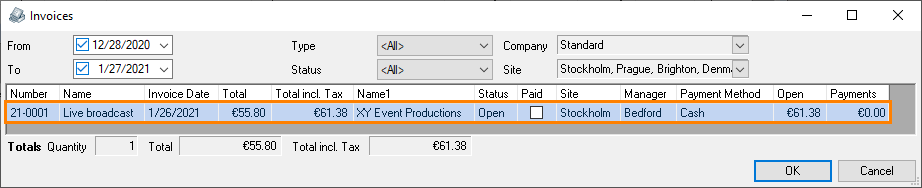
6. Ok
7. The cash transaction is carried out automatically
8. Adjust the posting date if necessary

9. The payment receipt is automatically created in the invoice
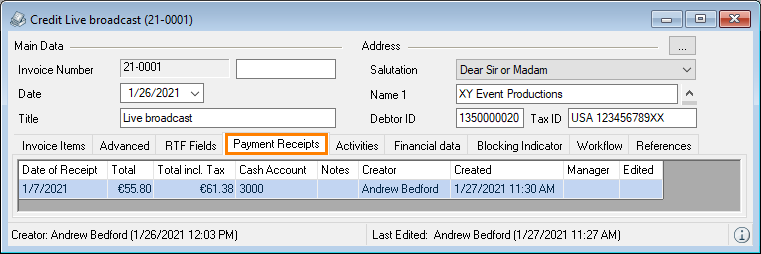
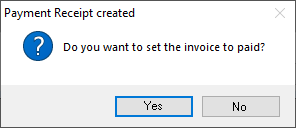
10. You can select whether to set the invoice to paid
11. Close
As long as you are still in the current entry, that is the cash book has not yet been closed, you can delete the current entry (e.g. if you selected the wrong invoice, for example). After closing the cash book, this is no longer possible and you must make a counter entry.
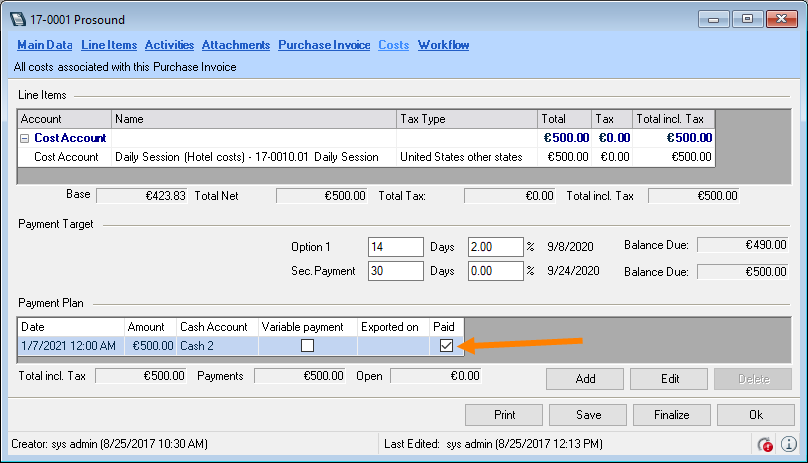
Entering the purchase invoice as the cash book entry
1. easyjob Menu Controlling Cash book
2. Use the filter to select the required account/company and the month
3. Open
4. Click Record Purchase Invoice in the Reason for payment column
5. Enter the purchase invoice as usual
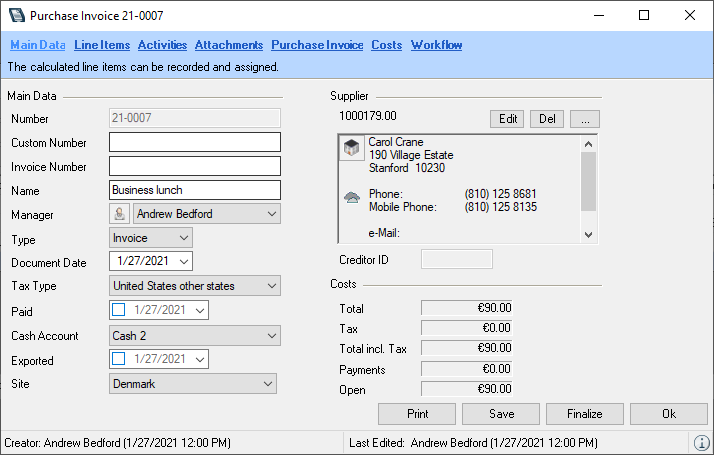
6. Ok
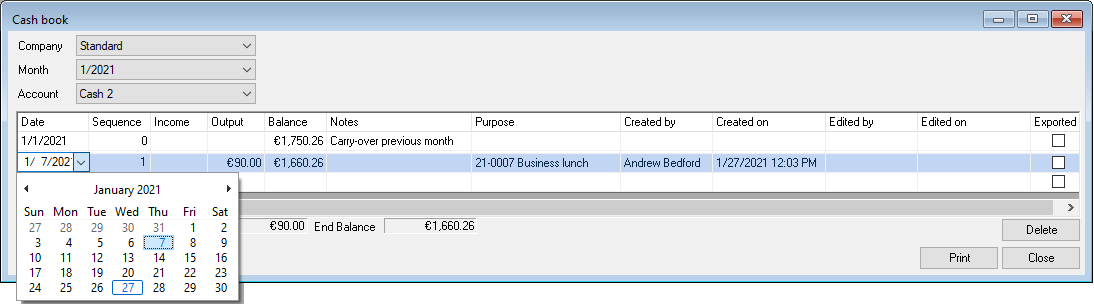
7. The cash transaction is carried out automatically
8. Adjust the posting date if necessary
9. The purchase invoice is automatically set to paid
Selecting the purchase invoice for the cash book entry
1. easyjob Menu Controlling Cash book
2. Use the filter to select the required account/company and the month
3. Open
4. Click Select Purchase Invoice in the Reason for payment column

5. Select the corresponding purchase invoice
6. Ok
7. The cash transaction is carried out automatically
8. Adjust the posting date if necessary
9. The purchase invoice is automatically set to paid
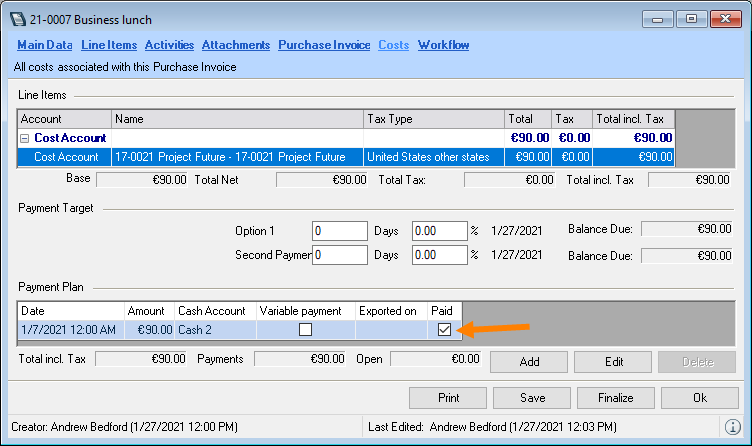
Creating a cash book entry in the purchase invoice
1. easyjob Menu Controlling Create Purchase Invoice
2. Enter the purchase invoice data
3. Select the cash book cash account
4. Costs tab
5. Add
6. Apply the amount or enter it.
7. Via Cash book
8. The cash book entry is made automatically and the purchase invoice is set to paid.
If you make a cash book entry from a Purchase Invoice, from this moment (date) you cannot make any earlier entries. The corresponding purchase invoice cannot be deleted.
Creating a cash book entry upon payment receipt (invoicing)
1. easyjob Menu Invoicing Payment Receipt
2. Select an invoice
3. Select the cash book cash account
4. Add
5. The cash transaction is carried out automatically and the invoice is set to paid
If you create an entry during from a Payment Receipt, from this moment you cannot make any earlier entries.. The corresponding invoice cannot be deleted.