easyjob Crm
Documentation
CRM
The easyjob CRM (Customer Relationship Management CRM) module helps you optimize your communication with customers, partners and suppliers. You can directly address your customers with activities, campaigns and marketing lists. With the CRM Dashboard, you can provide your Sales Team with a wide range of information and data in order to recognize sales potential and improve customer loyalty.
Installation and activation
Go to the easyjob program settings to activate the easyjob CRM module: A separate installation is not required.
Activating the CRM module:
1. easyjob Menu Tools Settings
2. Programm Modules tab
3. Select CRM
4. Ok
easyjob must be restarted to activate the settings.
Configuration and settings
No content for this section.
User settings
There are various rights available for the CRM module in the User Rights Manager.
Assigning the user rights for CRM:
1. easyjob Menu Tools Manage Users
2. Select a User
3. Edit
4. Access Rights tab
5. General
6. Assign the desired rights (e.g. view confidential activities or agreements, etc.)
7. Save
8. Ok
Templates
With the help of templates, you can initialize Document and Email activities. First create a Word document, assign a name to it, enter the desired content and then save it. You can use DOC or D files for the document type. Email templates are saved in HTM format (TXT format for Outlook).
Defining the templates:
1. easyjob Menu Tools Settings
2. CRM tab
3. Add
4. Select the template
5. Ok
easyjob must be restarted to activate the settings.
Variables
In CRM, there are many variables that you can integrated into your templates for documents and emails. When performing the activity, the variables used will be replaced with the respective data that was created in the activity (e.g. name, address). The selection of the variables can be found in Design mode of the activity email . With Preview you can check your entries. You can copy the created content to a Word document and manage the layout as you prefer. If your want to prepare an email template, we recommend after creating the Source text to save it in HTM or TXT format.
Creating a template with Variables for documents/emails
1. easyjob Menu CRM Activities
2. Add
3. Email type
4. Ok
5. Variables
6. Select the desired Variables
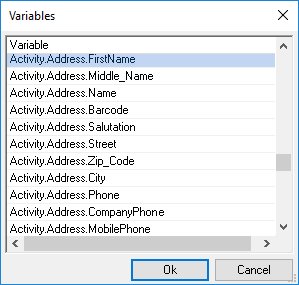
7. Ok
8. Manage the content as you prefer
Activities
Activities document all types of correspondence inside and outside your company. When creating an Activity , select the type. (e.g. task, phone or appointment). More information can be found in the Activity Type section. You can enter a wide range of details for every activity and filter them as required (see Activity overview) or analyze them using the easyjob Business Information Center.
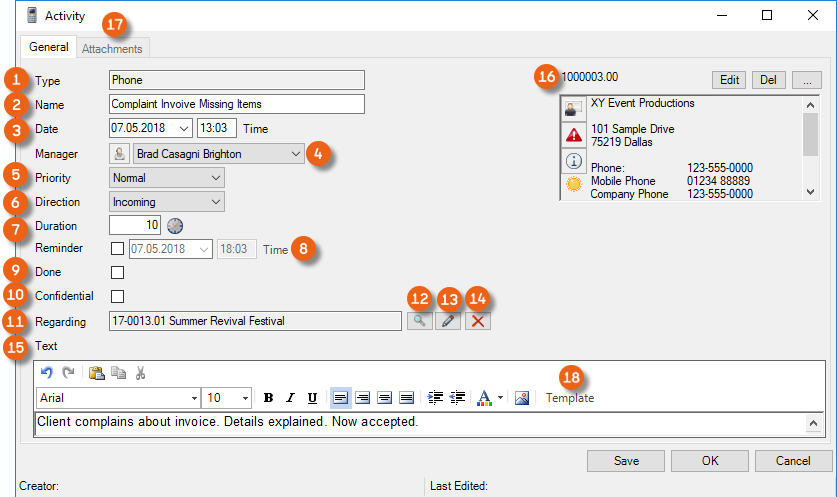
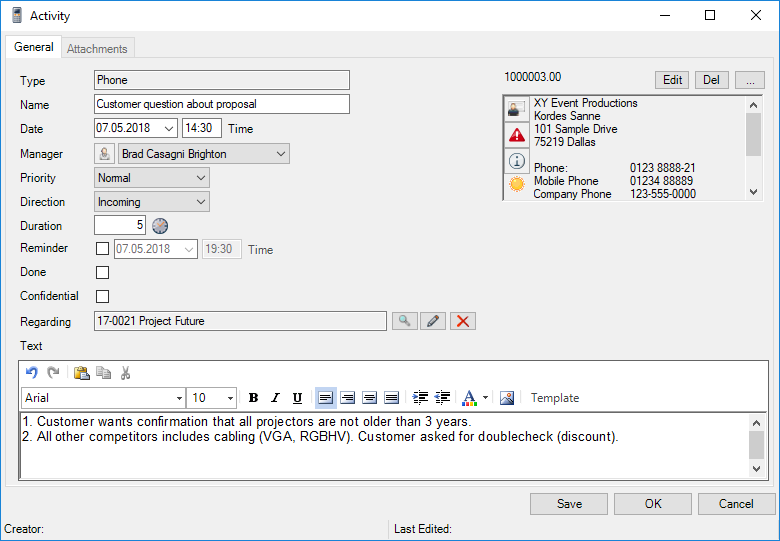
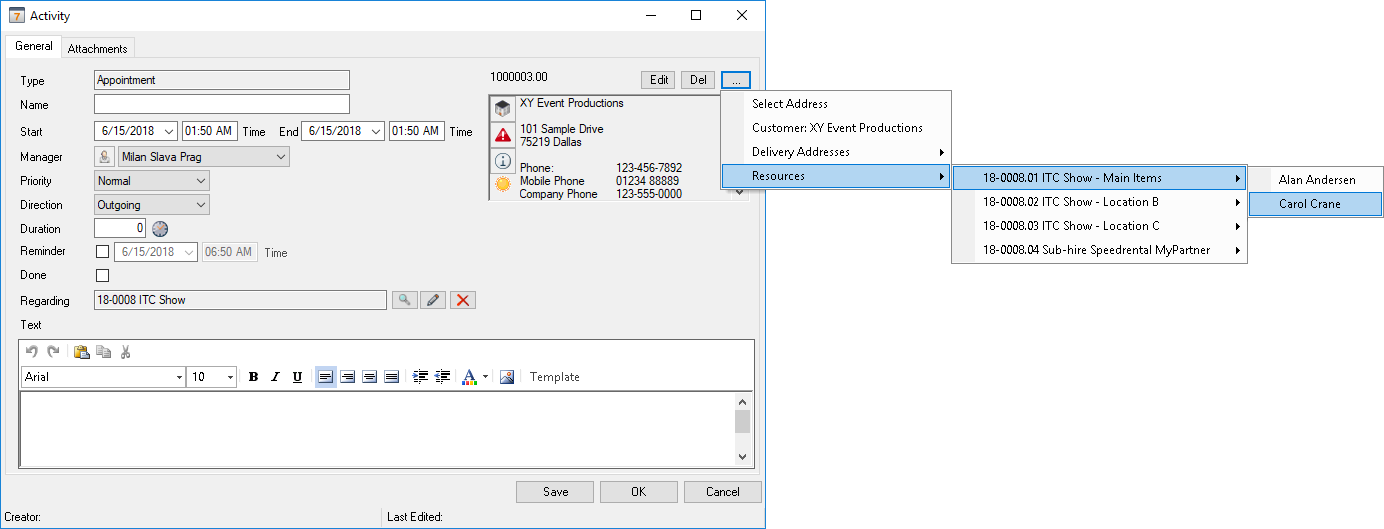
Enter the Name , Date and Time , the Manager who created and documented the process (this can be changed if you want to assign the Activity to a colleague, see also CRM Owner. You can also assign activities to a User Group, assign the Priority (high - normal - low), the Direction (incoming - outgoing), the Duration , a Reminder (date - time), mark the activity as Done , as Confidential (see also User settings), select a process regarding this activity , add a text and attachments . You can create RTF Templates for Activities. More info can be found in easyjob 6 manual.
Each activity refers to an Address . When you create a new activity, you must select an Address in order to save the activity.
The process to which the activity refers is called the Reference Type. This means, for example, an Address, a Project, a Rental Job, an Invoice, a Purchase Order, a Sales Job, an Item or a Workshop Activity. You can use the magnifying glass to open the Reference Type selection, and at the end you can select the related process, edit existing ones or delete them . By selecting the Reference Type, (e.g. invoice) and the related Process (e.g. project name) Activities are automatically assigned to the selected invoice.
Creating activities
The process for creating activities is identical in all areas.
Creating activities, e.g. in a project:
1. easyjob Menu Projects Edit Project
2. Select a project
3. Ok
4. Activities tab
5. Add

6. Select the type of activity
7. Ok
8. Enter all the information about the activity
9. Ok
Creating activities from the easyjob Menu:
1. easyjob Menu CRM Activities
2. Add
You can add additional documents to an activity. Select the Document tab and click Add. More information can be found in the easyjob 6 user manual in the Document Management chapter.
Activity Type
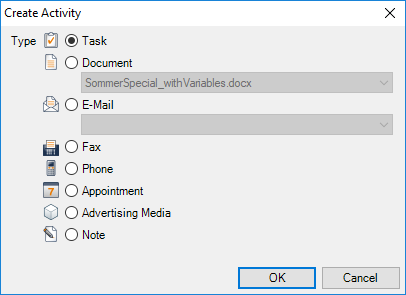
You can create different types of activities, such as Task, Document, E-mail, Fax, Phone, Appointment, Advertising Media, Note or Event.
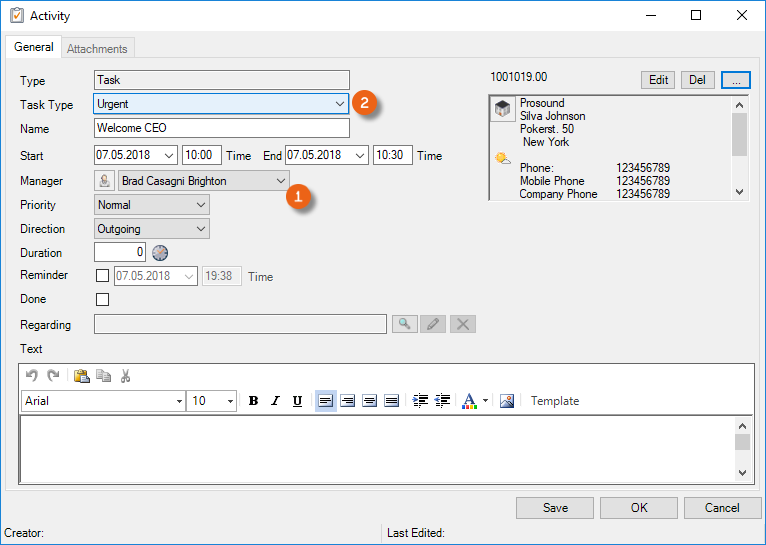
Task
By using the task Activity Type, you can create , edit and track as many tasks required for yourself or others. You can freely define the Task type in the Master Data.
Adding the task type in the Master Data:
1. easyjob Menu Master Data Task Type
2. Add
3. Enter a Name
4. Ok
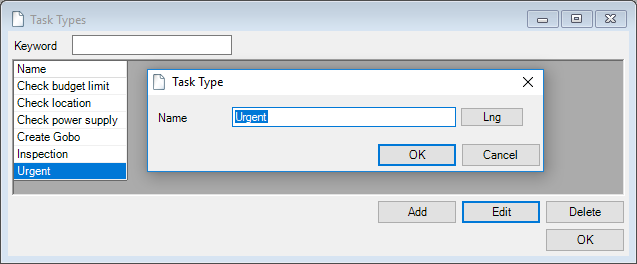
5. Ok
Quick Task
You can create a task type activity even faster using the key combination CTRL +T. Regardless of where you are in easyjob, this combination opens a new activity and you can assign a task to yourself or others.
Document
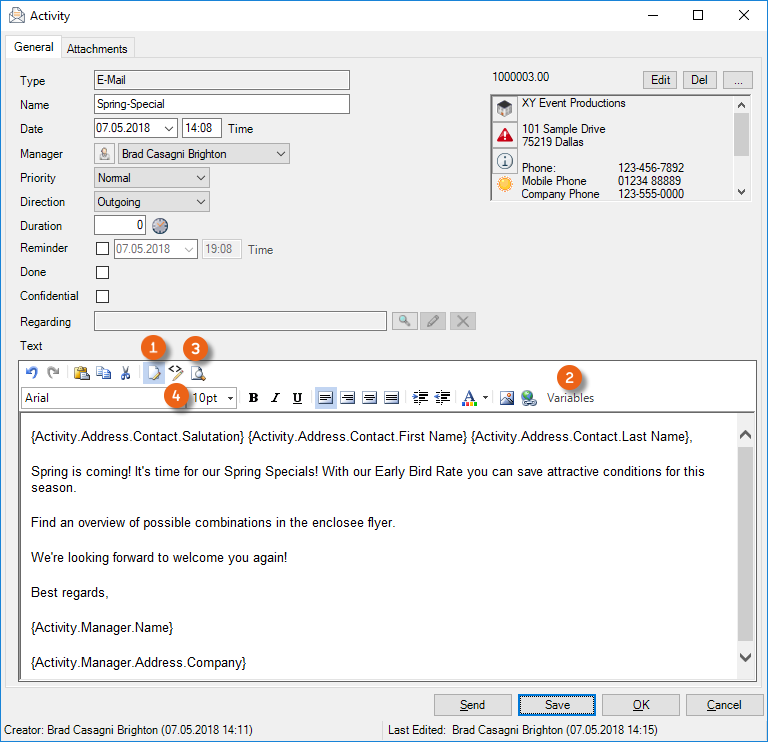
With the document activity, you can select Word documents that you previously created as a template and edited as required.
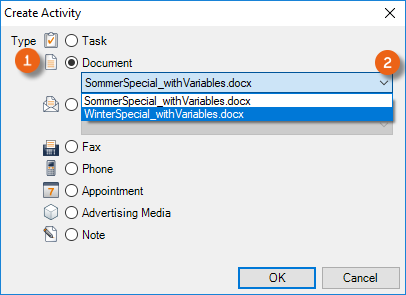
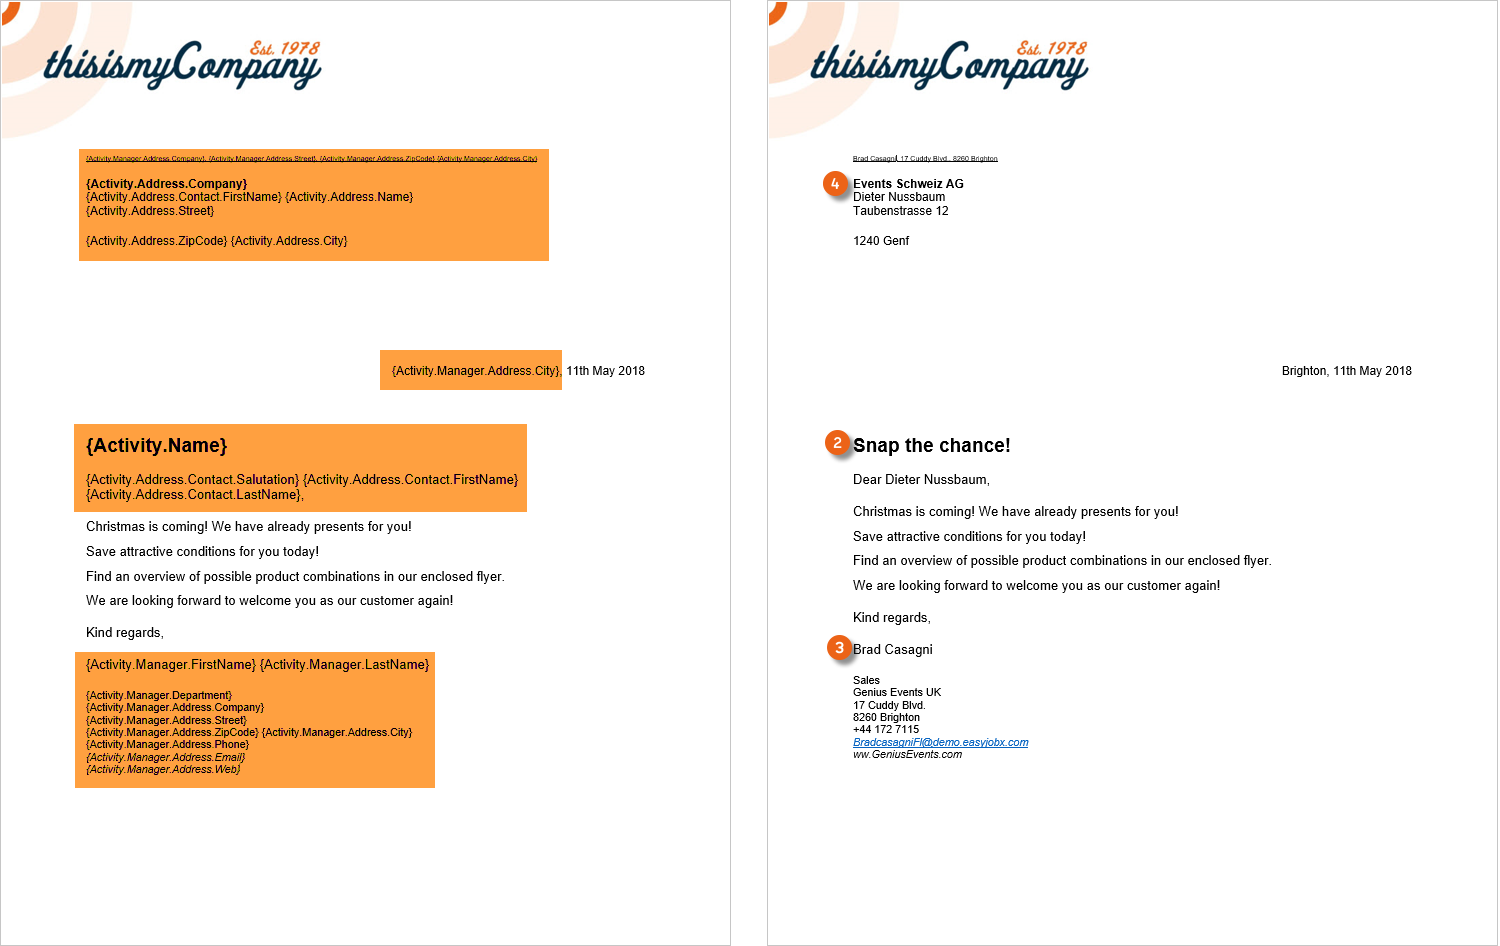
The templates can contain Variables, which are populated with various details from the activity (salutation, first and last name from the Address) when the document is opened. See also Templates and Variables.
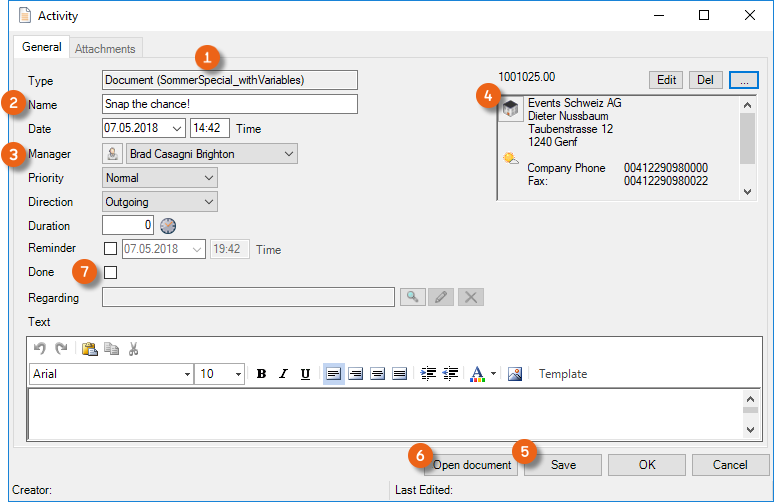
The name of the selected document is displayed in brackets. In this Word example, Variables are set for the fields Name , Manager and Address . After pressing Save and Open document , the created document is opened.
You can now print out the document and continue using it. After the document is opened , the activity is automatically set to Done and the created document is saved in the activity under Attachments .

Create a new activity with Ok & New . All entries are kept and you can create the same document for another customer by changing the address .
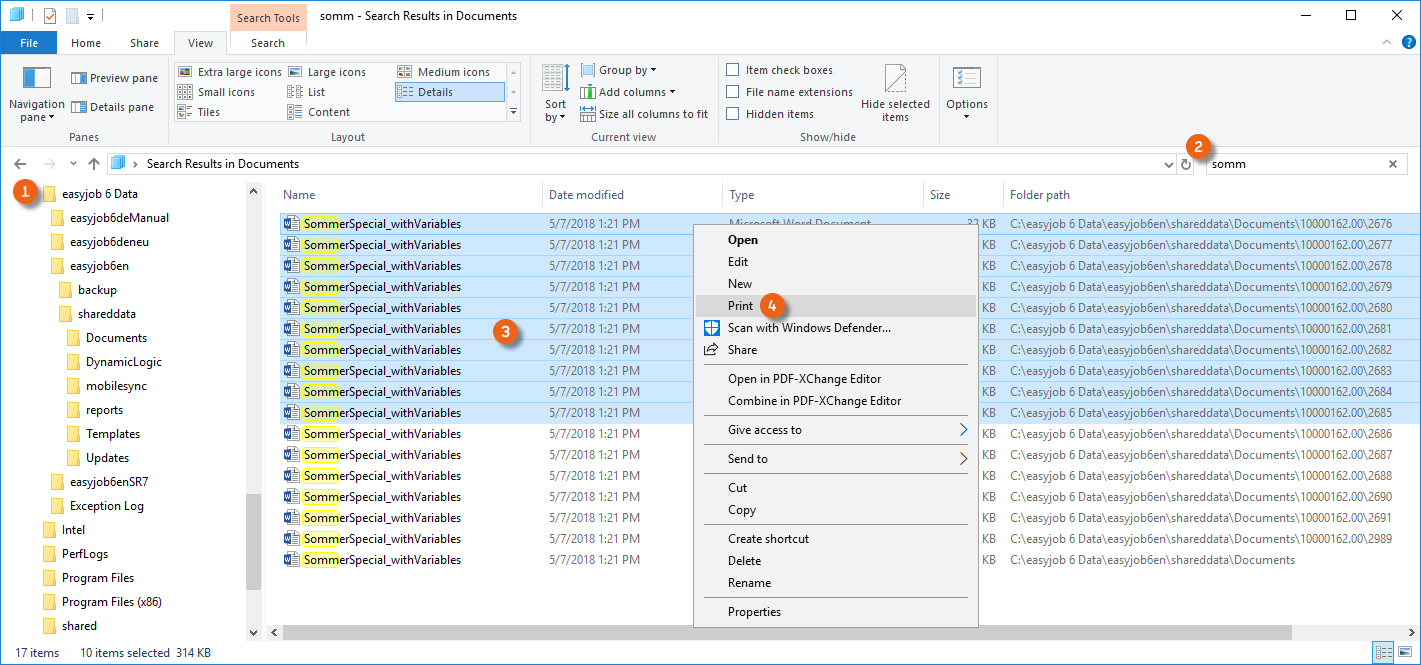
If you want to create and print out this document for many customers, we recommend creating this activity in a campaign. In order to print all documents together, you can select them in your easyjob global directory after starting the activity and print them out together.
Printing documents created in a campaign together:
1. Open the global directory
2. Enter the name of the created document as search text
3. Highlight all documents to be printed
4. Print
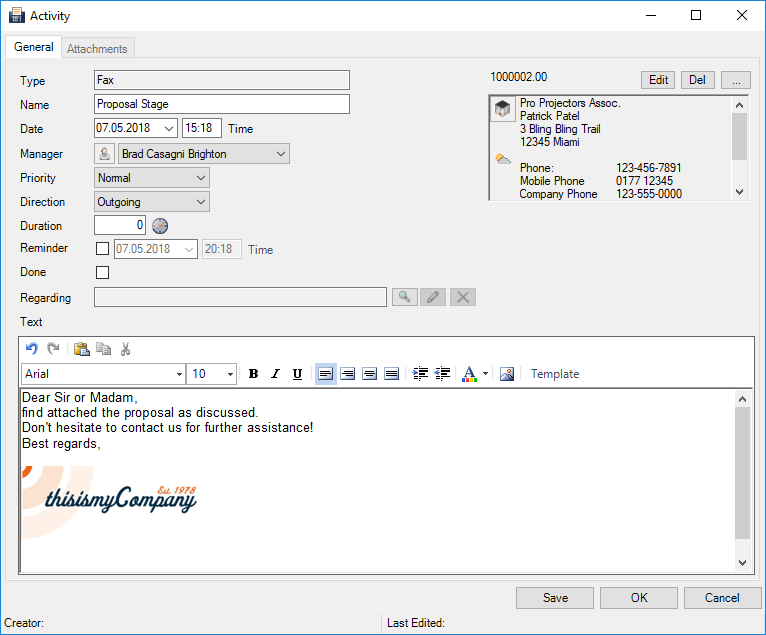
Fax
With the Fax activity, you can document incoming and outgoing faxes.
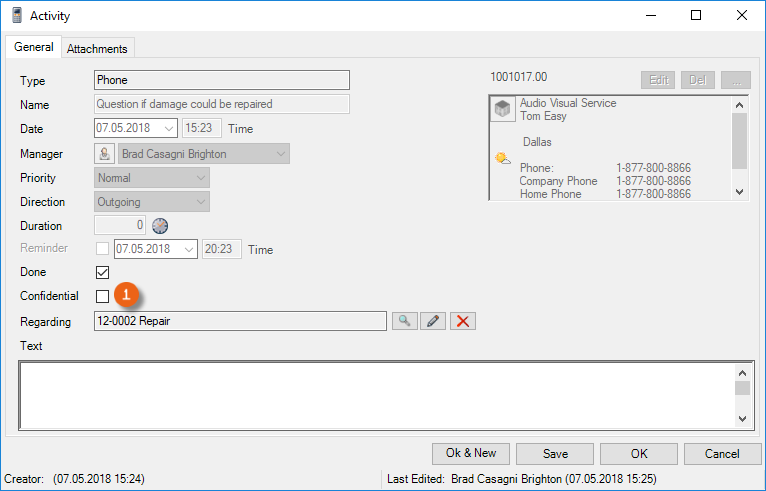
Phone
Here you can document all activities that are handled on the phone and, if necessary, mark them as Confidential .
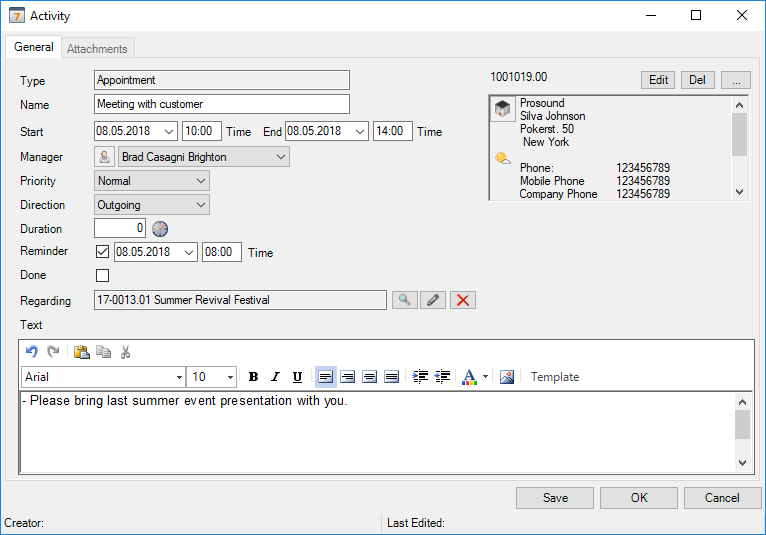
Appointment
Here you can create, document (e.g. attach the diary and the record as a document) and manage appointments,
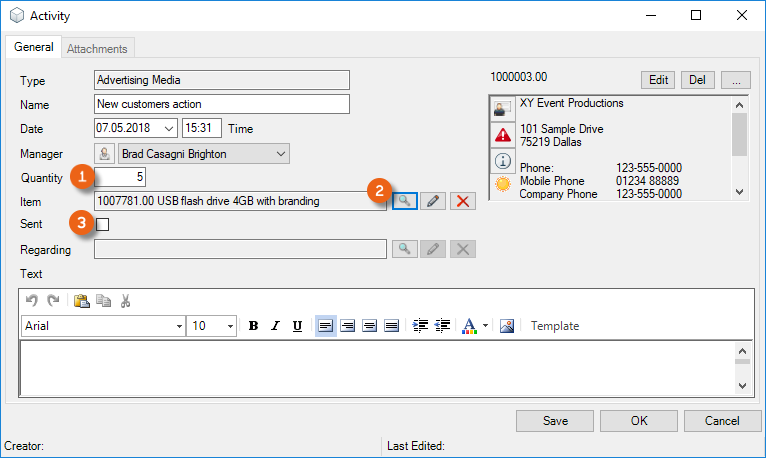
Advertising Media
The Advertising Media type of activity supports the distribution of Advertising Media. You can create the Advertising Media in the item master data as Expendable Items. Select the Quantity and the Advertising Media in the activity. By checking the Sent box, an Inventory Deletion is created.
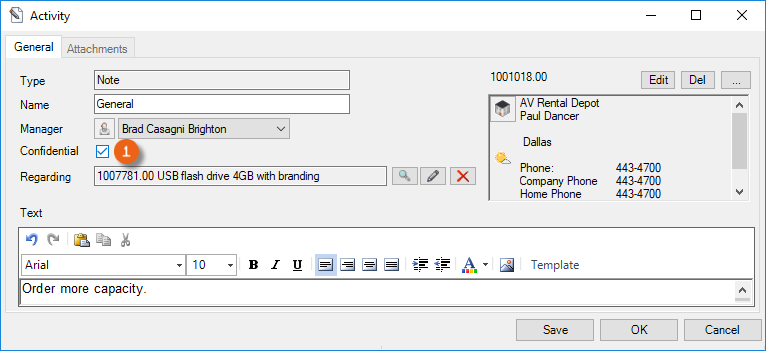
Note
For a simple note, you can create an activity and mark it as confidential, if necessary.
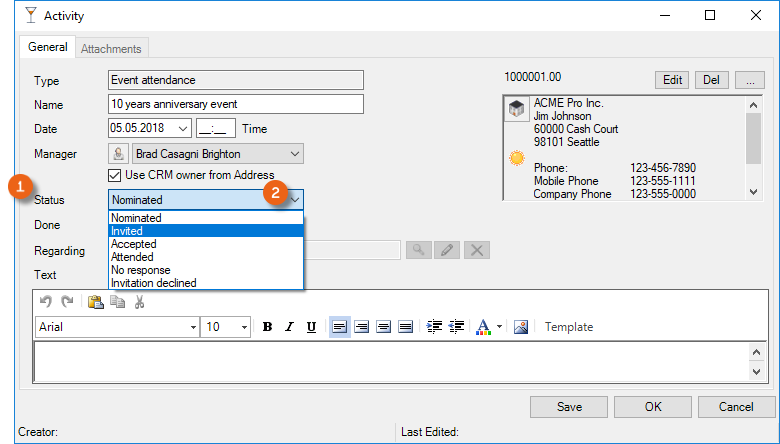
Event
You can create an Event activity in campaigns. You can document the status of the event attendance via a selection menu which provides you with an overview in the campaign of the status of the individual participants. See also Event attendance.
Activity in the print dialog
After you have created a Proposal, for example, you can create an activity (e.g. a phone call to discuss the Proposal, or a task for expired Proposal deadline).
Creating an activity from a print dialog:
1. Click the Print Icon on the toolbar
2. Select the report for a Job Proposal
3. Select the desired Job
4. Ok
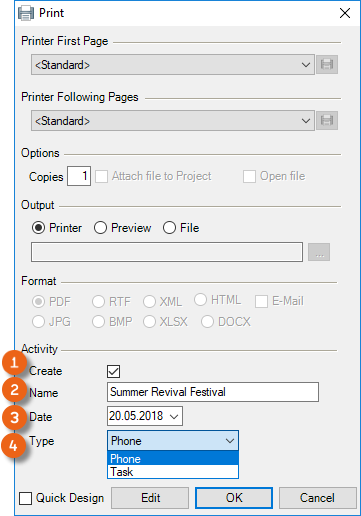
5. Under Activity, check the Create box
6. Enter a Name , a Date and set the Activity Type
7. Ok
Activity overview
You can display activities in the overview according to various filter criteria. In addition to the Period , you can limit the selection via the Manager , Include Groups in which the selected manager is a member, the CRM Owner , Type , Direction , Priority , selection of Only running Activities , Address , Reference Type , the Process it concerns and using a search text .
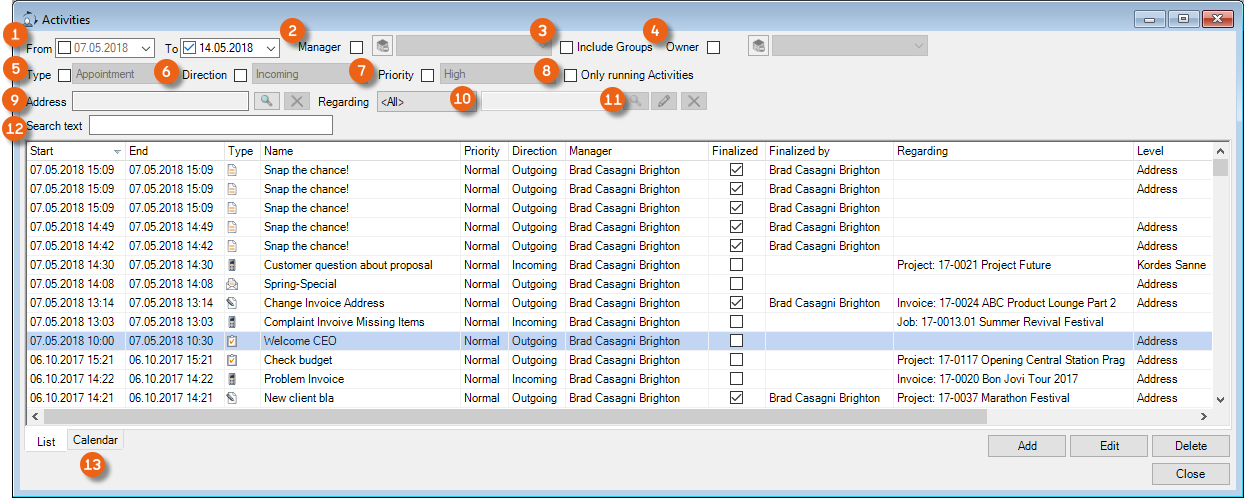
A graphical overview is provided on the Calendar tab. The Selection field shows the currently selected Day . You can carry out further actions - depending on the reference type - using the right mouse key context menu .
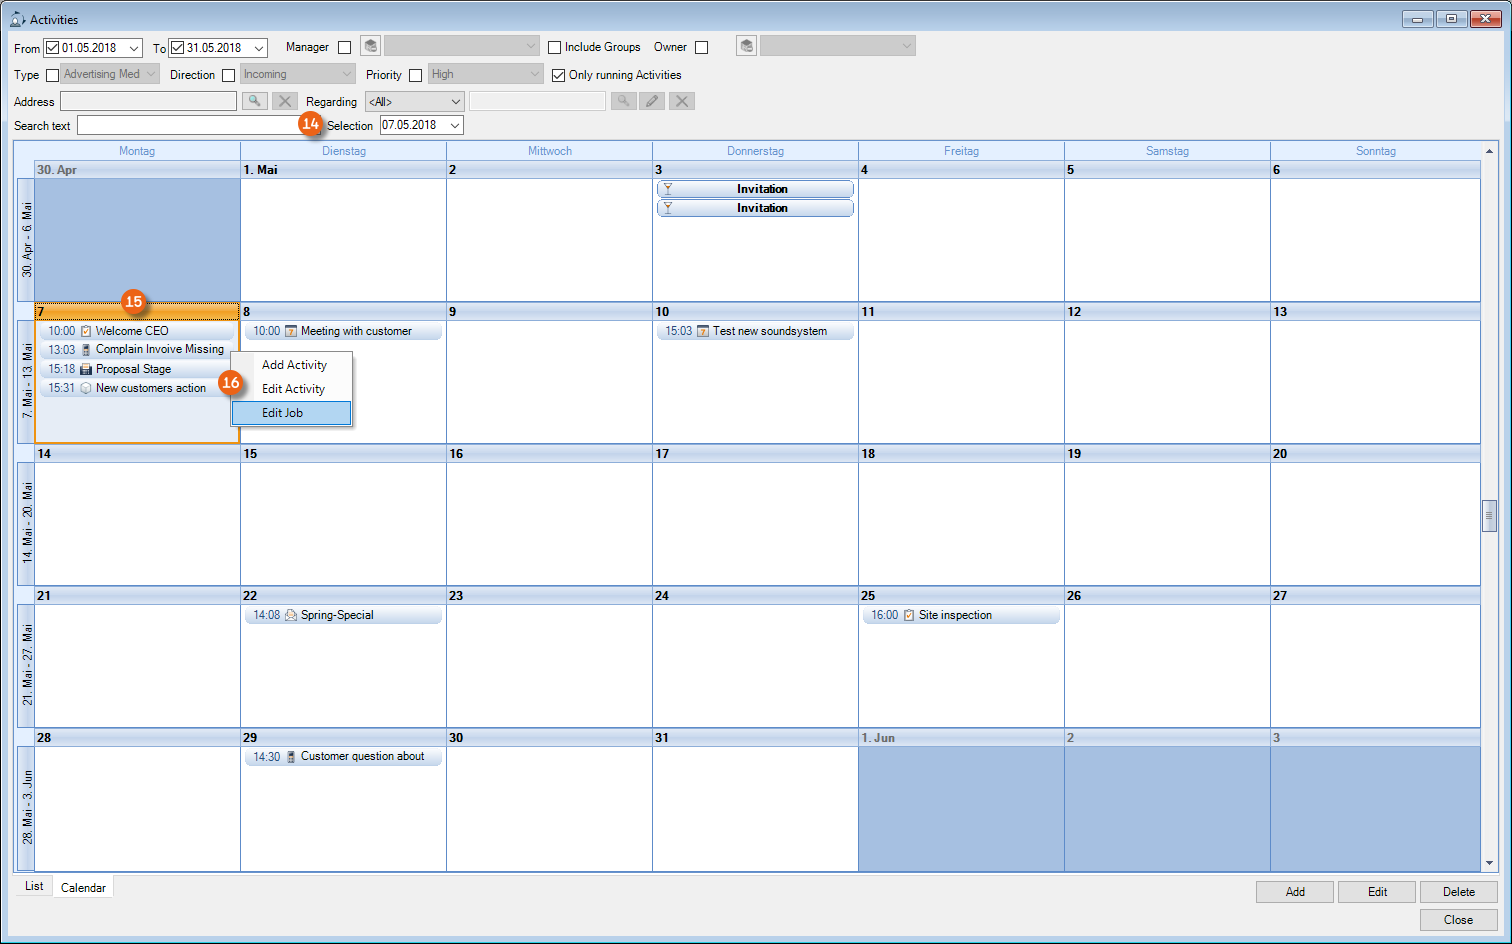
Selecting activities from the overview:
3. easyjob Menu CRM Activities
4. Set the filters as required
5. Select an activity
6. Edit
Activities in the Address Book
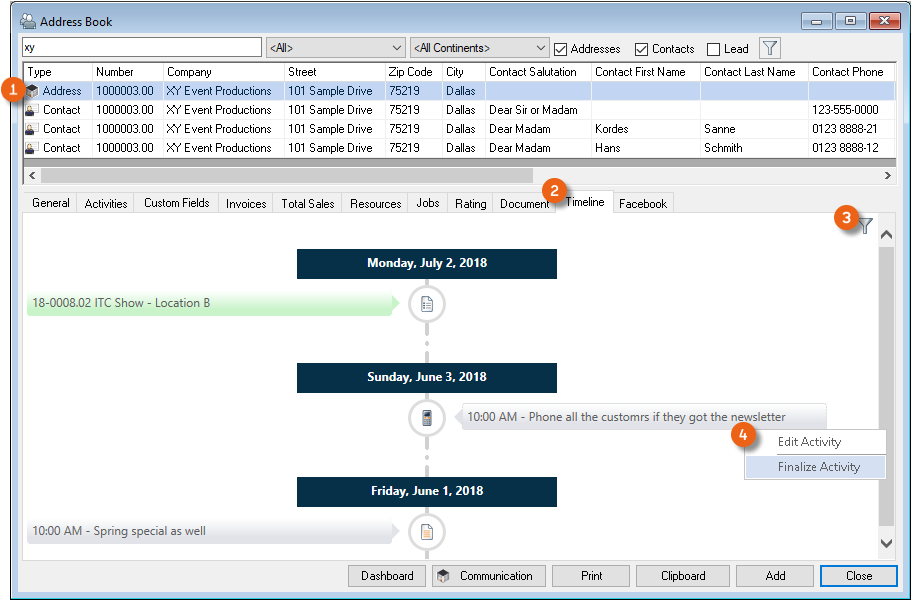
You can use the Address Book to create an overview of the activities related to the selected Address or the selected Contact and edit them if necessary. Use the up/down arrow key to select the Contact or the Address The related Activities will be displayed in the information window. Also a timeline is available. See also Timeline in the Address Book.
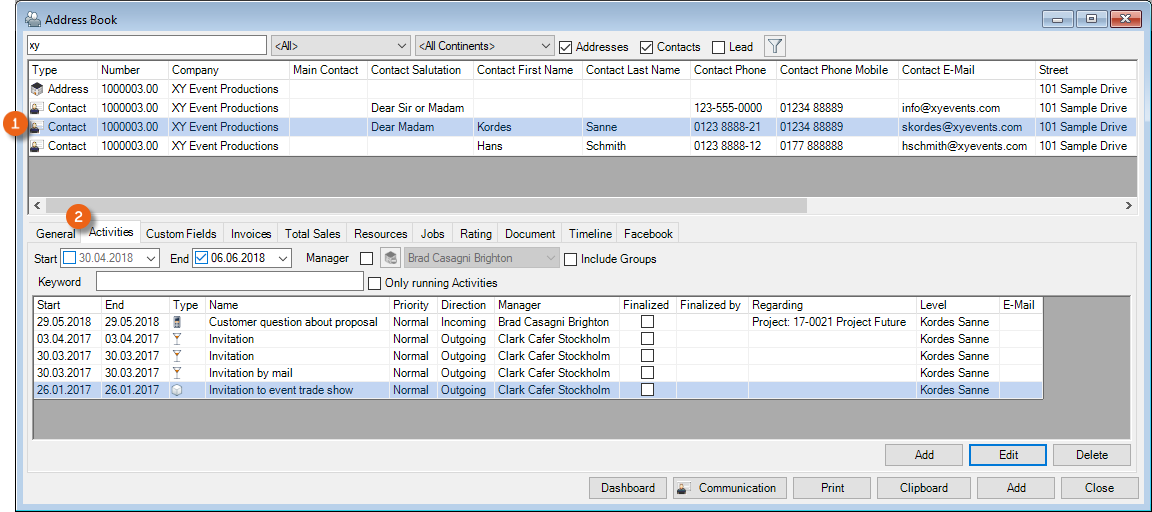
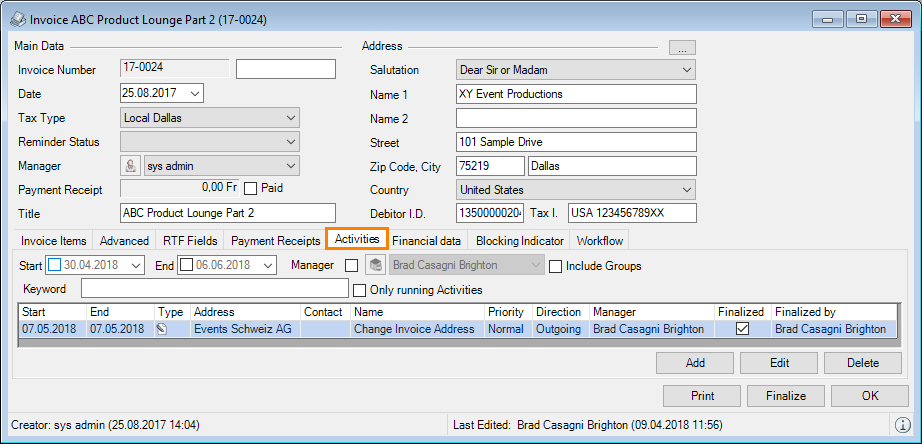
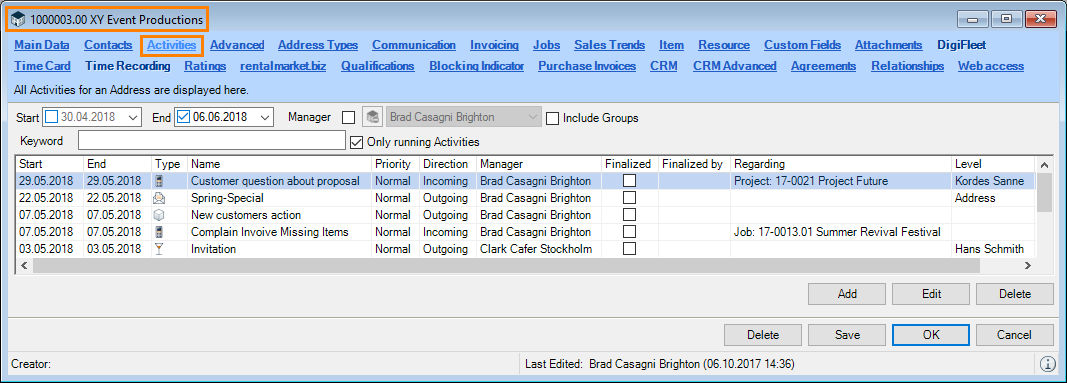
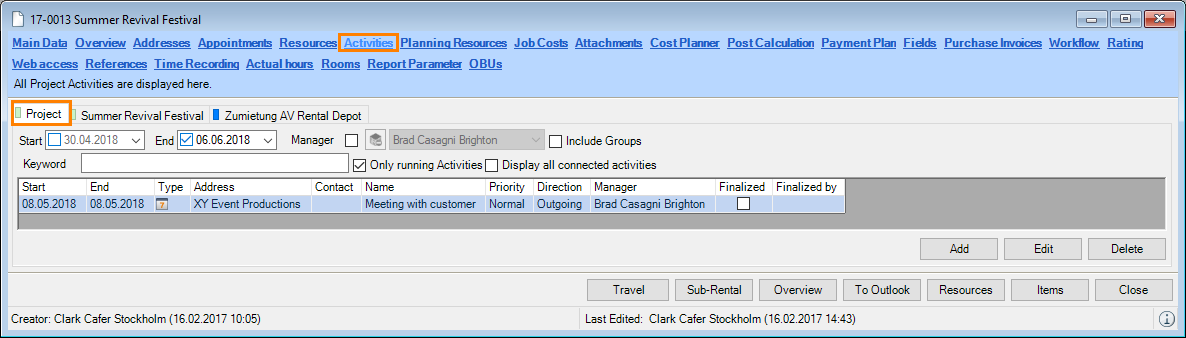
Activities in the reference type
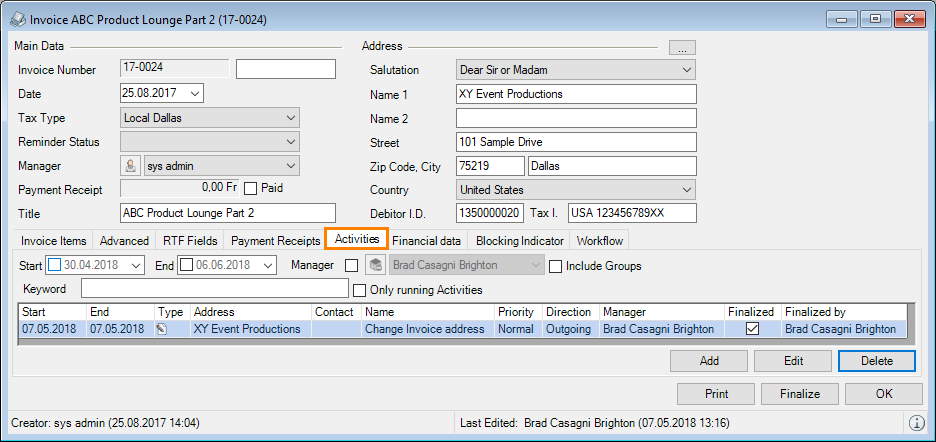
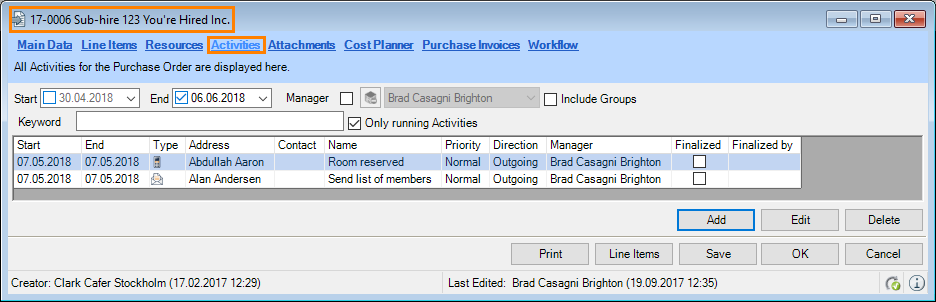
The created activities are can also be found in the associated reference types (Addresses, etc.) Available filter options include Period, Manager, Keyword search or Only running activities. Activities can be added, edited or deleted.
Address
Project
Job
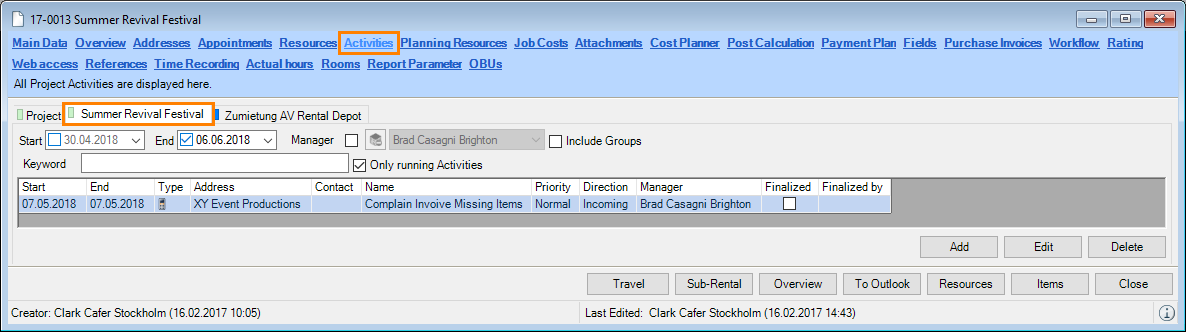
Invoice
Purchase Order
Activities in the Resource Plan
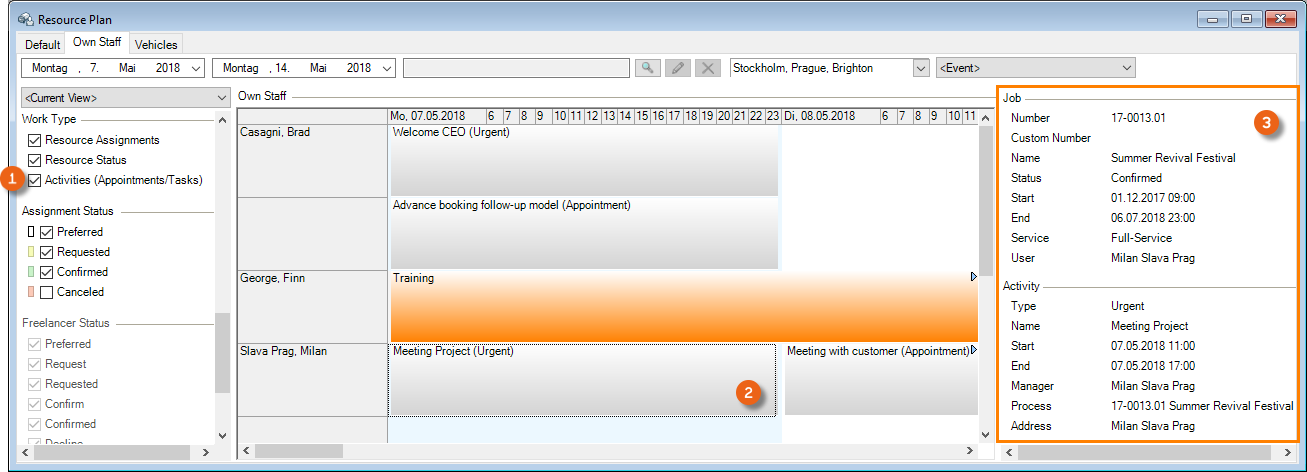
Activities, such as the manager's tasks or appointments, can be displayed in the Resource Plan. To activate the display, select Activities in the filter under Work type. Clicking the Activity displays the relative Details .
Activities at a glance
To see open and overdue activities at a glance, the Navigator, easyjob Today and the reminder screen are available.
Navigator and easyjob Today
You can create various overviews in the Navigator and in easyjob Today. In addition to the Check Address function (), all open and overdue Activities () can be seen in the General area. Birthdays () can also be displayed. In the Personal area, you can display My open and My overdue activities (). To add overviews in the Navigator, click Settings and drag & drop the desired views to the left side.
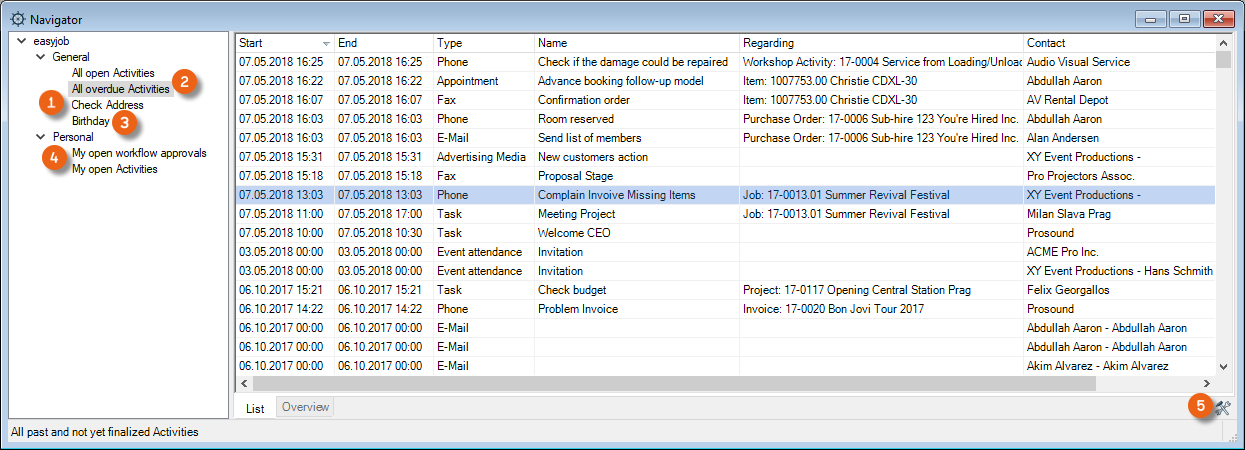
The same information sources are available in easyjob Today and in the Navigator. You can limit the period selection for Birthdays using a Filter . To create your individual View in easyjob Today, switch to the Setting mode , select the desired Line Item and click Add View.
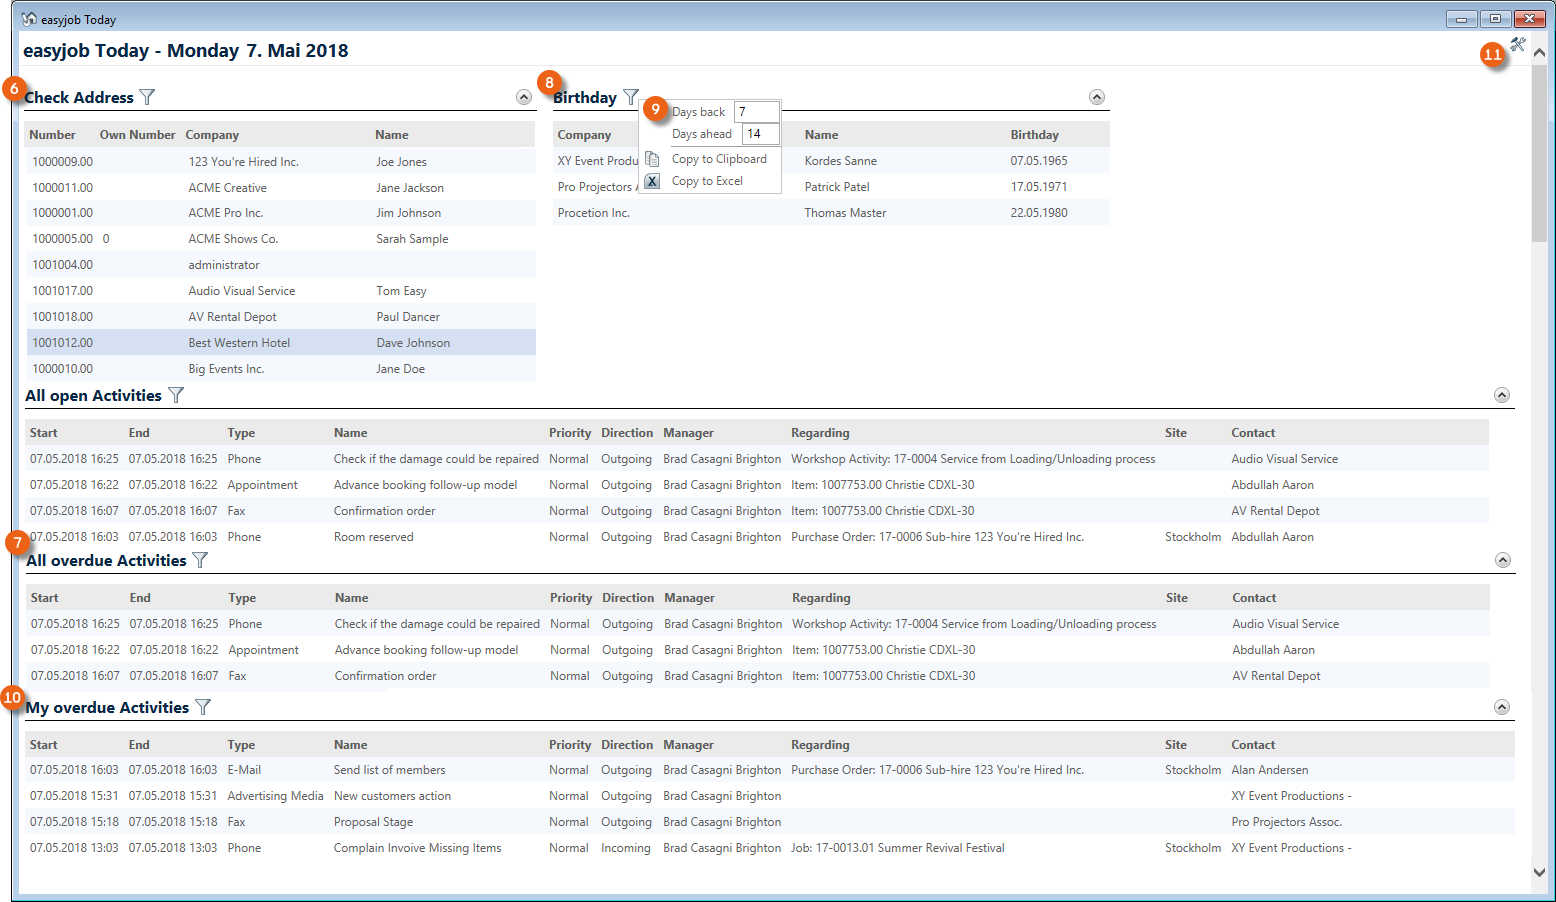
You can find a detailed description about customizing the settings for the Navigator view and easyjob Today in the easyjob 6 User Manual.
Checking an Address
Already created Addresses can be edited if necessary and marked as Checked in the Main Data .
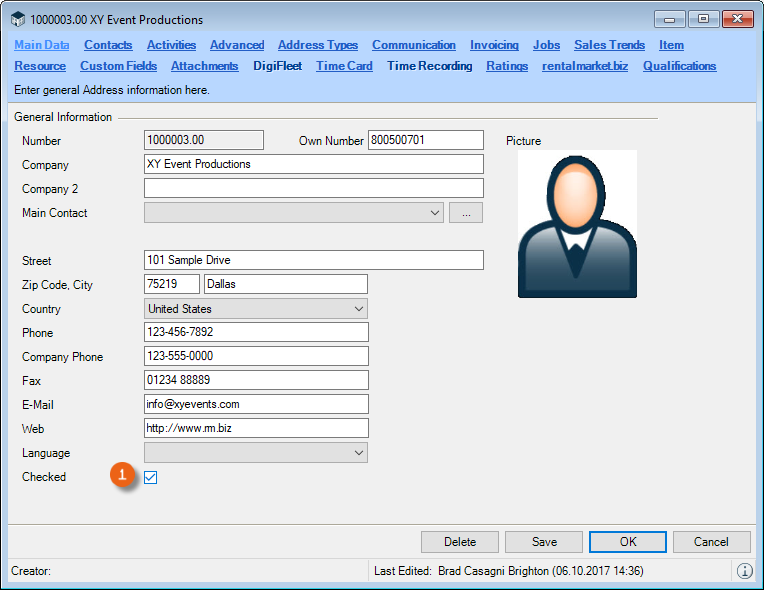
With the Check Address function in the Navigator or easyjob Today, all Addresses that were not yet checked are displayed in a List , from where they can be directly Edited or marked as Checked .
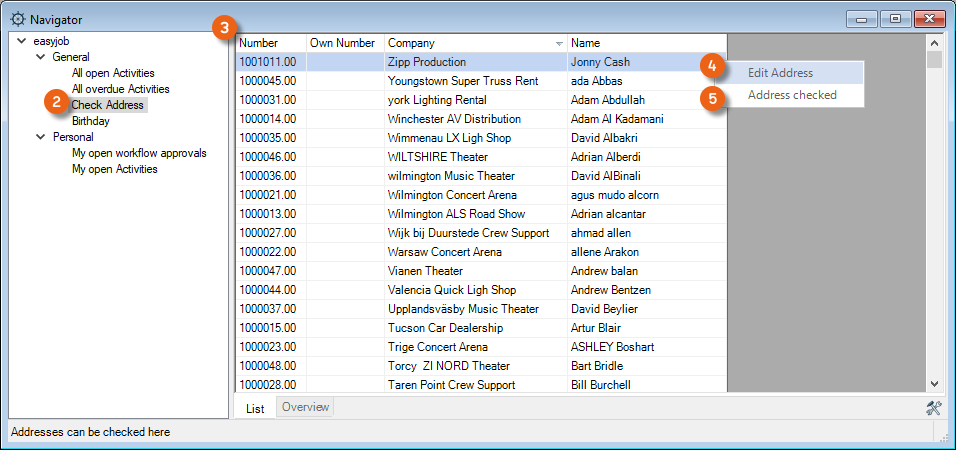
Checking Addresses with the Navigator view:
1. Click the Navigator Icon on the Toolbar
2. Settings icon
3. Drag and Drop Check Address to Navigation
4. Click the Settings icon to exit the mode
5. Select the desired address
6. Right mouse button
7. Edit Address and then mark it as Address checked
The list will only show Addresses that were not yet checked.
Birthdays
You can be informed automatically about birthdays. This View is available to you in easyjob Today and in the Navigator. You can enter the birthdays under Contacts in the Address Main Data
Entering a birthday in the Contact:
1. easyjob Menu View Address Book
2. Select an address
3. Edit Address
4. Contact tab
5. Select a Contact
6. Edit Address
7. Advanced tab
8. Enter the birthday
9. Save
Displaying the birthday in the Navigator view:
1. Click the Navigator Icon on the easyjob Toolbar
2. Settings icon
3. Drag & Drop Birthdays to Navigation
4. Click the Settings icon to exit the mode
Displaying birthdays in easyjob Today:
1. Click the easyjob Today icon on the toolbar
2. Settings icon
3. Select a Line Item and Add View
4. Select Birthdays
5. Ok
6. Click the Settings icon to exit the mode
Reminder Screen
If you set a Reminder for an activity, you can have this activity displayed on the Reminder window and specify the Reminder interval .
With Settings you can select from among various reminder views.
Activating reminders from the easyjob Menu:
1. easyjob Menu Tools User Settings
2. Reminders tab
3. Add
4. Select the desired settings and any filter options
5. Ok
easyjob must be restarted to activate the changes.
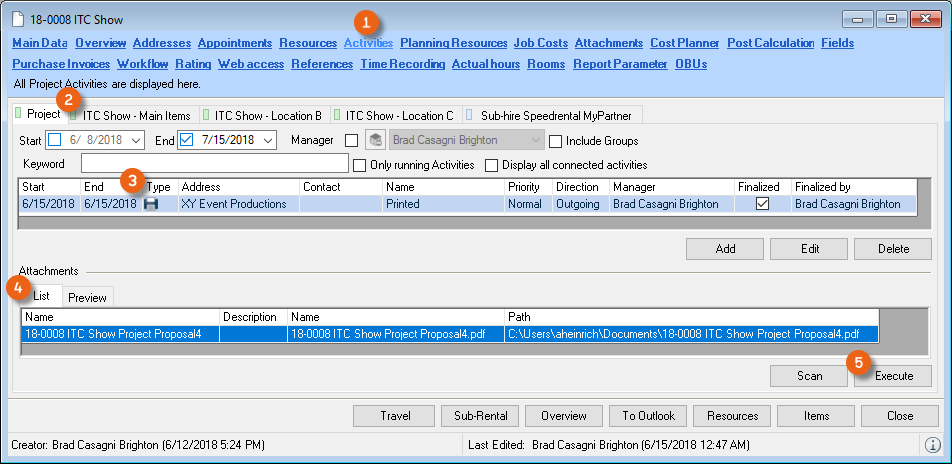
Print activities
When printing a report (e.g. Proposal) in a project and in a Job you can automatically create an activity. This creates a Print activity in the Activity overview for the Project/Job with various information such as the Print date, Address, Contact, Manager, etc. The relative PDF document will be saved and can be reopened at any time with Execute or by double clicking it.
 Activating automatic print activity creation:
1. easyjob Menu Tools Settings
2. Select the CRM tab
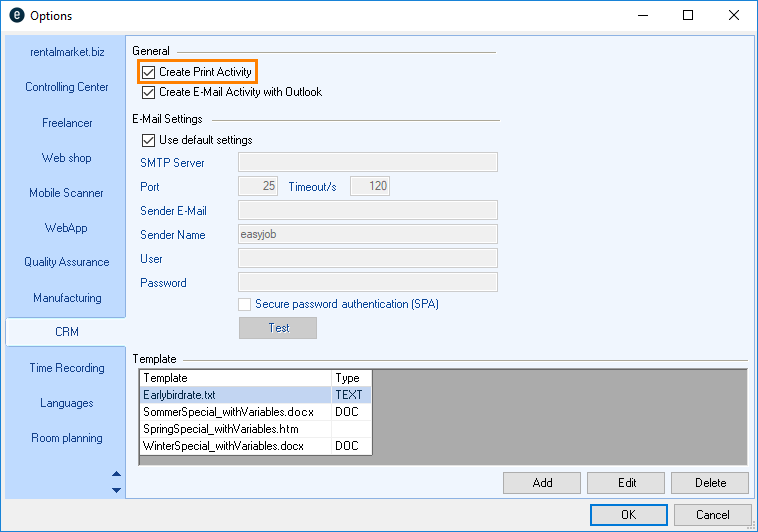
3. Check the Create print activities box
4. Ok
easyjob must be restarted to activate the changes.
Connected activities
In order to be informed in a project about all of the CRM activities related to this project, you can use the function Display all connected activities. If this selection has been activated, all activities for the relevant Purchase orders , Invoices and Workshop activities will be displayed in the Job activities.

Activating all connected activities:
1. easyjob Menu View Projects
2. Select a project
3. Edit
4. Activities tab
5. Check the box for Display all connected activities
Quick Change of the Address in the Project
If an activity is created in a project, the project customer is automatically preset. Via the address selection Quick Change function, you can display all Addresses present in this project to use them for a new activity.
Activities in the WebApp
Information from CRM can be viewed and managed using the easyjob 6 WebApp.
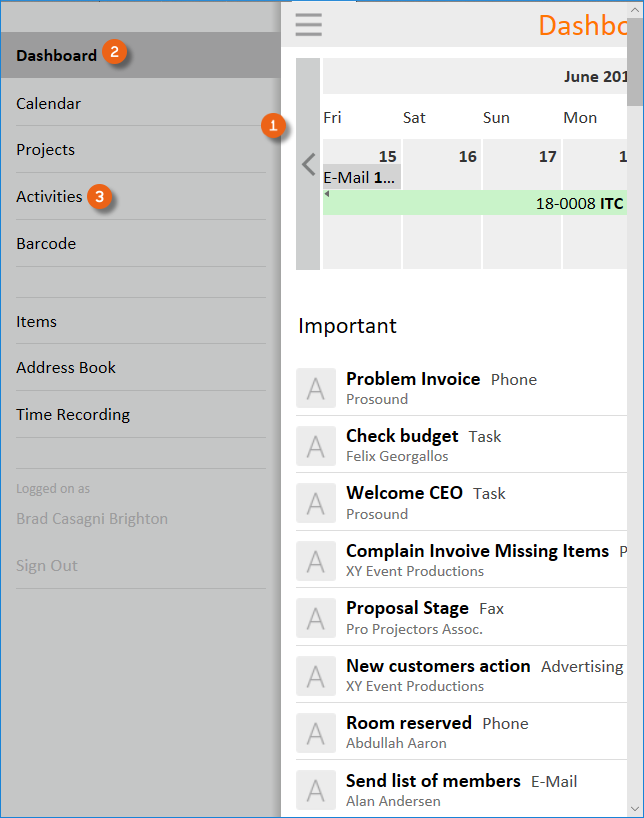
Dashboard
The WebApp Dashboard provides you with an overview of your activities. In the calendar overview, you can see the Activities scheduled for the day and can open and edit them. Your open activities are displayed under Important . Activities are indicated with an A . Your activities are also displayed under Today and From today .
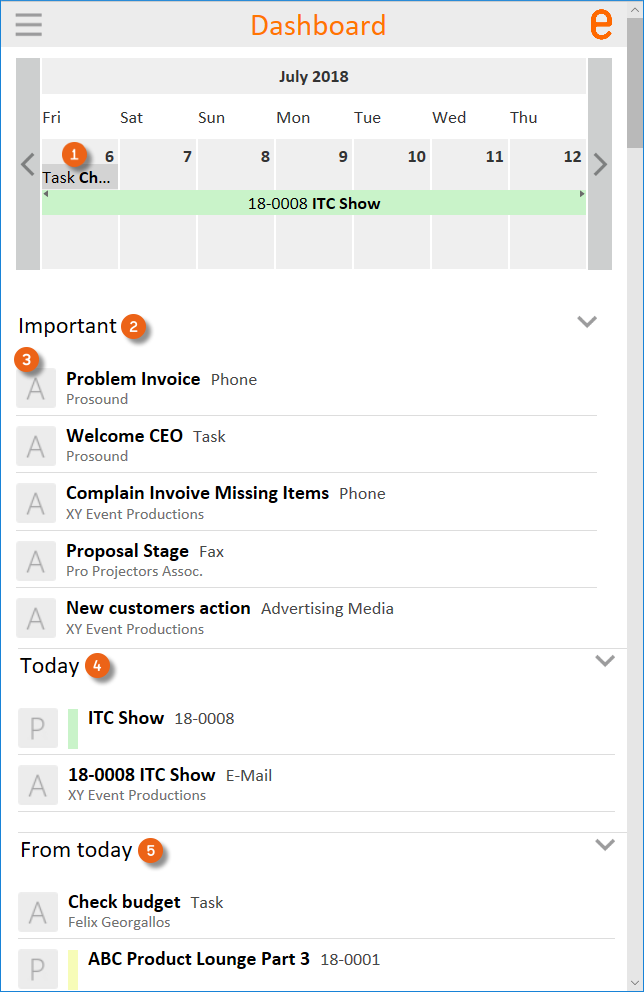
To edit an activity, tap it and you can change the start and end time , the Manager and the Address , mark the activity as Done and save your entries .

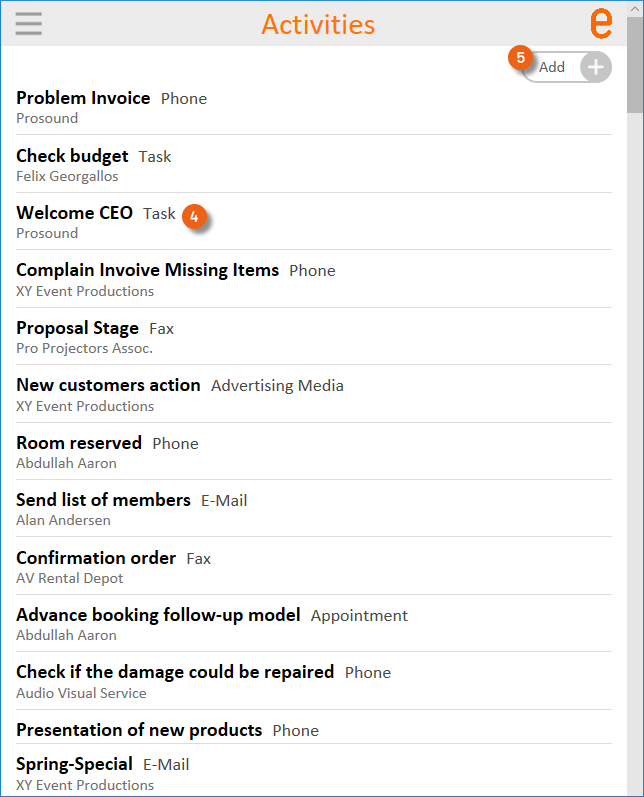
Activities
With the WepApp Menu you can switch from the Dashboard to Activities .
There you can Edit activities or Add new activities .
Address Book
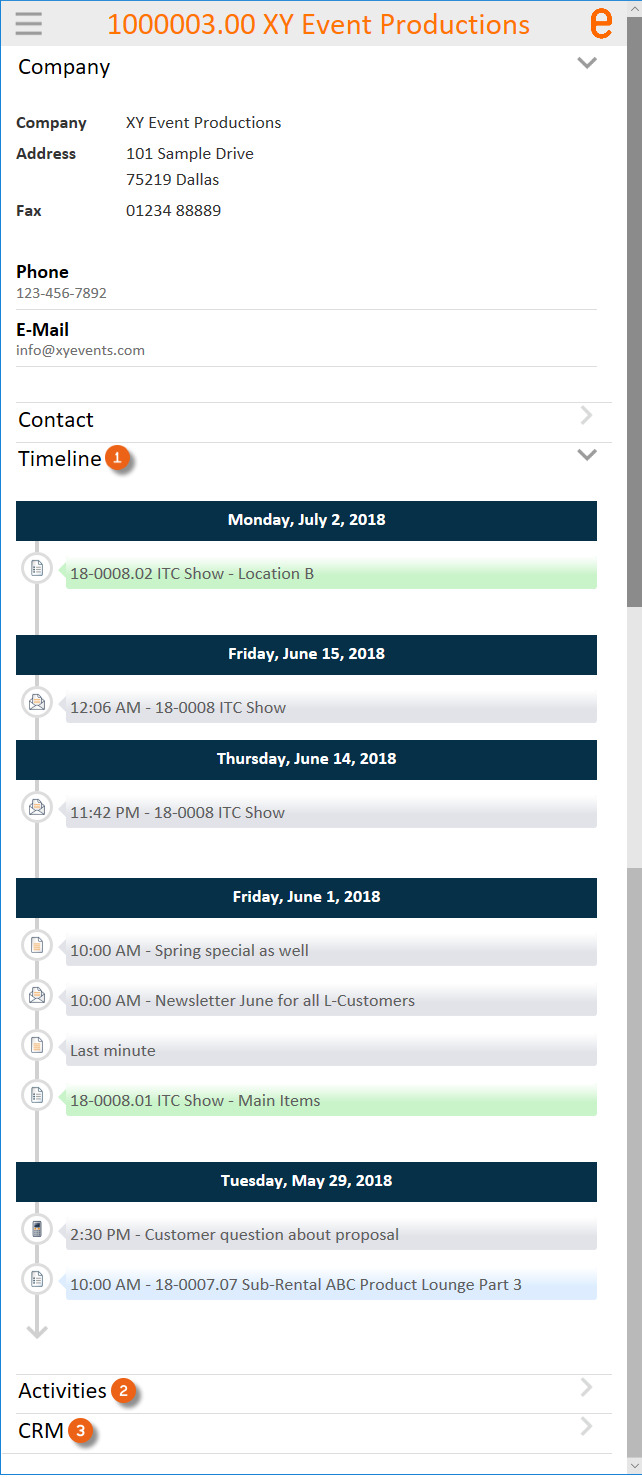
The Timeline , all the activities assigned to the Address and the CRM Advanced information is available in the Address Book.
Project management
In Project Management, in addition to the project or job related activities, it is also possible to collect and evaluate CRM relevant information (probability, cancellation reason, etc.).
Probability
When creating a Project or a Job, you can assign a probability to it.
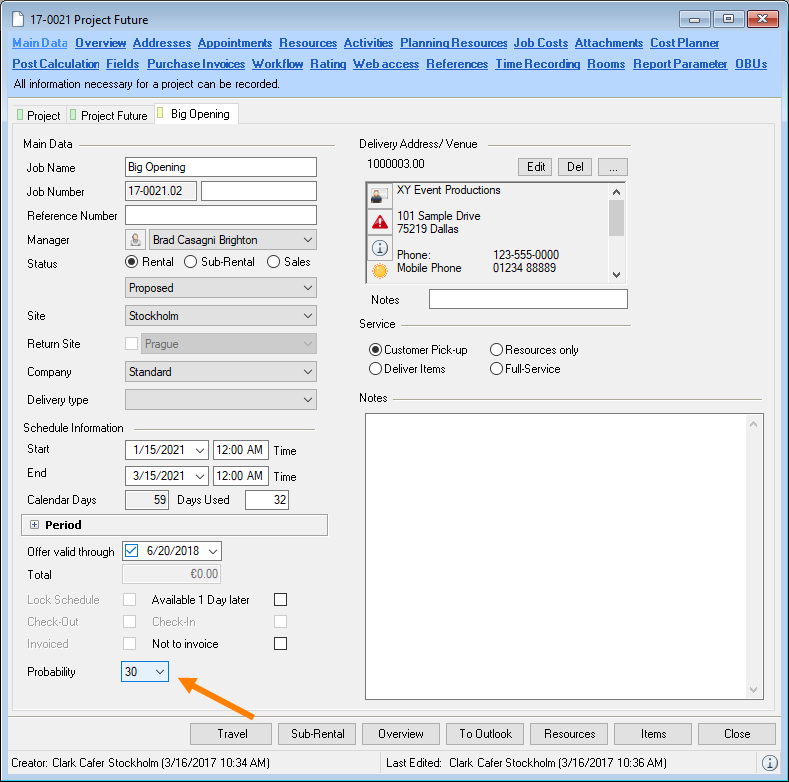
Entering the probability:
1. easyjob Menu Projects Edit Project
2. Select a project
3. Ok
4. Main Data tab
5. Enter the desired probability
You can assign a probability only to Projects and Jobs with a Proposed status.
The probability is displayed, for example, in the Project/Jobs View. The entries can be evaluated in the easyjob Business Information Center.

Cancellation reason
When a Job or Project is Canceled, you can enter the cancellation reason for future evaluations. Cancellation reasons include Proposal variation (if you created multiple Proposals at the same time for the same Request), Project Canceled, Unknown, Lost to other customer (if, for example, another agency for which you are a subcontractor received the order – in addition you can add the new, confirmed project) or Lost to competitor (in this case, you can enter the competitor). In all cases, you can enter a remark. The information you entered is displayed with MouseOver.
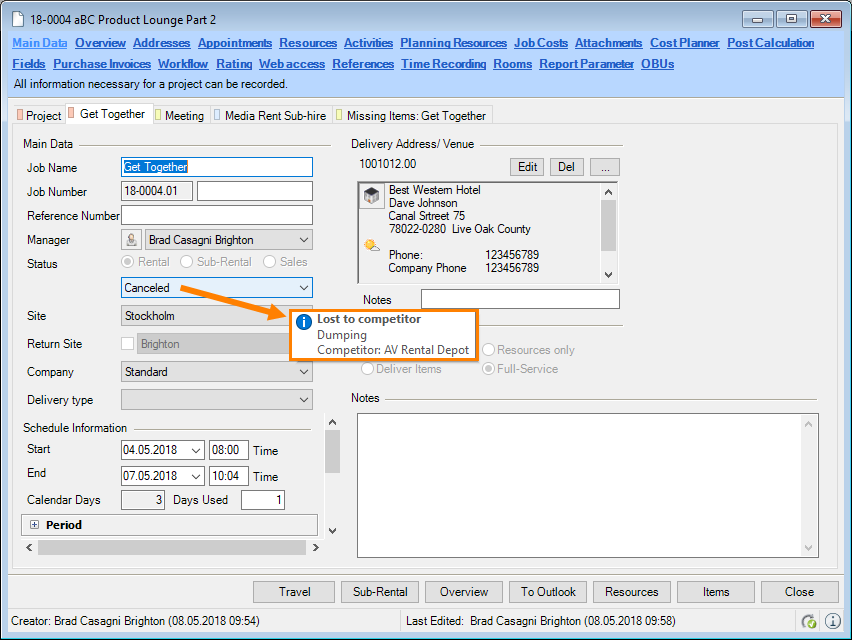
Canceling a Project/Job:
1. easyjob Menu Projects Edit Project
2. Select a project
3. Ok
4. Select a Job if necessary
5. Main Data tab
6. Set the status to Canceled
7. Enter the reason and any other information
8. Ok
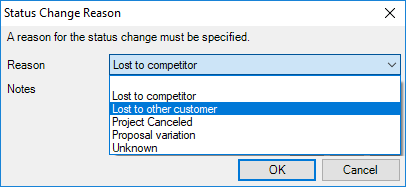
Credit Limit in the Project
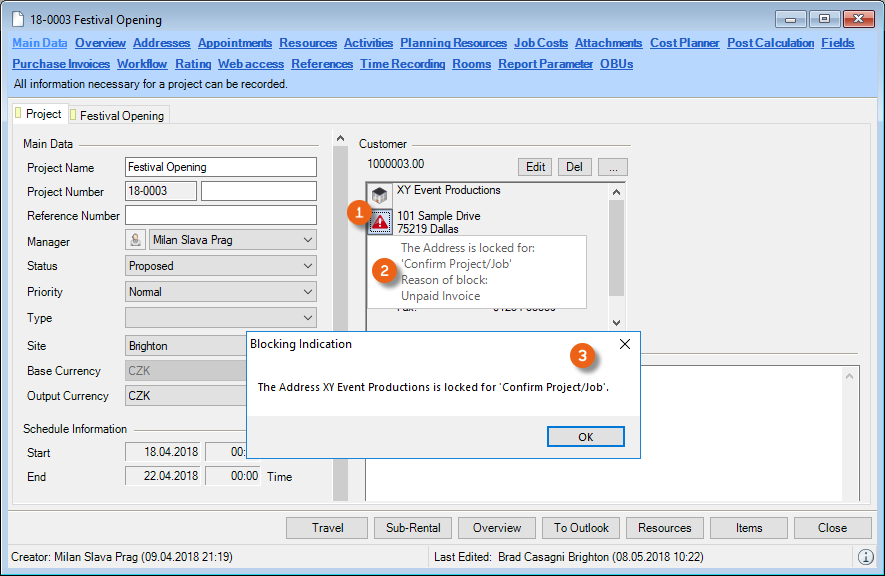
If you have set a Credit Limit in the Address Master Data, this will be displayed with the amount of the Credit Limit and the sum for Open Entries and the sum for currently Confirmed Jobs.
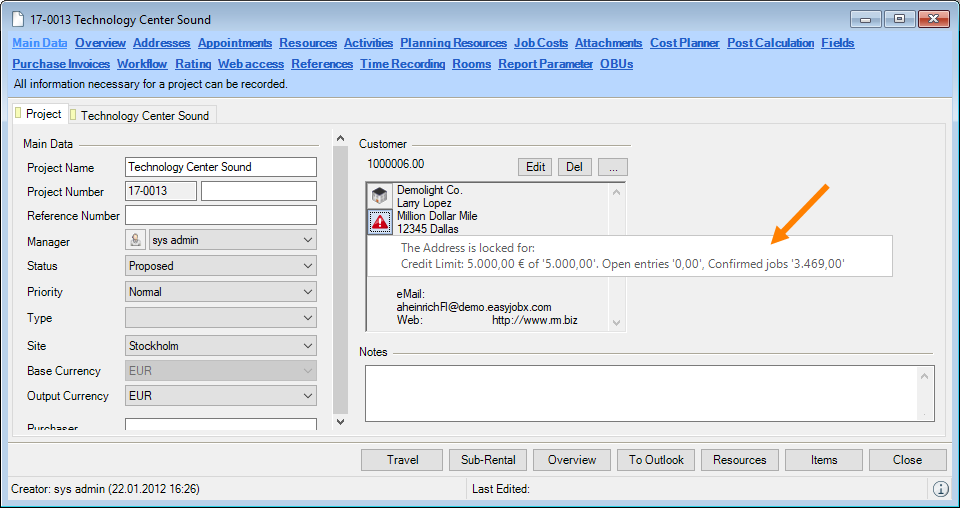
A warning is displayed in the Job and the Cost Planner if the Total exceeds the Credit Limit.
See also Credit Limit Blocking Indicator.
Address Master Data
You can enter a wide range of information for an address in the Address Master Data. CRM fields are available on the Master Data , Contacts , Activities , Blocking Indicator , CRM , CRM Advanced , Agreements and Relationships tabs.
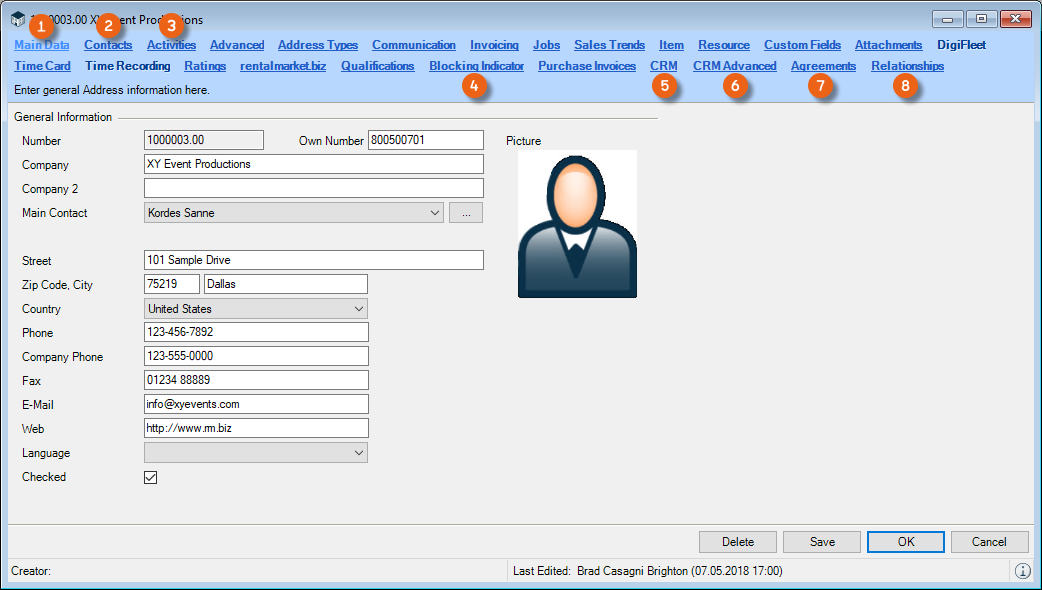
Main Data
See Checking an Address.
Contacts
For Contacts, you can enter information such as the Title, Source, Recommended by, Acquisition channel and the Newsletter Status.
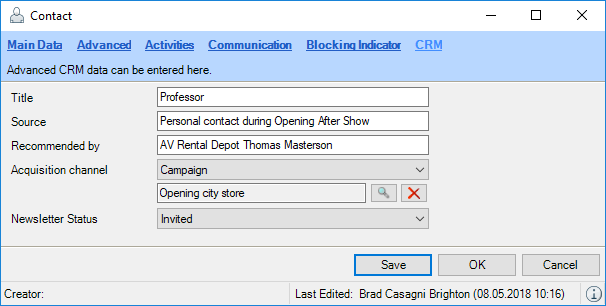
Entering CRM information for a Contact:
1. easyjob Menu View Addresses
2. Select a Contact Edit
3. CRM tab
4. Enter the information
5. Save
You can assign specific activities to the Contact and enter a Blocking indicator.
Entering activities for a Contact:
1. easyjob Menu View Addresses
2. Select a Contact Edit
3. Activities tab
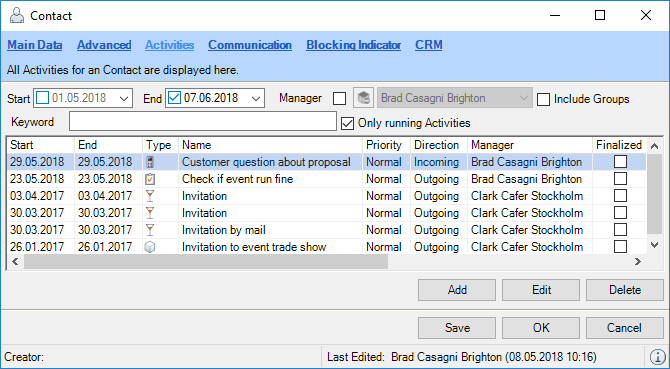
4. Create the desired Activities
5. Save
Activating a Blocking indicator in the Contact:
1. easyjob Menu View Addresses
2. Select a Contact
3. Edit
4. Blocking Indicator tab
5. Enter the desired Blocking indicators
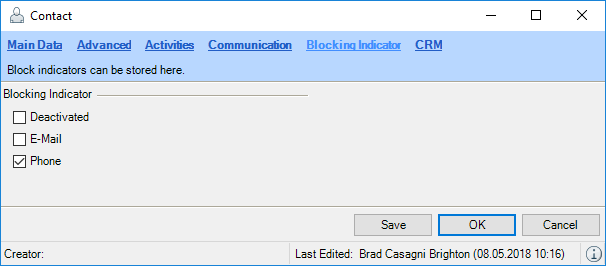
6. Save
Activities
Here you can find an overview of the activities assigned to this Address See also Activities in the reference type.
Blocking indicators
Blocking indicators are available on an address and contact level. With a Blocking indicator, you can block various activities for this Address. For example you can block the creation of a Reminder or limit the CRM Communication channels for the respective Address or Contact, if the customer does not want to receive e-mails in general or does not want to be called.
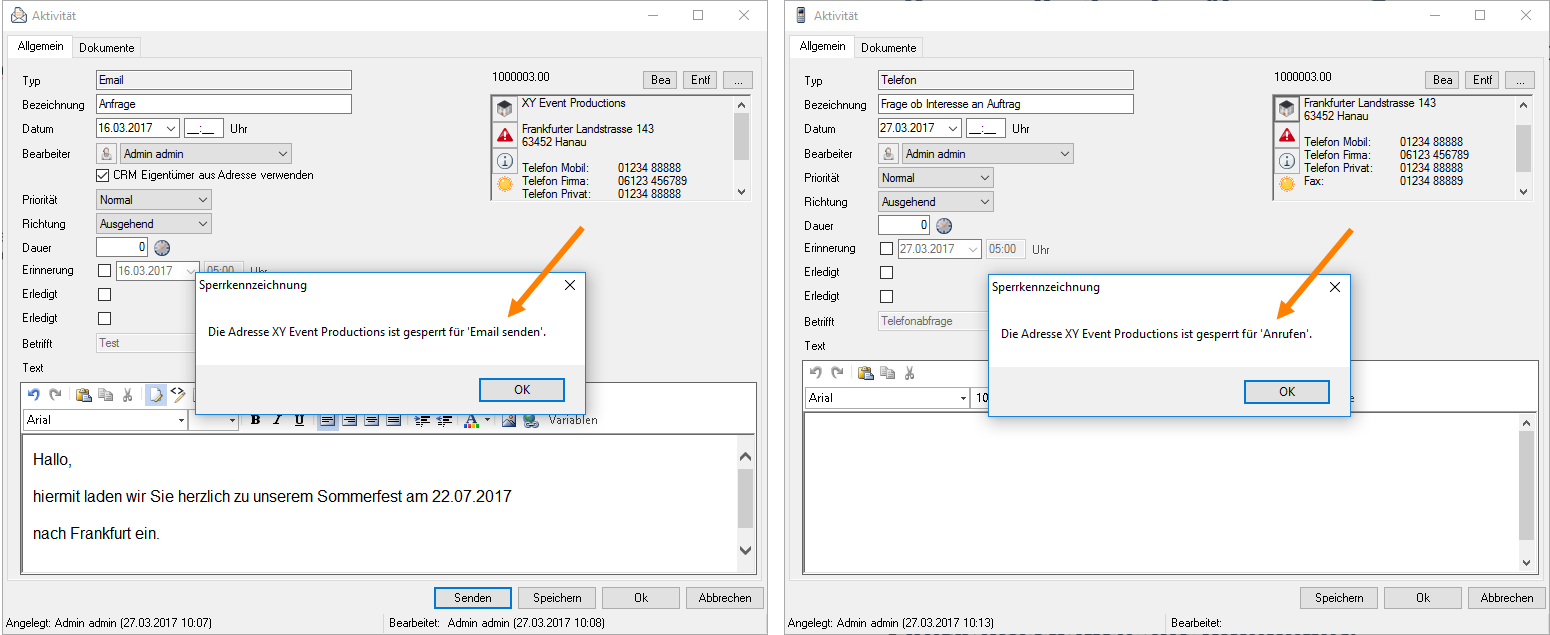
If you have activated a Blocking indicator for a customer, a symbol will appear in the address field. With the left mouse button, the name of the Blocking indicator and the reason for the block are displayed. If an attempt is made to perform an activity (e.g. Confirm Job) for which a Blocking indicator has been set, a dialog window opens and the activity cannot be carried out.
When changing Blocking indicators, a log entry is made for the address. In this way you can see who set or released which Blocking indicator and when it was done.
Credit Limit Blocking Indicator
You can enter an individual value for the Credit Limit Blocking Indicator. If a customer is selected for a new project, the sum of the open entries and the sum of the confirmed Jobs is added and you will receive a corresponding message. See also Credit Limit in the Project.
Blocking indicators in an Address
Activating Blocking Indicators for an Address:
1. easyjob Menu View Addresses
2. Select an address
3. Edit
4. Blocking Indicator tab
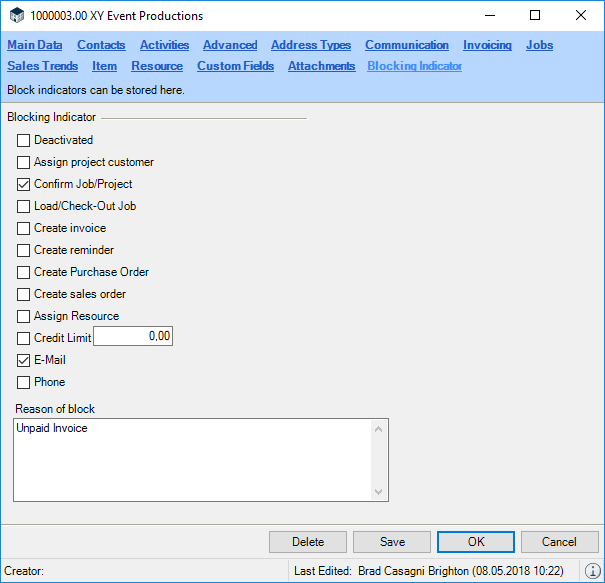
5. Enter the desired Blocking indicators
6. Save
Blocking indicators in a Contact
See Contacts.
Deactivate address
You can also deactivate individual addresses. The Address can no longer be selected. Any Activities in which the Address was used prior to deactivation will remain saved. You can assign separate user rights for deactivation and for viewing Deactivated Addresses.
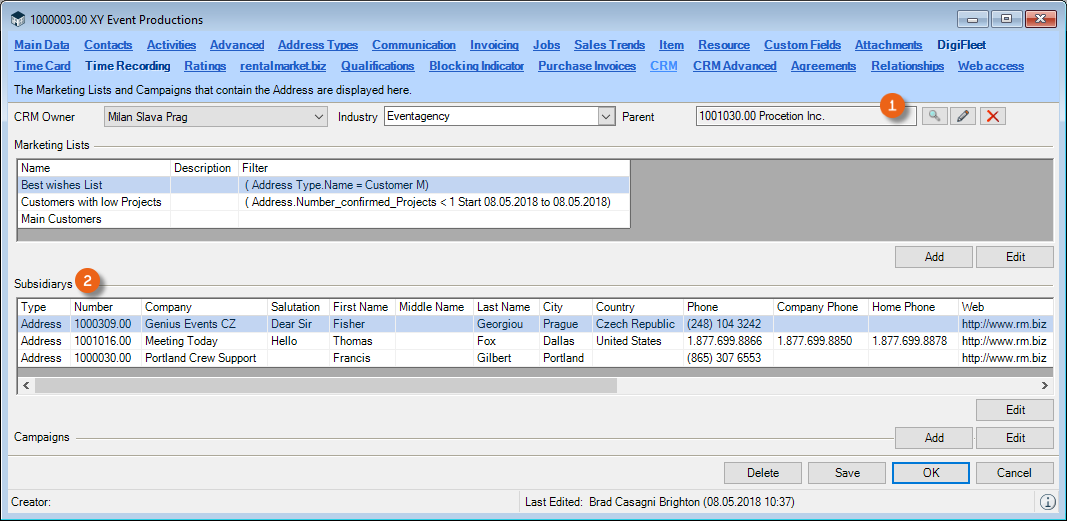
CRM
The CRM tab provides you with an overview of the CRM Owner , Industry (Supplier/Stand builder/etc.), Parent address (if the customer is a subsidiary), Marketing Lists in which the customer is a member, Subsidiaries this customer owns and Campaigns in which the customer was involved or will be in the future.
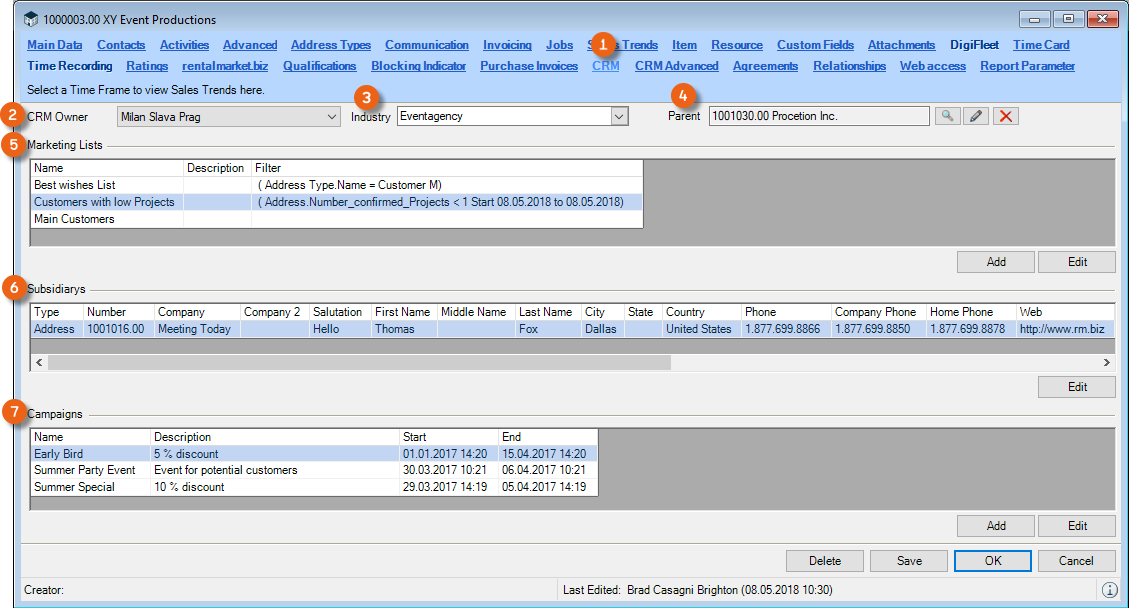
In this overview, you can Add Marketing Lists and Campaigns or Edit already existing ones. The Address Master Data for the Subsidiaries can be edited.
Making CRM entries for an Address:
1. easyjob Menu View Addresses
2. Select an address
3. Edit
4. CRM tab
5. Enter the desired content
6. Save
CRM Owner
The Address can be assigned to a user. This is the Employee that takes care of this customer from a CRM point of view. With entry, filters can be created, for example.
You can assign a right for Change Foreign Owner in the User settings. If this right is not activated, Addresses and Contacts cannot be assigned to other users.
Industry
The multi-level industry selection makes it possible for you to split suppliers between event agencies and stand builders, or divide the federal government into different states, and these in turn into municipalities. You can evaluate the entries in various areas (easyjob Business Information Center).
Creating an industry selection:
1. easyjob Menu Master Data Industries
2. Add

3. Create the industry level separately with the backslash
4. Ok
Parent address and Subsidiaries
In order to better display the group structure, you can assign a Parent address to each Address. The assigned Address will be automatically displayed as a Subsidiary in the CRM address tab for the parent address.
Assigning the parent address:
1. easyjob Menu View Addresses
2. Select an Address Edit
3. CRM tab
4. Assign the parent address
5. Save
Also the Contacts for the subsidiary can be displayed in the Contacts for the parent address.
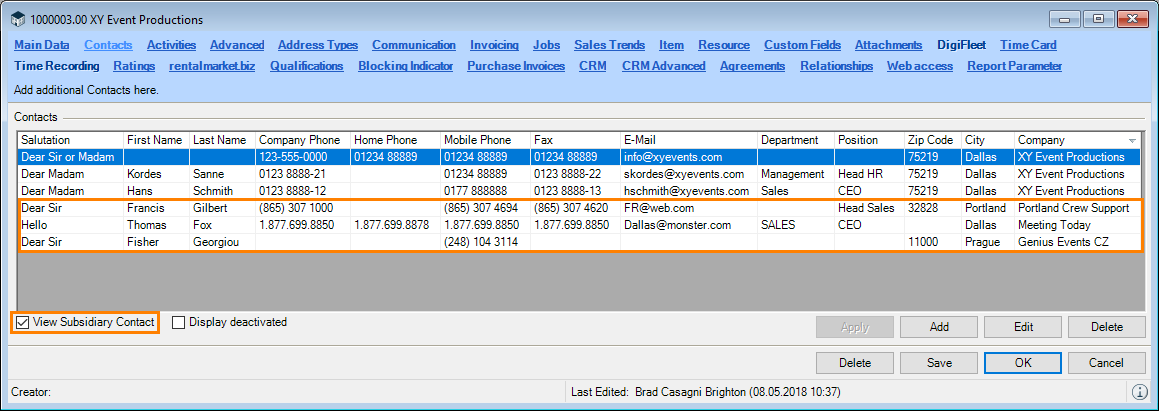
Displaying subsidiary contacts:
6. easyjob Menu View Addresses
7. Select an Address Edit
8. Contact tab
9. Check the View Subsidiary Contacts box
Marketing Lists
In order to carry out campaigns, you can create marketing lists for certain target groups in the Master Data. The CRM address tab shows which Marketing lists the Address belongs to. See also Marketing Lists.
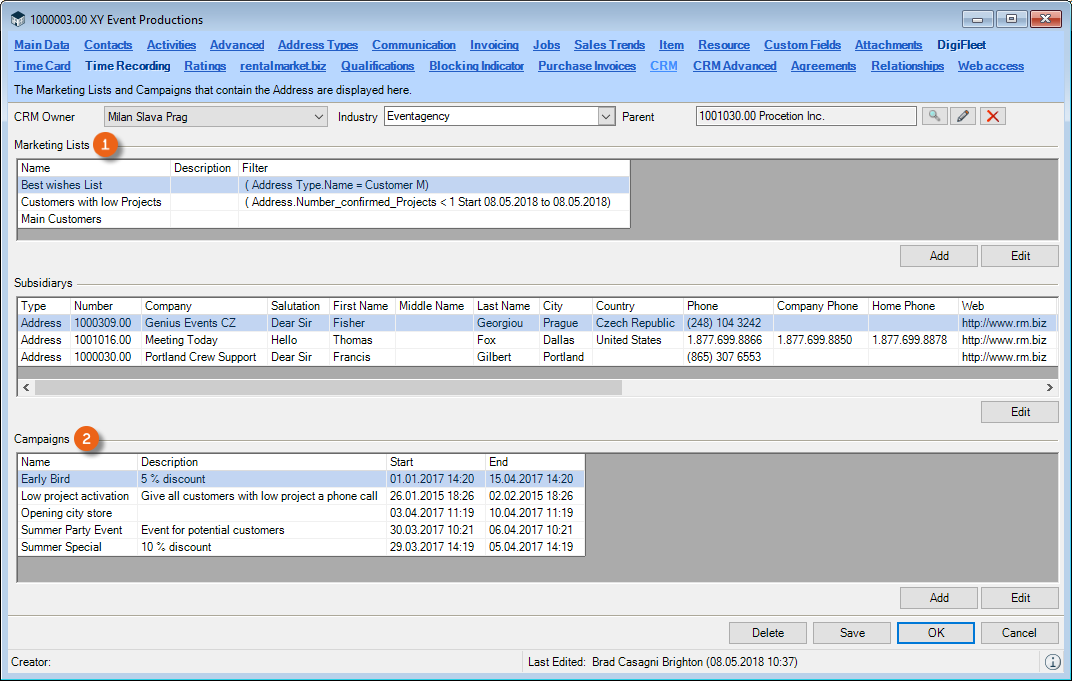
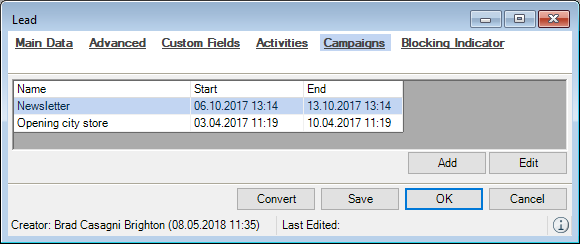
Campaigns
All Campaigns in which the customer was involved are displayed here. Additional campaigns can be added or already existing campaigns can be edited. Additional information can be found in Campaign.
CRM Advanced
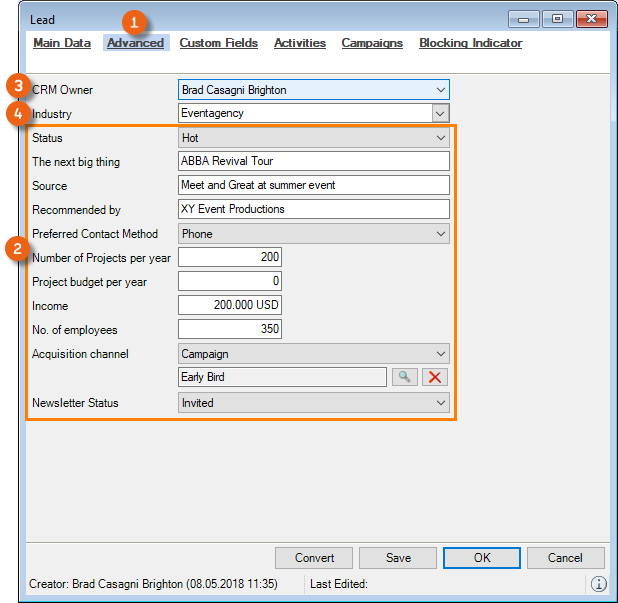
You can enter additional information about the address on the CRM Advanced tab. With details such as Status (Cold, Warm, Hot, Not interested and Qualified*), The next big thing (the customer's next large project), Source (where the information comes from), who the customer was Recommended by , Preferred Contact Method (E-mail or Phone), Number of Projects per year , Project budget per year , Income , No. of employees , Acquisition channel (e.g. a campaign and its name ) and the Newsletter Status (Invited, Subscribed and Denied), your sales team is able to record, evaluate and use important information about this customer.

Making CRM Advanced entries for an Address:
1. easyjob Menu View Addresses
2. Select an address
3. Edit
4. CRM Advanced tab
5. Enter the desired content
6. Save
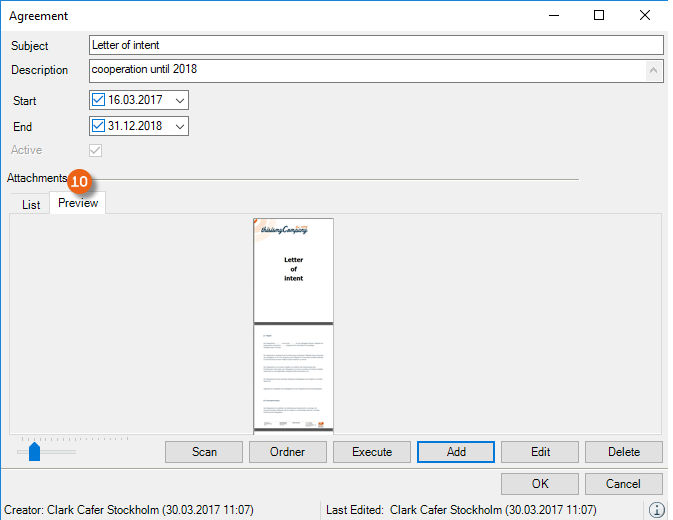
Agreements
Another option for documenting your customer relationships is available on the Agreements tab. Master Agreements, Letters of intent, etc. can be documented and managed here in a clear manner. An Overview shows the topic, a description as well as the start and end of the agreement. With the Show Inactive filter, you can display agreements that are no longer active . With Add you can create a new agreement.
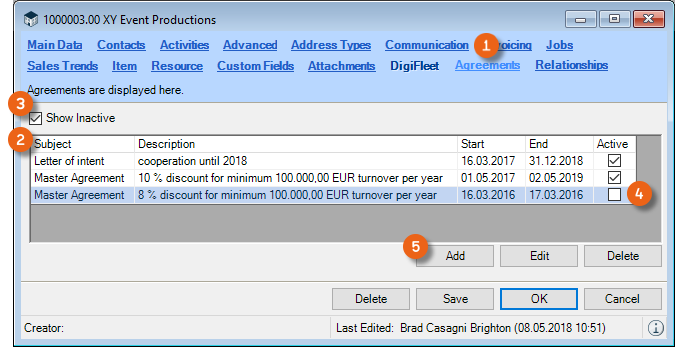
In addition, you can addAttachments for the agreement. The corresponding documents are shown in a List , which can be opened by double clicking them or by pressing Execute .
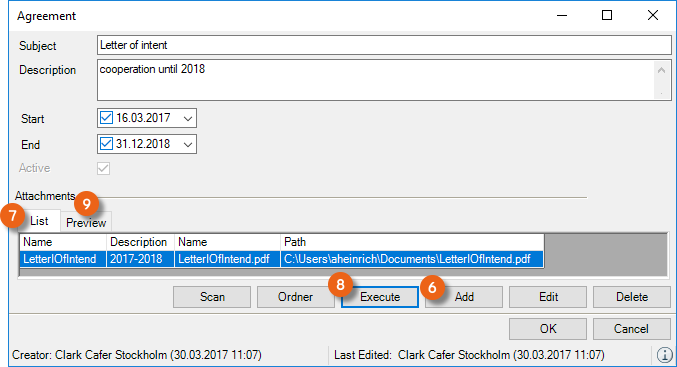
The selected Document is displayed in the Preview .
Creating agreements for an Address:
1. easyjob Menu View Addresses
2. Select an address
3. Edit
4. Agreements tab
5. Enter the desired content
6. Save
In User settings you can assign a right to View and/or Edit Agreements.
Relationships
Addresses that have a particular relationship with each other can be recorded in the Address Master Data on the Relationships tab. You can define the type of relationship (e.g. Supplier, Customer, Partner, etc.) in the Master Data. Create a new relationship with Add .
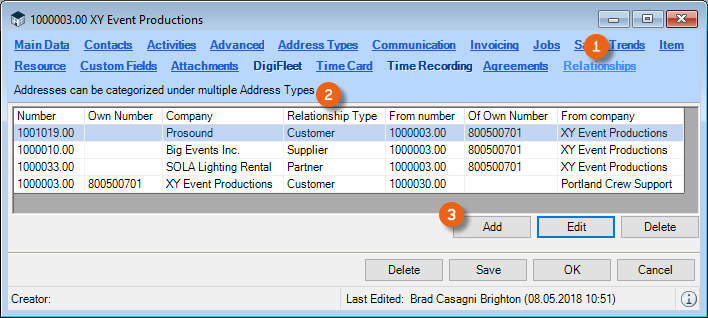
Creating relationships for an Address:
1. easyjob Menu View Addresses
2. Select an Address Edit
3. Relationships tab Add
4. Enter the Address and the Relationship type
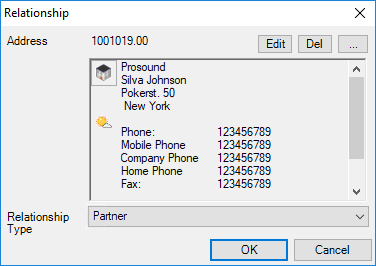
5. Ok
The Relationship Type and Address on which the relationship is based are also entered in the Address Master Data for the selected Address.
Creating a Relationship Type in the Master Data
1. easyjob Menu Master Data Relationship Type
2. Add
3. Enter a Name
4. Ok
Leads
Before you create a potential customer (e.g. an interested person at a trade show) in detail in your Address Master Data, you can enter him as a Lead in easyjob. On the Main Data , Advanced , Custom Fields , Activities , Campaigns and Blocking Indicator tabs, you can use many CRM functions also for the Lead. If this lead becomes a customer, then the lead can be Converted to the Address Master Data.
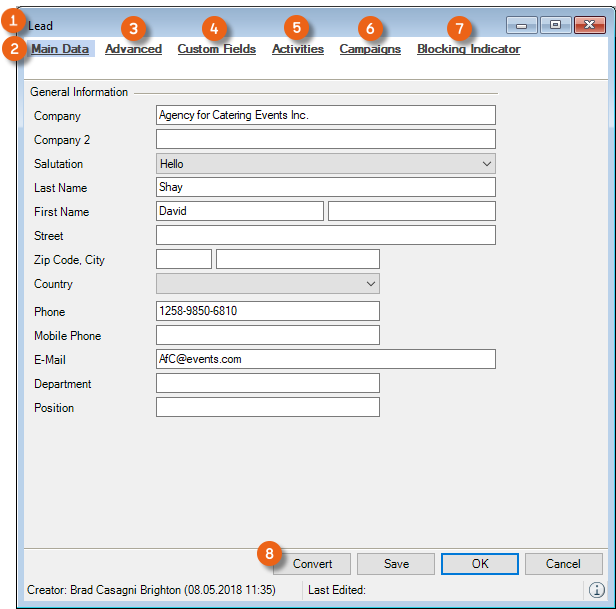
Creating a lead:
1. easyjob Menu Master Data Addresses
2. Add
3. Lead
4. Enter the information
5. Save
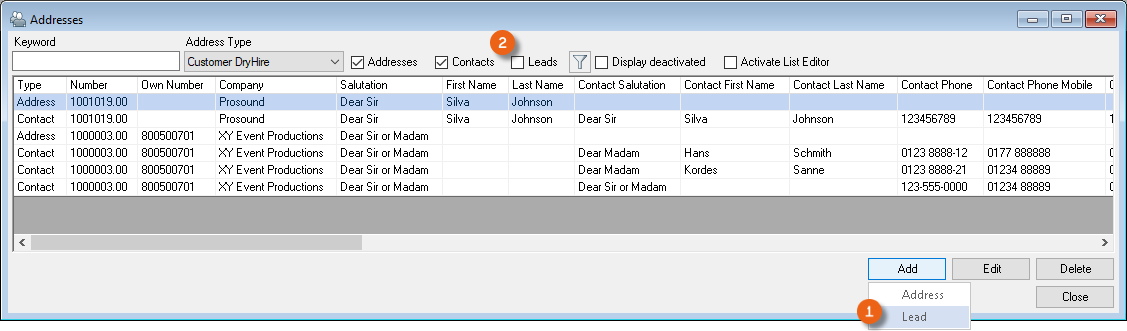
In your Address Main Data, you can not only by Addresses and Contacts, but also by Leads .
Main Data
Enter general information as well as communication details (e.g. CRM Owner) in the Main Data.
Advanced
The Advanced tab contains the same fields found on the CRM Advanced tab for an Address. In addition, you can enter the CRM Owner and the Industry .
Custom Fields
The Customer Fields are identical to those for the Address Master Data.
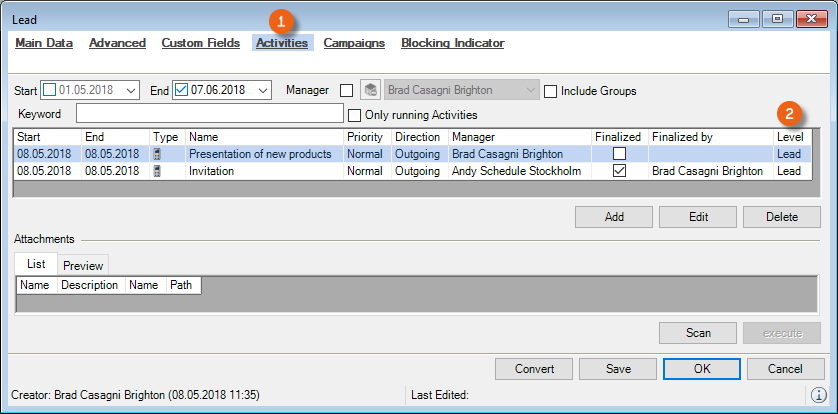
Activities
Here you can find an overview of the Activities assigned to this lead Address. The content of the Activities tab is analogous to the Address Master Data. The Level column indicates if it is a Lead, Contact or Address.
Campaigns
The campaign information is identical to the information in the Address Master Data.
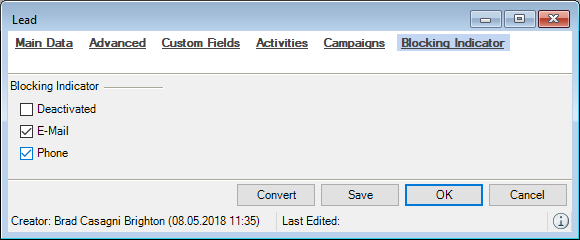
Blocking indicators
You can activate the same Blocking indicators in the Lead as in the Contact. See also Contacts and Blocking indicators.
Converting a Lead into an Address
Converting a lead:
1. easyjob Menu Master Data Addresses
2. Select the Lead
3. Convert
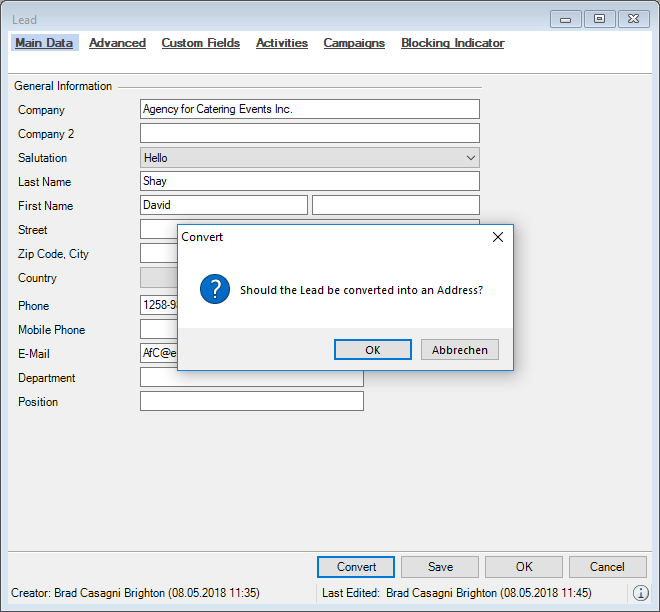
4. Ok
5. Enter any additional information for the Address
6. Save
When you create a Project and select a Lead as the customer for it, it is automatically converted into an Address.
Leads in the Dashboard
The CRM Dashboard is also available for Leads. You can display the Address Main Data, Activities, Timeline, Advanced Information, Campaigns and Events. More information can be found in Dashboard.
Dashboard
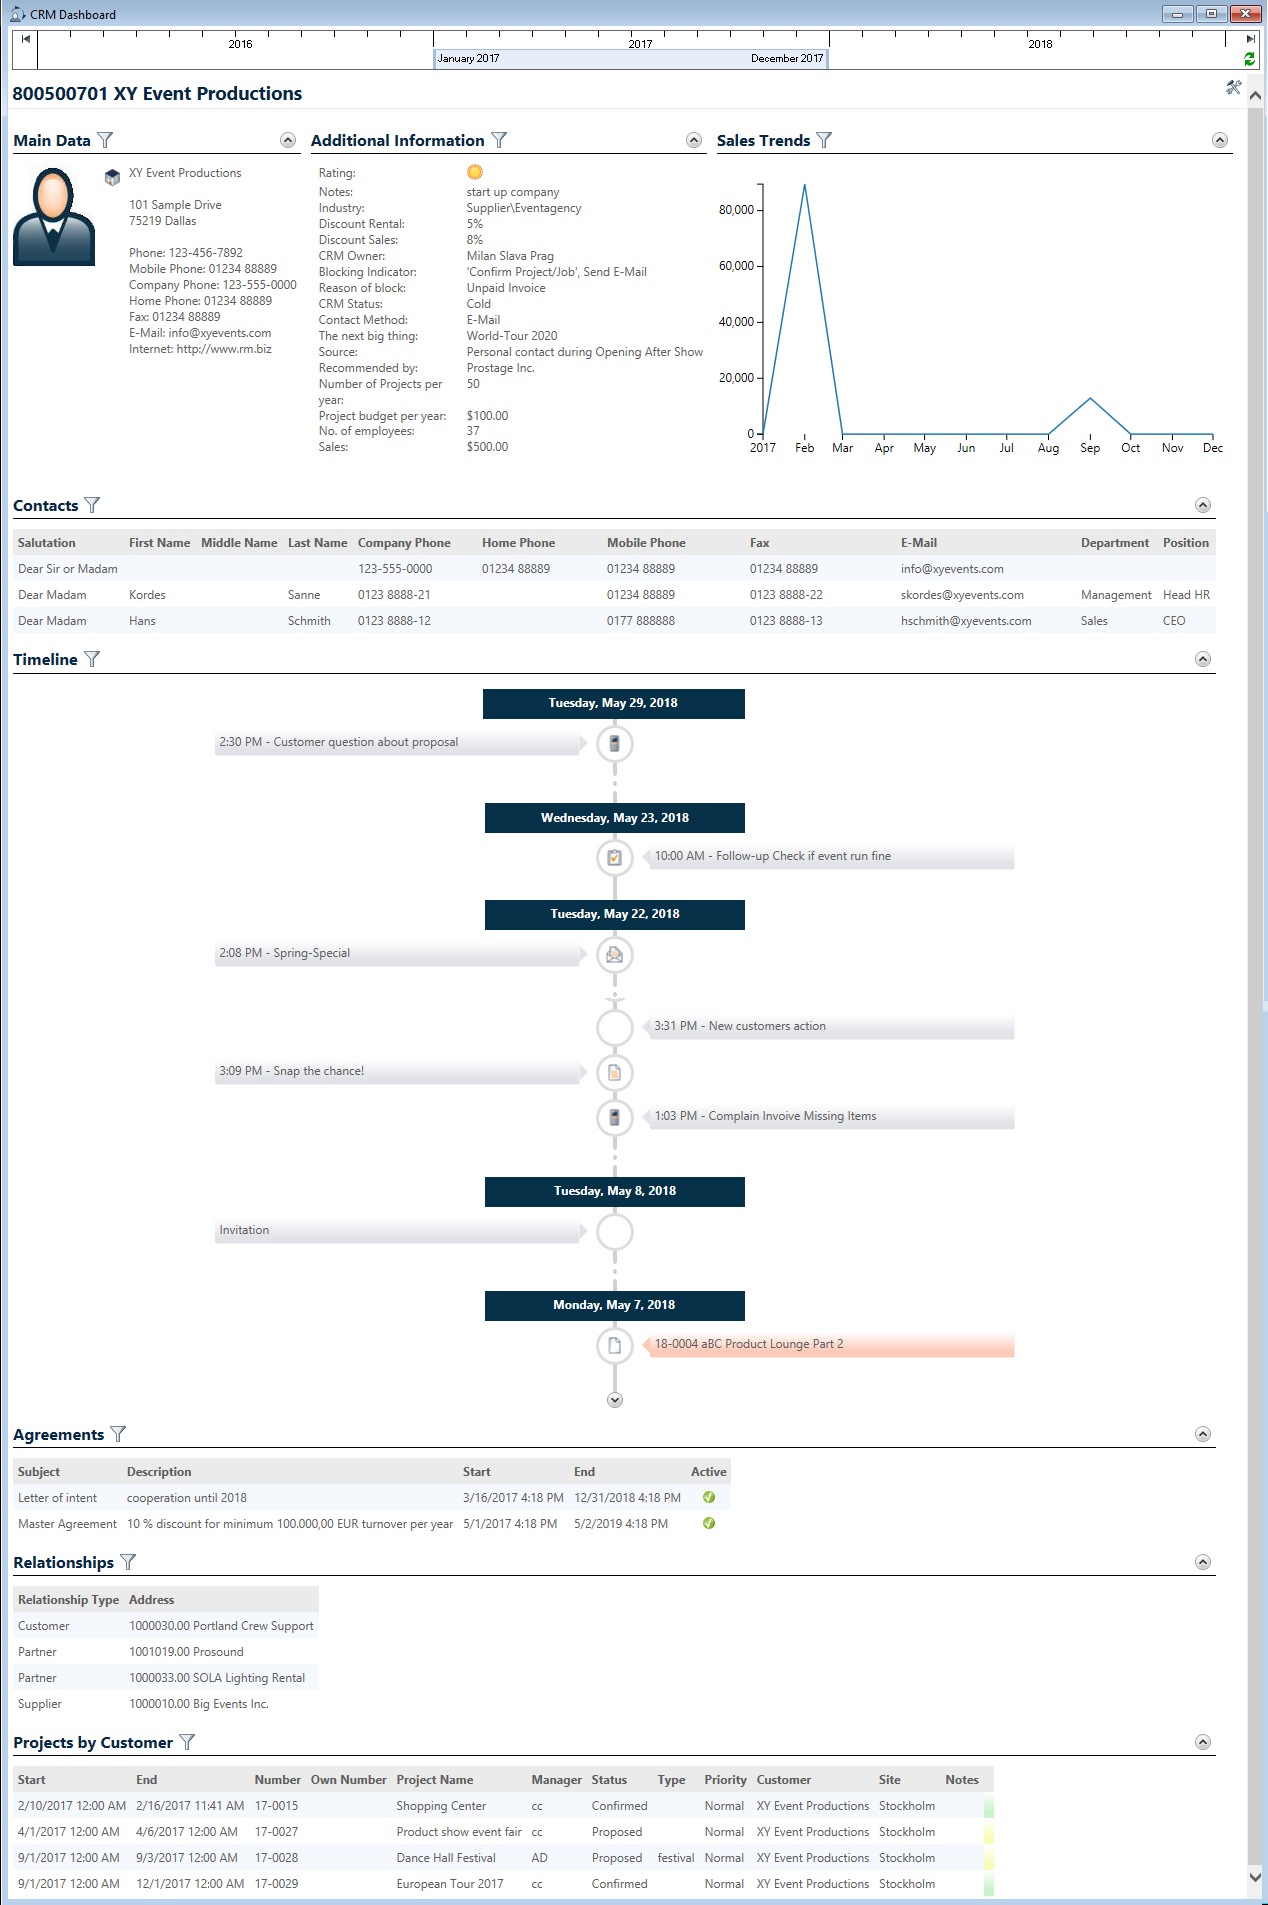
With the CRM dashboard you are informed about all processes of a selected address. You can see all information and data about your customer at a glance.
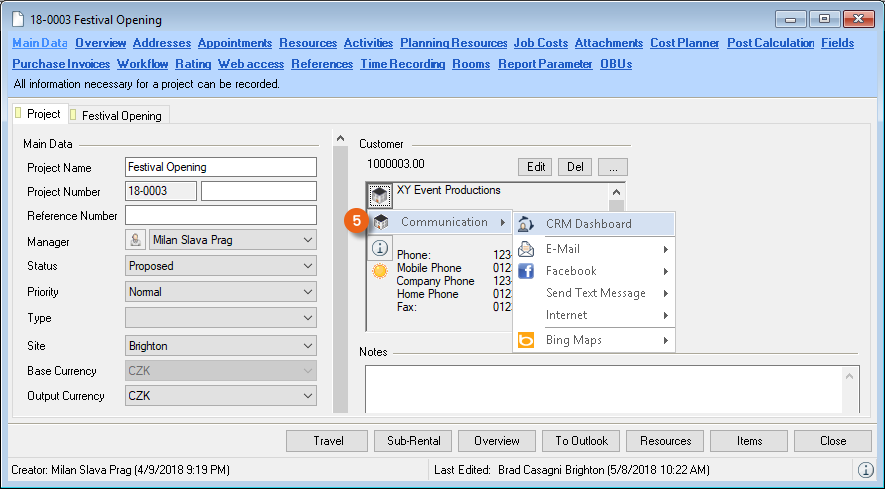
You can open the CRM Dashboard via the context menu (right mouse click) of the Address or the Contact . You can also access the CRM Dashboard via the Communication menu . You can also open it directly in the Address Book.
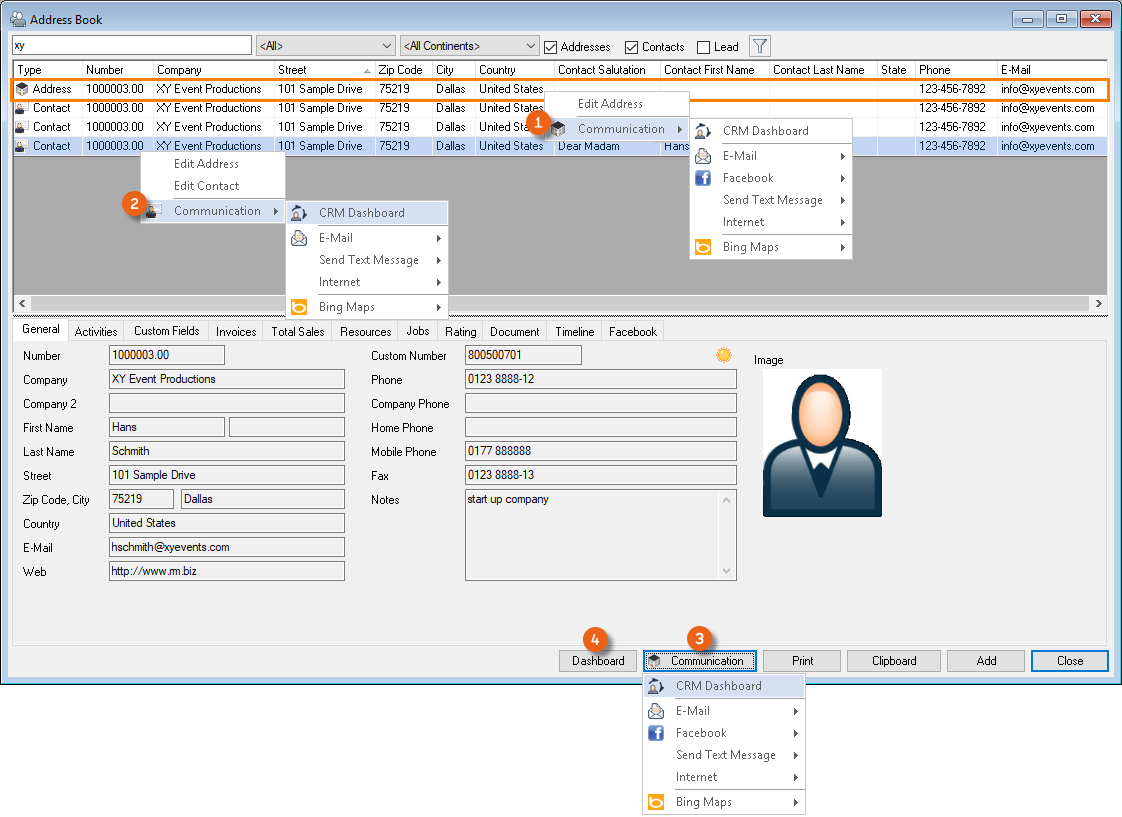
In nearly all points in easyjob where an Address or a Contact is used, you can open the Communication menu with the right mouse button. For example, in the Project .
Opening the Dashboard:
1. easyjob Menu View Addresses
2. Select an Address/Contact
3. Right mouse button Communication
4. CRM Dashboard
or
3. Dashboard button
Customizing the Dashboard
Many Settings are possible on the Dashboard. You can specify individually what information should be displayed in which point and which filter should be used. Many Views are available by default.

Reports from the Business Information Center
If you use the Business Information Center, you can group the individual reports and display them on the CRM Dashboard.
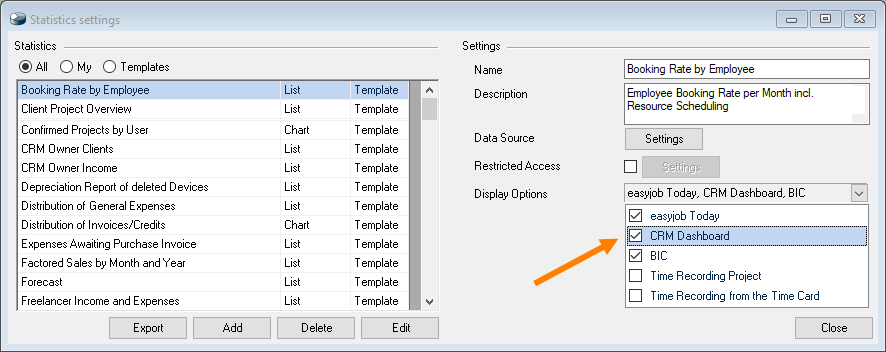
More information can be found in easyjob Business Information Center manual.
Time Frame
With the Time Frame, you can define the start and end time of your time frame related reports (e.g. Invoices). The report always starts on the first day of the indicated month and ends on the last day of a month. With the left mouse button you can push the time bar to the desired Line Item or use the items (e.g. Current Year, etc.) available in the drop-down menu . Press the Refresh button to update your selected Views for the set time frame.
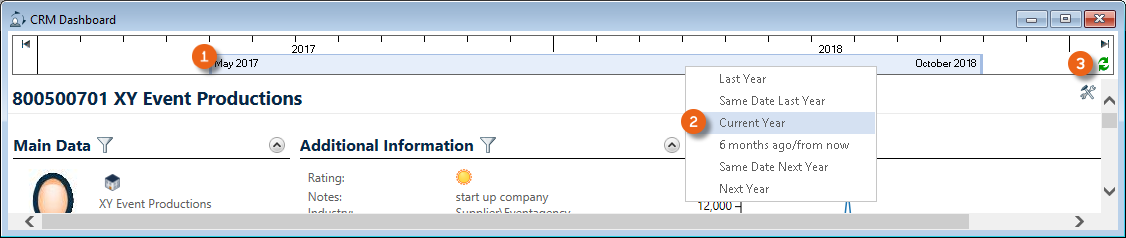
You selected the time frame 'Same Date Last Year', your report starts on the first day of the current month one year ago (e.g. March 1, 2017) and ends on the last day of the last month (February 28, 2018) of the year time frame. From March 2017 until March 2018 means March 1, 2017 until February 28, 2018.
Settings mode
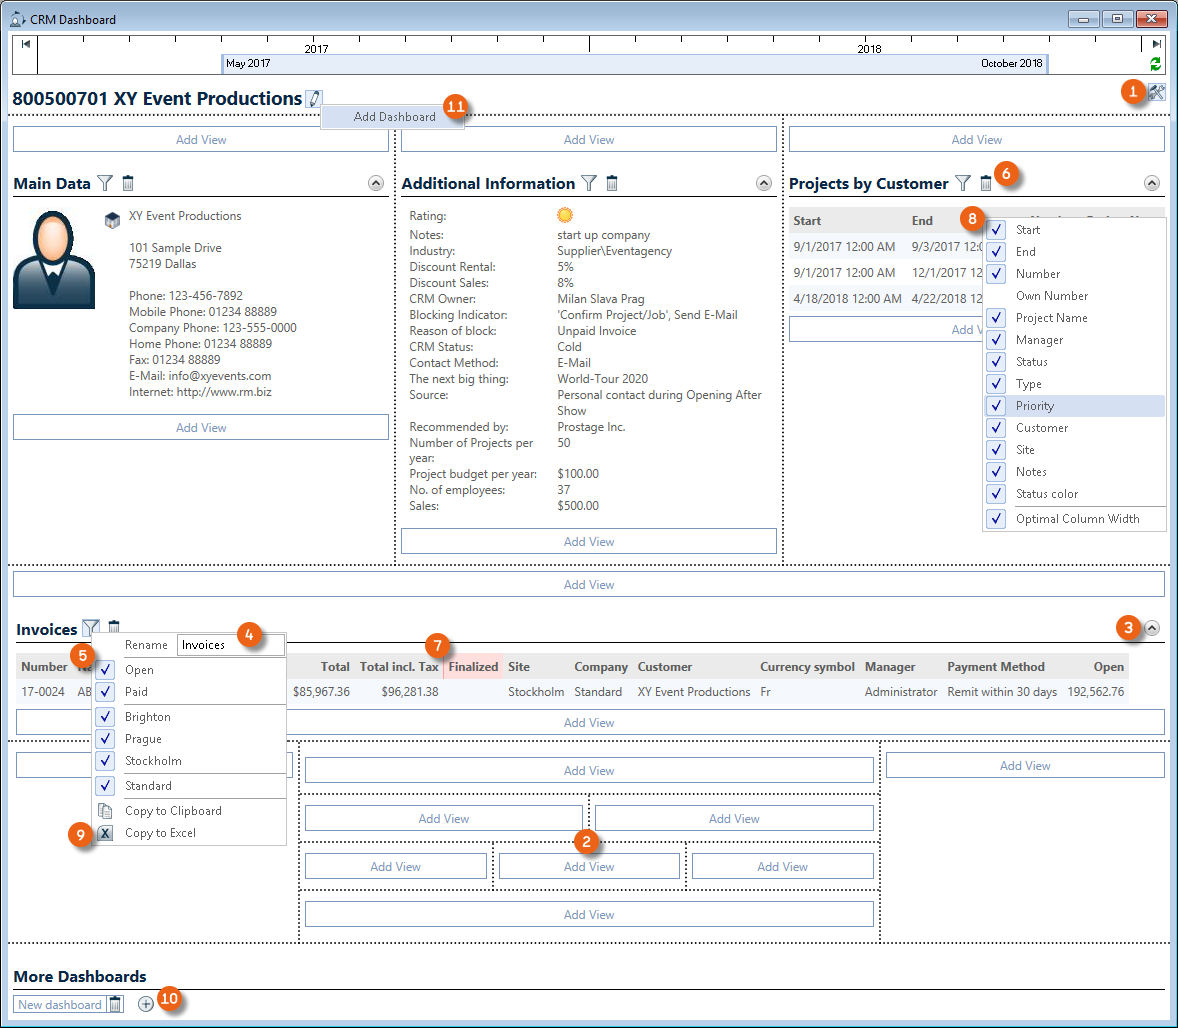
After switching to Settings mode you can freely order your information screen within the Matrix . It is possible to Open and Close as well as Rename , Filter and Delete views. You can move the Columns as required and display or hide them. The data for all Views can be copied to the Clipboard or to Excel for further use . If required, more Dashboards can be created . All the Information displayed in your Dashboard will be calculated in real time when opening the CRM Dashboard or when performing a Refresh. You can add as many Dashboard pages as you wish.
Inserting, ordering and filtering Dashboards as needed:
1. easyjob Menu View Addresses
2. Select an Address/Contact Dashboard button
3. Switch to the Setting mode
4. Select the desired position within the matrix and add a view from the selection list.
5. Ok
6. Modify the settings (rename, filter, columns, etc.)
7. Leave the settings mode
All the settings you make on the CRM Dashboard always apply for all Users.
You can manage the general use of the CRM Dashboards with the User settings .
Dashboard Views
On the CRM Dashboard, it is possible to display many views from the General,
Invoicing, Resources, Purchase Orders and Statistics categories.
You can add a View multiple times, filter it by different characteristics and rename it accordingly (e.g. Open Invoices - Paid Invoices)
Renaming Views:
1. easyjob Menu View Addresses
2. Select an Address/Contact Dashboard button
3. Switch to the Setting mode
4. Click the filter symbol of a View
5. Set the desired filter (e.g. open)
6. Enter a new Name
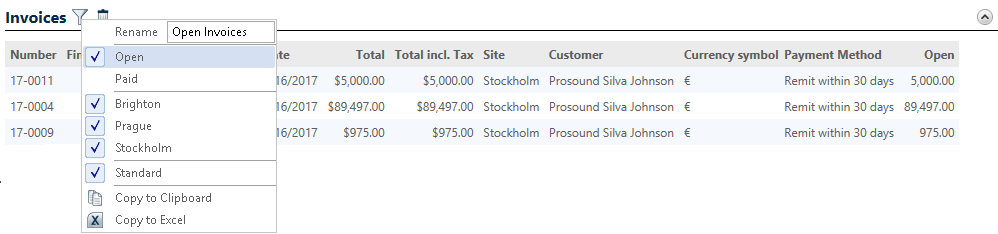
7. Confirm the new name with the Return key
8. Leave the Setting mode
Address Main Data
It shows the main data and a picture for an Address.
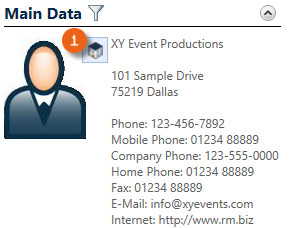
No other filters. The Communication menu can be started directly from the Dashboard.
Activities
This displays the Activities for the selected Address.

Filter by Open and Finalized Activities . In the Context menu you can set an activity as finalized or open an activity to edit it
Timeline
This displays the timeline for the Address.
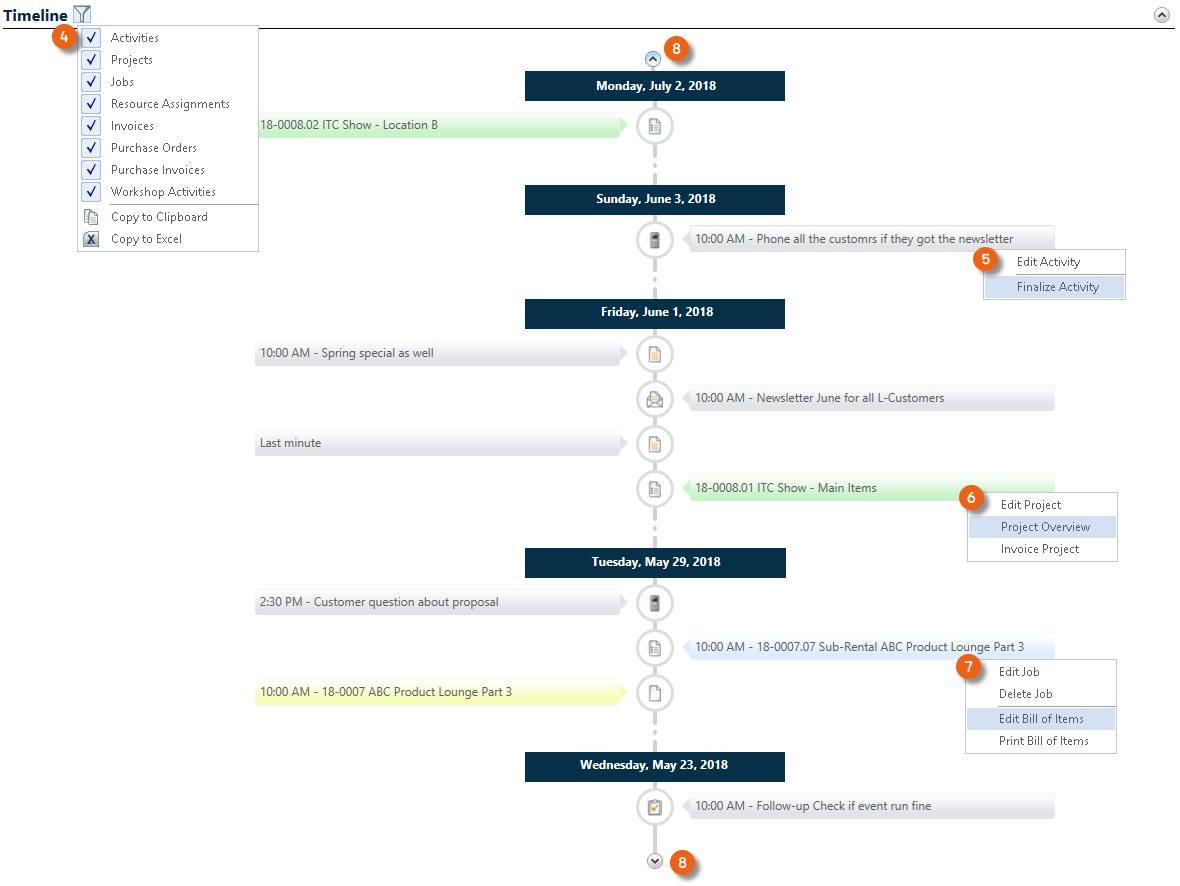
Filter by Activities, Projects, Jobs, Resource Assignments, Invoices, Purchase Orders and Workshop Activities . In the Context menu you can set an activity as finalized or open an activity to edit it. Various actions can be selected from the Context menu for Projects , Jobs , etc. The time bar for the timeline can be pushed into the past or the future .
Timeline in the Address Book
The timeline is also available in the Address Book. Just like for the Dashboard, after selecting the Address you can view the Activities, set Filters or directly edit Activities on the Timeline tab.
Documents
This lists all of the documents attached to the selected Address.  The document can be edited or executed via the Context menu.
Additional Information
This shows additional details about the Address.
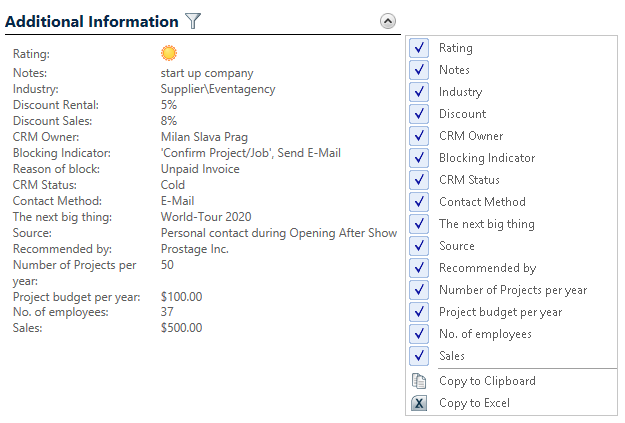
All additional information can be displayed or hidden by means of a filter.
Campaigns
This lists all Campaigns in which this Address participates. 
Contacts
This shows the Contacts for the selected Address. 
Jobs in progress
All Jobs in progress at the moment.

Filter by Rental, Sub-Rental, Sales, Proposed, Confirmed and Canceled. Various actions can be selected for the Job in the Context menu.
Projects by Customer
All Projects from today for a customer.

Filter by Rental, Sub-Rental, Sales, Proposed, Confirmed and Canceled. Various actions can be selected for the Project in the Context menu, depending on the status.
Events
This lists all the Events to which the Address was invited. 
The Event activity can be edited via the Context menu or by double clicking it directly on the Dashboard.
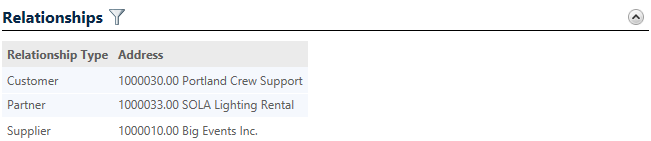
Relationships
This lists all relationships with other Addresses.
Agreements
It shows all existing agreements with the customer.

The agreement can be edited via the Context menu or by double clicking it directly on the Dashboard.
Invoices
This lists all invoices

Filter by Open and Paid. The invoice can be edited via the Context menu or by double clicking it directly on the Dashboard.
Resource Assignments
This displays all resources that are assigned to the Address.
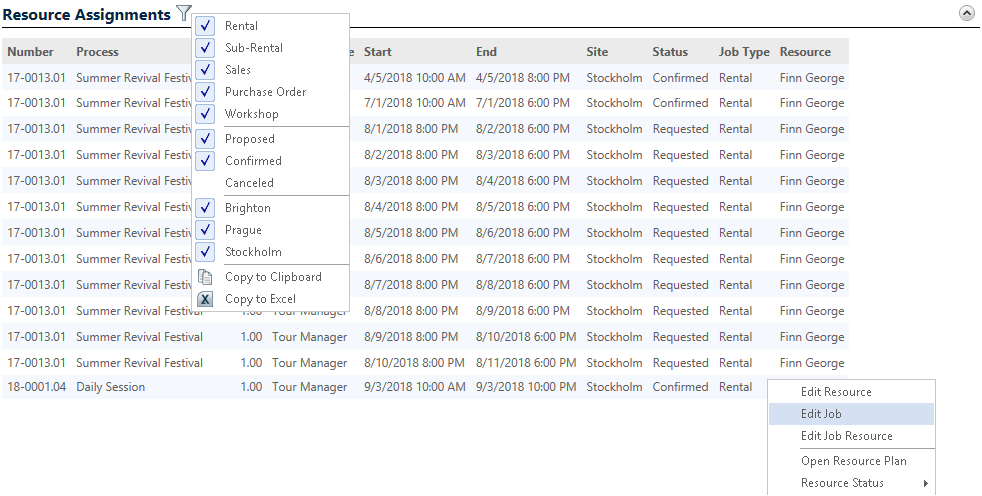
Filter by Rental, Sub-Rental, Sales, Purchase Order, Workshop, Proposed, Confirmed and Canceled. The Resource or Job can be edited via the Context menu or by double clicking it directly on the Dashboard.
Purchase Orders in progress
All Purchase Orders currently in progress.

Filter by Not ordered, Ordered, Confirmed, Closed and Declined. The Purchase Order can be edited via the Context menu or by double clicking it directly on the Dashboard.
Sales Trends
This shows the Sales Trends for the selected period as a chart. 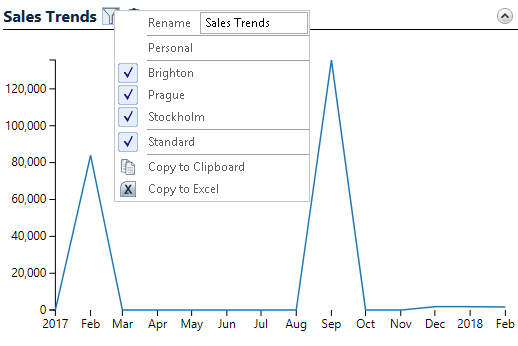
Sales overview
This shows the Sales Trends for the selected period as a table. 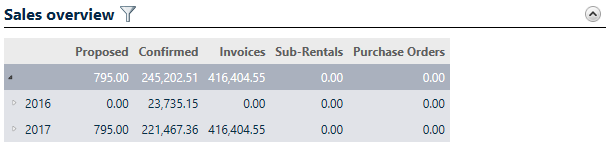
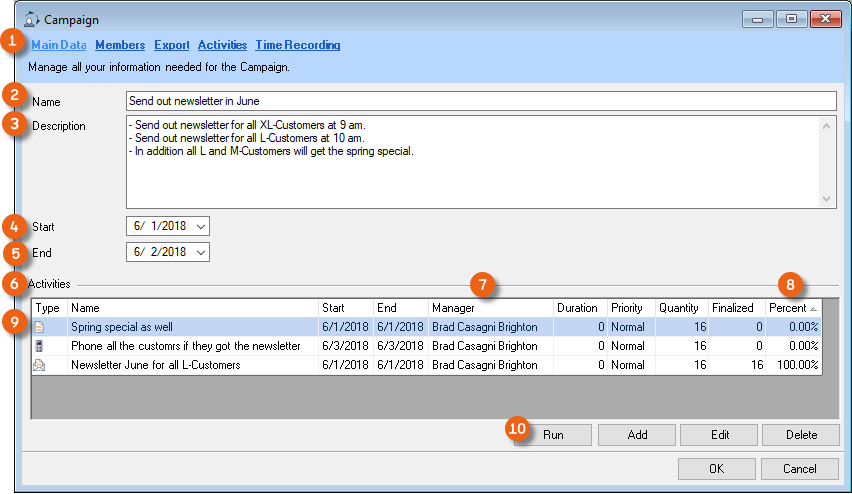
Campaign
CRM campaigns help you with customer actions such as events, mailings, show invitations by mail and telephone actions. Target groups can be created using marketing lists with special filters, and then reused. Using the export functions, the data can be transferred to Excel to create form letters, for example, or to transfer data to a mailing program.
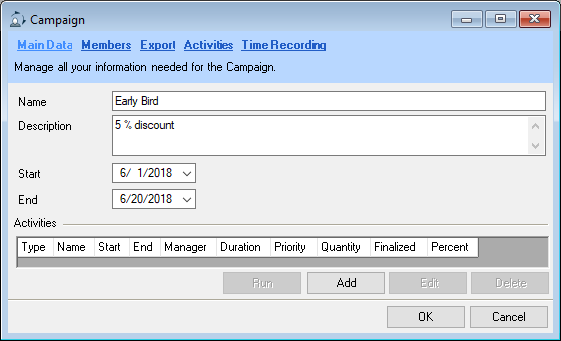
Main Data
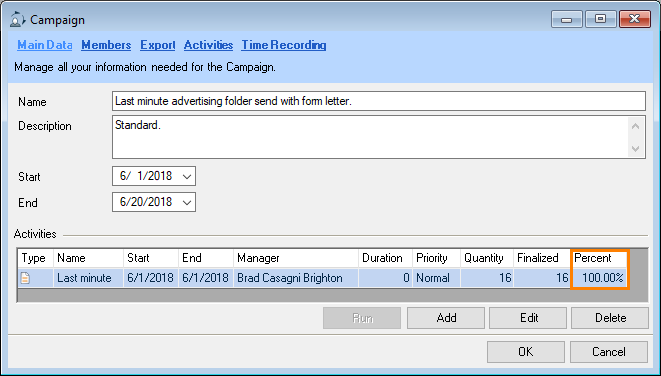
Enter a Name and a Description in the Main Data of a campaign. You can enter a Start and End date. As soon as you have added members to your campaign, you can Add, Edit or Delete them for the activities required for the campaign. The overview shows the Manager and the Status of the activity as a quantity and percentage. Document and E-mail activities can be set up here and applied to all participants by pressing Run .
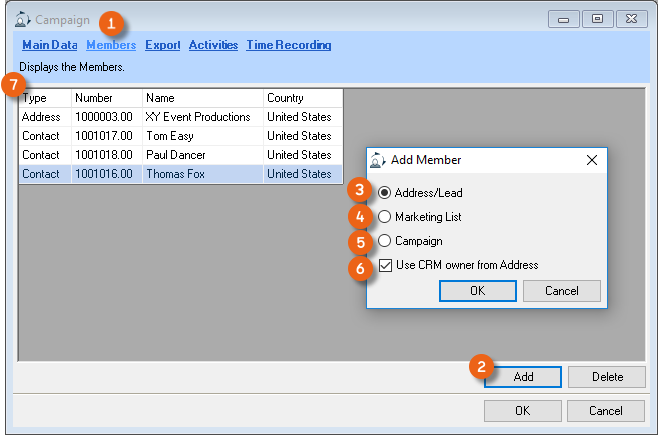
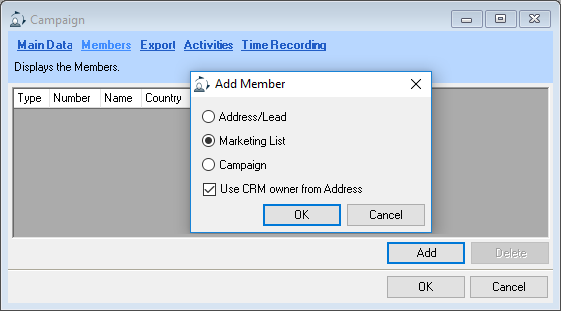
Members
On the Member tab, you can specify the Addresses that should be used for this campaign. With Add you can use individual Addresses or Leads , Marking Lists or Addresses from existing campaigns . By checking the box, the respective CRM Owner will be taken from the Address for already existing activities. You can see your selection in the Overview . See also Marketing Lists.
Export
All selected Members are displayed under Export . Individual Addresses can be edited if required and then the displayed list can be exported for further use (e.g. Word form letter) to an Excel file .
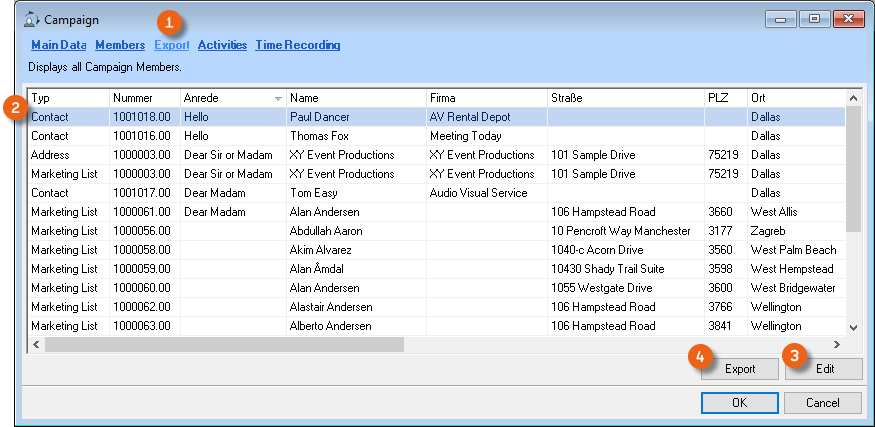
Exporting the Member List:
1. easyjob Menu CRM Edit campaign
2. Select a campaign
3. Ok
4. Export
5. Define the storage location and assign a file name
6. Save
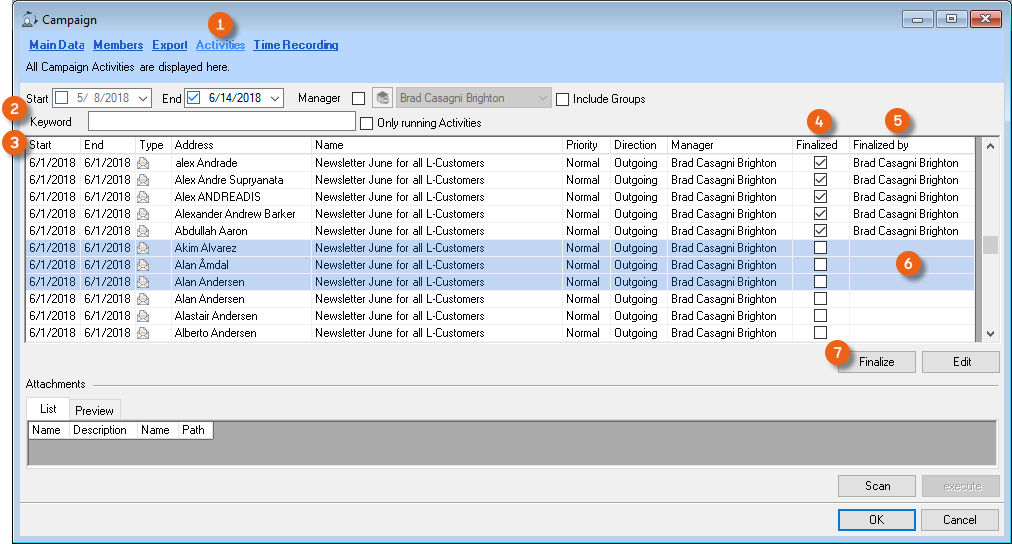
Activities
All the individual campaign Activities are displayed on the Activities tab. You can limit your selection with the Filter options . You can see which activities have been Finalized and by whom . You can select multiple Activities and finalize them together .
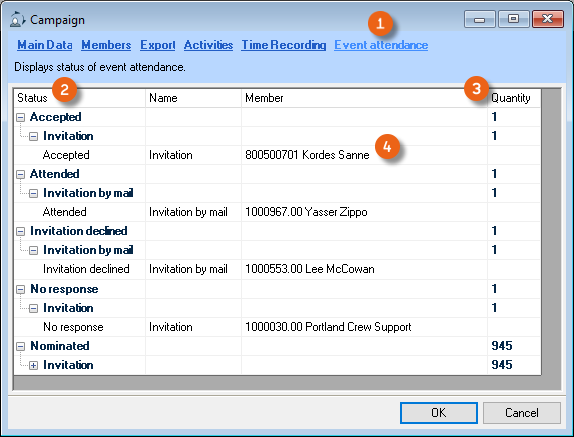
Event attendance
You can create the organization of an Event with a campaign. As soon as you create an Event type activity, a tab is created in the campaign called Event attendance . There you can see an overview with the Status of your Invitations, the corresponding Quantity and the names of the Participants .
Creating a campaign
1. easyjob Menu CRM Create campaign
2. Enter a Name and a Description, if necessary.
3. Enter a start and end date
4. Select the Members tab
5. Add
6. Select the members from Addresses/Leads, Marketing Lists or existing Campaigns Ok
7. Select the desired list Ok
8. Main Data
9. Add
10. Create the activity (e.g. Event)
11. Enter the data (e.g. Send invitation)
12. Save
Editing or starting a campaign
You can edit individual campaign activities or start a campaign with Run, starting all activities (Document or E-mail type) for the selected addresses.
Editing individual campaign activities:
1. easyjob Menu CRM Edit campaign
2. Select a campaign
3. Ok
4. Activities
5. Select the activity with the corresponding Address
6. Edit
7. Enter any necessary information
8. Check the Done box
Starting a campaign activity:
1. easyjob Menu CRM Edit campaign
2. Select a campaign
3. Ok
4. Select the activity you want to Run.
5. Run
You can only completely start one campaign activity. If you have already edited individual activities, this is no longer possible.
After clicking Run, the activity is carried out for all addresses and the individual activities are set to Done. The main data overview shows these activities as 100% finalized.
For a mailing action (newsletter, etc.), we recommend entering the data (content, participants) in an easyjob campaign, exporting the Addresses and sending the data to a suitable newsletter tool.
Marketing Lists
With marketing lists, you can prepare the target groups for your campaigns. The marketing lists can be static or dynamic. Static marketing lists are assigned manually to addresses and contacts. With dynamic marketing lists, addresses and contacts are created on the basis of data filters. In this way, you can create a target group with type-M customers. If you open this filter again after a certain period of time, the changes to this member group (new M-customers that were previously not on the list or previous M-customers that are no longer M-customers) will be displayed and you can adjust the list.
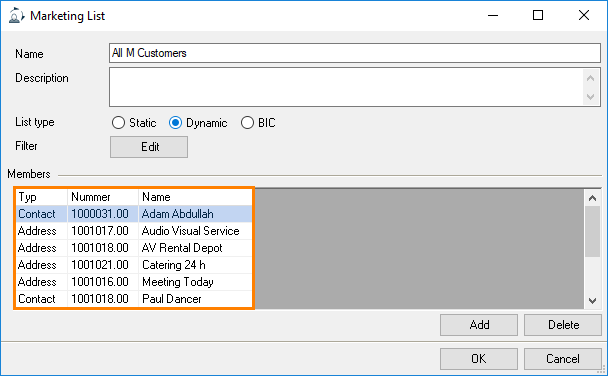
When creating a market list enter a Name , Description , if it is a Static or Dynamic List type ,and for dynamic lists, a Filter . Select the Address with Add .

Static Marketing Lists
Creating a Marketing List:
1. easyjob Menu Master Data Marketing lists
2. Add
3. Enter a name/description (e.g. all XL-customer contacts)
4. Static list type
5. Add
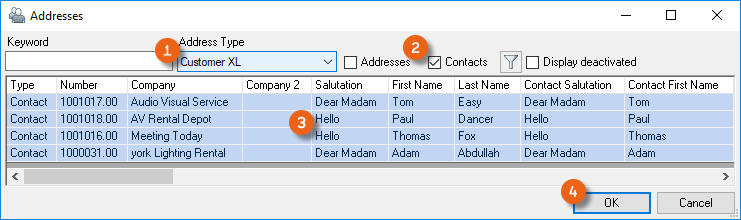
6. Limit the selection, for example with Address Type and Contacts
7. Ctrl + A
8. Ok
9. Ok
Dynamic Marketing Lists
Creating a Marketing List:
1. easyjob Menu Master Data Marketing lists
2. Add
3. Enter a name/description (e.g. all M-customers)
4. Dynamic list type
5. Filter Edit
6. Filter symbol Edit
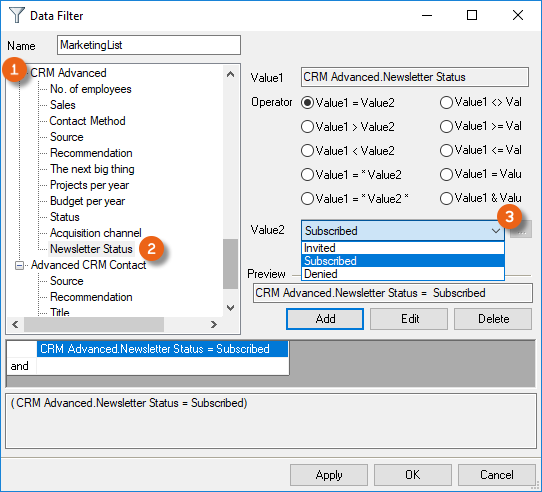
7. Define the filter by defining Value1 (e.g. Address Type.Name), the Operator and Value2 (e.g. Customer (M)) from the Selection
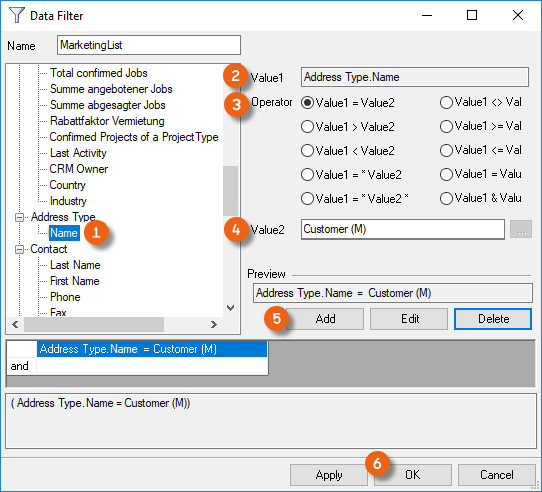
8. Add Ok
9. The utilized Filter , is shown on the right and the Result is shown on the left
10. Apply and Ok
11. The list is generated and the result is displayed
Before you can start a campaign with the dynamic marketing list, you can check if anything has changed with the member group (e.g. there is a new M type customer, or customers who are no longer M type customers, or you would like to use the main contact for the Address and not the individual Contacts).
Editing the dynamic marketing list:
1. easyjob Menu Master Data Marketing lists
2. Select the list to be edited (e.g. all M-customers)
3. Edit
4. Filter Edit
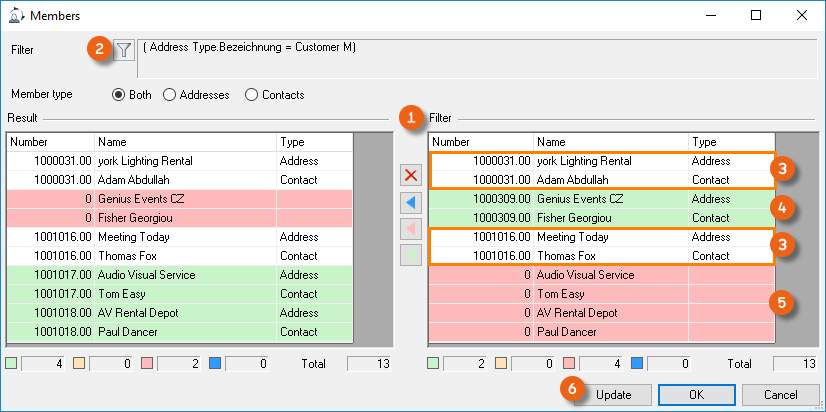
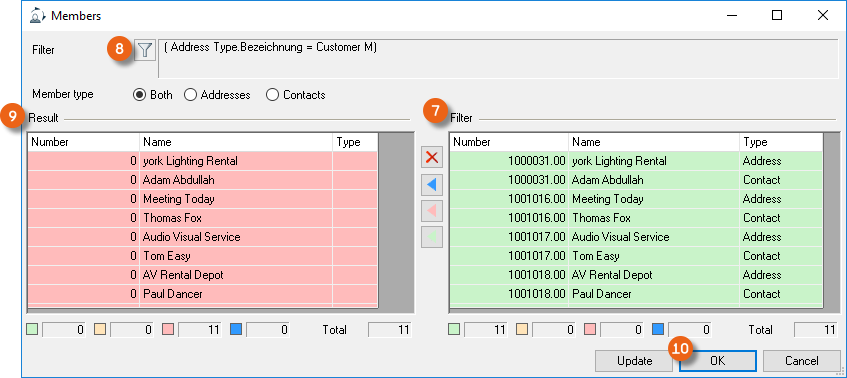
The right side of the table displays the set Filter , the Addresses and Contacts that fit the Customer M Filter. All Rows that are not selected contain data that still apply to the filter like before. Rows that are marked green were added new to the right side and are Customer Type M, they are not displayed on the left side and are therefore marked in red. The Addresses marked in red and the corresponding Contacts on the right side are no longer M-type customers and are marked in green on the left. With this color coding, you can check the filter and the changes and perform an Update or continue customizing the list. 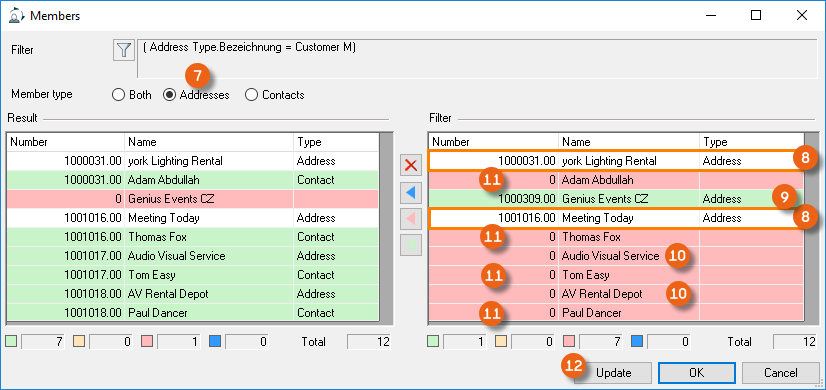
If, for example, you want to use only Addresses and no Contacts in your marketing list, select the Member type (in this example, Addresses ). The filter will be used and displays which Addresses were originally in the list and still apply for the filter , Addresses that were newly added are marked in green , Addresses that are no longer M-type customers are marked in red , all available Contacts are also marked in red , so the list is only filtered by Addresses. Update generates the list.
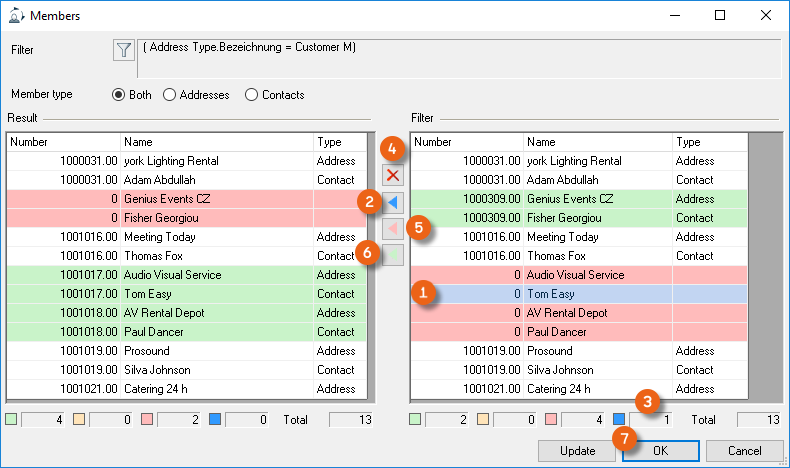
In order to customize the suggested filters further to your needs, you can update the data in the result list in blocks or update the items individually or delete them. The color coding makes it easier to customize the marketing list. You can mark a row for example and add it to the result list using the blue arrow . For a better overview, the number of currently selected rows is displayed , as you can use the Ctrl key to select multiple entries at the same time and add them to the result list. You can select existing entries and remove them completely from the selection . If you still want to keep the red marked Addresses and Contacts, which in this current example are no longer M-type customers, in the marketing list, add all red marked rows with the red arrow back to the result list. After you have checked the newly added M-type customers, and deleted any Addresses you do not want, you can move them to the results list them with the green arrow . Ok generates the desired list.
Newsletter Status
With the help of the dynamic marketing lists, you can add a filter about the Newsletter Status in the CRM Advanced category and only use customers with a Subscribed Newsletter Status in the Item Master Data.
See also CRM Advanced.
Marketing Lists from the Business Information Center
Marketing lists can also be created based on a statistic from the Business Information Center. In this way you can preselect based on the customer segment, sales during a certain period, the customer's language, rating, the newsletter recipient and much more.
Creating a marketing list from the BIC:
1. easyjob Menu Master Data Marketing lists
2. Add
3. Enter a name/description (e.g. all M-customers)
4. BIC list type
5. Select a Statistic

6. Filter Edit
Proceed in the same manner as for dynamic marketing lists. Alternatively, you can edit the selected statistic from the filter view.