easyjob Installation And Configuration
Documentation
Installation
This chapter will be published soon.
Getting started
This chapter will be published soon.
Installation and updates
This chapter will be published soon.
System requirements
For perfect easyjob performance, the minimum system requirements described below must be fulfilled.
Windows Client (Full use)
| Operating system in the physical or virtual computer: Windows 7, 8, 8.1,10 or 11 |
|---|
| Operating system for remote desktop environments: Windows 2012, 2012 R2, 2016, 2019, 2022, 7, 8, 8.1,10 or 11 |
| Min 2 GB free RAM |
| Minimum screen resolution 1280x1024 |
Web Client (Limited Features)
| Current web browser |
|---|
Mobile Client
| Android or iOS |
|---|
Application server
You may require further upgrades to your existing infrastructure in order to achieve optimal performance.
The easyjob server applications can be installed in desktop PCs in parallel in small environments and in addition to other applications on a server in medium-sized environments. We recommend an application server for large environments.
For operation, a Microsoft SQL Server database is also necessary.
Depending on the size of the environment, the SQL Server Express variant provided with the installation is sufficient.
A large amount of data is read and written in the SQL database. For this reason, the entire performance depends mainly on the SQL Server environment. We recommend using very fast disks and processors, and to have sufficient free RAM available.
SQL Server versions
Windows Server 2016, 2019 and 2022 server operating systems are supported.
Microsoft SQL Server 2016, 2017, 2019 and 2022 can be used in all editions for the SQL database.
Test environment
A test license is required to set up an easyjob test environment (you can receive this from our Support Team at Helpdesk Ticket System. The test environment makes it possible to fully test easyjob as well as advanced modules (e.g. Time Recording, Workflow, Controlling Center, etc.) or advance program functions.
The test environment must be installed on a server (we recommend a separate server). The test environment works with a test database. After the test license expires, you will no longer be able to access the activated modules/functions or the data generated in the test database.
The test environment should be set up on a separate server or a workstation.
Creating a test database on a separate server
No content for this section.
Backing up a current easyjob database
For the test database, create a copy (backup) of your current database and then import it in the test server.
Creating a backup of the current database
1. Open easyjob 6 server manager
2. Database backup
3. Backup database
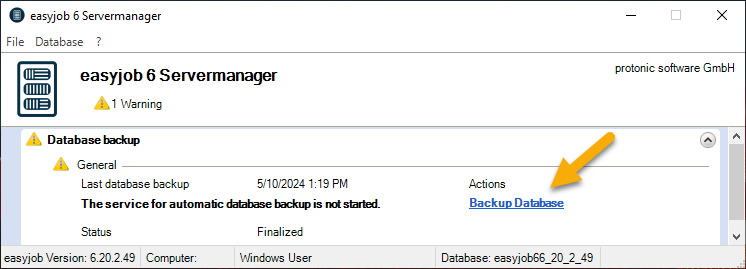
4. Save your backup file on a local drive of your test server
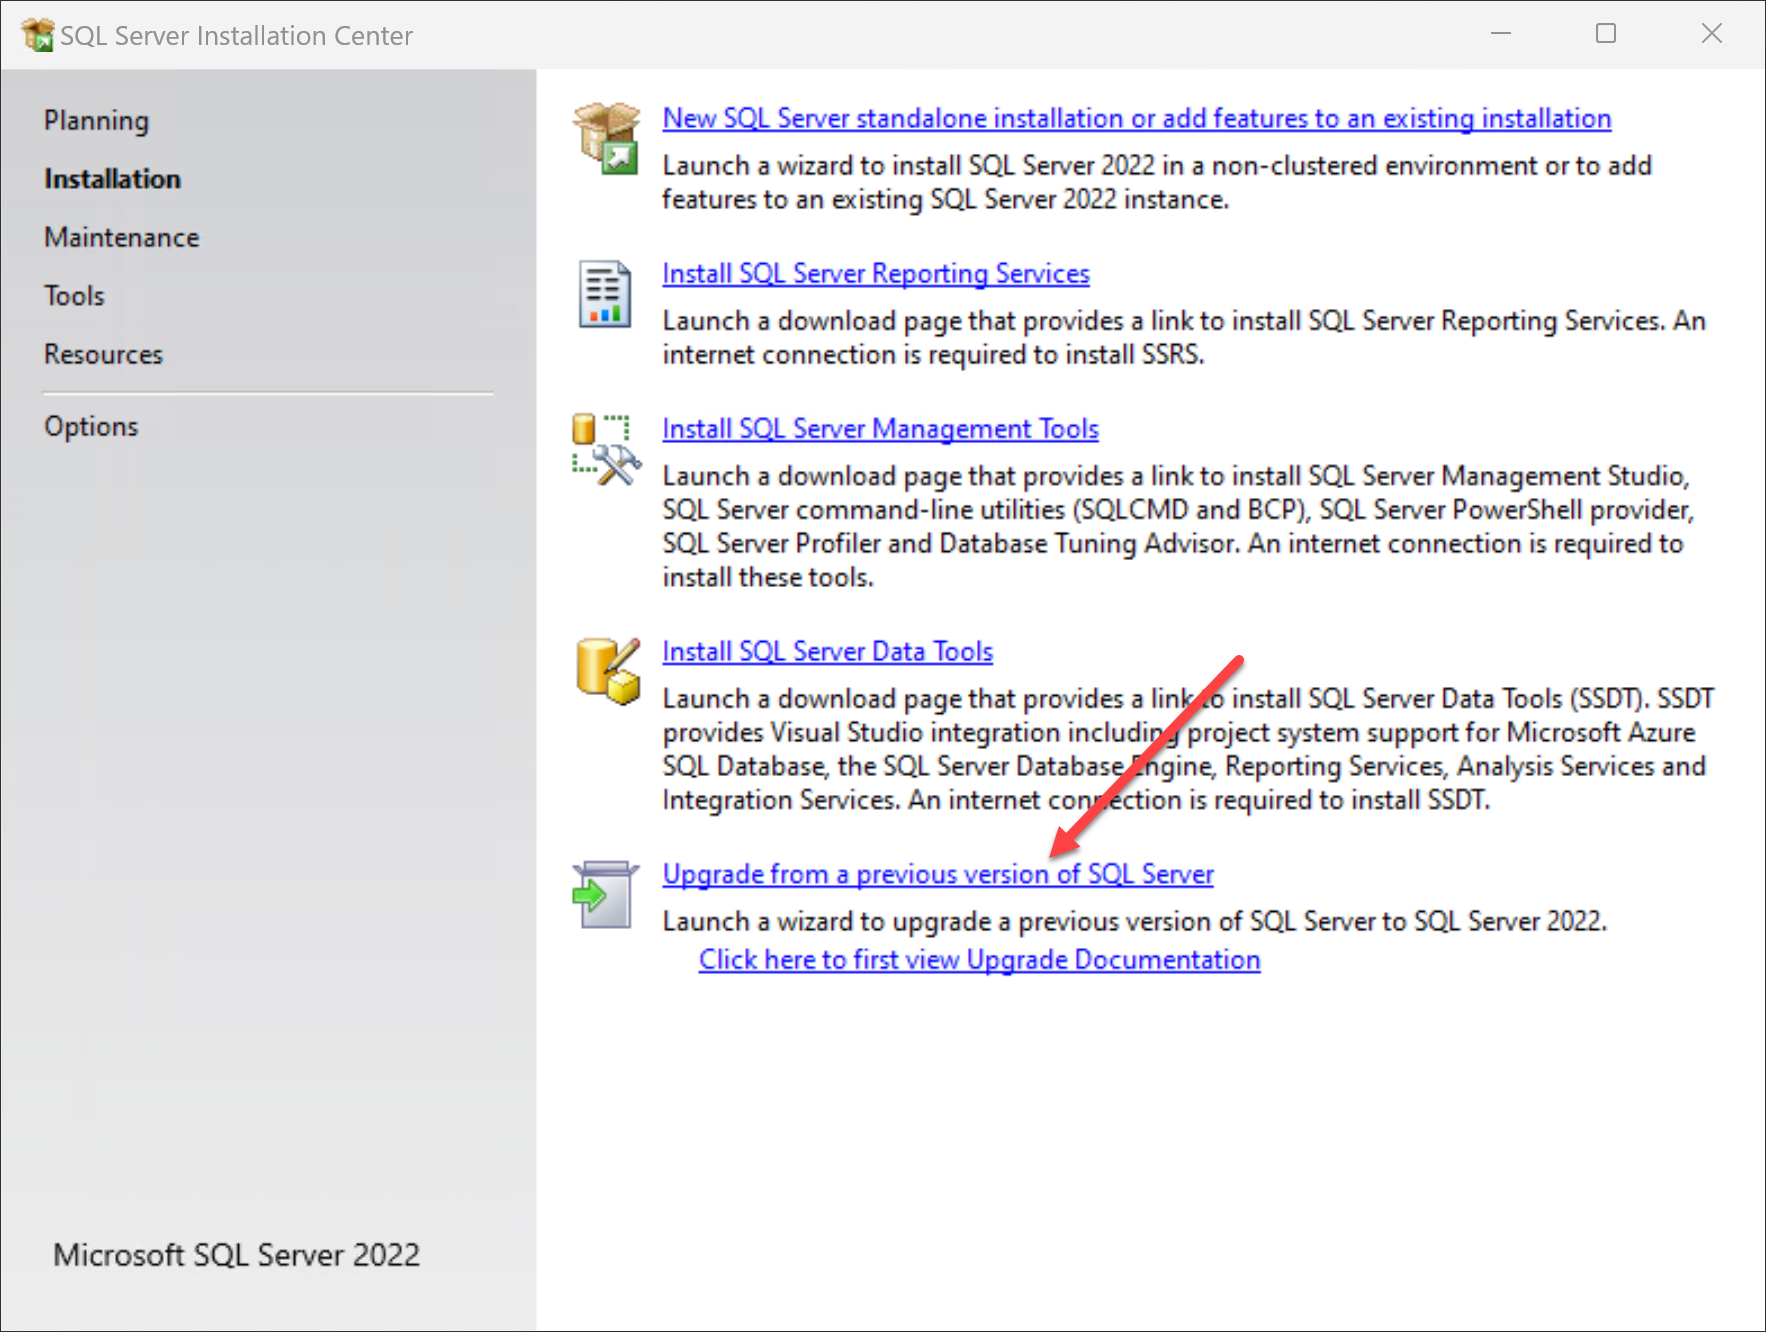
Installation
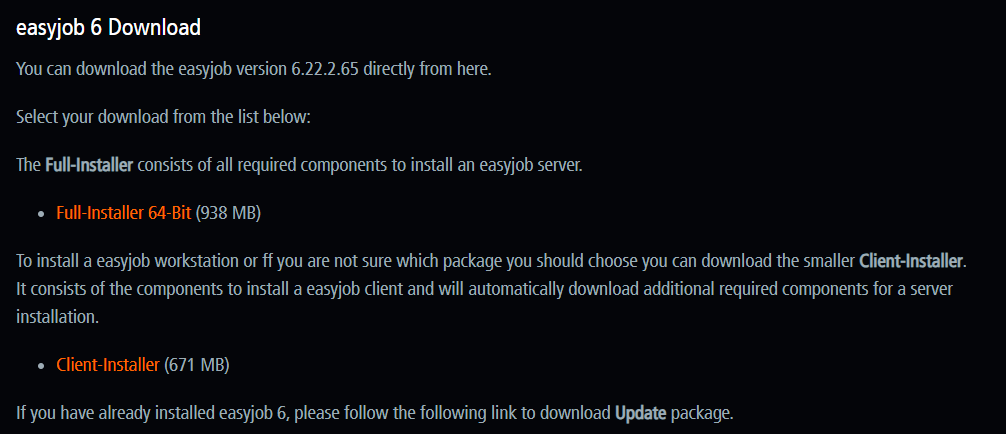
You can find the easyjob installation package using your personal access to our website:
https://www.protonic-software.com/en/service/downloads/
Then start the installation and check the Customize Installation box in the main menu. On the following window, check the corresponding box to select the easyjob program and server components as well as SQL Server 2022.
Creating the test environment in easyjob 6.20.2.21 and later
In easyjob 6.20.2.21 and later, we have made an additional tool available to support you when setting up your test environment. Details can be found in Setting up the test environment from version 6.20.2.21 .
Restoring the backup database for the test environment
Make sure that backup file is located on a local drive.
WARNING! The following steps must be carried out on the test server. If the same procedure is performed on the live server, the database will be overwritten. Data can be irrevocably lost.
Creating the test database
1. Open easyjob 6 server manager
2. Database
3. Restore database
4. Advanced Database Recovery
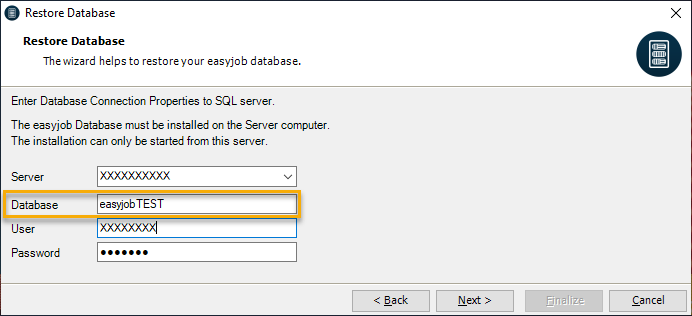
5. Create the database name, e.g. "easyjobTEST"
WARNING! We recommend changing also the database name for the test environment. Add "TEST", for example.
6. Next
7. Use 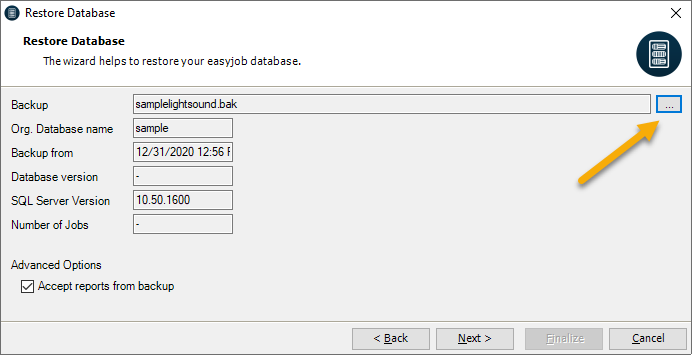 to select the backup for the test database, you can either use a
%2.copy of your own database that you created locally on the test server or
%2.a database provided by us with sample data
10. Next
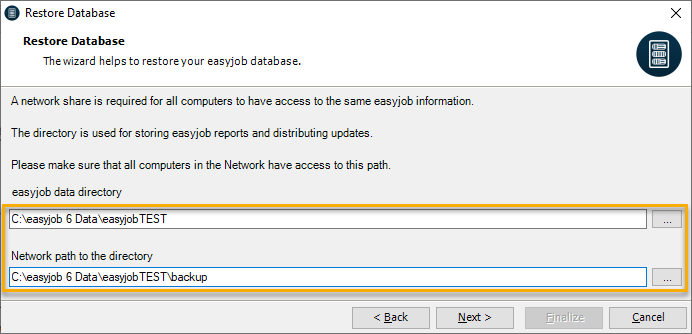
1. Define the data directory
2. Next
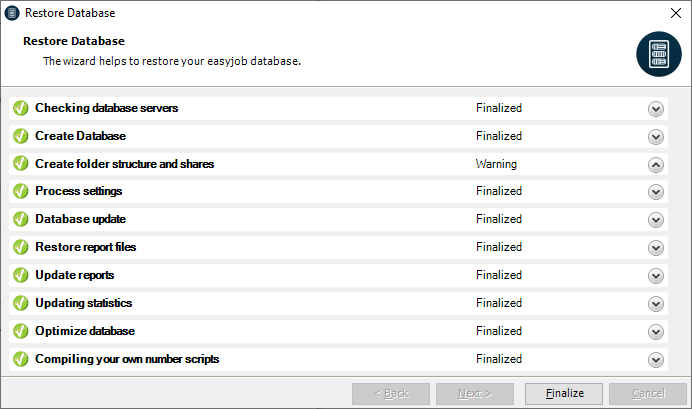
3. The database is restored
4. Finalize
Activating the test license
After the successful installation of the database backup, you can activate the test license using the provided link. To do so, use the test license provided by our sales office, click the activation link on the test server and follow the wizard's instructions.
Creating the easyjob test environment using live data
In easyjob 6.20.2.21 and later, we have made an additional tool available to support you when setting up your test environment. Details can be found in Setting up the test environment from version 6.20.2.21 .
Setting up the easyjob test environment services
In order to test all functions in the easyjob test environment, you must set up the corresponding easyjob services.
Resetting easyjob services
You can reset the services with the following SRQ: RstSrvs
Resetting easyjob services via SRQ
1. Open easyjob 6 server manager
2. Database
3. Extras
4. Execute Support SRQ
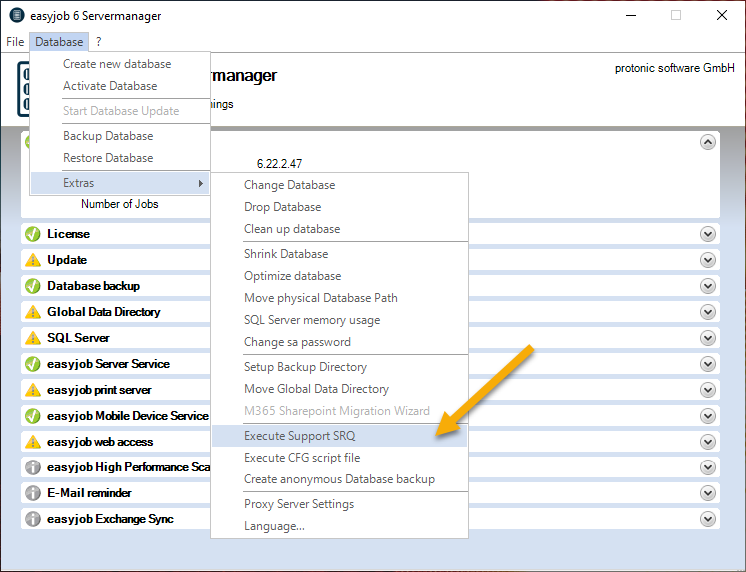
5. Enter the RstSrvs SRQ number
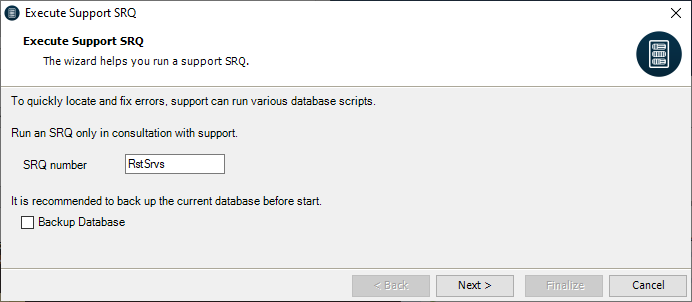
6. Next
7. SRQ is executed
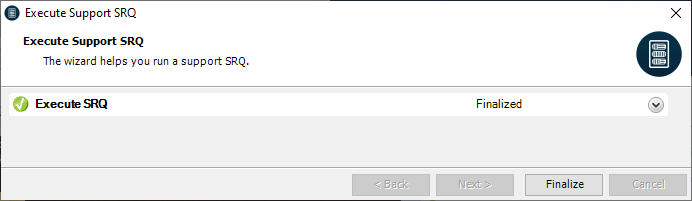
8. Finalize
9.
Database backup
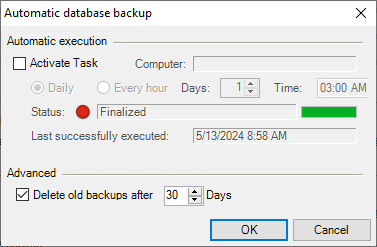
We recommend using the easyjob automatic database function to back up your test database, as this function optimizes database performance (index organization, reduction of log file size, etc.).
Setting up automatic backup
1. Open easyjob 6 server manager
2. Database backup
3. Set up automatic backup
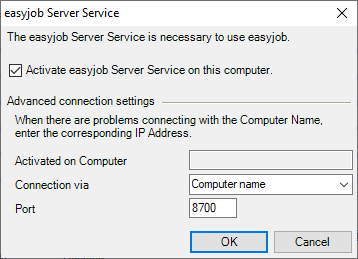
easyjob Server Service
Activate the easyjob Server Service on the test server.
Setting up the easyjob Server Service
1. Open easyjob 6 server manager
2. easyjob Server service
3. Configure the service
Setting up easyjob services
To be able to use all the functions in the test environment, set up the easyjob Services as described. The firewall must also be customized if necessary Configure the Windows Firewall.
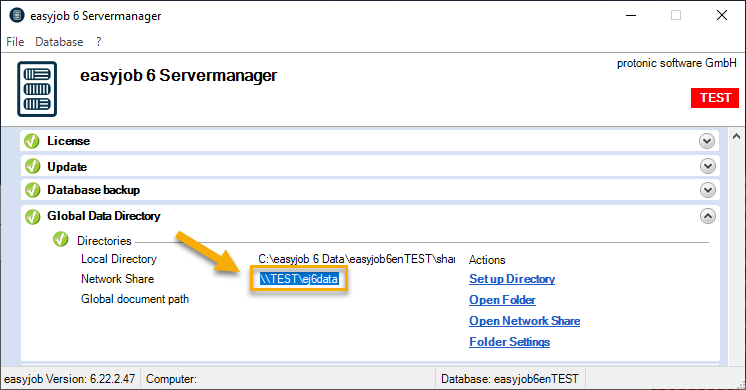
Configuring the global data directory for the test environment
Change the path for the global data directory of the test environment.
Moving the global data directory
1. Open easyjob 6 server manager
2. Database
3. Extras
4. Move Global Data Directory
Client connection to the test server
No content for this section.
Technical requirements
The following requirements must be fulfilled to connect clients to the test server
- No warning messages in the Server Manager
- All easyjob services are set up and active
- All firewall shares are set and active
- All ports have the necessary shares (the necessary ports can be found on the easyjob Server Manager)
Database connection for a new installation
When starting, you can chose to connect to an existing database. Please check if the server, database names, user and password coincide.
Changing a database connection on a client
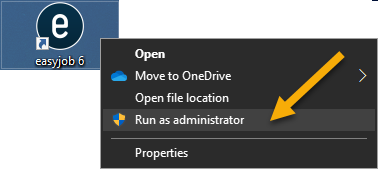
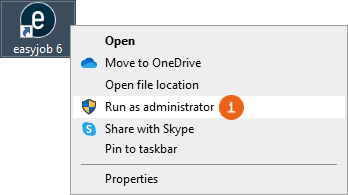
To connect a client to the test environment, run easyjob as administrator.
Changing the database connection for an existing client
1. Run easyjob 6 as administrator
2. easyjob Menu Tools Settings
3. General Database 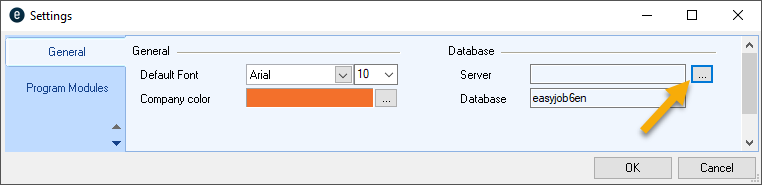
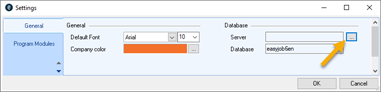
4. Please check if the server, database names, user and password coincide
5. Check the connection with Test
6. Follow the wizard's instructions
Option, if the connection to the client does not work
Copy the Connectionsetting.xml file for a functional Client/Server to the Client and overwrite the file with the same name on the client computer at
C:\ProgramData\protonic software\easyjob6
Setting up the test environment from version 6.20.2.21
From easyjob version 6.20.2.21 we have made a tool available that you can use to easily set up an easyjob test environment. With the user right Use test environment you can allow selected clients to connect to either the test system or the live system.
The test environment must always be installed on a separate server. After the test license expires, you will no longer be able to access the activated modules/functions or the data generated in the test database.
First install easyjob on your test server. Details can be found in Installation. If you are installing a new backup for a test environment that was already set up, you can find the here Installing a new backup in an existing test environment on the test server from version 6.20.2.21 .
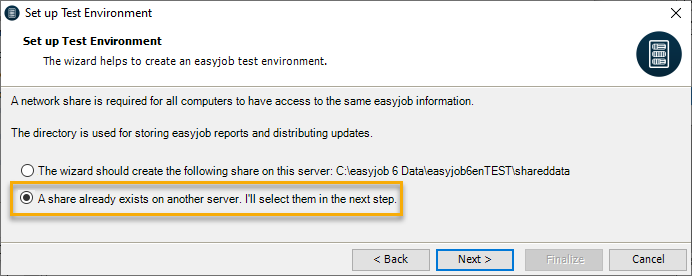
Setting up the test environment on test server from version 6.20.2.21
Make sure that that you have created a current backup file of your live system and that it is on a local drive (not on the desktop) of your test server.
WARNING! The following steps must be carried out on the test server. If the same procedure is performed on the live server, the database will be overwritten. Data can be irrevocably lost.
Setting up the test environment on the test server
1. Open easyjob 6 server manager on the test server
2. Key combination STRG+ALT+S

WARNING! The following steps MUST be performed on the test server.
3. Set up Test Environment
4. Select Reconfigure Test Environment
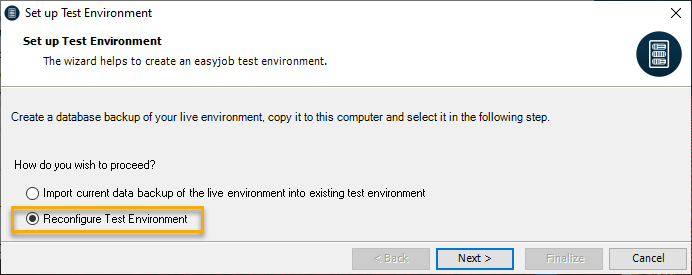
5. Next
6. Select the server.
7. Enter the database name, e.g. easyjob6TEST
8. Enter the user name and password
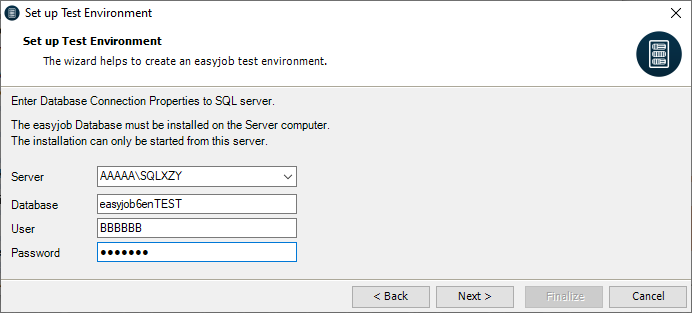
9. Next
10. Use  to select the backup of your live environment for the test database that you saved locally on the test server
11. Next
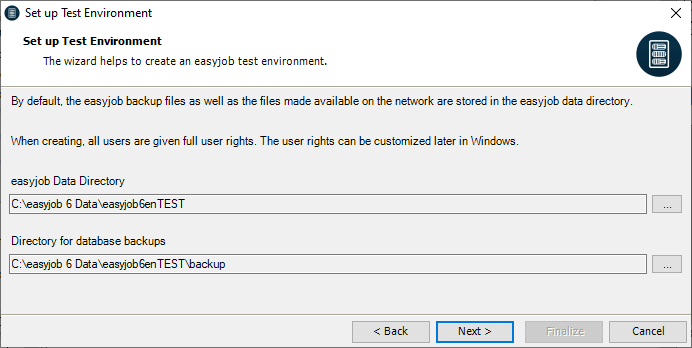
12. Define the data directory if necessary

13. Next
14. Select the following setting
15. Next
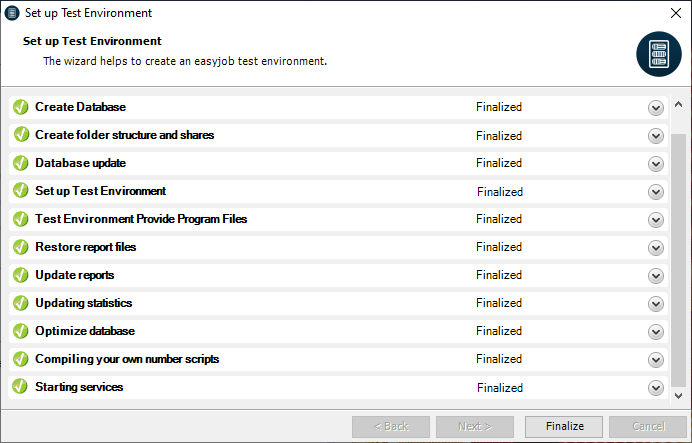
16. The wizard tries to call up a valid test license
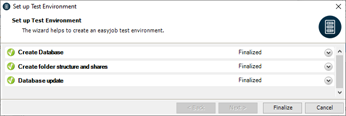
17. The test environment is created
18. Finalize
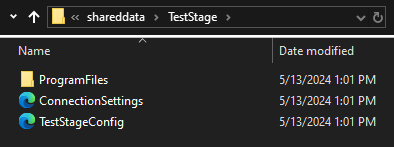
After successful finalization, a TestStage folder with the ProgrammFiles is created on the test server in the sharedata. It is copied by the client to LocalAppData.
The services activated in the live environment are implemented accordingly on the test server. Please check that all firewall shares are set for the easyjob services. Details can be found in Configure the Windows Firewall.
Workflows are deactivated in the test environment and running workflows are canceled. This prevents sending undesired messages/mails, for example, to Freelancer.
If there are existing customizations in the live environment that you want to change in the test environment, e.g. data path changes, you can set these customizations automatically via CustomSQLs to reinstall a current backup file of your life system.
Installing a new backup in an existing test environment on the test server from version 6.20.2.21
Save your new backup file on a local drive (not on the desktop) of your test server.
WARNING! The following steps must be carried out on the test server. If the same procedure is performed on the live server, the database will be overwritten. Data can be irrevocably lost.
Installing the current backup on the test server
1. Open easyjob 6 server manager on the test server
2. STRG+ALT+S
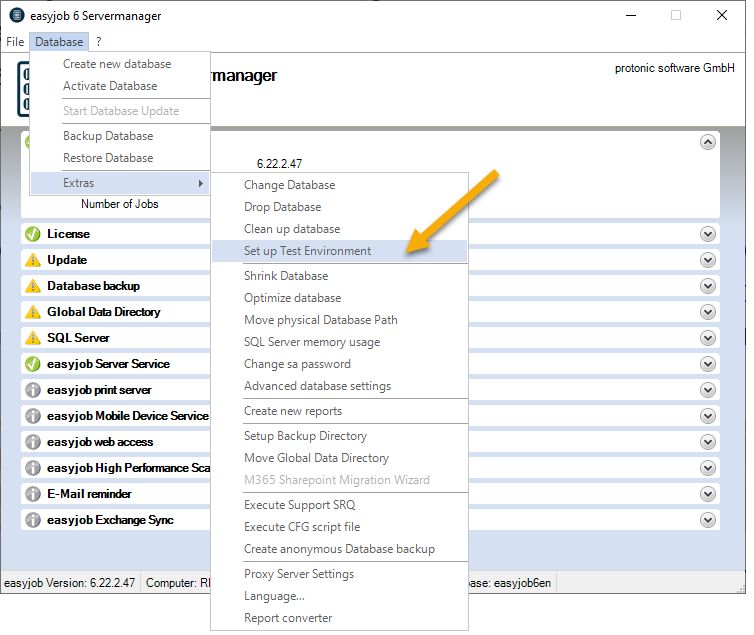
3. Set up Test Environment
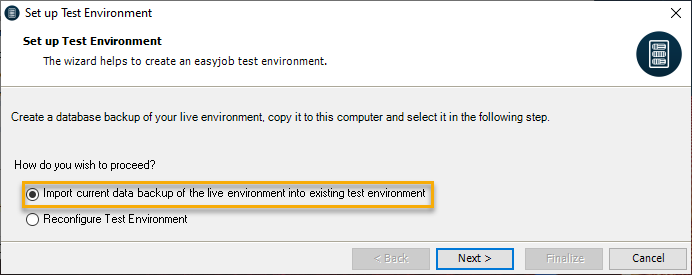
4. Select the Import current data backup of the live environment into existing test environment
5. Next
6. Use  to select the new backup of your live environement for the test database that you stored locally on the test server

7. Next
8. Define the data directly if necessary
9. Next
10. Select the following setting

11. Next
12. The wizard tries to call up a valid test license
13. The test environment is created
14. Finalize
Connecting the test environment with the client from version 6.20.2.21
To be able to connect a client with the test environment, you require the user right Use test environment or run easyjob as administrator.

Setting up the test environment for the client
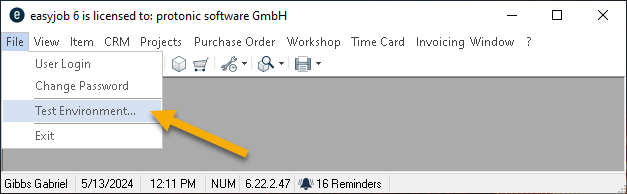
1. Run easyjob 6 as administrator
2. easyjob Menu File
3. Test environment…
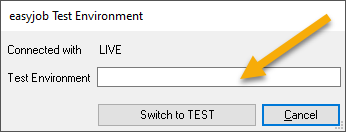
You must enter the network share for the test server once in the Test environment field, which can be found on the easyjob Server Manager of the test server
4. Open easyjob 6 server manager on the test server
5. Copy global data directory network network share
Please copy the entire path to the XML file ...\TestStage\TestStageConfig.xml
6. Adding the easyjob test environment on the client
Please copy the entire path to the XML file ...\TestStage\TestStageConfig.xml
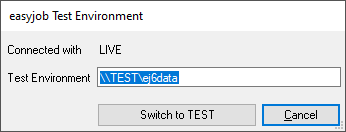
7. Switch to TEST
8. Continue
Switching between LIVE and test environment
1. easyjob Menu File
2. Test environment…
3. Select Switch to TEST
or
4. Switch to LIVE
We suggest switching between LIVE and TEST systems only on the client and not on the server. Please note that this function is available completely only from easyjob version 6.20.2.21. The Use test environment user right is required to use the test environment.
Interfaces
The easyjob WebApi offers real-time access to easyjob. Depending on user rights, Items, availability, addresses and projects can be called up via a JSON interface and partially edited. The WebApi has the same functional scope as the easyjob WebApp and the app for mobile end devices, as the same interface is used.
Webshop
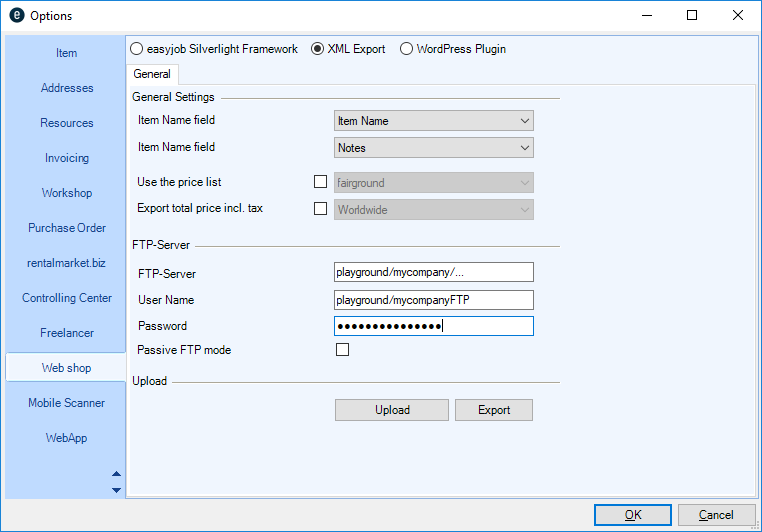
With the easyjob Webshop you can automatically load Item information for your own Webshop in XML format to a server via FTP.
Requests that are generated by the Webshop can be imported into easyjob as a project in a special file format (ewsm).
An easyjob WebShop license is necessary to use the interface.
Configuration
The export information for the Item master data is configured in the easyjob program settings.
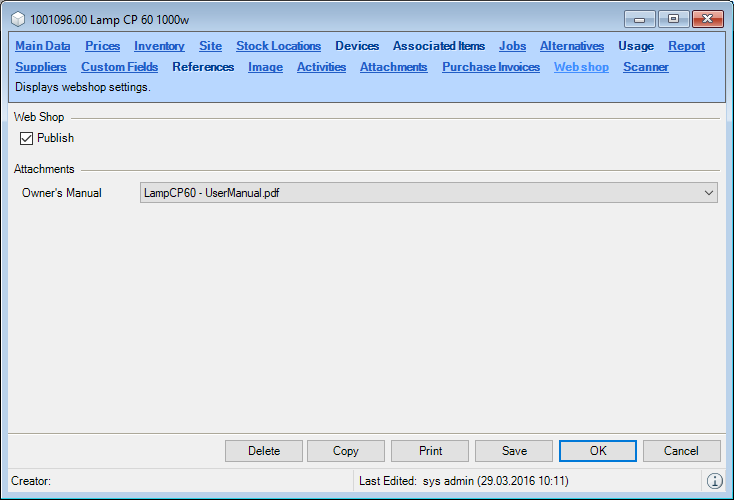
It is defined in the Item master data which Items should be available in the Webshop.
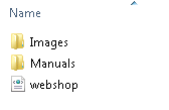
Directory structure on the server and setup of webshop.xml
The Item image data is stored in a large and small format in the Images directory. The manual associated with the item is stored in the Manuals folder.
All items inclusive of the sub-category hierarchy are exported to Webshop.xml.
Structure of the webshop.xml
<webshop>
<categories>
<category id="61">
<name><![CDATA[Lighting]]></name>
<subcategories>
<subcategory id="225">
<name><![CDATA[Control]]></name>
<items>
<item id="7755">
<name><![CDATA[2 CH Rack]]></name>
<description><![CDATA[]]></description>
<price>0.00</price>
<SmallImageUrl>Images/small7755.png</SmallImageUrl>
<LargeImageUrl>Images/large7755.png</LargeImageUrl>
<ManualUrl>Manuals/manual7755.pdf</ManualUrl>
</item>
</items>
</subcategory>
</subcategories>
</category>
</categories>
</webshop>
Processing incoming requests in easyjob
easyjob can import Webshop requests. To do so, the Webshop must create a file with the extension .ewsm.
easyjob records the file extension during installation. After the file is called (e.g. via an email attachment), easyjob automatically starts the import process.
Sample structure of an ewsm file
<root>
<ShopOrder xmlns:xsi="http://www.w3.org/2001/XMLSchema-instance" xmlns:xsd="http://www.w3.org/2001/XMLSchema" Version="1.0.0">
<Header>
<OrderId>695ab491-e931-47c6-bf25-f54ce7ba51d6</OrderId>
<CryptCode></CryptCode>
<Address>
<Name1></Name1>
<Addressnumber></Addressnumber>
<Firstname></Firstname>
<Lastname></Lastname>
<Street></Street>
<Line2></Line2>
<Zip></Zip>
<City></City>
<Email>info@protonic-software.com</Email>
<Phone></Phone>
<IdCountry>6</IdCountry>
<State></State>
<CountryCaption>Belgium</CountryCaption>
</Address>
<ProjectName>sfdsfsdf</ProjectName>
<StartDate>2019-03-21T09:00:00</StartDate>
<EndDate>2019-03-21T17:00:00</EndDate>
<Comment>sdffds</Comment>
<Service.Delivery>True</Service.Delivery>
<Service.Setup>True</Service.Setup>
<IdStock>1</IdStock>
<Service_FullService>True</Service_FullService>
<IdUserManager>0</IdUserManager>
</Header>
<Body>
<Items>
<Item>
<IdStockType>7742</IdStockType>
<Factor>10</Factor>
<Price>0</Price>
</Item>
</Items>
</Body>
</ShopOrder>
</root>
WebApi
With the easyjob WebApi interface, data is retrieved and updated in easyjob in real-time.
The data is transferred in JSON format by means of GET and POST instructions.
Based on the login, only data for which the user has rights is transferred.
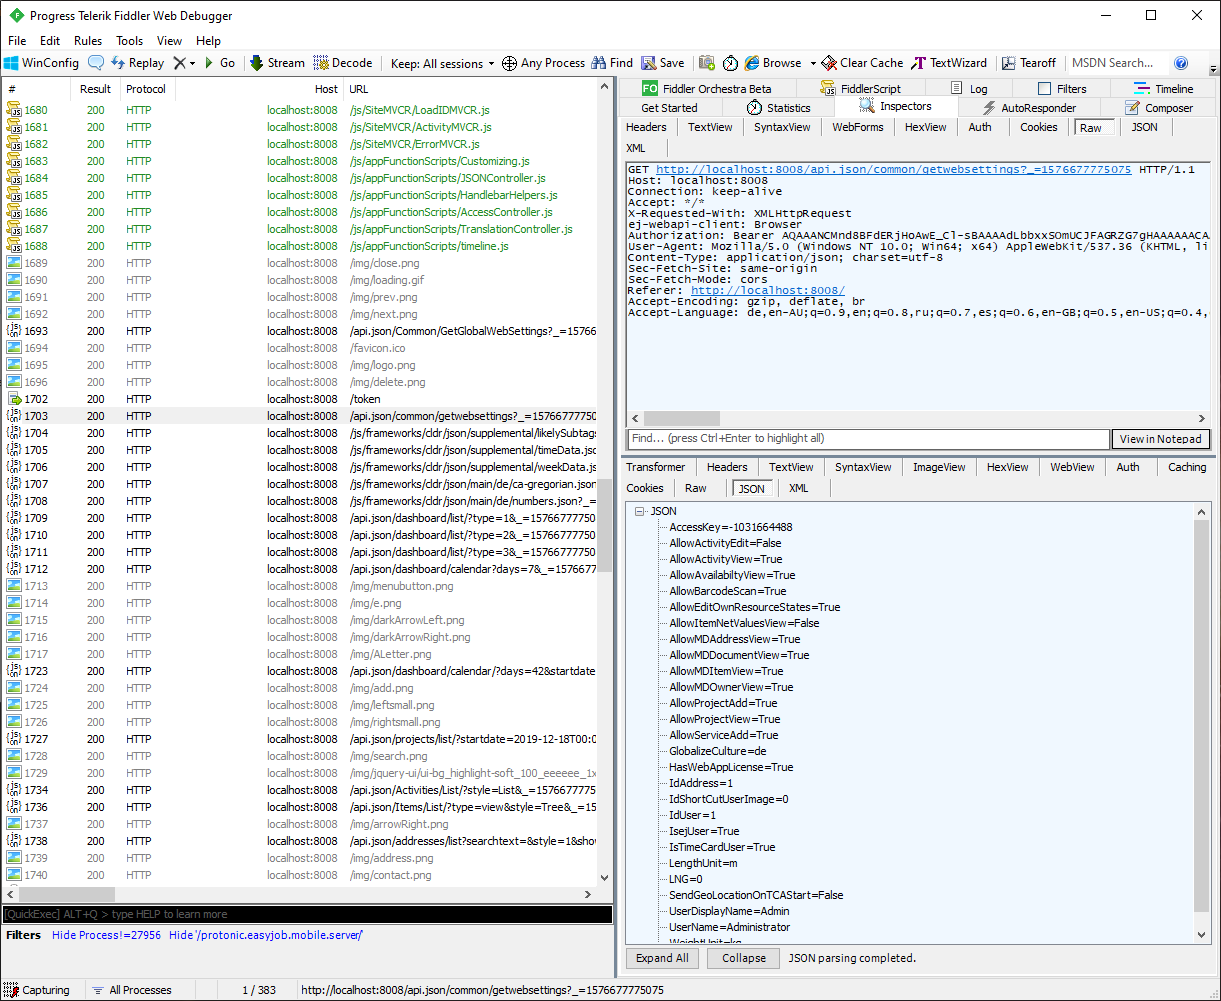
This WebApi documentation shows only the most important functions and calls to help you get started. For a complete overview, use an "HTTP Sniffer" program (such as Fiddler https://www.telerik.com/fiddler ). With the Postman program and service, you can send your example queries to your easyjob WebApi. There you can also find detailed information about the structure of queries for programs such as cURL and sample code for various program languages. Link to the Postman documentation: https://documenter.getpostman.com/view/17814395/UVR8onMz
In the following example, the list of the individual WebApi calls is shown to the left. The data for the selected call that is sent and received is shown to the right.
Functions
No content for this section.
Authorization
Authorization takes place via the OAuth 2.0 Bearer Token. It must first be requested at the end point "/token" in the WebApi.
The request to this endpoint must be performed as an HTTP-POST request
The “Content-Type” header must be set as follows: "Content-Type: application/x-www-form-urlencoded; charset=UTF-8".
The user name and password are transferred in the Request-Body with the following structure: grant_type=password&username=Administrator&password=123”
Authorization takes place both via the user's easyjob login or via the login data in the address/contact (WebApi license required).
Token request example:
POST http://server:8008/token HTTP/1.1
Content-Length: 55
Content-Type: application/x-www-form-urlencoded; charset=UTF-8
grant_type=password&username=Administrator&password=123
The WebApi answers the request as follows:
{
"access_token": "ACCESS_TOKEN",
"token_type": "bearer",
"expires_in": 172799,
"userName": "Administrator",
".issued": "Wed, 22 Jan 2020 15:05:12 GMT",
".expires": "Fri, 24 Jan 2020 15:05:12 GMT"
}
The answer contains a validity date next to the Access Token that indicates until when the token is valid ("expires_in" is indicated in seconds).
The received token must be set in all further requests in the Authorization Header: “Authorization: Bearer ACCESS_TOKEN”.
The content type must be set to "application/json; charset=utf-8".
Project details request example:
GET <http://server:8008/api.json/projects/details/62 HTTP/1.1>
Authorization: Bearer ACCESS_TOKEN
Content-Type: application/json; charset=utf-8
The WebApi answers the request as follows:
HTTP/1.1 200 OK
Content-Length: 1002
Content-Type: application/json; charset=utf-8
{
"AllowHeadEdit": true,
"AllowDocumentView": true,
"AllowTimeCardView": true,
"AllowPriceView": true,
"AllowActivityView": true,
"AllowJobAdd": true,
"AllowCostplanView": true,
"HtmlColor": "#C9F3C9",
"CurrencySymbol": "EUR",
"IdProject": 65,
"Number": "20-0003",
"CustomNumber": "",
"Caption": "Sample project",
"ProjectState": {
"IdProjectState": 1,
"Caption": "Confirmed",
"Color": -3542071
},
"StartDate": "2020-01-22T00:00:00",
"EndDate": "2020-03-01T00:00:00",
"Address_Customer": {
"IdAddress": 8,
"Number": "1000008.00",
"Company": "Sample company LLC",
"FirstName": "Max",
"Surname": "Smith",
"Street": "Main street 1",
"Zip": "0000",
"City": "Any town",
"Phone": "",
"PhoneCompany": "",
"Fax": "",
"EMail": "",
"WWWAdress": ""
},
"Contact_Customer": {
"IdContact": 8,
"Surname": "Smith",
"FirstName": "Max",
"Phone": "",
"Fax": "",
"Mobile": "",
"Email": ""
},
"Jobs": [
{
"IdJob": 120,
"Number": "20-0003.01",
"Caption": "Sample job",
"Stock": {
"IdStock": 1,
"Caption": "Default"
}
}
],
"Stock": { "Stock": {
"IdStock": 1,
"Caption": "Default"
}
}
General
With the Postman program and service, you can send your example queries to your easyjob WebApi. There you can also find detailed information about the structure of queries for programs such as cURL and sample code for various program languages. Link to the Postman documentation: https://documenter.getpostman.com/view/17814395/UVR8onMz
Possible calls
- GET /api.json/Common/GetGlobalWebSettings (Anonymous)
- GET /api.json/Common/GetWebSettings
- GET /api.json/Common/AutoComplete/?searchtext=abc&table=project
Dashboard
Provides a view of the current processes related to the login
Possible calls
- GET /api.json/Dashboard/List/?(type=Important|Today|FromTodayOn)
- GET /api.json/Dashboard/Calendar/?days=7&(startdate=2019-01-01T00:00:00.000Z)&(tables=7)
Views
Access to all Navigator/easyjob Today views
Possible calls:
- GET /api.json/Views/List
- GET /api.json/Views/Excecute/viewname
Addresses
Access to the easyjob address master data
Possible calls
- GET /api.json/Addresses/List/?(searchtext=abc)&(style=List|Compact)
- GET /api.json/Addresses/Details/123?(Idcontact=123|-1)
- GET /api.json/Addresses/ActivityList/123?(style=List|Compact)&(tables=7)
- GET /api.json/Contacts/Details/123
Projects and Jobs
Access to easyjob Projects and Jobs
Possible calls
- GET /api.json/Projects/List/?(searchtext=abc)&(style=List|Compact)&(startdate=2019-01-01T00:00:00.000Z)&(enddate=2019-01-01T00:00:00.000Z)
- GET /api.json/Projects/Details/123
- POST /api.json/Projects/Save/[model]
- GET /api.json/Projects/GetFormData/?(type=add|edit)
- GET /api.json/ShortCuts/List2Object/123?table=project&(style=List|Compact)
- GET /ShortCuts/download|image|thumb|thumb2/123?access_token=abc&access_key=123
- GET /api.json/Job/Details/123
- POST /api.json/Job/Save/[model]
- GET /api.json/Job/GetFormData/(123)?(type=add|edit)
Items
Access to easyjob Items
Possible calls
- GET /api.json/Items/List/?(searchtext=abc)&(type=View|Book)&(style=List|Compact)&(IdCategoryParent=123)&(IdCategory=123)
- GET /api.json/Items/CategoryList/?(type=View|Book)
- GET /api.json/Items/Details/123
- GET /api.json/Items/BillOfItems/123
- GET /api.json/Items/LineItemDetails/(123)?(idst=123)&(idjob=123)&(idst2jg=123)
- GET /api.json/Items/GetLineItemFormData/(123)?(idjob=123)&(idst2jg=123)
- POST /api.json/Items/Book/[model]
- GET /api.json/Items/Avail/123?startdate=2019-01-01T00:00:00.000Z&enddate=2019-01-01T00:00:00.000Z&(stock=123)
Resources
Access to resource planning
Possible calls
- //GET /api.json/Resources/List/?(searchtext=abc)&(resourcetype=Staff|Vehicle|GenericRessource)&(style=List|Compact)
- GET /api.json/Resources/List2Object/123?(table=job)
- GET /api.json/Resources/AllocationList/123
- GET /api.json/Resources/Details/123
- GET /api.json/Resources/GetFormData/(123)?(idjob=123)&(resourcetype=Staff|Vehicle|GenericRessource)&(idresourcefunction=123)
- POST /api.json/Resources/Save/[model]
- POST /api.json/Resources/Delete/123
Starting printing processes (PDF generation)
Possible calls
- GET /api.json/Reports/List/?table=project
- GET /Print/123/project/123?access_token=abc&access_key=123
Time Card
Access to time recording
Possible calls
- GET /api.json/TimeCard/List2Object/123?(table=project)
- GET /api.json/TimeCard/Details/?(d=2019-01-01T00:00:00.000Z)
- POST /api.json/TimeCard/StartWorkTime
- POST /api.json/TimeCard/CloseWorkTime/?(d=2019-01-01T00:00:00.000Z)&(force=0|1)
- GET /api.json/TimeCard/GetFormData/?(worktype=123)
- POST /api.json/TimeCard/SaveWorkTrace/[model]
- POST /api.json/TimeCard/SaveWorkQualification/[model]
- GET /api.json/TimeCard/GetWorkQualificationTemplates
- GET /api.json/TimeCard/GetWorkTraceTemplates
- GET /api.json/TimeCard/UserList (Anonymous)
- POST /api.json/TimeCard/DeleteWorkTrace/123
- POST /api.json/TimeCard/DeleteWorkQualification/123
TAPI interface
When integrating a phone, incoming calls will be resolved based on the stored phone number data and signaled with a popup window.

You can perform additional activities using the context menu.
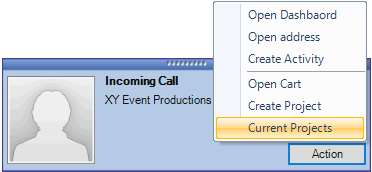
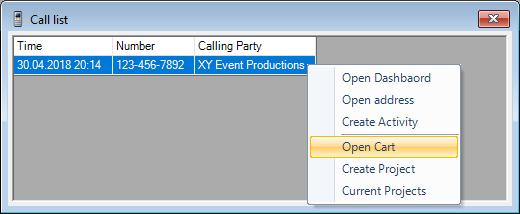
From the call list context menu you can perform additional actions using a known address.
Installation and activation
No content for this section.
User options
TAPI integration is activated in the user options.
Activating TAPI
1. easyjob Menu Tools User Settings
2. TAPI
3. Check the Activate TAPI box
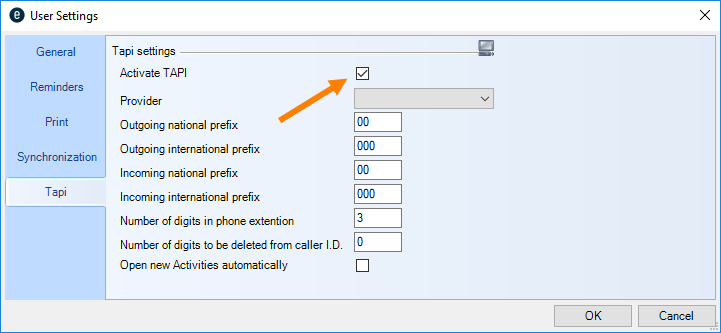
In the user options, also select the provider made available by the installed TAPI driver of the telephone system. The prefix settings are inclusive of any numbers for accessing an outside line as well as local and international codes. If you have to select 0 for an outside line, for a national call it is = 00 (one 0 for the outside line and 0 for the area code). Internationally, you need one more 0: 0 = outside line 00 = int. code.
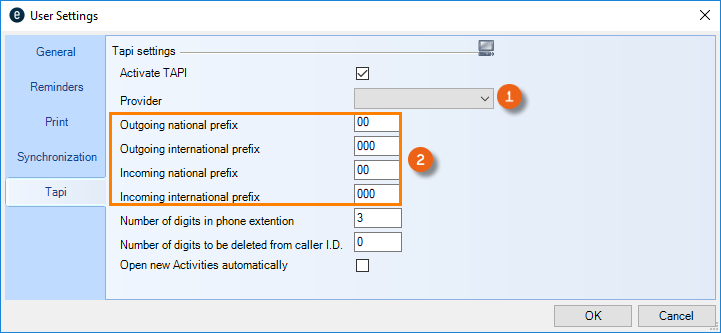
For incoming prefixes, it depends if the telephone sends the 0 for the outside line as a code for external calls. If yes, it is the same as for outgoing prefixes, otherwise with one less 0. (0 = national, 00= int.).
Company address
Your own company address is selected in the program options from the master data. In order for the TAPI interface to function, the company address must contain the country.
Storing the company address
1. easyjob Menu Tools Settings
2. General
3. Select your company address
4. Ok
easyjob must be restarted to activate the settings.
Countries
The country phone prefix must be entered in the country master data.
Managing countries
1. easyjob Menu Master Data Countries
2. Select a country you want to Edit or create a new country with Add.
3. Enter a name, country code and phone prefix.
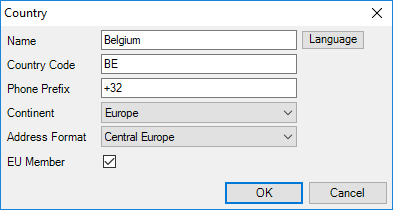
4. Ok
Report Designer
This chapter will be published soon.
Important information for the migration from List & Label 23 to 27
From easyjob 6.17 you have the option to migrate your reports individually to a higher List & Label Version. After you have selected the desired Report , the Designer Version (e.g. List & Label 23 ) of the selected report will be displayed. With Update you can convert the reports to the current List & Label Version.

When converting the report, a backup will be automatically stored in Version 23 in the Shared Report directory in the Backup subfolder (SERVER\easyjob 6\Data\easyjob\shareddata\Reports\).
Please note that this update cannot be reversed. After converting, please fully test your report to make sure that it functions like before the conversion.
Changed behavior of Group Header Lines
Behavior up to Version 23:
The group header was output up until now to the field type of the first printed data line.
New behavior from Version 24:
The group header is output up to the first data line, regardless if it is printed, presented visually or not.
This change influences the behavior of the totals variables when Parts data source is used as a counter. If Parts in the data source are transferred at the beginning as a counter, they will not be executed and will be output up to the first data line, which should not be optically printed in the report. Here the group header must be intercepted and be excluded from the Parts counter of the data source by means of a display condition, so that they are executed and can also be counted.
You can find this in our Standard Report Templates Job Delivery Note, Job Pack Lists, Job Pack Lists according to Stock Location, Project Item Lists. The total quantity of the items/packages that could be counted via the totals variable is output at the top in the header.
If you do not have a group header or if the totals variable can no longer be used in a Version 27 report, the following approaches are possible:
- PreCalc() function (see the L&L manual in the Designer)
- Multi-pass procedure (Multi-pass-processing Finally – a Glance in the Crystal Ball (combit.blog))
Which procedure is right depends on the individual report. Newly revised report templates are available from Version 6.17. You can find information about further changes and new features in the List & Label Designer at https://www.combit.net/.
If you require support for the migration of the List & Label Designer Version, please contact our Support.
Operation and provision
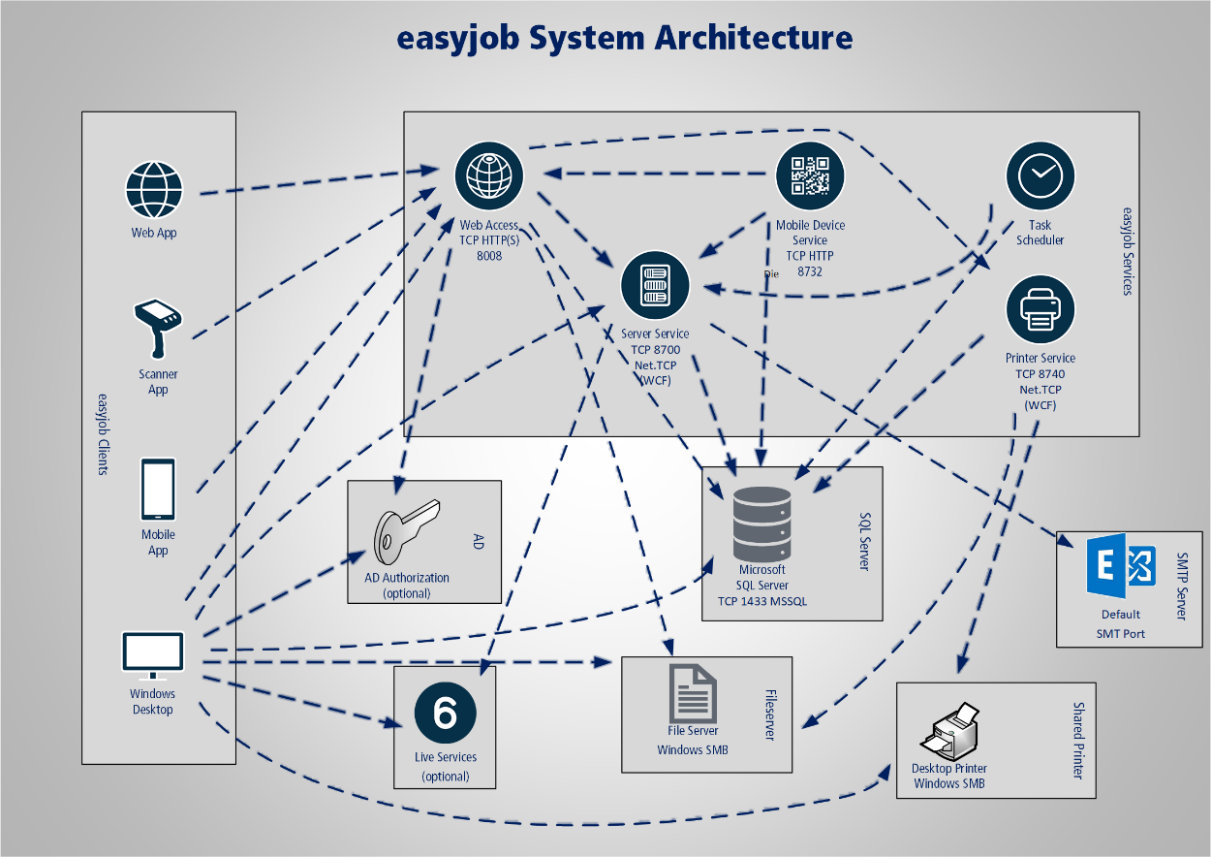
easyjob system architecture
The easyjob system architecture is comprised of the easyjob Clients, easyjob Services as well as third-party services such as the Microsoft SQL Server.
easyjob Clients

easyjob Windows Desktop
The Windows Client with full functional scope can be virtualized on a local client or used as a remote desktop.
| Necessary user context rights | - Read access to the easyjob program directory- Read access to the global data directory- Write permission for the global data directory (e.g. to add document attachments)- Temp write permission- Access to the printer |
|---|---|
| Provided network services (server) | - None |
| Utilized network services (client) | - SQL database- LDAP Authorization (if configured)- SAML Authorization (if configured)- Office 365 (if configured)- easyjob Server Service- easyjob Web Access- easyjob High Performance Scaler (if configured)- servicepoint.easyjob6.com (if errors should be sent or if a check for updates should be performed. Can be deactivated) |

Provides mobile access to the most important easyjob functions. The app is available for IOS and Android.
| Utilized network services (client) | - easyjob Web Access- SAML Authorization (if configured)- Office 365 (if configured) |
|---|

easyjob Web App
It provides mobile access to the most important easyjob functions via the web browser. All commonly used browsers are supported.
| Utilized network services (client) | - easyjob Web Access- SAML Authorization (if configured)- Office 365 (if configured) |
|---|

easyjob Scanner App
It optimizes easyjob functionality for use with barcode scanners. The app is available for IOS and Android.
| Utilized network services (client) | - easyjob Web Access |
|---|

easyjob Remote Session Enhancer (RSE)
The easyjob Remote Session Enhancer improves the integration of an easyjob application run on a remote desktop and the local client.
| Utilized network services (client) | - easyjob Web Access- SAML Authorization (if configured)- Office 365 (if configured) |
|---|

easyjob Officebar
With easyjob Officebar, it is possible to interact with easyjob from Outlook and Excel. The Officebar can be used in Office in Windows, macOS as well as in the web browser.
| Utilized network services (client) | - easyjob Web Access- SAML Authorization (if configured)- Office 365 (if configured) |
|---|

easyjob Venue Equipment Tracker
The easyjob Venue Equipment Tracker makes it possible for drivers and external transport service providers without easyjob knowledge to plan and document the delivery and return delivery.
| Utilized network services (client) | - easyjob Web Access |
|---|
easyjob Services

easyjob Server Service
It is the central communication interface between the individual easyjob components and takes over central tasks, such as the performance of workflows.
| Necessary user context rights | - Read access to the easyjob program directory- Read access to the global data directory- Temp write permission- Run as service rights- TCP lists on configured port |
|---|---|
| Provided network services (server) | - Microsoft .net TCP (WCF). Standard port 8700, can be configured |
| Utilized network services (client) | - SQL database- servicepoint.easyjob6.com (if errors should be sent or if a check for updates should be performed. Can be deactivated)- SMTP (Optional)- EWS (Optional)- Office 365 (if configured)- easyjob High Performance Scaler (if configured) |

easyjob Web Access Service
Provision of HTTP(S) requests for access to easyjob data via JSON as well as provision of HTML applications.
| Necessary user context rights | - Read access to the easyjob program directory- Read access to the global data directory- Write permission for the global data directory when document attachments should be added- Temp write permission- Run as service rights- TCP lists on configured port |
|---|---|
| Provided network services (server) | - TCP HTTP(S) Standard port 8008, can be configured |
| Utilized network services (client) | - SQL database- LDAP Authorization (if configured)- Office 365 (if configured)- easyjob Server Service- easyjob Printer Service- easyjob High Performance Scaler (if configured) |

easyjob Mobile Device Service
The service is still used on old barcode scanners due to compatibility reasons and should end in the future.
| Necessary user context rights | - Read access to the easyjob program directory- Read access to the global data directoryTemp write permission- Run as service rights- TCP lists on configured port |
|---|---|
| Provided network services (server) | - TCP HTTP(S) Standard port 8732, can be configured |
| Utilized network services (client) | - SQL database- easyjob Server Service- easyjob Web Access |

easyjob Task Scheduler
This triggers the performance of recurring server tasks, such as synchronization with third-party services, maintenance tasks. etc.
| Necessary user context rights | - Read access to the easyjob program directory- Read access to the global data directory- Write permission for the global data directory when document attachments should be added- Temp write permission- Run as service rights |
|---|---|
| Provided network services (server) | None |
| Utilized network services (client) | - SQL database- easyjob Server Service |

easyjob Printer Service
Performance of printing processes if there is no user context. For example, for the generation of delivery notes via the barcode scanner or automatic reporting via the Workflow Engine.
| Necessary user context rights | - Read access to the easyjob program directory- Read access to the global data directory- Temp write permission- Run as service rights- Access to the utilized printer- TCP lists on configured port |
|---|---|
| Provided network services (server) | - Microsoft .net TCP (WCF). Standard port 8740, can be configured |
| Utilized network services (client) | - SQL database |

easyjob High Performance Scaler Service (HPS)
An Intelligent Service, that reduces the load for the SQL Server when calculating and evaluating data and therefore considerably improves the overall performance of the easyjob environment.
| Necessary user context rights | - Run as service rights- TCP lists on configured port |
|---|---|
| Provided network services (server) | - Microsoft .net TCP (WCF). Standard port 8741, can be configured |
| Utilized network services (client) | - SQL database- easyjob Server Service |
Third-Party Services

Microsoft·SQL·Server
Access takes place via the standard Microsoft protocol. The TCP port can be configured on the SQL Server. Data communication can be encrypted.
Live Services (servicepoint.easyjob6.com)
The service point provides various (optional) live services via http(s):
- Sending program errors
- Checking for easyjob updates
- Activation of the license
- Geolocalization of addresses

Windows File and Printer Services
A standard Windows interface is used for document storage, report definitions, printing procedures, etc.

LDAP Authorization (Optional)
The authorization provided by easyjob can be used for authorization. Alternatively, authorization can take place via LDAP.

SMTP Service and EWS
Emails can be sent from the system via SMTP. Additionally, it is possible to synchronize appointments, tasks, etc. with EWS.
easyjob Servermanager
This chapter will be published soon.
SQL database
Installing the Microsoft SQL Server
The express version of the Microsoft SQL Server can be installed automatically with the easyjob setup.
A manual installation guide for the SQL server will be provided soon in this point.
Microsoft SQL Server Versions Upgrade
There are various options for performing an SQL Server Versions Upgrade.
The SQL Server setup of a newer SQL server can update the existing SQL Express Version with little effort.
Follow the steps below to perform the upgrade:
1. Start the setup file
2. Select the upgrade installation
3. Follow the steps
4. Select the previous easyjob SQL instance
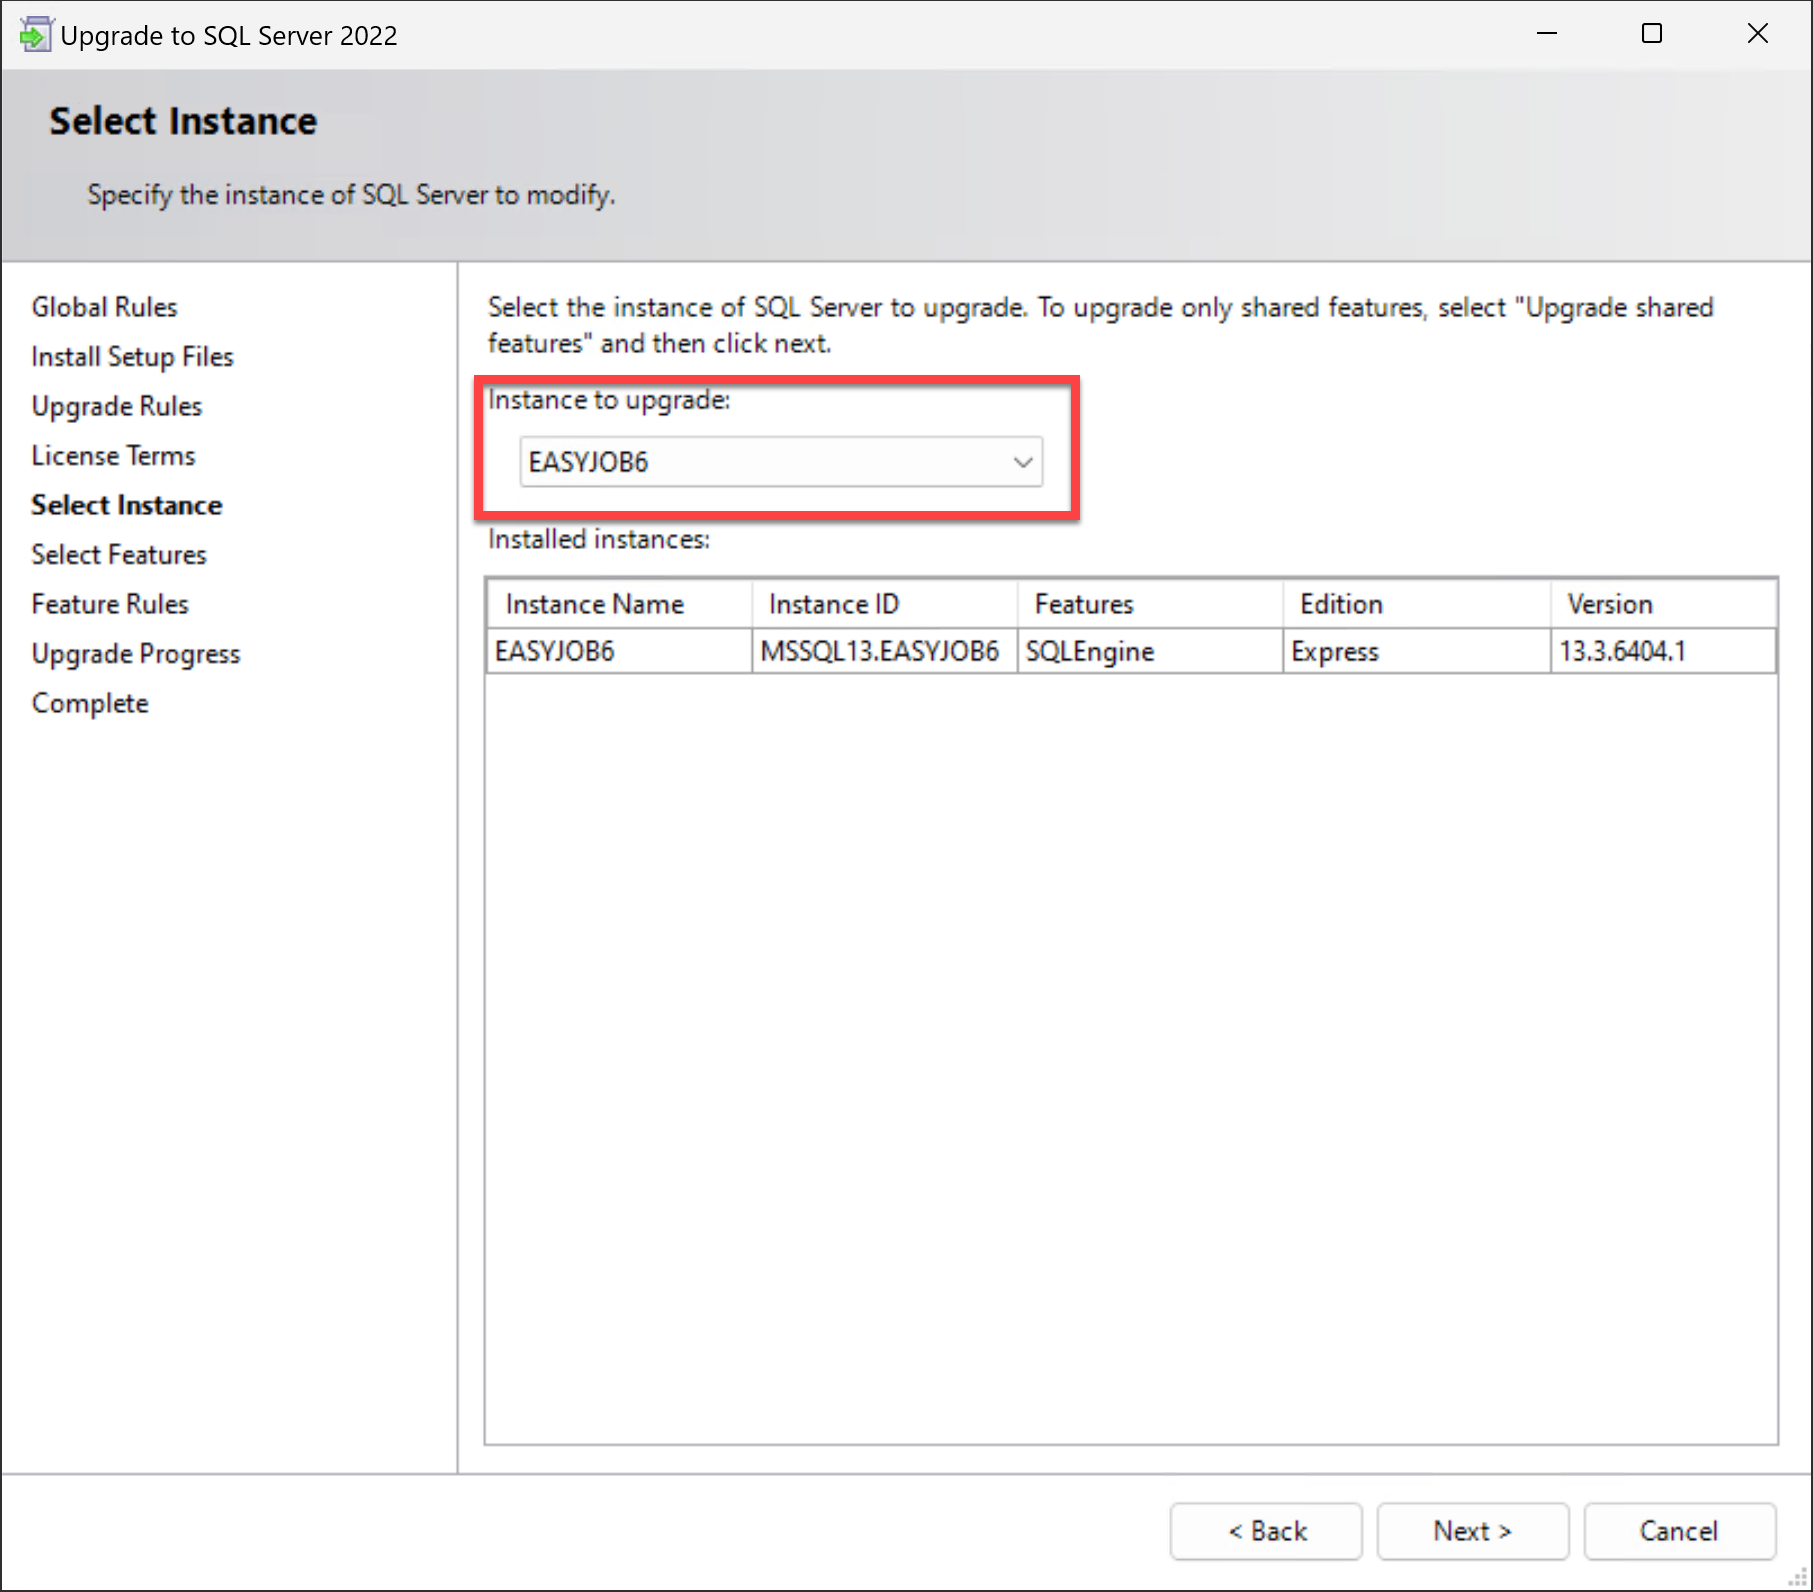
5. The following dialog is displayed if the upgrade was successful
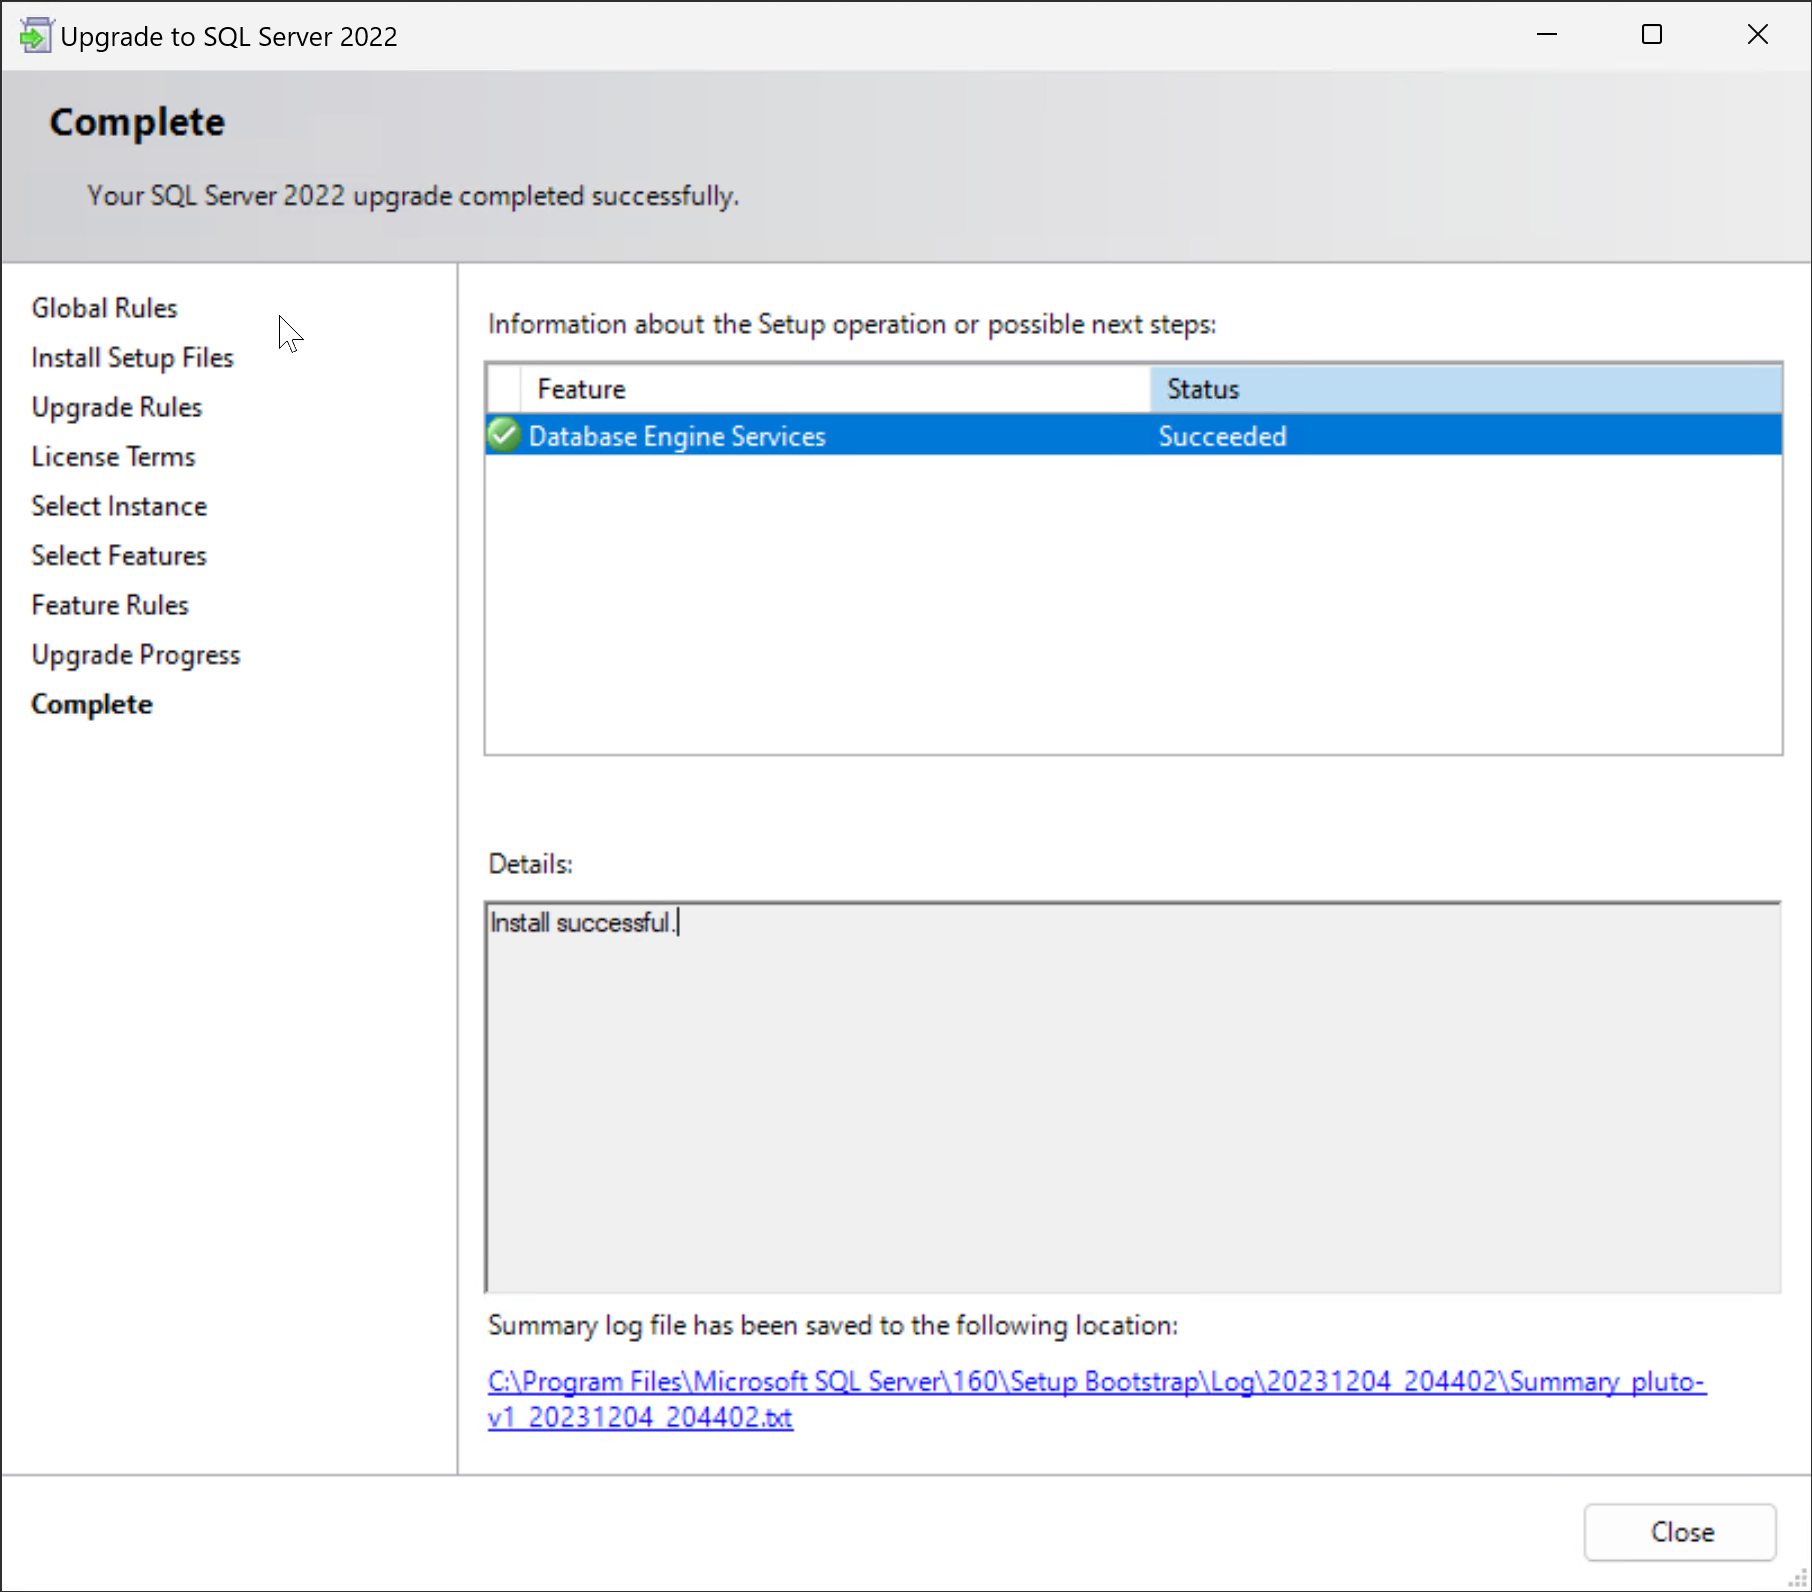
The SQL database compatibility level must be updated after successful installation.
More information can be found in chapter Database compatibility level.
You can find more information on the Microsoft SQL Upgrade on the following Microsoft website:
Upgrade: Installation Wizard (Setup) - SQL Server | Microsoft Learn
SQL Server database optimization
In addition to the database hardware, the utilized SQL server version can have considerable influence on easyjob performance.
The SQL Server Query Optimizer decides how the necessary data physically on the disk is read fastest. With each new SQL server version, Microsoft optimizes the tool to ensure the best possible performance. Database queries can also be slower with a new version and must be adapted.
It is possible, for example, that the easyjob Cost Planner is fast with the newest SQL server version, but extremely slow with older versions.
We customize the database queries to the current version. For this reason, we recommend using the latest SQL server version available, license conditions permitting.
If you use the SQL Expression variant, you can update it free of charge. Additional Information can be found in chapter Microsoft SQL Server Versions Upgrade.
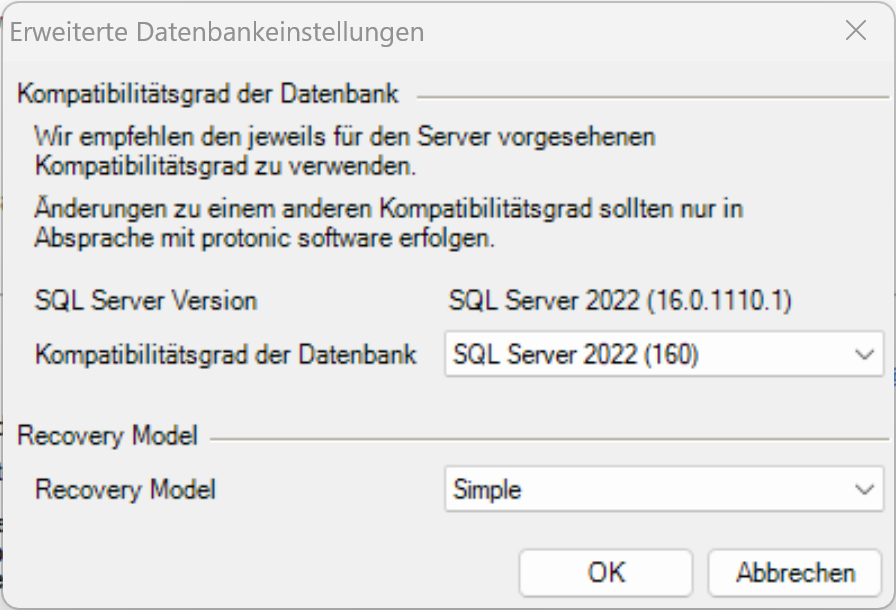
Database compatibility level
With the database compatibility level, it is possible to specify that the SQL server must work with an older version of the Query Optimizer. We recommend using the current database compatibility level and to use an older version only for test purposes.
Customizing the database compatibility level
1. easyjob Server Manager SQL Server Customize degree of compatibility action
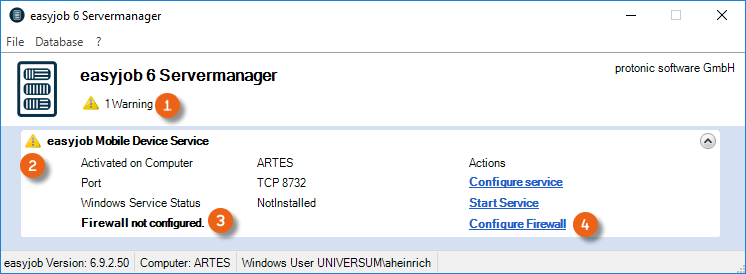
easyjob Services
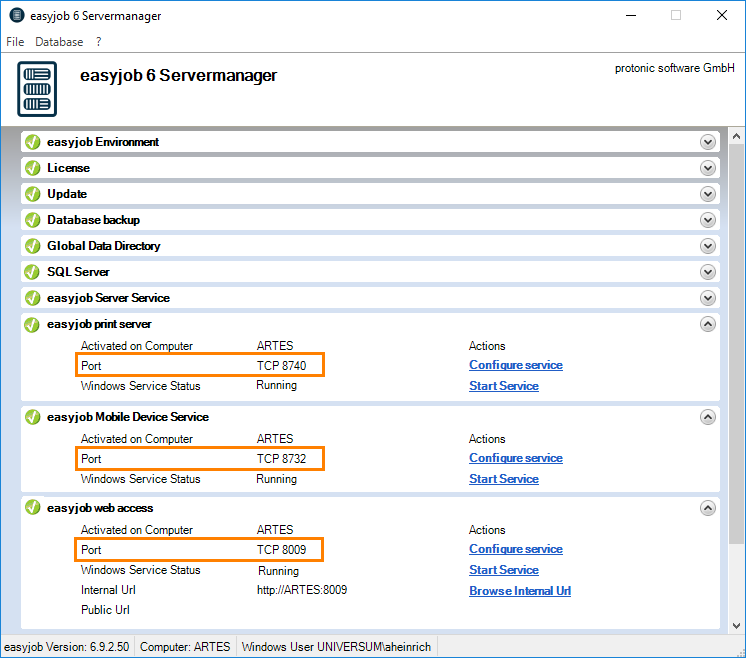
To be able to use the numerous easyjob applications, the easyjob Mobile device, easyjob web access and easyjob print server services must first be activated and configured in the server manager.
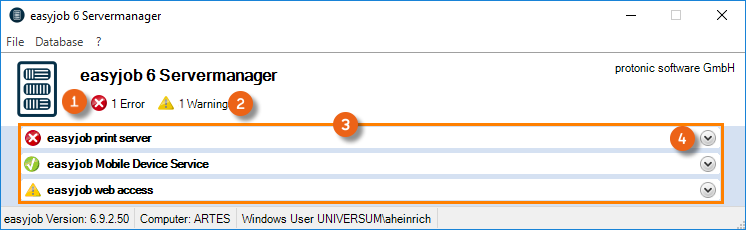
These services can be found in the easyjob server manager. Errors or warnings are displayed in the overview. To start the described services, , open them one after the other and make the configurations.
easyjob Mobile Device service
Activating the easyjob Mobile Device Service
1. Open easyjob 6 server manager
2. easyjob Mobile Device Service
3. Configure service

4. Check the box Activate the Mobile Device Service on this computer
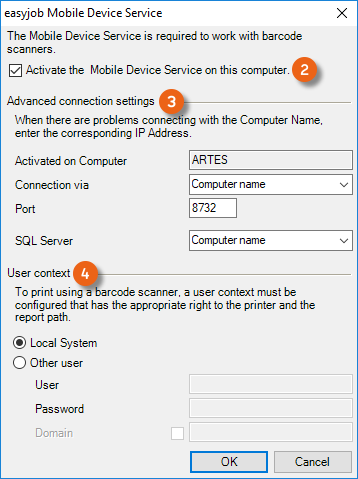
5. If needed, perform the Advanced connection settings or configure the user context
6. Ok
The service will be executed by default with the Local System user context.
easyjob web access service
A functional public URL must be set up to be able to use the Room Planner or the TimeCard, for example, via the WebApp.
This public URL must be entered in the Server Manager in the corresponding field . Then port forwarding from port 8008 (default) on the server on which the web access service runs must be set up in the firewall, which is the transition from the Internet to the internal network.
Activating the easyjob Web Access Service
1. Open easyjob 6 server manager
2. easyjob Web Access
3. Configure service
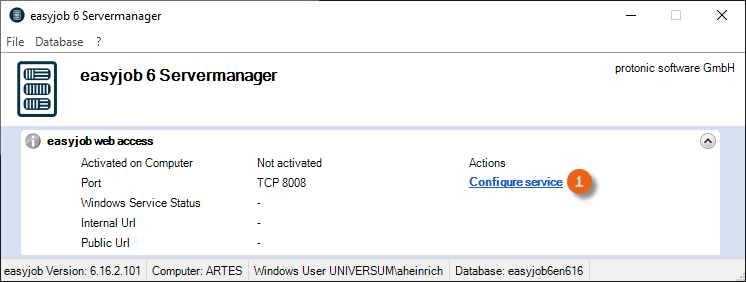
4. Check the easyjob web access box on this computer
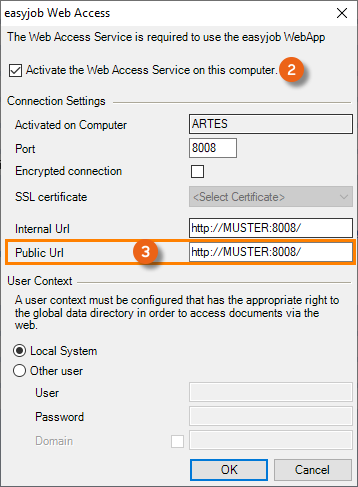
5. If necessary, select an SSL certificate for an encrypted connection
6. Define the public URL
7. Ok
The service will be executed by default with the Local System user context.
A functional public URL must be set up to be able to use the Room Planner, for example, via the WebApp.
easyjob print server
Perform the configuration in the same way as for easyjob Mobile Device service.
easyjob High Performance Scaler
The easyjob High Performance Scaler is an intelligent service that reduces the load for the SQL Server when calculating and evaluating data and therefore considerably improves the overall performance of the easyjob environment.
For optimal performance improvement, the service requires enough RAM on the server. The possible RAM usage is displayed on the Server Manager.
Its operation requires an active easyjob XL subscription.
The High Performance Scaler takes over mainly CPU and disk-intensive tasks. This also frees up resources on the SQL server, which can therefore process other tasks faster.
Activating the High Performance Scaler
1. Open easyjob 6 server manager
2. easyjob High Performance Scaler
3. Configure service
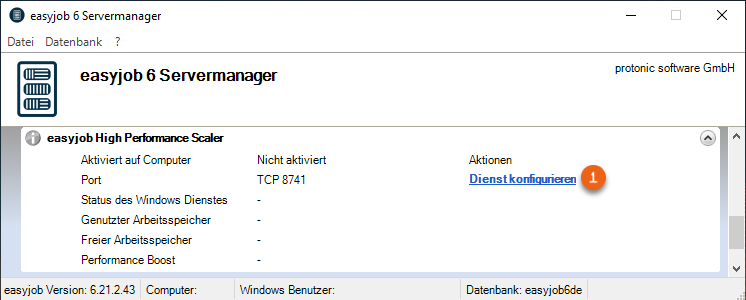
4. Check the box Activate easyjob High Performance Scaler on this computer
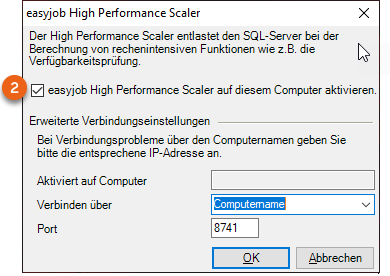
5. Ok
easyjob Remote Session Enhancer (RSE)
If easyjob is provided as a Remote App or via a Remote Desktop and parallel applications such as Microsoft Office are used, the interaction between easyjob and emails, file attachments and Microsoft Teams is not optimal.
The easyjob Remote Session Enhancer improves integration between the executed easyjob application on the remote desktop and the local desktop.
Only a small app is required on the local desktop. Communication takes place via http. In this way, a complete easyjob installation on the desktop and a VPN connection are not necessary.
The following actions are currently supported:
- Manually adding files from the local desktop
- Opening email dialog on the local desktop
- Opening Microsoft Teams on the local desktop
- Opening file uploading dialog on the local desktop
- Adding files from Outlook via Drag&Drop
- Clicking Open file on the local desktop
- Adding an attachment to the most recently processed projects
- Performing easyjob protocol calls to an easyjob instance on the server
The user interface of the Remote Session Enhancer Clients can be found in easyjob 6 manual.
Activating the Remote Session Enhancer
In order for easyjob to recognize if the current easyjob Client has a remote session, the Remote Session Enhancer Host must be activated on all remote computers.
Activating the Remote Session Enhancer Host
1. Start the easyjob Client on the respective Remote Session Host with Windows administrator rights
2. easyjob Menu Tools Settings
3. Integration tab
4. Check the Remote Session Enhancer Host box on the corresponding computer
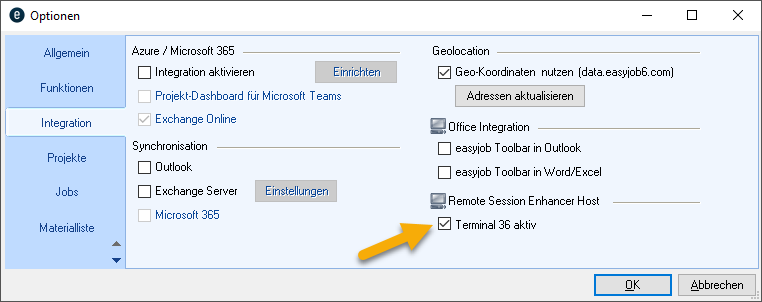
5. Ok
easyjob must be restarted to activate the settings.
easyjob Remote Session Enhancer Client Installation
The Remote Session Enhancer Client is installed using Windows msix technology. The client can be distributed manually or automatically, e.g. using Microsoft Intune.
By means of an auto update function, the client can automatically notify when new versions are available and install them automatically depending on the permissions.
The installation components are available on the following website: https://remotesessionenhancer.easyjob.com/setup/
The URL for the easyjob WebApi and the access data for the respective user must be stored in the client settings.
The user can start and log into as many Remote Session Enhancer Clients as they want. Communication with easyjob on the remote session host takes place with the last client that was started.
Configuring Exchange Sync
To be able to synchronize the Exchange Server or Microsoft 365, Exchange Sync must be activated and configured on the easyjob Servermanager.
The service is required for Synchronization tasks (e.g. for projects, jobs, addresses, activities, tasks) to be able to synchronize them with Outlook and/or Microsoft 365. The synchronization frequency is specified as well in Exchange Sync.
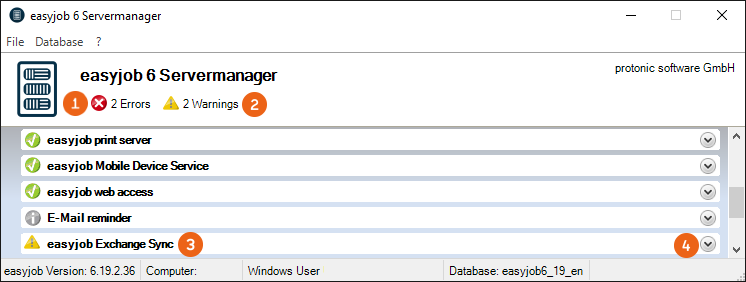
This service can be found in the easyjob Servermanager. Errors or warnings are displayed in the overview. To start the described service and configure the Synch Task expand it and make the configurations.
Activating Exchange Sync
1. Open easyjob 6 server manager
2. Exchange Sync
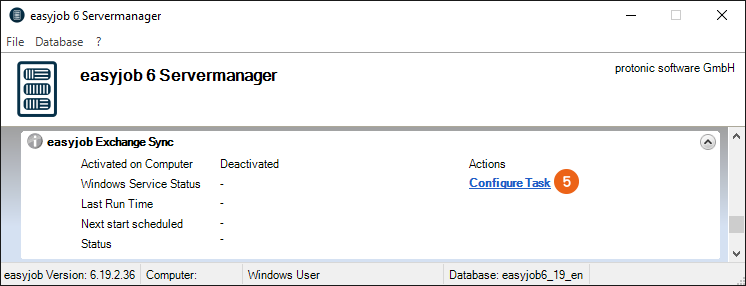
3. Configure Task
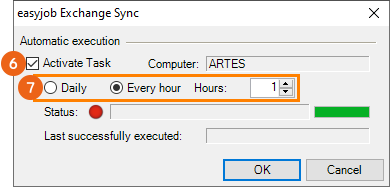
4. Check the Activate Task box
5. Determine the frequency of the synchronization task
6. Ok
7. If required, configure the service or restart it
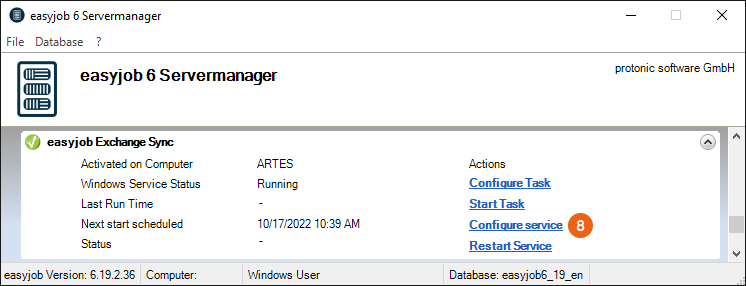
The service will be executed by default with the Local System user context.
Configure the Windows Firewall
No content for this section.
Share of the necessary TCP Ports
If the server is firewall protected, TCP authorizations are required. The easyjob Server Manager automatically configures the Windows integrated Firewall.
Windows Firewall Configuration
If the necessary settings are missing, you will receive a corresponding warning message in the server manager and in the respective service for which the firewall was not yet configured.
The firewall for the concerned service can be directly configured from the server manager .
Configuring the firewall
1. Open easyjob 6 server manager
2. open easyjob Service
3. 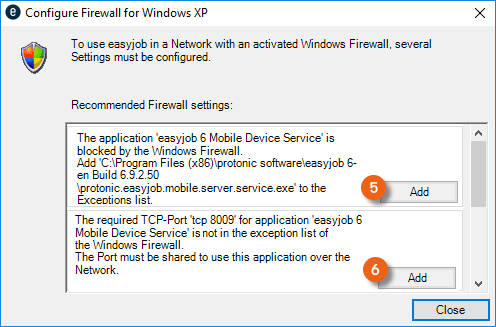 Configure the firewall
4. Add to enter the exception in the firewall
5. Close
After successful firewall configuration, the following exceptions are entered:
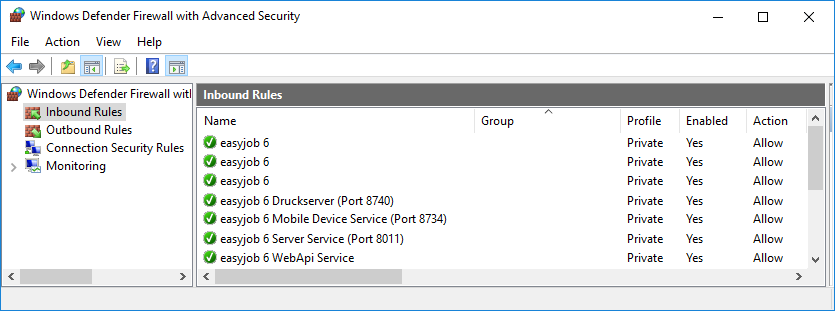
Configuring a non-Windows firewall
If you use another firewall, please note that the easyjob Server manager only detects a Windows Firewall and therefore can only create warning messages for a Windows Firewall.
For the release of a non-Windows firewall, please use the port information from the respective service of your server manager. The TCP number can deviate from the following image depending on the type of easyjob installation.
Please note that a release is necessary separately for each service and two releases are required for every service. First, the corresponding .exe file for the rights to access the network and second the port to permit communication between the network and the computer.
| Service | .exe |
|---|---|
| easyjob print server | protonic.easyjob.printserver.service.exe |
| easyjob Mobile Device service | protonic.easyjob.mobile.server.service.exe |
| easyjob web access | protonic.easyjob.WebApi.service.exe |
Synchronization with Outlook/Exchange Server/Microsoft 365
Outlook Synchronization only takes place locally on the client computer with Outlook installed in it and therefore is PC-dependent. Exchange Server Synchronization requires additional settings and the synchronization service on the Server. This can be configured with the easyjob Servermanager and is independent of the PC.
In both variants, the user has the opportunity to create their own individual Synchronization tasks in the user settings (e.g. for projects, jobs, addresses, activities, tasks).
Some of the following settings are only possible with Admin rights. Open easyjob by right clicking with the mouse and run it As Administrator.
Microsoft·Outlook
Go to the easyjob program settings to activate Outlook synchronization. Under Synchronization, check the Outlook box.
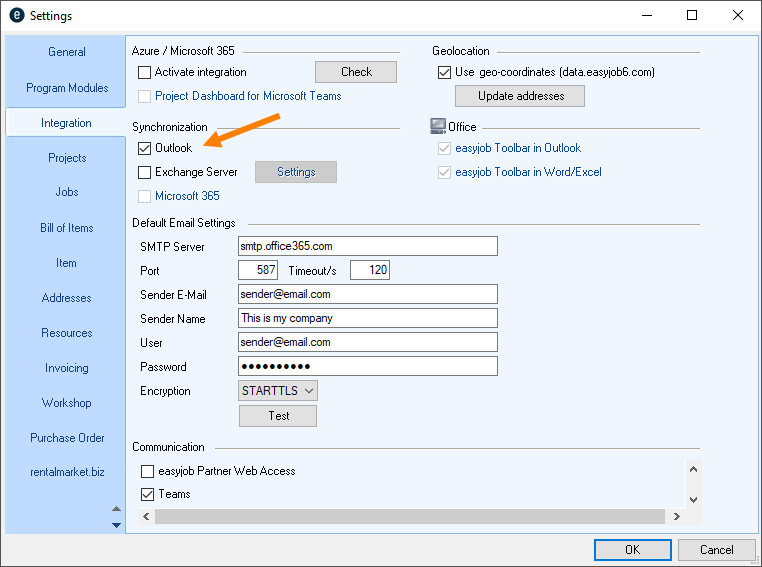
Activating Outlook Synchronization
1. easyjob Menu Tools Settings
2. Integration tab
3. Check the box for Synchronization Outlook
4. Ok
easyjob must be restarted to activate the settings.
User settings for Synchronization
Every user who would like to use Synchronization must have a master data address assigned in the easyjob User settings that contains a corresponding email address . Furthermore the Login Name must be stored with the format Domain\user name. You can use the search function to select the user from the Microsoft Active Directory.

After set up was successful, you will see the easyjob - AddIn tab.

You can select the synchronization tasks in the easyjob user settings.
See also Synchronisationseinstellungen.
User settings for synchronization
1. easyjob Menu Tools Manage Users
2. Select a User
3. Edit
4. Under General Address click on 
5. Select an address Ok
6. Under Access Login Name click on  Search
7. Select the user
8. Ok
9.
Exchange Server
For the synchronization with the Exchange Server, check the corresponding box and click on Settings . Enter the Exchange Service Url under which the Exchange service can be reached (e.g. https://servername/ews/Exchange.asmx), as well as the User and Password for authentication.
Also the Synchronization service must be set up and active on the server. See Configuring Exchange Sync.
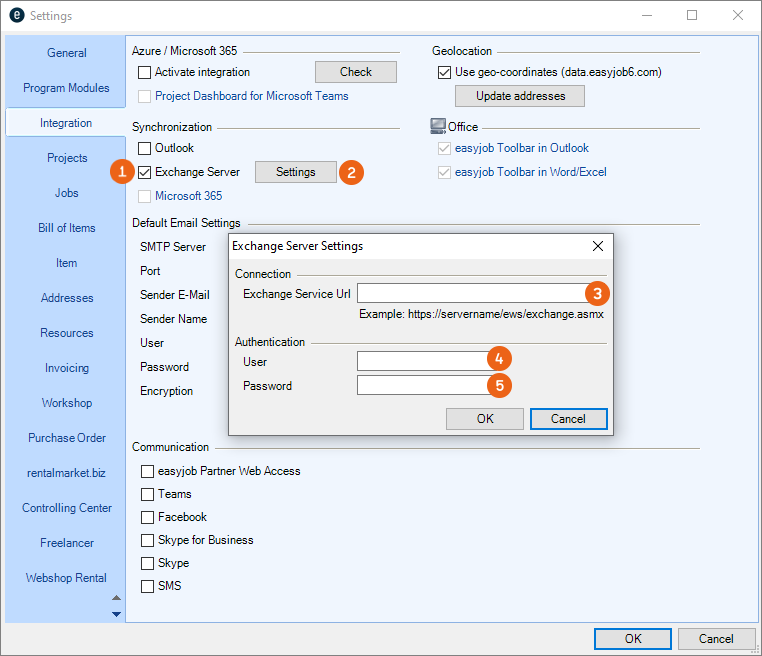
Activating Exchange Server Synchronization
1. easyjob Menu Tools Settings
2. Integration tab
3. Check the Exchange Server box
4. Settings
5. Enter the Exchange Service Url, User and Password
6. Ok
easyjob must be restarted to activate the settings.
Assigning Folder permissions
Under the Exchange Webservice URL, a user is required who has the corresponding permissions for the concerned folder. It must be stored for the individual objects (calendar, address book, etc.) for which synchronization is to take place.
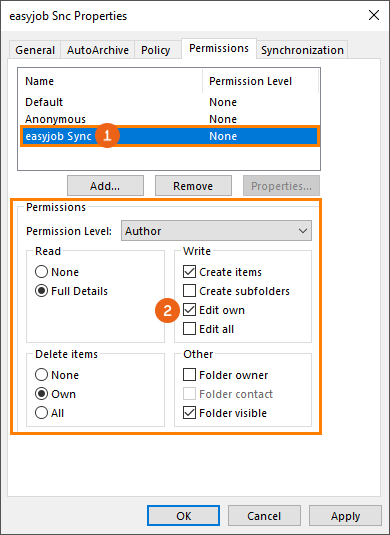
Assigning permissions for the folder
1. Microsoft Outlook
2. Select a folder
3. Properties
4. Permissions tab
5. Add the user for Authentication from the Exchange Server settings as the authorized author
6. Ok
When all settings are made, the Exchange Task can be activated with the Servermanager. An address must be assigned to the easyjob users. The e-mail address is used to identify the email account. See also User settings for Synchronization and Synchronization settings.
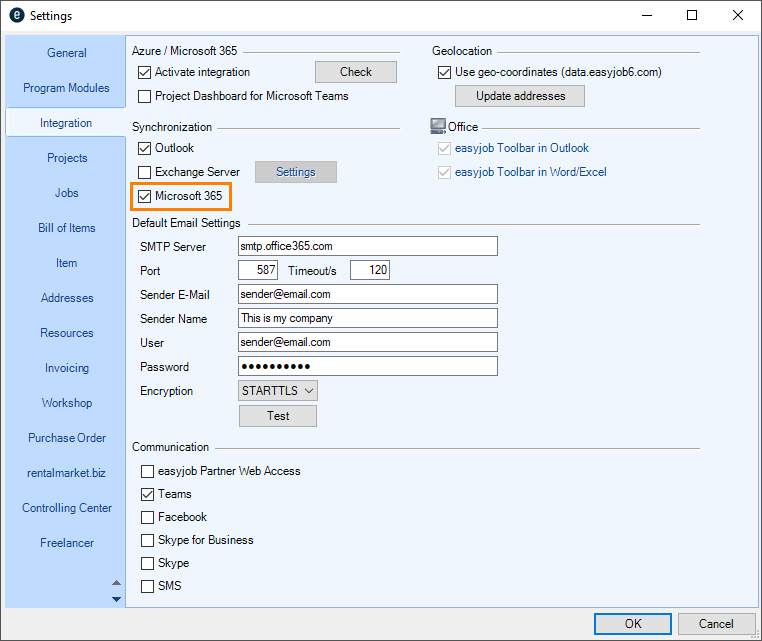
Microsoft 365
For integration / synchronization with Microsoft 365 please use easyjob from version 6.19. To be able to use all functions of the Azure Integration, access to the easyjob web access service via SSL is required. Please note that in order to set up the integration, a Microsoft 365 environment (retail version) and administrator access to this environment are required.
Microsoft 365 Integration
For setup, check the box under Azure / Microsoft 365 for Activate integration and click on Set up .
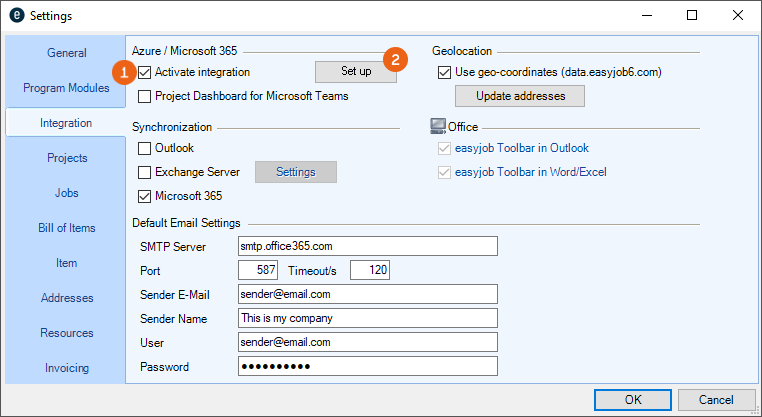
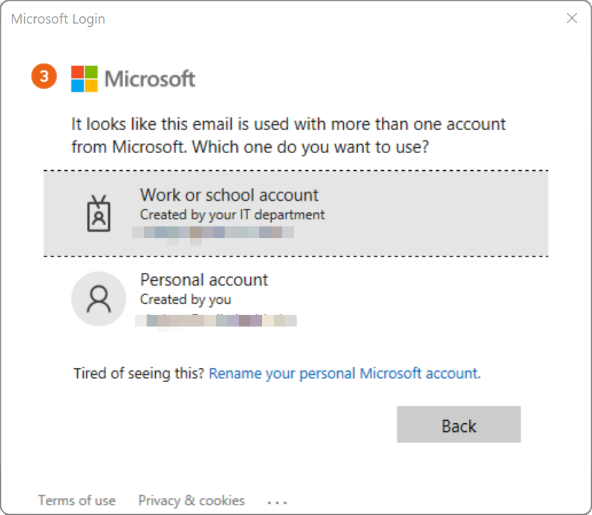
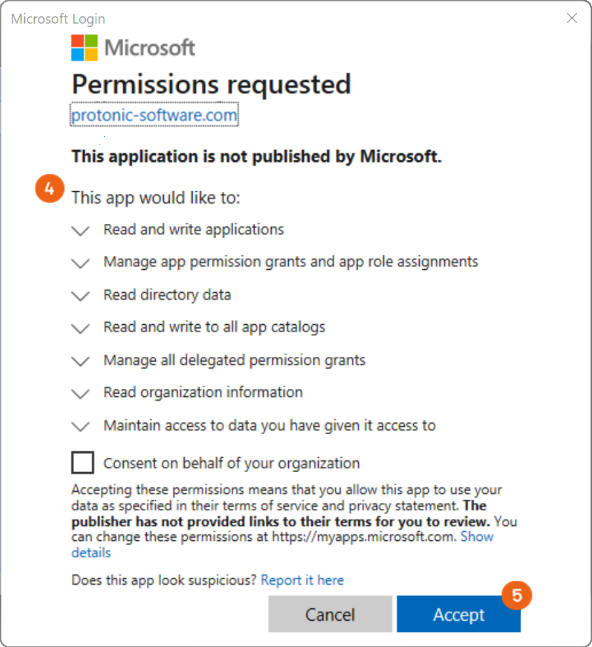
Then you must confirm your Microsoft account or select the correct account and accept the request from protonic software for one-time access permission .
Activating Microsoft 365 Integration
1. easyjob Menu Tools Settings
2. Integration tab
3. Check the box for Azure / Microsoft 365 Activate integration
4. Set up
5. Confirm/select the Microsoft account
6. Ok
easyjob must be restarted to activate the settings.
Logged-in Microsoft 365 user
After setting up MS365 Integration, in easyjob under
1. easyjob Menu Tools User Settings
2. Integration tab
Microsoft 365 Integration can be activated for the current easyjob user. This window shows which Microsoft user is currently logged in.

At this point, the currently logged in Microsoft user is logged out, and if required another Microsoft Account can be logged in.
Microsoft 365 Synchronization
To set up the synchronization tasks, under Synchronization select Microsoft 365 in the easyjob program settings.
For the use of synchronization, the Synchronization service must be set up and active on the server. See Configuring Exchange Sync.
Details about the possible synchronization tasks can be found in Microsoft 365 synchronization settings.
Activating Microsoft 365 Synchronization
1. easyjob Menu Tools Settings
2. Integration tab
3. Check the box for Synchronization Microsoft 365
4. Ok
easyjob must be restarted to activate the settings.
Microsoft Teams
With Microsoft 365 you can also integrate Teams in easyjob. To do so, select Teams in the program settings. You can also display a Project Dashboard in Teams. Please check in advance if Microsoft 365 Integration was activated.

Activating easyjob Teams communication
1. easyjob Menu Tools Settings
2. Integration tab
3. Check the box for Communication Teams
4. Ok
easyjob must be restarted to activate the settings.
Activating the easyjob Project Dashboard for Microsoft Teams
1. easyjob Menu Tools Settings
2. Integration tab
3. Check the box for Azure /Microsoft 365 Project Dashboard for Microsoft Teams
4. Ok
easyjob must be restarted to activate the settings.
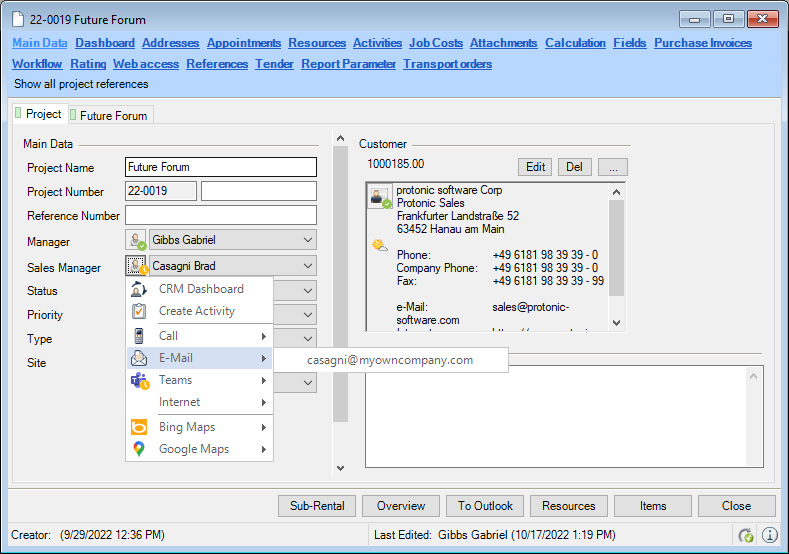
Teams presence status in the easyjob Communication menu
After you have completed easyjob Teams Integration, the current team presence status appears in all areas in easyjob with the related address in the communication menu and the possibility to directly communicate via Teams.
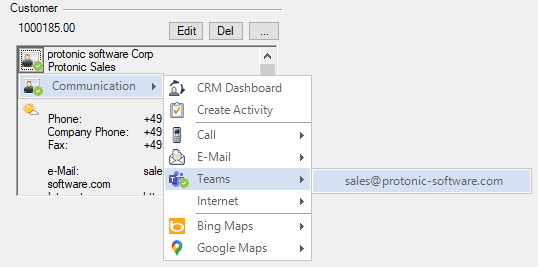

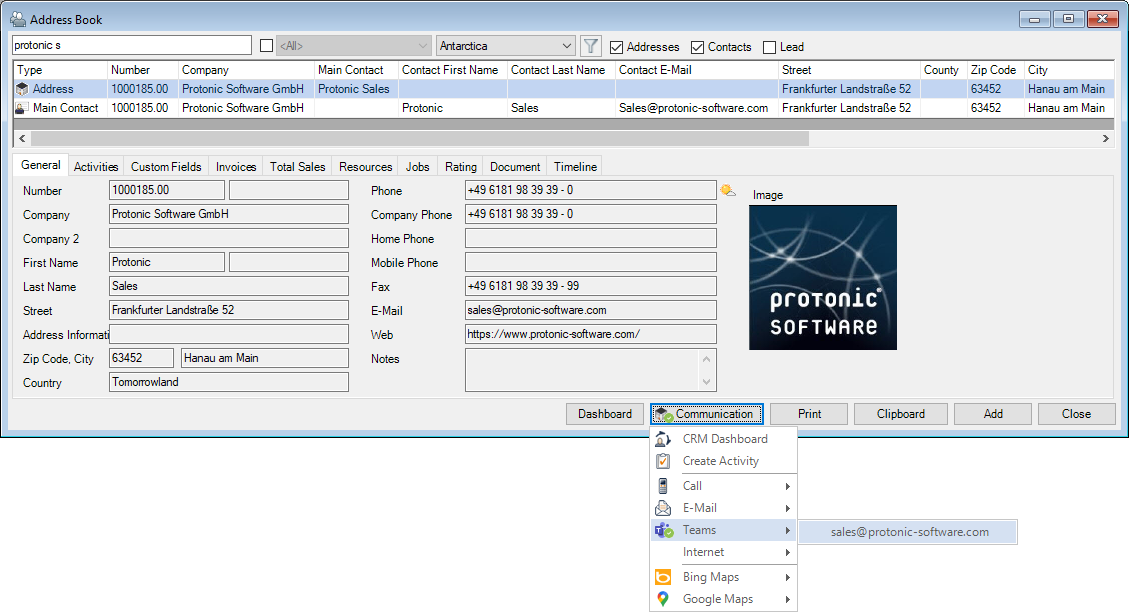
The Teams communication menu is also available to Managers.
Project Dashboard for Microsoft Teams
For an easyjob Project, you can create a new team or open a new channel in an existing team in order to work on this project with other Teams users. First go to the easyjob program settings to activate the function. See Microsoft Teams .
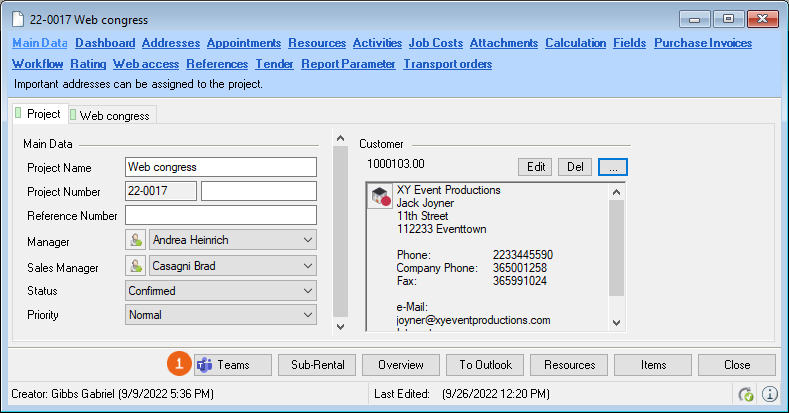
You must perform Teams Integration once per project. You can identify an existing Teams Integration by the colored Teams Logo on the Project tab.
Click the Teams button while pressing the CTRL key to assign another Teams channel to the project or create a new Team/Channel.
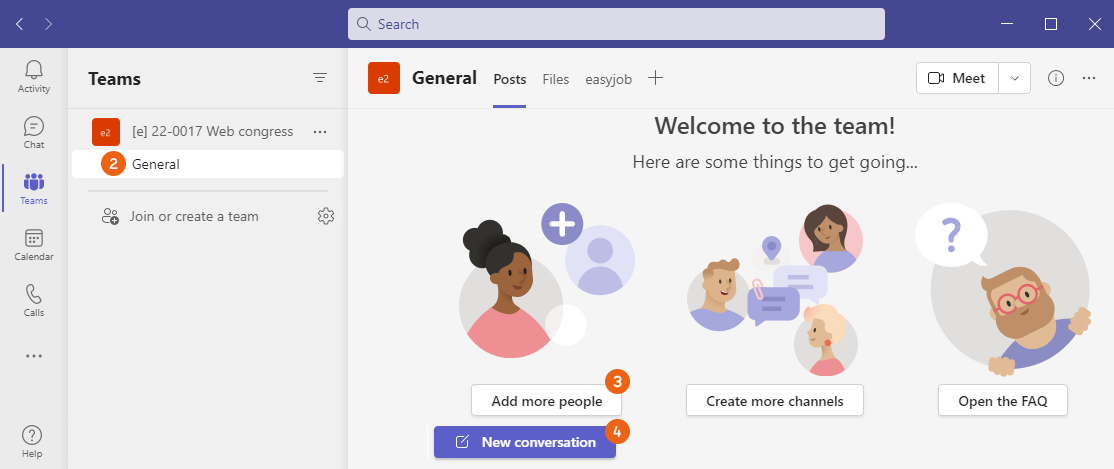
If you want to create a new Team, first the General channel is created in Teams. The Team owner is always the Microsoft 365 user who is currently logged in, regardless of the Project/Job manager. You can add people or start a conversation .
Creating easyjob Teams Integration
1. easyjob Menu Projects Edit project or Create project
2. Teams
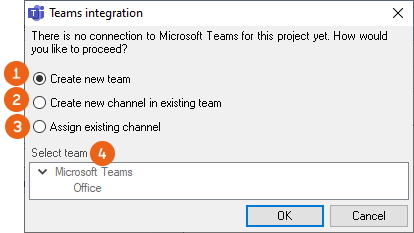
3. Select whether to create a new team , create a new channel in an existing team or assign an existing channel
4. Ok
easyjob Project tab in Teams
As soon as you have performed Teams Integration for an easyjob project, a new Project tab appears in Teams that provides direct access to easyjob data.
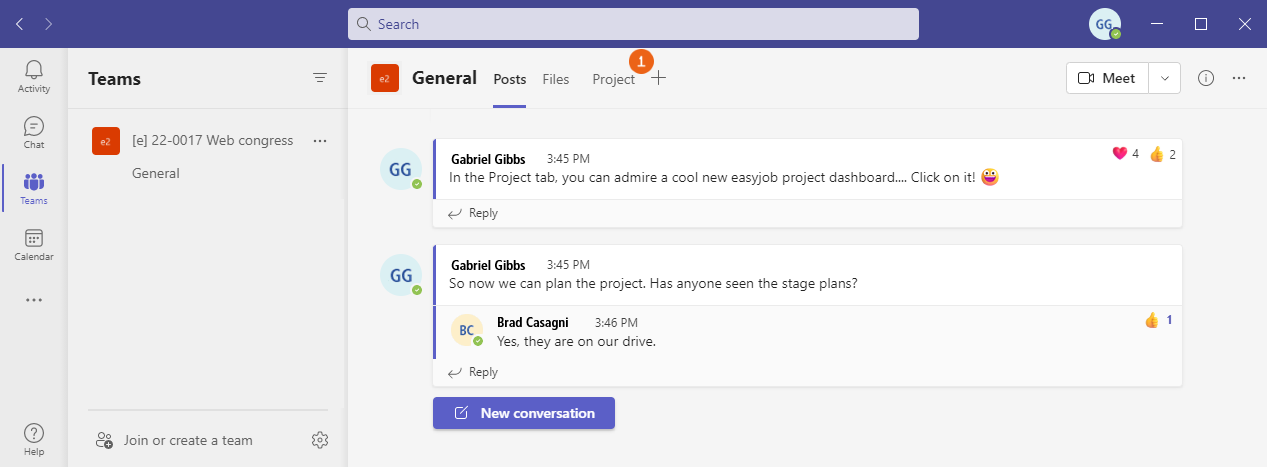
When you click on this tab, you must log into the easyjob WebApp with your access data. This step is omitted if you are already logged into the WebApp.
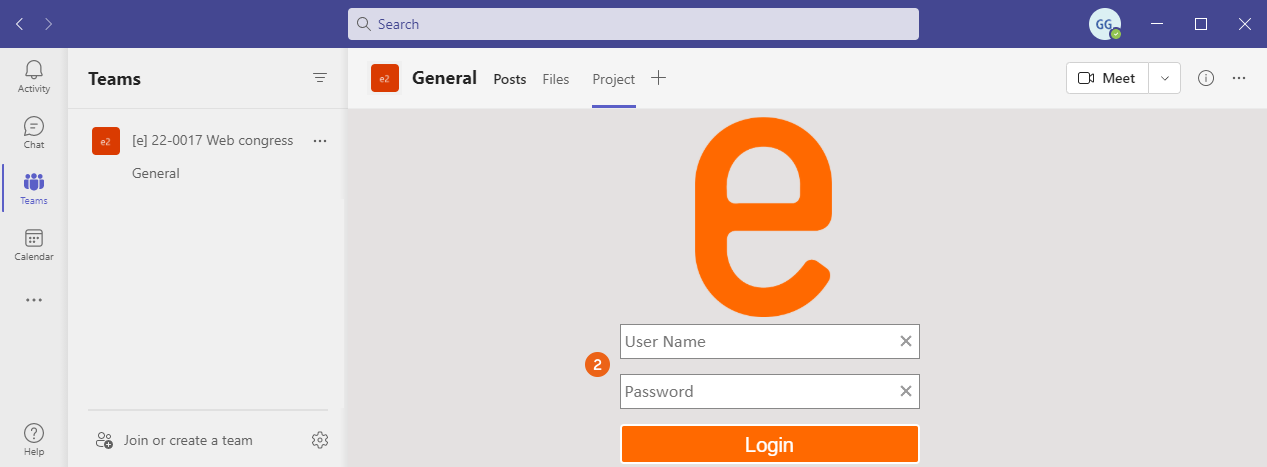
The home page shows the easyjob Project Dashboard with the Project Status , which shows the various areas of the project and their status. You can configure the dashboard as you wish or open the easyjob project directly from Teams .
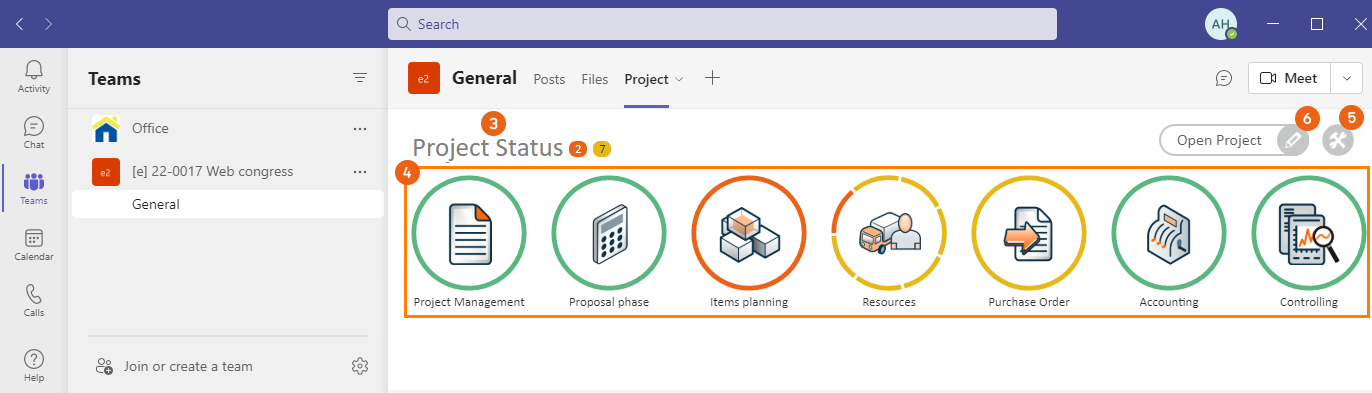
You can find more information about the easyjob Project Dashboard under Dashboard.
Adding the easyjob App in Teams
You can add the easyjob App as a tab in any chat or channel in Teams regardless if you created a separate team/channel for it from easyjob or if Teams is activated or not in the program settings– the requirement is a Microsoft 365 Integration). Click on + in the desired chat or channel. Under Add tab enter easyjob as the search text or click on the easyjob App .
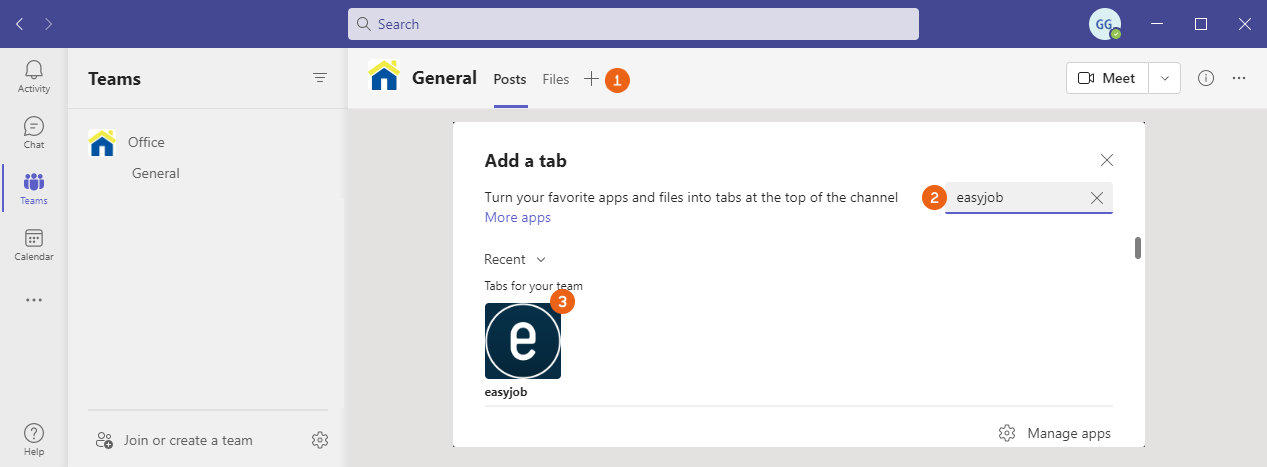
Confirm installation of the easyjob App with Add , then select the project whose project dashboard should be displayed and click on Save . If necessary, log into the easyjob WebApp with your access data.
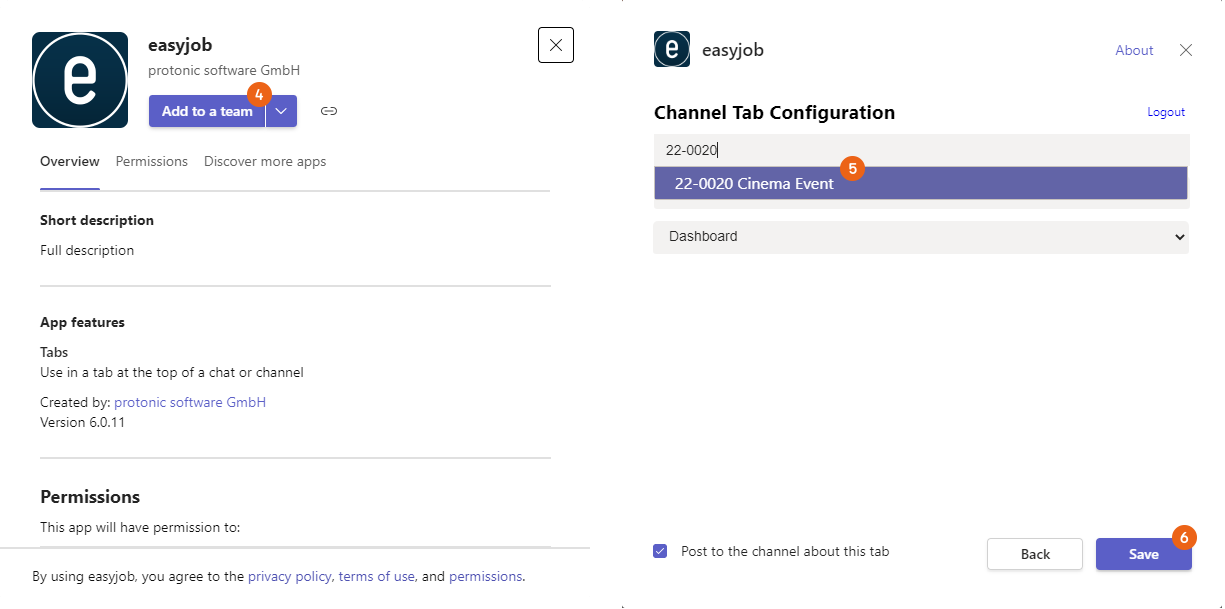
The selected easyjob Project Dashboard is displayed .
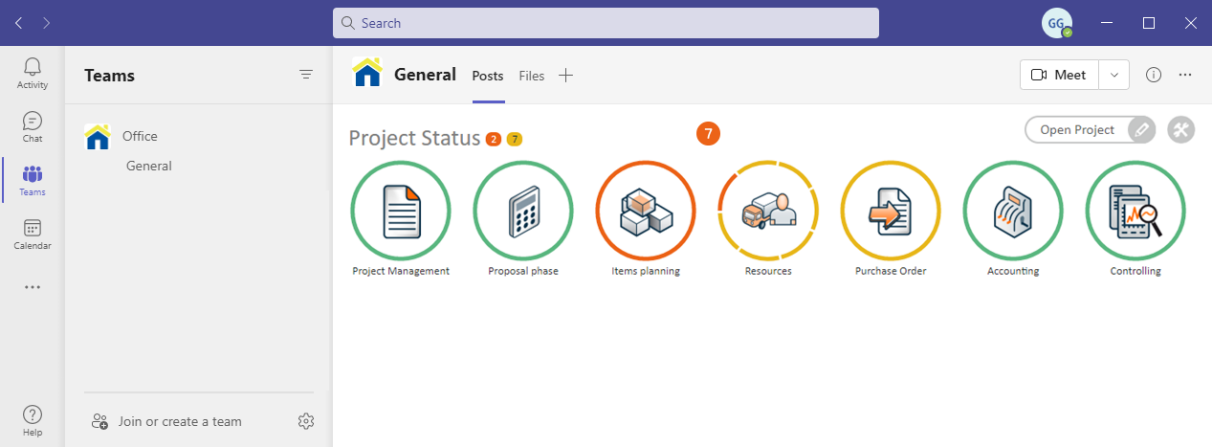
You can find more information about the easyjob Project Dashboard under Dashboard.
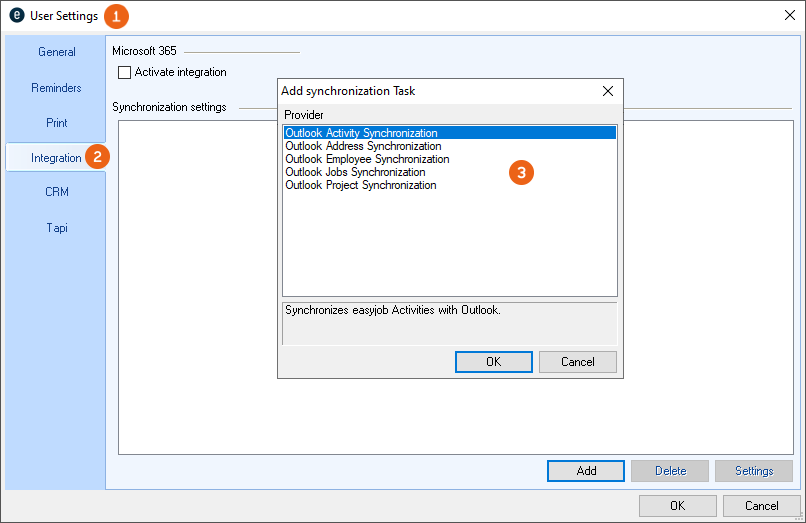
Synchronization settings
The synchronization tasks are defined once per user in the easyjob User Settings under Integration . Select Outlook Synchronization for Addresses, Activities (with the CRM module) or Tasks, Jobs, Personnel and Projects.
See also Microsoft 365 synchronization settings.
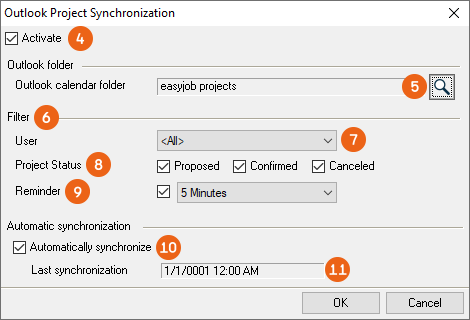
If, for example, you want to synchronize easyjob projects in your Outlook Calendar, select Outlook Project Synchronization , define the Calendar to be synchronized and use – depending on the easyjob process – different Filters to customize the synchronization. In the project, you can view for example all projects or only the ones for a certain user. Project Status and Reminder can also be selected. You can Automatically synchronize and see when the last synchronization took place.
Synchronization in easyjob processes
1. easyjob Menu Tools User Settings
2. Integration tab
3. Add
4. Select the desired Outlook Synchronization
5. Ok
6. Modify the settings as necessary
7. Ok
easyjob must be restarted to activate the settings.
Microsoft 365 synchronization settings
For the bi-directional assignment of a Microsoft Account and an easyjob Account, an easyjob address must be assigned to each user (who would like to use Sync) in the easyjob User Manager. An e-mail address must be assigned to this easyjob address that matches the corresponding Microsoft Account of the user.
The synchronization tasks are then defined once per user in the easyjob User Settings under Integration . Under Microsoft 365 check the Activate integration box. With Add you can see the possible selection of synchronization tasks .
Select M365 synchronization for Addresses, Activities (with CRM module) or Tasks, E-Mail Tracking, Jobs, Employees and Projects.
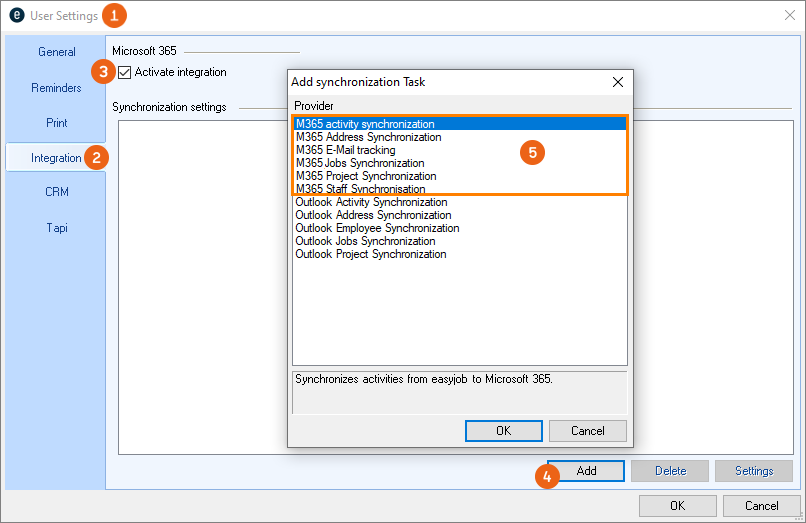
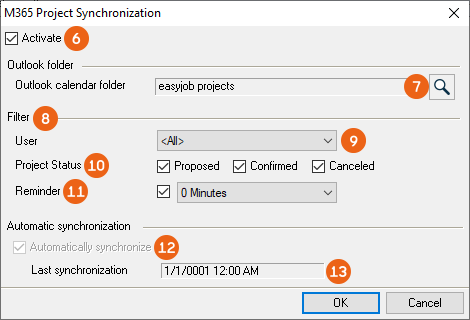
If you want to synchronize easyjob projects in your M365 calendar, select 365 Project Synchronization , define the Calendar for synchronization and use – depending on the easyjob process – different Filters to customize the synchronization. In the project, you can view for example all projects or only the ones for a certain user. Project Status and Reminder can also be selected. You can Automatically synchronize and see when the last synchronization took place.
Synchronization in easyjob processes
1. easyjob Menu Tools User Settings
2. Integration tab
3. Check Microsoft 365 Activate integration
4. Add
5. Select the desired M365-Synchronization Ok
6. Modify the settings as necessary
7. Ok
easyjob must be restarted to activate the settings.
Office Integration
To be able to use easyjob data in the various Microsoft Office programs, you can integrate easyjob Toolbars in Outlook and/or Word/Excel. Various requirements must be fulfilled to be able to use the Toolbar.
Details about Microsoft 365 Office Integration can be found in Microsoft 365 Office Integration.
Prerequirements for the Office Integration
| easyjob and MS Office installation on the same client |
|---|
| MS Office in the 32Bit installation |
| MS Office version 2010 or later |
| Active Directory Login for easyjob |
| Local administrator rights are required for set up |
For set up, run easyjob as an Administrator (right-click the easyjob symbol). Afterwards to go the program settings under Integration and under Office Integration activate the desired Toolbar .
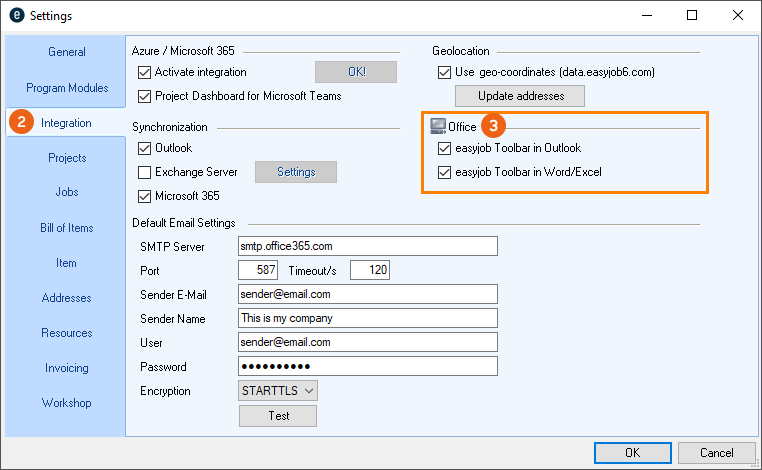
Activating Office Integration
1. Run easyjob as administrator
2. easyjob Menu Tools Settings
3. Integration tab
4. Check the desired Office Integration
5. Ok
easyjob must be restarted to activate the settings.
Information on setting up Office Integration
No content for this section.
Office Integration selection options are grayed out
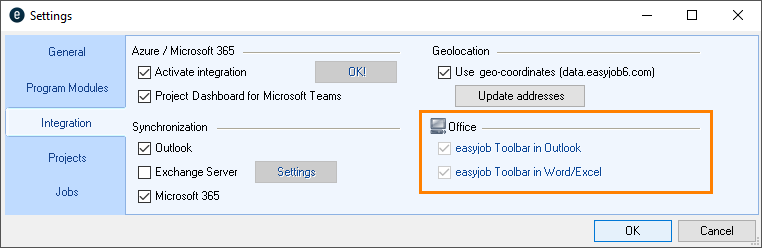
To be able to perform Office Integration, you must start easyjob as a local administrator. (Please right click on easyjob.exe from the program directory and select Run as administrator).
easyjob Toolbar is not visible in MS Office
Check in Outlook/Word/Excel in the corresponding Microsoft program under File Options Add-Ins, if the easyjob Add-in is activated.
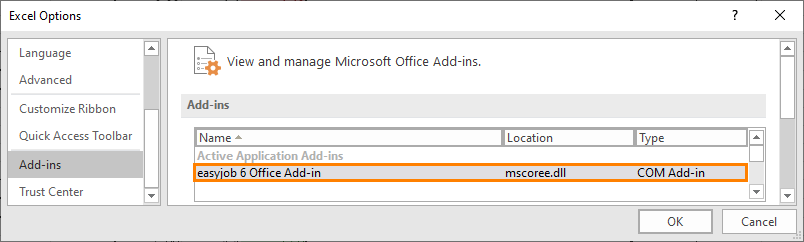
If the Add-In is not displayed , go to Manage and select COM Add-Ins and Go… . There you can activate the easyjob 6 Office Add-In .

MS Office 32 BIT installed
Check in Outlook/Word/Excel in the corresponding Microsoft program under File Account Info about Outlook/Word/Excel if MS Office 32 BIT is installed.
Microsoft 365 Office Integration
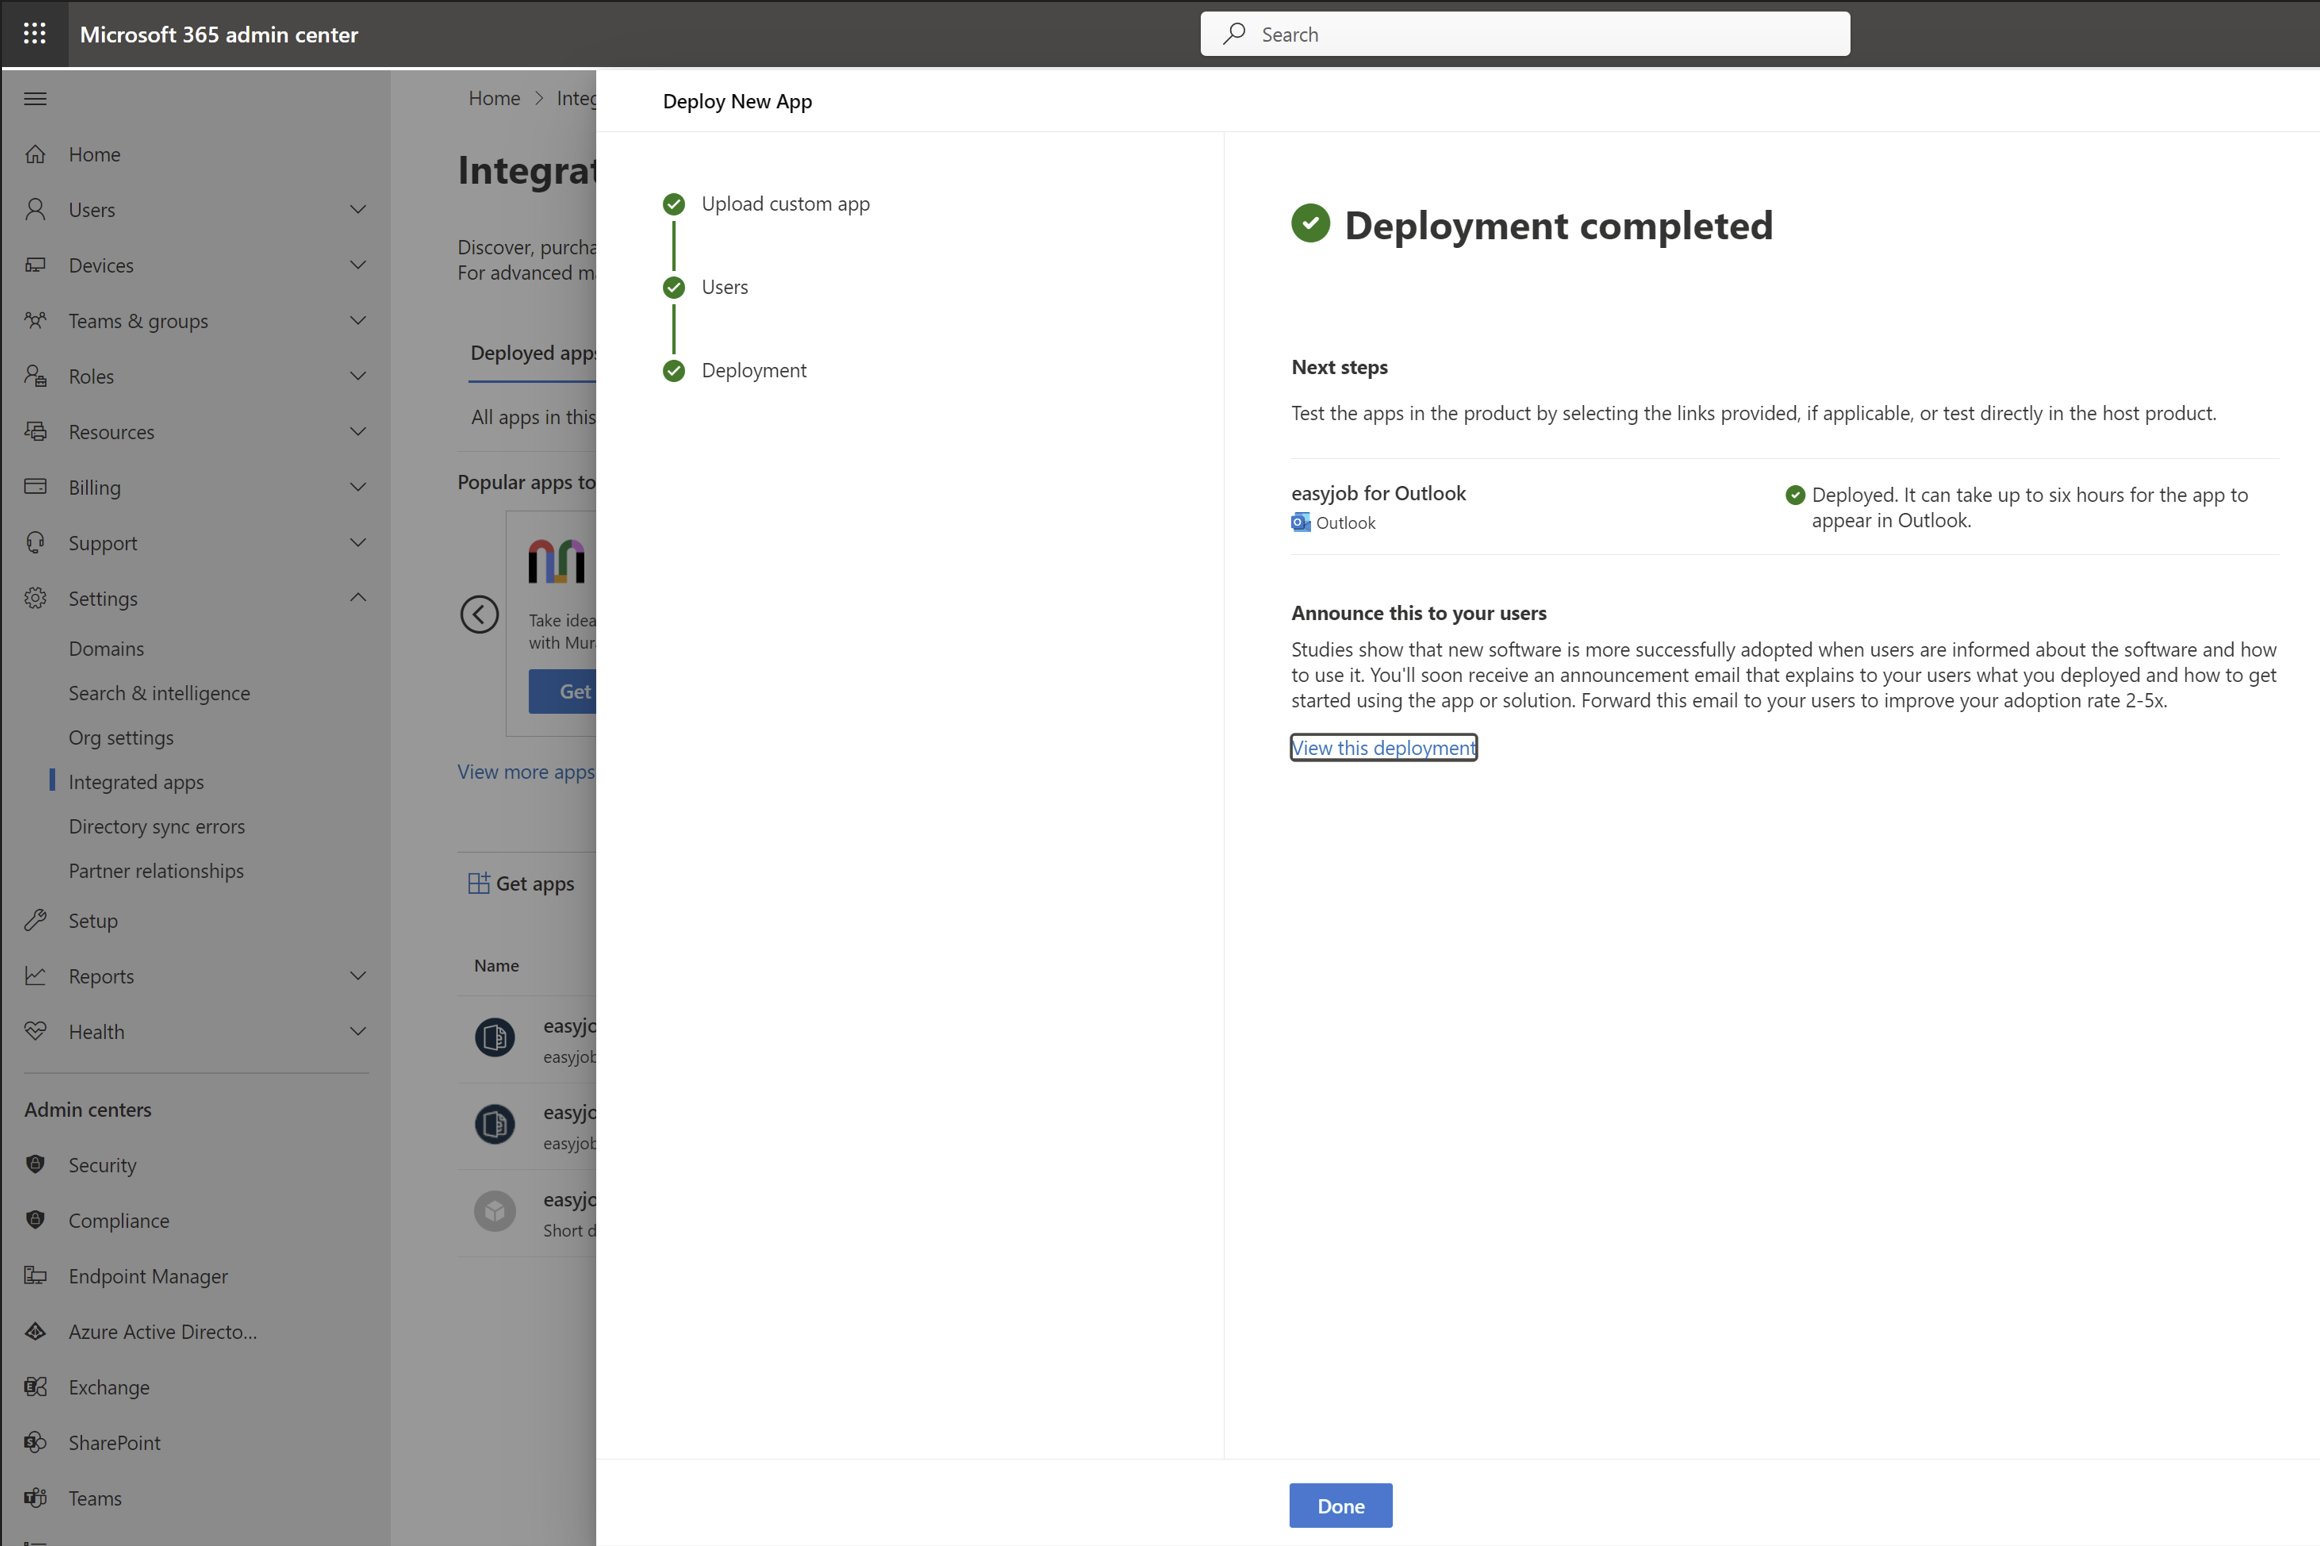
Microsoft 365 Office Integration can only be performed by an Azure Administrator. The individual steps are described below. The integration for easyjob for Office and for easyjob for Outlook must be done separately.
Preliminary information and conditions can be found under learn.Microsoft Before you begin and learn.Microsoft Microsoft 365 Requirements.
Installing a new add-in
1. Open https://admin.microsoft.com/
2. Log in as Azure Administrator
3. Show all
4. Settings Integrated apps Upload custom apps
5. Select Office Add-In for App type
6. Provide link to manifest file
7. Set the link to the manifest file
easyjob for Office: https://www.easyjob6.com/Addins/Office/Manifest%5FOffice.xml
easyjob for Outlook: https://www.easyjob6.com/Addins/Office/Manifest%5FOutlook.xml
8. Validate
9. Next
10. Select Entire organization for Assign Users
11. Next
12. Confirm permissions with Next
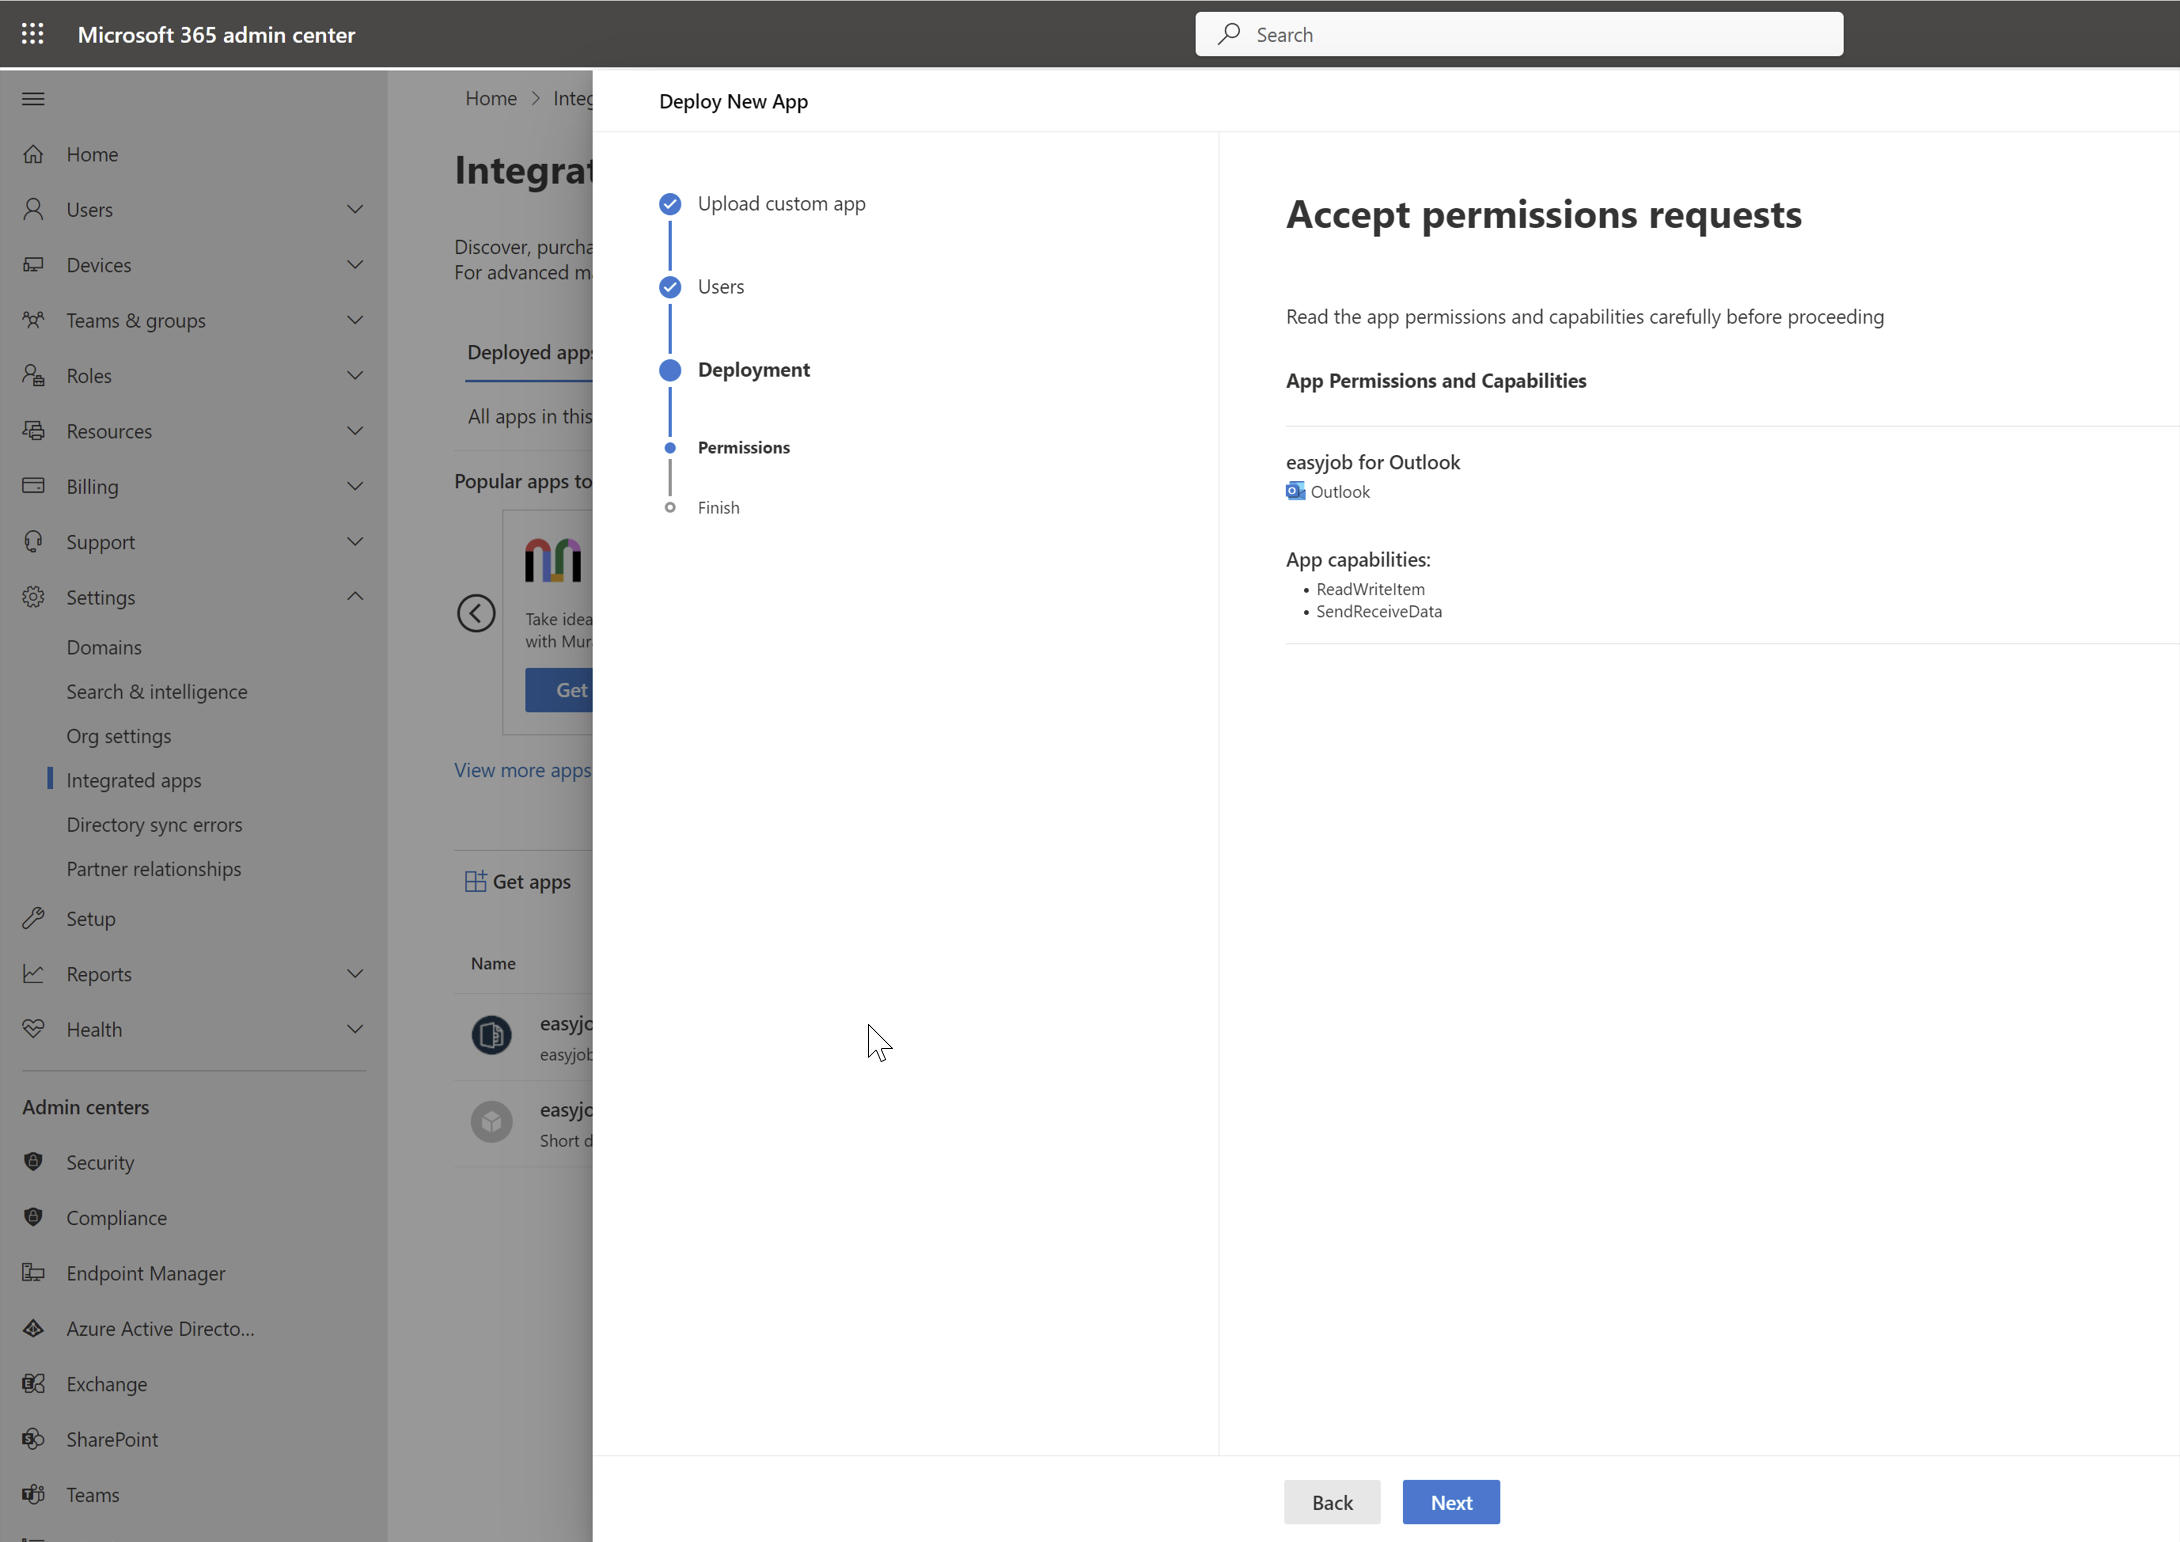
13. Finish deployment publishes the App
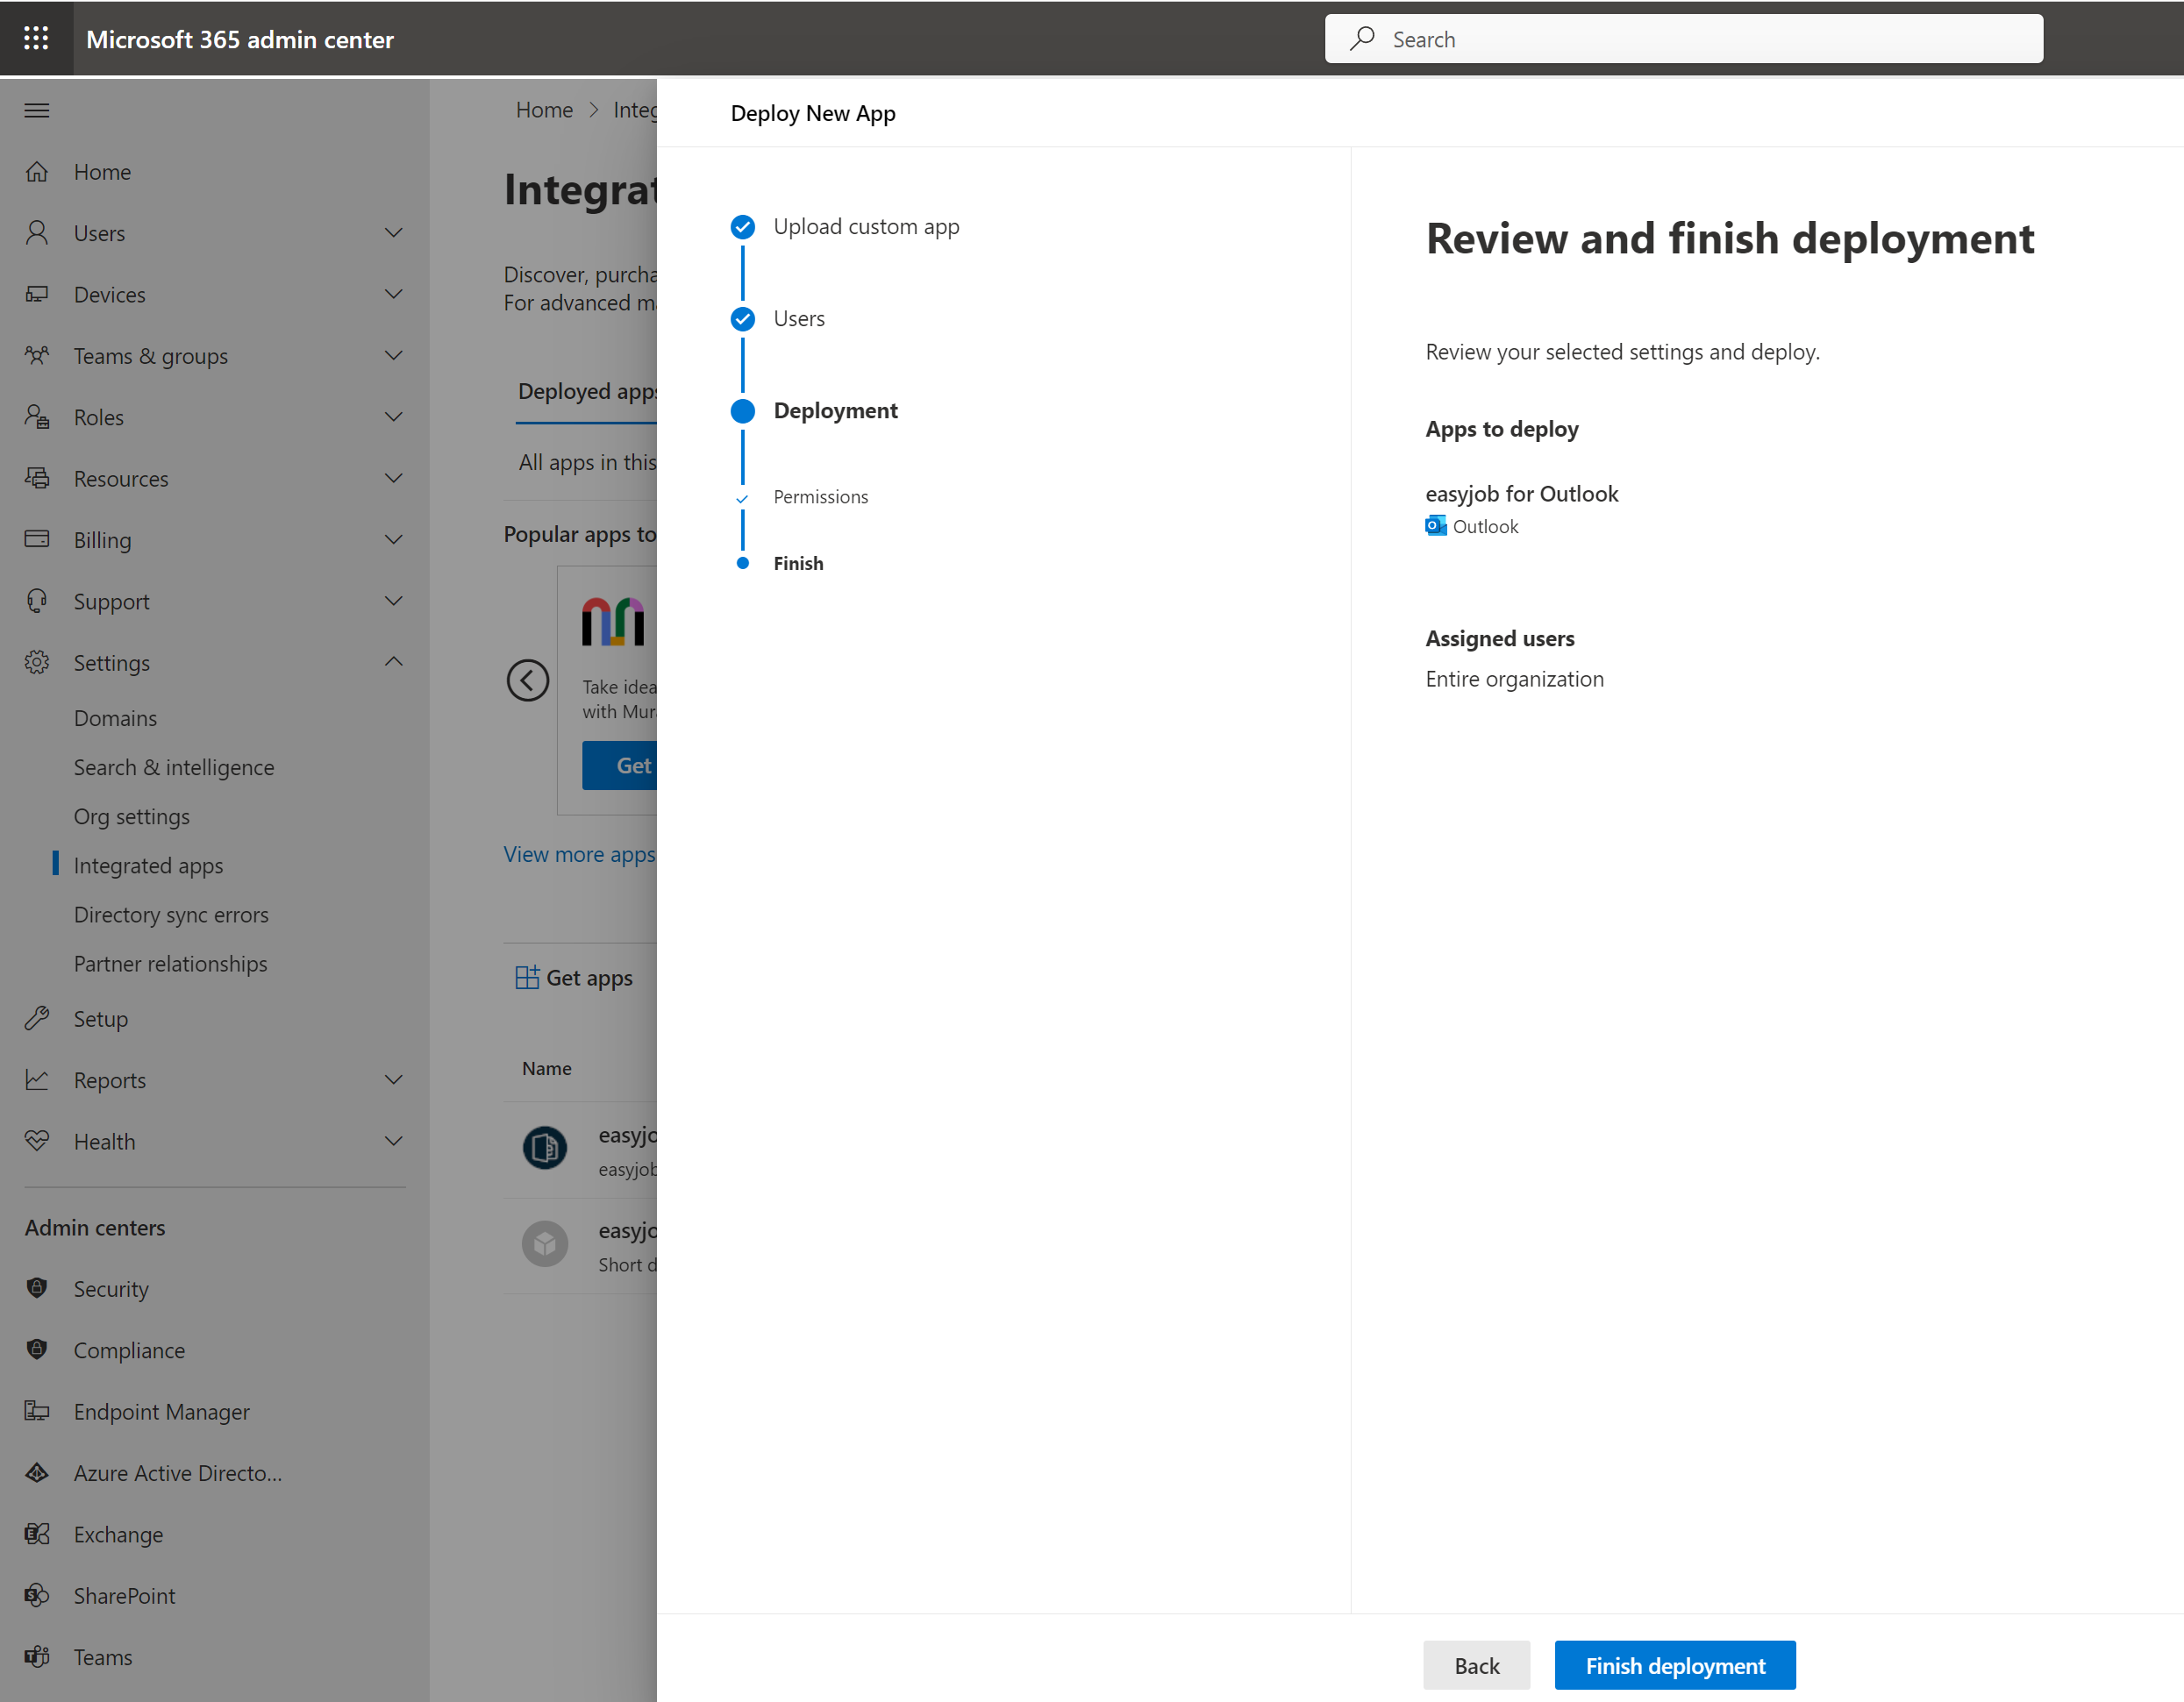

14. Deployment completed ends the Add-In Installation
Publishing an update for an existing Office Add-in
1. Open https://admin.microsoft.com/
2. Log in as Azure Administrator
3. Show all
4. Settings Integrated apps
5. Select an Add-In to be updated
6. Update add-in and continue as described in chapter Installing a new add-in in point 7.

-
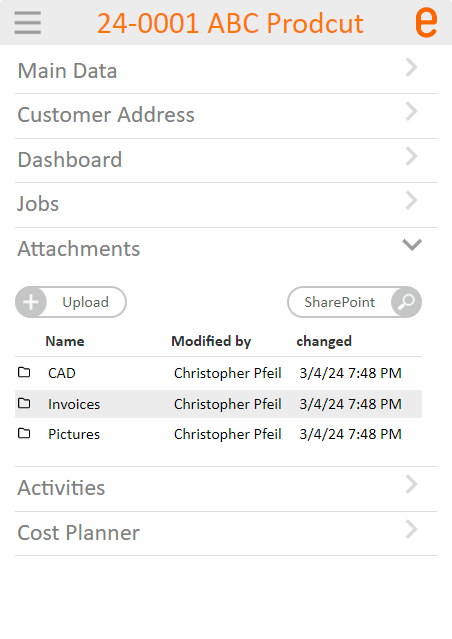
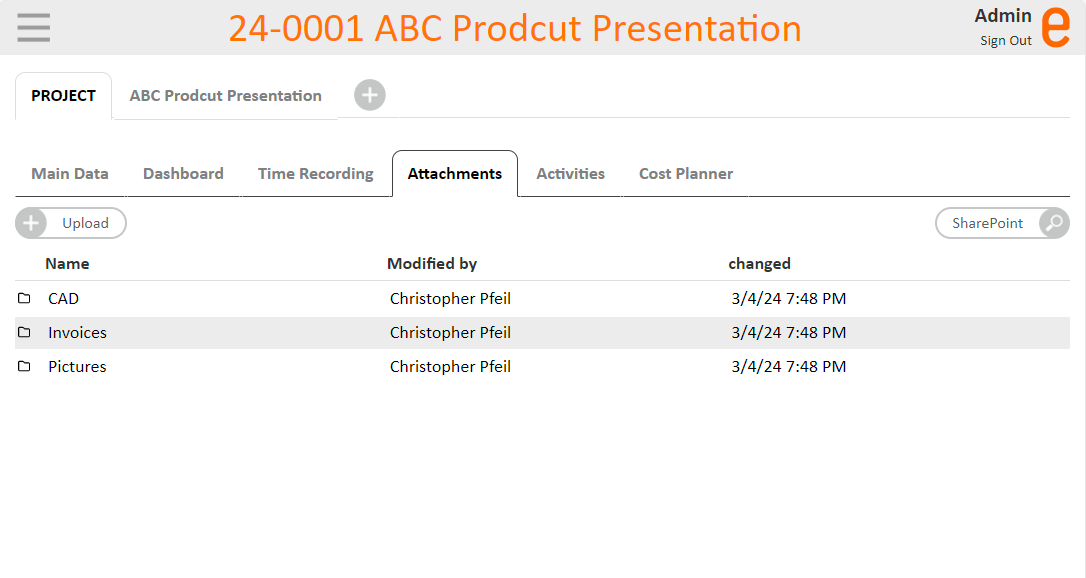
Document storage in SharePoint libraries
As an alterative to storing documents in SMB folders, document attachments can also be stored in SharePoint Libraries.
The SharePoint Document Library replaces the easyjob file attachments in the Windows application, in the web browser as well as in easyjob iOS and Android App.
The advantages of SharePoint Integration include:
- A storage location for documents for different Tools such as Microsoft Teams, Outlook, OneDrive etc.
- Access from different operating systems
- Management of subfolders in projects
- Control of access rights (via workflow)
- Offline provision of documents via OneDrive
- easyjob can still access a folder in a library to change its name
In the easyjob Windows application, instead of a list of the linked documents, the web browser shows the SharePoint content of the respective folder.
For security reasons, Microsoft has somewhat limited the connection of the SharePoint page in web applications.
For this reason, the WebApp and the easyjob iOS and Android App display a simple list of the folder content.
The SharePoint page is shown on a new tab in the Brower via the SharePoint link.
The corresponding folder structure can be created in every library via a selection of various folder creation guidelines. In addition, it is possible to use the Workflow Engine to create the respective folder structure and to assign access rights to the respective subfolder.
In the previous folder structure, documents marked as confidential (document type) lose this marking when integrated into SharePoint (also the easyjob user right no longer applies). The rights for this type of document must then be assigned accordingly in the Sharepoint.
The integration can take place in mixed mode. The storage location can be configured individually for each type of attachment. In addition, for example, attachments for older projects can still be managed in SMB folders and stored in a SharePoint for newly created projects.
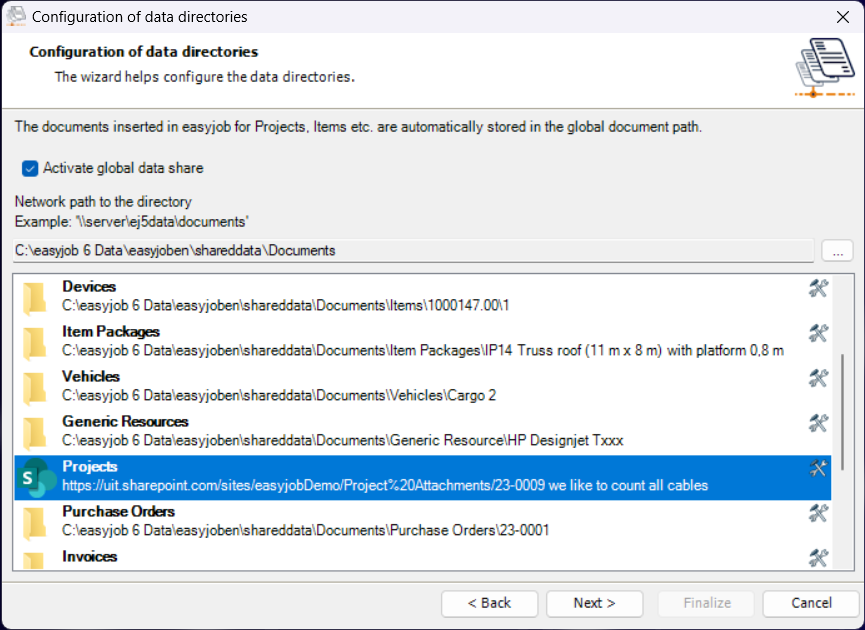
Unique object references to the respective folder are stored in the background in the easyjob database. This maintains the link also after renaming a folder or moving it within a library.
Interaction with Microsoft Teams
A Microsoft Teams Project or a Channel can be created for each easyjob project. More information can be found in chapter Microsoft Teams .
To avoid the duplicate storage of files in Microsoft Teams Projects and SharePoint folders, when creating a Microsoft Teams Project or Channel the files are moved automatically to the standard project folder.
Interaction with OneDrive
If a file from the Windows App is opened from the SharePoint Library, the application first checks if the file is available via OneDrive. If it is available, the file is opened from the OneDrive folder.
This offers the advantage that the file does not need to be downloaded and then uploaded back to the library after any editing.
Interaction with the Remote Session Enhancer (RSE)
The SharePoint Integration also interacts with the Remote Session Enhancer. More information about the Remote Session Enhancer can be found in Chapter Remote Session Enhancer (RSE).
This means that the files files are not added or opened on the server, rather on the client.
The Remote Session Enhancer Client also checks if a file is available via OneDrive on the client and then opens the file via the OneDrive folder.
Technical requirements
As a technical requirement, Office 365 Integration must be activated and the respective user must be authorized. More information can be found in the chapter Microsoft 365.
In addition to the respective users, also the automatically registered easyjob Azure App must have access to the respective SharePoint folder. This is necessary to ensure that file accesses also function if a user is not authorized. This can happen, for example, if the barcode scanner or the easyjob item info page needs access.
Influence SharePoint storage with List&Label
With List&Label, the SharePoint storage of documents can be influenced via the SetDMSParameter function.
The Document Type property is controlled in SharePoint with the "DocumentType" parameter name. You can transfer as many documents types as required separated by commas.
The Filename parameter name controls the file names when they are saved. The corresponding subfolders are addressed with a backslash in the value.