easyjob Room Planner
Documentation
Room Planner
The easyjob Room Planner (RP) makes it possible for you to indicate, the specific requirements of your location with different spaces (divisible multi-purpose rooms or multipurpose halls with different standard equipment), to create, plan and calculate them with details (dimensions, types of use, etc.) It is also possible to define different room configurations (e.g. different seat arrangement and technical equipment) as well as enter different use times (e.g. setup, rehearsal, event, strike) for the rooms. You can see room availability at a glance graphically in order to avoid overbookings and to make best utilization of your rooms. You can directly invoice the room after the event.
Installation and activation
Go to the easyjob program settings to activate the easyjob Room Planner module: A separate installation is not required.
Activating the Room Planner module
1. easyjob Menu Tools Settings
2. Functions tab
3. Select room planning
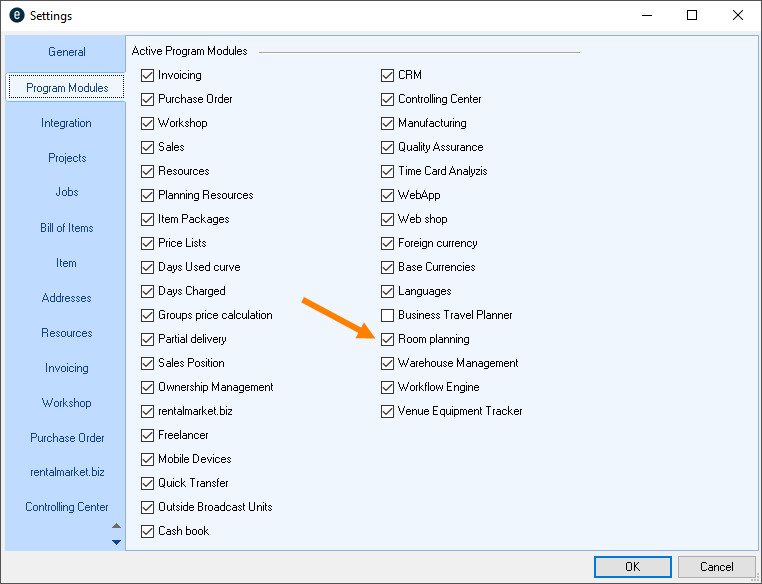
4. Ok
easyjob must be restarted to activate the settings.
Configuration and settings
No content for this section.
User settings
The rights for creating and editing the master data for Room Planning out are defined in the user settings.
Assigning the user rights for Master Data
1. easyjob Menu Tools Manage Users
2. Select a user
3. Edit
4. Access Rights tab
5. Projects/Jobs - Rooms
6. Assign the desired rights
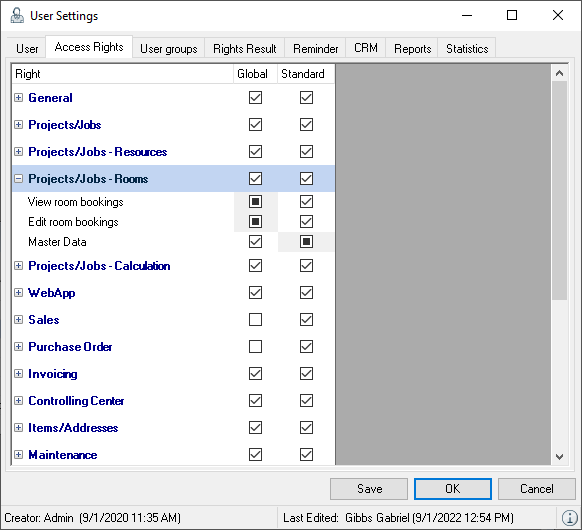
7. Save
8. Ok
Defining custom fields
In the program settings, you can use two additional custom fields for the room master data and for the room booking . You can name the title and content to meet your needs and output the information in different reports (Proposed, Information for technicians, etc.).
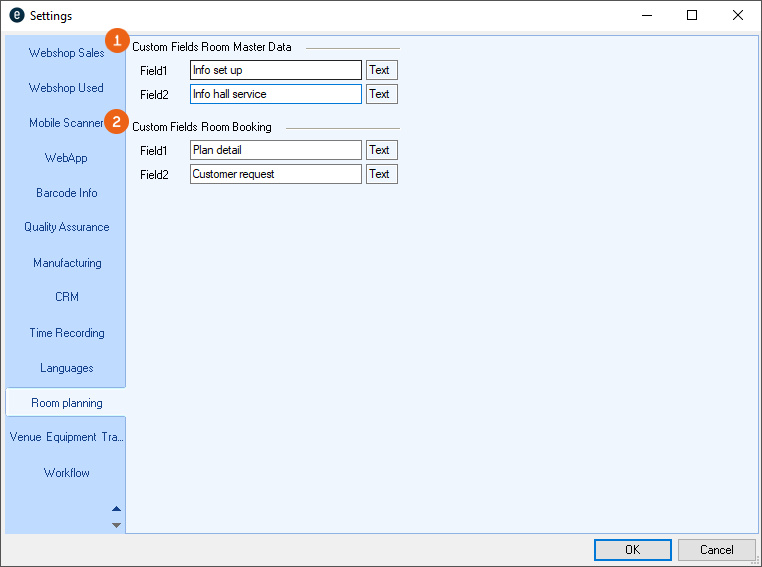
Defining custom fields
1. easyjob Menu Tools Settings
2. Room planning
3. Enter the desired title for the fields
4. Ok
easyjob must be restarted to activate the settings.
Defining rooms
In the first step, create your rooms in the easyjob master data. First define the smallest unit of your hall with all the related properties.
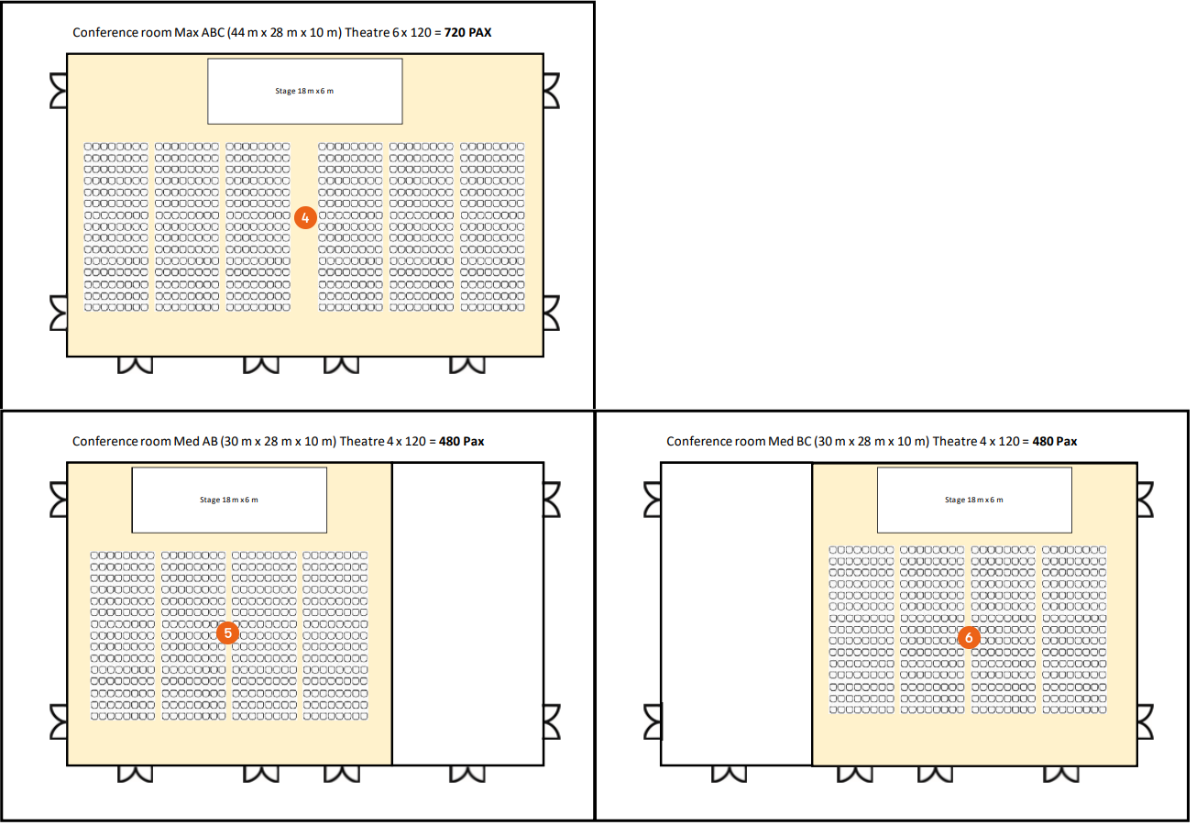
For a better understanding, the following example uses a hall that can be used completely as a 3/3 hall (Max ABC) , as a 2/3 hall (Med AB or Med BC ) or as a 1/3 hall (A , B or C ). Each hall size has different seating arrangements, e.g. empty , row seating (RB) , row seating with tables (AT) or seating around round tables (banquet) .
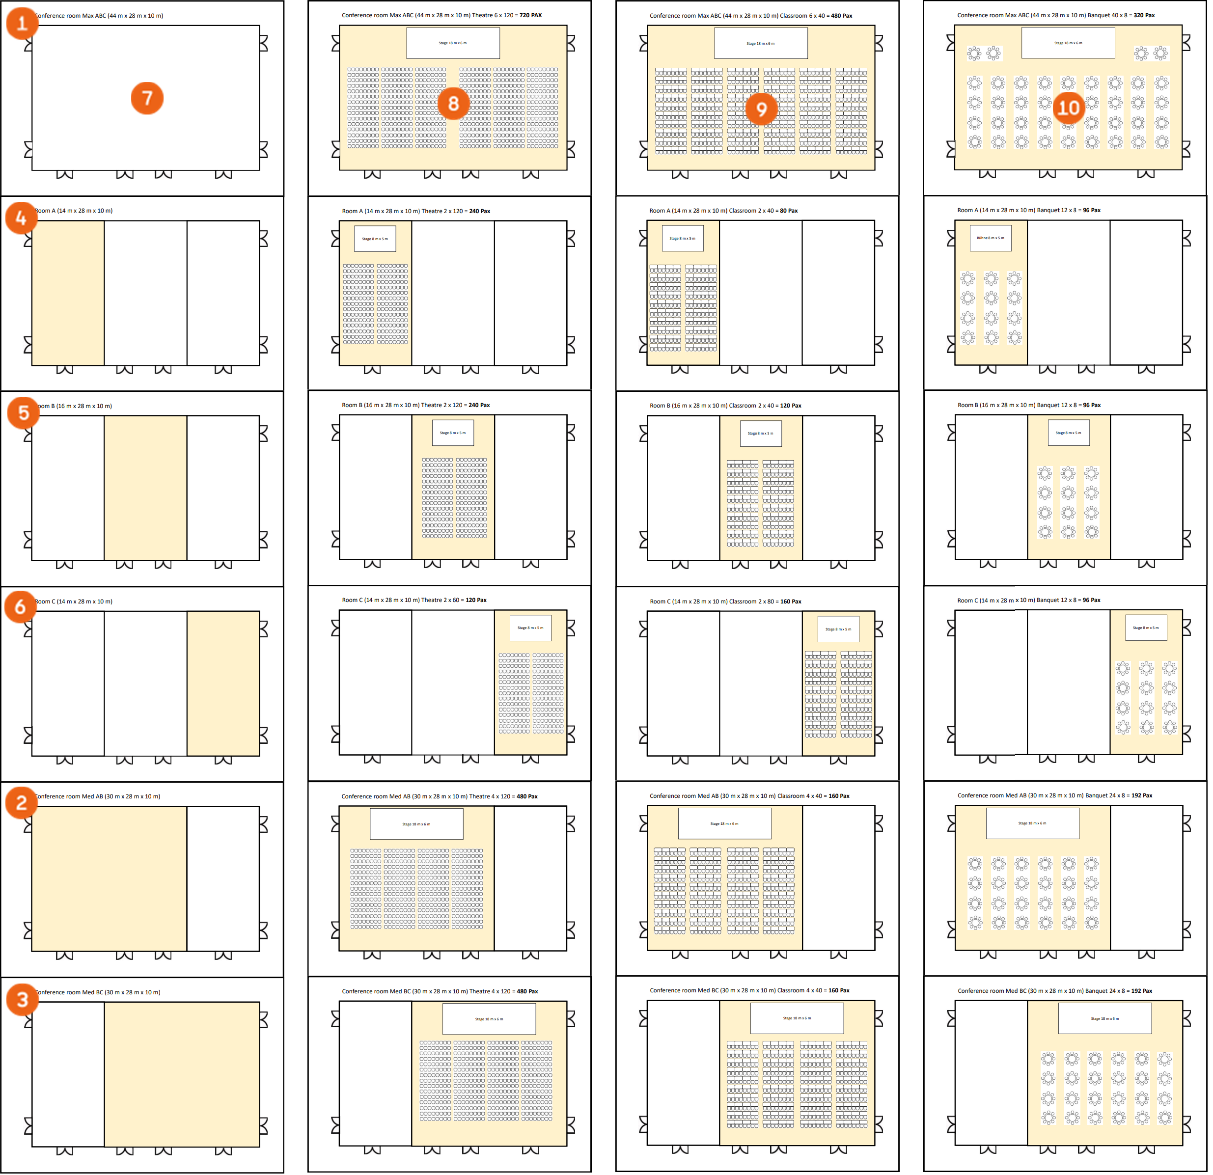
Creating room master data
1. easyjob Menu Master Data Rooms
2. Add
3. Enter the desired data as described below
4. Save
5. Ok
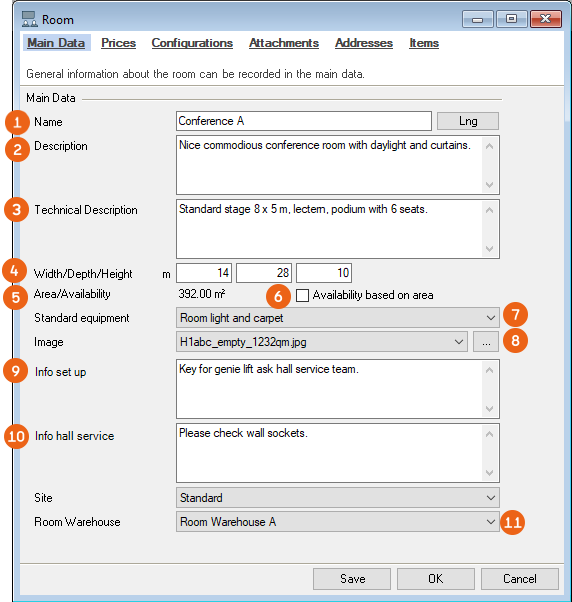
Main Data
In the master data, you can first enter a Name , a general Description and a technical Description . easyjob uses the Dimensions to automatically calculate the Area . With Availability based on area checked, you specificy the basis for the availability calculation. You can assign standard equipment to the room. Standard equipment is an item package and can be created as required in the master data. In addition to an image or a plan, there are also two text fields you can use to describe the title and content. For information on how to change the title, refer to Defining custom fields. With Room Warehouse you define the items that are stored in the room. See also Creating and managing the room warehouse.
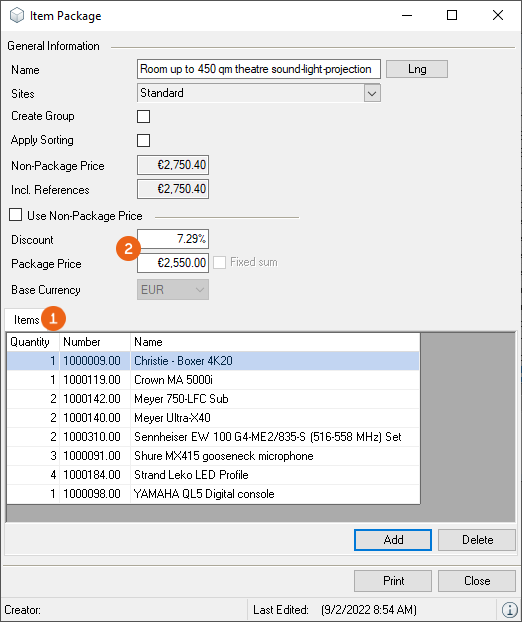
Creating and managing standard equipment as an item package
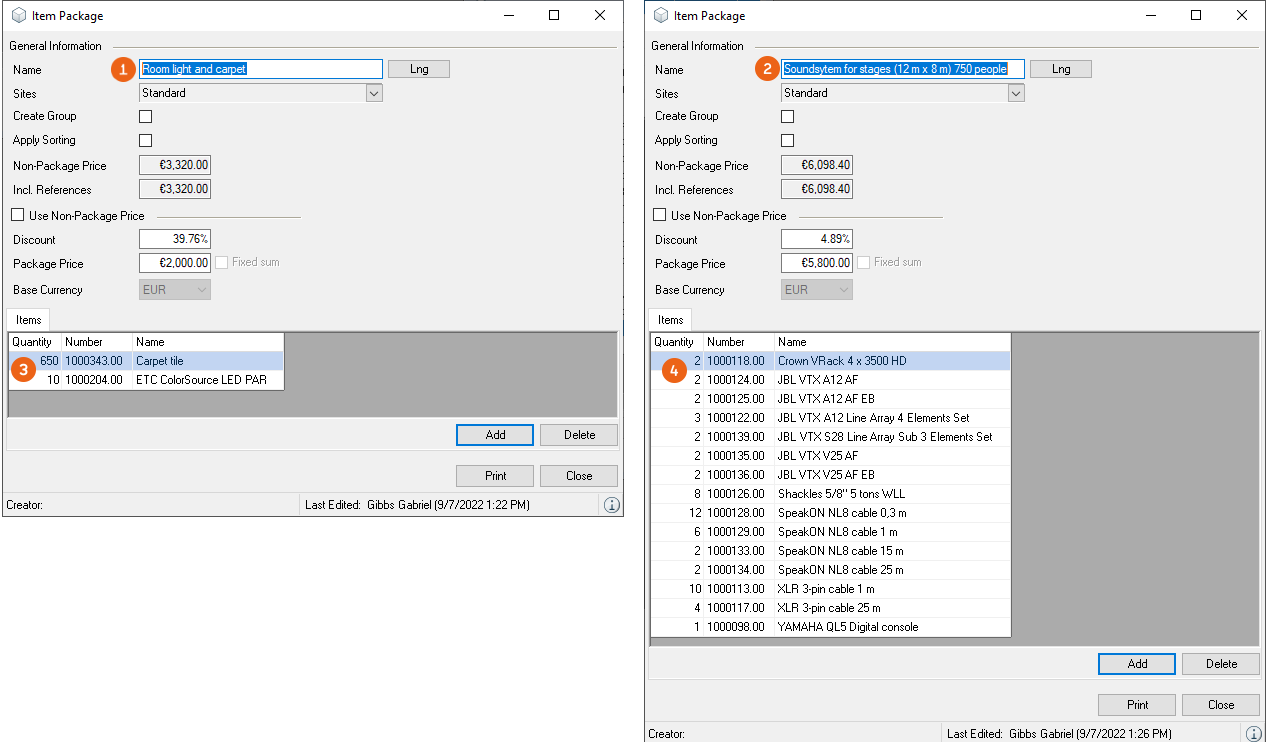
An item package is a group of different items . If you book a room with standard equipment assigned to the job, the stored item package is automatically booked in the job's bill of items as an item package. You can define a fixed price for the item package.
Creating and managing item packages
1. easyjob Menu Master Data Item Packages
2. Select an item package with Edit or create a new one with Add
3. Enter a name for the item package
4. Book the desired item with Add.
5. Close
Each item package is identified with a clear name.
You can add as many items to an item package as you like. Associated items are automatically considered when booking and do not need to be added separately.
We recommend first creating the room's standard equipment as empty (e.g. only with minimum equipment such as hall lights or carpet tiles) and entering a base price. You can then add additional set ups and different seating arrangements, equipment, stages, etc. in the Configuration with item packages and markups.
Prices
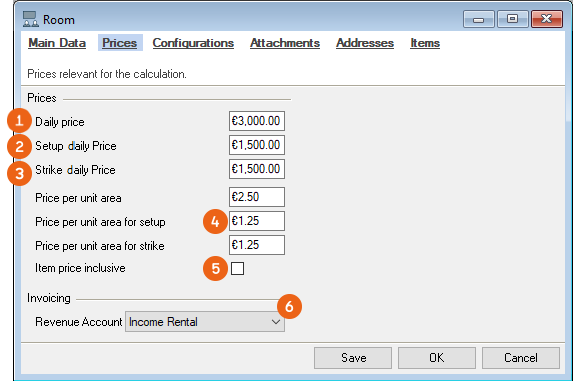
For the room, you can enter a Daily price as well a daily price for Setup and Strike . If you want to rent your booms based on an area unit , enter that price. By checking the Item price included box, all items booked in the item package of the standard equipment in the bill of items will be discounted 100 %. You can select a revenue account for invoicing.
Room divisions
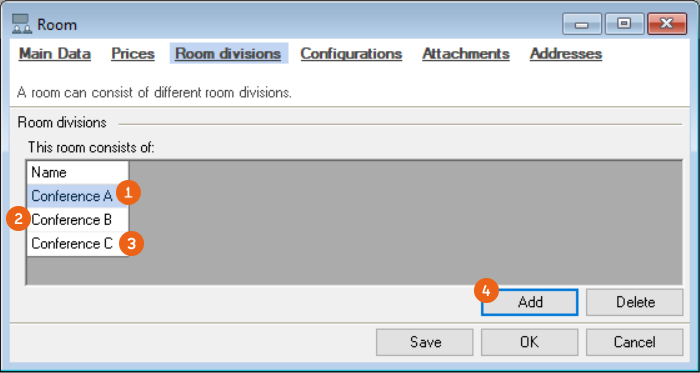
When you have created all rooms in the hall, which in our example are rooms A, B and C, create a new room with a name, such as Conference Max ABC or Total hall and assign the smallest units to this room under room divisions, using Add . See also Configuration.
Configuration
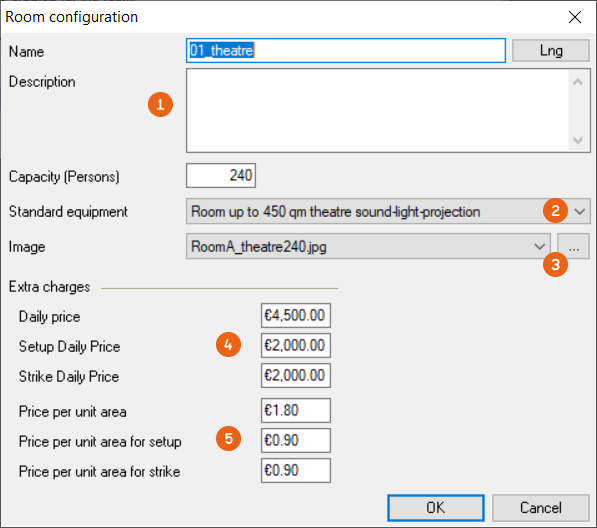
Under room configuration, define all the variants with which you want to rent your room. The overview shows you the Name and Capacity (number of persons) of the room with the various variants (e.g. seating). Add further details using Edit or Add . If you want your variants to always be displayed in the same order, number them.
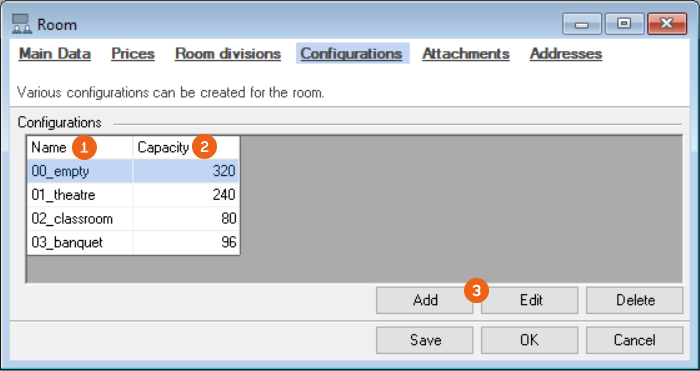
With Add or Edit you can define not only the name, description and capacity but also what the standard equipment should include for this rental variant (e.g. row seating with stage, sound, light and projection equipment). A Plan or Image can also be entered. Depending on if you are charging rent based on the Room or the Area , define the markups for the respective configurations.
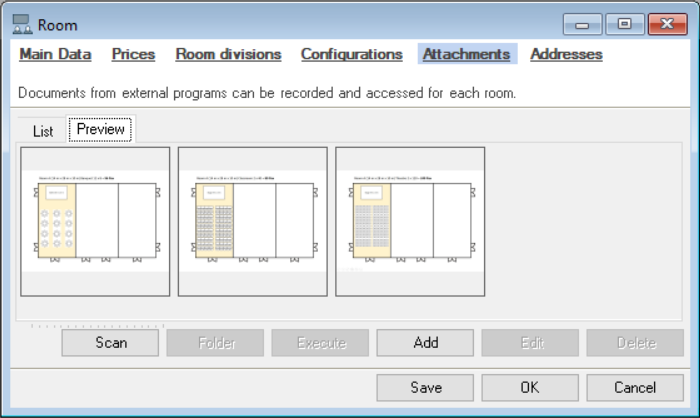
Attachments
All documents added as an image or plan are displayed here in a list and as a preview. You can add additional information (e.g. hall arrangement, building plan, etc. as usual.
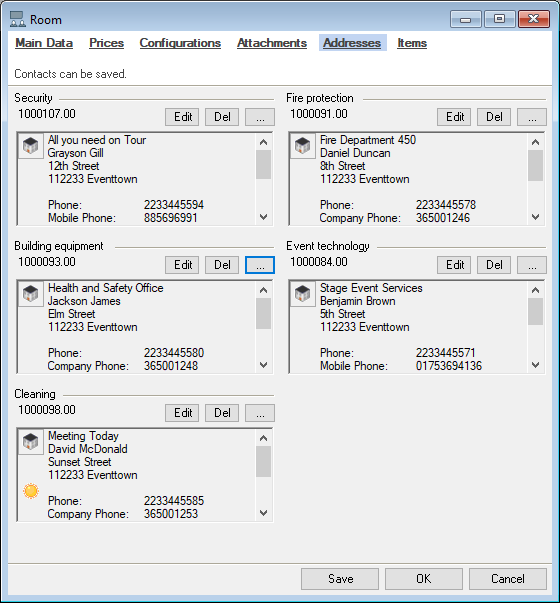
Addresses
You can assign the addresses and contacts you need in the room for each room.
Creating and managing the room warehouse
Please note that the room warehouses are warehouse locations in addition to your standard warehouse and each room warehouse requires a fee-based activation. If interested, please contact our Support.
In a room warehouse, you can store Items and Devices that belong fixed to this specific room by means of an inventory transfer. Room warehouses are handled like separate Sites where items are stored and can be transferred from the main warehouse to the room warehouse. The room warehouse must first be created.
Creating a room warehouse
1. easyjob Menu Master Data Site Management
2. Add
3. Enter a Name (e.g. room warehouse A)
4. Enter the desired data such as Initials, Addresses, etc.
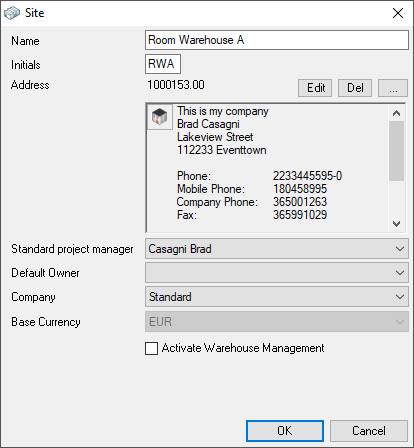
5. Save
6. Ok
Then assign the room warehouse to the room.
Assigning a room warehouse to a room
1. easyjob Menu Master Data Rooms
2. Select a Room Edit
3. Select the desired room warehouse
4. Save
Then transfer the desired items to the room warehouse.
Transferring items to a room warehouse
1. easyjob Menu Master Data Rooms
2. Select a Room Edit
3. Items
4. Transfer
5. Select the required items
6. Enter the quantity and if required additional details (e.g. device)
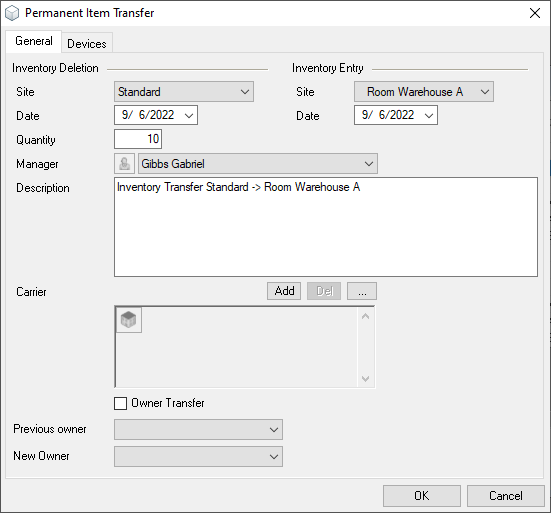
7. Ok
You can transfer items away from a room warehouse by suitably adjusting the Inventory Deletion and Inventory Entry Site.
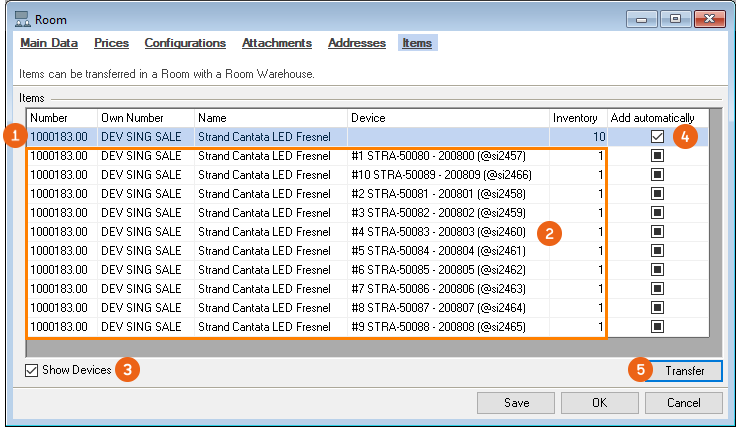
Items
The view shows the items contained in the assigned room warehouse. You can control the view of the devices with Show Devices . By checking the Add automatically box the items of the room warehouse are added automatically to the bill of materials when the room is booked. If you have assigned a room warehouse to a room, you can transfer items (or devices) to the site of this room warehouse (see also Creating and managing the room warehouse).
Combining rooms
After you have created all the small units for a hall of a large room (in our example A,B and C), you can assign the individual rooms to a larger room.
In addition to the individual rooms A, B and C, you can now create the rooms Max ABC , Conference Med AB and Conference Med BC in the master data.
Creating room master data
1. easyjob Menu Master Data Rooms
2. Add
3. Enter a name (e.g. Conference Room Max)
4. Enter the desired data as described starting from Main Data.
5. Save
6. Ok
The room master data summary displays the Conference Room Max with divisions A, B and C.
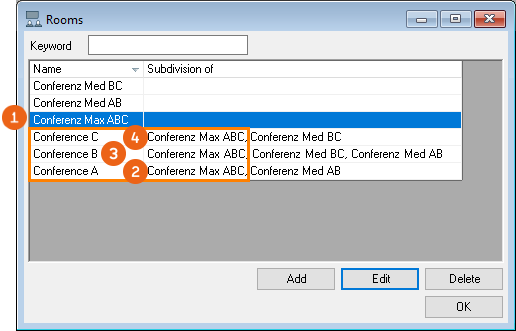
If you book a combined room (e.g Conference Max ABC), only the properties for the combined room (price, text fields, plans, etc.) will be applied, and not those for the divided rooms (e.g. Room A, B and C), as the conference room Max ABC is handled as a separate unit with its own standard equipment and configuration.
Room use types
In addition to the rooms, you can enter as many types of room uses in the master data as you wish.
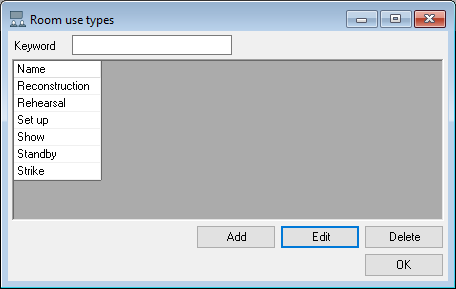
Creating room use types in the Master Data:
1. easyjob Menu Master Data Room use types
2. Add
3. Enter the desired name
4. Define a color
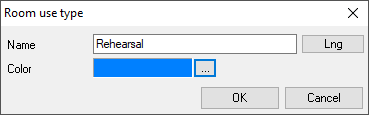
5. Ok
Room booking in the project
As soon as you have defined your rooms in the master data, you can use them in a project or in individual jobs.
Opening a project:
1. easyjob Menu Projects
2. Create project or Edit project
3. Rooms tab
Under Project , an overview of all booked Rooms , their Configurations and Room use type is displayed. You can customize the Usage times , Edit or Delete rooms .
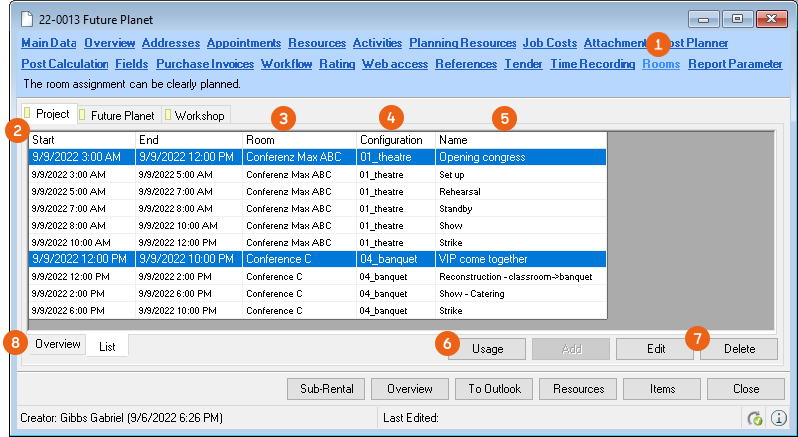
A graphical overview with details about use and availability is also available.
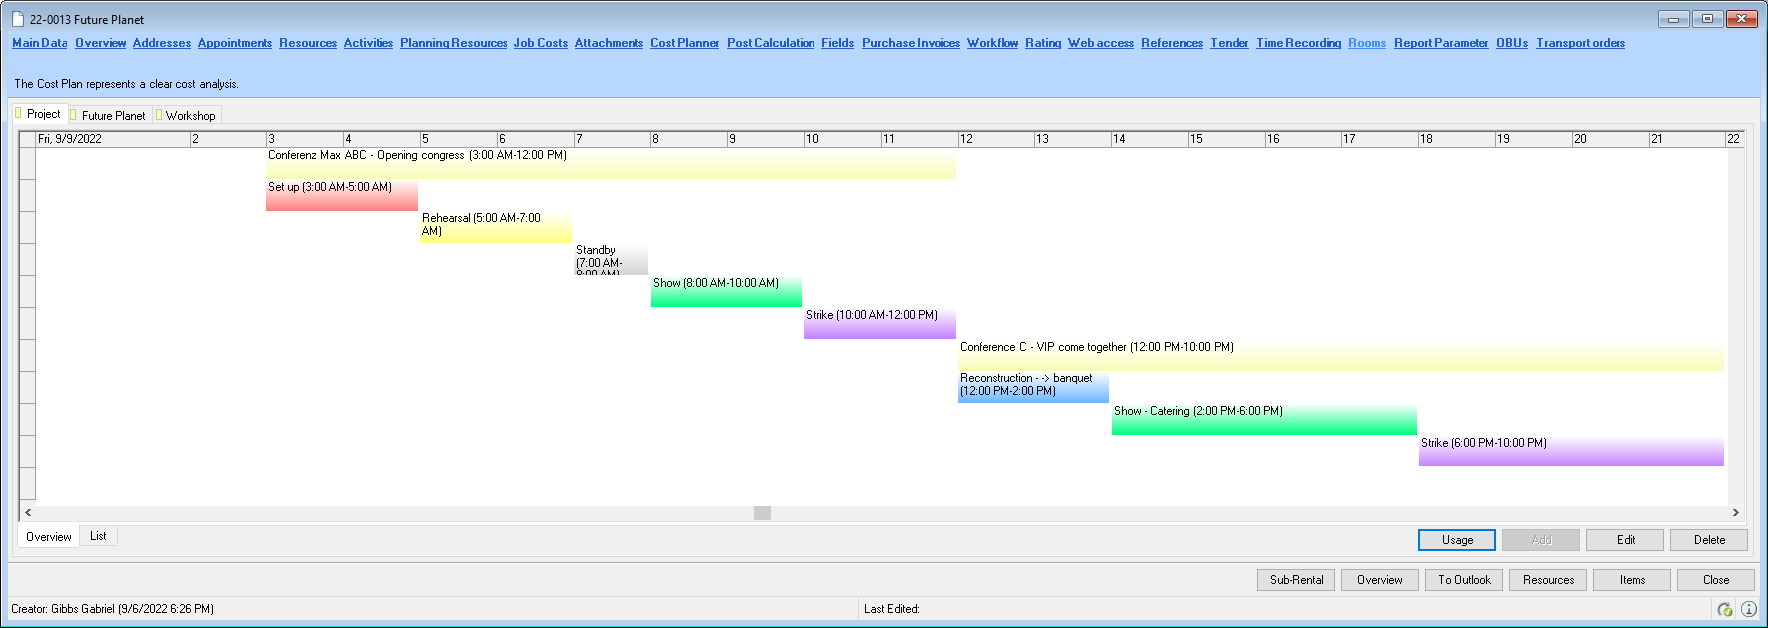
This overview is also available on the job level.
Booking rooms in a job
Booking rooms in a job:
1. easyjob Menu View Jobs
2. Select job
3. Rooms tab
4. Add
General
To book the desired room for a job, select the Room and the Configuration . Enter a Name and a Comment if necessary. You can rename the two free text fields, named Plan note and Customer request in the program settings Defining custom fields. Based on the Period easyjob converts hours into days , which can be used for the calculation . Alternatively, you can use the days from the Job period or enter them manually . You can also enter the number of People .
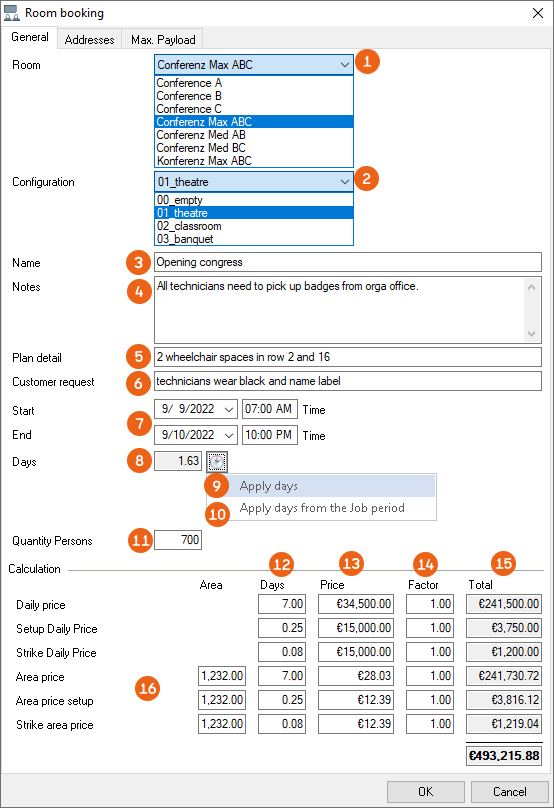
The calculation results in the Price based on the daily price of the room plus any entered markup for the respective configuration (also for the Set up and Strike daily price). With the Factor you can enter additional discounts or markups. Day x Price x Factor results in the Total price . Alternatively you can make the calculation based on the Area .
Addresses
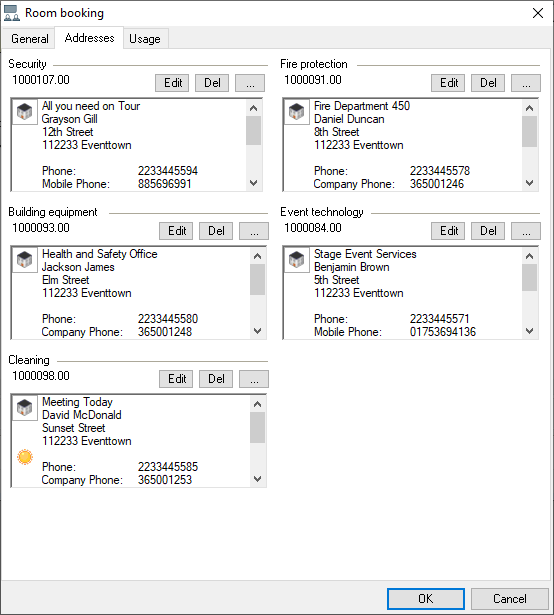
When booking the room, you can enter all the addresses related to this room on the Addresses tab.
Use
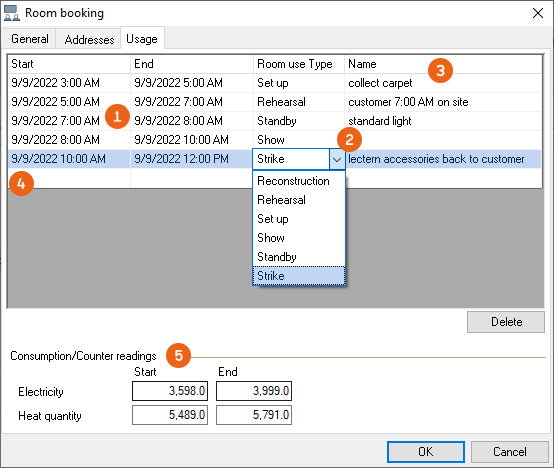
You can enter detailed Times that only concern this room on the Use tab. In addition to the Use type you can also enter a Comment . Click the empty line to add new lines. In addition you can record the consumption and the counter readings for electricity and heat.
All fields used for the room booking and in the room master data can be displayed as required in a report (e.g. as an equipment form, room information, time plan. etc.). If you require support for report design, please contact our Support.
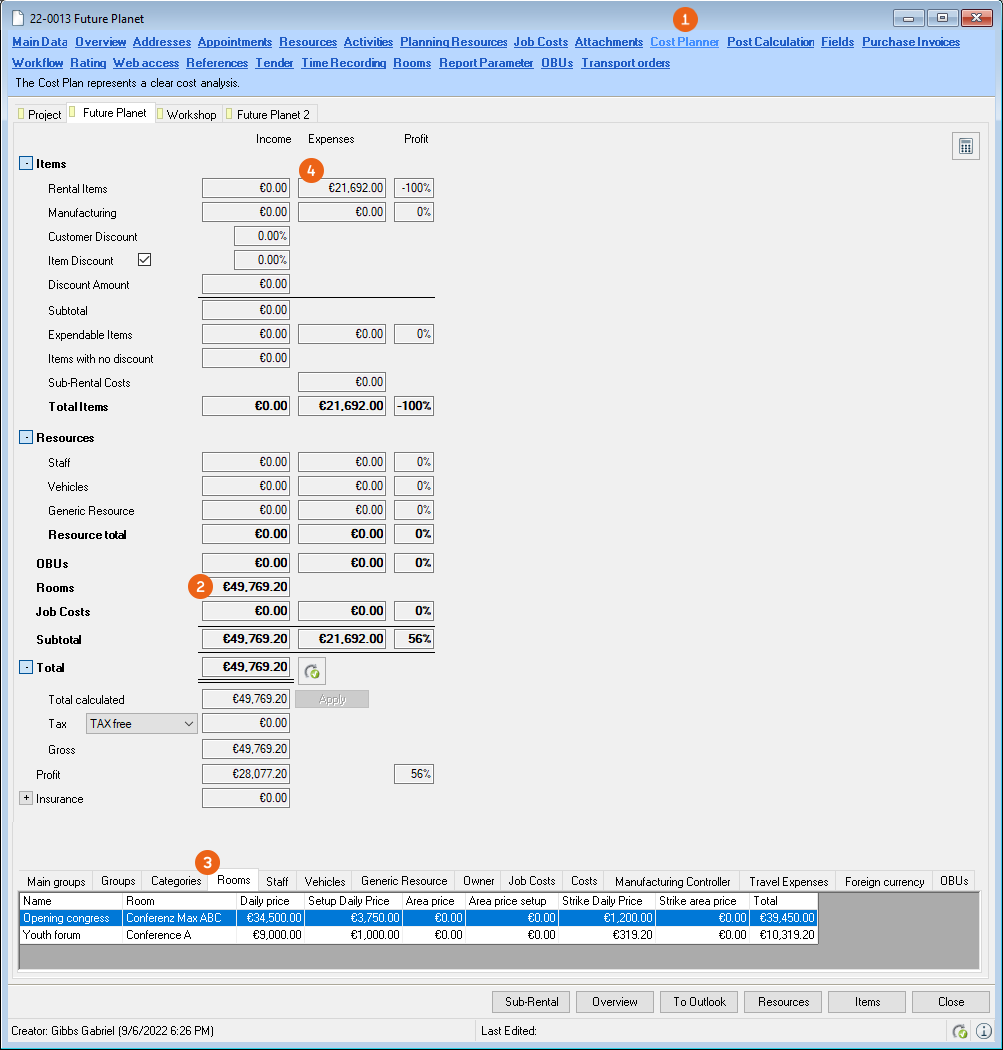
Rooms in the Cost Planner
In the Cost Planner the prices for Rooms are summarized separately. The overview also shows how the prices are distributed over the individual rooms, daily price, set up, strike or area price. If you defined an item price as all inclusive, the items are discounted 100 % and the income for the rental items is € 0.00. See also Prices.
Rooms in the Bill of Items
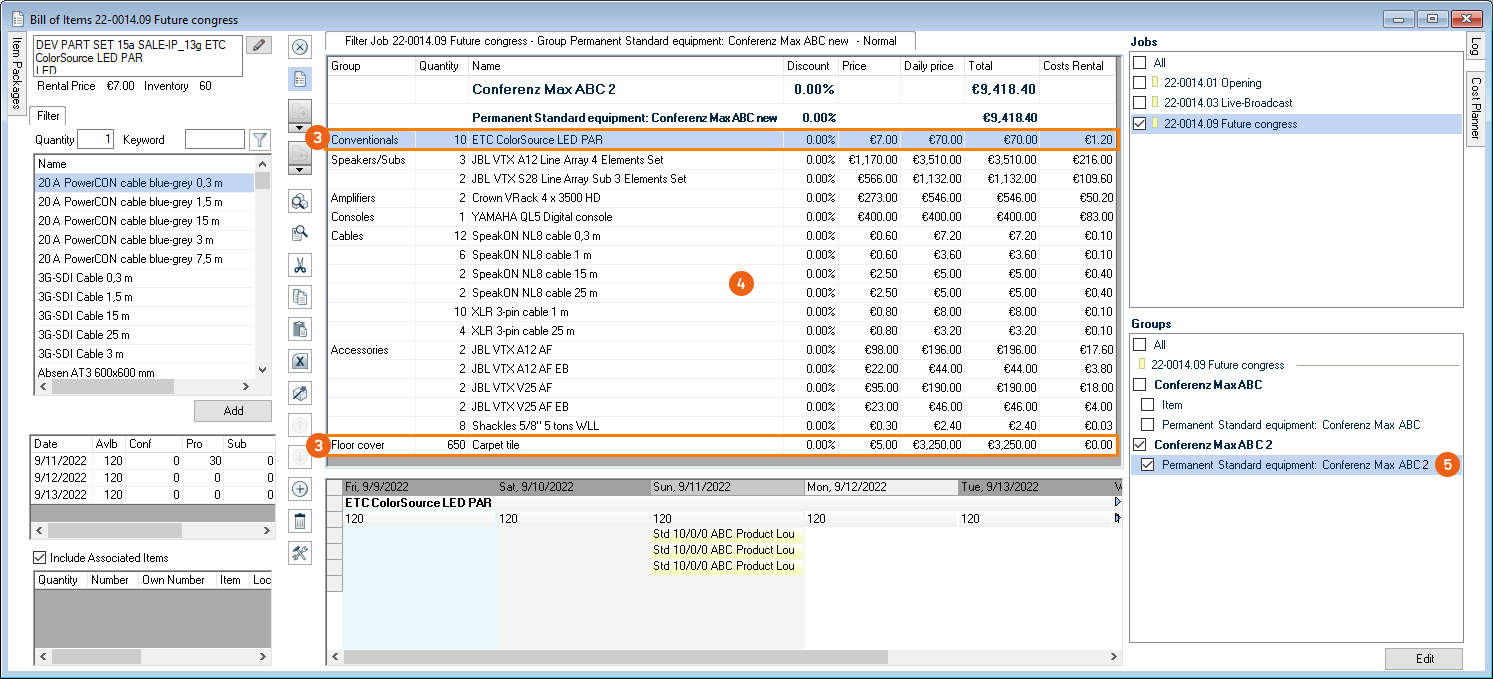
The standard equipment for a selected room (e.g. for Conference Max ABC Ceiling light and carpet tile room item package ) and the standard equipment for the selected configuration RB (e.g. item package Sound-Light-Projection ) is automatically booked when booking a room under the standard equipment item package: Conference Max ABC . If this room is used frequently for a job, it is numbered accordingly (in the example, standard equipment for Conference Max ABC 2).
The items from both item packages are summarized in the bill of items in a group as standard equipment . The Items are sorted in order by sub category.
Room plan
The room plan summarizes the occupancy of all rooms and their use times. You can select the Period of the view. In addition you can Display times , Display use , filter according to Job status , adapt the Display Options of the Room booking and Room use and show/hide the desired rooms . If a room (e.g. conference room Max ABC) is booked that contains multiple rooms, all concerned rooms are marked as Taken and the rooms that are also taken mandatorily are displayed with an asterisk before the job name . If the room is booked twice, an Overbooking warning appears. A context menumakes it possible to change the overbooked room or perform other actions.
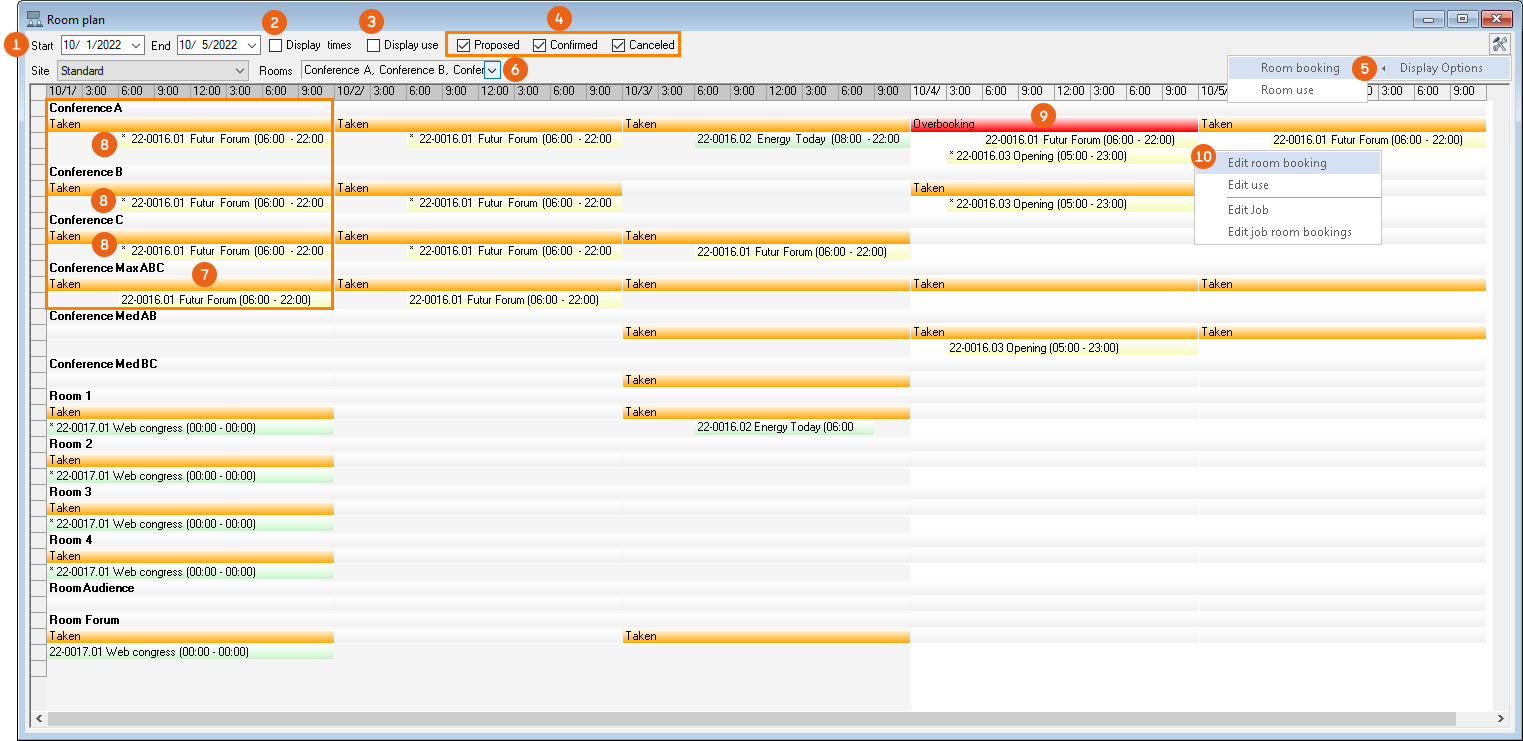
Opening a room plan
1. easyjob Menu View Room plan
Room plan in the WebApp
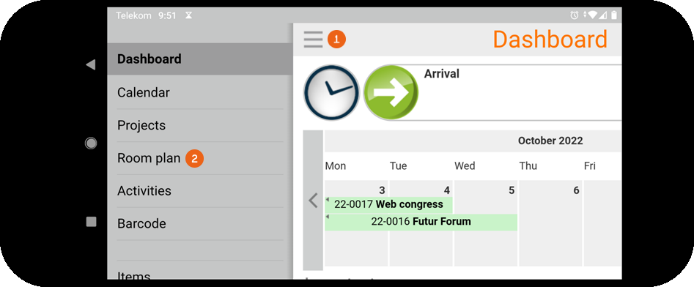
If you are on the road and want to take a quick look at the current room plan and the booking, you can do that easily with the WebApp. A summary of the room plan is also available here.
Opening the room plan in the WebApp
1. WebApp Dashboard
2. Room plan
In addition to the Period and Room the overview can be created as required with additional filters such as Room use or Job status .
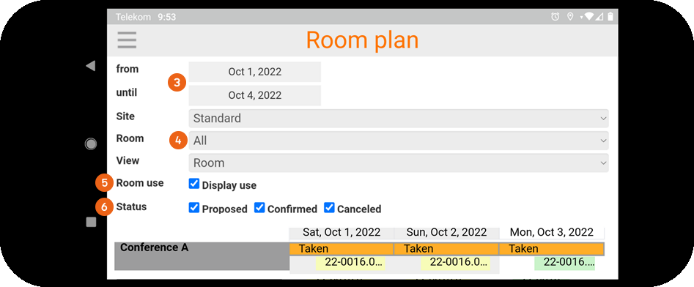
Also without access data to the WebApp third parties can view the room plan at any time. For example, if an employee that usually does not require easyjob would like to check if a room is booked for the next hours or if it can be used spontaneously. The room plan can be opened by a so-called Anonymous User.
To do so, use the address http://SERVER:PORT/roomplan.htm. You can find the name of the server and port can be found in its public URL. See also Configuring the easyjob service.
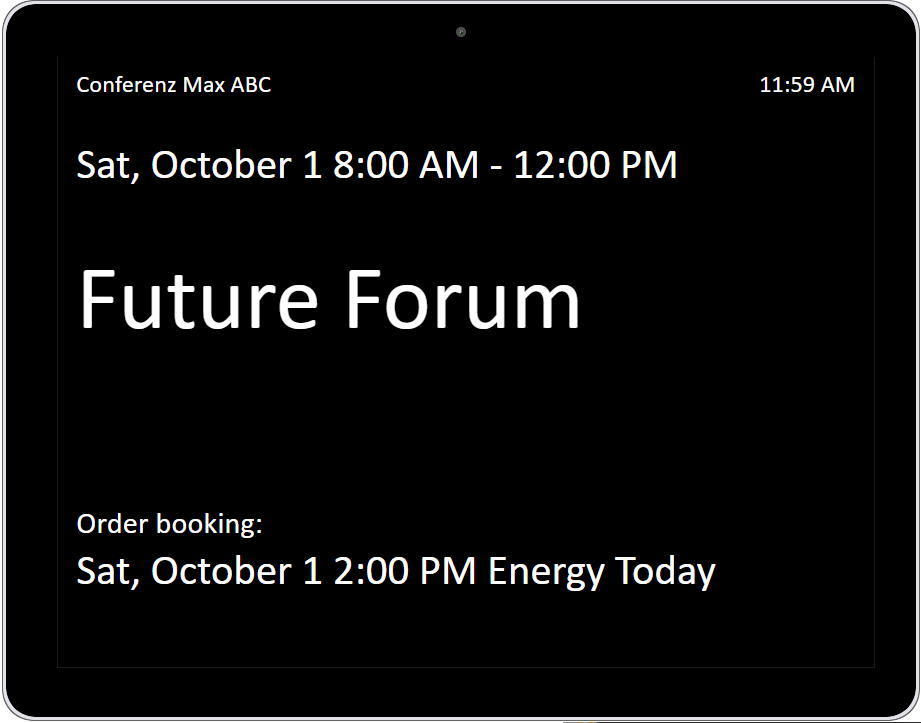
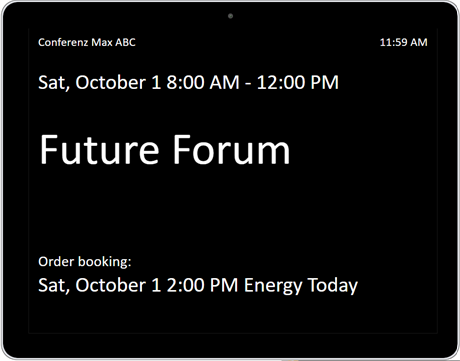
Room signage via WebApp
You can also use a virtual door plate for your room bookings. This requires a web-enabled end device/display to be able to open an internet address.
The view is called up via the URL of the WebApi. You can find the name of the server and port can be found in its public URL. See also Configuring the easyjob service. The room number of the room (Id) is assigned in the order in which you created your rooms. The display language is controlled directly via lng for German lng=de (z. B. http://SERVER:PORT/room.htm?id=1&lng=de) or for English lng = en (http://SERVER:PORT/room.htm?id=1&lng=en).
Configuring the easyjob service
To be able to use the WebApp functionality, the easyjob Web Access service must first be activated and configured in the Service Manager.
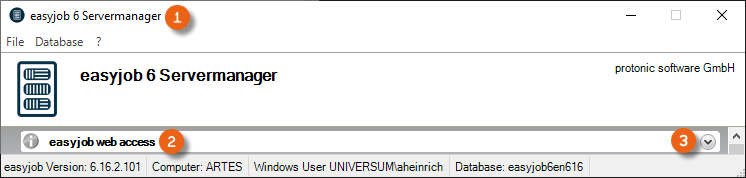
This service can be found in the easyjob server manager . To start the described service , open it and make the configurations.
Activating the easyjob Web Access Service
1. Open easyjob 6 server manager
2. easyjob Web Access
3. Configure the service
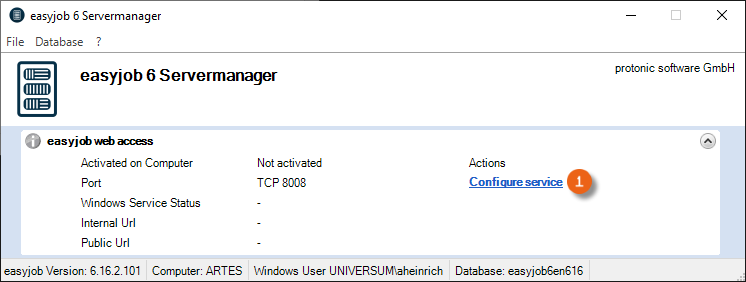
4. Check the box easyjob web access on this computer
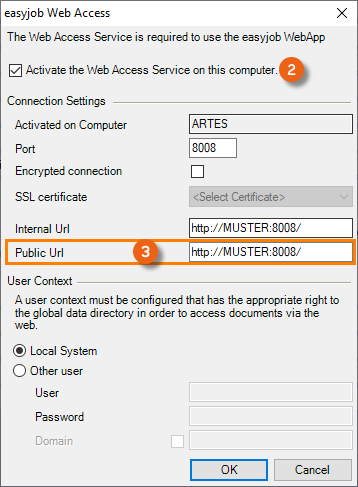
5. Define the public URL
6. Ok
The service will be executed by default with the Local System user context.
A functional public URL must be set up in order to be able to use the Room Planner via the WebApp.
Configure the Windows Firewall
If required, configure the firewall for this service. See also Configure the windows firewall.