easyjob Time Card
Documentation
Time Card
With the easyjob Time Card Analysis (TCA) module, easyjob is expanded with a time recording functionality for in-house staff as well as for freelancers. This makes it possible to record the work times of your employees and freelancers and carry out a qualification (which employee carried out a certain activity for how long, e.g. for a project). In addition to recording vacation and sick days, you can also implement individual break rules and work time modules. An automatic, interactive recording (easyjob creates a proposed list), expense recording and various analyses also also provided for optimal project control.
Installation and activation
Go to the easyjob program settings to activate the easyjob Time Card module: A separate installation is not required.
Activating the Time Card module:
1. easyjob Menu Tools Settings
2. Functions tab
3. Select Time Card Analysis
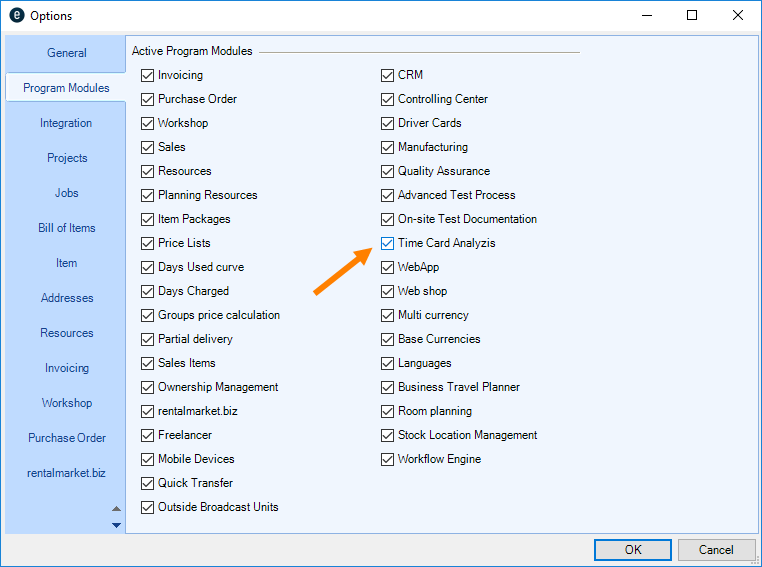
4. Ok
easyjob must be restarted to activate the settings.
Configuration and settings
No content for this section.
User Settings
Various user rights are available for the Time Card module.
Assigning the user rights for Time Card:
1. easyjob Menu Tools Manage Users
2. Select a User
3. Edit
4. Rights tab
5. Time Recording
6. Assign the desired rights
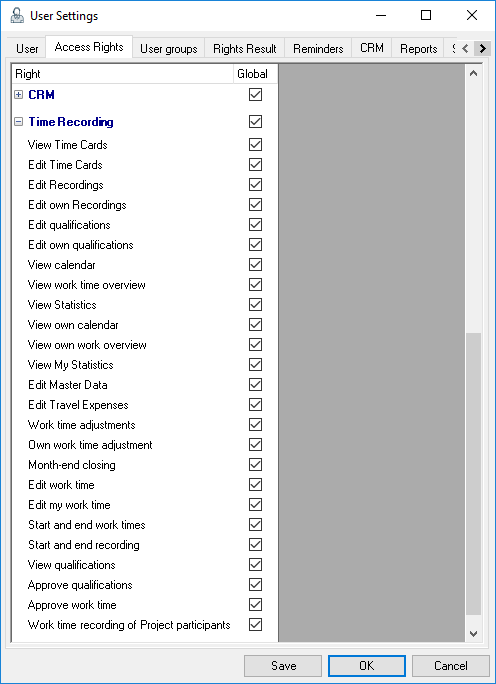
7. Save
8. Ok
General settings
You can define additional parameters in the easyjob program settings. This includes the period from which Recordings should be started and continued. You can also define if there should be the automatic work time and/or activity recording, as well as various terminal settings.
With the work time start and end entry you can define the time frame of the presetting for the calendar view. Furthermore, you can set the basis for Vacation calculation as well as the rounding for the Actual hour calculation.
1. easyjob Menu Tools Settings
2. Time Recording
3. Modify the desired Settings
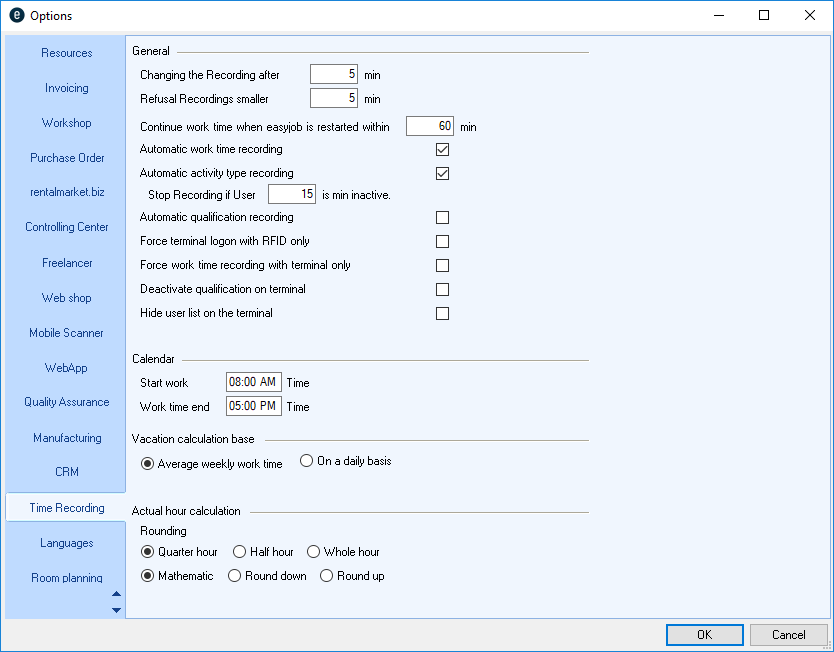
4. Ok
easyjob must be restarted to activate the settings.
Assigning addresses to employees
A basis for employee work time recording is assigning an address to the respective employee.
Assigning an address
1. easyjob Menu Tools Manage Users
2. Select a User
3. Edit
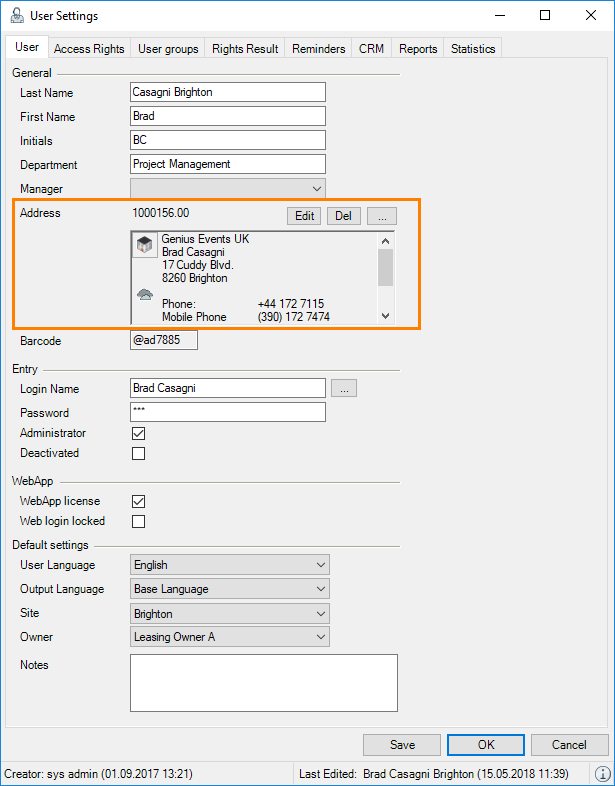
4. Add an address or create a new address dataset
5. Save
WebApp
You can find a description of how to launch the easyjob WebApp component in the easyjob WebApp Handbuch.easyjob WebApp manual.
Time Card Terminal
The Time Card Terminal application is installed with the easyjob setup packet. An executable WebApp is also required.
Installing the Time Card application
1. Install the easyjob Software in workstation mode
2. Connect easyjob with your server database
3. Start the Time Card application
(protonic.easyjob.TimeCard.Client.exe from the easyjob program directory)
4. Select … to enter the WebApp-URL
In order to limit access to the Time Card application, the application is started in full screen mode.
In order to automatically start the Time Card application if the computer is restarted, we recommend configuring autostart.
Configuring the Time Card terminal for autostart
1. Start the Time Card application
(protonic.easyjob.TimeCard.Client.exe from the easyjob program directory)
2. Start at Windows logon
3. Configure the Windows auto-login
The user can be authorized at the terminal using an easyjob password or an RFID card.
To readout the RFID cards, easyjob assigns the card serial number to the user. No data is written on the card. In this way it is also possible to use other RFID objects such as alarm device dongles with the NXP Mifare standard.
Card readers as well as custom printed RFID cards are available at our webshop or contact us at sales@protonic-software.com
Assigning an easyjob user to RFID
1. Start the Time Card application
(protonic.easyjob.TimeCard.Client.exe from the easyjob program directory)
2. Select an easyjob user
3. Hold the RFID card in front of the reader.
4. Initialize
Work Time Recording
No content for this section.
Concept
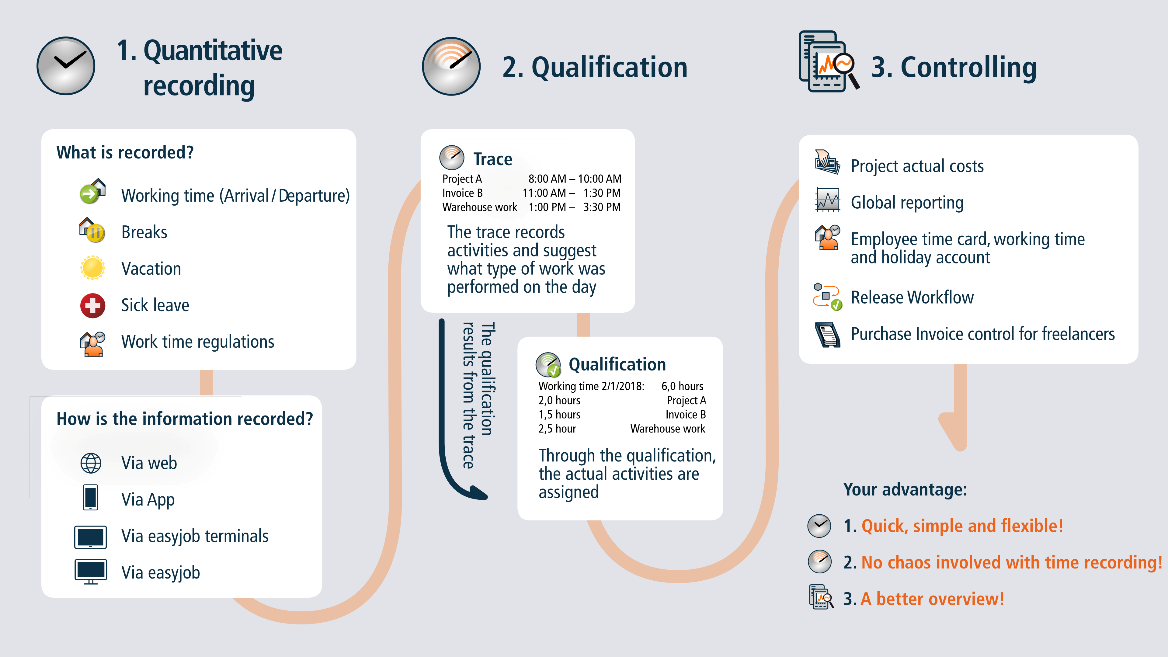
The conceptual idea behind the easyjob Time Card Module is to provide users with support in assigning their activities to projects, jobs, workshop activities, warehouse work, addresses or in sales based on automatic and/or manual work time recordings (Quantitative Recording). This assignment is called Qualification. At the end in Controlling the recorded data can also be used for the optimal assignment of costs to projects or for evaluating work times and costs of your own employees and freelancers.
Terminology
Work time
The work time is the actual presence of the employee. Employee presence can be recorded using easyjob, the easyjob WebApp or using the Time Card terminal. Break and overtime rules can be defined accordingly.
Recording
Recording (trace) is used to determine at which time point a worker carried out which activity. In an optimal case, the recording is automatically recorded using the easyjob IntelliTraceTM function. The recording provides support when qualifying the activities.
Qualification
Qualification is the final definition of the cost in hours of the corresponding activity. Through qualification, the corresponding cost as well as the type of activity is assigned to the corresponding easyjob process. Qualifying the activities of a work day must take place within the respective work time.
Time Card
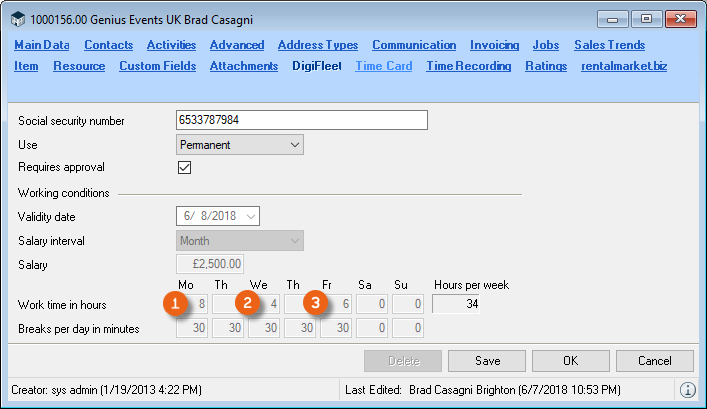
The Time card is used to manage employee master data, such as weekly work time, work time rules, yearly vacation entitlement, monthly costs, etc. The type of employee assignment can be Temporary (e.g. for student help), Permanent (e.g. for regular employees working full or part time) or Deactivated. Further work conditions (e.g. weekly hours, salary, etc.) can also be stored only for the Permanent assignment type. You can also define if Approval is required by another user (e.g. supervisor) for the recorded work time and the qualification of activities. See also Approving work times and qualifications. You can define the corresponding right in the User Settings. Enter all employee master data under Working conditions . See also Working conditions. Furthermore, you can record the Company affiliation , notes and the site.
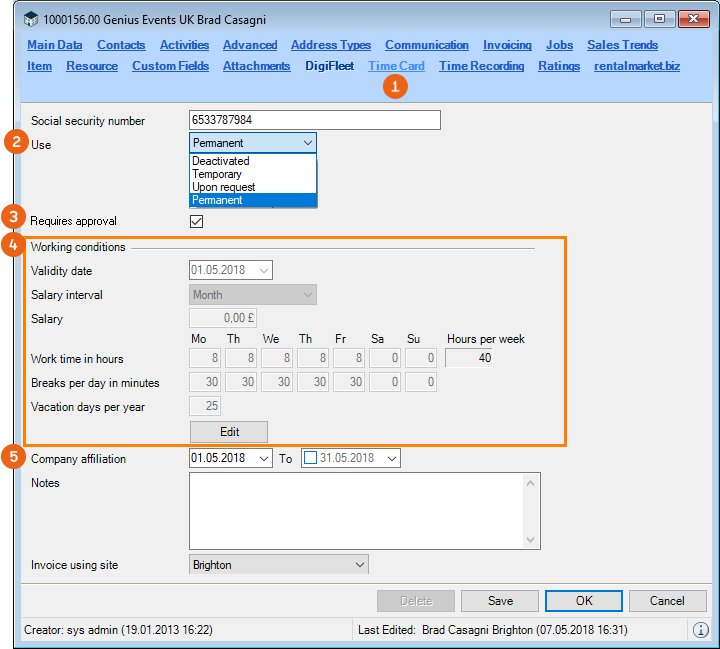
Activating an employee's time card
1. easyjob Menu Master Data Addresses
2. Select the Address
3. Edit
4. Time card
5. Enter the social security number.
6. Define the type of assignment
7. Activate Requires approval if necessary
8. Save
Working conditions
The working conditions are divided into General , Cost calculation and Rules . In addition to the Validity date (in this way, for example, you can change work time modules during an employment period), you can define the Salary interval (month, hour, day or week) and the Salary . Earnings are the monthly costs and income. This means that all ancillary expenses must be calculated in this value. Enter the Vacation days per year and the individual work time model . The automatically calculated Average will be directly displayed, and this is used for calculating the monthly time recording.
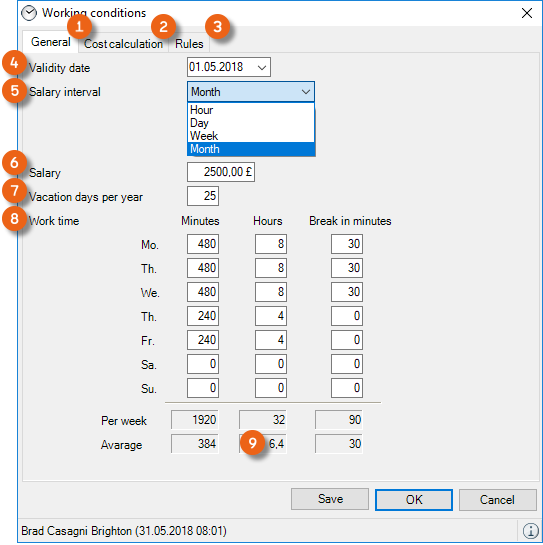
Defining the working conditions of an employee
1. easyjob Menu Master Data Addresses
2. Select the Address
3. Edit
4. Time card
5. Edit
6. Modify the desired Settings
7. Save
Vacation days are always calculated on a daily basis in the time recording. In program settings you can define if the vacation calculation basis should be done based on the average weekly work time or on a daily basis.
For example, an employee works 38 hours a week. 8 hours Monday to Thursday and 6 hours on Friday. The daily average is 7.6 hours.
If the vacation calculation basis is Daily and the employee only takes a holiday on Friday, the target work time for this week will be Monday to Thursday, 8 hours each = 32 hours.
If the vacation calculation is Average week work time and the employee takes a vacation day on Friday, the average of 7.6 hours x 4 days = 30.4 hours will be calculated as the target work time for this week.
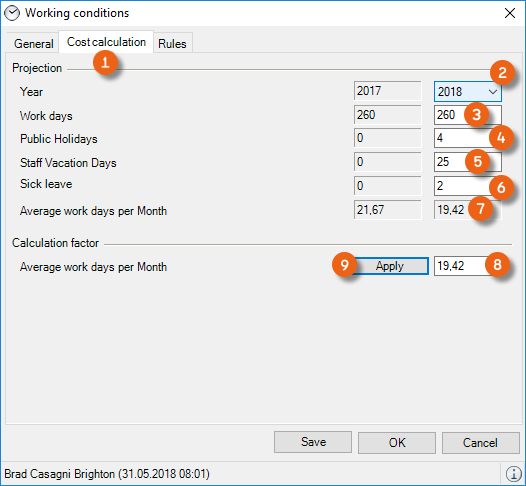
Cost calculation
The average calculation factor for the costs of this employee (e.g. for a project assignment) is determined under Cost calculation . For the projection, first define the Year . Based on the time card information (e.g. Mon-Fri 8 hours each), the Work days are calculated based on the assumption of 52 weeks. For a more accurate calculation, you can adjust this value accordingly. Public holidays that were already defined for this year, Vacation days from the time card and Sick leave that was already taken will also be taken into consideration. This results in the average work days for this employee per month .
Formula: (work days – public holidays – vacation days – sick leave) / 12 months
You can freely edit the average workdays per month or apply the calculated value .
Creating the cost calculation
1. easyjob Menu Master Data Addresses
2. Select the Address
3. Edit
4. Time card
5. Edit
6. Cost calculation tab
7. Modify the desired Settings
8. Save
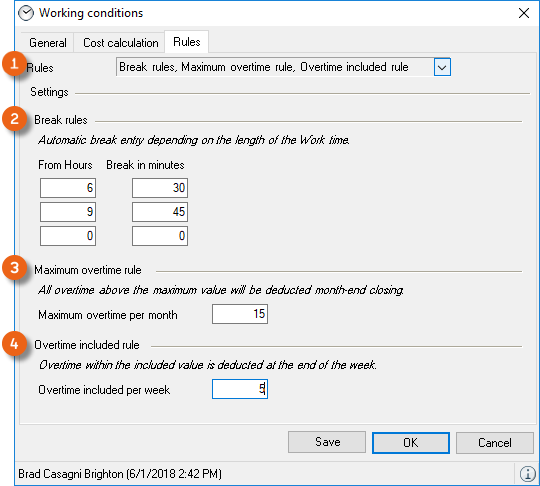
Rules
Individual break and overtime rules can be entered under Rules . By default, break rules , the maximum overtime rule per month and the overtime included rule per week are implemented. If you require a special rule, please contact our support team.
Entering rules for an employee
1. easyjob Menu Master Data Addresses
2. Select the Address
3. Edit
4. Time card
5. Edit
6. Rules tab
7. Modify the desired Settings
8. Save
You can decide individually if the employee ends the work time for the break and then restarts (e.g. to exactly calculate the breaks and work time), or if the employee should remain logged in the entire work time and the break should be automatically deducted according to the break rules, regardless if the employee actually takes a break or how long it is.
If the break rule is activated – depending on the requirement – the break time is automatically deducted after hour X. It will be deducted regardless if the employee took a break from work (end and new start of the work time) or not.
Holidays
You can enter legal holidays in the master data.

Entering public holidays
1. easyjob Menu Master Data Events
2. Add
3. Enter the Name and the Type of Public Holiday
4. Specify the Date and if necessary a Color
5. Ok
The Public holidays defined in this manner will be taken into account in the Work time overview and are not included when calculating the Target time total .
Open the work time overview:
1. easyjob Menu
2. Time recording
3. Work time overview
See also Calculating holidays.
Vacation and sick leave
Vacation and sick leave can be managed as usual with the Resource Status. More information can be found in the easyjob 6 User Manual in the Staff and transportation planning chapter under Managing absences.
In addition, you can add and edit vacation and sick leave in the Time recording module using the Calendar and the Work time overview. Your entries will automatically update all the data related to the resources.
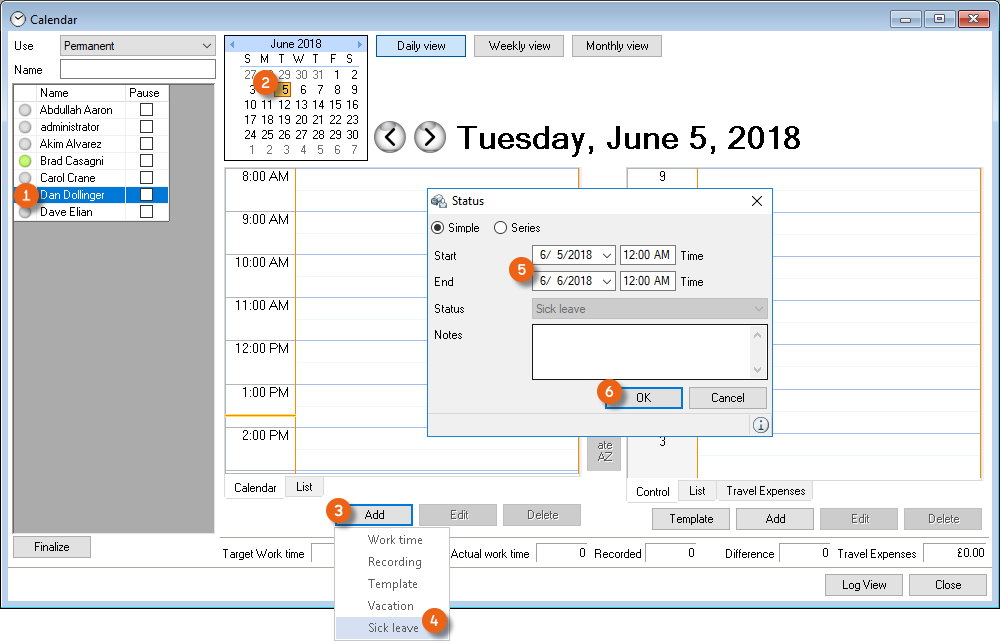
Enter the vacation and sick leave using the Calendar:
1. easyjob Menu Time recording Calendar
2. Select an Employee and the corresponding Date
3. Add
4. Select Sick leave , for example, and enter the Dates
5. Ok
In the calendar,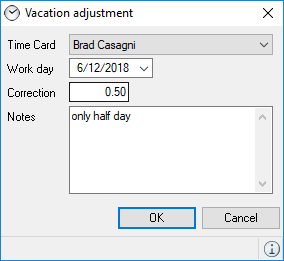 ,
, and public holidays are shown with icons and color coding for a better overview. You can remove entries by selecting and deleting them in the calendar view.
Entering vacation and sick leave using the Work time overview
1. easyjob Menu Time recording Work time overview
2. Select an employee and the corresponding date
3. Add
4. Select vacation, for example, and enter the dates
5. Ok
In the Work time overview you can correct a vacation entry and enter it, for example, as a work time correction instead of worked hours. You can make the work time or vacation correction for the entire month also on the last day of the month.
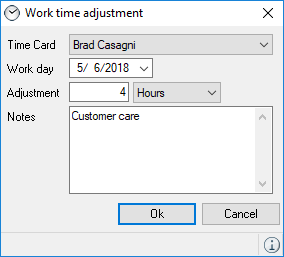
If the employee received, for example, two days of special vacation in a month, enter it using the Vacation adjustment, and the employee's vacation days will be increased by two days. The correction - for vacation or work time - can also be negative.
Vacation or work time adjustment
1. easyjob Menu Time recording Work time overview
2. Select the name and the corresponding date.
3. Add
4. Select Vacation adjustment or Work time adjustment and enter the dates
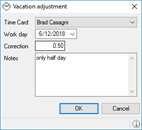
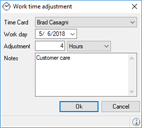
5. Ok
See also Calculating vacation and Calculating sick days and other absences.
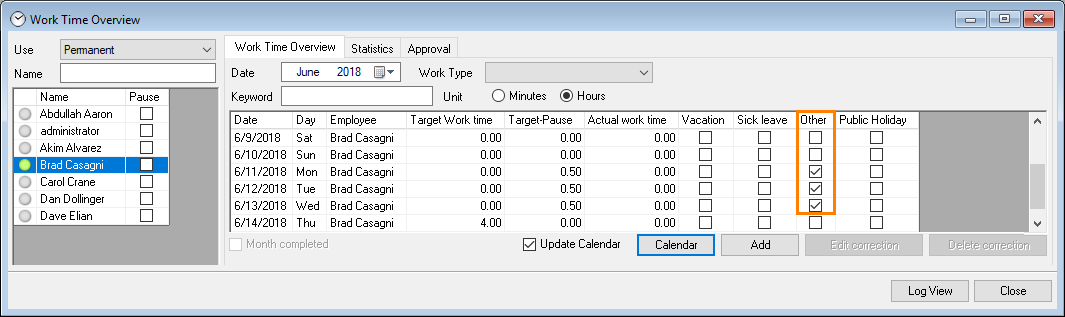
Other absences
In addition to public holidays, vacation and sick leave, you can enter all other absences in the time recording under Other. If training is entered for the Resource status of the employee and if the Work time box is checked in resource status, this will appear in the Other column of the work time overview. More information about the functionality of the resource status can be found in the easyjob 6 User Manual in the Staff and transportation planning chapter under Managing absences.
Defining resource status as work time
1. easyjob Menu Master Data Resource Status
2. Select the desired status
3. Edit
4. Check the work time box
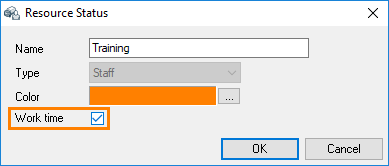
5. Ok
Approving work times and qualifications
You can define for each time card if the respective employee requires Approval for his work times and qualifications or not.
Setting Requires approval in the time card
1. easyjob Menu Master Data Addresses
2. Select the Address
3. Edit
4. Time card
5. Check the Requires approval box
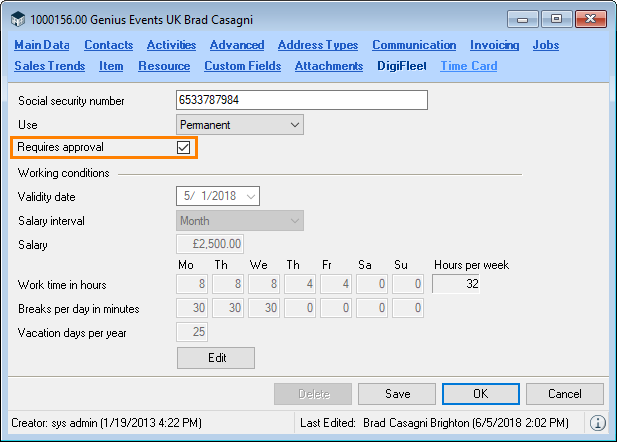
6. Save
You need a special user right to approve work times and/or qualifications. See also User Settings.
You can approve work times and qualifications in every area where it is possible to add and edit work times and qualifications.
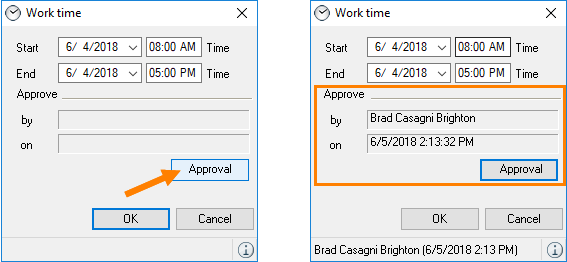
On the Work time overview, you can find the Approval tab, which displays all the work times that were approved and not approved as well as the qualifications, and you can edit them if necessary. By checking the box you can approve the work times directly in the list.
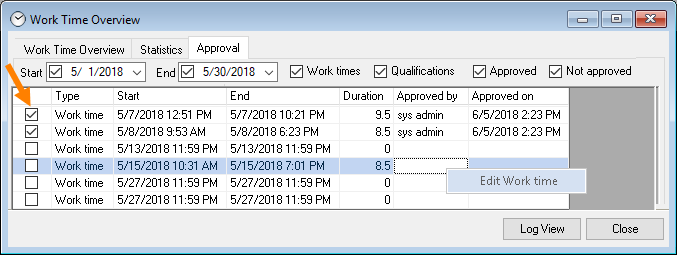
1. easyjob Menu Time recording Work time overview
2. Select a name
3. Approval
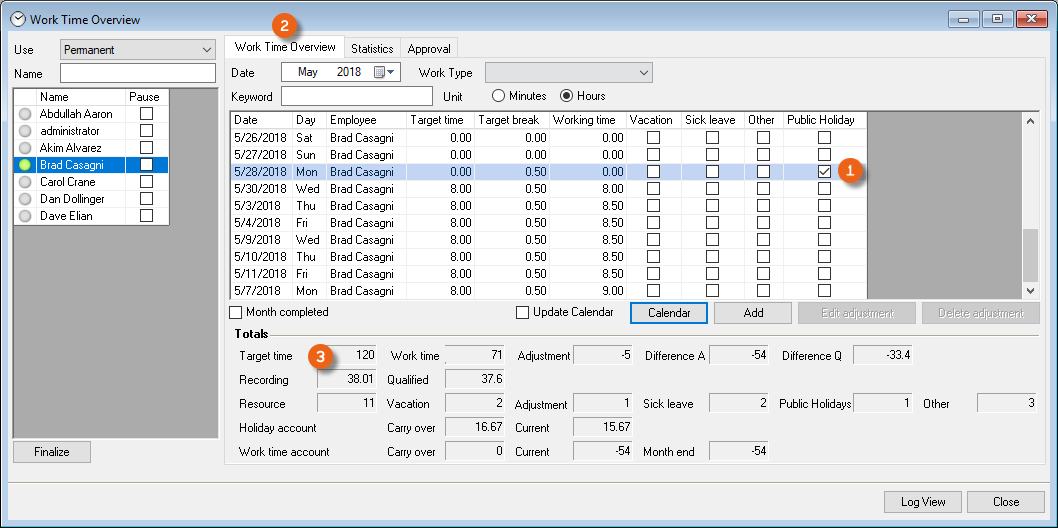
Work Time Overview
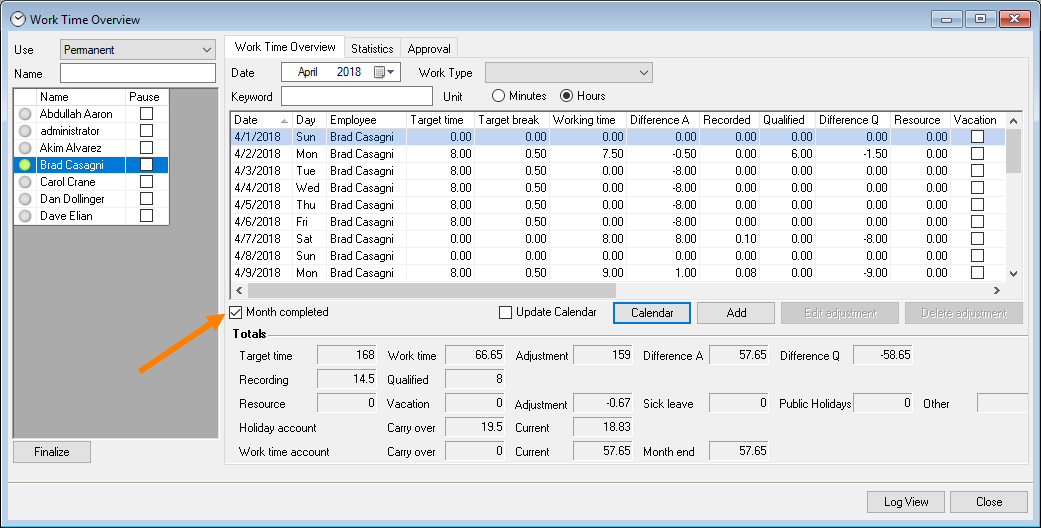
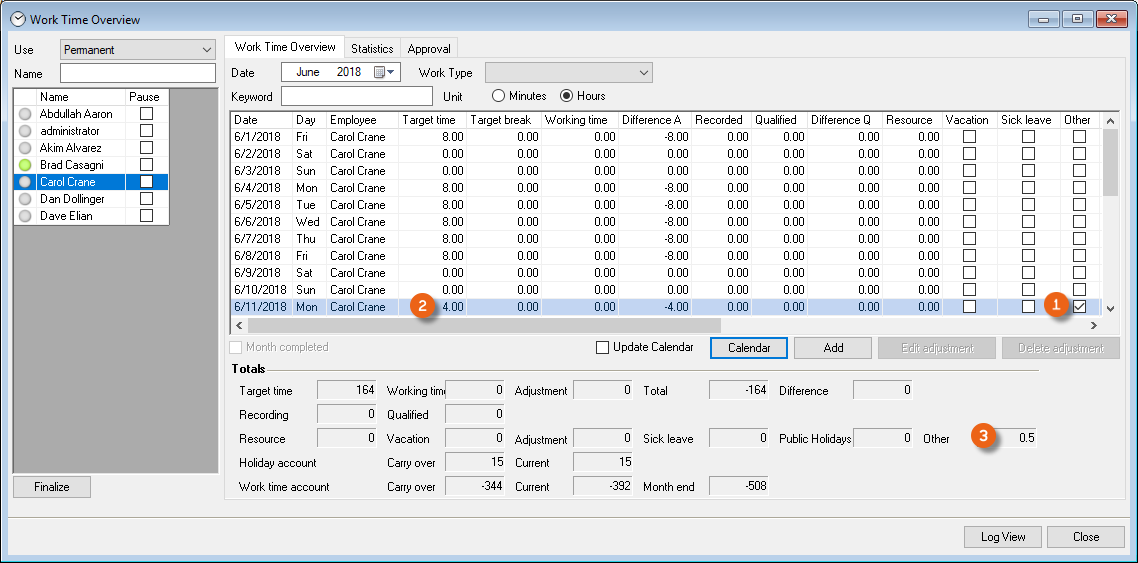
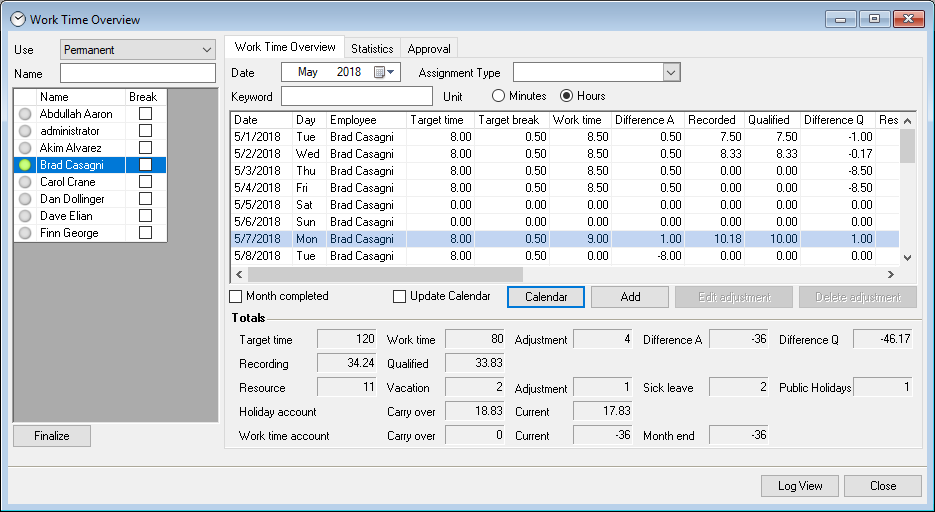
With the work time overview, you can see the monthly time and activity type recording for each employee at a glance. You can define multiple criteria when selecting the employee. With Assignment you can filter according to the employee assignment type (e.g. permanent), in the Name search filter you will find a pre-selection of the available name list. The green mark indicates that the employee's work time has started and that the employee is present. If it is red, the work time on this day has already ended. Gray means that the employee has not yet started his work time. If an employee has started his work time, ended it and started it again, the Break box is checked. The Work time overview displays the data for the selected employee
Additional display criteria in the work time overview can be limited using the presettings . You can use the date to select the desired month and the Work Type (e.g. Project management). In the totals view, you can see how many hours were recorded and qualified in total for this month for this work type. You can make a further limitation using the search filter , you can search for a special activity from the work type (e.g. Project name) and read under Recording and Qualified how much work time the selected employee, for example in the area of project management, has invested in this specific project. Use Unit to define if the information should be displayed in minutes or hours.
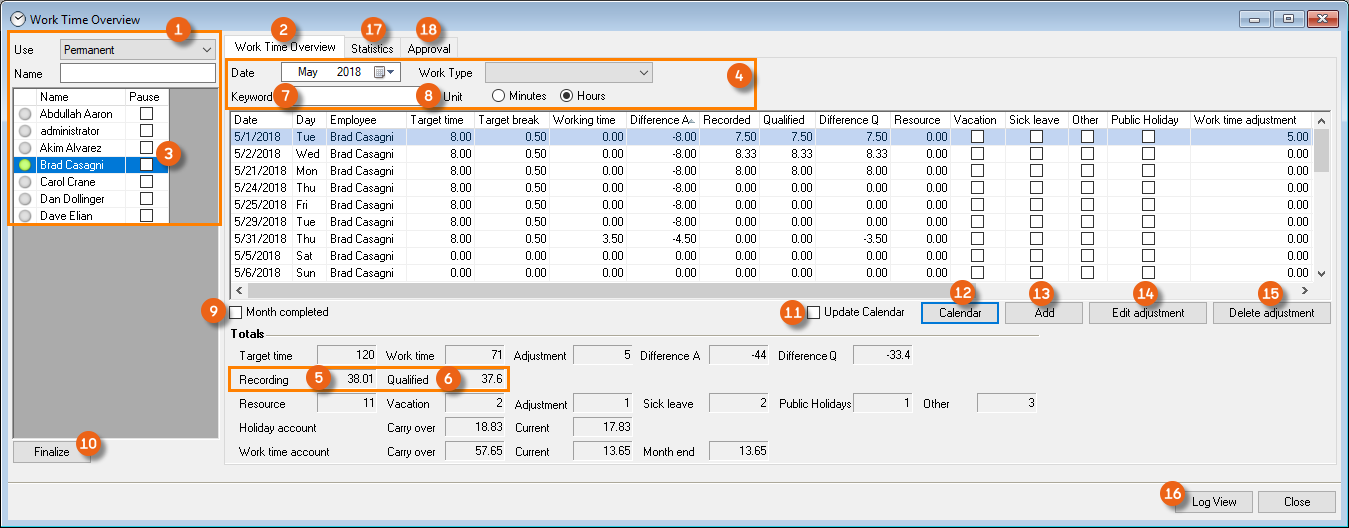
By checking the Month completed box, the subsequent editing of previous months is blocked. Under Finalize it is possible to finalize one or multiple months for multiple employees at the same time. With Update calendar , the calendar view is displayed each time a day is selected and if you position the Work time overview window and Calendar next to each other, you can see everything at a glance. By pressing Calendar you can switch to the calendar view, which will always display the day that is currently marked in the work time overview. With Add you can enter absences (vacation, sickness) and correct work times and vacation if necessary. Corrections can also be edited or deleted . With the Log view you can keep track of entries, changes and corrections. Statistics see Statistics/Reports. Under Approval you can see an overview of the Approving work times and qualifications.
The names of the column headings in the work time overview are mainly self-explanatory. You can display or hide the column headings as usual and sort by column headings. You can find a summary of the displayed values in the Totals section .

| Field | Formula/definition |
|---|---|
| Total target time | = Time card hours total– Vacation total – Sick leave total – Public holidays total – Other total |
| Difference A total | = Total work time – Target time total +/- Adjustment total |
| Difference Q total | = Qualified total – Work time total |
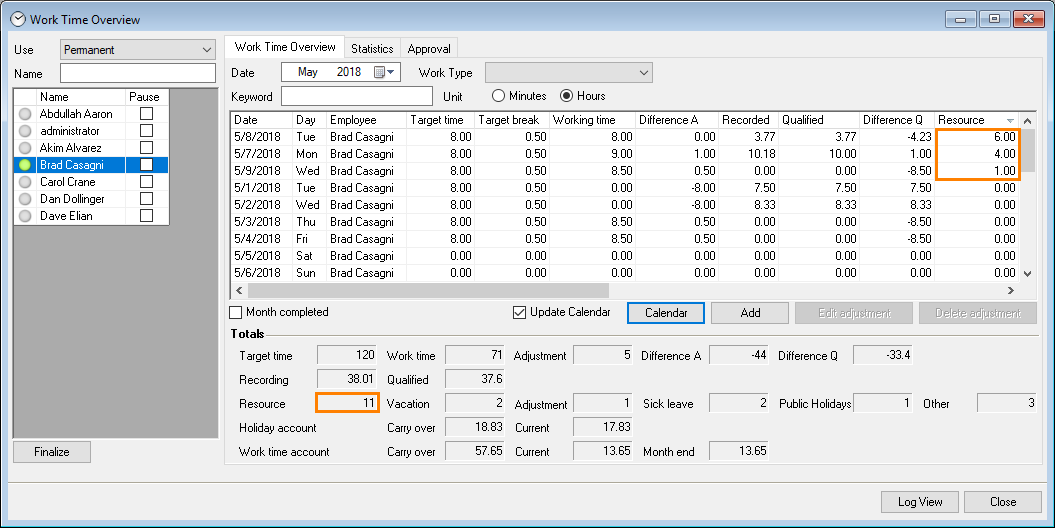
| Resource | The time a worker was working as a resource (e.g. AV technician) for a project. |
| Holiday account | Vacation carry over from previous month*– Vacation current month +/- Adjustment total = Current vacation |
| Work time account | Hour carry over from the previous month+/– Difference A total = Current hours |
| Month end | Work hours that must still be worked as of today in order to reach the target time for the current month. |
*Vacation days from the time card
Resource
In the work time overview, the work hours an employee worked as a resource for a job are shown in a separate column.
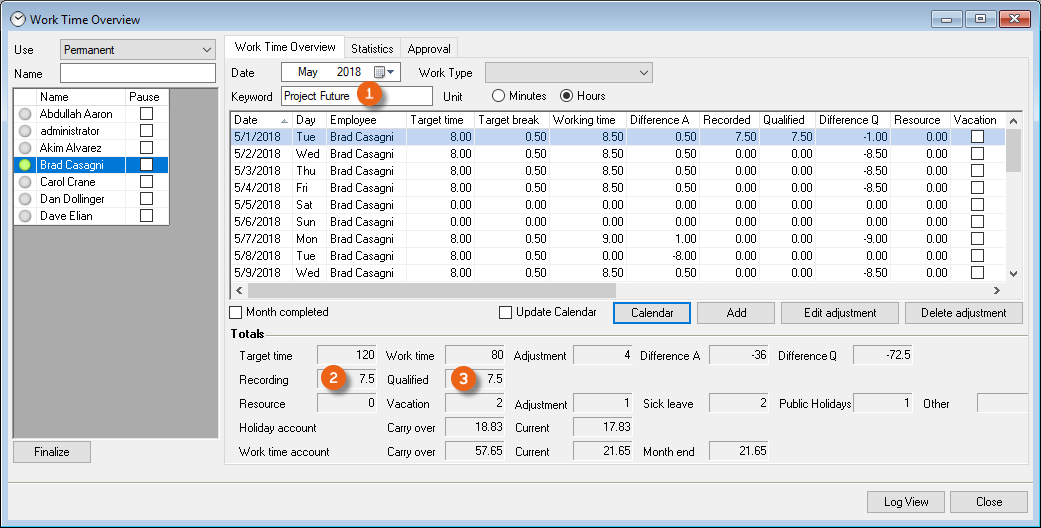
Activity filter example
If you specify Project management for example for the activity, only the hours that the employee used this month for Project management will be added in the total view (Recording and Qualified ).

Search filter example
If you enter a project name , e.g. Festival Open Doors in the search filter, only the hours the employee used this month for this project will be added to the total view (Recording and Qualified ).
The search filter searches in descriptions from projects, jobs, invoices, workshop activities, purchase orders, sales orders, purchase invoices and manufacturing orders.
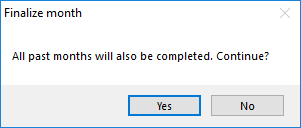
Finalizing the month
After all time recording entries are complete, you can finalize the month, 'freezing' the status. Finalized months must then no longer be calculated live by easyjob, which improves performance (processing speed). You can only finalize a month if the previous months have been finalized. To simplify the process, you will receive a request.
Subsequent changes are no longer possible in the finalized month. Unless you uncheck the box for the Month completed status. There is a specific user right for this function. See also User Settings.
In order to switch to a vacation calculation basis, the monthly work time overview of all employees created in the time recording must be closed
Calendar
See chapter Qualitative recording.
Dashboard
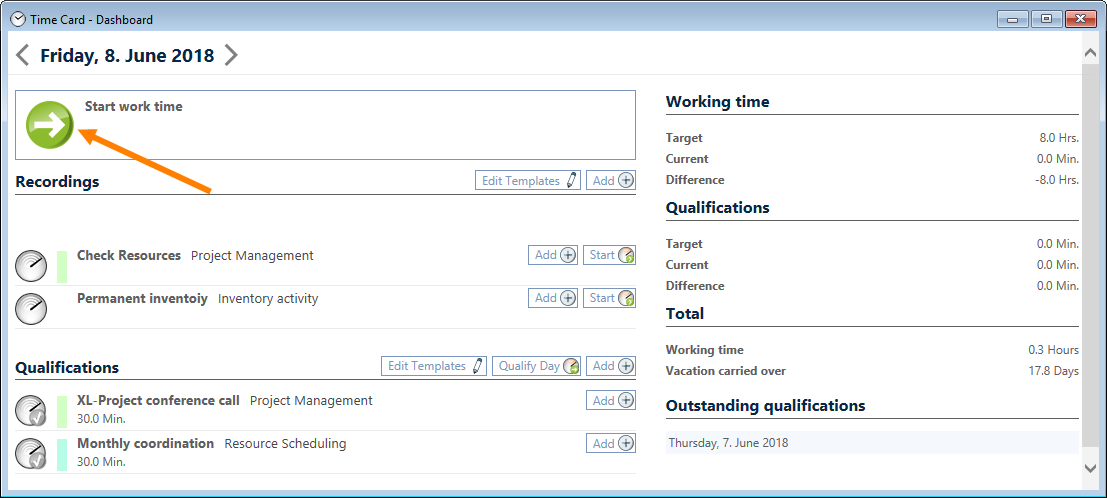
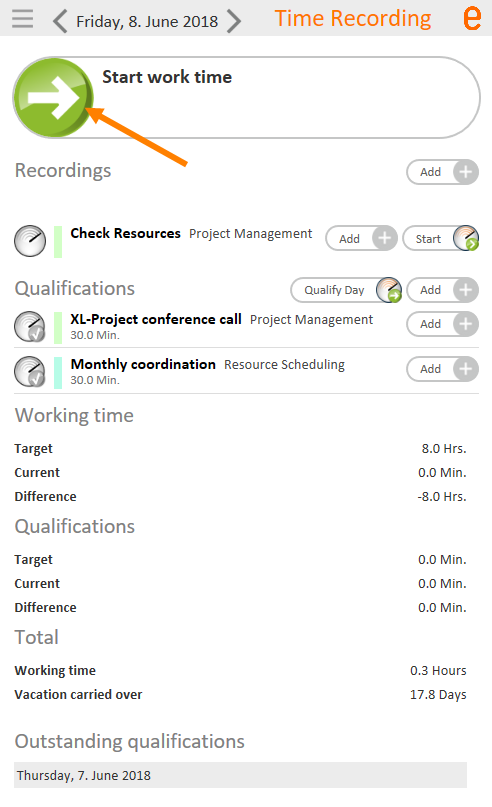
The time recording Dashboard makes it easier to enter Work times and Qualifications due to its intuitive user interface. Similar to the WebApp, you can carry out all important time recording functions here. You can start and end your work time using the in/out button . All recordings for the day are listed under Recordings . The Recording without an end time is still in progress. You can end it and directly add a new one . You can delete or edit previous recordings. Recording templates are displayed in gray You can add the suggested recordings to your work time or start directly from the template . Recording templates can also be edited .
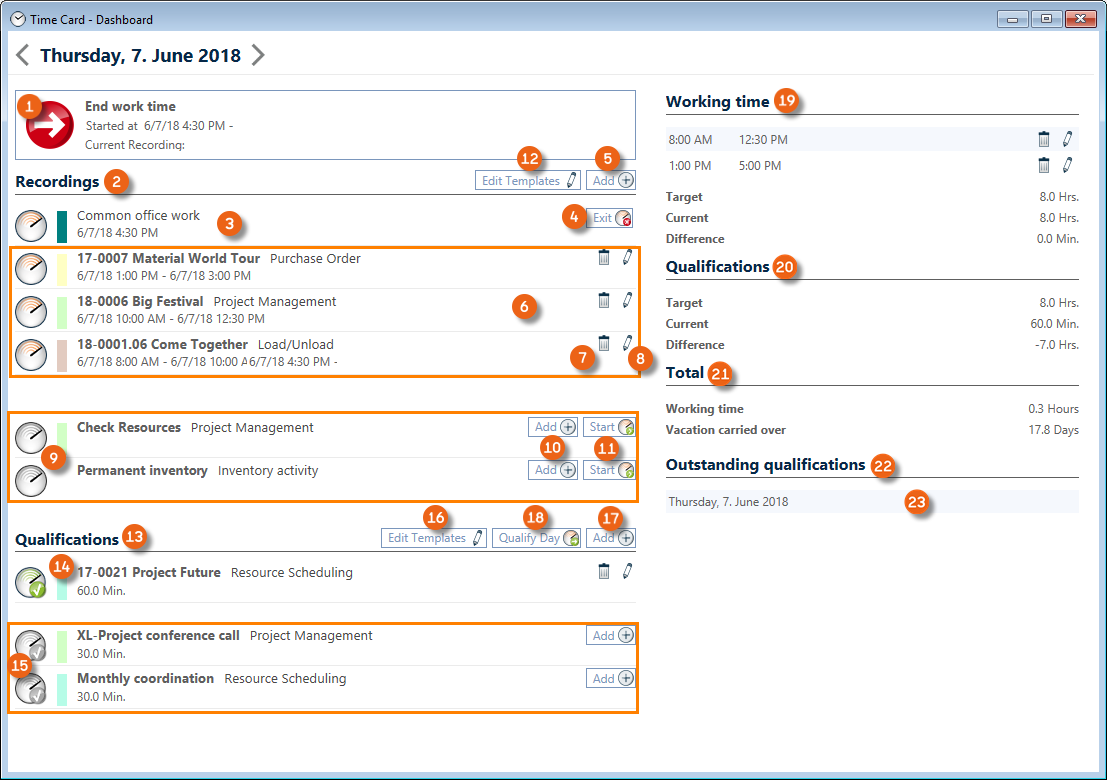
All activities are listed under Qualifications that were already qualified for this day . Qualification templates are displayed in gray . You can edit qualification templates or add a new one. It is also possible to qualify all available recordings on this day at once .
The already documented working time for this day can be deleted or edited. The target working time, the current working time and the difference are displayed as information. The current status of the qualifications (target – current – difference) and the Total with working time and vacation carried over are shown accordingly.
Outstanding qualifications are displayed and can be directly edited by clicking them.
You require a user right to start and end recordings. See also User Settings.
Work time recording
With the time recording you can document the start and end of your daily work time. You can do this manually, using the automatic time recording or using the interactive terminal. A Web Interface makes it possible to record the activities and the work times for your own employees and freelancers also outside of the company.
Manual time recording in the calendar
Your work time can be documented in the time recording calendar.
1. easyjob Menu Time recording Calendar
2. Select the name
3. Add
4. Work time
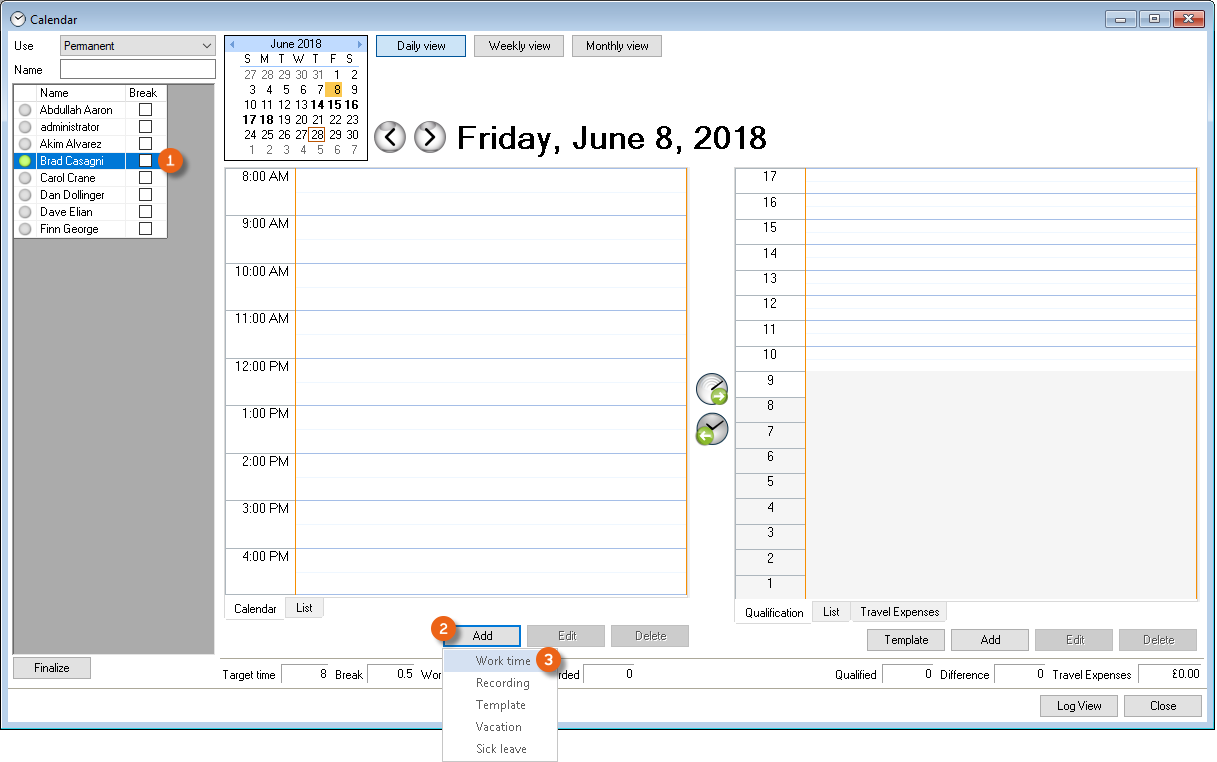
5. Enter the corresponding data
6. Ok
You can use the mouse to change the work time window in the calendar view. In addition, there a list view is available for the entries. If necessary, you can also delete entries in the calendar view. Select the entries to delete in the calendar view and click Delete. You can also edit the calendar by right clicking the Time Card Icon  on the status bar and Open calendar.
Manual time recording on the Dashboard
You can easily document your work time using the Dashboard.
1. easyjob Menu Time recording Dashboard
2. Click the in (or out) icon
Time recording via the WebApp
You can document your work time when on the road using the easyjob WebApp.
1. Opening the easyjob WebApp
2. Time recording
3. Click the in (or out) icon
With the Web Interface, you can enter activities and carry out qualifications for your own employees and freelancers without easyjob as well as from outside your company. The Webinterface is based on the easyjob WebApp technology. More information about setting up the WebApp can be found in easyjob WebApp User Manual.
Automatic work time recording
Activate the work time recording in the easyjob program settings.
1. easyjob Menu Tools Settings
2. Time recording tab
3. Check the Automatic work time recording box
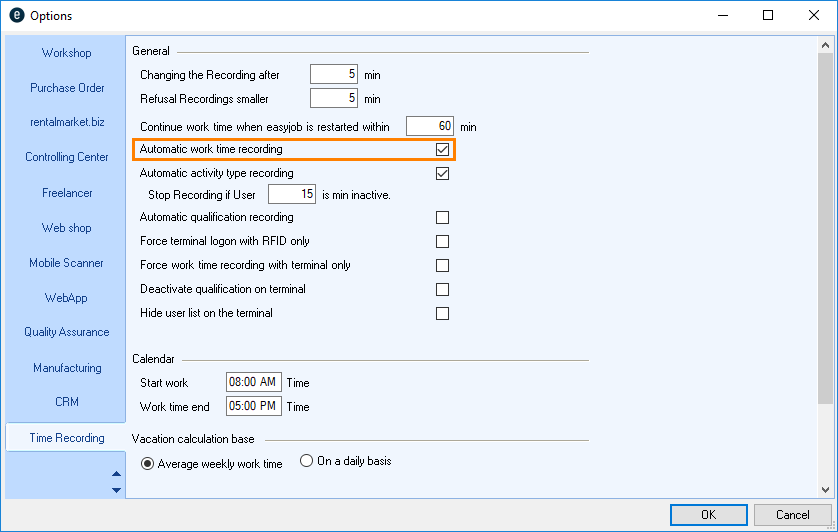
4. Ok
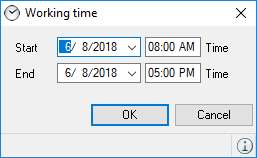
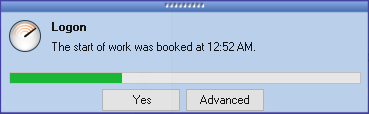
After the necessary restart, the logon window will appear for ten seconds and will suggest the current time as the work start time. Confirm the suggested time with Yes. With Advanced you can change the work start and stop time. If you ignore the logon window, the work start will be booked as suggested.
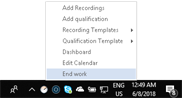
In addition to entering the work end as described for Manual time recording, you can also right click the Time Card icon 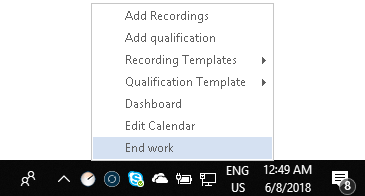 on the status bar to end your work time.
Work time recording with the Time Card Terminal
With the easyjob Time Card Terminal, the work time is entered also without a local computer. For this, the easyjob password or an RFID card is necessary. Additional information about installing the terminal as well as about programming the chip cards can be found in Time Card Terminal.
Use of the terminal interface is almost identical to using the WebApp.
Logging on to the terminal using the easyjob password
1. Select the easyjob user from the user list
2. Enter the password using the numerical touch interface
3. Select in/out and enter the qualification if necessary
Log onto the terminal using the RFID card
1. Position the RFID card in front of the card reader
2. Select in/out and enter the qualification if necessary
Work time calculations
No content for this section.
Calculating holidays
The holidays in the current month will be deducted from the target work time of the respective day according to the time card presettings. If - as in the example of a public holiday on Monday - 8 hours will be deducted from the target work time. If the public holiday is on a Wednesday, accordingly 4 hours or if it is on a Friday then 6 hours are deducted from the target work time.
The quantity of public holidays per month is displayed in the
Work Time Overview.
Calculating sick days and other absences
The absences can be entered as half 0.5 or whole 1.0 days. The basis of calculation is the work time defined in the time card presettings. If the target work time, for example on a Monday, is 8 hours and the employee uses 4 hours to take part in a training course (other) he must still work an additional 4 hours .
Depending on the difference to the work time defined in the time card presettings for this day, the daily target work time will be recalculated.
Underlying calculation format in hours:
| Field | Formula |
|---|---|
| Remaining target work time/day | Time requirement (time card/day)– Absence time (other-sick/day) |
| Other total | Absence time (other-sick/day)/ Time requirement (time card/day) |
Sample calculation
| Time card on this day in hours | Absence in hours (Other/Sick) | Remaining target work time on this day | Total Other/sick |
|---|---|---|---|
| 8 | 3 | 5.0 | 0.36 |
| 8 | 4 | 4.0 | 0.5 |
| 8 | 5.5 | 3.5 | 0.69 |
| 8 | 6 | 2.0 | 0.75 |
| 6 | 3 | 3.0 | 0.5 |
| 4 | 4 | 0.0 | 1 |
| 4 | 6 | 0.0 | 1 |
Excess or non-recorded extra hours will be corrected using the time correction.. In this way, for an employee with a target work time of 4 hours, who had an appointment outside of the company that lasted 7 hours, you can credit the 3 hour difference to his work time account.
Calculating vacation
Vacation days are calculated similarly to the other absences/sick leave based on the Average work week time or on a Daily basis. Vacation days are always calculated on a daily basis in the time recording. A half vacation day is therefore 0.5. You can define the calculation basis in the easyjob program settings.
1. easyjob Menu Tools Settings
2. Time recording tab
3. Select the desired Vacation calculation basis
4. Ok
Vacation calculation on an average week time basis
With this type of calculation, easyjob uses the Average week work time as the basis for the vacation calculation total. With a 5 day week with an average of 38 hours, that is 7.6 hours per day. In this case, the 7.6 hours would be deducted for each vacation day. For example, from Monday to Thursday 8 hours and Fridays 6 hours. On Fridays 6 hours will be deducted from the target work time and 0.79 vacation days.

Underlying calculation format in hours
| Field | Formula |
|---|---|
| Remaining target work time/day | Time card on the vacation day– Vacation time taken* |
| Vacation total | Time card on the vacation day/ Average week work time |
* maximum is the time card hours for this day
Example table
| Average week work time | Time card on the vacation day in hours | Vacation time taken on this day | Remaining target work time on this day | Vacation total |
|---|---|---|---|---|
| 8 | 8 | 8 | 0.00 | 1.00 |
| 7.6 | 6 | 6 | 0.00 | 0.79 |
| 7.6 | 8 | 4 | 4.00 | 0.53 |
| 7.6 | 8 | 8 | 0.00 | 1.05 |
| 7.6 | 8 | 10 | 0.00 | 1.05 |
Daily vacation calculation
In the case of daily calculations, exactly the number of hours of the day of absence will be taken into account, which is previously defined in the time card. That is, from Monday to Thursday 8 hours and Fridays 6 hours, corresponding Fridays to a deduction of 6 hours from the target-work time and 1 vacation day. 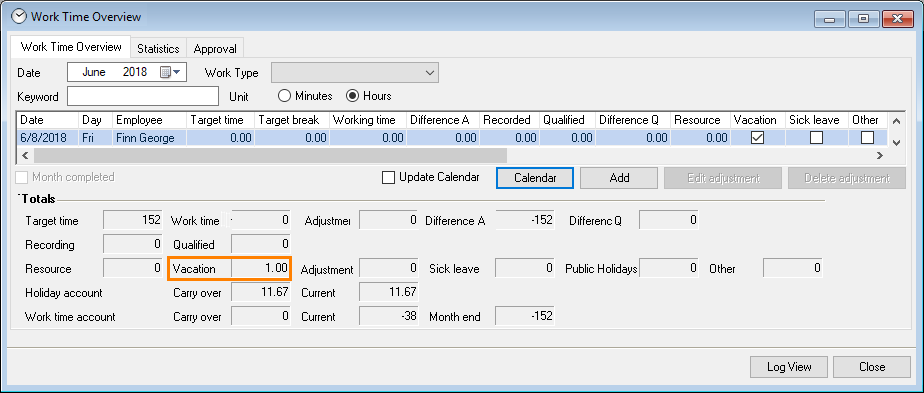
Underlying calculation format in hours
| Field | Formula |
|---|---|
| Remaining target work time/day | Time card on the vacation day– Vacation time taken* |
| Vacation total | Time card on the vacation day/ vacation time taken* |
* maximum is the time card hours for this day
Example table
| Time card on the vacation day | Vacation time taken on this day | Remaining target work time on this day | Vacation total |
|---|---|---|---|
| 8 | 8 | 0.00 | 1.00 |
| 8 | 4 | 4.00 | 0.50 |
| 6 | 2 | 4.00 | 0.33 |
| 6 | 7 | 0.00 | 1.00 |
| 4 | 8 | 0.00 | 1.00 |
Activity recording
With activity recording, you can use recordings to document which worker carried out which activity and for how long. That can be done either Manually or Automatically using the IntelliTraceTM function. Finally, you can qualify these assignments by assigning a certain activity (e.g. a project) to the assignment.
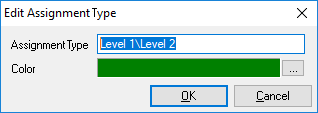
Activity types
easyjob Time Card includes a predefined set of activities types that you can expand as needed in the master data.
Creating an activity type
1. easyjob Menu Master Data Activity type
2. Add
3. Enter a name
4. Select a color
5. Ok

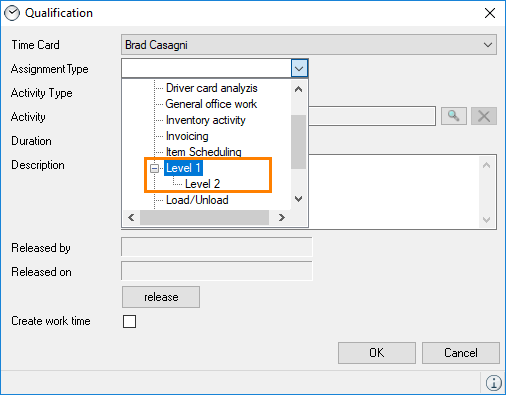
With \ you can create additional activity levels
Manual activity recording
All activities carried out will be documented through automatic recording. Multiple options are available to manually add recordings.
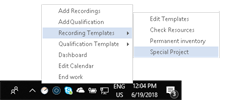
Adding recordings via the status bar.
1. Right click on the Time Card icon 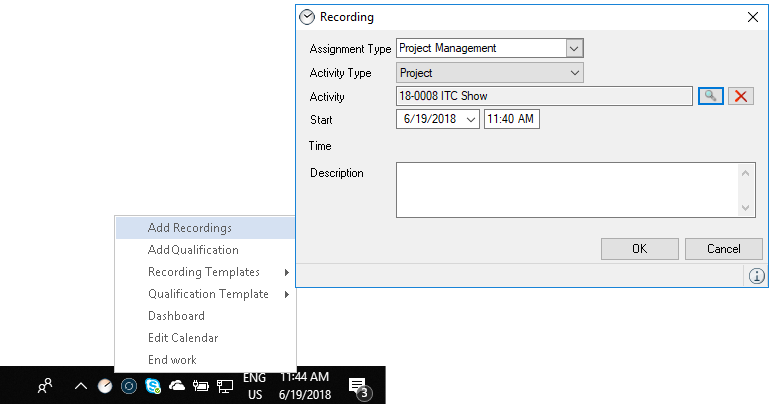 on the status bar
2. Add recordings
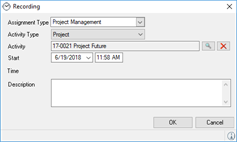
3. Select an Assignment type
4. Select the Activity type (This selection is optional)
5. Assign the respective Activity
6. Define a Start and End time.
7. Ok
Using the arrow icons, you can have the next possible free time frame for a recording be suggested. The recording will be saved in the calendar.
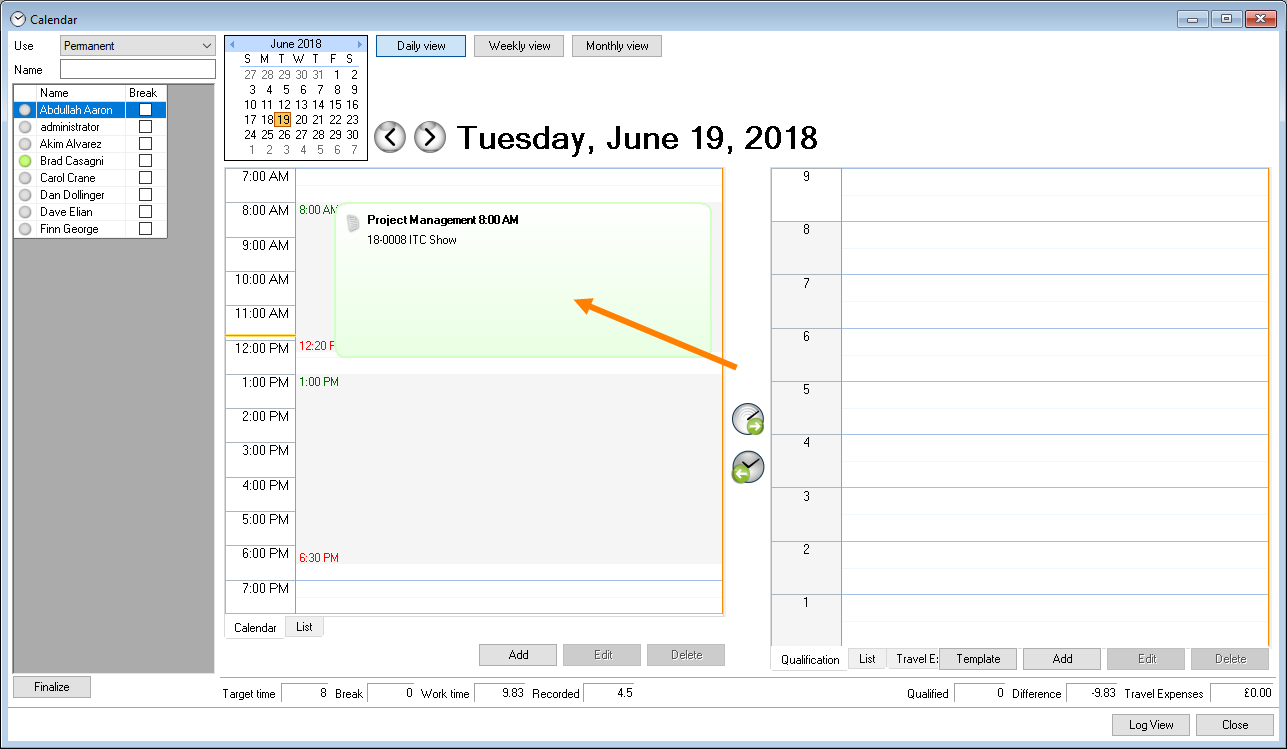
Adding a recording via the Time recording calendar:
1. easyjob Menu -> Time recording -> Calendar
2. Select the name
3. Add
4. Select the activity
5. Enter the corresponding data
6. Ok
After selecting them, you can Edit and Delete existing recordings.
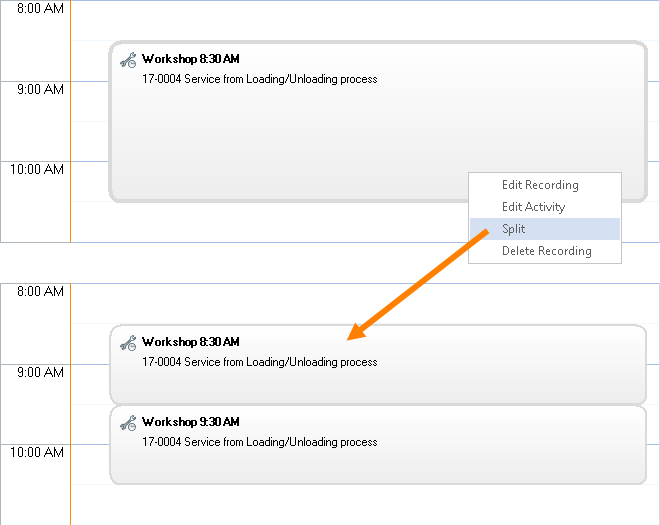
In addition, the Split function is available in the calendar. Right click the recording that you want to split to open the context menu. Splitting creates two recordings with half the time.
By selecting a splitted process, holding down the left mouse key and dragging it on the recording with which it should be joined, you can put the parts back together. The context menu can also be used to directly access the respective process. You can open the selected activity with Edit activity .
Automatic recording with IntelliTraceTM
 With the IntelliTraceTM function, times and activities are automatically recorded based on the easyjob activities. Activities from the Project, Job, Bill of Items, Resource Planning, Invoicing, Purchase Order, Sales Order, Workshop, Purchase Invoice Management, CRM and Manufacturing Controller areas are recorded.
You will receive an activity proposal list on the basis of IntelliTraces. Depending on the user rights, you can make manual changes to the activity list.
Go to the easyjob program settings to activate automatic activity recording:
1. easyjob Menu Tools Settings
2. Time recording tab
3. Check the Automatic activity recording box
4. Ok
After the required restart and after opening a project, the recording window will appear for ten seconds and will suggest the change to the recording.
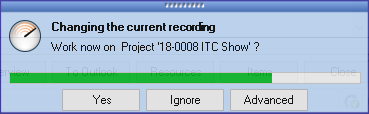
Yes confirms that you are working on the displayed project. Ignore stops the suggested recording. With Advanced you can change the recording start, the assignment type, the activity type, the activity and also the end. If you ignore the recording window, the recording will be booked as suggested.
Recording templates
To create the recordings quicker, you can create templates for frequently repeating processes.
Creating recording templates
1. Right click on the Time Card icon 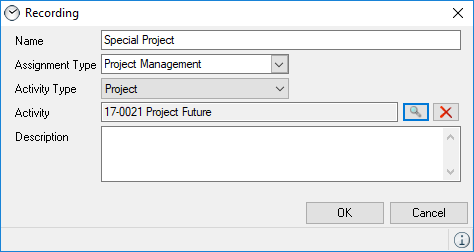 on the status bar
2. Recording templates
3. Edit templates
4. Add recording
5. Enter a name, such as Special project
6. Select an Assignment type
7. Enter an Activity type
8. Assign the respective Activity
9. Ok
You can use the recording template by opening the Time Card icon 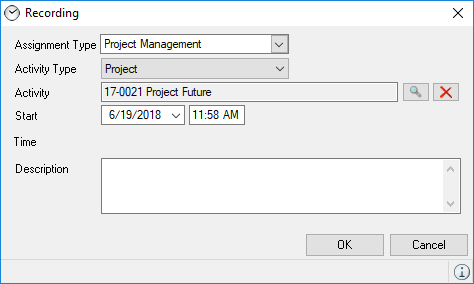 on the Status bar or via the Calendar.
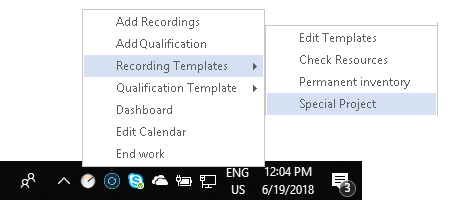
Opening the recording template via the status bar:
1. Right click on the Time Card icon  on the status bar
2. Recording templates
3. Click the desired template, e.g. Special project
4. Define the Start and End
5. Ok
Using recording templates in the calendar:
1. easyjob Menu -> Time recording -> Calendar
2. Select a name
3. Add
4. Select From template
5. Select the desired template
6. Ok
(The assignment type, activity type and activity will be pre-filled according to the template)
7. Define the Start and End
8. Ok
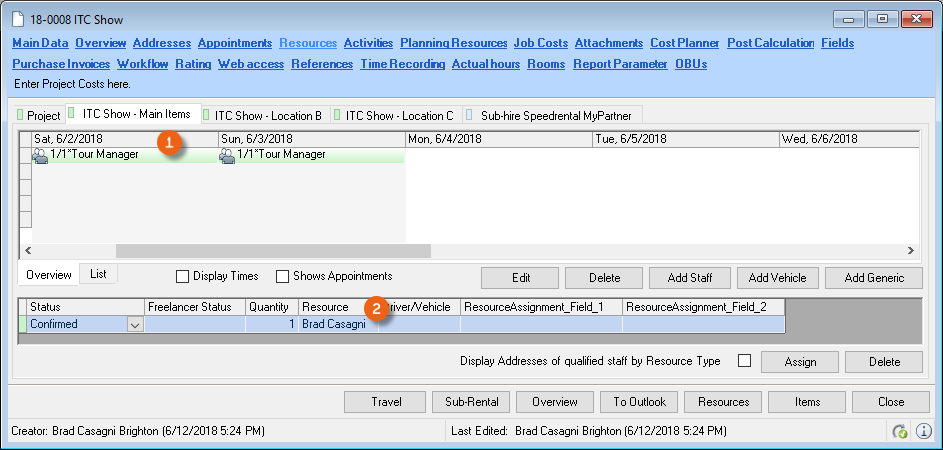
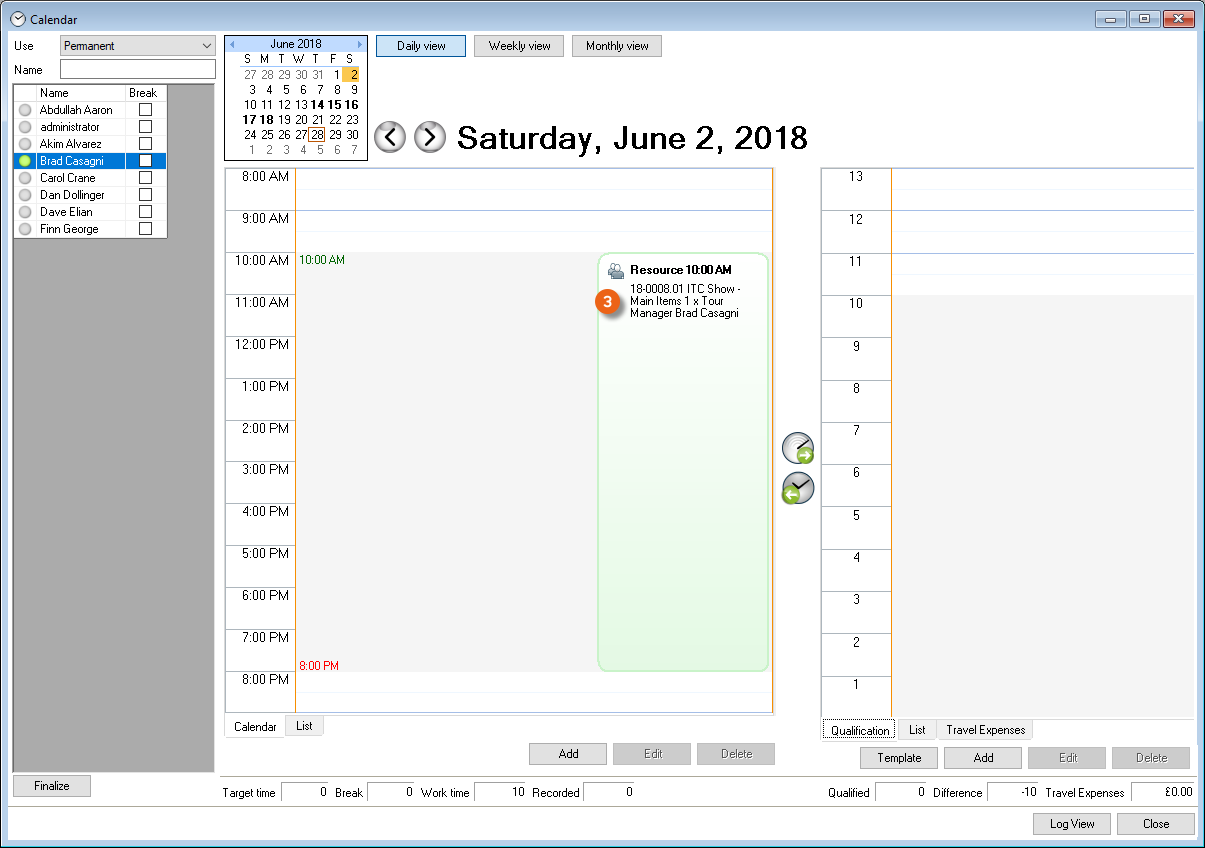
Resource time recording
When assigning an address as a Resource to a Job, an entry is automatically created in the time recording calendar .
Qualitative recording
By transmitting the recorded activities from the calendar to the qualification, the activity cost will be calculated in minutes, the corresponding easyjob processes are qualified and the respective real costs are assigned.
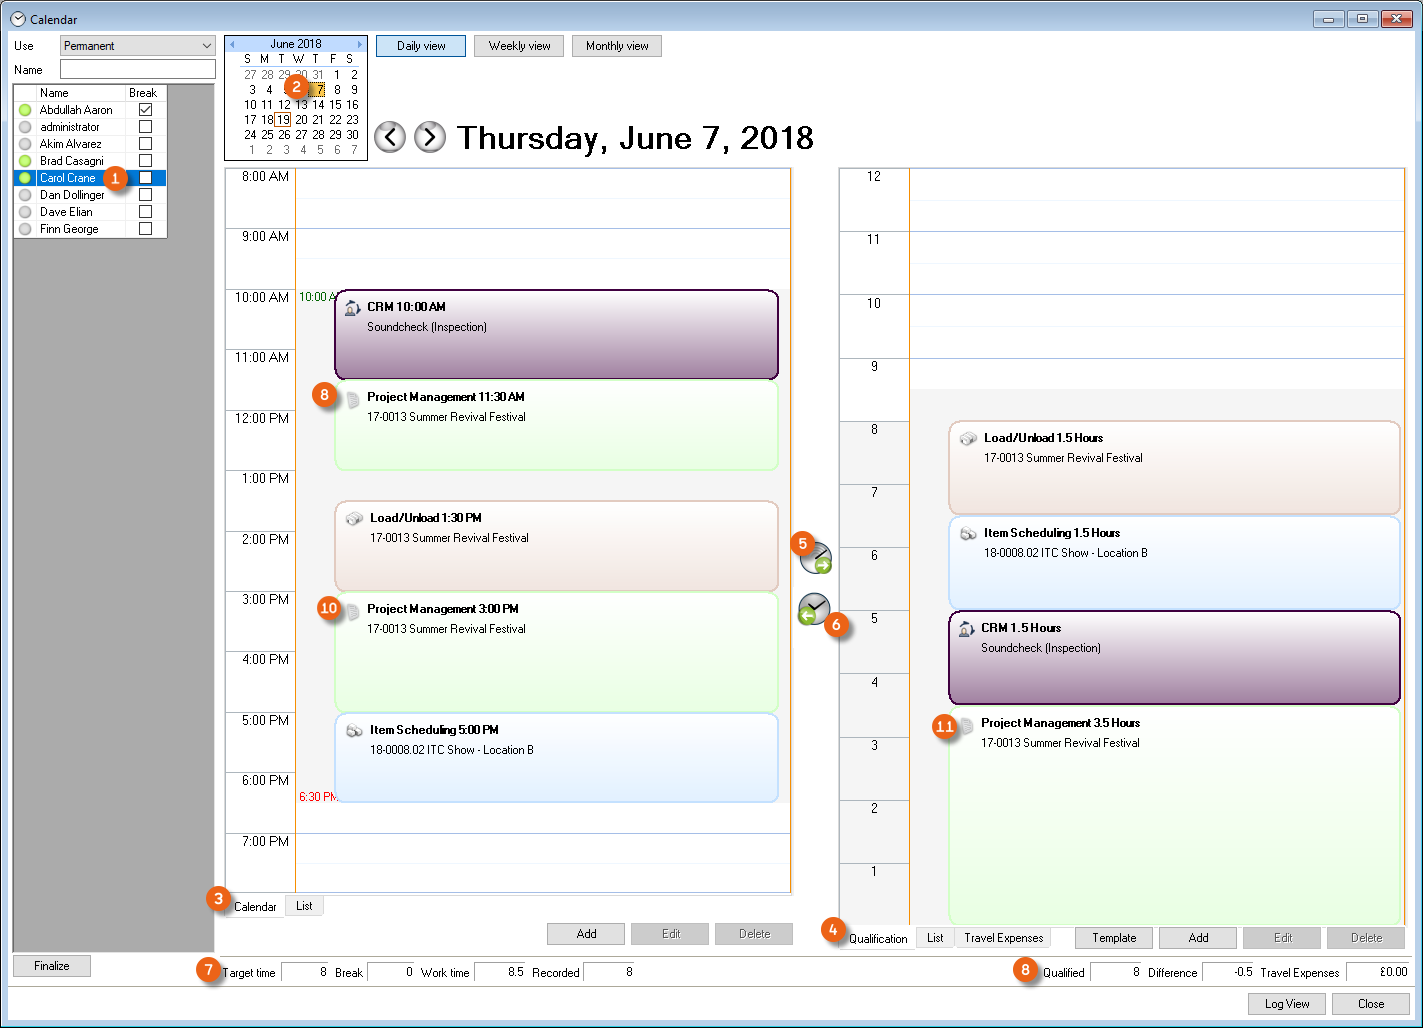
The left side of the calendar shows the created recordings and the right side shows the qualified activities. In the calendar, first select the Name of the employee for whom the qualification should be carried out. Set the date using the Calendar view . On the calendar page you will see the recordings for this day. By activating the transfer button , the activities are sorted by duration and shown in the Qualification view . You can also use the Work time transfer button to create a work time from the duration of all available qualifications. The Footer provides additional information about the target work time, the actual work time and the recorded work time. It will also show how many hours have been qualified and how large the difference is between the recorded and qualified hours. If a project is worked on with a break, e.g. first from 11:30 am to 1:00 pm Project management and then from 3:10 to 5:00 pm , both of these activities will be summarized after qualification with a duration of 3.5 hours. The list view displays the exact times:
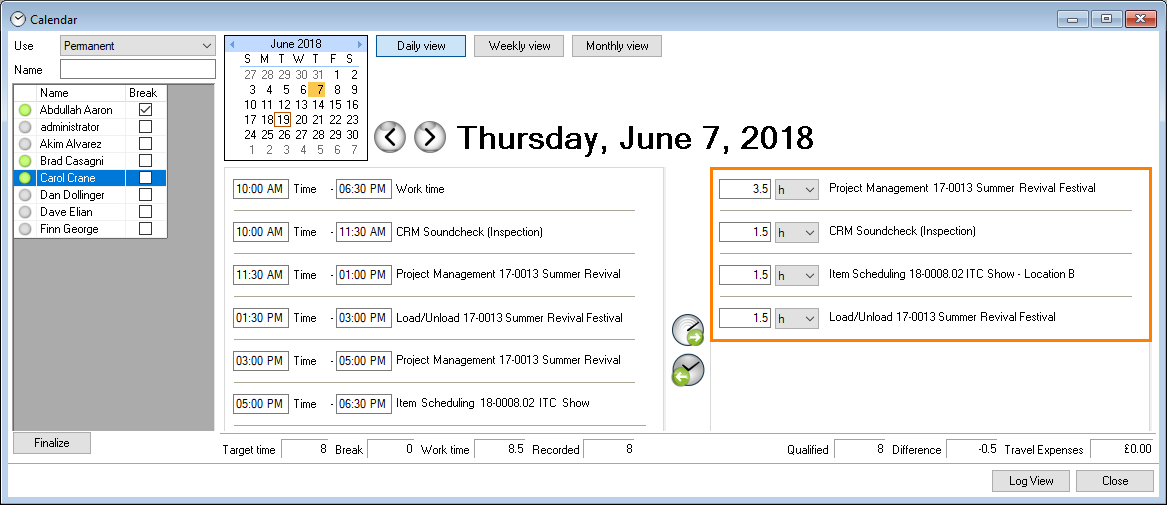
The work time overview also shows the entries from the calendar in a list.
In addition to the user's personal calendar, you can globally view and administer the work times, qualifications, etc. using the work time overview.
Opening a user's work time overview:
1. easyjob Menu Time recording Work Time Overview
2. Select the name
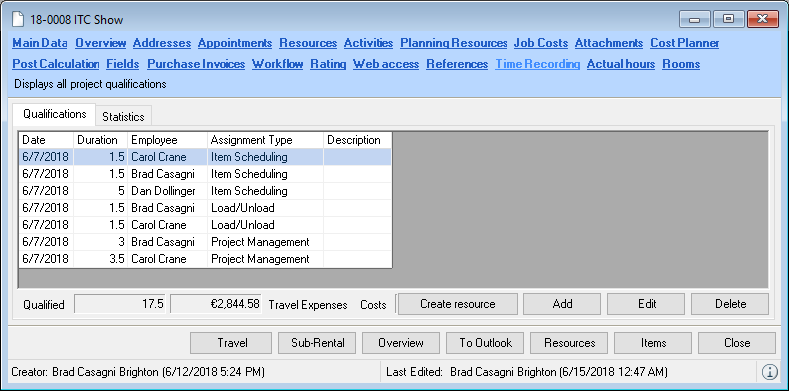
Within the project, you will receive detailed information about the qualified project activities. Qualifications can also be processed within the project.
Adding qualifications to the project mask
1. easyjob Menu Projects Edit projects
2. Select the desired project
3. Ok
4. Click the Time recording tab
5. Add
Actual hour calculation in the project
With the Actual Hour Calculation function, the actual hours worked by a resource is stored in the Job based on what is recorded in the Time Card. To do so, you must first create the rate for the actual hours and assign it to a resource.
Creating a rate for actual hours
1. easyjob Menu Master Data Rates
2. Add
3. Enter a name, e.g. actual hours
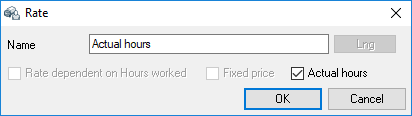
4. Ok
Assigning the actual hour rate to a resource
1. easyjob Menu Master Data Resources
2. Select a resource
3. Edit
4. Rates tab
5. Add
6. Select the actual hours rate
7. Ok
8. Enter the billing rate and the own cost
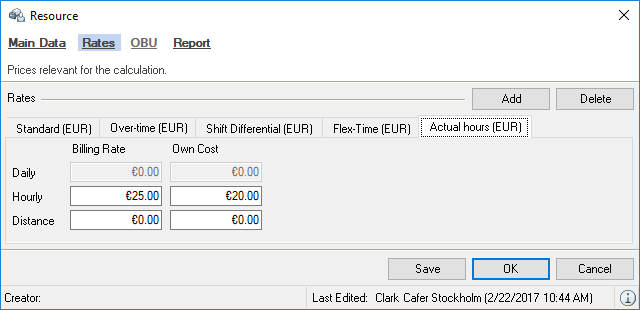
9. Ok
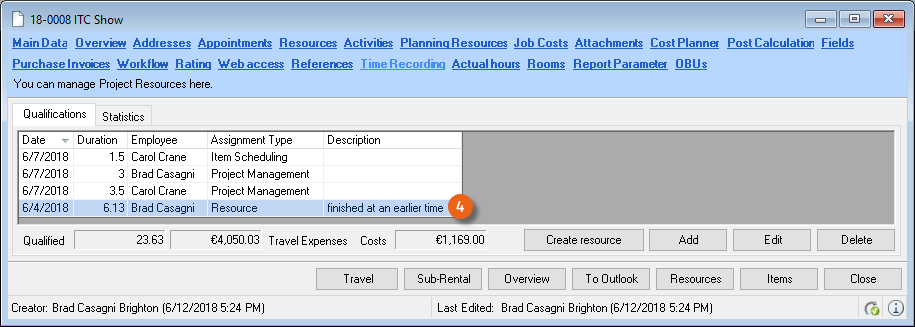
Book in the project under resource with this rate in the Job.
1. easyjob Menu Projects Edit projects
2. Select the desired project
3. Ok
4. Click the Resource tab
5. New staff
6. Enter the dates and select the Actual hours rate
7. Assign an address

As soon as you have selected a rate with actual hours , a new tab with the title Actual hours will be created in the project. The resource was booked with 8 hours , but only 6.13 hours were qualified.
On the Actual hours tab you can apply the hours that were actually worked for invoicing the customer with a right click .
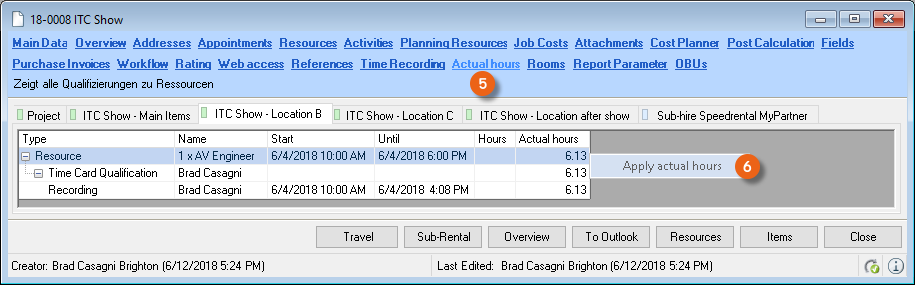
After selecting the rounding type, the number of hours is calculated.
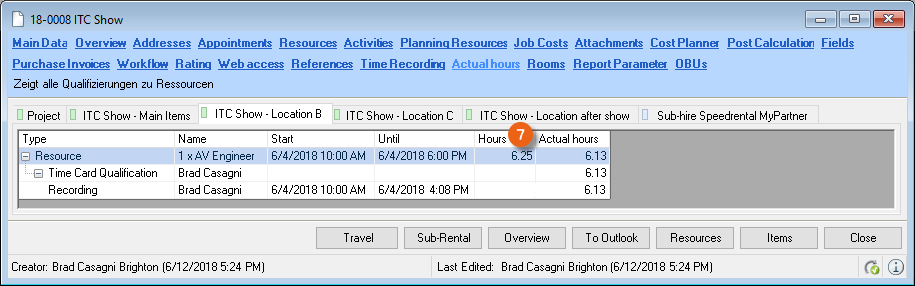
Rounding is set to a Quarter hour and Mathematic, the time is rounded from 6.13 to 6.25.
You can define the rounding base in the easyjob program settings.
1. easyjob Menu Tools Settings
2. Time recording tab
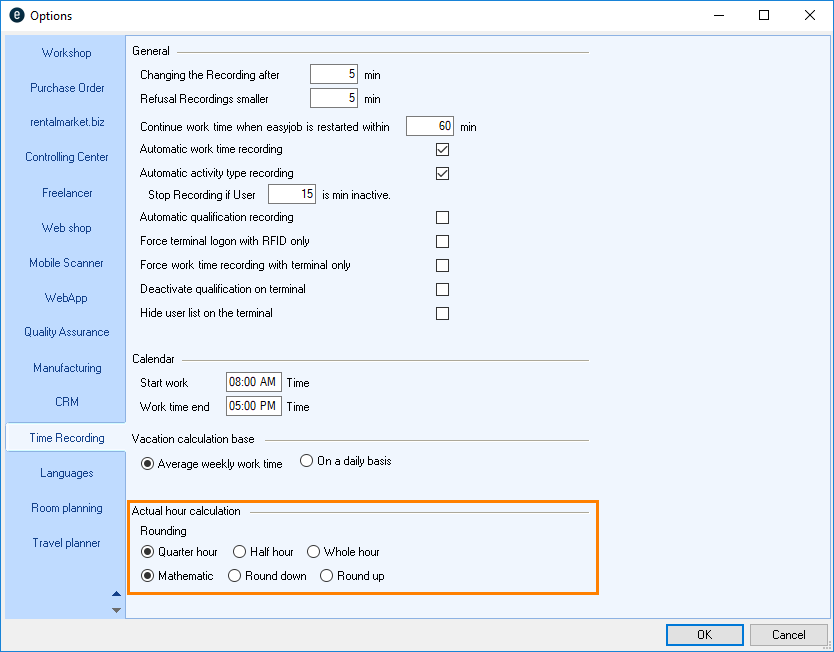
3. Select the desired Rounding for the Actual hour calculation
4. Ok
easyjob must be restarted to activate the settings.
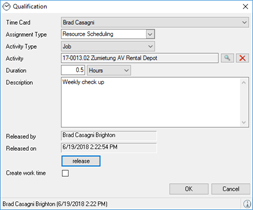
Adding a qualification
In addition to transforming recordings into qualifications, you can also generate an additional qualification using the Time Card icon  on the Status bar, on the Dashboard, in the Time recording calendar or in the Project on the time recording tab.
Adding a qualification via the Windows status bar.
1. Right click on the Time Card icon  on the status bar
2. Add qualification
3. Select the Time card.
4. Enter the assignment type, activity type and activity, duration and description
5. Ok
Adding a qualification via the Dashboard
1. easyjob Menu Time recording Dashboard
2. Qualification section
3. Add
4. Enter the assignment type, activity type and activity, duration and description
5. Ok
Adding a qualification via the Calendar
6. easyjob Menu Time recording Calendar
7. Add on the qualification page.
8. Select the Time card.
9. Enter the assignment type, activity type and activity, duration and description
10. Ok
Adding a qualification to the Project:
1. easyjob Menu Projects Edit projects
2. Select the desired project
3. Ok
4. Click the Time recording tab
5. Add
6. Select the Time card.
7. Enter the assignment type, activity type and activity, duration and description
8. Ok
Qualification templates
You can create templates in order to enter qualifications faster for frequently repeating processes.
Creating qualification templates
1. Right click on the Time Card icon 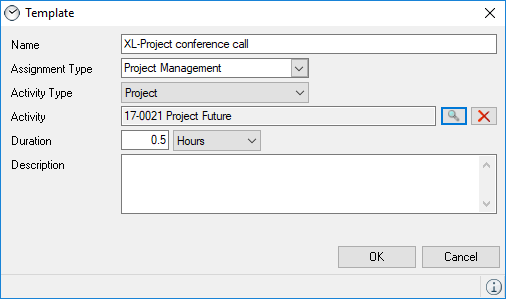 on the status bar
2. Qualification templates
3. Edit templates
4. Add qualification
5. Enter a description such as XL-project conference call
6. Select an Assignment type
7. Enter an Activity type
8. Assign the respective Activity
9. Enter the duration and a description, if necessary
10. Ok
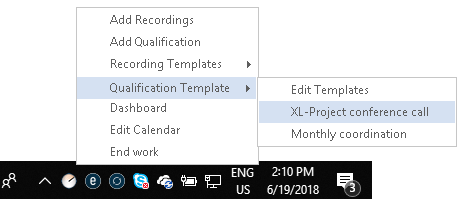
In order to use the qualification template, you can open it via the Time Card icon 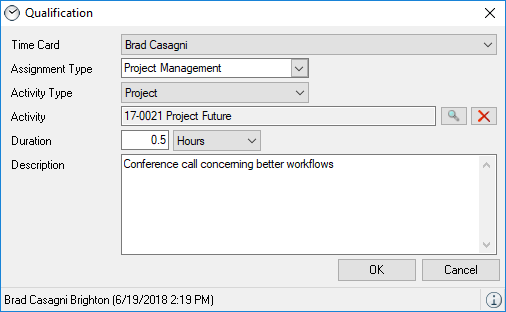 on the Status bar, on the Dashboard or in the time recording calendar.
Opening the qualification template via the Status bar
1. Right click on the Time Card icon 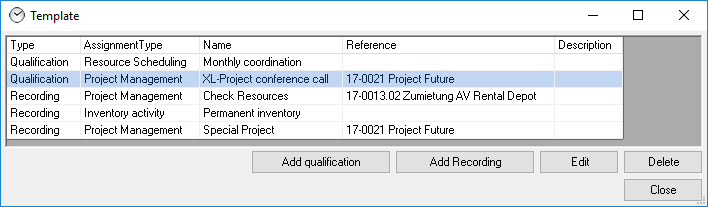 on the status bar
2. Qualification templates
3. Click the desired template, e.g. XL-project conference call

4. Select the Time card.
5. Adjust the proposed dates if necessary
6. Ok
Using the qualification template in the Dashboard
1. easyjob Menu Time recording Dashboard
2. Edit templates
3. Select the desired template
4. Edit
(The assignment type, activity type and activity will be pre-filled according to the template)
5. Define the Duration
6. Ok
Using the qualification template in the Calendar
7. easyjob Menu -> Time recording -> Calendar
8. Select the name
9. From template
10. Select the desired template
11. Ok
(The assignment type, activity type and activity will be pre-filled according to the template)
12. Define the Duration
13. Ok
Expenses
With Time Card, you can assign project expenses to employees and freelancers. You can also see these in the cost plan overview of the individual projects. Expense analyses are also available. You can edit the expense type in the master data and also pre-fill it with costs if necessary.
Editing the expense type:
1. easyjob Menu Master Data Expenses types
2. Add
3. Enter a name (e.g. airport taxi)
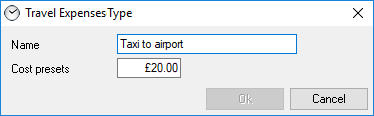
4. You can pre-fill the costs if necessary
5. Ok
Adding travel expenses
1. easyjob Menu -> Time recording -> Calendar
2. Select the name and the corresponding date.
3. Travel expenses tab
4. Add
5. Select the desired expense type, define the project, the costs and add a description if necessary
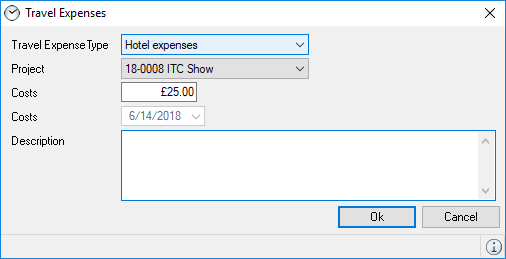
6. Ok
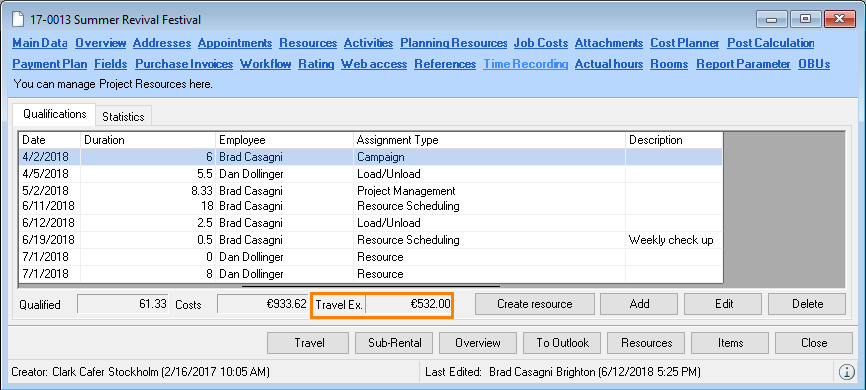
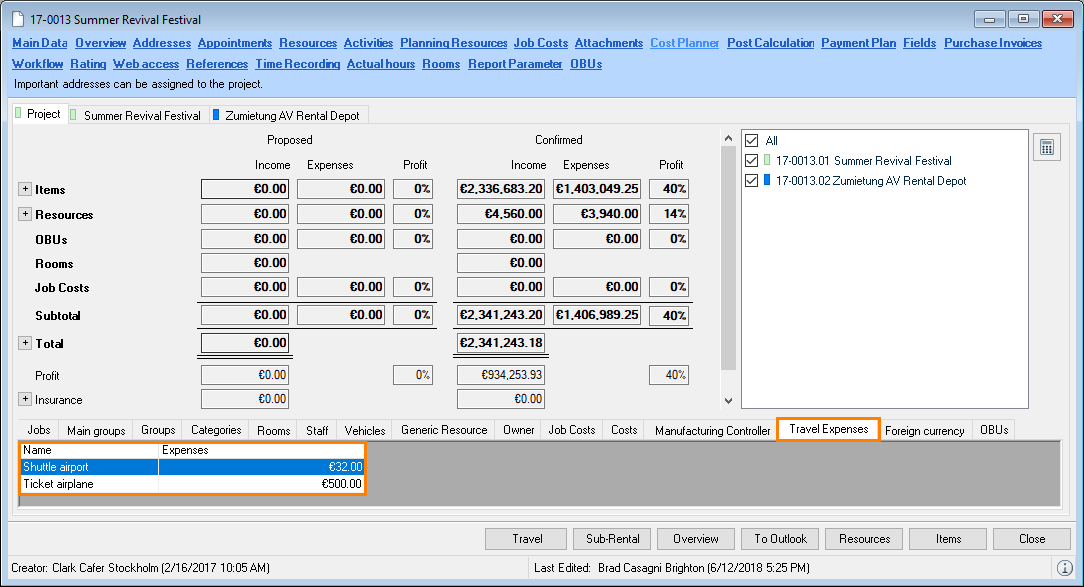
Project expenses
In the project, you can view the expenses in the time recording and in the cost planner.
Travel expenses in the Time recording project view
Travel expenses in the Project cost planner.
Statistics/Reports
Multiple analyses are available for the processed data. These include:
- Time and personnel costs per project
- Time per customer
- Target/actual time analysis
- Work time analysis per employee
- Activity analysis per employee
- Started activities
- Expense list
The analyses are generated based on the context from the address, work time overview, project and globally via the Business Information Center.
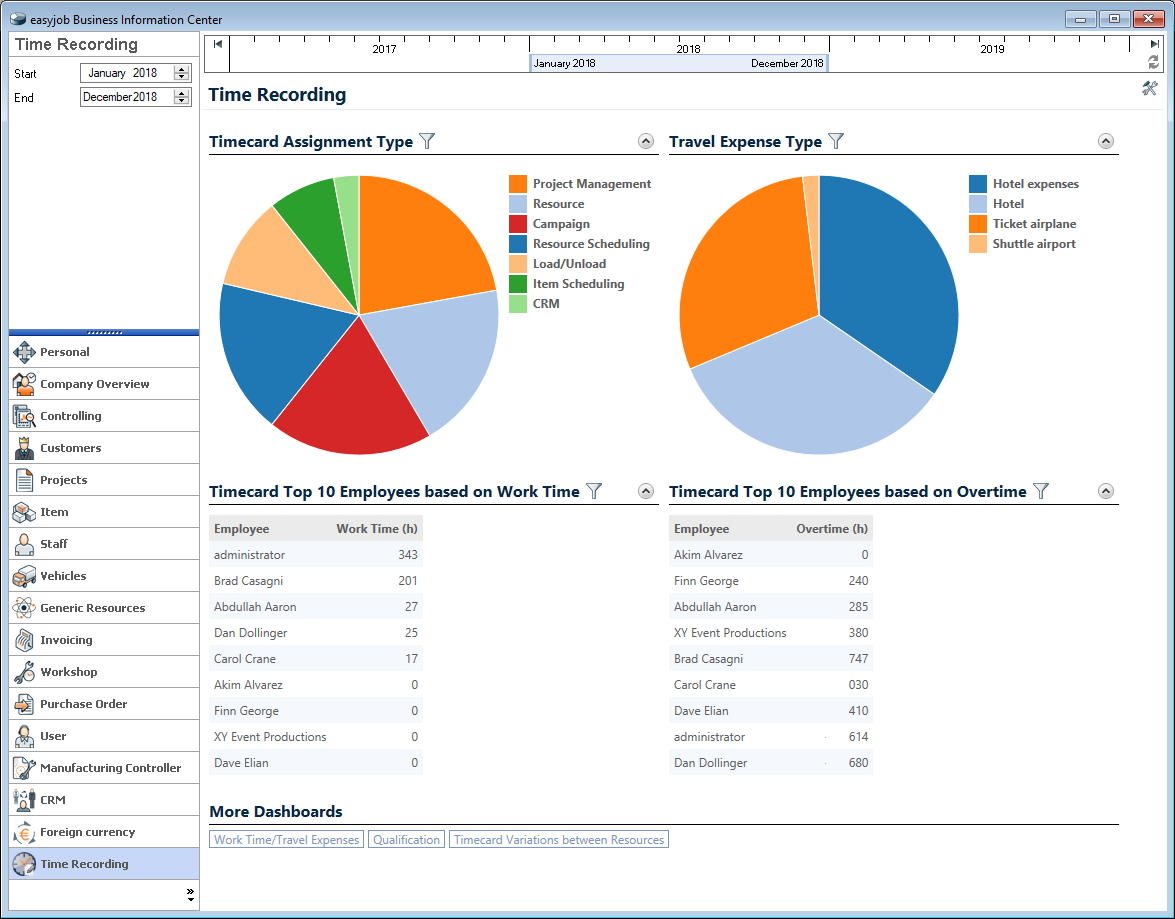
Time recording in the Business Information Center
Opening the project related analysis
1. easyjob Menu Statistics Business Information Center
2. Time recording tab
Details about using the Business Information Center can be found in the related manual.
Opening the project related analysis
3. easyjob Menu Projects Edit projects
4. Select the desired project
5. Ok
6. Time recording tab
7. Statistics tab
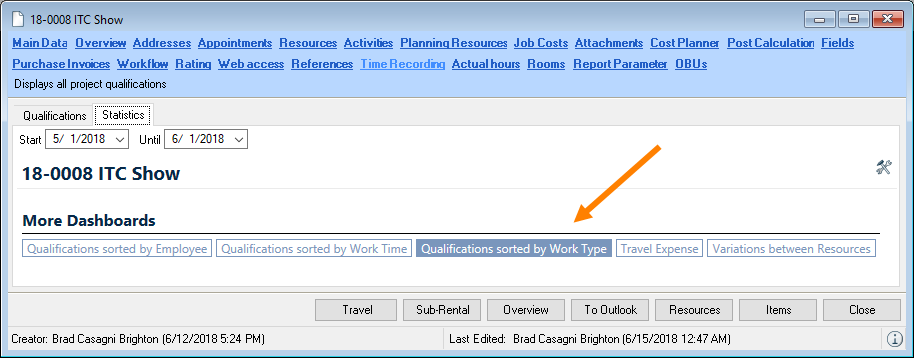
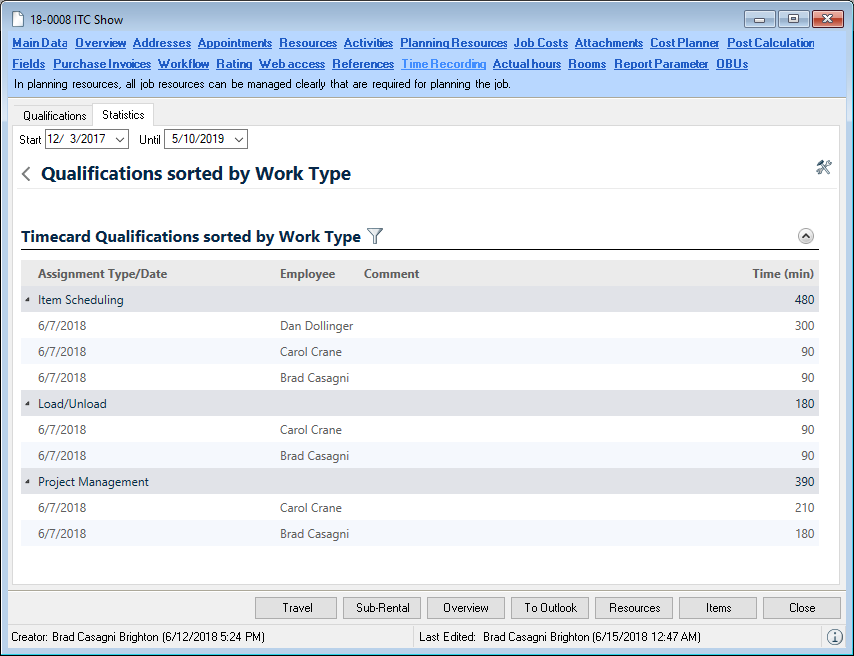
8. Click the desired statistic (e.g. qualification by activity type)
Opening a personal analysis via the master data:
1. easyjob Menu Master Data Addresses
2. Select the desired address
3. Ok
4. Time recording tab
5. Click the desired statistic (e.g. qualification by reference)
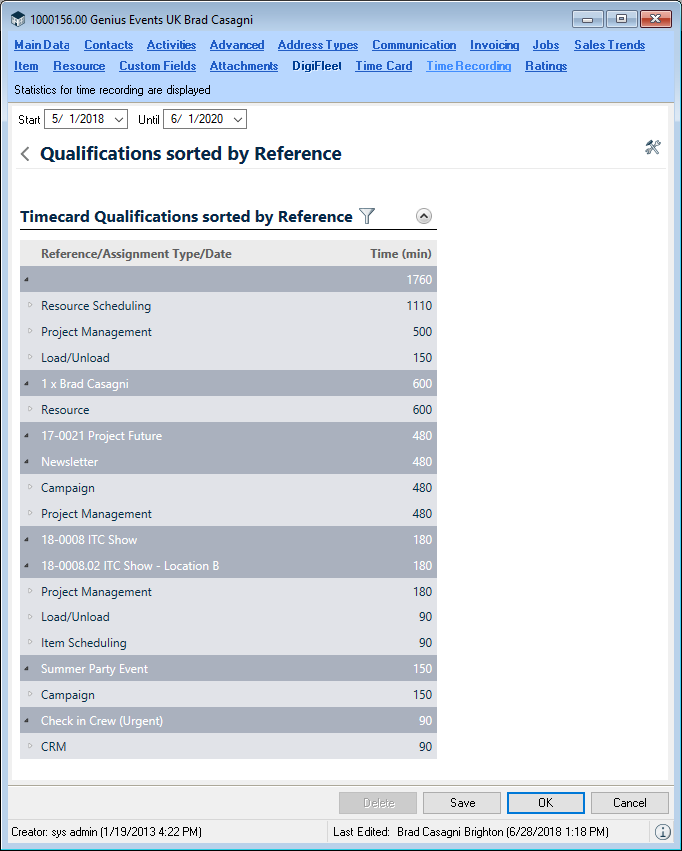
In this view you can also determine the time frame for the statistical analysis. You can access the same analysis via the Work time overview
Displaying a personal analysis in the work time overview
1. easyjob Menu Time recording Work time overview
2. Select the name
3. Statistics tab
4. Click the desired statistic (e.g. travel expense) 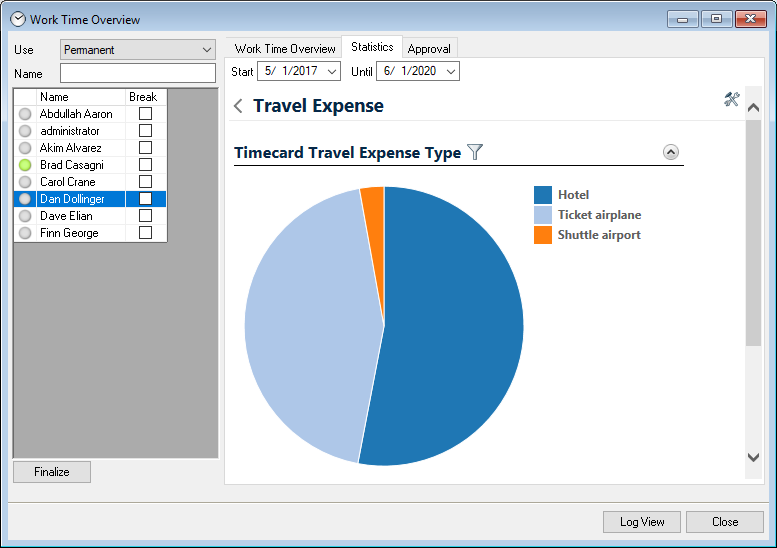
Advanced controlling functions
In connection with the Controlling Center, there is the option to assign the activity cost from projects with Time recording , thereby calculating the actual work cost for an order.
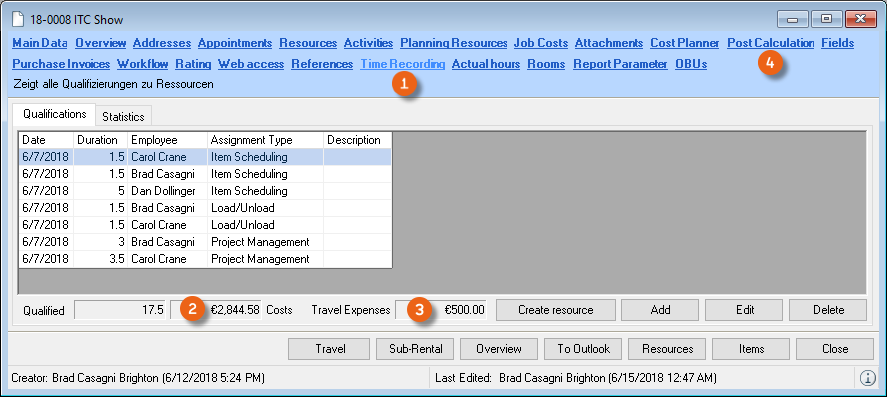
In the post calculation of the project, the costs from Qualification and the incurred Travel expenses are taken into account under Real Resources Staff Own Staff .
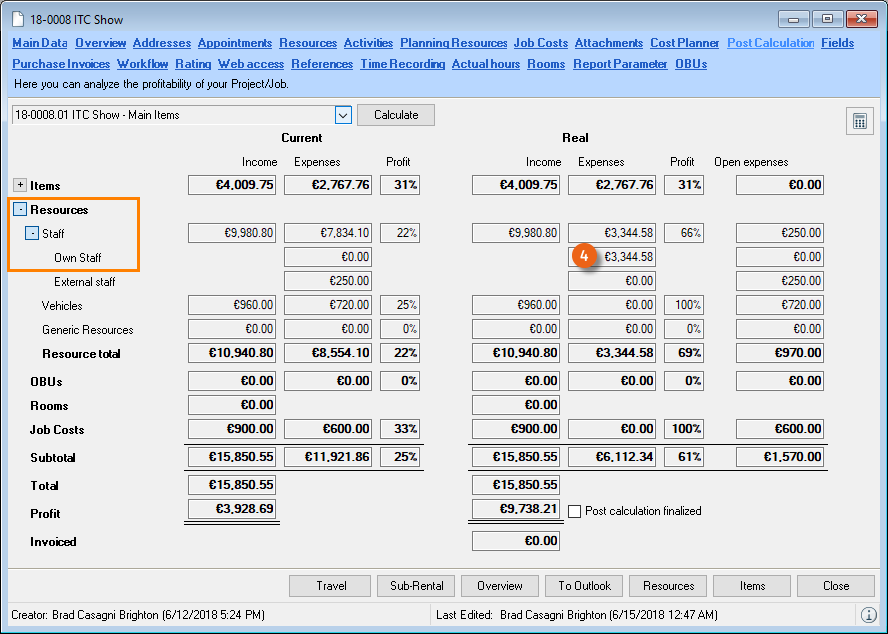
Details about using the Controlling Center can be found in the relative manual under Post Calculation.
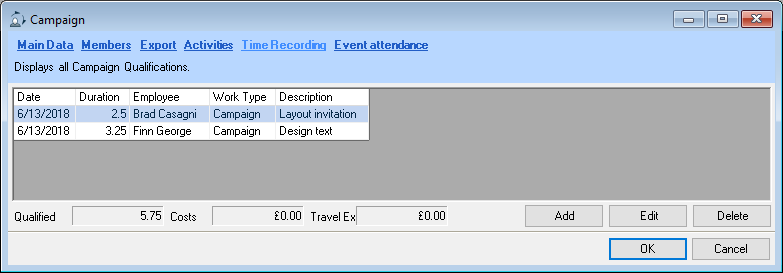
Advanced CRM functions
In the campaign, you can also carry out qualifications on the Time recording tab