easyjob Venue Equipment Tracker
Documentation
Venue Equipment Tracker
With the easyjob Venue Equipment Tracker you can transfer data from easyjob to the Equipment Tracker App by scanning the barcode or via a hyperlink. The items are transferred to the customer by scanning a barcode using the camera integrated in a smartphone. and then returned in the same manner. The app provides an overview of all transport orders, photo-documentation of the progress of items, a record of damage and the possibility to have the customer place their digital signature directly on the display.
Requirements and license
To be able to use the functionality of the Venue Equipment Tracker, you need a local or cloud-based easyjob environment, version 6.16.2.33 or later using Edition M, L or XL. An easyjob license with the Venue Equipment Tracker module is necessary to create a transport order. To use the App itself, no additional licenses are required. However at least Android version 6.0 is required.
Installation and activation
Go to the easyjob program settings to activate the easyjob Venue Equipment Tracker module. A separate installation is not required.
Activating the Venue Equipment Tracker module
1. easyjob Menu Tools Settings
2. Functions tab
3. Select Venue Equipment Tracker
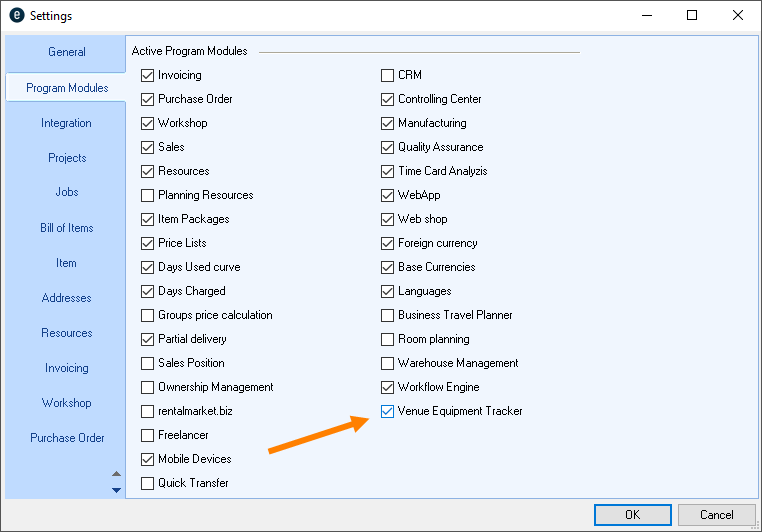
4. Ok
easyjob must be restarted to activate the settings.
To be able to assign a driver as a resource in a transport order you must define a resource type.
Defining the driver resource type for the transport order
1. easyjob Menu Tools Settings
2. Venue Equipment Tracker tab
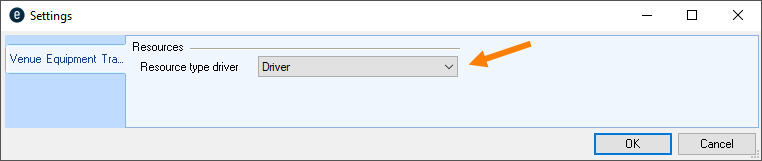
3. Select the resource type driver
4. Ok
easyjob must be restarted to activate the settings.
Configuring the easyjob service
To be able to use the easyjob Equipment Tracker App the easyjob Web Access service must first be activated and configured in the Service Manager.
This service can be found in the easyjob server manager . To start the described service , open it and make the configurations.
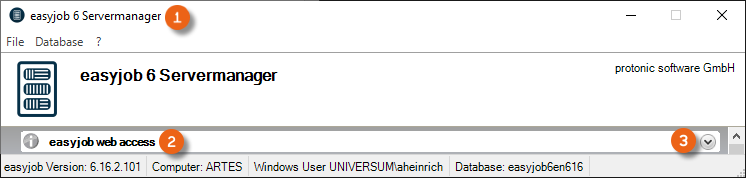
Activating the easyjob Web Access Service
1. Open easyjob 6 server manager
2. easyjob Web Access
3. Configure service
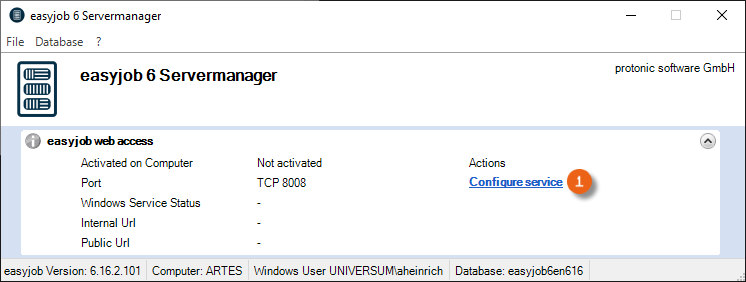
4. Check the box Activate the Web Access Service on this computer
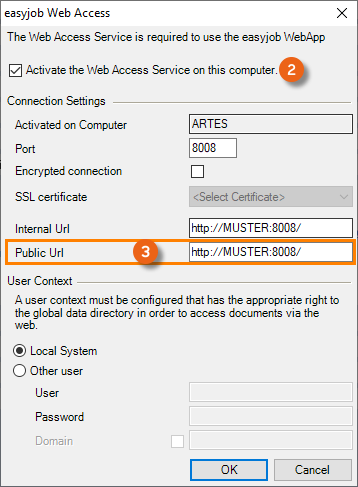
5. Define the public URL
6. Ok
The service will be executed by default with the Local System user context.
A functional public URL must be set up in order to be able to use the Venue Equipment Tracker.
Configure the Windows Firewall
If required, configure the firewall for this service. See also Scanner App manual.
Download Venue Equipment Tracker
The Android and the iOS Apps are available for installation in the respective App Stores (e.g. Google Play Store or Apple Store).
The name of the app is Equipment Tracker.
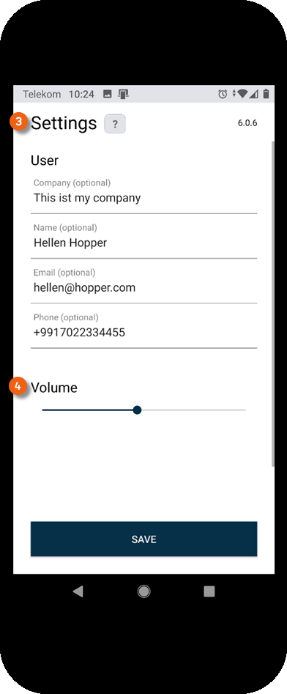
After downloading the app, you can open it and create your User profile under Settings . You can customize the volume of the confirmation beep. The various settings for the barcode input are explained in more detail in Scanner App manual. If you use the camera integrated in your smartphone, simply use the barcode, no other information must be entered. Then save your settings.


In the Equipment Tracker App, you can directly call up the help pages of this manual for support. To do so, click the question mark in the point where you need help or more information.
Transport order in easyjob
To be able to process a transport order in the Equipment Tracker App, it must first be created in easyjob. The project and job are first planned and loaded as usual. Partial deliveries can also be used if necessary. You can find more information about project/job planning and partial deliveries in easyjob 6 manual.
Adding a transport order
After you have completed your planning in the Bill of Items and and planned and loaded a partial delivery if necessary, a transport order must be created for the loaded item (e.g. for the driver who brings the goods to the customer).
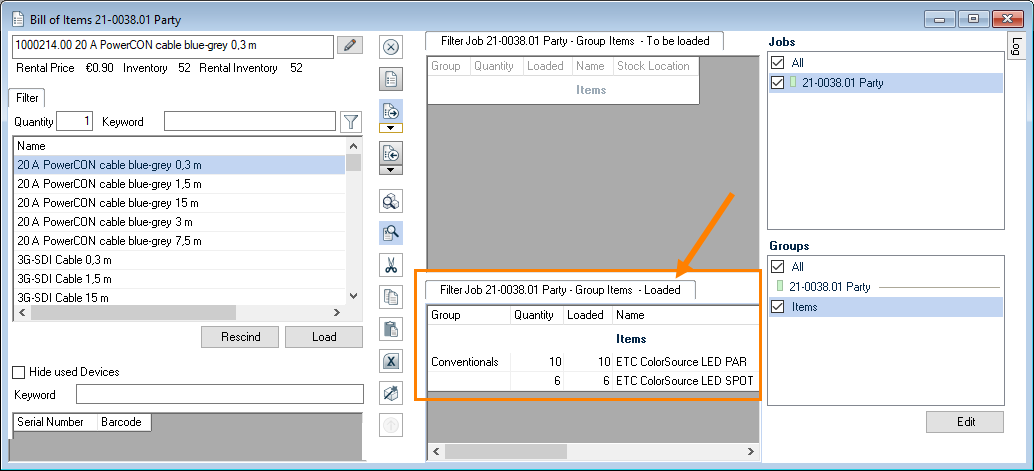
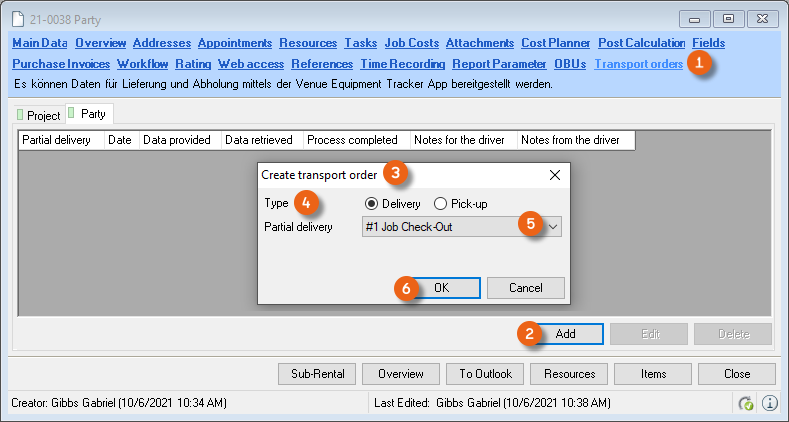
To do so, close the Bill of Items and open the Transport orders tab . Transport orders can only be created for confirmed jobs. Press add to create a new transport order . The type of transport order (delivery or pick-up), the concerned delivery (for a complete job without a partial delivery, this is identical to the Job Check-Out) must be selected and confirmed with OK .
Adding a transport order
1. easyjob Menu Projects p Select Project
2. Transport orders Add
3. Enter the type and select the concerned delivery
4. Ok
5. Add a note if necessary
6. Ok
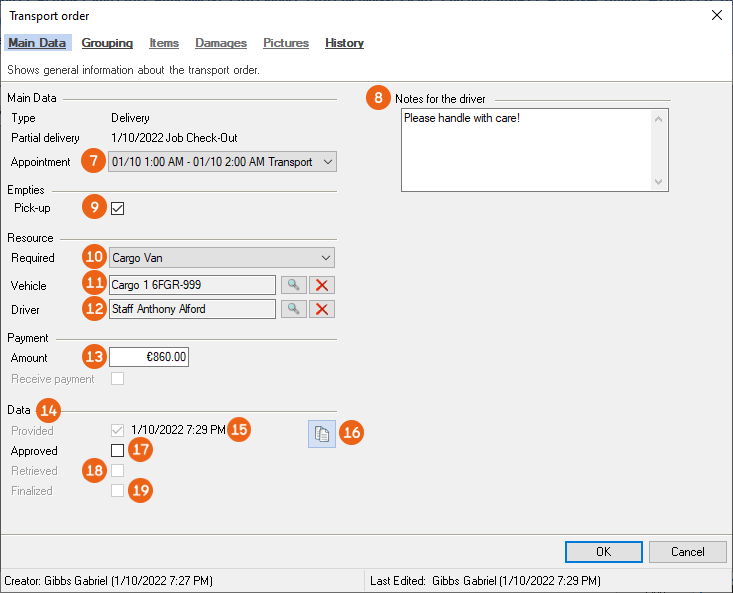
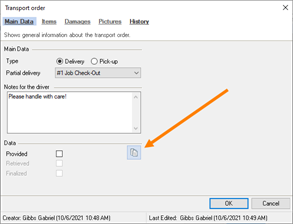
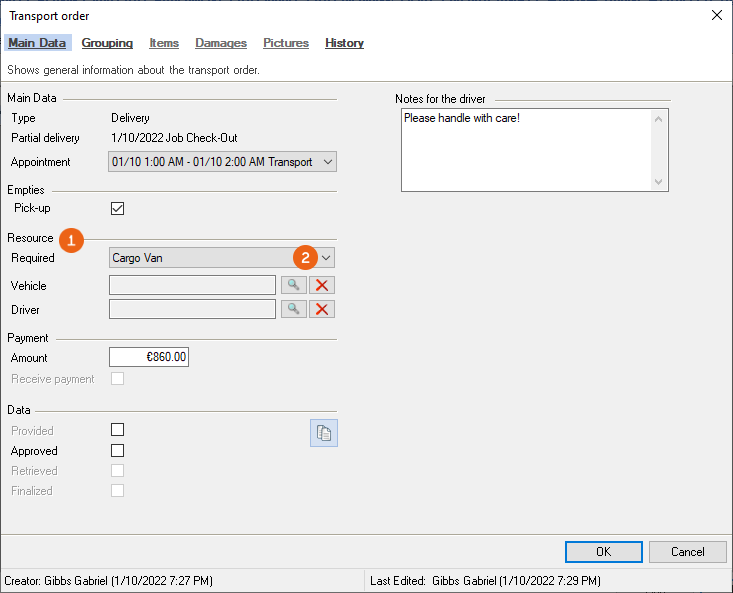
You can select an additional Appointment in the window. In addition to Notes for the driver , you can also indicate that empties must be picked up , the Required resources with the Vehicle and Driver (you must first define the driver resource type in the program settings - see also Installation and activation), as well as the Amount for a payment to be collected on site. The date the data was provided for the transport order is indicated in the Data section. This takes place when the individually created link to the respective transport order is created. With the link the driver can receive the basic information in advance via the Equipment Tracker App. A note appears in the App that the order has not yet been approved and that the transport order must be updated. After Approval the transport order can be updated in the App and processed further. As soon as the transport order (after approval) is retrieved in the App and at the end after finalization of the order the times are logged accordingly.
Please note that the content of the transport orders is created only for loaded items and devices. Items and devices that have not yet been loaded are not shown in the Equipment Tracker App. In that case, only the order data (pick-up address, et.) is provided.
Generating a link for the transport order
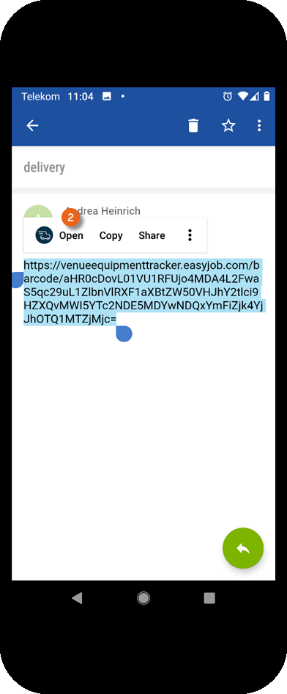
Clicking the symbol 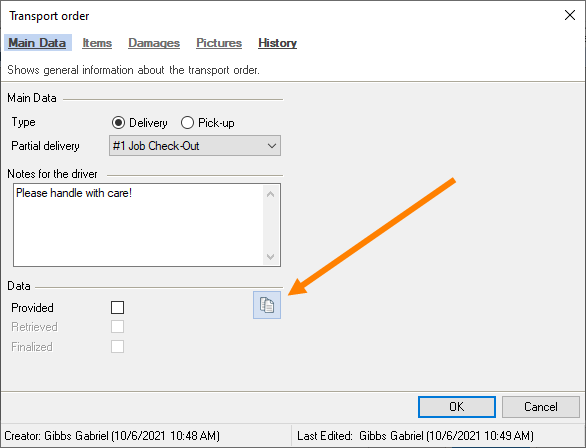 in your transport order copies the individually created link to the clipboard, and then you can add it, for example, to your e-mail (STRG + V) and forward it.
Alternatively, you can use the link to generate a QR code and create an individual report for this transport order.
The further processing of the transport order in the Equipment Tracker App is described in more detail in Transport order in the Equipment Tracker App.
Assigning resources to a transport order
You can assign resources (vehicle/driver) to a transport order. You can make assignments in the main data of the transport order or in the resource plan. Select the necessary resources, vehicle and driver directly in the main data. See Adding a transport order. If under Resource you did not select any or only the necessary Resource , you can make the assignment in the resource plan.
Display the Transport orders section in the resource plan. You can find more information about handling the resource plan in the easyjob 6 manual Resourcen Plan. All transport orders for the selected period are displayed under Transport orders . The No assignment area displays all the transport orders that still require a resource assignment. When a required resource type is selected, this is displayed in the corresponding column . Details regarding the transport order such as the Quantity of items , the Weight and the Volume help you with planning. You can assign the Vehicle and Driver as usual via Drag&Drop. With Edit transport order you can open it from the resource plan .
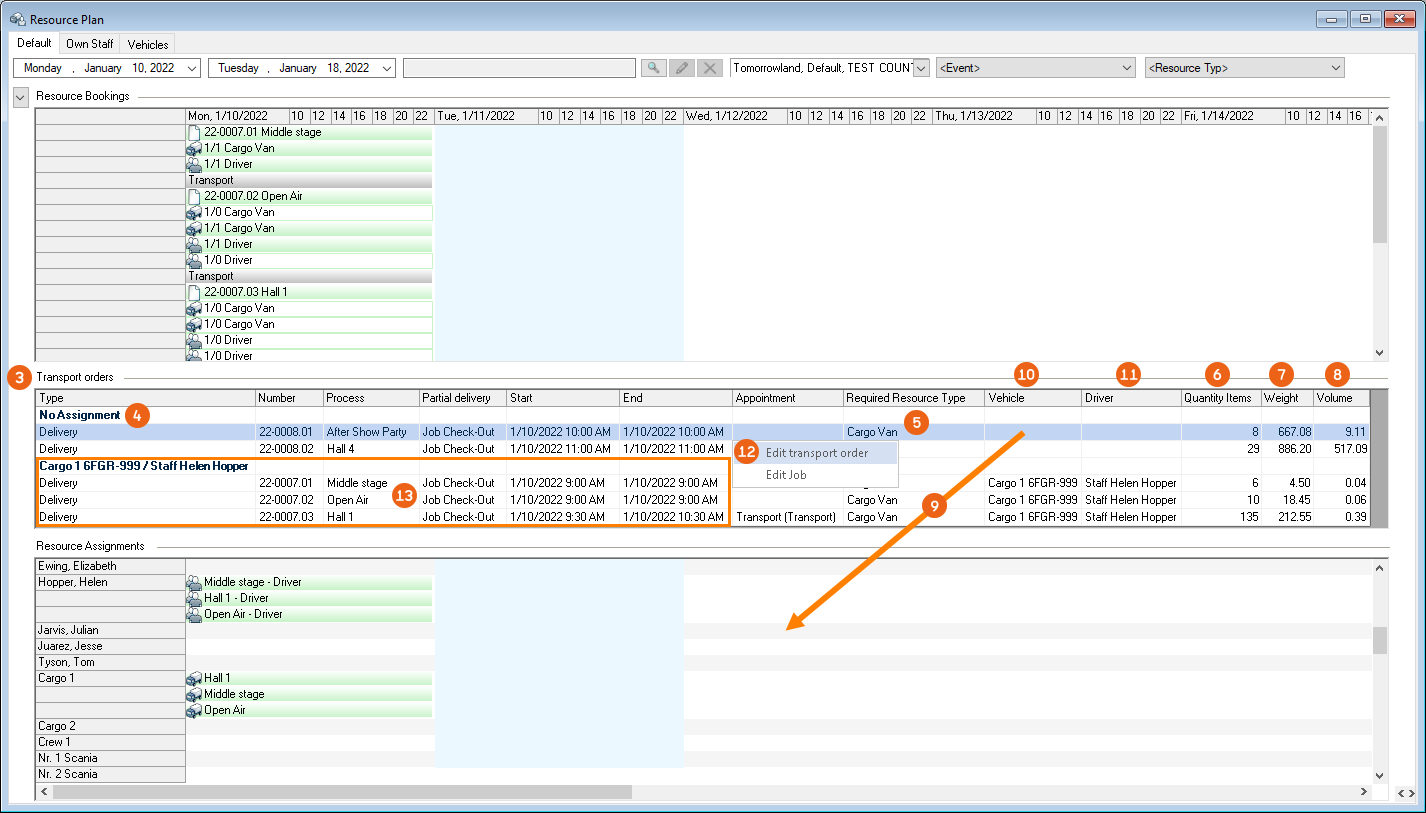
The resource plan helps you summarize the transport orders, if necessary, and assign a vehicle and driver . If items are to be delivered to or picked up from the same delivery address, the transport orders can also be grouped for the driver in the Venue Equipment Tracker App. See also Grouping.
Informing the driver from the resource plan
This function is only available with the easyjob CRM Module. Via the Transport order context menu in the Resource plan , you have the option to provide your driver with a CRM email activity that contains information about a certain transport order (or about multiple transport orders using the multiple selection ).

The CRM activity opens up and in addition to the Resource data it also contains a link for the Venue Equipment Tracker App of the respective transport order , in addition you can add information . You can send the e-mail directly by pressing Send .
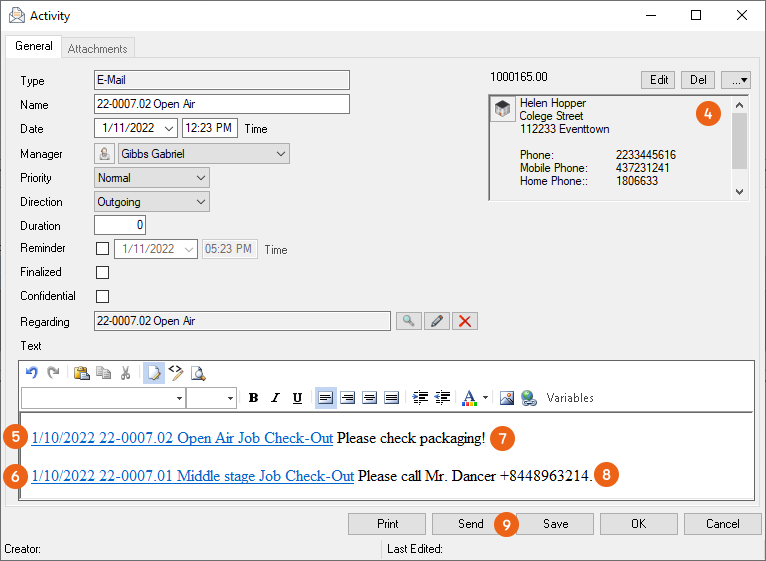
As soon as the Driver resource is assigned in the resource plan or the transport order, the CRM e-Mail symbol appears in the transport order. Clicking the symbol opens the CRM email activity that can be sent directly to the assigned driver.
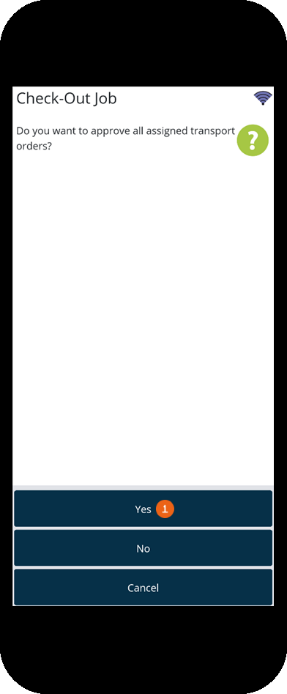
Informing the driver via the scanner during check-out
Another way to provide the driver with information is during check-out via the scanner. The Signature at Check-Out setting must be activated in the scanner for this function. After the employee has scanned (loaded) all job items, they transfer this to the driver. After the job is checked out on the scanner, the assigned transport orders can be approved . A comment can be entered in addition to the signature , the name of the driver and their e-mail address . See also Quittieren von Material auf dem Scanner. The comment is transferred to the transport order and is displayed not only in the Notes for the driver entered in easyjob but also in the Venue Equipment Tracker App.
Transport order documentation
After the transport order has been finalized in the Equipment Tracker App and the data has been provided - see Finalizing the transport order – you can view all the information concerning the transport order. Some details about the process are shown in the overview. The entry contains the name of the delivery or partial delivery (here Job Check-Out), as well as the date and time from the schedule information , the date and time the data was provided (link created) and when the data was retrieved (opened in the Equipment Tracker App). The date and time the process was completed , as well as notes for the driver and notes from the driver . The signature icon indicates that a digital signature is available. By right clicking the symbol 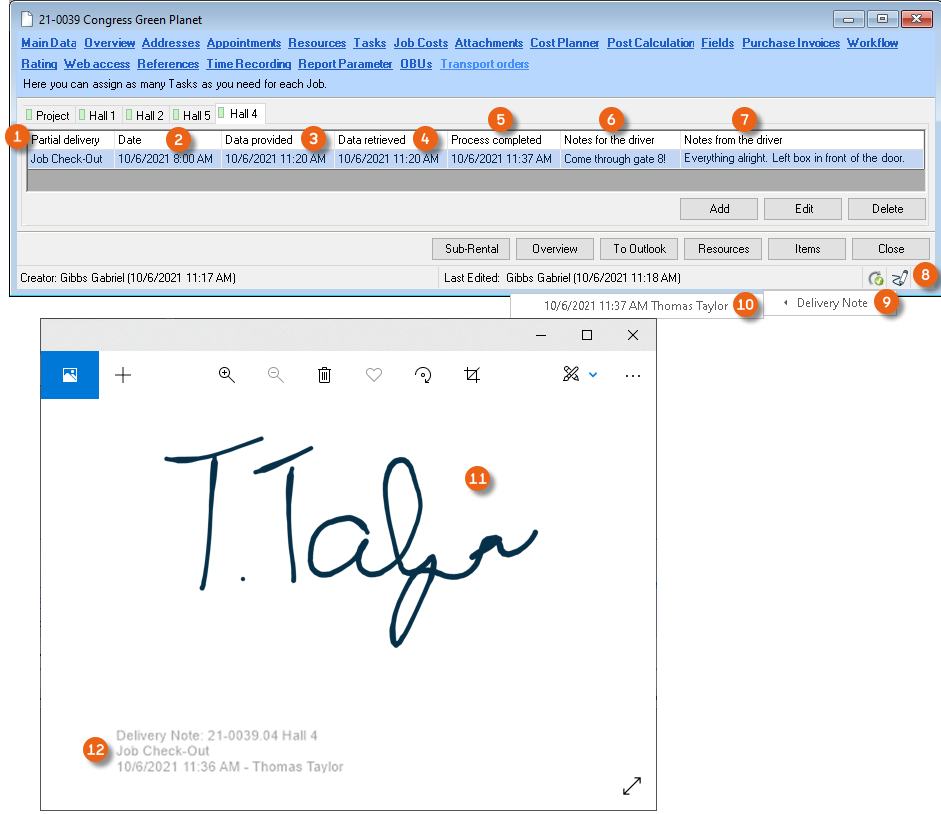 , the required Delivery Note can be selected and opened . The signature is displayed and, in addition, a stamp for the data relevant for the delivery is included in the signature image.

Viewing the transport order
1. easyjob menu View p Job p Select Job Edit
2. Transport orders
Editing a transport order
The transport order includes all the data about the process and can be tracked.
Editing a transport order
1. easyjob menu View p Job Select Job Edit
2. Transport orders
3. Select the desired transport order
4. Edit
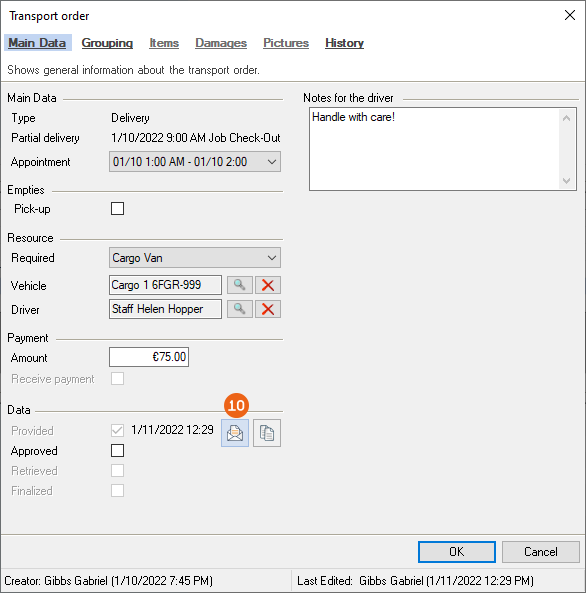
Main Data
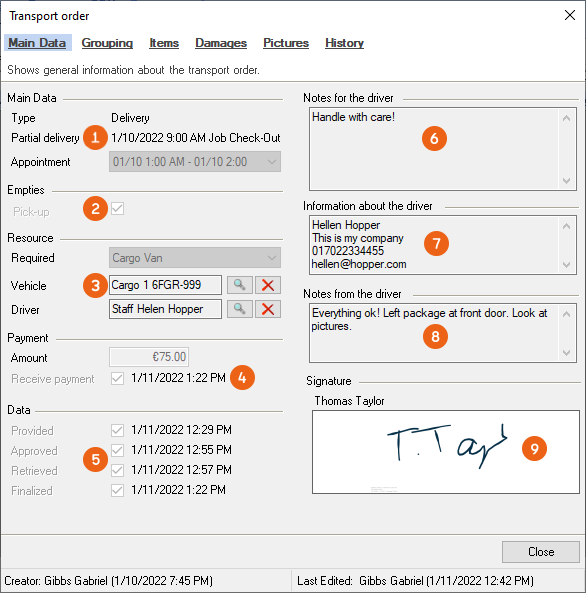
All relevant information about the transport order is displayed in the main data. In addition to the type (pick-up/delivery) and the concerned delivery or Partial delivery , you can see information about empties , resources and if a payment was due and if it was collected . The time of the order for the provision, approval, retrieval and finalize are shown under data . The notes communicated to the driver , the information about the driver provided in the Equipment Tracker App , the notes from the driver when finalizing the transport order and the digital signature are documented.
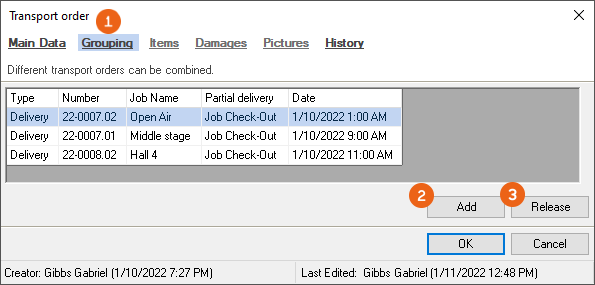
Grouping (multi-job process)
Transport orders with multiple jobs from different projects can be combined into a delivery. These transport orders are sent grouped to the Venue Equipment Tracker App. A requirement for grouping is that they have the same delivery date and delivery type. The processes are continued to be processed separately, the grouping is shown in the App and it is possible to have a single signature for all grouped transport orders. Under Grouping you can Add orders from order jobs and Release them again if necessary.
Items
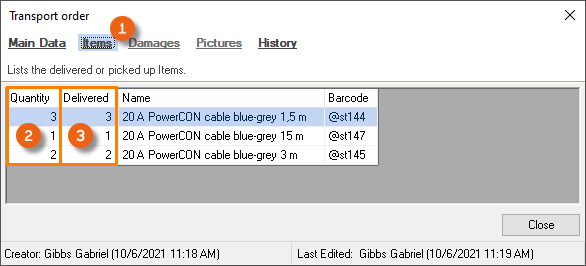
Under Items , all items/devices are displayed that are available in the transport order with an indication if they are scanned as delivered (or picked-up) .
Damage
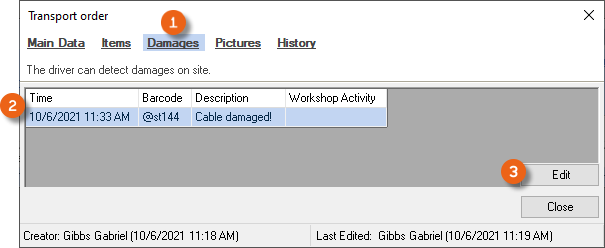
If there is any damage , all items/devices for which damage was recorded in the Venue Equipment Tracker App are displayed . You can edit the damage .
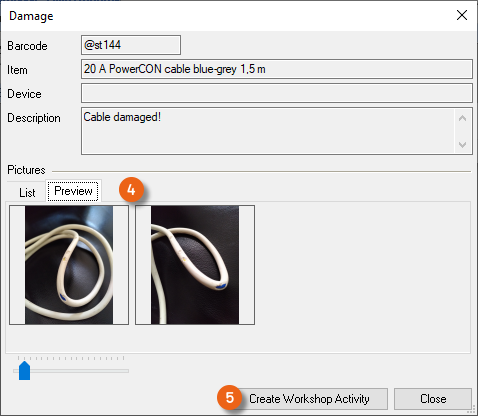
The pictures taken in the Venue Equipment Tracker App of the damage are displayed in the damage documentation. You can create a Workshop Activity directly from here.
Create a workshop activity
More information about the Creating a workshop order function can be found in easyjob 6 manual.
Pictures
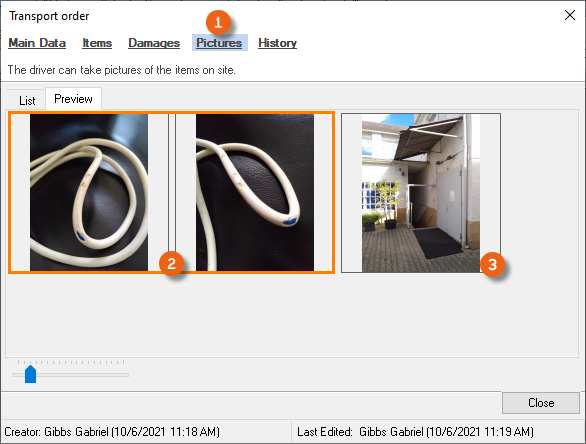
The Pictures section contains all the pictures created for this order in the Venue Equipment Tracker App, all pictures of the damage the pictures taken directly using the Pictures function, e.g. to document the delivery location .
History

The History shows the log entries for the transport order. In addition to the information in the Master Data, such as when the data was created, provided, approved, retrieved and finalized , a detailed list of the scanning process is displayed here. You can see if the items/devices were scanned individually or if the quantity was first entered and then the item scanned only once. If there is no entry in the Barcode column, the Item was not scanned or confirmed directly in the App. The time of the signature and the entered name are also displayed .
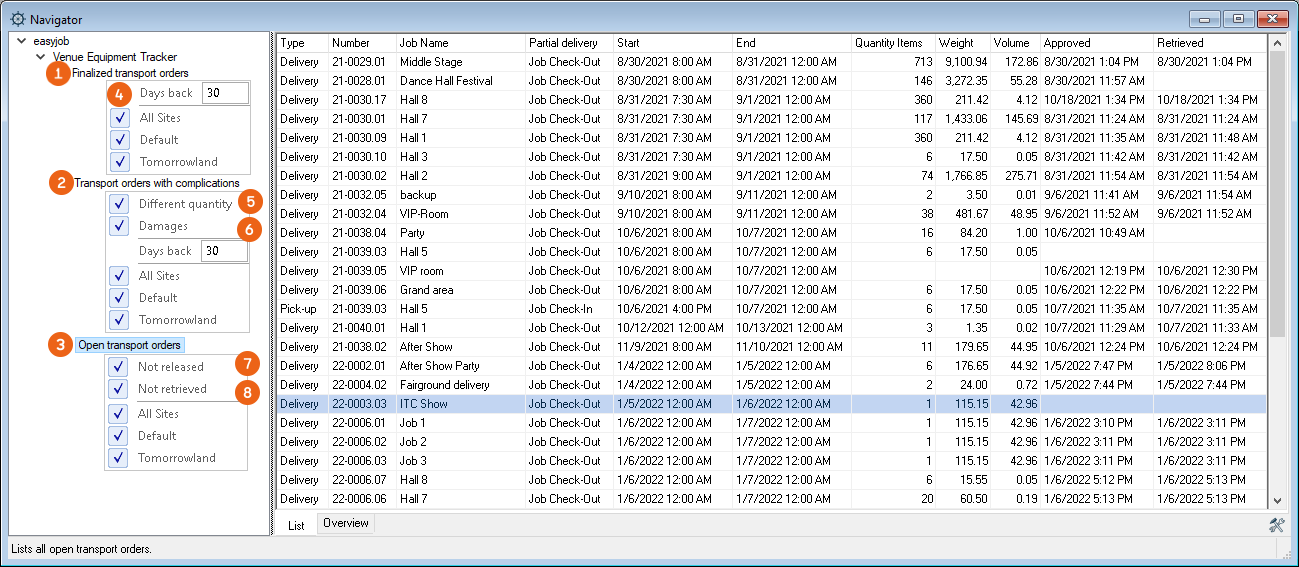
Navigator and easyjob Today views
The views Finalized transport orders , Open transport orders and Transport orders with complications are available in Navigator and easyjob Today. Depending on the view, you can use additional filters such as Days back , Different quantity , Damages , Not released or Not retrieved .
Transport order in the Equipment Tracker App
If you want to further edit the transport order with the Equipment Tracker App, you can either open the link created in easyjob (e.g. from an e-mail) or scan the transport order QR code in the Equipment Tracker App.
Settings in the Equipment Tracker App
After you have opened the Equipment Tracker App, the Home screen is displayed. Tap Settings and enter your contact data . This information will be transferred to the purchaser when sending the transport order. You can also adjust the volume of the confirmation beep when scanning.
Opening the transport order using a link
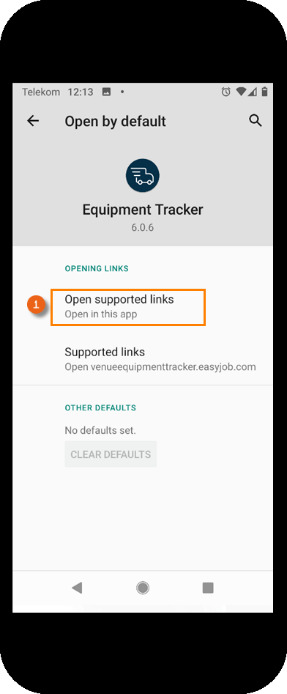
Depending on which e-mail program or browser is used, a setting may be necessary that specifies that the link should be opened automatically with the Equipment Tracker App . After you have received a notification with the link for the transport order, open the link with the Equipment Tracker App , the transport order is opened .
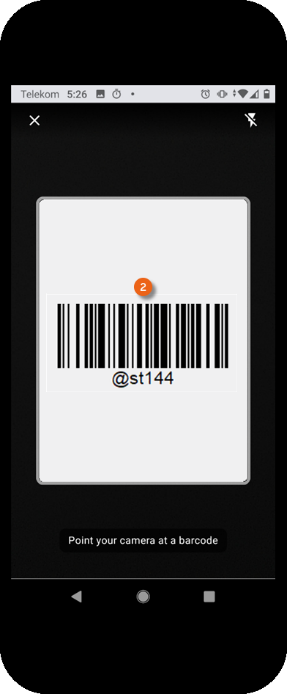
Scanning the transport order using a QR code
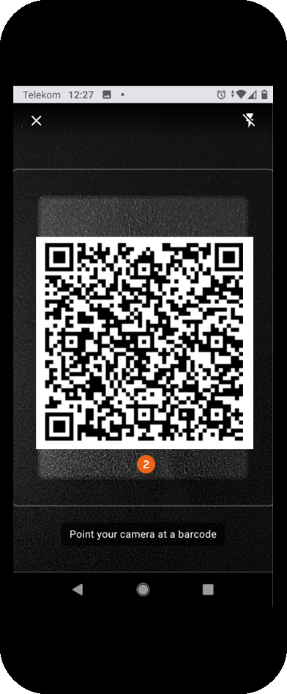
To scan a transport order using a QR code, start the Equipment Tracker App using your end device and click Add . Point your camera at the QR code . As soon as it is detected, the transport order will open.

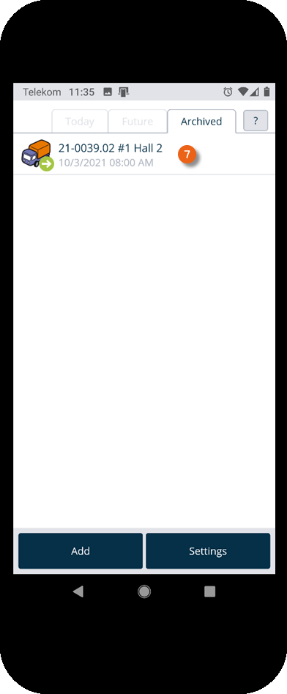
Managing transport orders
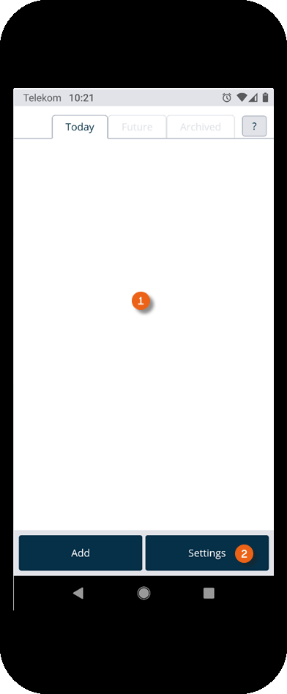
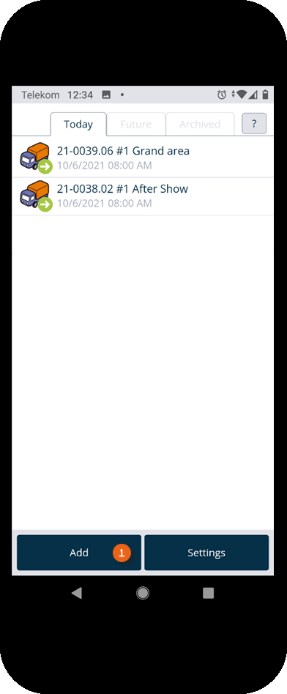
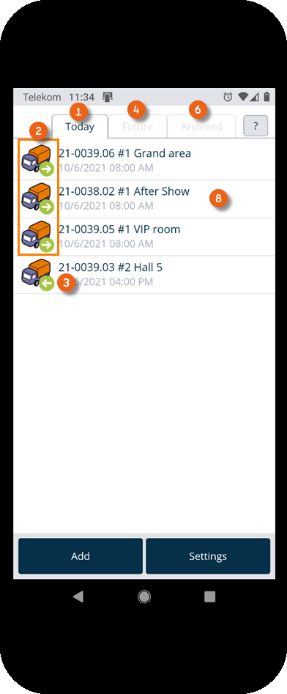
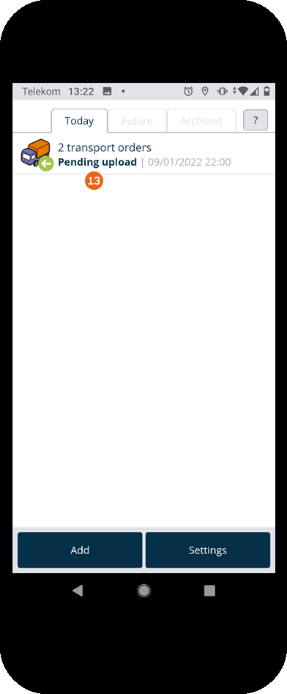
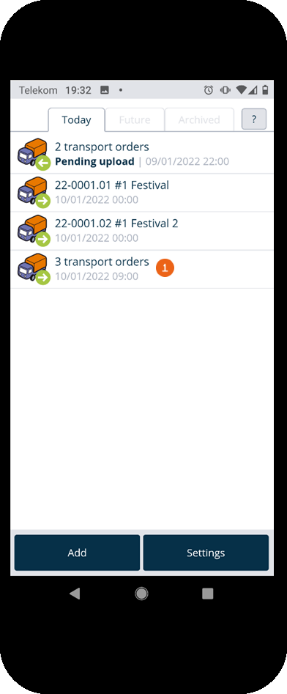
The home screen is displayed after the Equipment Tracker App is opened. It shows which transport orders are pending today . The green arrow to the right indicates a delivery, the left arrow indicates a pick-up. The Future tab shows future transport orders . The Archived tab shows completed orders . Tapping an entry opens the selected transport order.
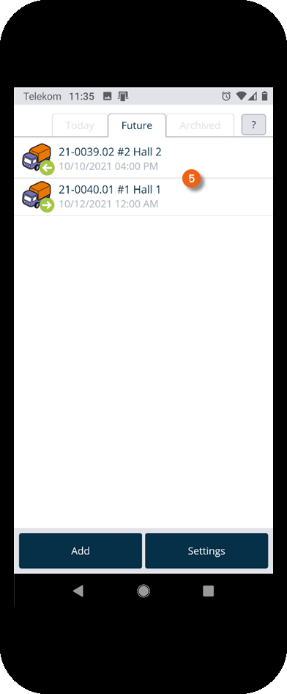
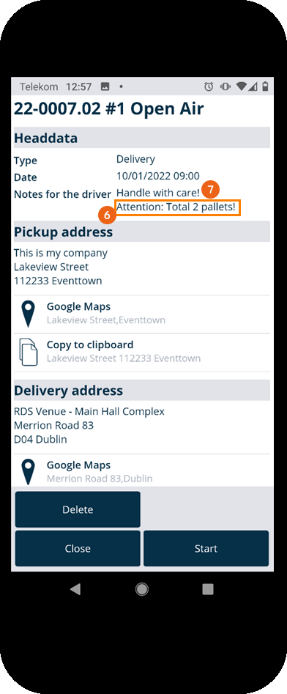
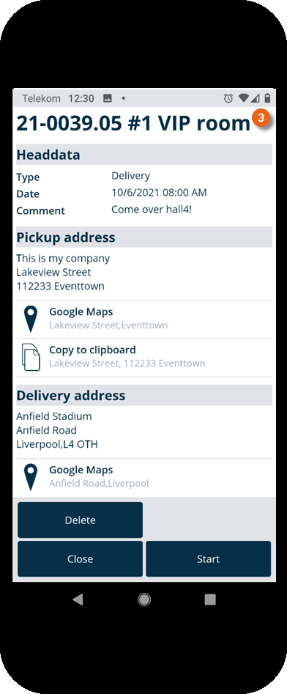
The order dates , the pick-up address , the delivery address and the contact (job manager) are displayed. If empties are to be picked up, the corresponding note appears. The addresses can be opened directly in Google Maps or copied to the clipboard . By tapping the telephone number it is called directly by your end device. You can Delete the transport order completely.
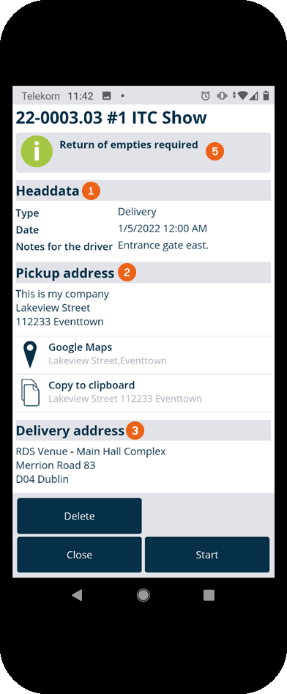
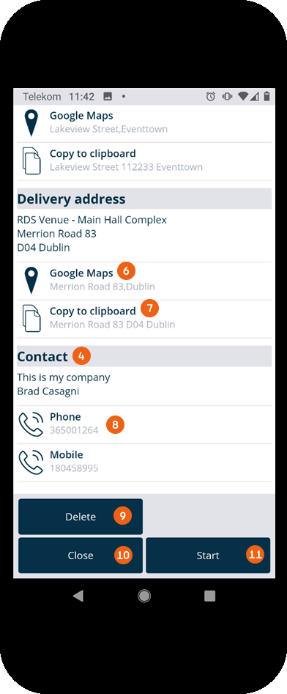

Close or Start item transfer. If the transport order was not finally released, a note appears in the order that it must be updated , as well as the time of the last update . Only released orders can be started, prior to the release you can already Open them for an overview.
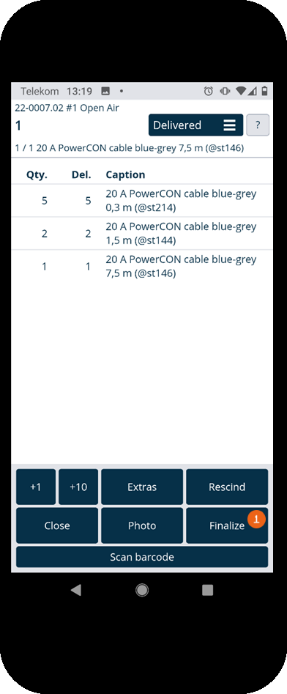
Delivering items from a transport order
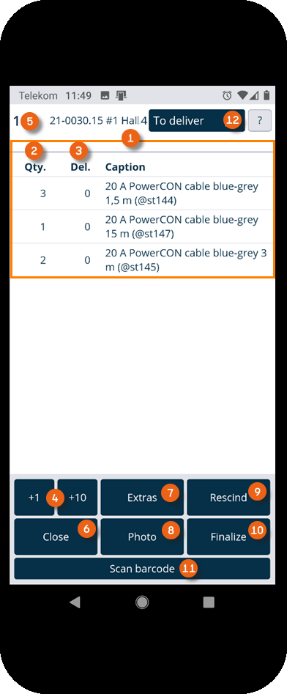
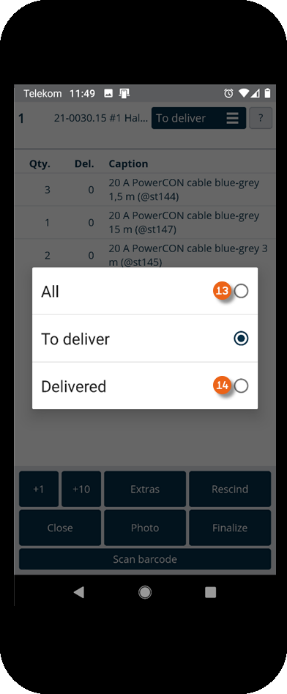
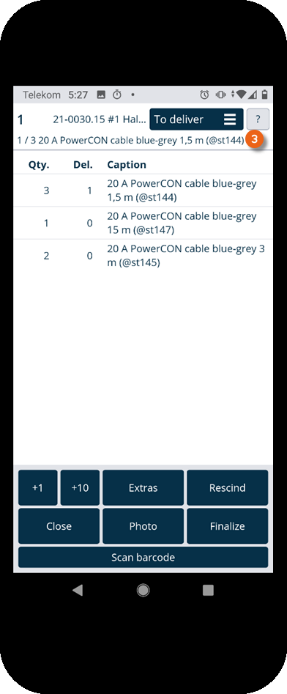
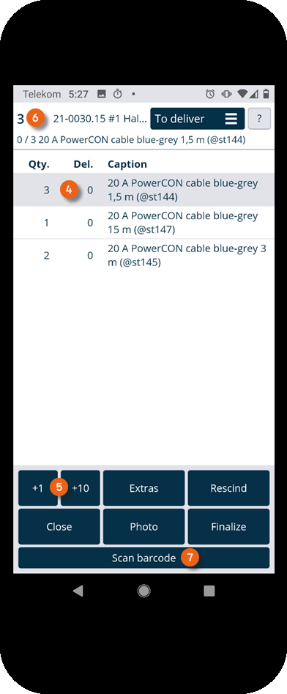
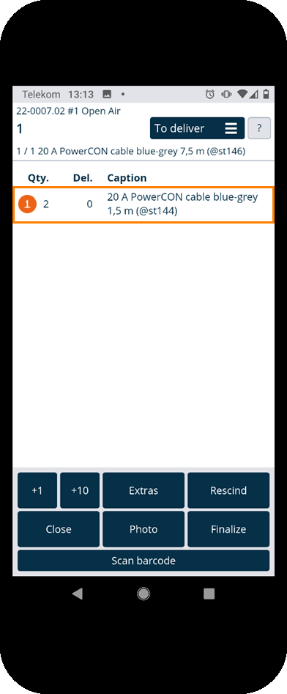
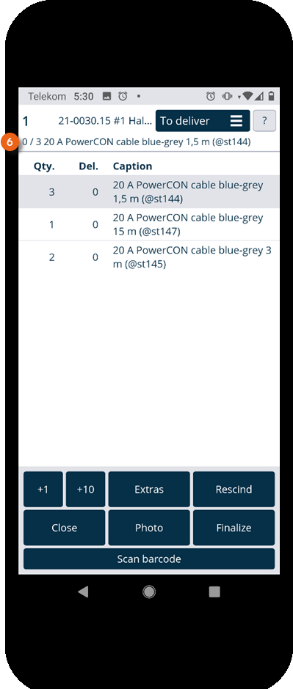
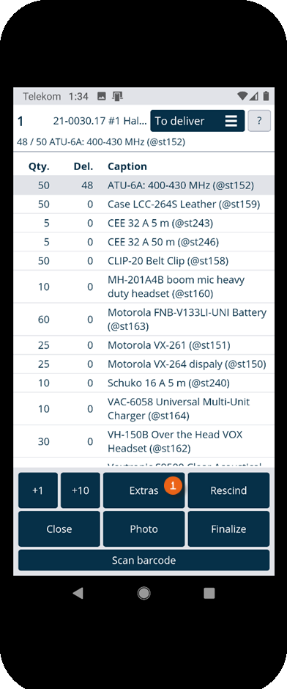
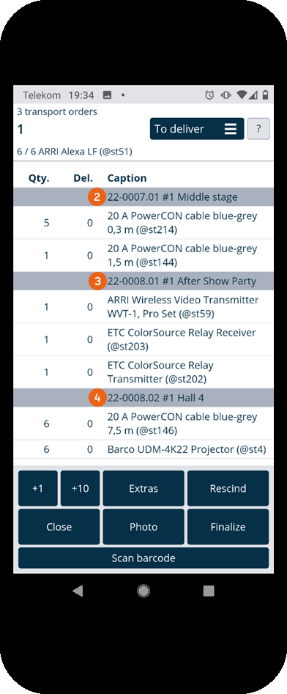
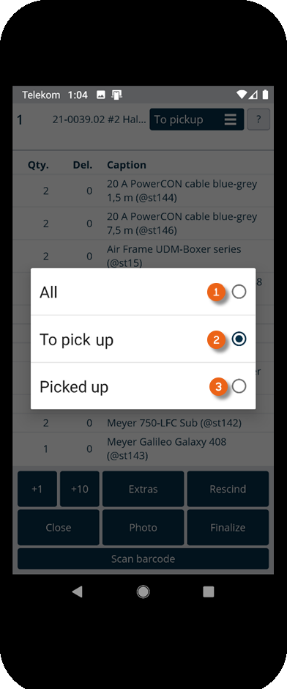
As soon as you have started a transport order, an overview of its items and the respective quantities is shown. You can also see how often the item was already scanned. With +1 and +10 you can preallocate the quantity of items to be scanned. for example if you want to deliver 13 of the same item, you can tap 2 x +10 and 3 x +1, the number of the item to be scanned changes from 1 to 13 and the barcode for the 13 items must only be scanned once. Alternatively you can tap directly on the quantity and change the number directly . You can close the order if necessary (already scanned items remain saved). With Extras you can record damage or add additional Pictures to your transport order for documentation purposes (e.g. the deposit location). Items marked accidentally as delivered can be canceled and finalized at the end of the transport order. With Scan barcode you can activate the camera to start scanning. Depending on the complexity of the order, you can switch the view from To deliver to All or Delivered .
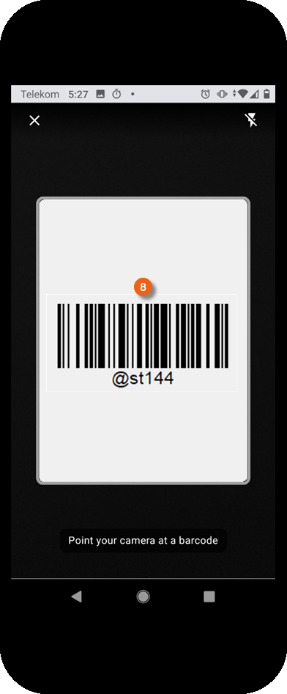
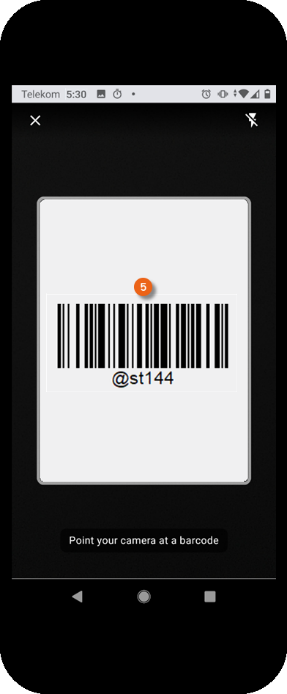
Scanning items
There are two possibilities for scanning items. You can scan all items in sequence (regardless of the order) until no more items are shown in the To deliver view. To do so, tap Scan barcode and then start scanning . The currently scanned item is also shown in the view . Repeat Scan barcode until all items have been scanned.
Alternatively, you can enter the quantity of items to scan all at once. To do so, tap the concerned item and increase the quantity with the +1/+10 buttons. Then tap Scan barcode and scan the barcode . The selected quantity is shown as delivered .

Delivering items without scanning
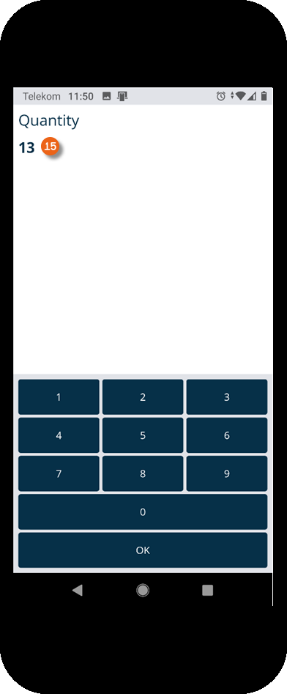
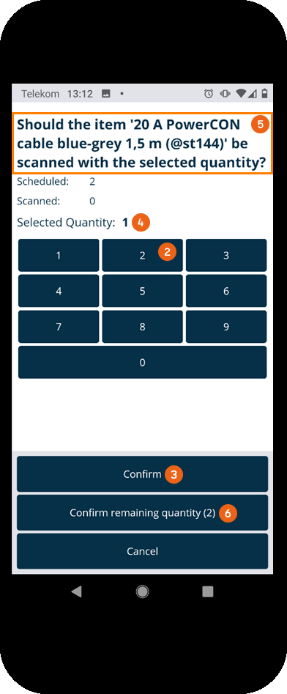
Alternatively, you can also deliver items without scanning the item barcode, e.g. when the barcode is not available or the camera is not functioning. To do so, tap the item you want to deliver for at least 2 seconds. A numeric display appears you can use to enter and confirm the quantity to deliver . When the correctly selected quantity is displayed, you can confirm the query if you want to scan the item with the selected quantity . Alternatively you can directly confirm the remaining quantity . The item and the entered quantity are marked as delivered.
Canceling items
If you accidentally scanned an item twice, you can cancel it. To do so, tap Cancel (the button will turn green as long as canceling is active), if necessary increase the quantity to be canceled , Scan barcode and scan the item or items to be canceled . The item or items will be canceled accordingly.

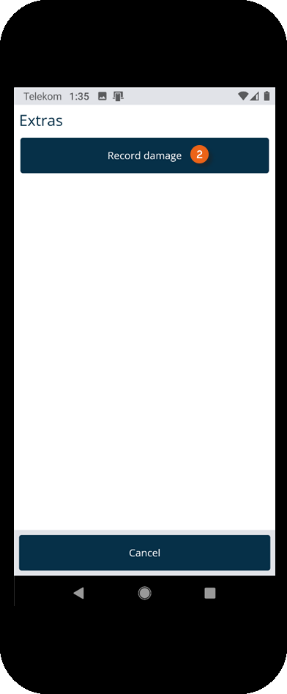
Recording damage
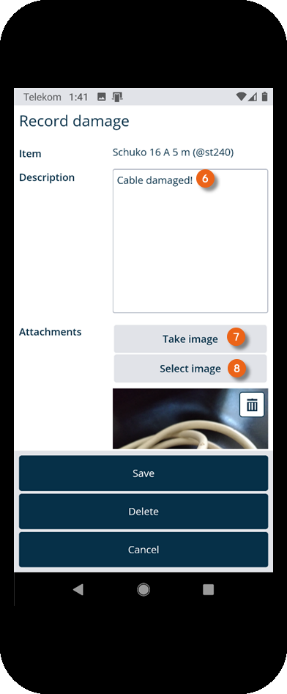
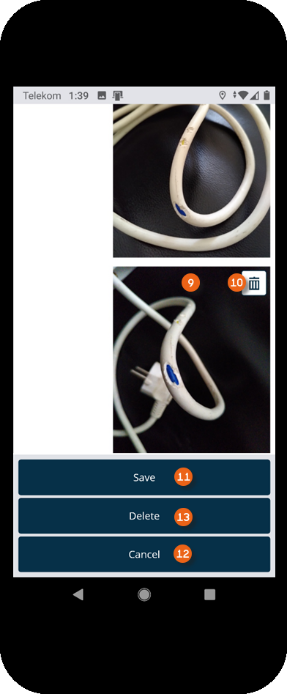
If an item is damaged, you can document the damage in the Equipment Tracker App. To do so, tap Extras and Record damage in the transport order. Select the item from the list and click OK or go to Scan barcode and scan the item for which you want to record the damage.

To document the damage, you can add a description take a picture or select an existing image . You can add multiple images or delete them . When finished, save the recorded damage. You can also cancel damaging recording or delete the process .
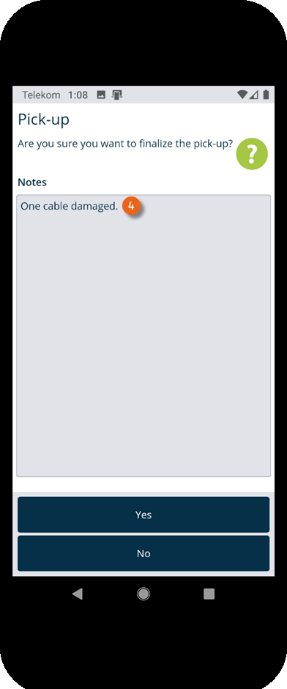
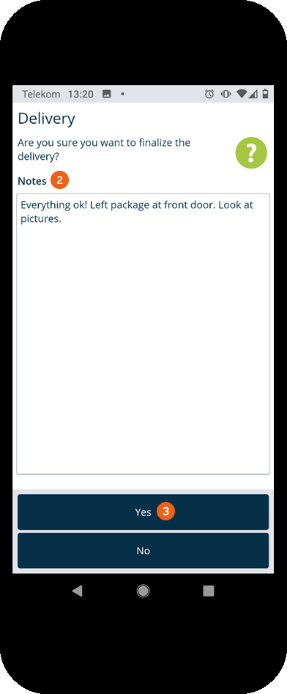
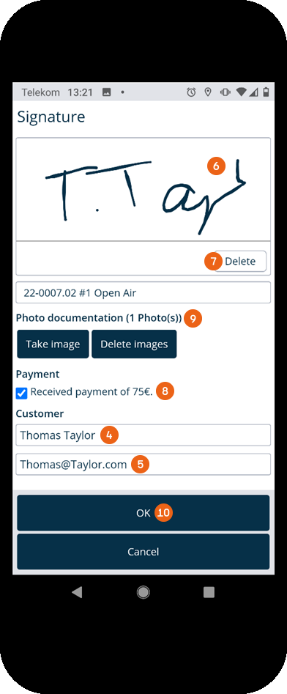
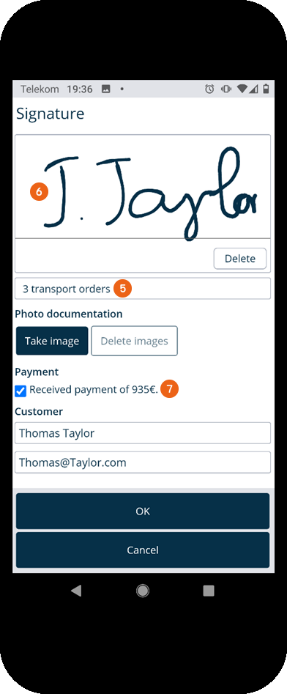
Finalizing the transport order
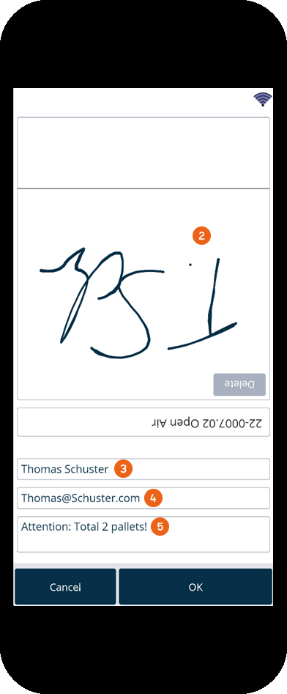
After recording all items, you can Finalize the transport order. You can also add Notes before finalizing the delivery with Yes . You now have the possibility to enter the name and e-mail address of the recipient and let them sign digitally . In case of a failed attempt, the digital signature field can be deleted . If a payment must be made, the receipt of payment is specified here. Alternatively you can provide photo documentation to document that the delivery was made, and where, if no one was there to receive it. Press OK to start the data transfer.
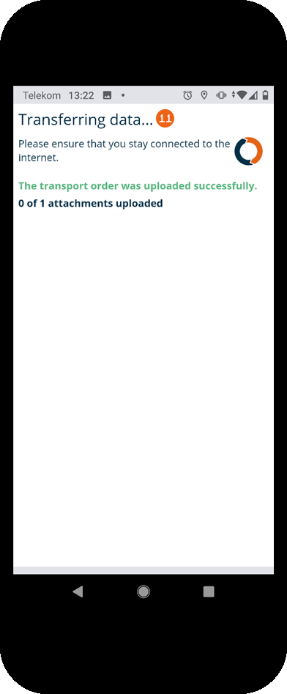
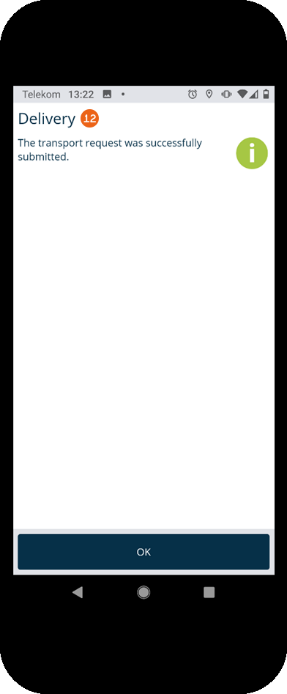
An Internet connection is required for the data transfer . A status message is displayed that shows which data was already uploaded. After the data was transferred successfully, a Final message is displayed. If a transport order cannot be transferred, it remains on the start screen with the message Pending upload . It can be opened and uploaded again.
Grouped transport orders (multi-job process)
If multiple transport orders are grouped in easyjob, they are displayed accordingly on the home screen . After starting, all grouped orders are shown together . The items in the grouped orders can be scanned in any order. After successful delivery, all grouped transport orders are finalized with the same note and a signature for all grouped orders . If payments must be collected, the total of the amounts to be paid can be confirmed when finalizing . The payments with the individual amounts are listed separately in the transport order documentation.
Picking up items from a transport order
In the Equipment Tracker App, a pick-up functions as the delivery. The view can be switched between All , To pick up and Picked up . When finalizing the transport order, you can add Notes . See also Delivering items from a transport order. The recipient data and the digital signature are omitted.
 …
…