easyjob Workflow Engine
Documentation
Workflow Engine
With the easyjob Workflow Engine module, you can optimally connect your own work processes with easyjob by customizing or creating Workflows. By integrating Workflows, you can standardize your worksteps from different areas and create a new world of process optimization for yourself, your employees, and your customers.
Installation and activation
Go to the easyjob program settings to activate the easyjob Workflow Engine module. A separate installation is not required.
Activating the Workflow Engine module
1. easyjob Menu Extras Options
2. Functions tab
3. Select Workflow Engine
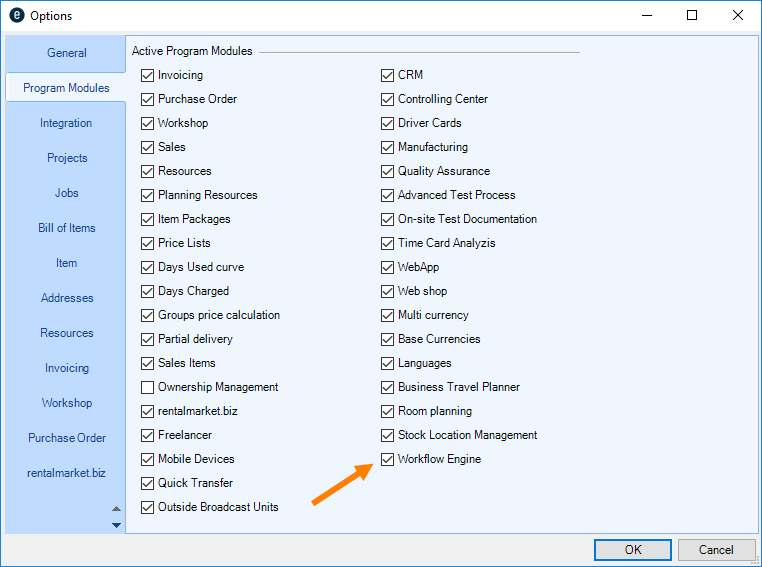
4. Ok
easyjob must be restarted to activate the settings.
Please note that after activating the Workflow Engine module, the authorization process in the Purchase Invoice will no longer be available and can be replaced, if needed, by a Workflow. A corresponding warning message will be displayed prior to activation.
Standard e-mail settings
Adjusting e-mail settings
1. easyjob Menu Tools Settings
2. Integration tab
3. Fill out the fields according to the selected e-mail account
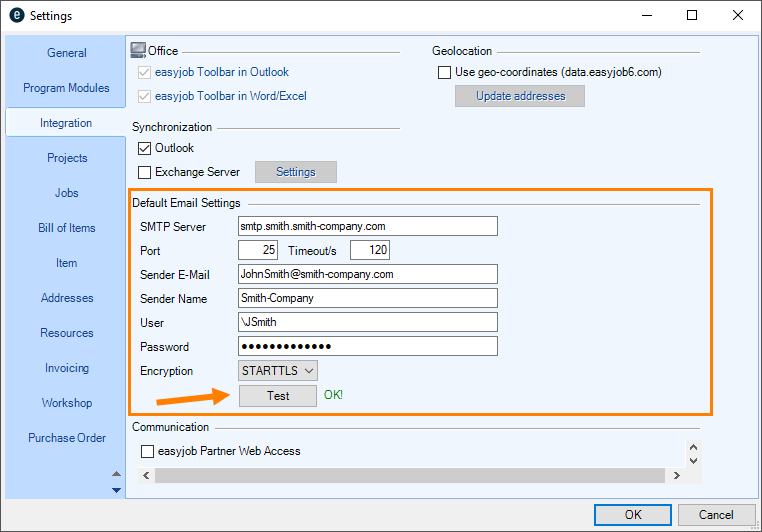
4. Perform a test and  wait (a test e-mail is sent)
5. If Failed is displayed, adapt the settings or encryption Test
6. Ok
easyjob must be restarted to activate the settings.
Enabling push notifications for workflows
Enabling push notifications
1. easyjob Menu Tools Settings
2. WebApp tab
3. Check Enable Push Notifications
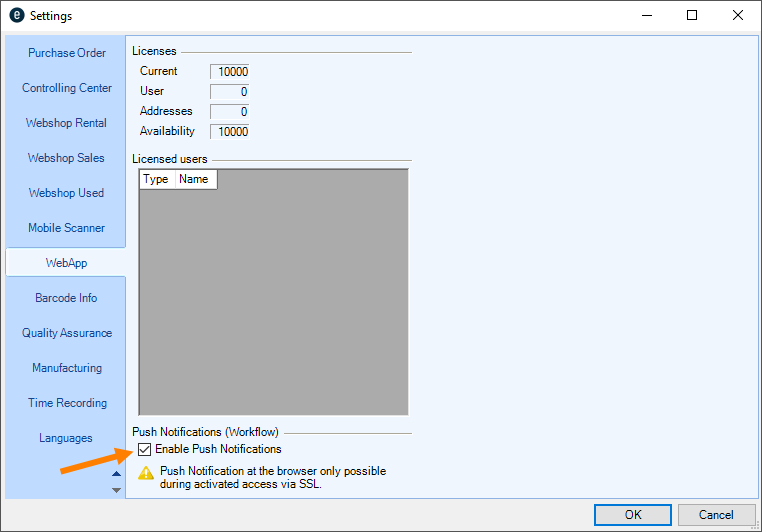
4. Ok
easyjob must be restarted to activate the settings.
Creating a connection with SSL
A secure connection can be established with SSL in the WebApi service in the Server Manager
Enabling an encrypted connection in the Server Manager
1. Start the easyjob Server Manager.
2. easyjob Web Access
3. Configure the service
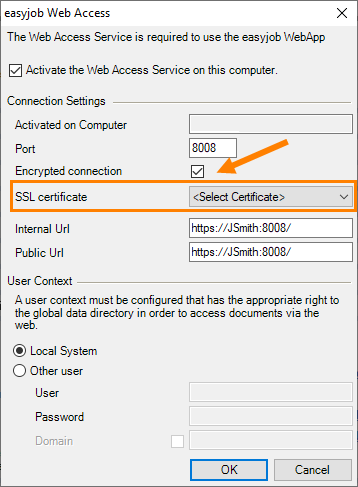
4. Check Encrypted connection
5. Select SSL certificate
6. Ok
A certificate must first be installed in the computer. This can be done or checked using the IIS Manager of the Management Console (MMC). What is important is that it is in the computer. The certificate must be issued for the domain and must contain the URL.
Control the workflow via the WebApi interface
There are customized endpoints in the WebApi with which an existing easyjob Workflow (e.g. manual job) can be started by means of an http request. (e.g. print delivery note, etc.). The data is transferred in JSON format of GET and POST instructions. Additional Information can be found in WebApi.
POST /api.json/workflow/start
{
IdWorkflowDefinition: 15,
IdObject: 35194,
IdTable: 4
}
GET /api.json/workflow/list2object/?ido=35194&idt=4(&idwd=15)
User settings
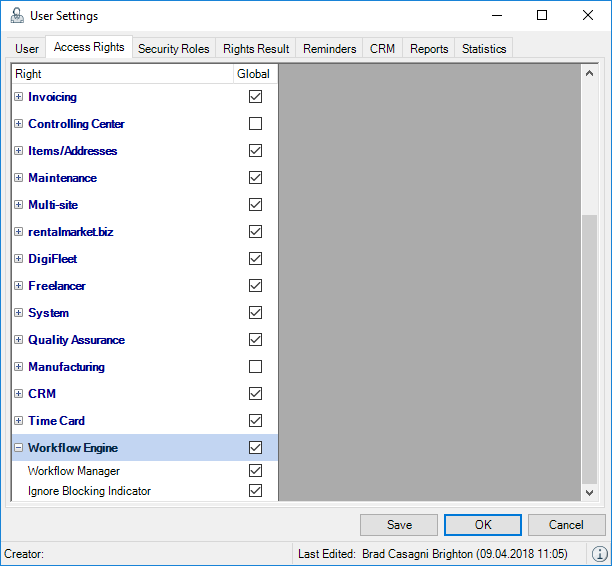
The right to use the Workflow Engine is defined in the user settings.
Assigning the user right:
1. easyjob Menu Extras User Rights Management
2. Select a user
3. Edit
4. Rights tab
5. Workflow Engine
6. Assign the desired rights
7. Save
8. Ok
As soon as you have enabled the Workflow Engine module, you can trigger the Workflows assigned to processes and view the triggered Workflows as well as your open Workflow authorizations in the Navigator and easyjob Today. You need the Workflow Engine right if you want to create and manage workflows.
Workflow Administrator
As the Workflow Administrator you can access the Workflow Manager, the Workflow Definitionen and therefore the Workflow Designer. You can see all open Workflow authorizations in the Navigator und in easyjob Today.
Ignoring Blocking indicators
Due to the Workflow, it is possible to block processes via Blocking Indicators (e.g. Allow printing or Permit status changes). With the Ignore Blocking Indicator right, you can bypass the block also if the condition is not fulfilled on the workflow side.
Workflow licensing
The functionality of the easyjob Workflow Engine module differs depending on the type of license. Without a license, you can edit parameters of existing Workflows. Workflows created individually by protonic software can be imported.
A license is required to be able to make full use of the Workflow Designer.
| Functionality | Without a license | Workflow Engine | Workflow Engine Advanced |
|---|---|---|---|
| Executing Workflows (Standard Workflows or individually designed by protonic software) | X | X | X |
| Importing Workflows individually designed by protonic software | X | X | X |
| Workflow Designer functionality | |||
| Customizing parameters in Workflows | X | X | X |
| Creating and designing existing Workflows | X | X | |
| Basic actions (conditions, operators, ...) | X | X | |
| Email and Message Action | X | X | |
| Authorization and Blocking Indicator Action | X | X | |
| Create CRM Activity Action | X | X | |
| Create Job Costs Action | X | X | |
| Book Resources Action | X | ||
| ...Action Add Item | X | ||
| Set Job Date Action | X | ||
| …Multiple Condition Action | X | ||
| …Create Group Action | X | ||
| Add Item Package | X | ||
| Parameter Query (Dialog) | X |
Individual Workflows
Independently of your Workflow license, we offer the possibility to create individual Workflows according to your specifications or adapt customer-specific Actions to already existing Workflows. For more information, please contact our Support.
Shortcuts
Various shortcut functions are available to you in the Workflow Designer to create and edit a Workflow.
| Shortcut | Explanation |
|---|---|
 | Delete selected Action |
 + C + C | Copy (when exactly one Action is selected) |
 + V + V | Paste |
 + plus + plus | Zoom in |
 + minus + minus | Zoom out |
 + A + A | Mark everything except Start, to move it |
 + Pos1 + Pos1 | Zoom |
 + Mousewheel + Mousewheel | Zoom 100% |
 + Z + Z | Undo- Add/delete a connection- Add/delete an action- Changing parameters |
| Right mouse button + move mouse | Scroll |
Workflow type
The type of Workflow is defined by an automatic, manual or Validation Action, which causes the Workflow to start. The respective Trigger Event for the actual Workflow is listed in the Trigger Event.
Automatic
Workflows can be triggered automatically (e.g. when creating a Project or a Job, when changing the Project or the Job Status, when creating, changing, saving or finalizing Purchase Invoices, Purchase Orders or Invoices or when checking a Job in or out).
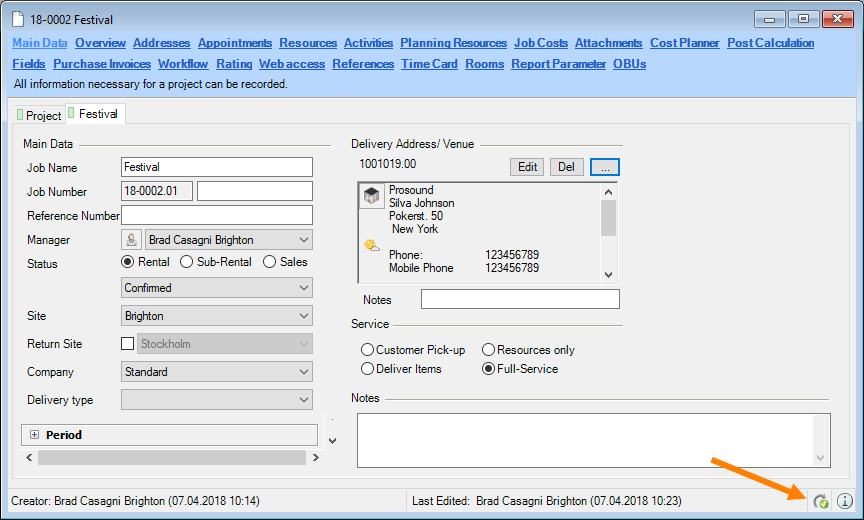
Manual
A manual Workflow must be actively triggered by the user by means of a mouse click. In the Project, Job, Cost Planner, Purchase Order, Purchase Invoice areas, the Workflow symbol is displayed next to the Log View when the Workflow is active. By clicking it, the active Workflows that are available and that can be started by clicking on them are displayed
General Workflow
The General type of manual Workflow is not assigned to a certain object and therefore can be used, for example, to send a report or a statistic always on day X every week/month. It is started manually in the Workflow Manager.
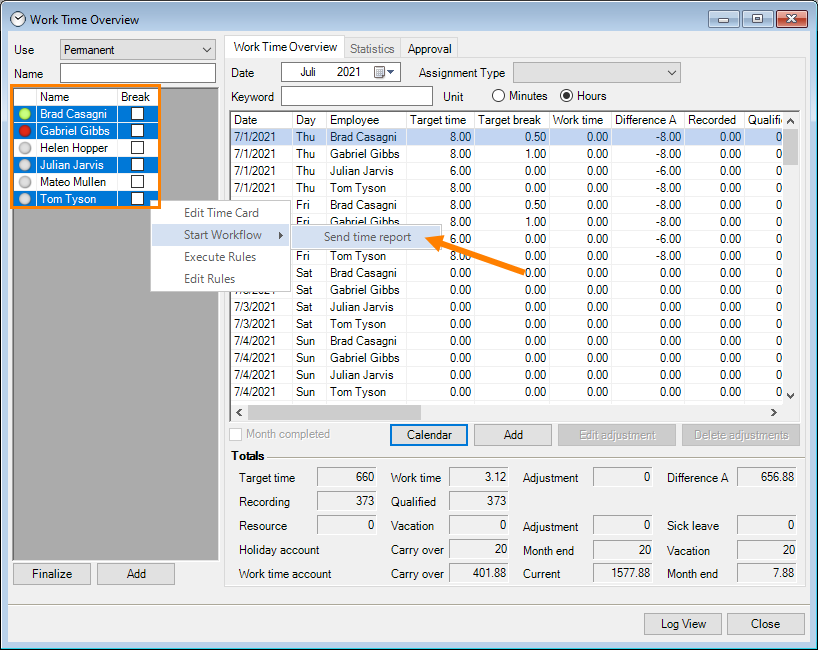
Workflow Time Recording
Workflows can be created for the Time Recording module that are started in the Work Time Overview. The selected Workflows can be started for one or more users at the same time.
Validation
When creating Leads, Addresses, Contacts, Items, when an attempt is made to save the entry, a form validation Workflow is triggered. This can prevent an address from being saved if, for example, the zip code, telephone number or other mandatory entry is missing. Likewise, if a user attempts to print a Purchase Order, Project, Job or Invoice, the Validation Workflow can be activated if you want to link a certain condition in order to print a Job.
Trigger Event
Overview Table
| Workflow Type | Trigger Event | Object |
|---|---|---|
| Automatic | Create | Project, Job, Purchase Order, Purchase Invoice, Resource Assignment, Workshop |
| Booking, Loading, Unloading | Item | |
| Save | Purchase Order, Purchase Invoice, Invoice, Resource Booking, Resource Status (vacation, sick leave, etc.) Resource Assignment Status, Workshop | |
| Change | Project status, Job status, Purchase Order status | |
| Finalize | Purchase Invoice, Partial Delivery, Transport Order, Monthly Time Recording | |
| Check-out, check-in | Job | |
| Manually | GeneralProject/JobInvoicePurchase OrderPurchase Invoice (Line Item, Assignment)Items-Workflow (Job - Group)Items-Workflow (Job position)Workshop ActivitiesTime card | |
| Validation | Form | Lead, Address, Contact, Item, Monthly Time Recording |
| Printing | Project, Job, Invoice, Purchase Order |
*Also automatically as a Global Items Workflow or per item
Workflow definition
A Workflow defines how the Workflow should take place All Actions, Variables, Queries, Calculation Operations, Blocking Indicators, etc. are packetized in Workflow Designer.
Workflow Instance
As soon as a Workflow is started, the Workflow is filled with data (its variables, queries, etc) and the Workflow executes a so-called Instance, by completing Actions according to the specific Workflow Definition. All the relative information needed for execution is saved in the individual Instance.
Trigger Mode
With Trigger Mode, you can define how the Workflow Instance should be executed.
| Trigger Mode | Description |
|---|---|
| One-time | The Workflow runs only one time, then never again. Even if the Trigger Event (e.g. saving a Project) takes place again |
| Multiple Instance | The Workflow is started again as soon as the Trigger Event (e.g. saving a Project) takes place again |
| One Active Instance | The Workflow always waits first for a certain action before it runs a second time |
With the Client Site Trigger Mode, you can start an Action directly on the user client (Parameter Dialog). Here, the Workflow runs in the foreground (on the Client). Workflows with a One-time, Multiple Instance, or One Active Instance Trigger Mode run in the background (on the Server).
A Workflow with one active Instance (e.g. waiting for authorization from another user) can run or wait even multiple days. In the case of an active Workflow with Client Site, the user must first carry out the action specified by the Workflow (e.g. enter a zip code in the Address Field, enter a stage size in the Item Booking) in order to work further in the program.
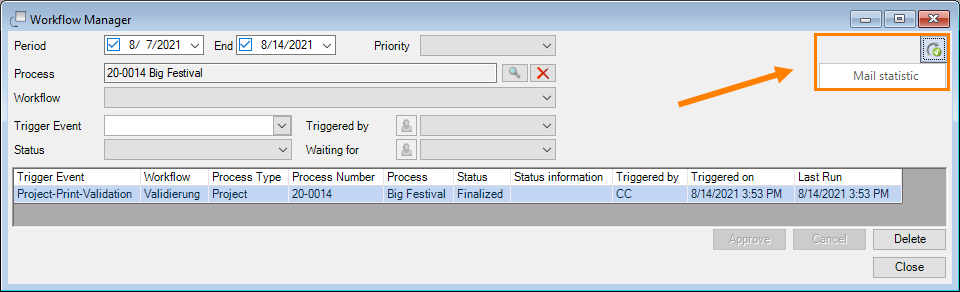
Workflow Manager
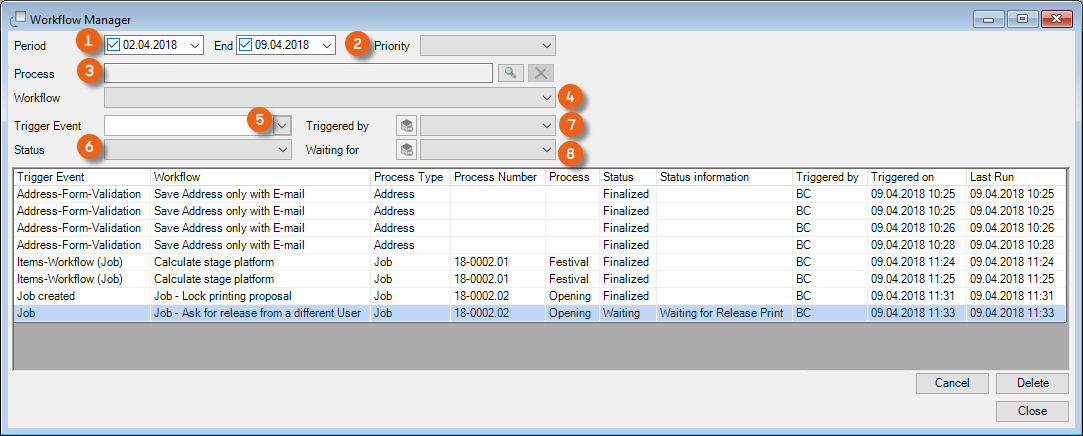
With the Workflow Manager you can see all Workflows at a single glance. Being able to filter according to the Period , Priority (High, Low, Normal) , the Process in which the Workflow (e.g. Job: 18-0010.02 Conference) is assigned, the Workflow itself , the Trigger Event and the Status (Canceled, Finalized, Error, Initialized, Waiting, Running) makes searching easier. The Workflows can also be narrowed down according to Triggered by or Waiting for .
Opening the Workflow Manager
1. easyjob Menu View
2. Workflow Manager
Log View
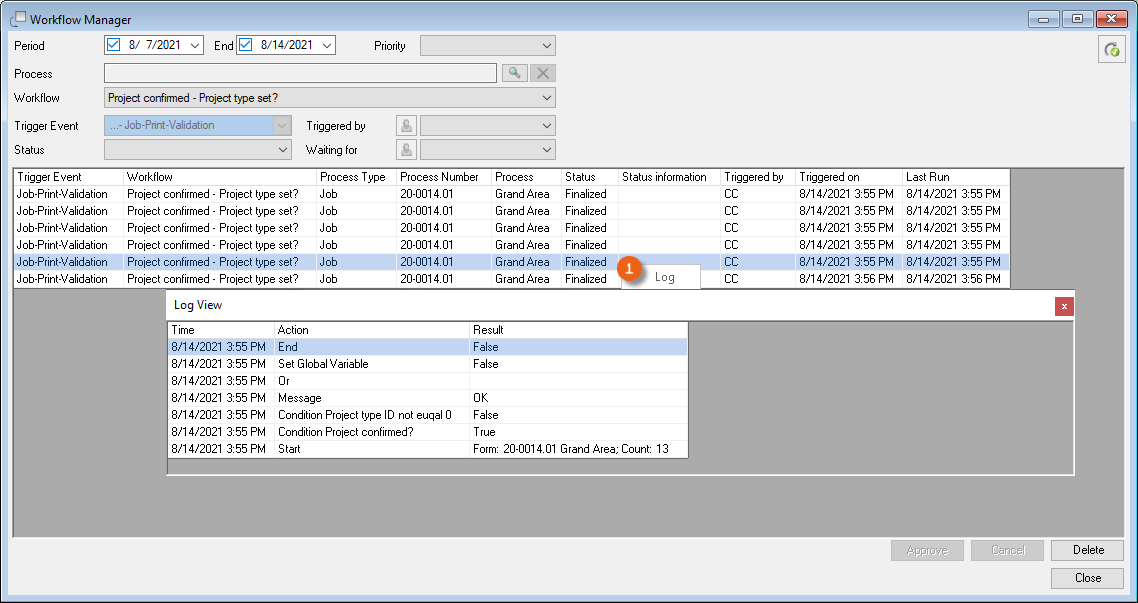
In the Workflow Manager and in all easyjob processes in which Workflows take place, there is a detailed log view of the individual log steps on the Workflow tab. Therefore it is possible to track what the Workflow does in which point and is everything if processed as planned. Right-click the process and open the log.
Workflow in Navigator and in easyjob Today
In the Navigator and in easyjob Today, you can display all open Workflow tasks and filter accordingly (e.g. according to priority).

Workflow Notifications
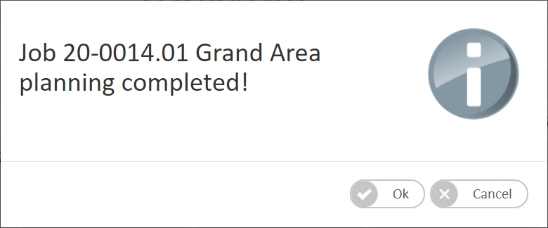
By means of a Workflow, triggered notifications can be displayed in the Navigator/easyjob Today views as a pop-up window (Client-Side – Message and Parameter Dialog trigger mode) or as a message (server-side trigger mode– Message for User and Waiting for Release)
An e-mail can be sent (Send E-Mail module) regardless of the trigger mode. The program settings for this must be configured in the Standard E-Mail Settings. See also Standard e-mail settings.
Push Notifications
Server-side notifications (Message for User and Waiting for Release modules) can also be sent as Push notifications. These are displayed in the WebApp on a mobile end device on the start screen (also when the App is closed).


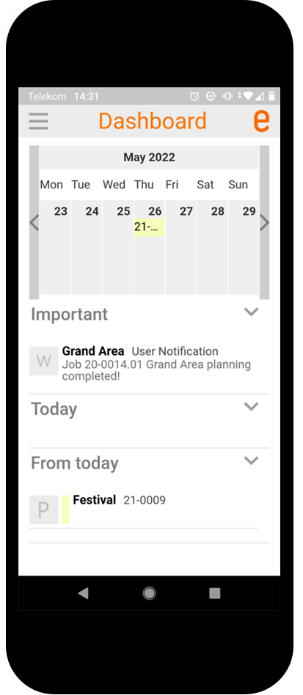
The message will also be displayed via the browser. The browser must also be started (active) for this, e.g. the notification will be displayed after the Browser is started.
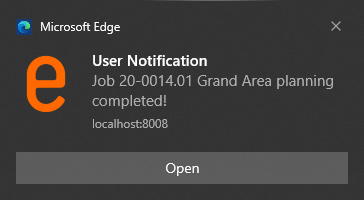
It can be opened and edited by double clicking it. This is helpful, for example, when a user should be made aware of a certain process (e.g. release of a time-critical order).
To be able to use push notifications, the settings must be adjusted in the easyjob Program settings and in the easyjob Server Manager settings. More information can be found in Enabling push notifications for workflows and Creating a connection with SSL.
This function is only available with an active easyjob subscription. The push notification service is hosted and maintained by protonic software.
Information about the subscription can be found at
https://www.protonic-software.com/de/shop/subscription-faq.psx.
Workflow in easyjob processes
In all easyjob processes where Workflows are used, the Workflows are listed on a separate Tab.
Workflow when booking, loading or unloading an item
In the Item Master Data, you can assign a Workflow created previously with the Items Workflow (item position) trigger mode to one or more items. In addition, you can decide when booking (Added Item Booking), if the Item Loading or Unloading workflow should be triggered. The Workflow is triggered each time this item is booked, loaded or unloaded in the Bill of Items. This can be used, for example, if Job Costs or Resources should always be automatically booked when the item is booked or when a quality assurance query should be carried out when unloading.
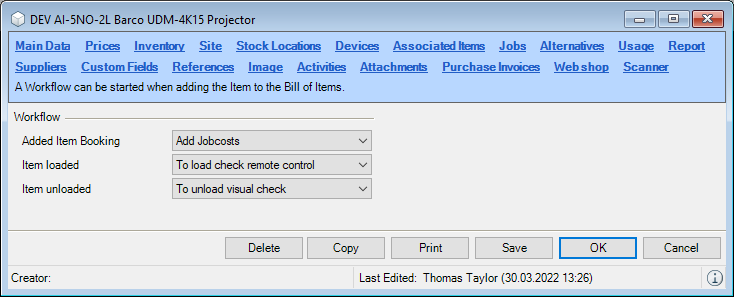
Adding Workflows to an Item
1. Easyjob Menu Master Data Items
2. Select the Item Ok
3. Workflow tab
4. Select Workflow
5. Ok
Global Material Workflows
The workflows for booking (Added Item Booking), loading or unloading an item can also be defined globally for all items.
Adding global workflows for all items
1. easyjob Menu Tools Settings
2. Workflow tab
3. Select the workflow for the respective process
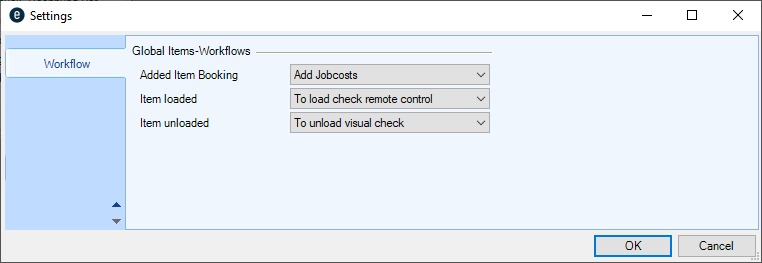
4. Ok
easyjob must be restarted to activate the settings.
Project/Job
The Workflow tab provides detailed information about the Workflow processes in the respective Project/Job. You can display the Workflow for the Project or for individual Jobs . The Workflows are listed with various information If there is more relevant information (e.g. for user requests) for a Workflow, this is also listed . To receive a better overview, you can filter the list by Blocking Indicators If a blocking indicator is active, this is indicated by a special Icon . By moving the mouse over the Blocking Indicator, its type and the last status from the Workflow are displayed .
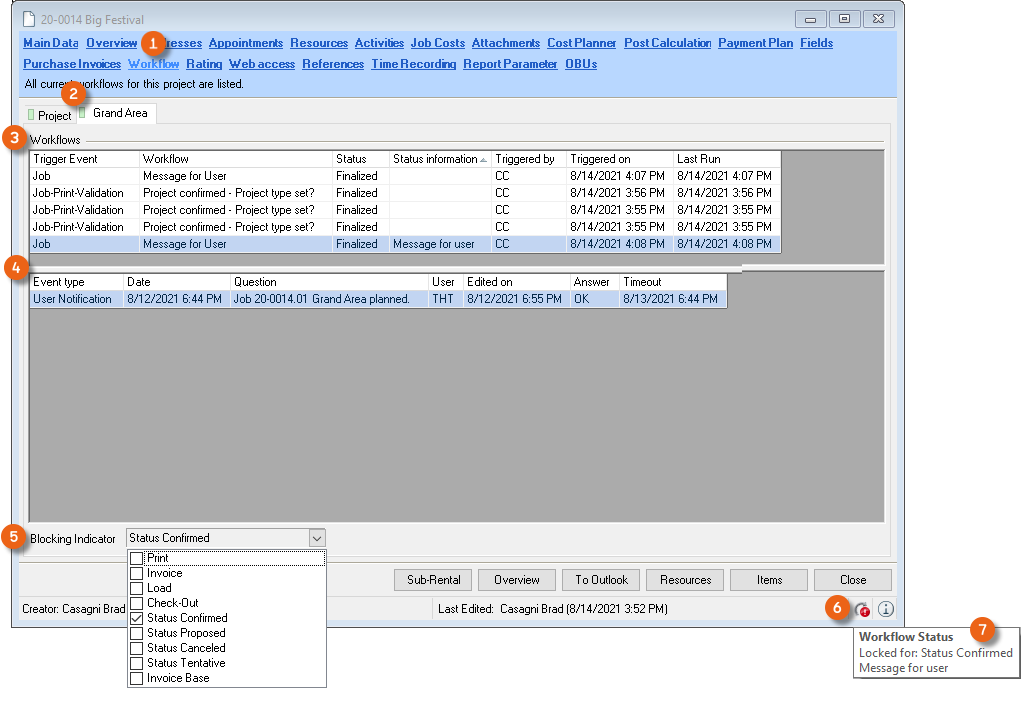
Displaying Workflows in a Project/Job
1. easyjob Menu Projects Edit Project
2. Select the Project Ok
3. Select the Project or Job
4. Workflow tab
Purchase Order
The Workflows are listed with a variety of information If there is more relevant information (e.g. for user requests) for a Workflow, this is also listed . To receive a better overview, you can filter the list by the Blocking Indicators
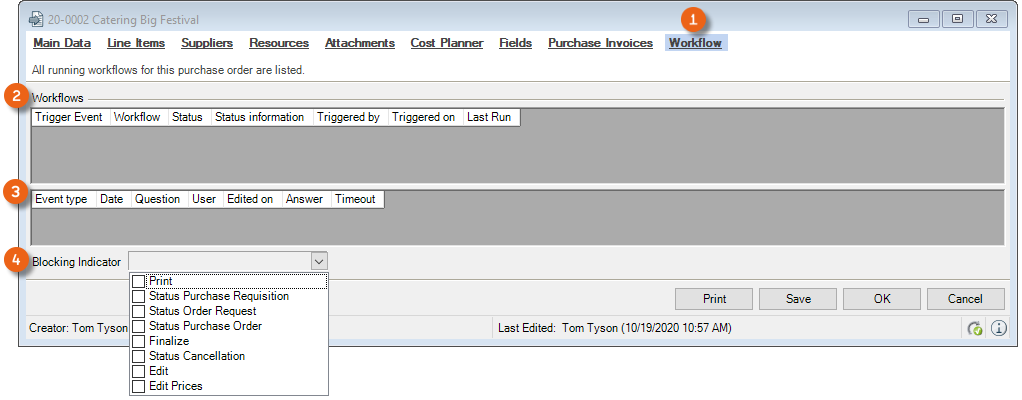
Displaying Workflows in the Purchase Order
1. easyjob Menu Purchase Order Edit Purchase Order
2. Select Purchase Order Ok
3. Workflow tab
Purchase invoice
Same as Bestellung.
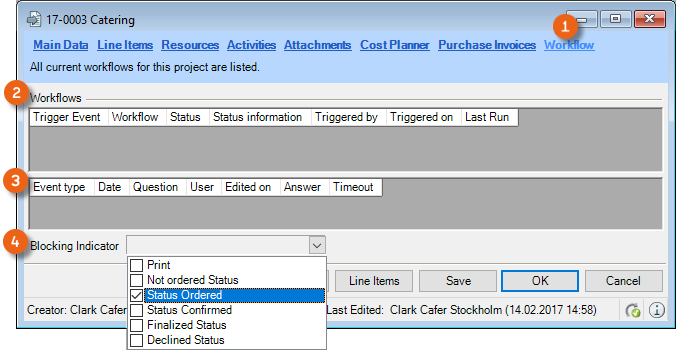
Displaying Workflows in the Purchase Invoice
1. easyjob Menu Controlling Edit Purchase Invoice
2. Select Purchase Invoice Ok
3. Workflow tab
Invoicing - Invoice
Same as Purchase Order.
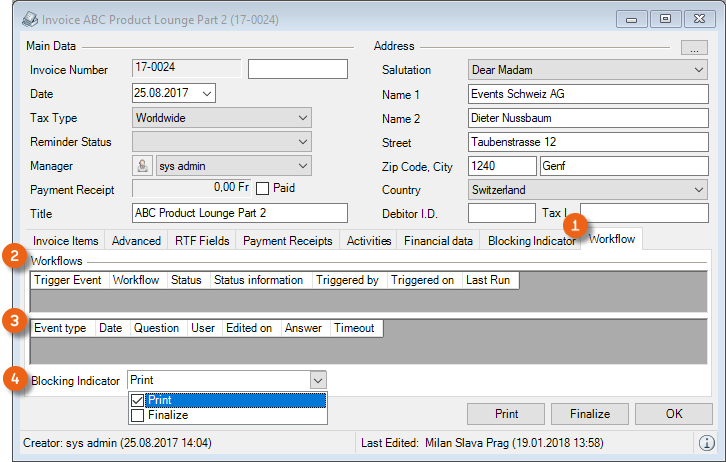
Displaying Workflows in the Invoice
1. easyjob Menu Invoicing Edit Invoice
2. Select Invoice Ok
3. Workflow tab
Workflow Definitions
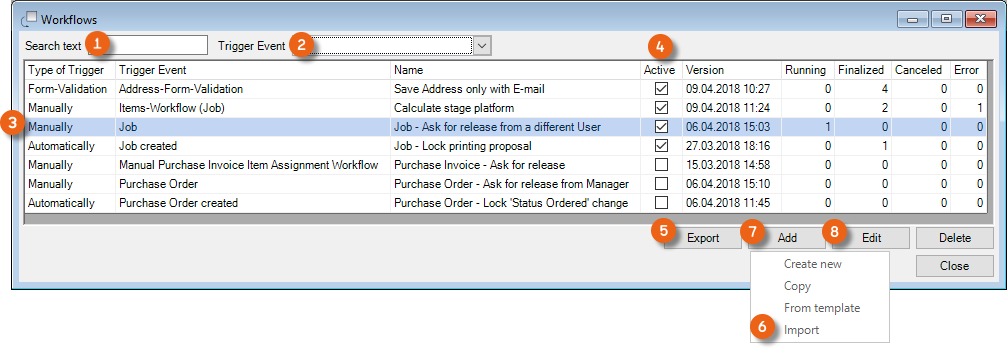
You can edit the available Workflows in the Master Data. In order to filter existing Workflows, you can use the Search Text Field , and/or limit the displayed Workflows according to the Workflow type (Automatic, Manual, Validation) and the Trigger Event (e.g. Job created, etc.). Double click or click Edit to open the Workflow Engine. A sortable column displays if the Workshop is currently active. A Workflow can be exported and imported You can add Workflows by copying an existing one, using a Workflow from a template, or by creating a completely new one.
Creating a new Workflow
1. easyjob Menu Master Data Workflow Definitions
2. Add Create new
As soon as you edit a Workflow Definition or would like to create a new one, the Workflow Designer opens.
Importing a Workflow
Workflow definitions have the file format.ejwd.
Importing an existing Workflow:
1. easyjob Menu Master Data Workflow Definitions
2. Import
3. Select Workflow
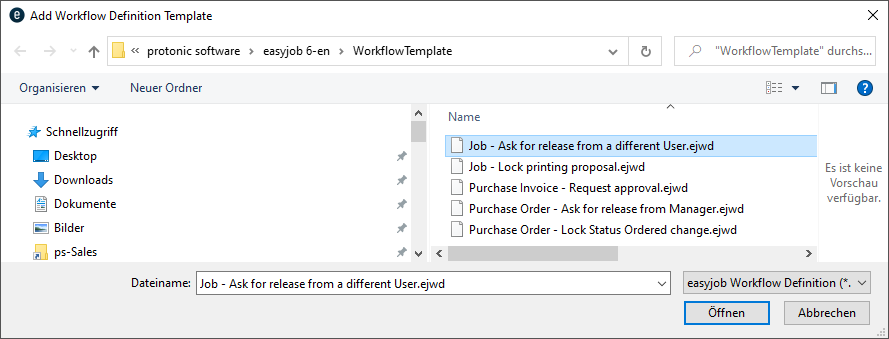
4. Open
5. A preview is shown, change the name if necessary
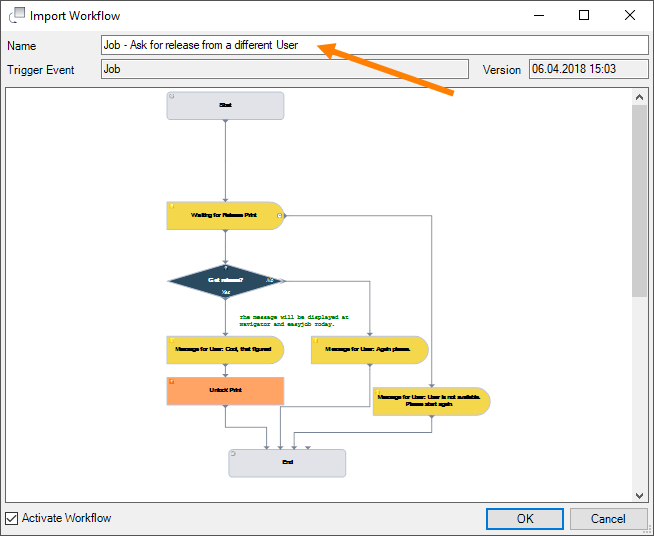
6. Ok
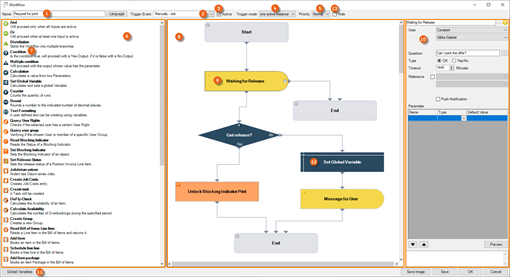
Workflow Designer
In order to create a new Workflow in the Workflow Designer, first enter a Name . Define the Workflow type and the Trigger Event. Check the box to activate the Workflow. Determine the Trigger Mode. If multiple Workflows run in parallel, use the Priority option (normal, high or low) to determine which Workflow takes precedence. The left column provides a selection of actions (e.g. start, condition, set Blocking Indicator, etc.) that you can include in the respective Workflow type.
You can Drag&Drop the module, e.g. Condition to the Design area . By clicking the respective module , the right column will display the parameters or operations that are available to you for this action. You can rename the modules for a better overview.
You can connect the individual modules together by clicking the gray triangle of the module, keeping the button pressed, and drawing a line to the gray triangle of the next module. To delete the connection, click the gray connection triangle. This will make it turn red and it can then be deleted with 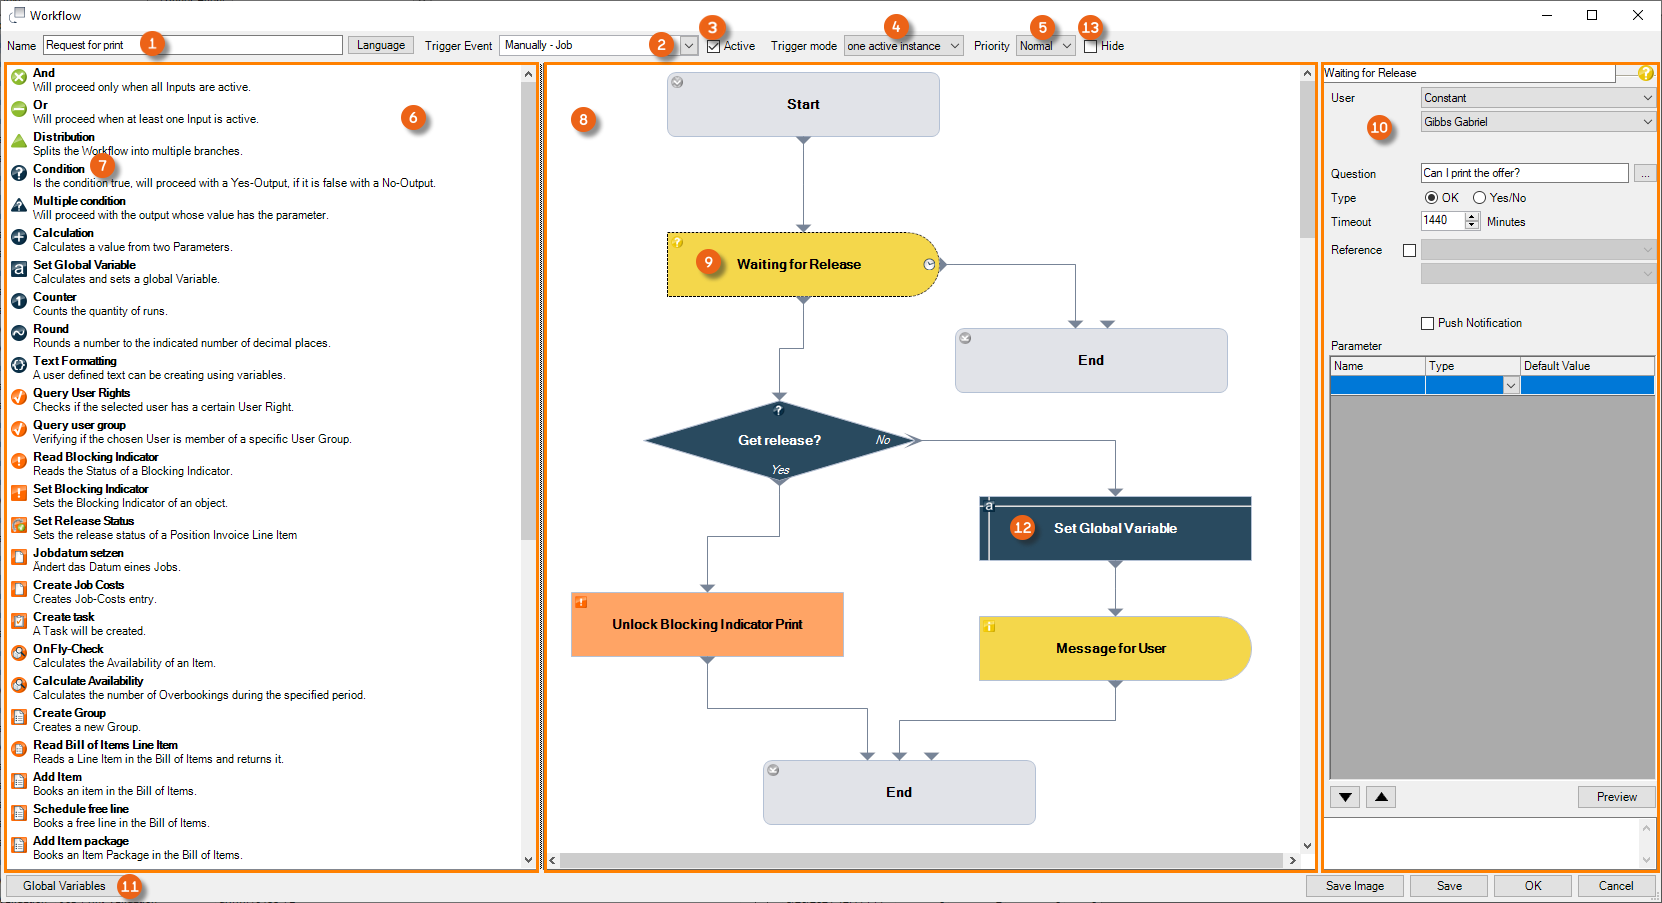 . See also Shortcuts.
It is also possible for you to create as many Global Variables as you want and use them in your Workflows. Programming knowledge is an advantage for this. You can save the Workflow graph as an image and reuse it. For nested workflows, they can be hidden for direct selection.
Modules
Various setting options, parameters or operations for an action are available depending on which module you select in the Designer. After you have dragged & dropped the module to the Design area, click the Action and the setting options will be displayed on the right side.
| Action | Parameters/Operator and Variables | Explanation |
|---|---|---|
And |  | Two or more inputs must be active for this action for the Workflow to continue. (e.g. if two releases are required for a project) |
Or | With an Or action, the Workflow is continued when at least one input is active. | |
Distribution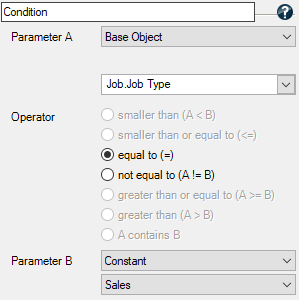 | Note: It is only possible to process actions in the Workflow in a thread. Distribution is only necessary and useful in very specific situations. Normally the modules are run sequentially. | Distribution cannot be used, for example, by multiple users at the same time to request an action (release). The workflow runs further via the thread with the user who reacts first. |
Condition 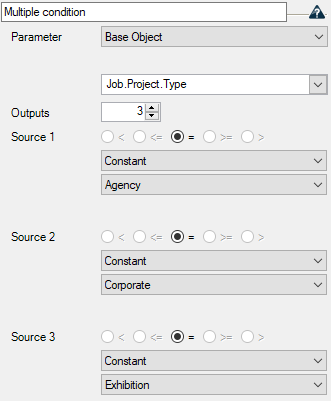 | 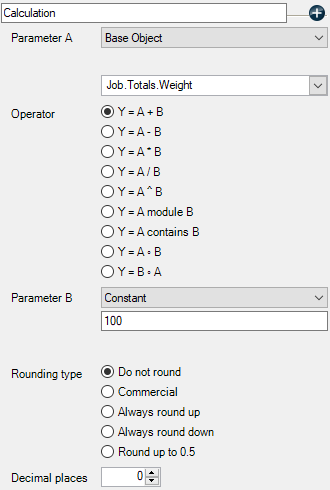 | Parameter A is compared with Parameter B using the Operator. If the result is true, the next step follows after Yes |
Multiple condition**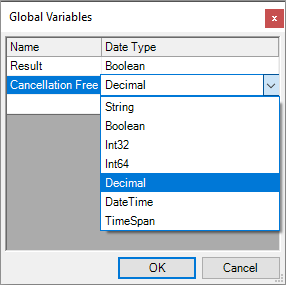 | 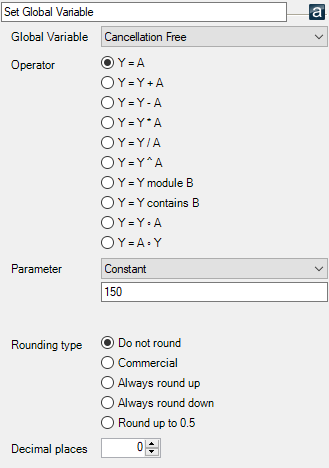 | The parameter is compared with the requirement for the respective output. The Workflow continues running where the result is true. Up to ten outputs are possible. |
Calculation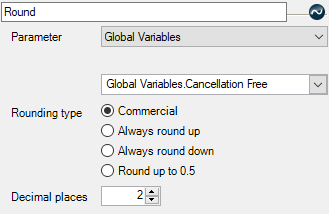 | 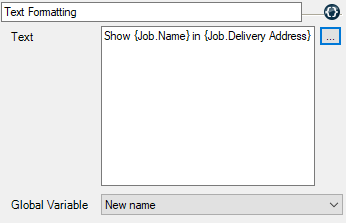 | The result of the Operation from Parameter A and B can be used further in the next step. The rounding type and the decimal places can also be set |
Set a Global Variable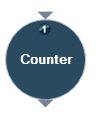 | 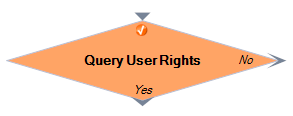  | To be able to use a Global Variable, it must first be created in the respective Workflow and the data type must be defined. Subsequently, the Global Variable can be filled with a value from the base object, a constant or another Global Variable. Various calculation operations are possible |
Round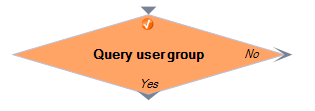 | 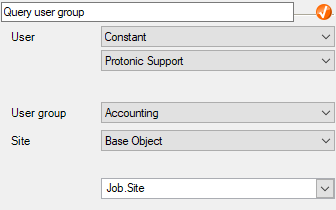 | Here values (usually from Global Variables) are rounded and limited to the number of decimal places. |
Text Formatting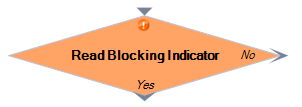 |  | Text formatting makes it possible to freely compose a text, for example from variables, and set it in a string data type Global Variable. |
Counter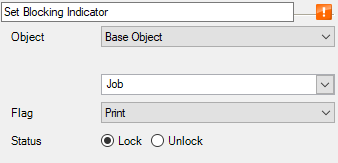 | 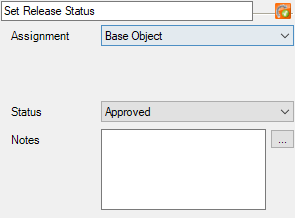 | The Counter counts how often the Workflow performs a certain Action (For Workflows with Loops) |
Query user rights 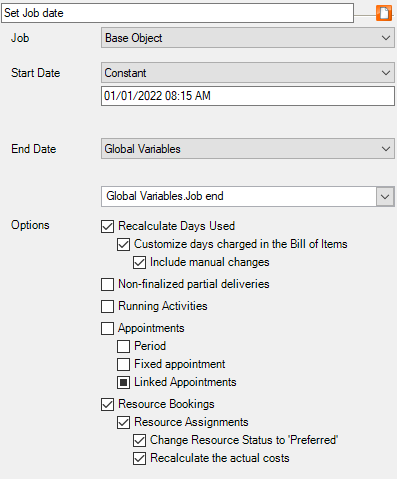 | 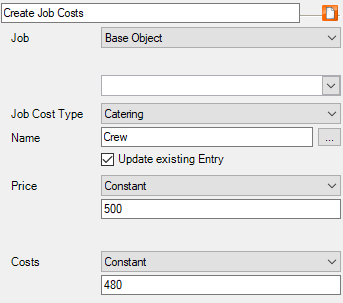 | A check is performed if the selected User has a certain user right If the result is true (the user has the right), the next step follows after Yes |
Query User Group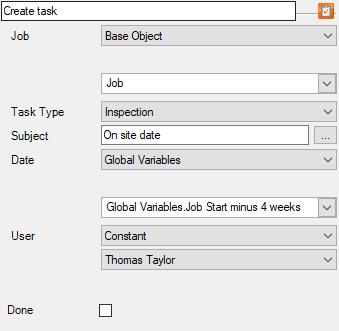 | 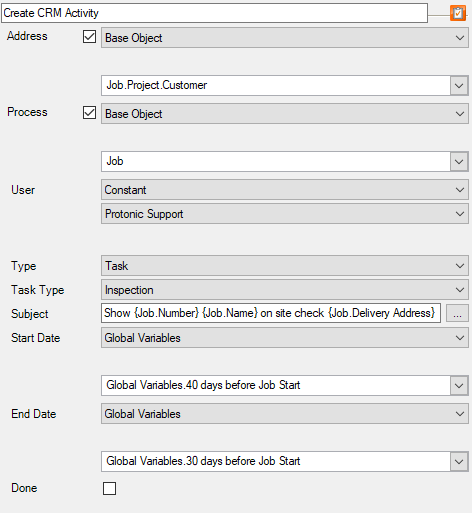 | A check is performed if the selected user is a member of a certain user group. If yes, the next step follows after Yes. |
Read Blocking Indicators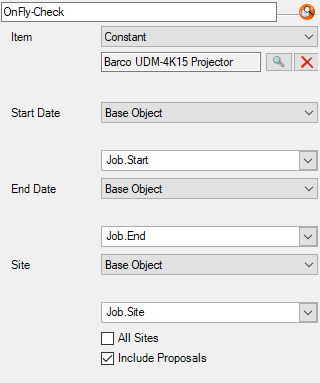 | 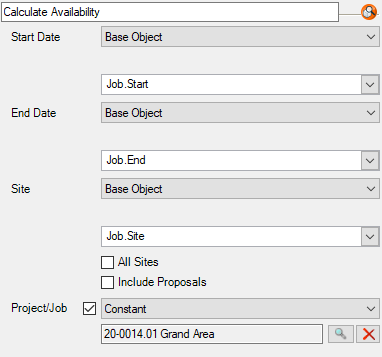 | The Blocking Indicator status of the selected Object/Process is read out. If it is set, the Workflow continues with Yes |
Set Blocking Indicator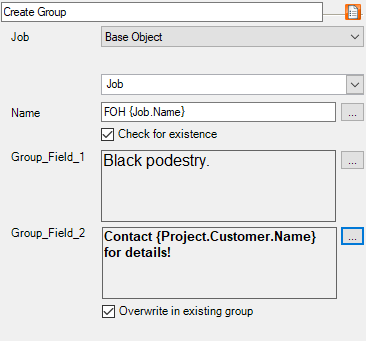 | 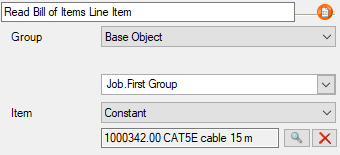 | The Blocking Indicator is set in the selected Object/Process |
Set Authorization Status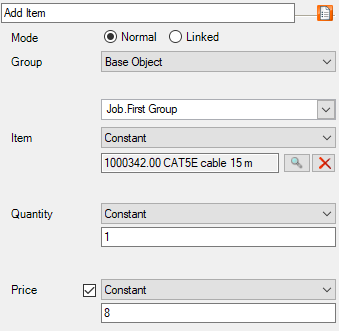 | 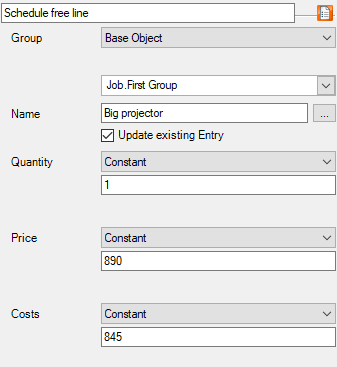 | This sets the Authorization Status of the Purchase Invoice Line Item |
Set Job Date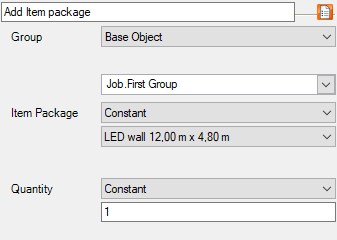 | 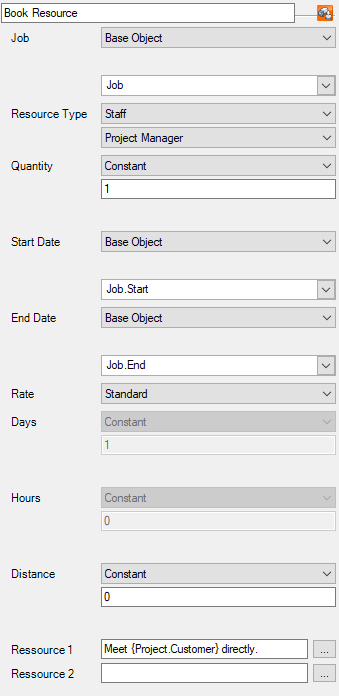 | The start and/or end date of a job can be changed here. Options can also be selected |
Create Job Costs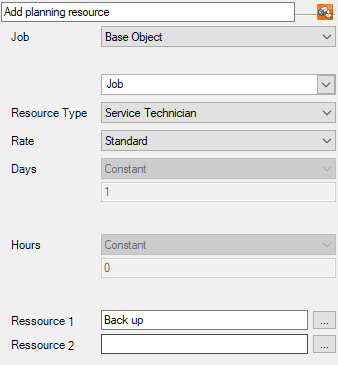 | 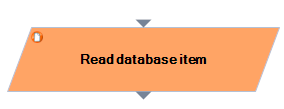 | Job Costs can be defined with a Name, Price and Costs. The existing entry can be updated if necessary |
Create Task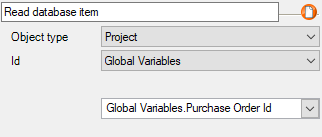 | 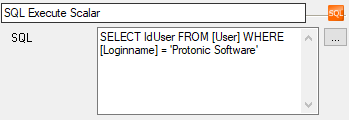 | This module creates a task with different details for a user (it is visible with the CRM Module is inactive) |
Create CRM Activity*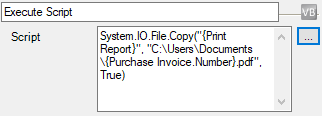 | 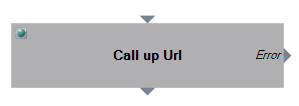 | With this module, you can create CRM Activities (similarly to the easyjob Programming function CRM Activities) |
On-fly Check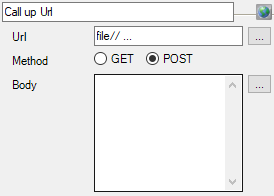 | 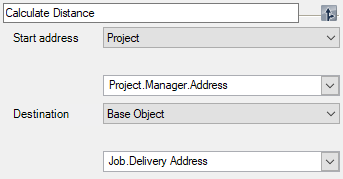 | The availability of a certain item can be checked for a defined time period. There is an additional option if Proposals should be included |
Calculate Availability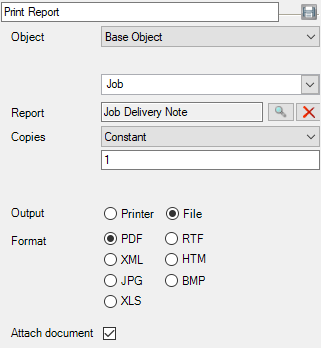 | 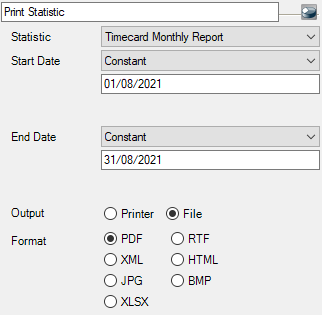 | Here the availability is calculated for a specified time period. In addition, proposals can be included or the check can be limited to a certain job/project |
Create Group**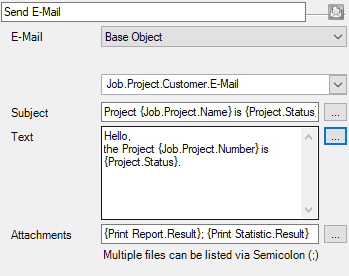 | 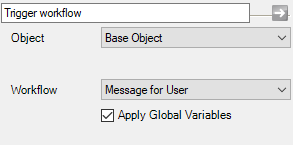 | With this Module you can create a group and describe the user fields |
Read Bill of Items Line Item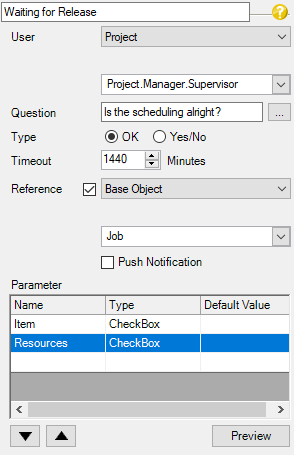 | 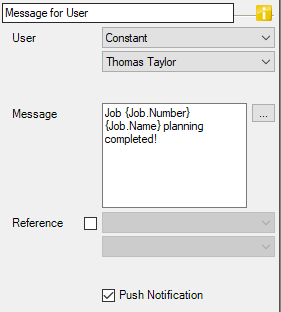 | This function reads the Bill of Items for a certain Item and returns the quantity |
Adding an item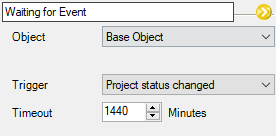 | 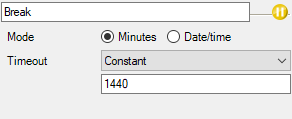 | A normal or a linked item can be added with this module, also the price can be calculated individually if required. The Group in which the Item is to be booked can be created in a previous module and set here with Action and with what is selected from the Booked Group |
Schedule Free Lines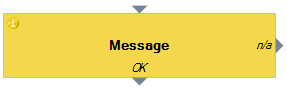 | 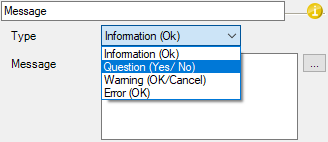 | A free line is added |
Add Item Package**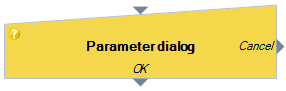 | 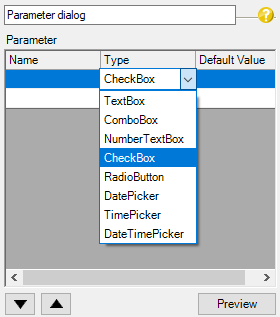 | An Item Package is added |
Book Resource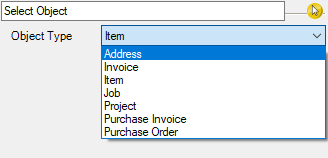 | 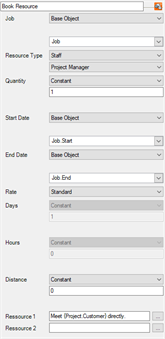 | A resource with many parameters to be set can be added here. |
Add planning resource  | 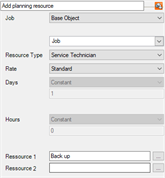 | This action adds a Planning Resource with preset parameters. |
Read database item | 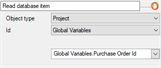 | With this function, for example, the ID of another process can be selected in advance via Scalar, and then the variables of this procedure can also be accessed. |
SQL Execute Scalar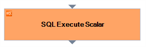 | 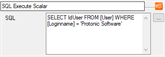 | This performs an SQL Command and returns the selected value |
Execute Script | 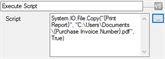 | Performs a VB Script |
Call up Url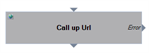 | 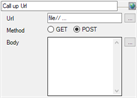 | This http Request can control Web I/O Modules located in your own network. With POST, for example, open the corresponding sliding gate after Check-Out or query the status of a module, e.g. with GET check if the warehouse light is turned on. |
Calculate distance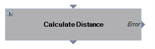 | 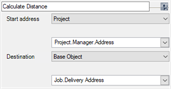 | The distance between two addresses can be calculated and used further. (Requirement: Geolocation is activated in easyjob menu Extras Options Integration) |
Print Report | 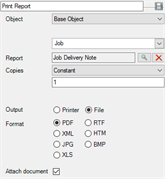 | The module prints a report directly on the printer or as a file in a folder. |
Print Statistic | 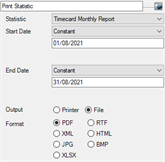 | The module prints a statistic (only List&Label) directly on the printer or as a file in a folder. |
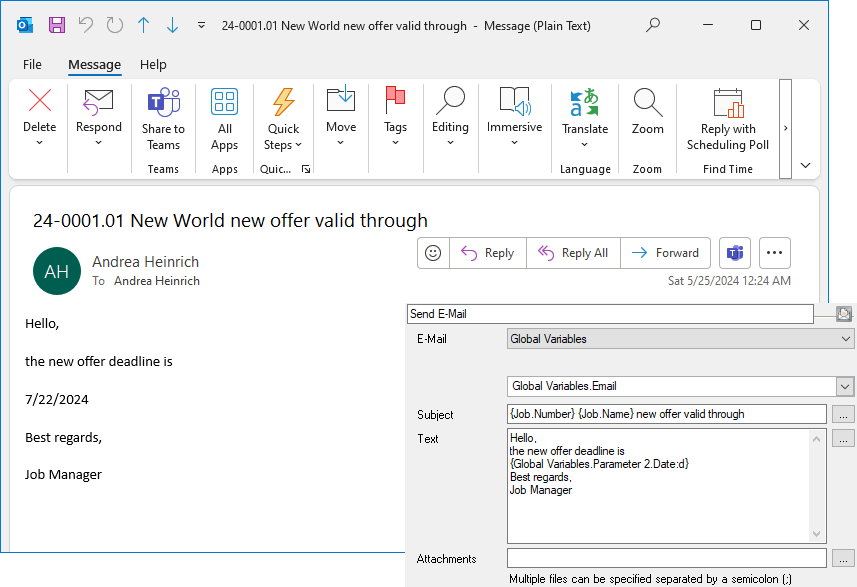
Send E-mail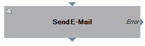 | 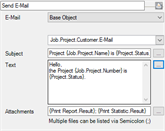 | The content of the recipient, the subject and the text can contain variables. Previously printed reports or statistics can be attached to the e-mail. Multiple recipients are possible via base object constants and separation with semicolons |
Trigger Workflow | 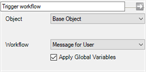 | Another Workflow can be started from the current Workflow. As a feature, Global Variables and their content can be used in the following Workflows. This requires the Global Variables to have the same name and the same data type. |
Wait for authorization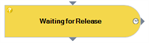 | 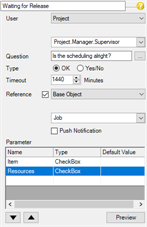 | The Workflow waits until the corresponding authorization is processed by the selected user, and then continues. After a certain amount of time (Timeout) another action can be started. The release requirement can also include a reference as well as parameter queries. Push notifications can also be used |
Message to User | 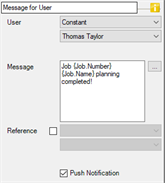 | A message is displayed for the User under Workflow Messages (in the Navigator and in easyjob Today) A reference can also be given. Push notifications can also be used |
Wait for Event | 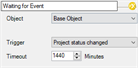 | The Workflow continues after certain Events occur. After a certain amount of time (Timeout) another action can be started |
Pause | 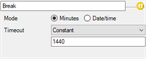 | The Workflow will continue after a defined period of time or at a certain time point |
Set Status | 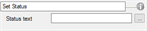 | A user-defined status text is set in the Workflow |
Message* | 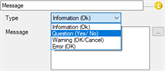 | A message window is displayed |
Parameter Dialog*/**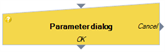 |  | This opens a dialog with the user for information, confirmation, or to enter parameters. The result is displayed in a preview |
Select Object*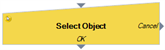 | 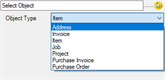 | This opens a dialog with the user to select an easyjob Object |
| Notes |  | A comment can be set in every point of the Workflow |
End | This action ends the Workflow. It can be used multiple times to make the Workflow clearer |
*Only possible with the Client Site trigger mode
**Please note that certain modules are only available depending on the Workflow License. See also Workflow licensing.
Variables for text modules
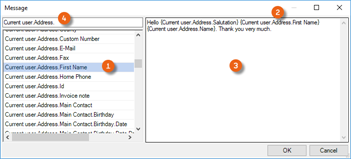
Everywhere in the Workflow where you see the symbol with the three dots  you are able to create texts with individual variables (which are then filled during execution). After opening the window, you can select from the variables that are available and Drag&Drop them to the text window. Additionally, you can create free texts in the Window and integrate your desired variables (e.g. Project name, etc.) in the text. To make editing easier, a Filter is available for the variables.
Formatting Numbers and Dates
Variables that contain numbers or a date can be displayed formatted with an addition. With numbers, for example, with :N2 the thousand separation and the display with two decimal places take place. With a date format, the addition :g , hides the seconds .
 Additional formatting can be found in
Standard numeric format strings | Microsoft Docs
Standard date and time format strings | Microsoft Docs
Workflow glossary
| Name | Description |
|---|---|
| Action | A module that is executed in the Workflow (This must be selected as a parameter when the following operation should refer to a certain Action included in the Workflow) |
| Current User | The user that triggered the Workflow or that currently issued the Authorization/Request |
| Triggering User | The user that originally triggered the Workflow (once) |
| Base Object | The Object that contains the Trigger Event, and through which the Workflow is started (e.g. Purchase Invoice, Job, Project, etc.) |
| Global Variables | You can create Global Variables yourself from the following datatypes - Boolean, String, Int32, Int64, Decimal, DateTime or TimeSpan |
| Constant | This is a fixed value with which another parameter is compared |
| Operator | E.g. Add, Subtract, Multiply, Divide, Link Strings, Comparison - larger than/smaller than or equal to |
| Parameter A or B | These are a Base Object, Action, Constant, Global Variable, Triggering User or Current User |
| Parameter Query (Dialog) | With the parameter query, the user is directly addressed on the user interface to make an entry, for example, or to confirm with Yes/No/OK |
Sample Workflow with Parameter Query (Dialog)
Description: When creating a new Address, the entry can only be saved if an e-mail address is entered.
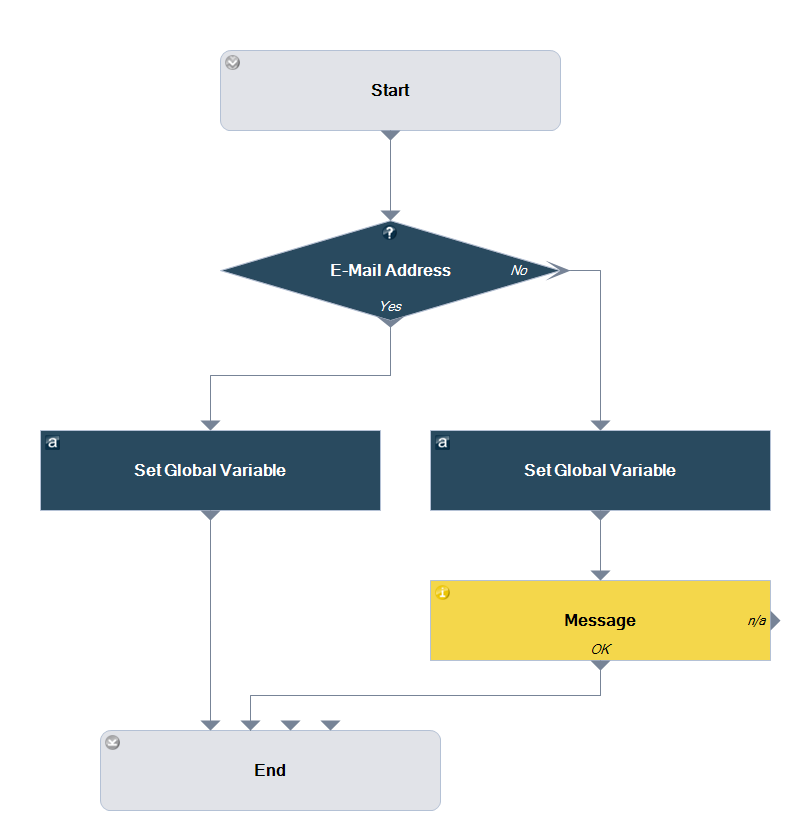
Workflow definition 'Save address only with e-mail address' step by step
1. easyjob Menu Master Data Workflow Definitions
2. Add Create new
3. Enter a name 'Save address only with e-mail address'
4. Define the Trigger Event Validation Address Form Validation
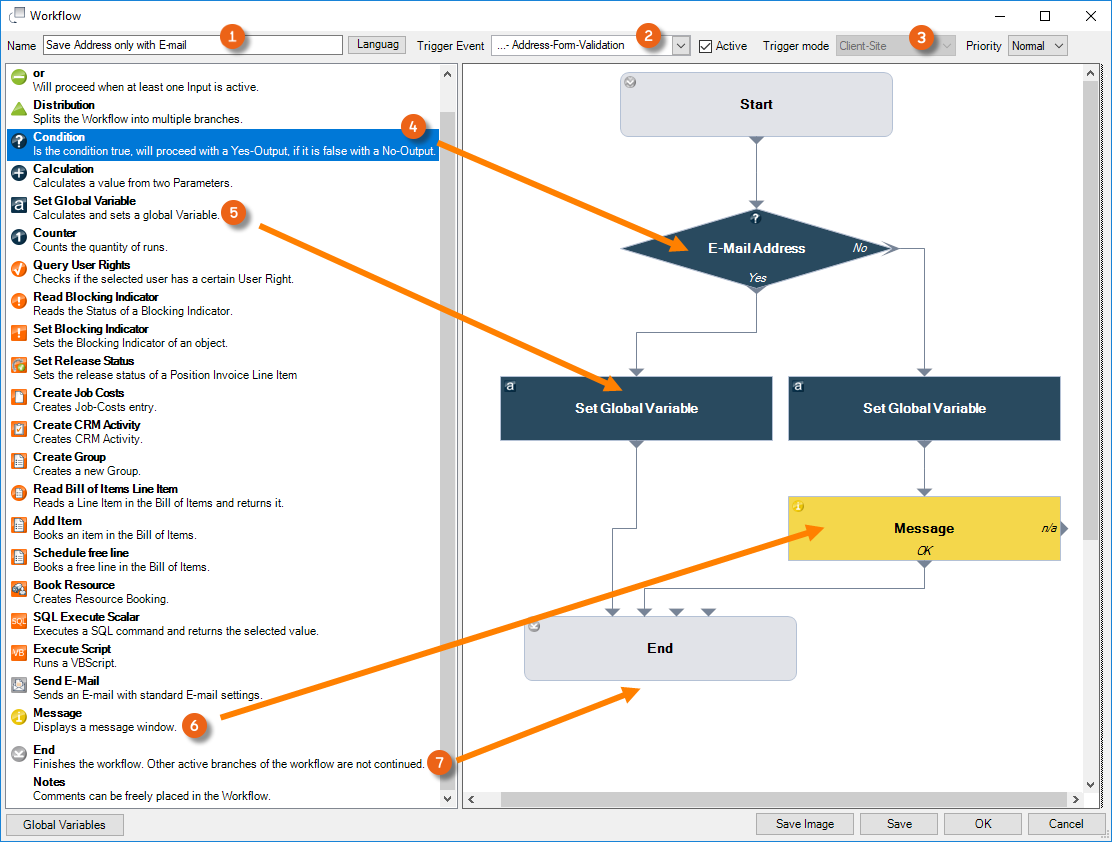
5. The Trigger Event for Validation Workflows is automatically Client Site
6. Left click the Condition action and Drag&Drop it to the Design area
7. Add the Set Global Variable Action twice
8. Drag the Message Action to the Design area
9. Drag the End Action to the Design area
10. You can connect all modules together by clicking the gray triangle (it will turn orange) and dragging it to the triangle of the next module

11. Click the Condition module to set the Parameter
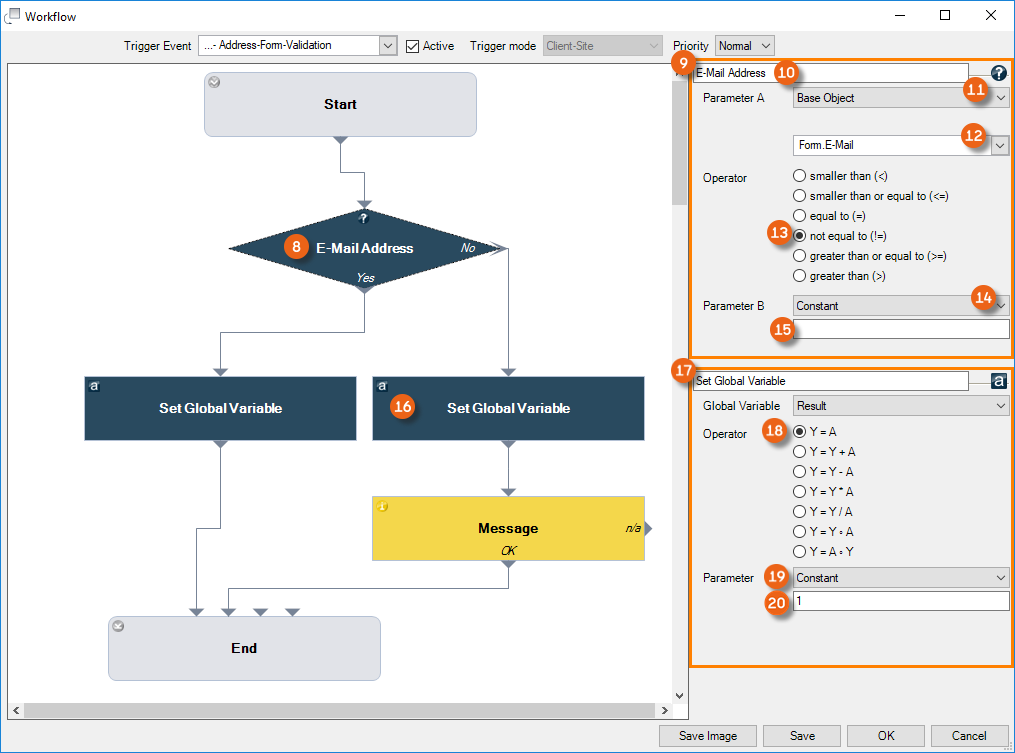
12. Change the name of the condition to 'E-mail present'
13. For Parameter A, select Base Object and select the E-mail Form field
In the DropDown Menu, you can select Address or Form fields as the Base Object. The address contains the fields that are already in the database. Forms are the fields that will entered in a new form and are not yet saved, and are also not yet present in the database. As when a new address is created, it can only be saved with one E-mail, the E-mail Form variable is selected.
14. Set the Operator not equal to
15. Set Constant as Parameter B
16. Leave the field for the Constant empty (this means that it will be checked if something was entered in the E-mail field in the form)
17. Click the Set Global Variable module to set the Parameter
18. Select the Operator Y=A Select
19. Select Constant as the Parameter
20. Enter the Value 1 (for true)
21. Similarly, set the Parameter for the second Set Global Variable module, and enter a value of 0 (false) for this Constant
Here, an additional Global Variable is necessary as the result of the condition must be directly queried from the form. If the result of the condition would come from the database, Global Variables would not be necessary for the evaluation
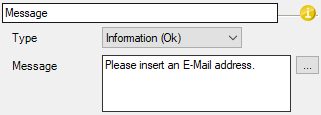
22. Select the Message Action and enter the desired text
23. Set the Workflow Definition to Active
24. Save
The Workflow is now active.
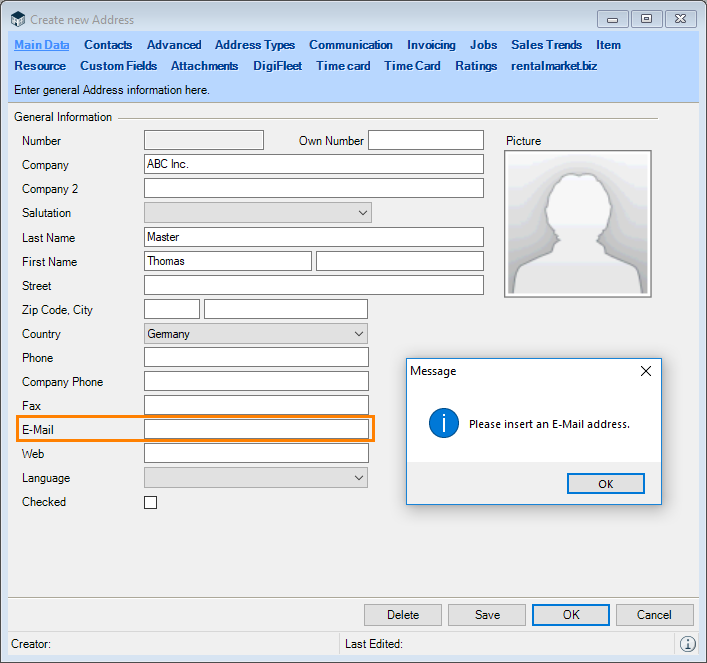
25. easyjob Menu Master Data Addresses
26. Add Address
27. Enter a name and try to save the form without an e-mail address
28. The Workflow is triggered, the form cannot be saved and the defined message appears
Example of a workflow for a batch activity
With a batch activity, you can select multiple easyjob processes (e.g Jobs in the Navigator view) in order to to start the same workflow for all selected processes. By right clicking with the mouse, the menu for Batch activity is started. Check the box for Start workflow and select the desired Workflow .
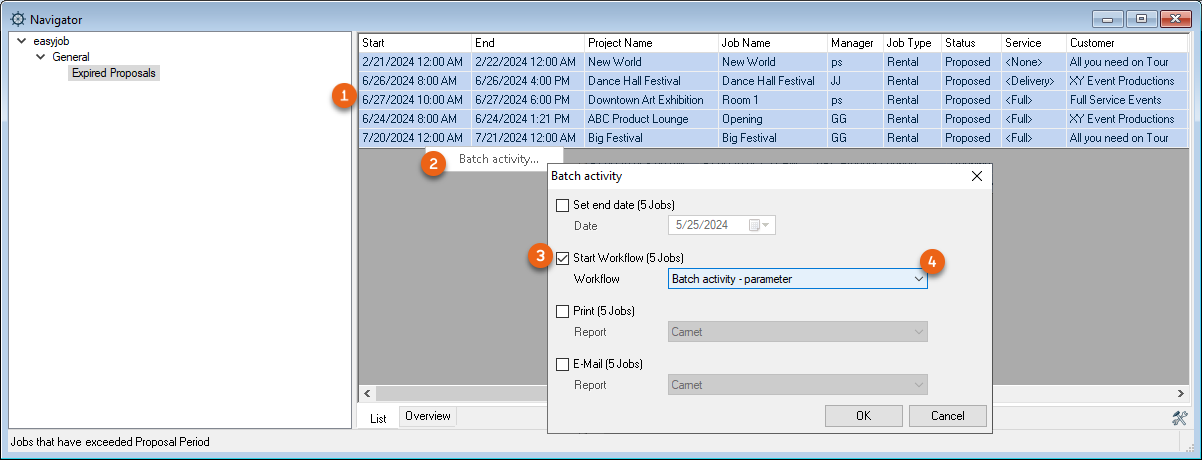
If this workflow has a Parameter Dialog query (client-side trigger mode), you can transfer the results of the query dialog of the first workflow to the following workflow using a Global Variable. As a result, the result of the query applies for all of the subsequent batch activity workflows. The dialog field therefore appears only once.
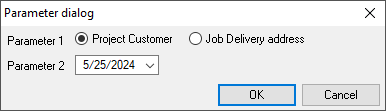
In the sample workflow 'Batch activity parameters', two parameters (Parameter 1: Customer project or Job delivery address and Parameter 2 a date selection) are queried.
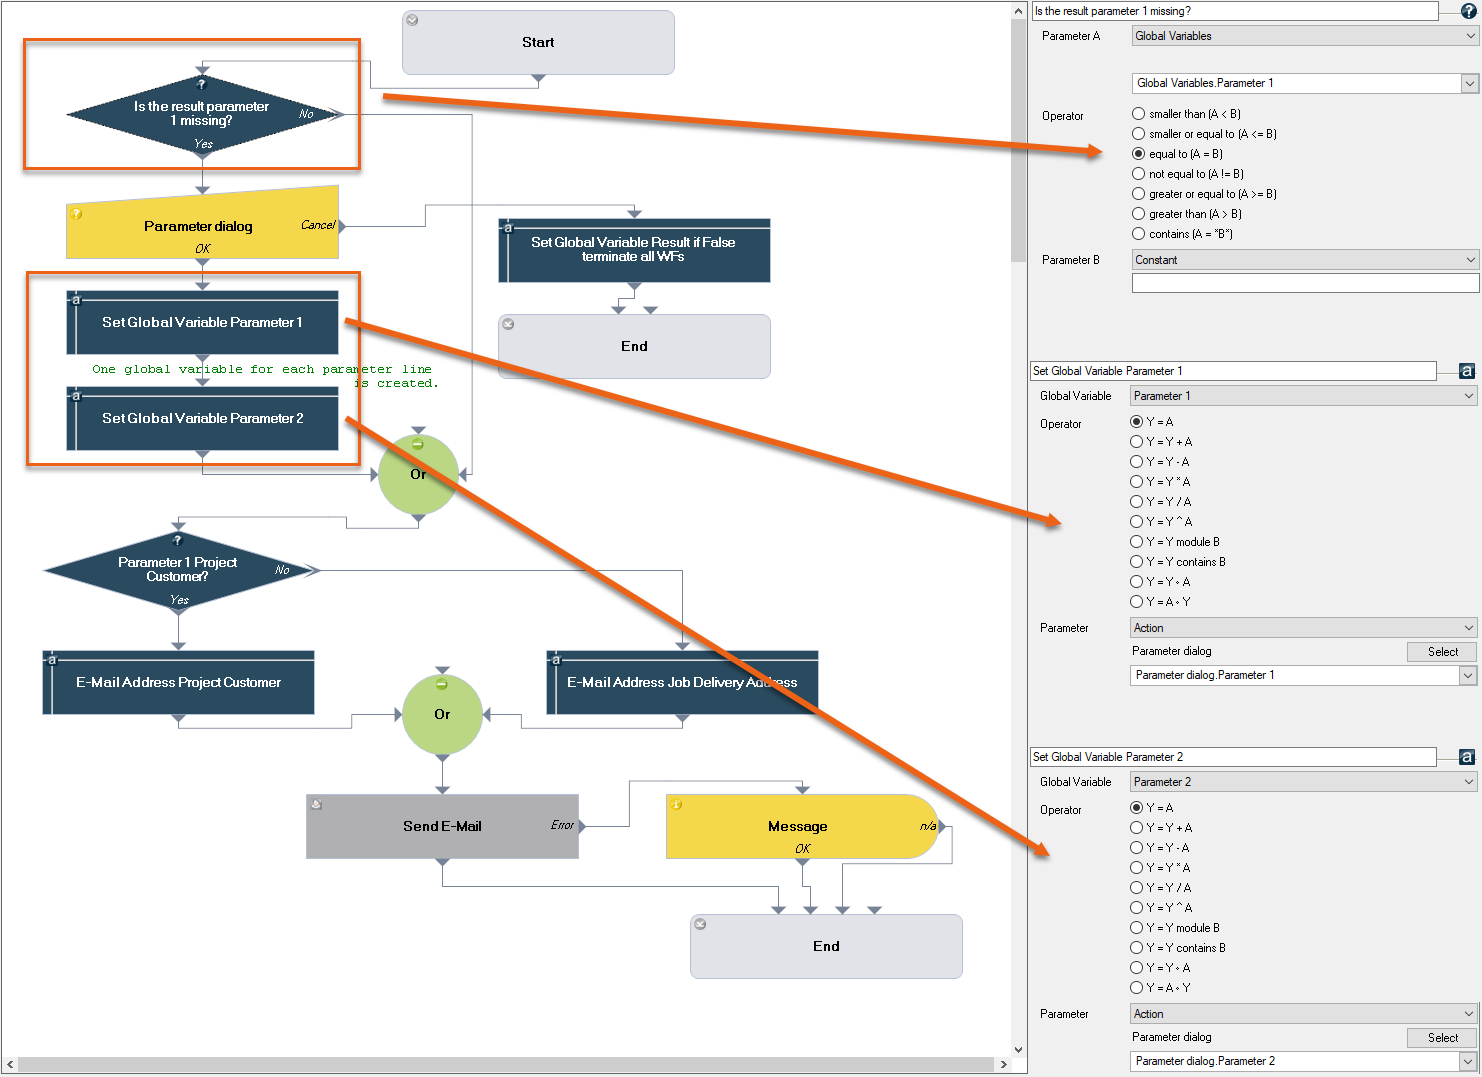
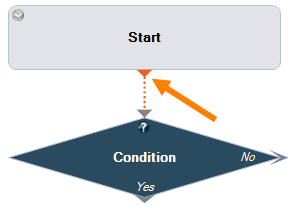
First, it is checked in the workflow if one of the two parameters was already set in a previous workflow. The query 'Is the result of Parameter 1 missing?' is used, if this = 'empty', the Parameter Dialog query is triggered and the input can be made. The results are set directly in Global Variables.Parameter 1 and Global Variables.Parameter 2. The workflow that starts afterward already has Global Variables.Parameter 1 and 2 filled with content, so that the query 'Is the result of Parameter 1 missing?' is answered with No and the workflow goes to the next action with the Or module. This 'bypasses' the parameter dialog.
Depending on the selection in the Parameter Dialog, Parameter 1 is used for example, for the e-mail recipient, for the address of the project customer or the job delivery address. The recipient of the email is set with the action Send e-mail.
The date selection from Parameter 2 is used again in the e-mail text. As there can be only one result, the Global Variables.Parameter 2.Date is used directly in the e-mail text.
Workflow definition‚ 'Batch activity Parameters' step by step
1. easyjob Menu Master Data Workflow Definitions
2. Add Create new
3. Enter a name 'Batch activity parameters'
4. Define the Trigger Event Manual Job
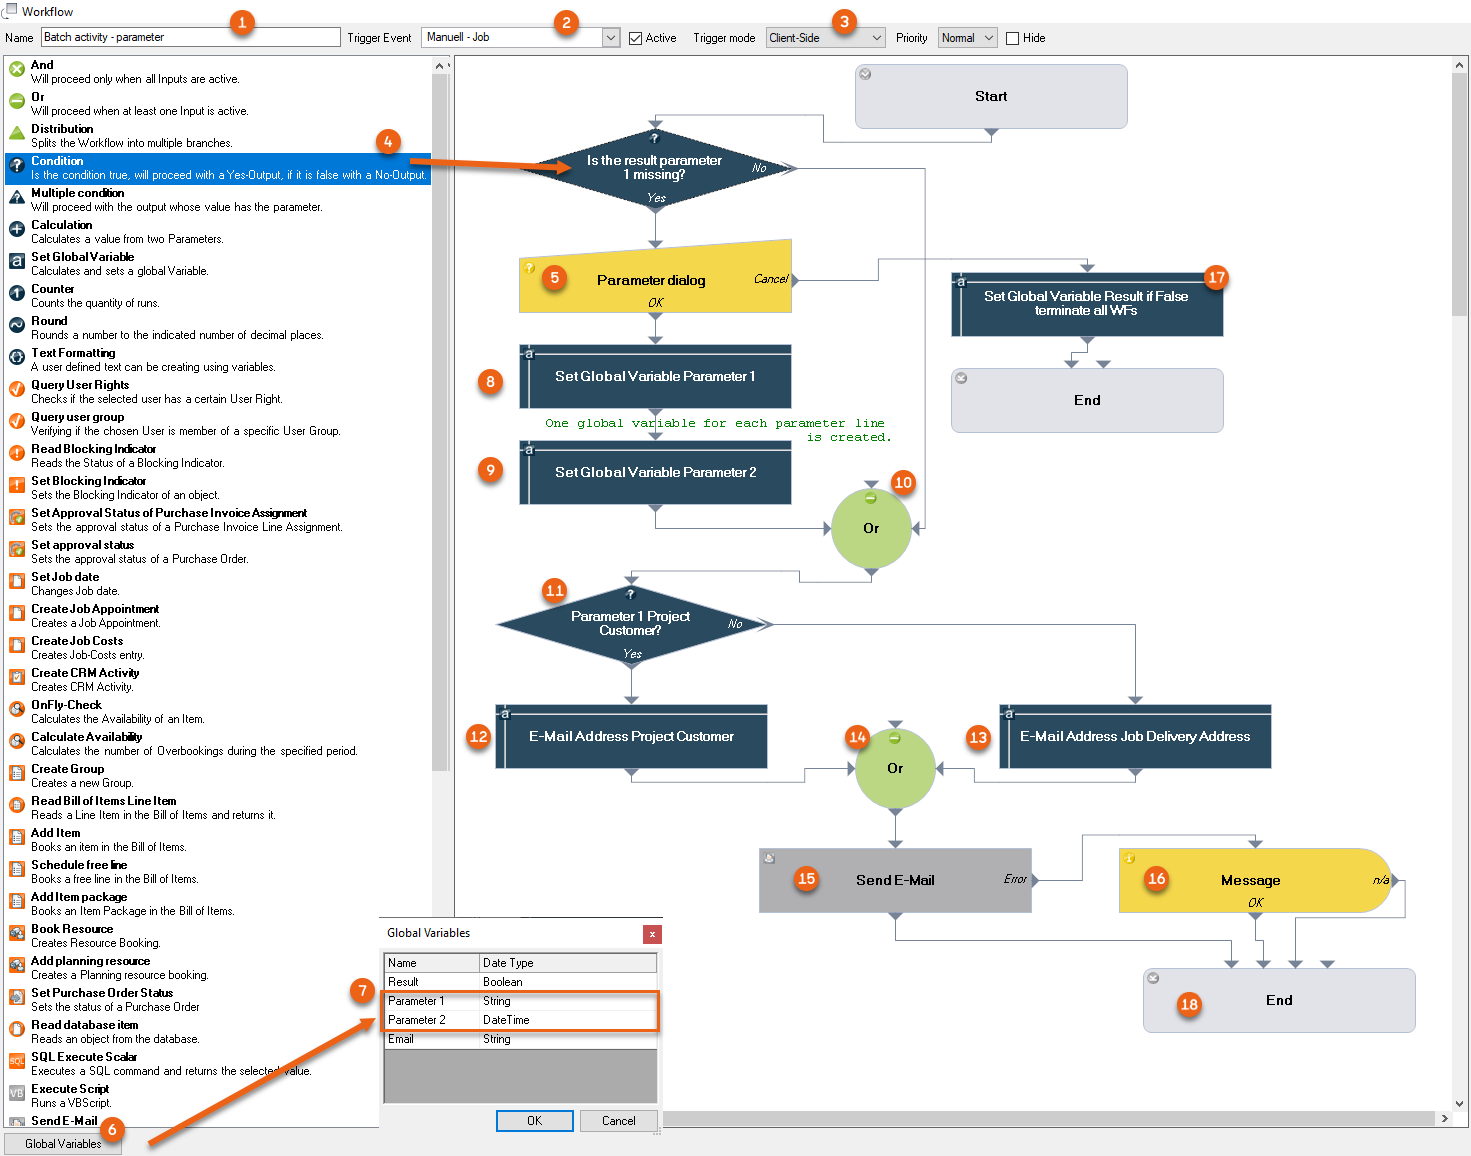
5. Set the trigger mode to Client Site
6. Left click the Condition action and Drag&Drop it to the Design area
7. Drag the Parameter Dialog Action to the Condition Action
8. Depending on how many Parameter Dialog queries you require (two in this example), create the same number of Global Variables for this Parameter
9. Add the Set Global Variable Action (twice in this example)
10. Add an Or module
11. Drag the Condition Action to the Design area
12. Add the Set Global Variable Action % twice and add an Or
13. Add Send e-mail and Message
14. Drag the End Action to the Design area
15. You can connect all modules together by clicking the gray triangle (it will turn orange) and dragging it to the triangle of the next module
Connect the actions as shown in the illustration.
16. Click the Condition module to set the Parameter on the right side.
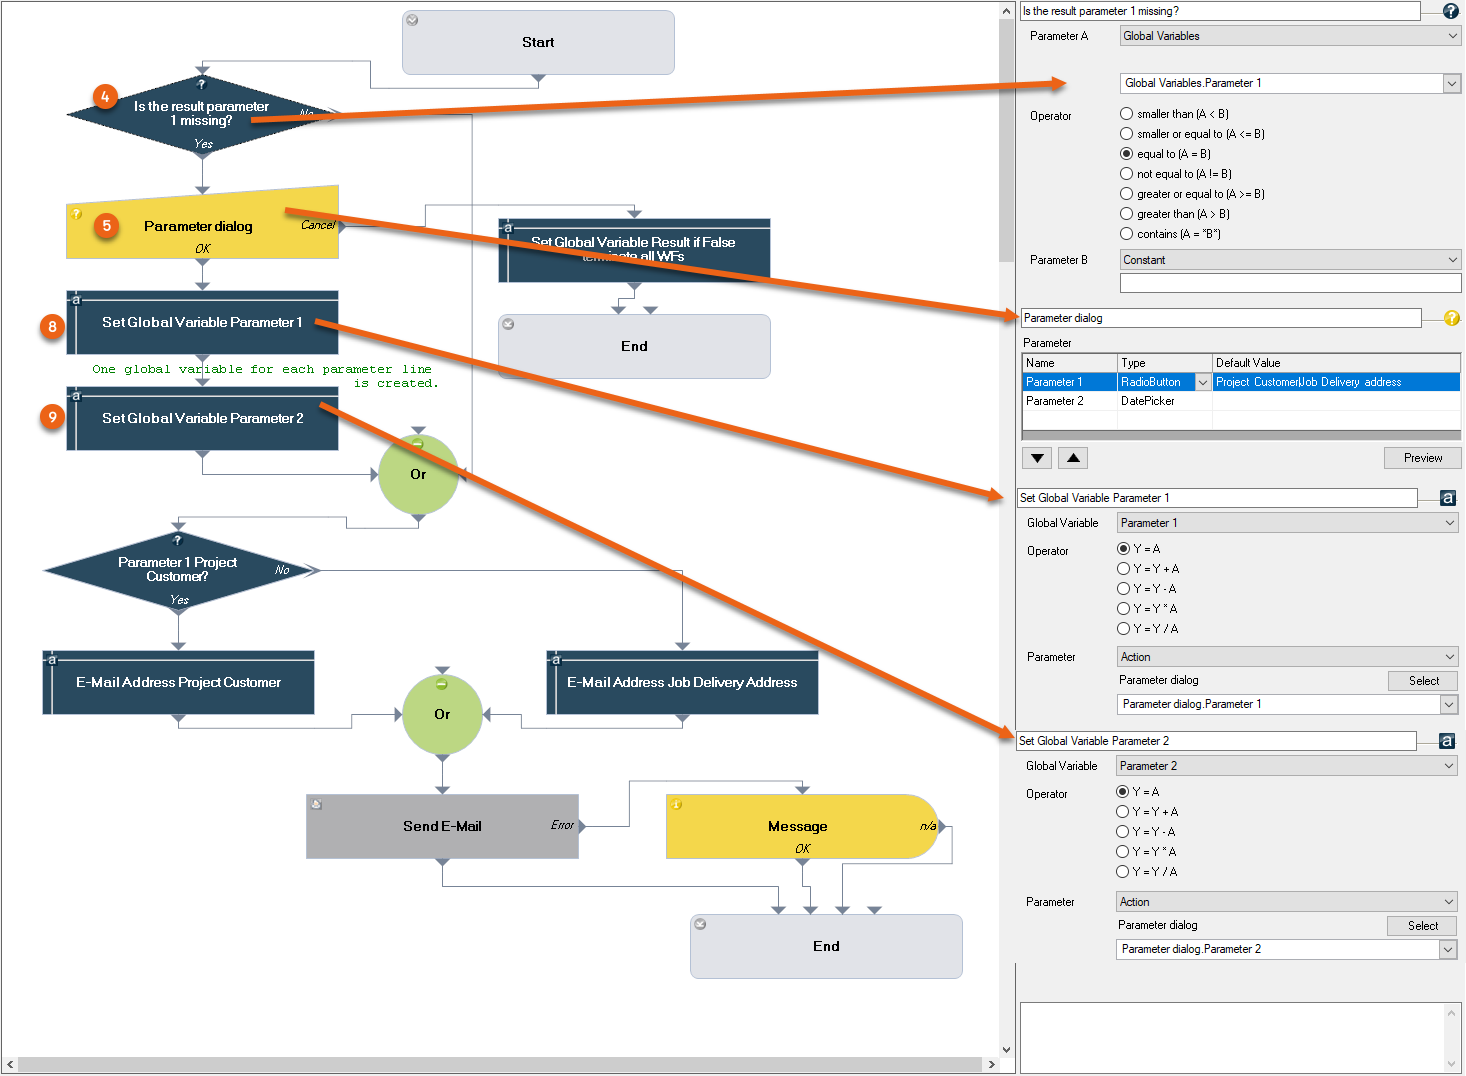
17. Perform the settings for the modules as shown in the illustration
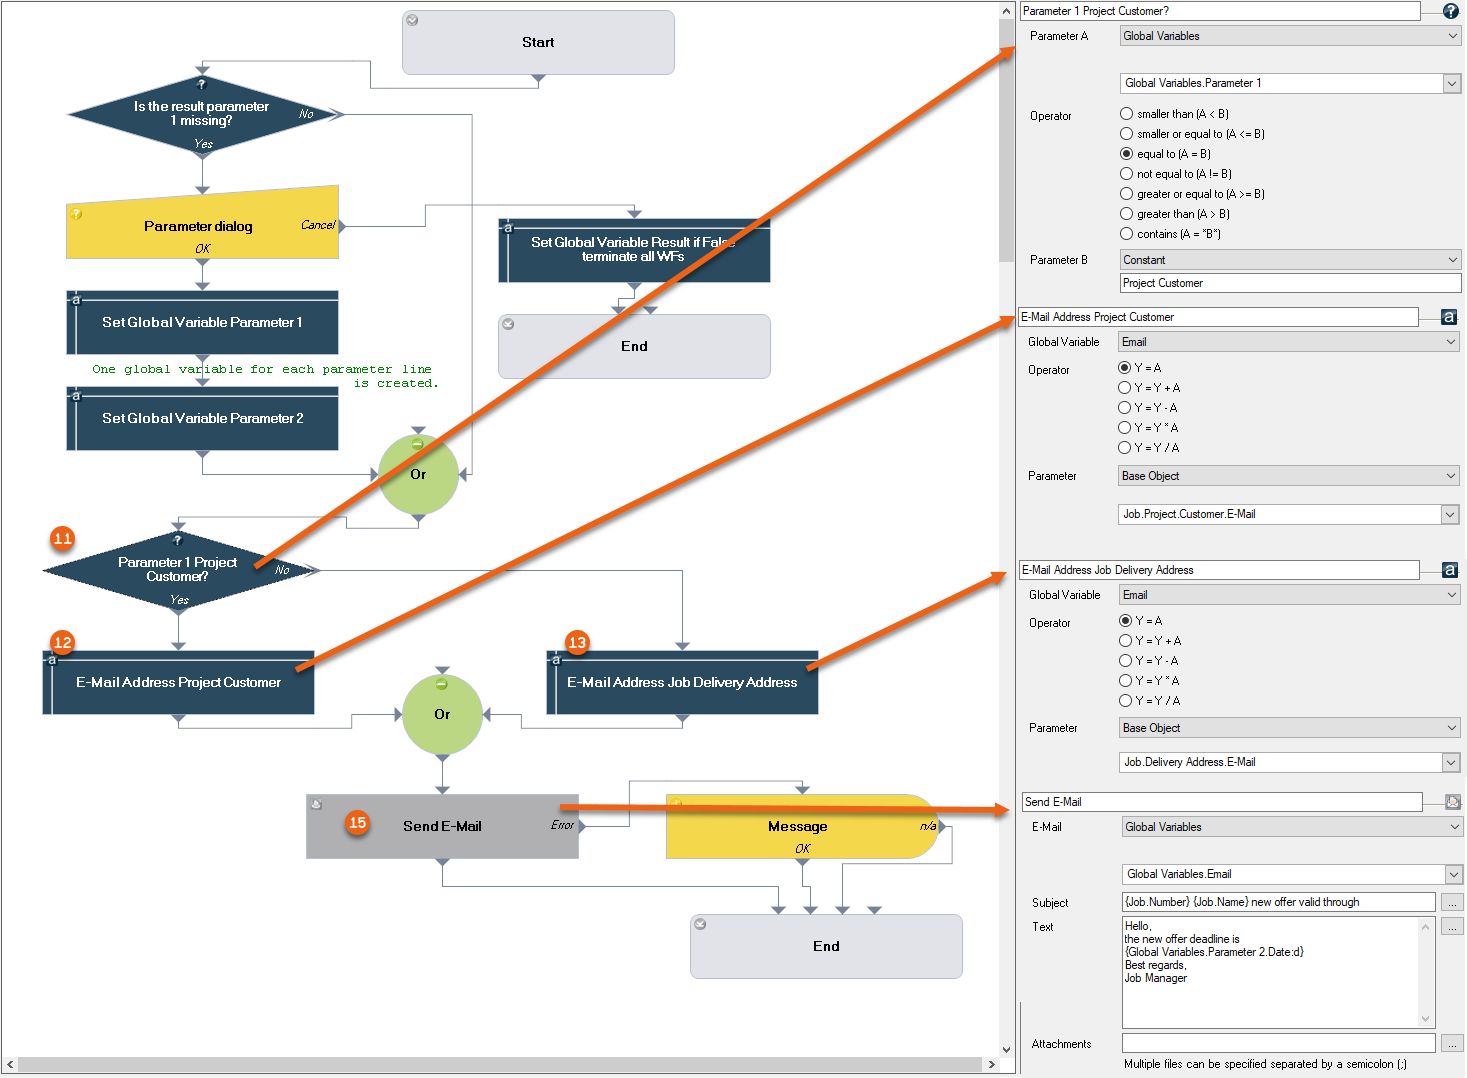
18. Continue with the actions and perform the settings as shown in the illustration

19. The Message appears when an error occurs when sending the e-mail
20. To directly end the following workflow if the parameter dialog cancels the workflow, set the Global Variable Result in this point to 'False'.
21. Set the Workflow Definition to Active
22. Save
The Workflow is now active.
Standard Workflows
Three Workflows (Job Workflow, Purchase Order Workflow and Purchase Invoice Line Item Authorization Workflow) are supplied standard. You can activate the Workflow module, change parameters and use the three standard Workflows also without a license.
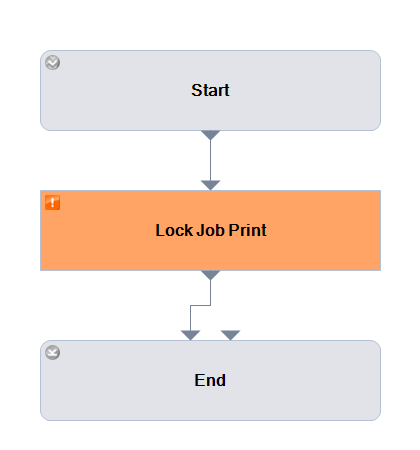
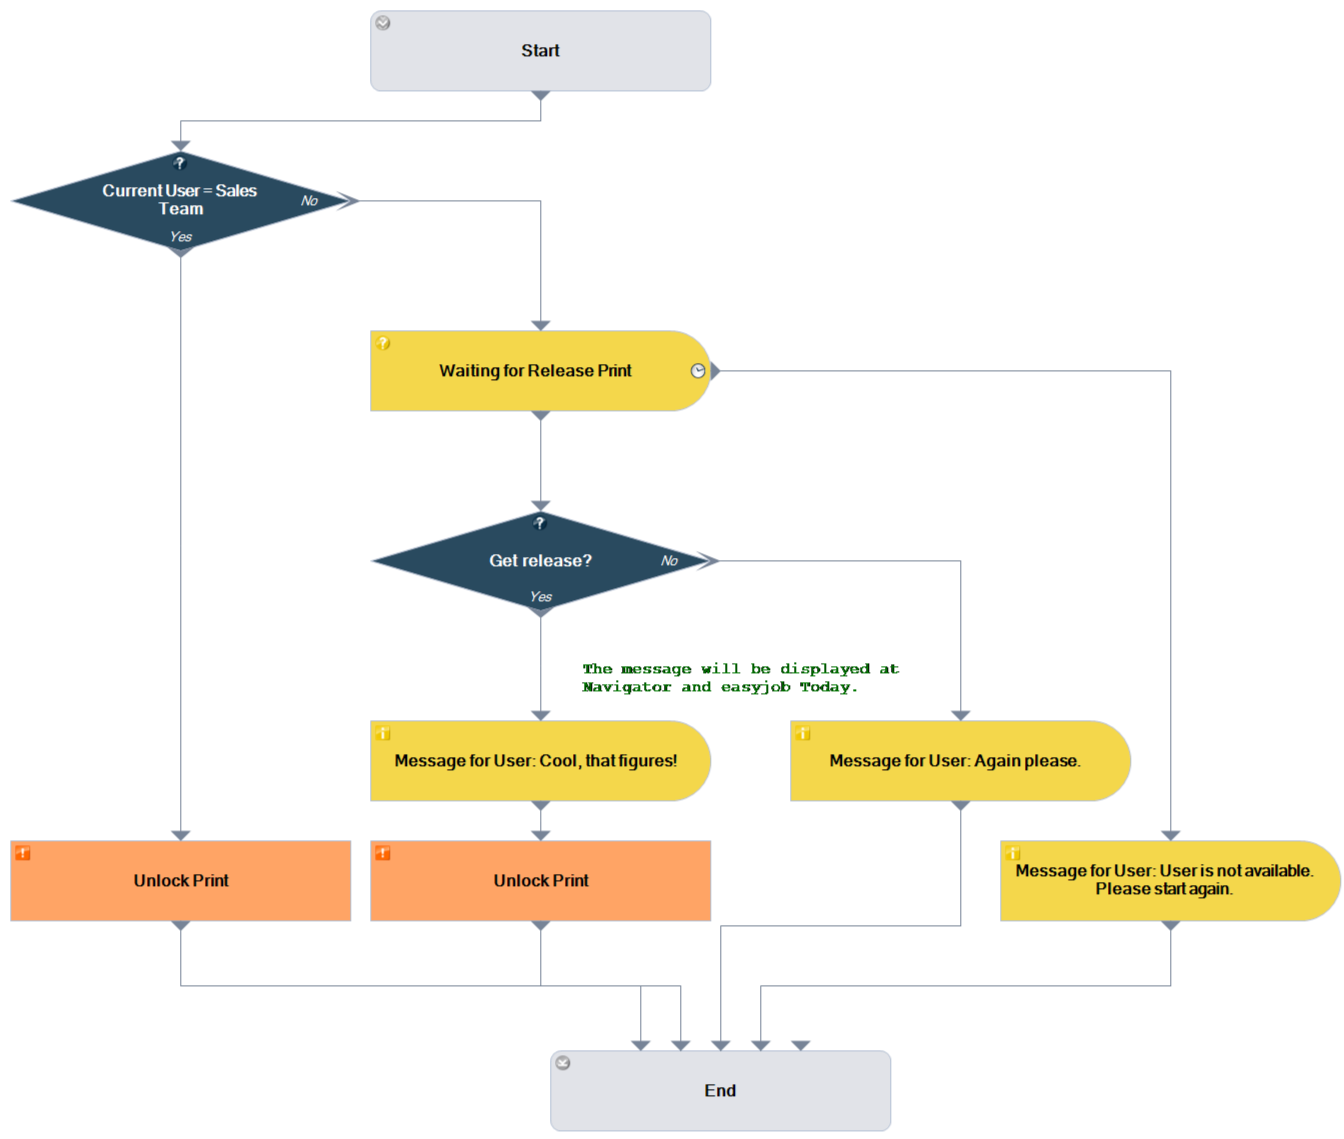
Job Workflow: Receive authorization to print a proposed job
Description: When creating a Job, the Printing of Reports is blocked if the user is not part of a certain User Group (here, the Sales Team). The concerned user has the possibility of receiving authorization to print
This Workflow consists of two Workflow definitions.
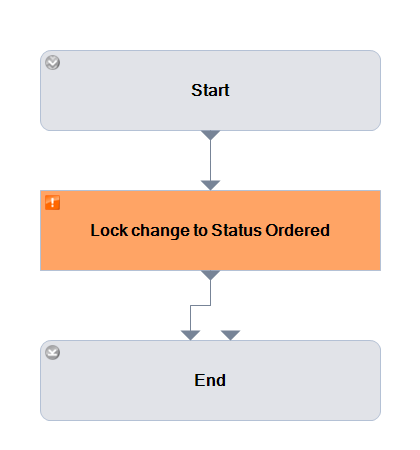
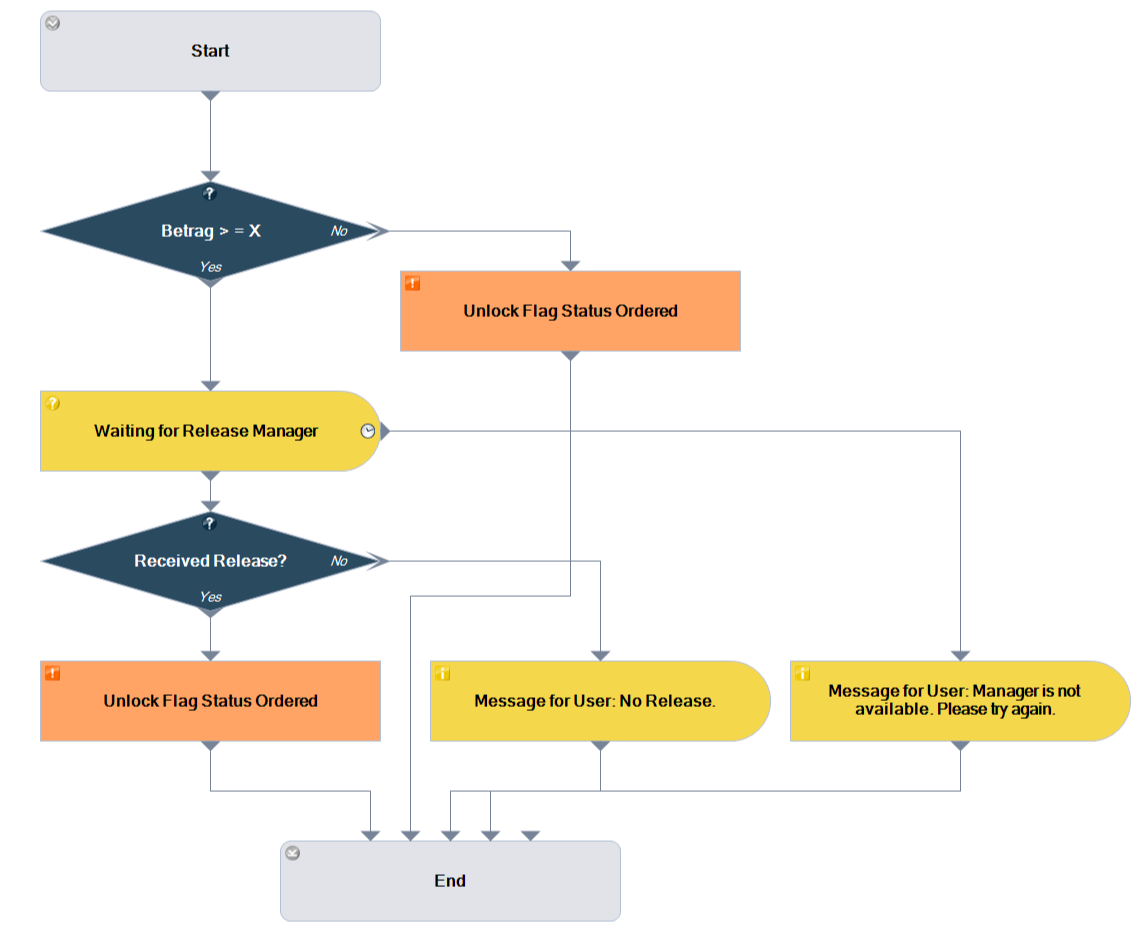
Purchase Order Workflow: Requesting authorization from a superior to change a Purchase Order
Description: When creating a Purchase Order, changing it is blocked in Ordered status The user can receive authorization to change the status from a superior Additionally: If the Purchase Order amount lies above a certain amount (freely definable), the Ordered status can still be set.
This Workflow consists of two Workflow definitions.
Purchase Invoice Line Item Authorization Workflow
To ensure the checking of Received Invoices, an authorization process is started when assigning Purchase Invoices. This Workflow maps the Received Invoice check as described in easyjob Controlling Center Handbuch under Workflow Process. To use this Workflow, activate it in Workflow Designer.

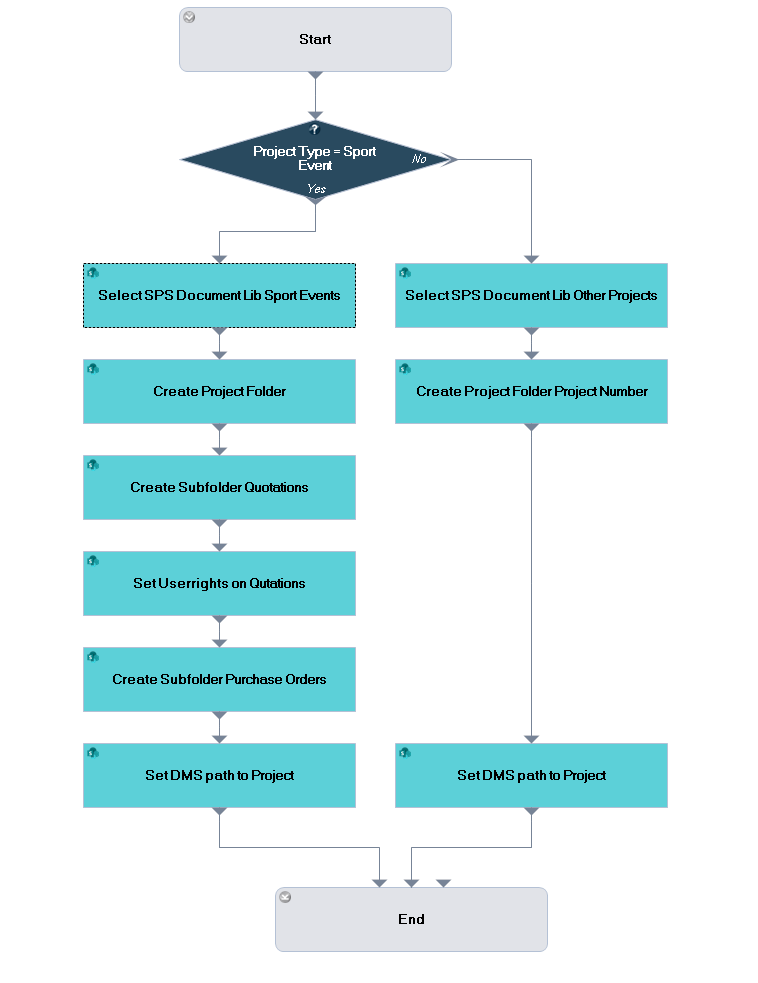
SharePoint Workflows
The Workflow Engine provides a very efficient option for creating automated subfolder structures in SharePoint. The Workflow Trigger Event DMS – DMS Project folder makes it possible to create a project folder and subfolder, as well as the access rights to the created folders depending on freely definable conditions, such as the project type.
Controlling the SharePoint folder via workflow
Various workflow modules are available for the automatic, individual storing of files in SharePoint folders and subfolders, as well as for assigning folder permissions. The trigger event DMS Project folder starts the workflow when a file (e.g. proposal, plan, etc.) should be stored in a certain area e.g. Projects.
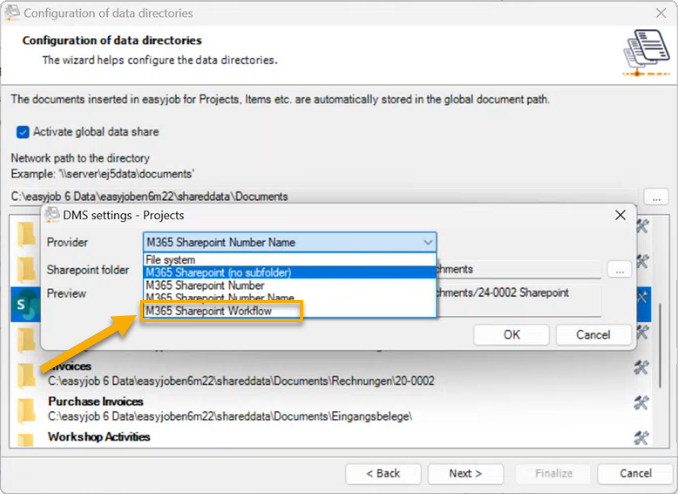
The created workflow must be selected accordingly in the easyjob Server Manager in the Global Data Directory.
The trigger event DMS Project folder only allows a client-side workflow.
SharePoint Workflow Modules
| Action | Parameters/Operator and Variables | Explanation |
|---|---|---|
Select DMS root.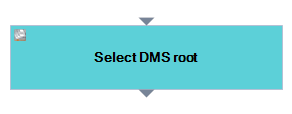 |  | The SharePoint Library set in the Service Manager can be changed (overwritten) with this action. This makes it possible to use different SharePoint Sites and Libraries depending on various parameters. As a result, project attachments can be stored differently depending on the location, year or project type, for example. The respective site and library are selected in the Settings parameter. |
New Folder |  | A subfolder is created in the current DMS path. (By checking DMS Root directory, the directory stored in the Global Data Directory is used). The module (action) for reference to the current folder is selected, and the name of the folder to be created is defined. |
Setting the permission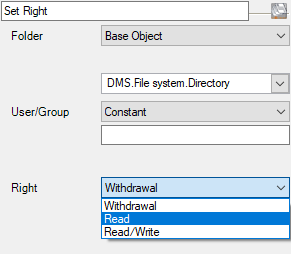 |  | This action assigns user rights to a folder. These permissions are assigned globally for SharePoint/ Office 365 and are independent of easyjob user rights. E-mail addresses must be entered here. |
Set the DMS path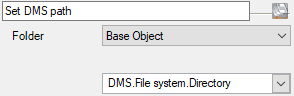 |  | Sets the DMS path of the object. Here the 'New Folder' action must be selected, for example, in order to set the corresponding DMS path for this folder. |
The functional linking of easyjob and SharePoint requires that the easyjob user is also authorized in Office 365. The Set permission Action requires therefore the e-mail addresses (groups) from Office 365.
SharePoint Workflow example
In the following example, another storage location is used, depending on the project type. In addition, subfolders are created and permissions assigned.